 Skip to content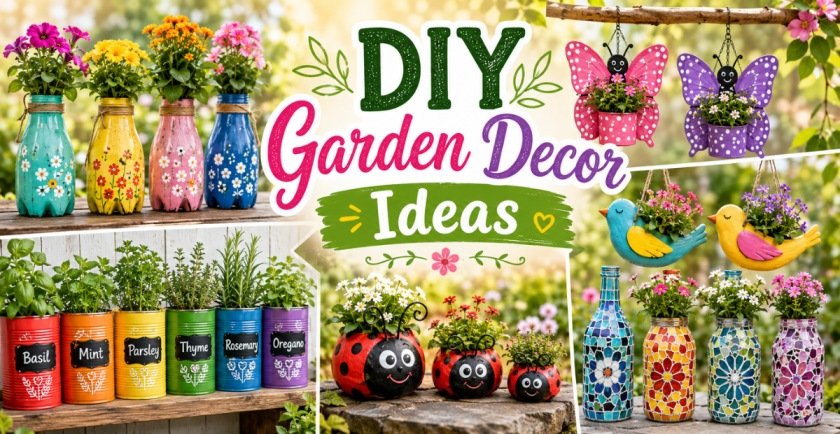
If you love giving ordinary household items a second life, these DIY Garden Decor Ideas are an easy way to add personality, color, and handmade charm to your outdoor space. Plastic bottles, tin cans, old bowls, cups, rope, wood scraps, and other reusable materials can become surprisingly beautiful planters and garden accents with a little paint and creativity.
The projects below range from playful character planters to practical herb gardens and vertical displays. Most are beginner-friendly and can be adapted for a balcony, patio, porch, fence, or backyard. Always use care when cutting plastic or drilling containers, wear appropriate eye and hand protection, and smooth sharp metal or plastic edges before handling or planting.
Affiliate note: This article includes suggested supplies from Amazon and retailers commonly used through LTK. Before publishing, replace the standard retailer links with your own approved affiliate links and include any disclosure required by your affiliate programs and local rules.
Why Recycled DIY Garden Decor Works So Well
- Budget-friendly: the main container is often something you already planned to discard.
- Customizable: change the colors, plants, patterns, and scale to suit your garden.
- Small-space friendly: hanging and wall-mounted projects save valuable floor space.
- Creative: handmade pieces give a garden more personality than mass-produced décor.
- Reusable: many projects can be refreshed with a new coat of paint or replanted each season.
1. Bird-Shaped Hanging Planters From Recycled Bowls or Containers
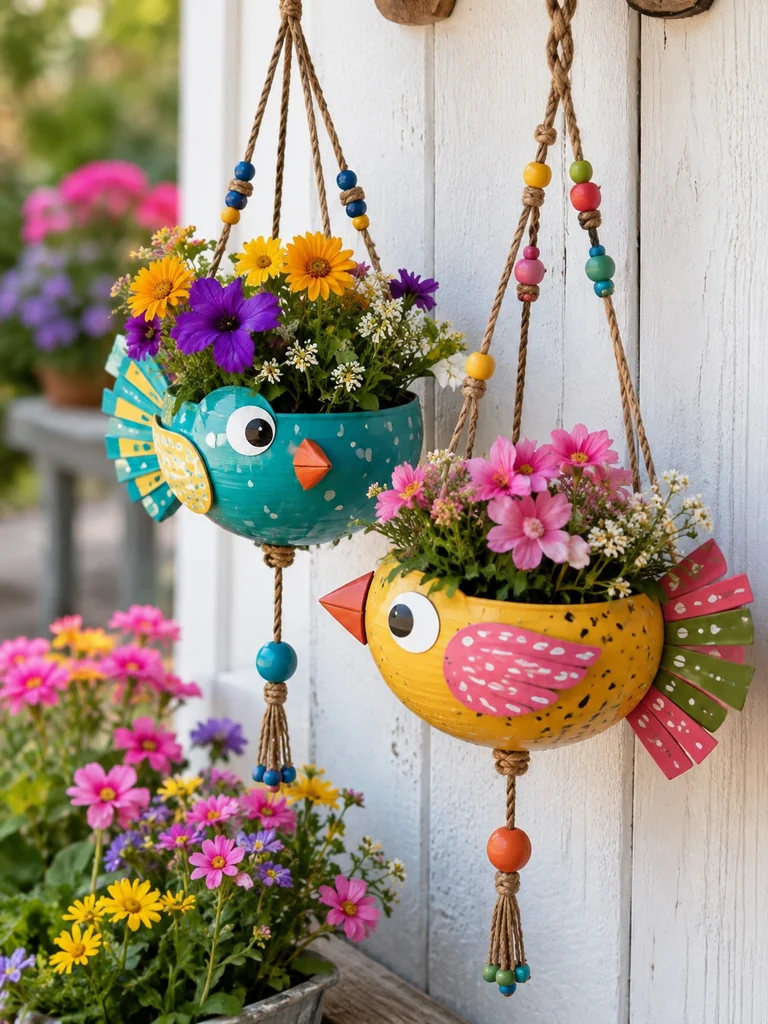
Give a plain discarded container a playful second life by turning it into a colorful bird planter. This cheerful project works beautifully on a porch wall, pergola, balcony, or covered garden nook.
Things You Need
- Clean recycled bowl or sturdy food container
- Outdoor acrylic paint
- Craft foam or thin recycled plastic for wings and tail
- Jute rope
- Wooden beads
- Strong waterproof craft adhesive
- Potting mix
- Compact flowering plants
Making Process
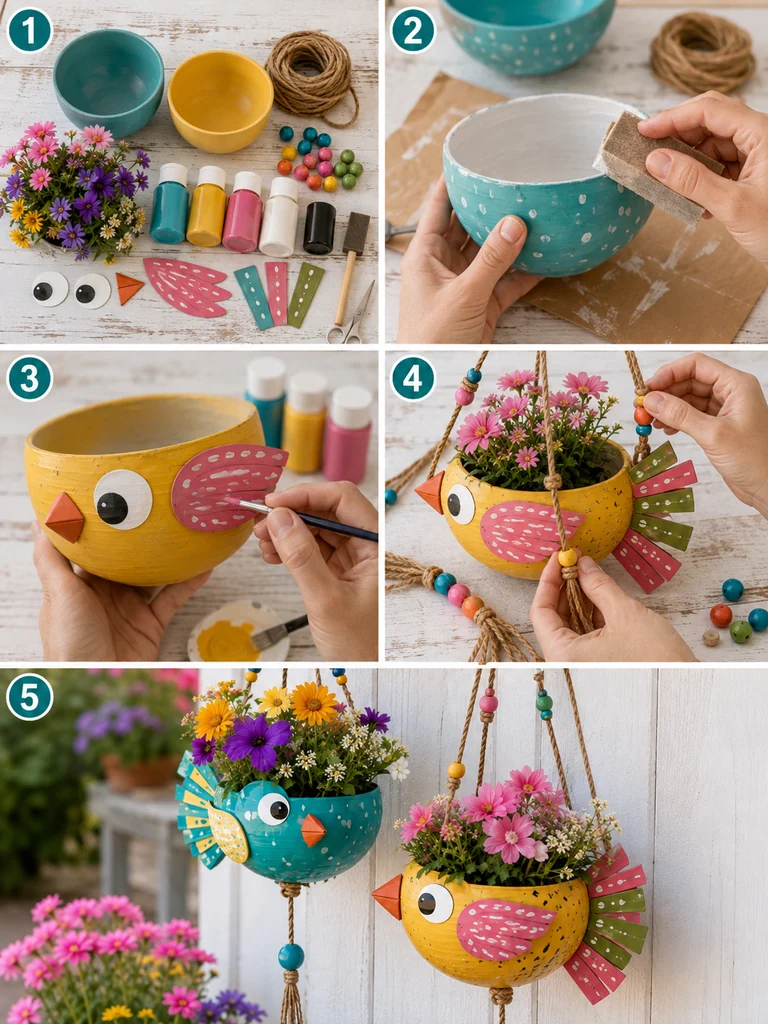
- Wash the container thoroughly and let it dry.
- Paint the container in a bright base color and allow the coat to cure.
- Cut simple wing, beak, and tail shapes from craft foam or recycled plastic, then paint the details.
- Glue the decorative pieces securely and add painted eyes.
- Make balanced hanging holes, thread jute rope through them, and add wooden beads if desired.
- Fill with lightweight potting mix and plant compact flowers before hanging.
Products Recommendations:
2. Painted Plastic Bottle Hanging Flower Planters
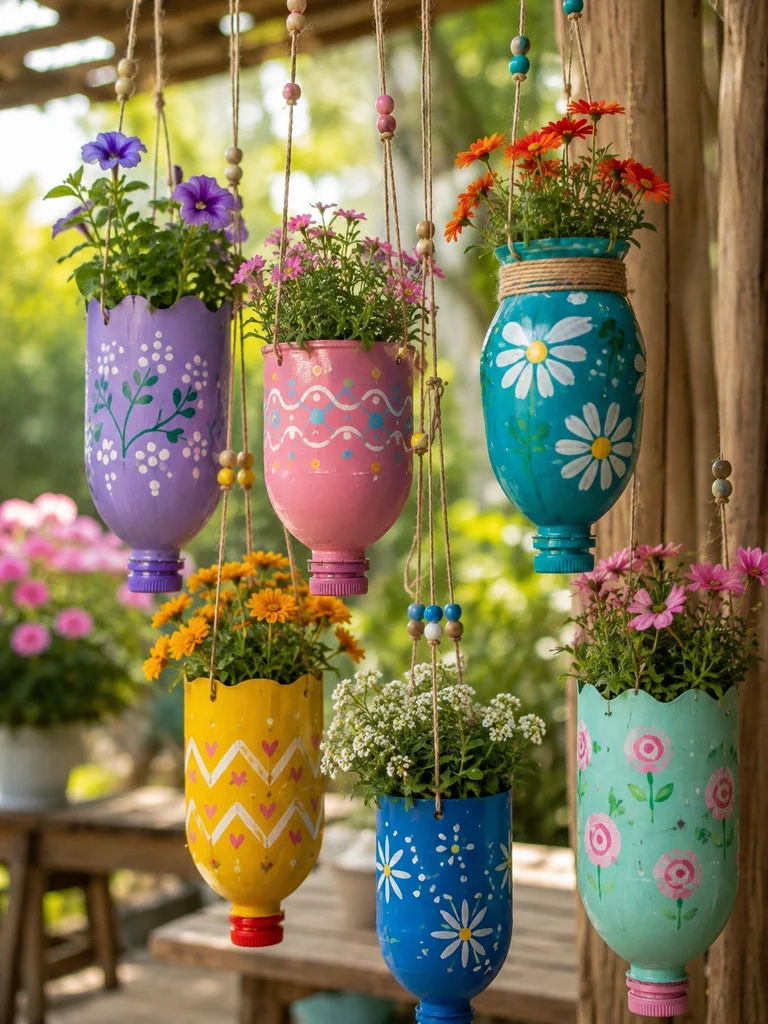
Recycled plastic bottles become surprisingly pretty hanging planters when they are cut, painted, and decorated with simple floral patterns. Use several colors together for an easy vertical splash of color.
Things You Need
- Large plastic bottles
- Utility knife and sturdy scissors
- Acrylic or multi-surface paint
- Paint brushes
- Jute twine or weather-resistant cord
- Small wooden beads
- Potting mix
- Trailing or compact flowers
Making Process
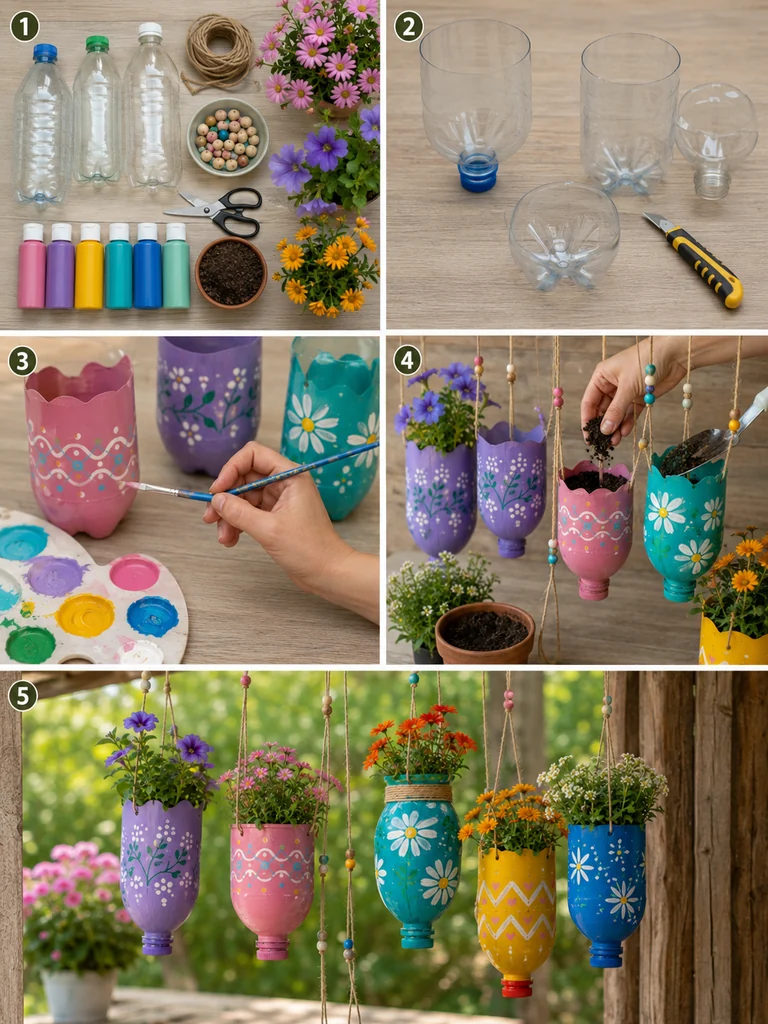
- Clean the bottles and remove all labels.
- Cut away the upper section to form an open planter and smooth any sharp edges.
- Paint each bottle in a different cheerful shade.
- Add hand-painted flowers, dots, or simple geometric details.
- Pierce evenly spaced hanging holes and thread the cord through securely.
- Add potting mix and plants, then hang at staggered heights.
Products Recommendations
3. Horizontal Bottle Planters With Floral Hand-Painted Designs
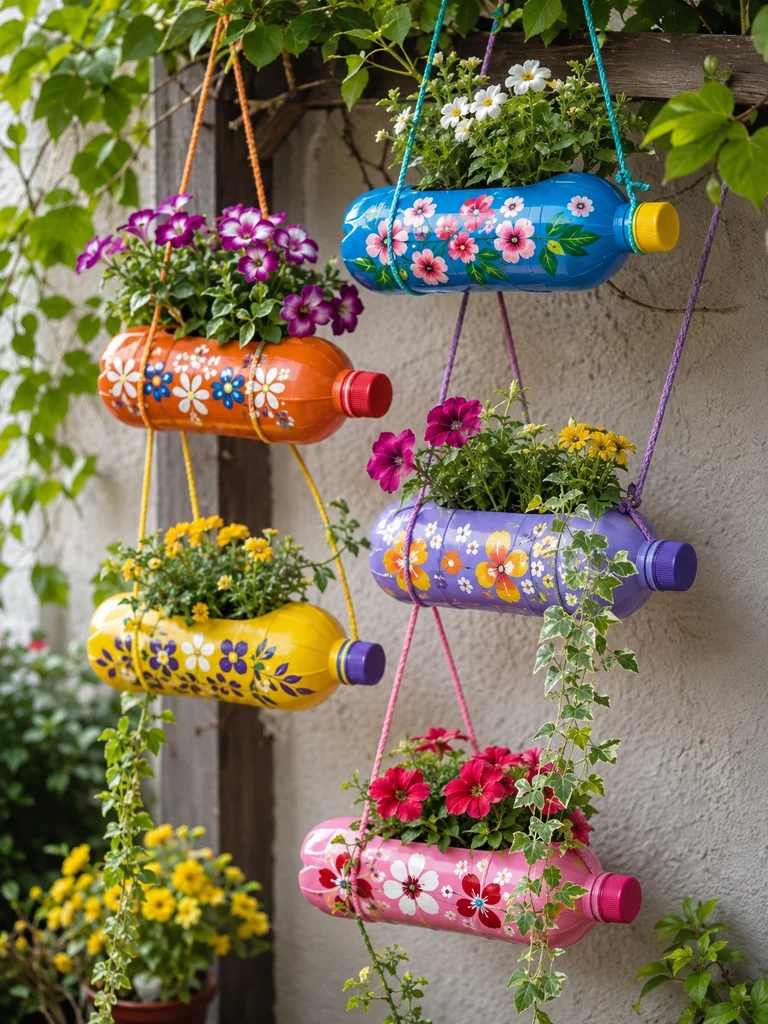
Instead of hanging bottles upright, turn them sideways to create window-box-style recycled planters. The horizontal shape gives roots more room and looks especially attractive with vines and cascading flowers.
Things You Need
- Large plastic bottles
- Utility knife
- Drill or heated awl for drainage holes
- Outdoor craft paint
- Fine detail brushes
- Strong hanging cord
- Potting soil
- Flowers or trailing greenery
Making Process
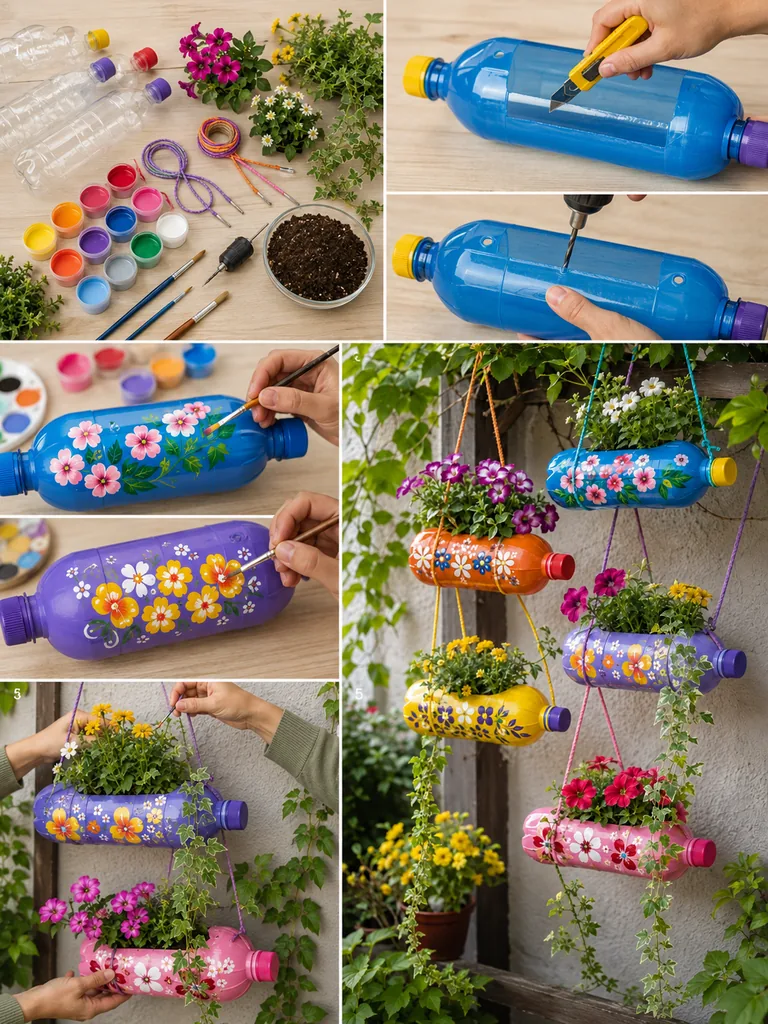
- Wash and dry each bottle.
- Mark a wide planting window along the side and carefully cut it out.
- Add small drainage holes along the bottom side.
- Paint the exterior and add floral motifs once the base coat dries.
- Create hanging points at both ends and attach cord securely.
- Fill with soil and add flowers, herbs, or trailing plants.
Products Recommendations
4. Bee-Themed Hanging Planters From Recycled Bottles
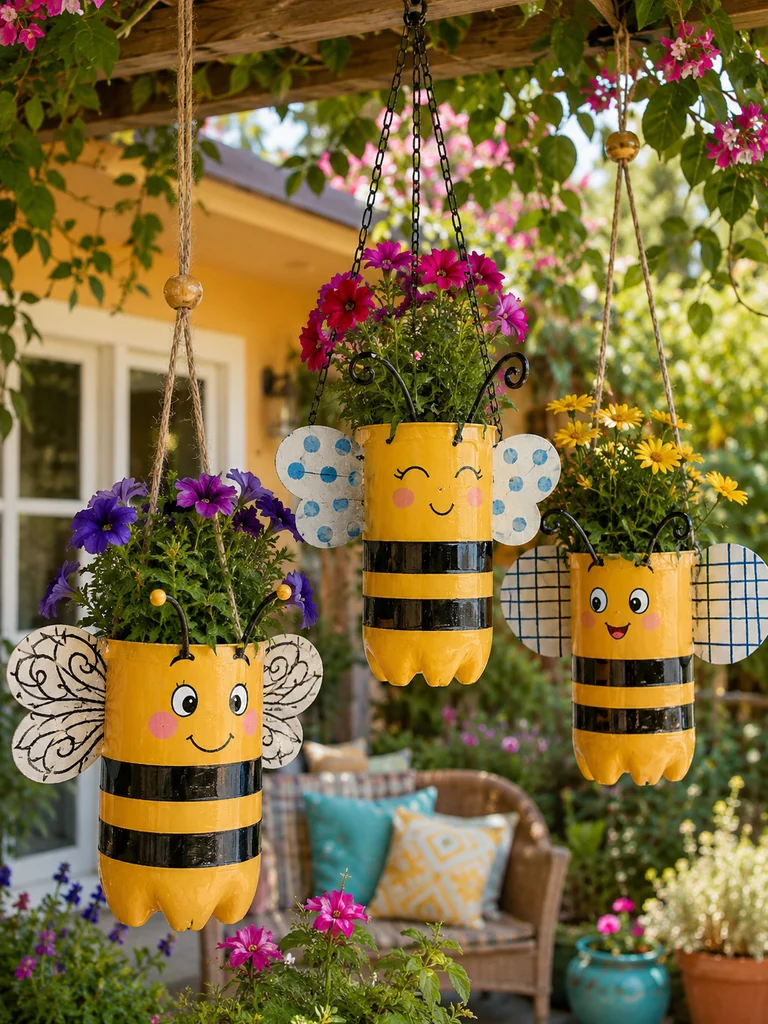
Black-and-yellow stripes instantly turn a recycled bottle into a sweet bumblebee planter. Add simple wings and antennae for a whimsical garden accent that looks especially cute filled with bright flowers.
Things You Need
- Plastic bottles
- Yellow and black outdoor paint
- White craft foam or recycled plastic sheet
- Flexible craft wire
- Jute rope or hanging chain
- Waterproof glue
- Potting mix
- Flowering plants
Making Process
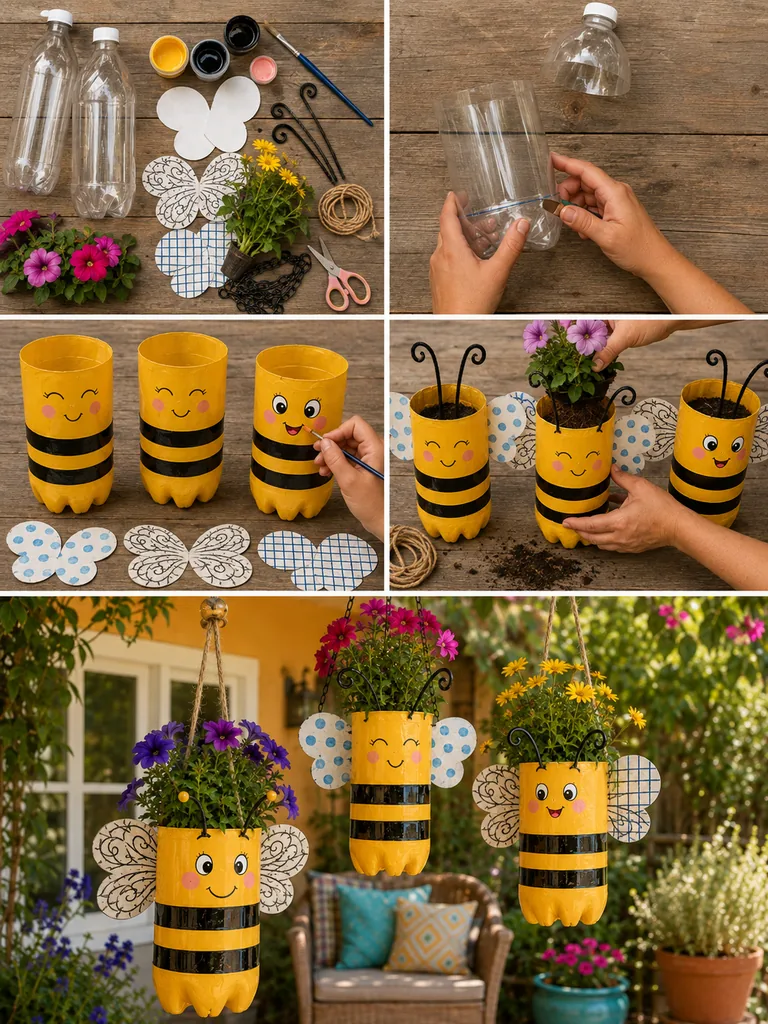
- Cut and clean the bottle to create an open planting container.
- Paint the entire bottle yellow, then add black horizontal stripes.
- Create wings from foam or recycled plastic and attach them to the sides.
- Shape antennae from flexible wire and secure them near the top.
- Add hanging cord or chain and check that the planter balances evenly.
- Fill with soil and colorful flowering plants.
Products Recommendations
5. Cute Face Planter Wall Shelf Using Old Pots and Rope Shelves
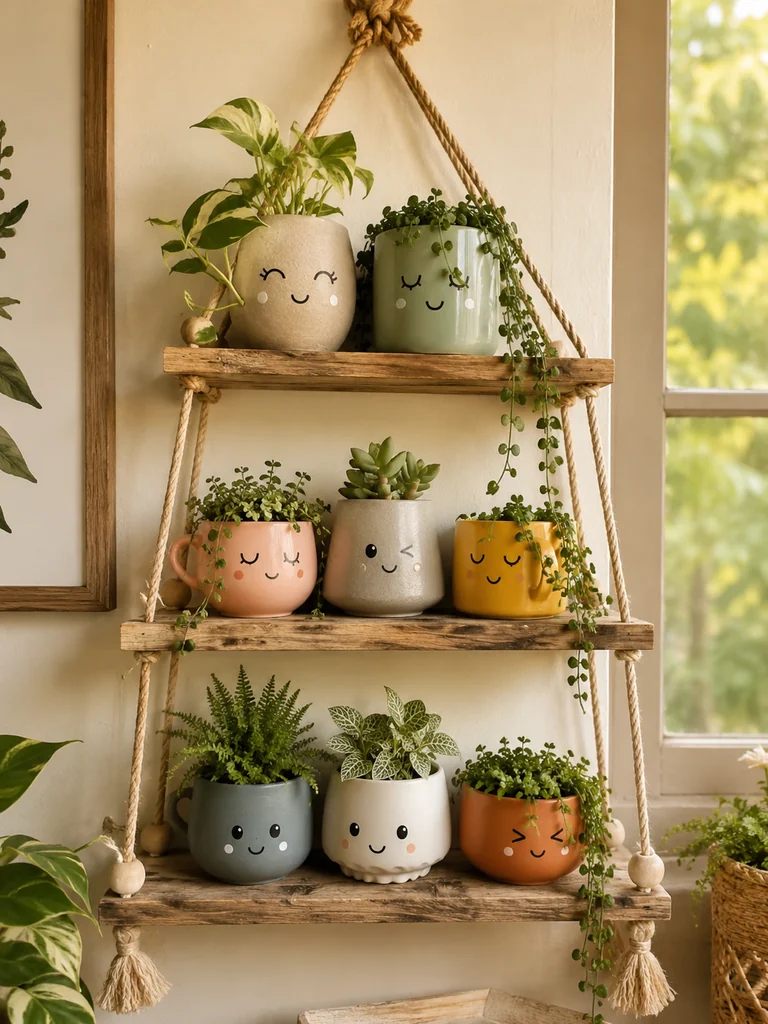
A rustic rope shelf filled with smiling planters brings personality to a blank wall while reusing small pots, cups, and containers you already have. Mix sizes and colors for a relaxed handmade look.
Things You Need
- Three reclaimed wood boards
- Strong jute rope
- Small old pots or mugs
- Paint markers
- Wooden beads
- Drill
- Wall hook rated for the finished weight
- Small plants
Making Process
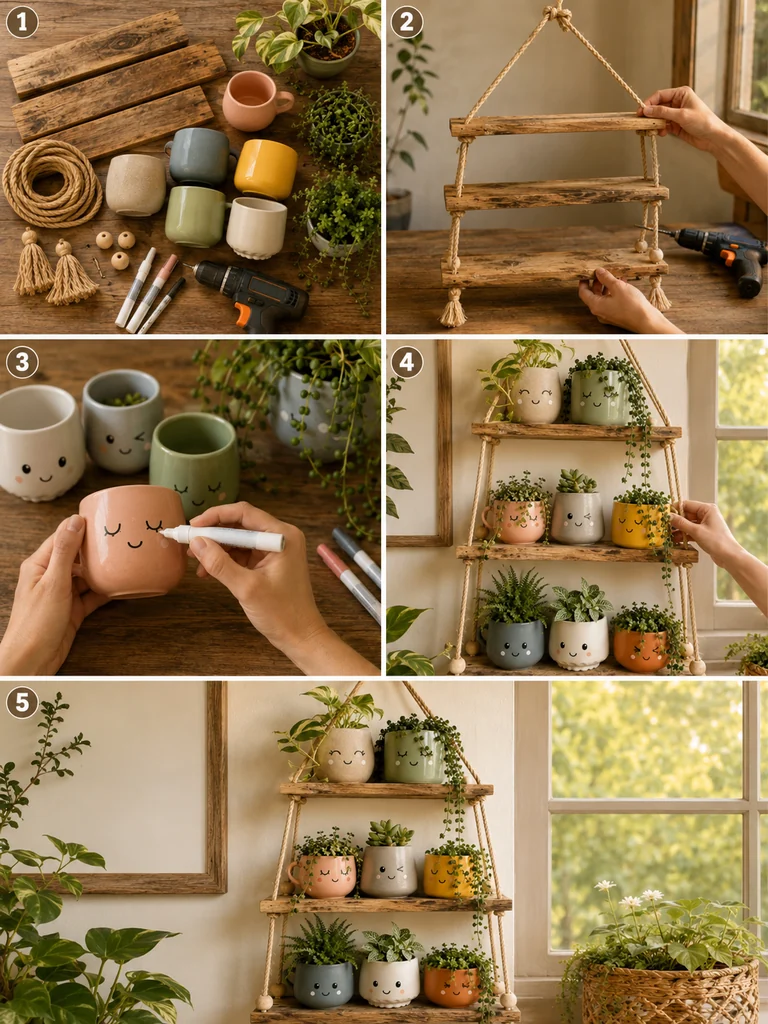
- Sand the reclaimed wood boards and wipe away dust.
- Drill matching rope holes near each corner of every board.
- Thread rope through the boards, knotting securely beneath each shelf.
- Paint simple faces on the recycled pots and allow them to dry.
- Add wooden beads or tassels as decorative accents.
- Pot the plants, arrange them on the shelves, and hang the unit from a secure wall anchor.
Products Recommendations
6. Funny Tin Can Hanging Planters With Beads and Rope Legs
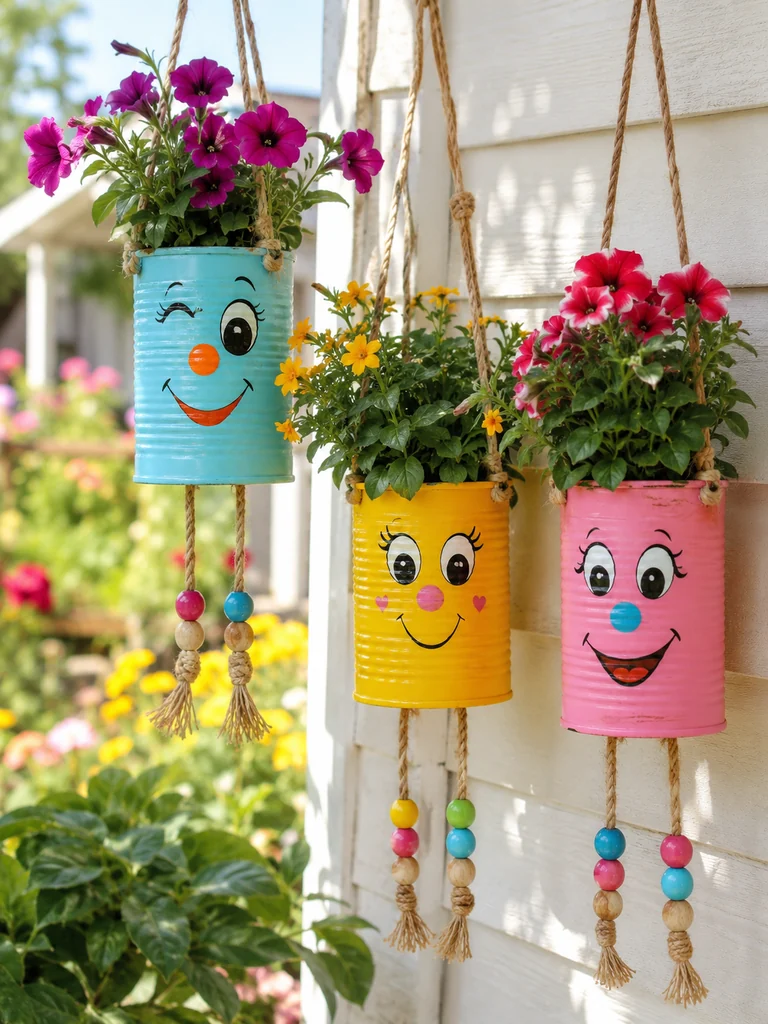
Tin cans are perfect for quick recycled garden crafts. Painted faces, rope arms, dangling legs, and colorful beads transform ordinary cans into cheerful hanging characters.
Things You Need
- Clean tin cans with smooth edges
- Metal-safe primer
- Bright acrylic paint
- Paint markers
- Jute rope
- Colorful wooden beads
- Small drill or metal punch
- Potting mix and flowers
Making Process
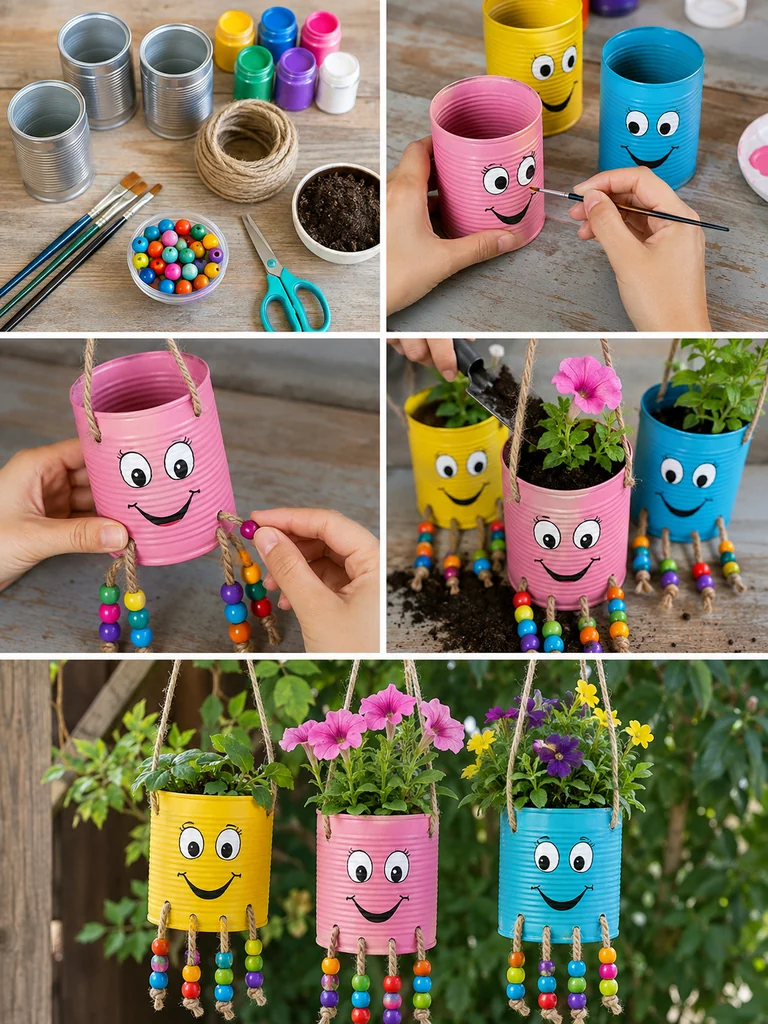
- Wash the cans, remove labels, and make sure the rims are safe and smooth.
- Prime and paint the cans in bright colors.
- Draw friendly faces with paint markers.
- Punch holes for the hanging rope and dangling legs.
- Thread beads onto the rope legs and knot the ends securely.
- Add soil and flowers, then hang where the characters can move gently in the breeze.
Products Recommendations
7. Character Succulent Planters Made From Recycled Tin Cans
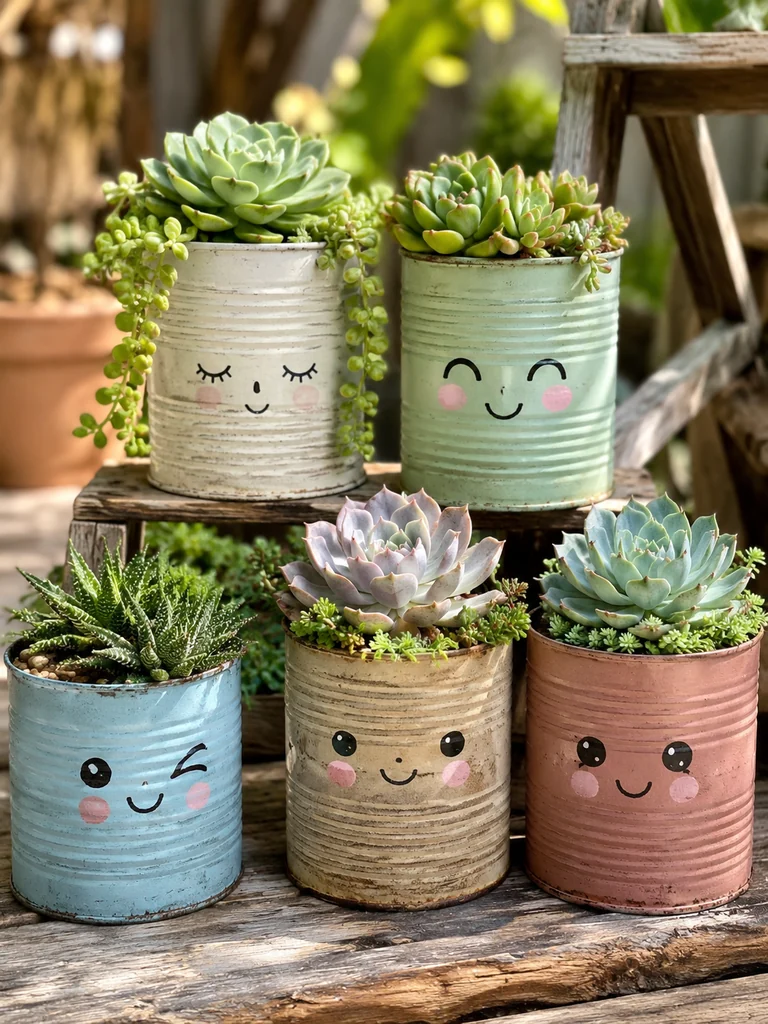
Pastel-painted cans with tiny expressive faces make an adorable home for succulents. Because succulents need less water than many flowers, this project is especially easy to maintain.
Things You Need
- Tin cans
- Pastel multi-surface paint
- Black and white paint markers
- Drill or nail for drainage
- Cactus and succulent potting mix
- Small pebbles
- Succulents
Making Process
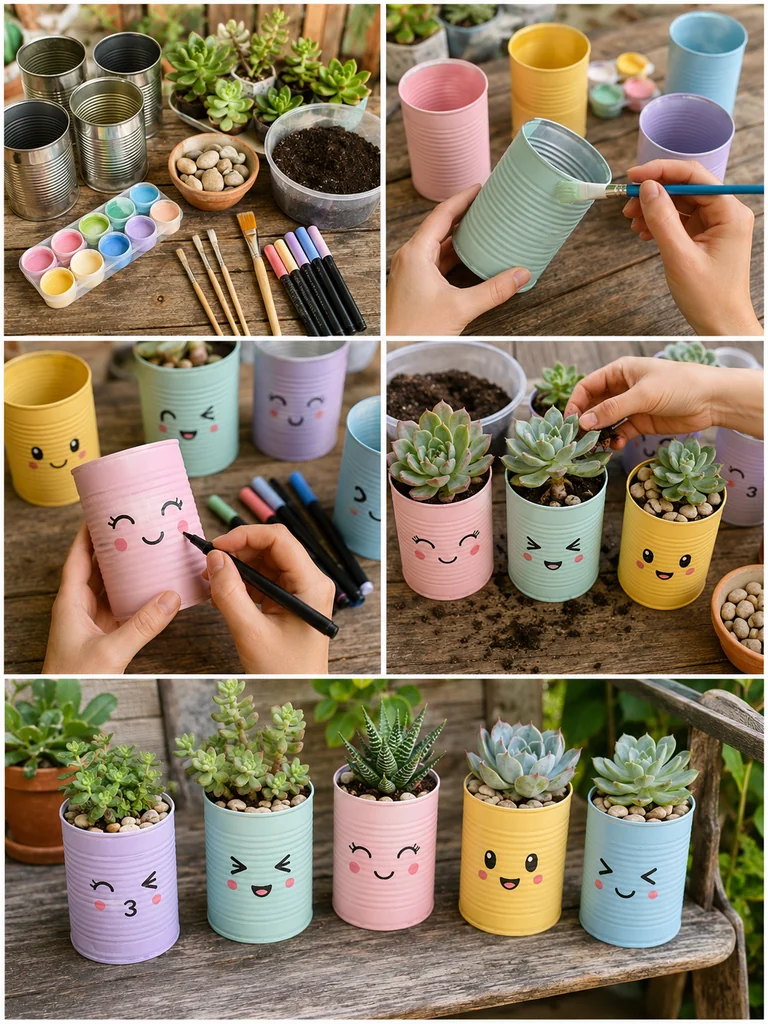
- Clean the cans and make several drainage holes in the bottom.
- Paint each can in a different pastel shade.
- Add simple eyes, smiles, winks, or rosy cheeks.
- Let the paint cure fully before planting.
- Add a small layer of pebbles and fill with succulent mix.
- Plant compact succulents and finish the top with decorative gravel.
Products Recommendations
8. Colorful Two-Tier Bottle Flower Pots
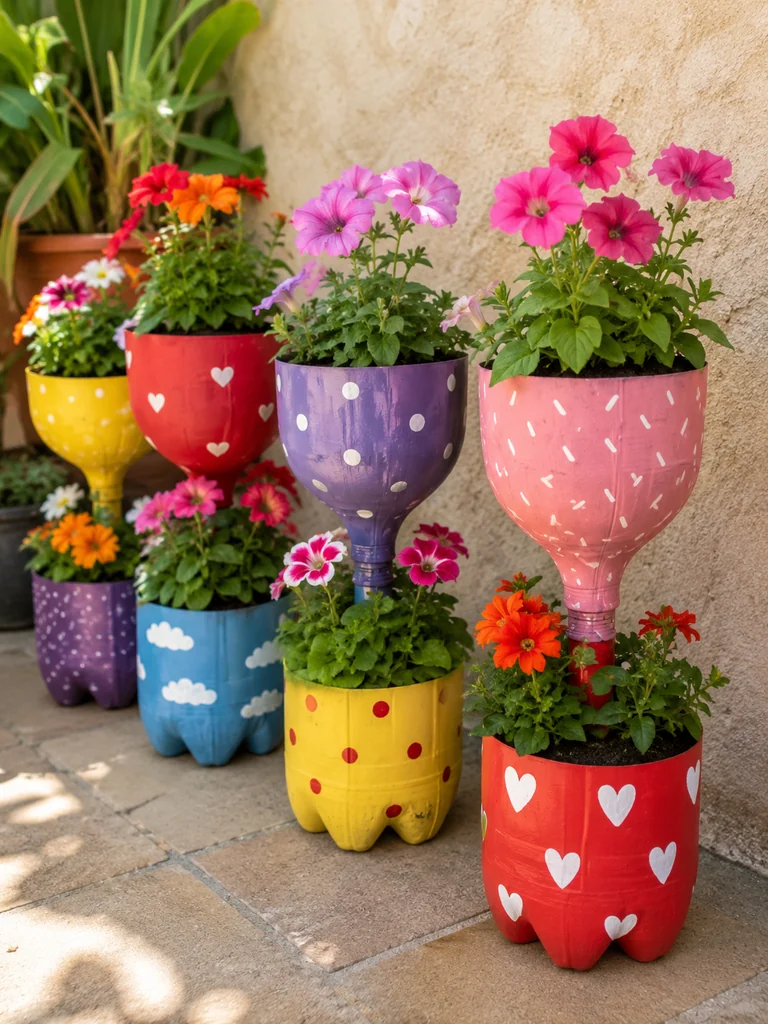
Stack cut bottle sections vertically to create compact two-tier planters that add height without taking up much floor space. Polka dots and contrasting colors make them especially playful.
Things You Need
- Several large plastic bottles
- PVC pipe or sturdy central rod
- Utility knife
- Bright outdoor paint
- White paint marker
- Drill
- Potting mix
- Compact flowers
Making Process
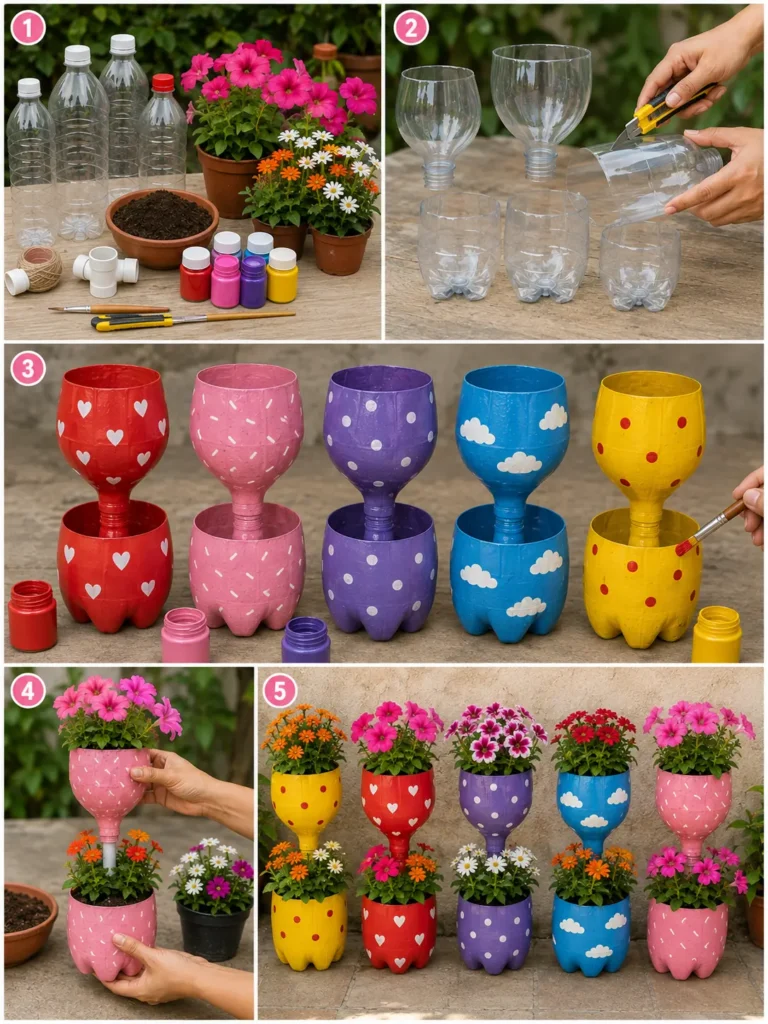
- Cut the lower sections from clean plastic bottles to create bowl-shaped pots.
- Add drainage holes and paint each piece in a different color.
- Decorate the pots with dots or simple patterns.
- Fix a sturdy central rod into the lower container.
- Slide or secure the upper planter section onto the rod.
- Fill both levels with soil and flowers, checking that the tower remains stable.
Products Recommendations
9. Swan-Shaped Planter Made From a Recycled Plastic Container
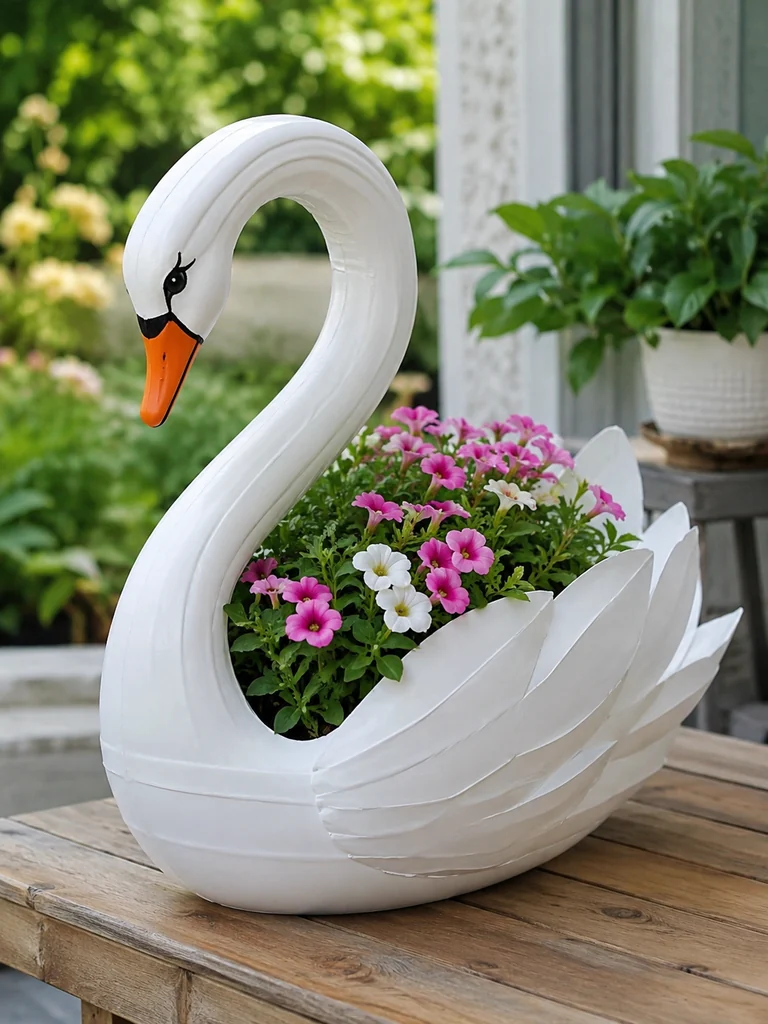
A large detergent or milk container can become an elegant swan planter with a little cutting, shaping, and white paint. This is a fun statement project for a patio table or garden path.
Things You Need
- Large plastic jug
- Utility knife
- White multi-surface paint
- Orange and black paint
- Craft foam or lightweight recycled plastic for feathers
- Hot glue or waterproof adhesive
- Potting soil
- Flowers
Making Process
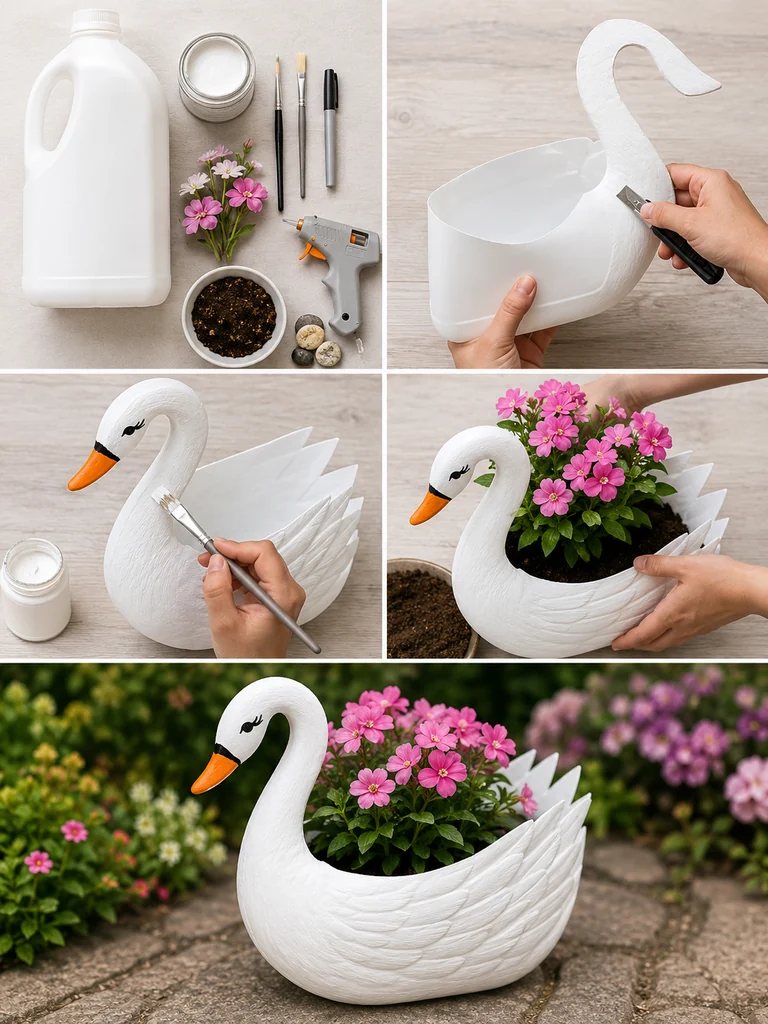
- Clean the jug thoroughly and sketch the planter opening.
- Cut the opening while preserving enough plastic to shape the swan neck.
- Shape and reinforce the neck if necessary.
- Paint the swan white and add the orange beak and black eye details.
- Layer simple feather shapes along the sides using waterproof adhesive.
- Fill the body cavity with soil and flowering plants.
Products Recommendations

23 Crochet Christmas Tree Ideas for Festive Home Decor

23 Creative DIY Winter Door Hanger Ideas You Can Make at Home

23 Creative DIY Christmas Wreath From Paper Ideas for Festive Decorating

45 DIY Winter Wedding Decorations for a Cozy Rustic Celebration

24 Enchanting DIY Halloween Houses Ideas for Spooky Fall Decor

23 Beautiful DIY Christmas Decorations Indoor Ideas You Can Make at Home
10. Animal Face Wall Planters From Cut Plastic Bottles
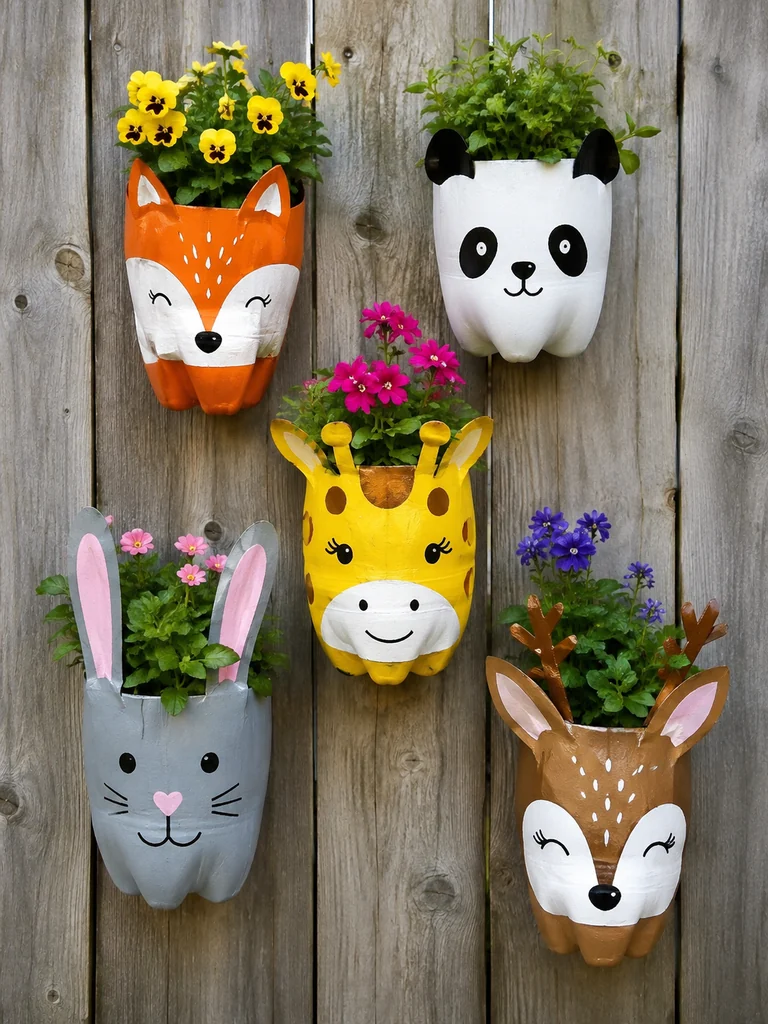
Foxes, pandas, giraffes, rabbits, and other simple animal faces make bottle planters feel completely different from the original container. Group several together for a playful vertical garden.
Things You Need
- Plastic bottles
- Utility knife
- Acrylic paint
- Paint brushes and markers
- Craft foam for ears or horns
- Wall hooks
- Potting mix
- Small flowers or herbs
Making Process
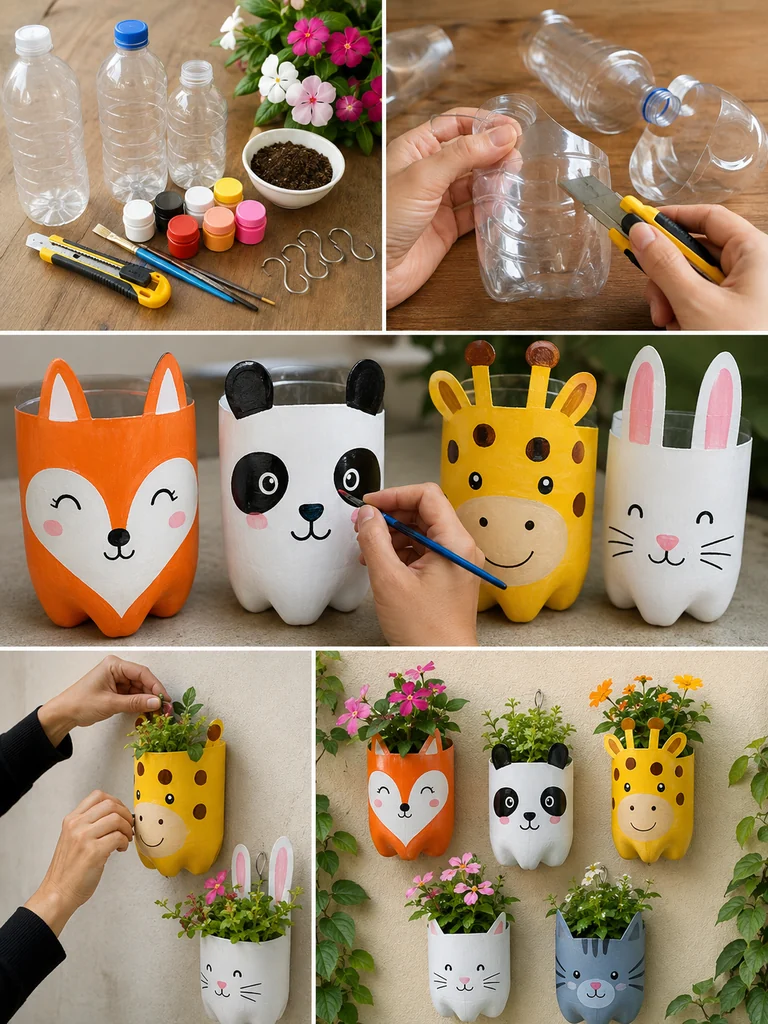
- Cut each bottle to create an open planter shape.
- Paint the base color that matches the chosen animal.
- Add ears, horns, or other simple shapes using foam or recycled plastic.
- Paint facial features and allow the design to dry.
- Add drainage and a secure hanging hook.
- Fill with soil and plants, then arrange several designs together on the wall.
Products Recommendations
11. Emoji Bottle Wall Planters for a Fun Garden Corner
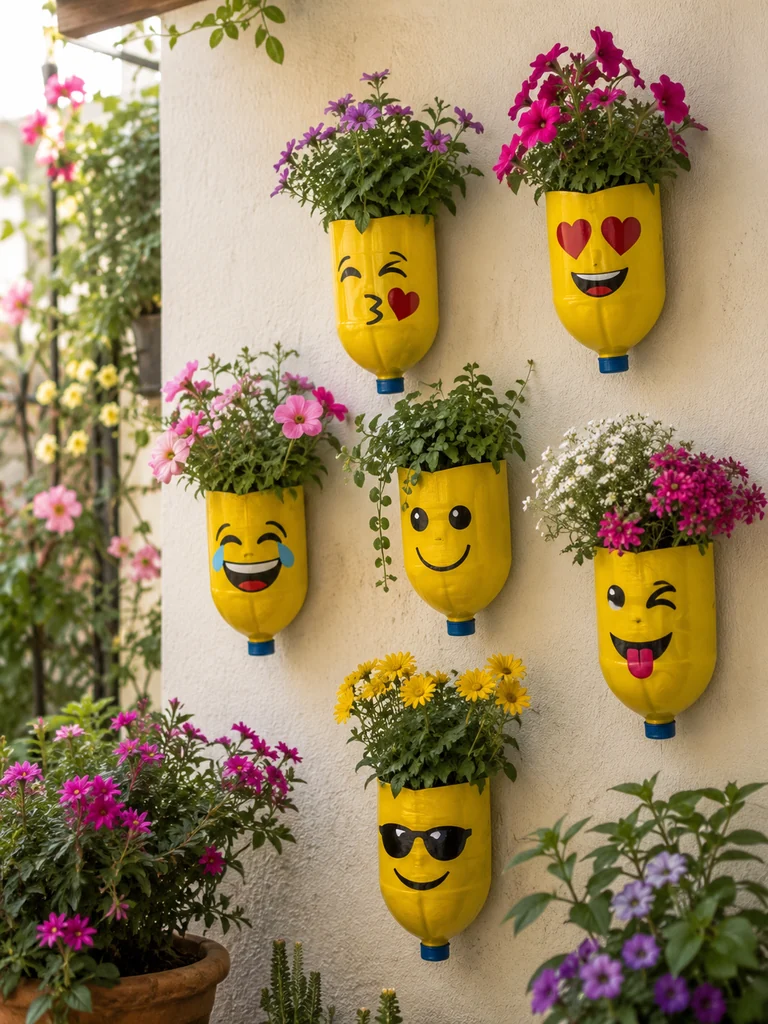
Turn recycled bottles into bright yellow emoji planters with different expressions. A group of laughing, winking, smiling, and heart-eye faces instantly livens up a plain wall.
Things You Need
- Plastic bottles
- Yellow outdoor paint
- Black, red, white, and blue paint pens
- Utility knife
- Drill
- Wall hooks or wire
- Potting soil
- Colorful flowers
Making Process
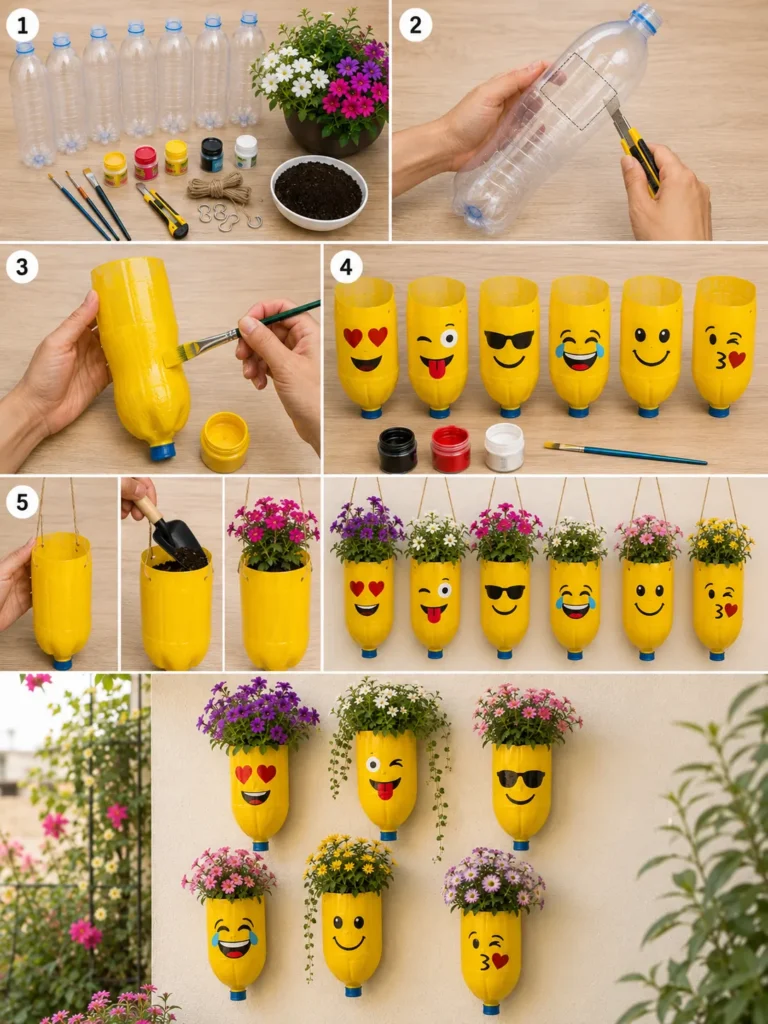
- Clean and cut the bottles into planter shapes.
- Paint each bottle bright yellow.
- Sketch a different emoji expression on each planter.
- Fill in the facial details with weather-resistant paint pens.
- Add drainage and a secure wall-hanging point.
- Plant flowers and arrange the emoji faces in an asymmetrical cluster.
Products Recommendations
12. Stacked Polka-Dot Bottle Tower Planters
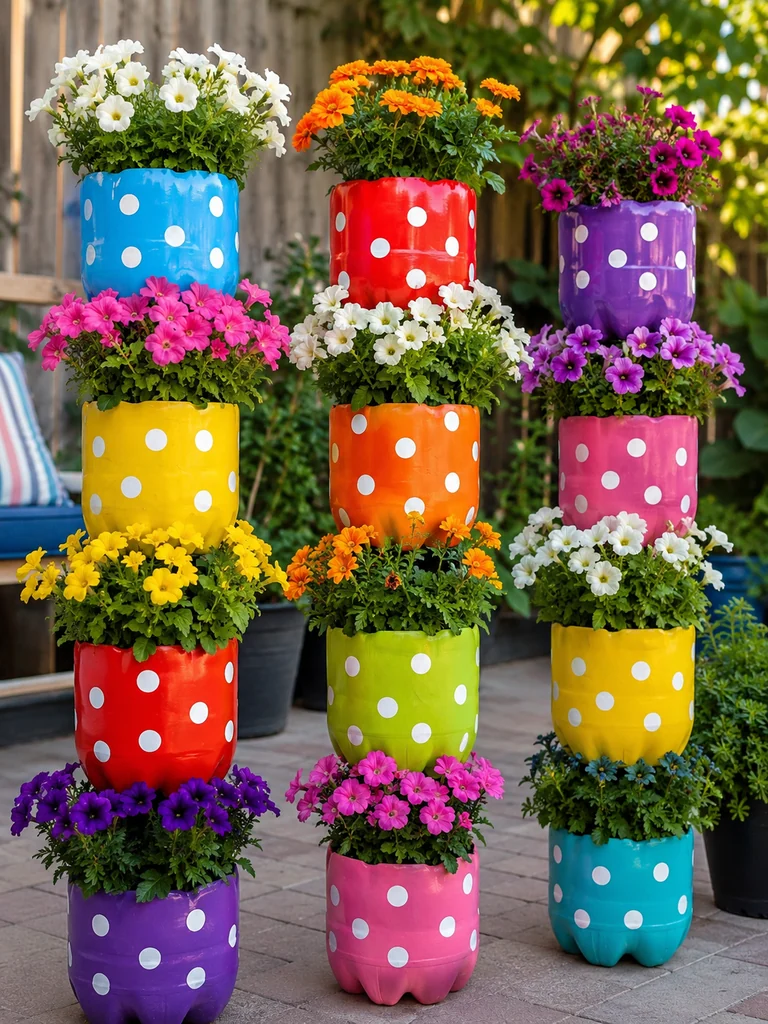
Bright bottle-bottom planters stacked around a central support create a whimsical vertical flower tower. White polka dots tie the mismatched colors together.
Things You Need
- Large plastic bottles
- Central metal rod or PVC pipe
- Outdoor acrylic paints
- White paint marker
- Drill
- Stable base pot
- Potting soil
- Compact flowering plants
Making Process
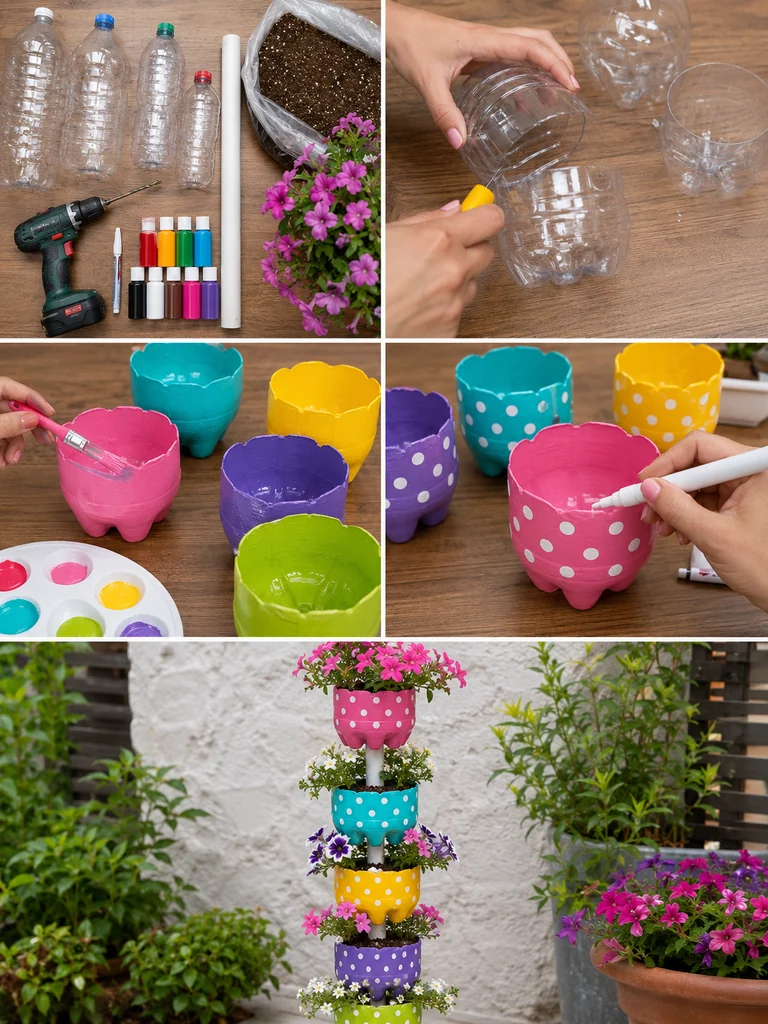
- Cut bottle bottoms into pot-shaped containers and add drainage holes.
- Paint each pot in a bold color and add white polka dots.
- Prepare a stable central rod fixed into a weighted base pot.
- Stack and secure the bottle planters vertically along the support.
- Add potting mix to each level.
- Plant flowers in every tier and water gently from the top downward.
Products Recommendations
13. Fence-Mounted Bottle Herb Planters
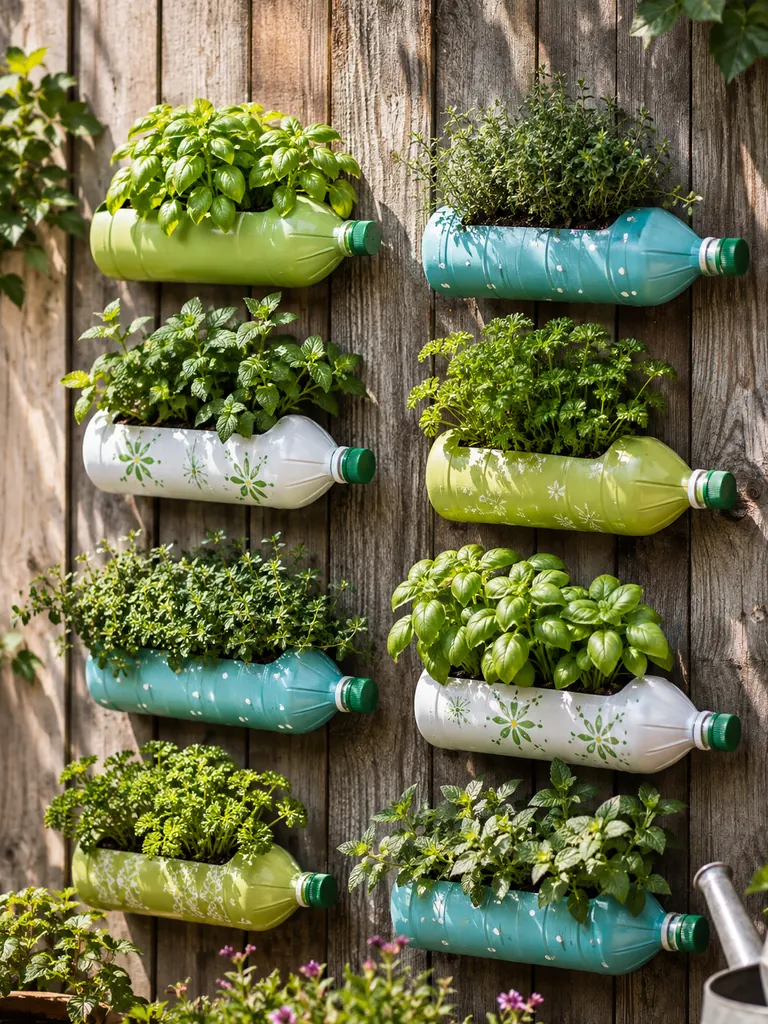
Create a compact herb garden by mounting horizontal recycled bottles to a fence. Basil, mint, parsley, oregano, and thyme look beautiful and remain easy to harvest.
Things You Need
- Large plastic bottles
- Utility knife
- Drill
- Exterior paint
- Zip ties or exterior screws with washers
- Wood fence or mounting board
- Potting mix
- Herb plants
Making Process
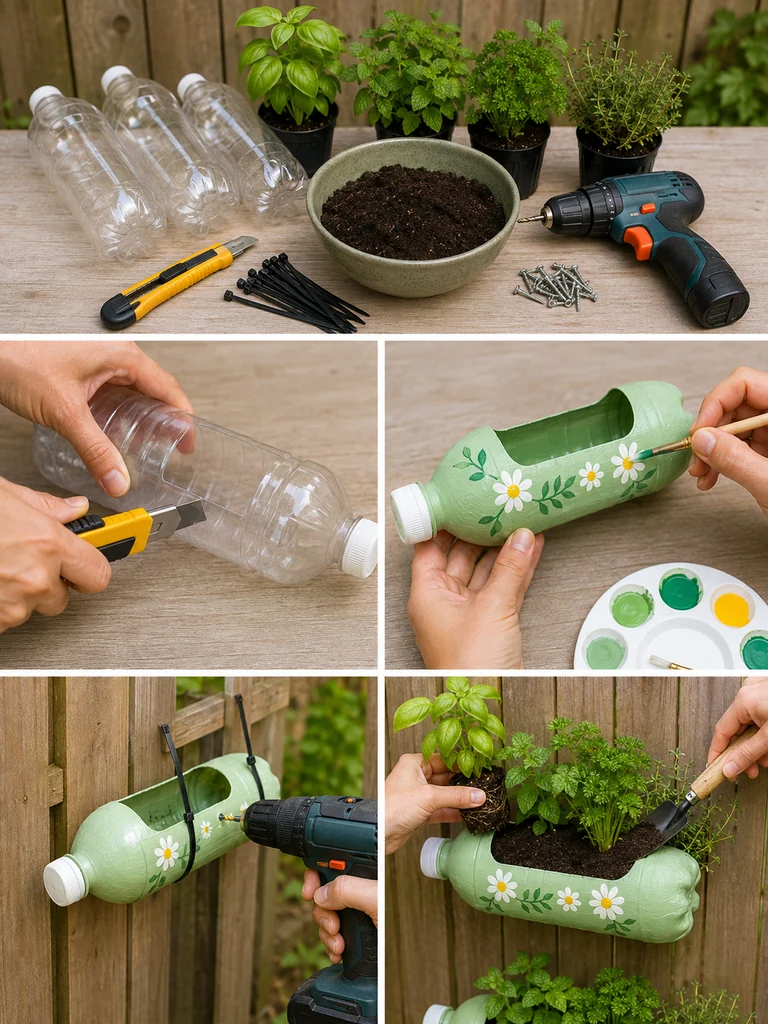
- Cut a wide planting opening along one side of every bottle.
- Add drainage holes along the opposite side.
- Paint and decorate the bottles, leaving the planting opening clear.
- Position the bottles on the fence and mark secure attachment points.
- Fasten with heavy zip ties or screws and washers.
- Fill with potting mix and add herbs, leaving room for growth.
Products Recommendations
14. Ladybug Garden Planters From Old Pots or Bowls
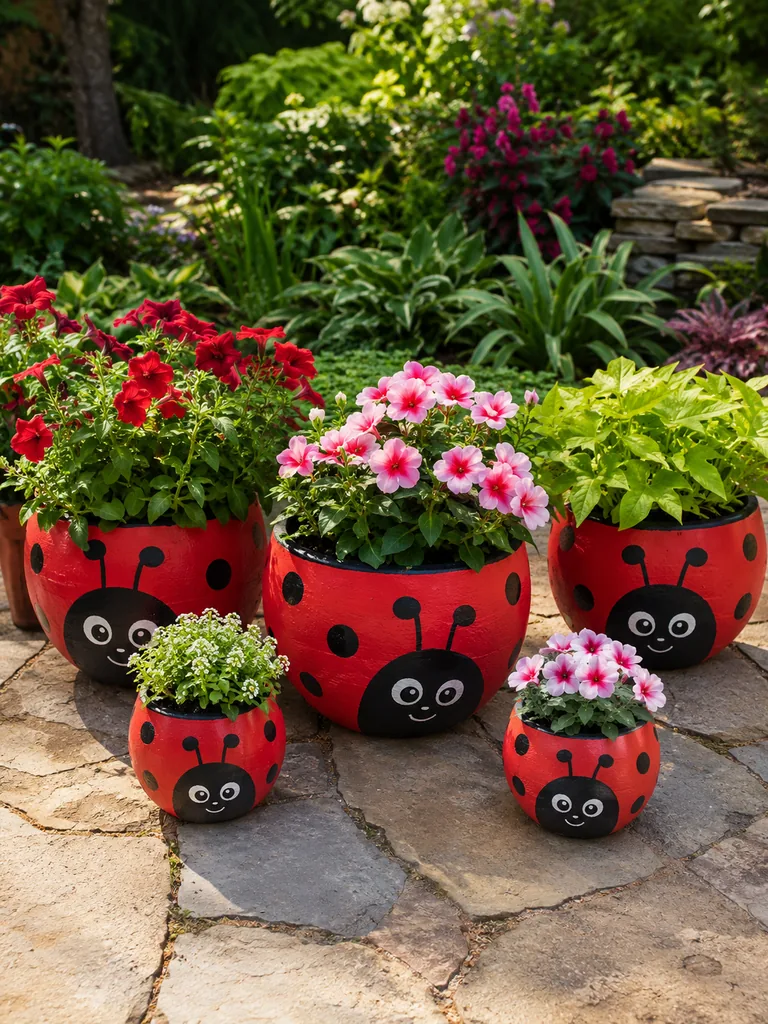
Old bowls and rounded pots naturally lend themselves to ladybug designs. A glossy red finish, bold black spots, and a friendly face turn worn containers into charming garden accents.
Things You Need
- Old rounded bowls or pots
- Red exterior paint
- Black and white paint
- Paint brushes
- Clear outdoor sealer
- Potting soil
- Flowers or foliage plants
Making Process
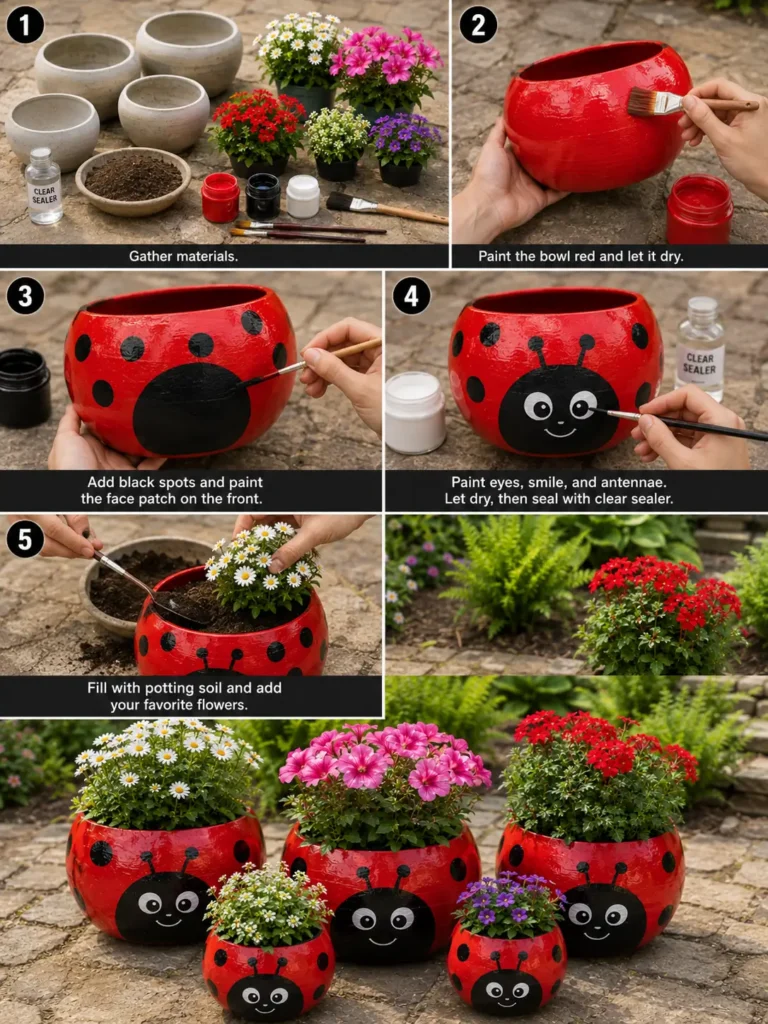
- Clean and lightly sand the old pot or bowl.
- Paint the entire exterior red and let it dry.
- Paint a black face area and add large black spots.
- Add simple white-and-black eyes and a smile.
- Seal the painted surface with a clear outdoor protective coat.
- Fill with soil and plants after the sealer has fully cured.
Products Recommendations
15. Butterfly Wall Planters Made From Recycled Containers
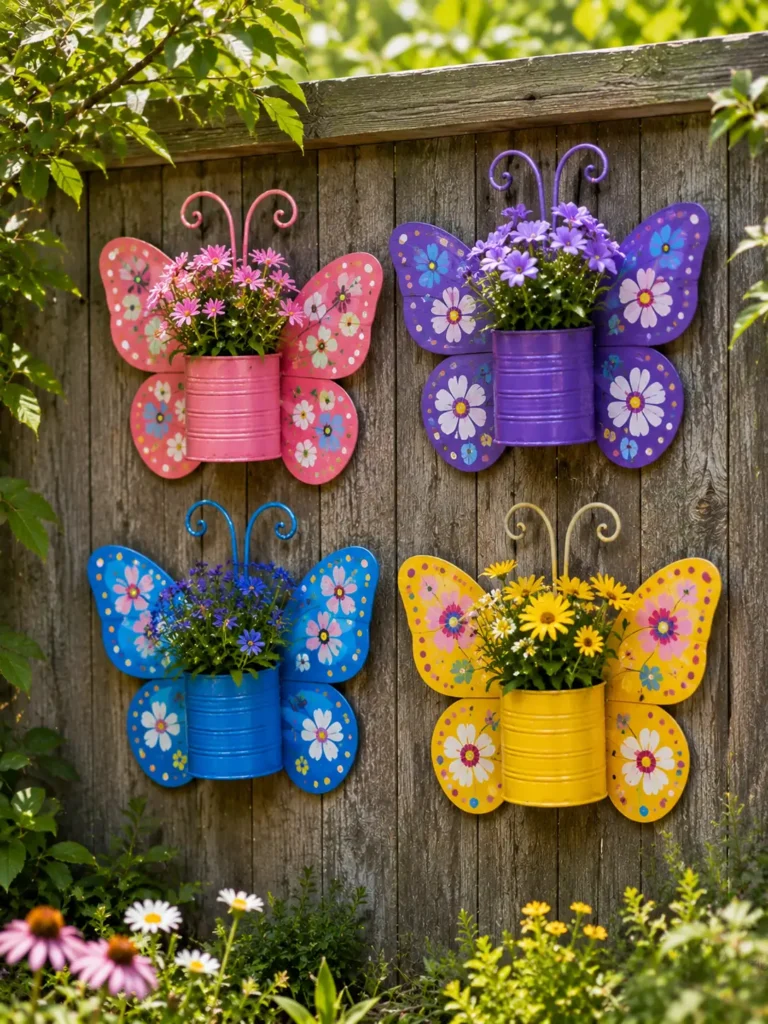
Large painted wings transform a simple bottle or can into an eye-catching butterfly wall planter. Use different wing patterns so every butterfly feels unique.
Things You Need
- Plastic bottle or tin can
- Craft foam, thin wood, or recycled plastic for wings
- Bright acrylic paint
- Black craft wire
- Strong waterproof adhesive
- Wall hook
- Potting mix
- Flowers
Making Process
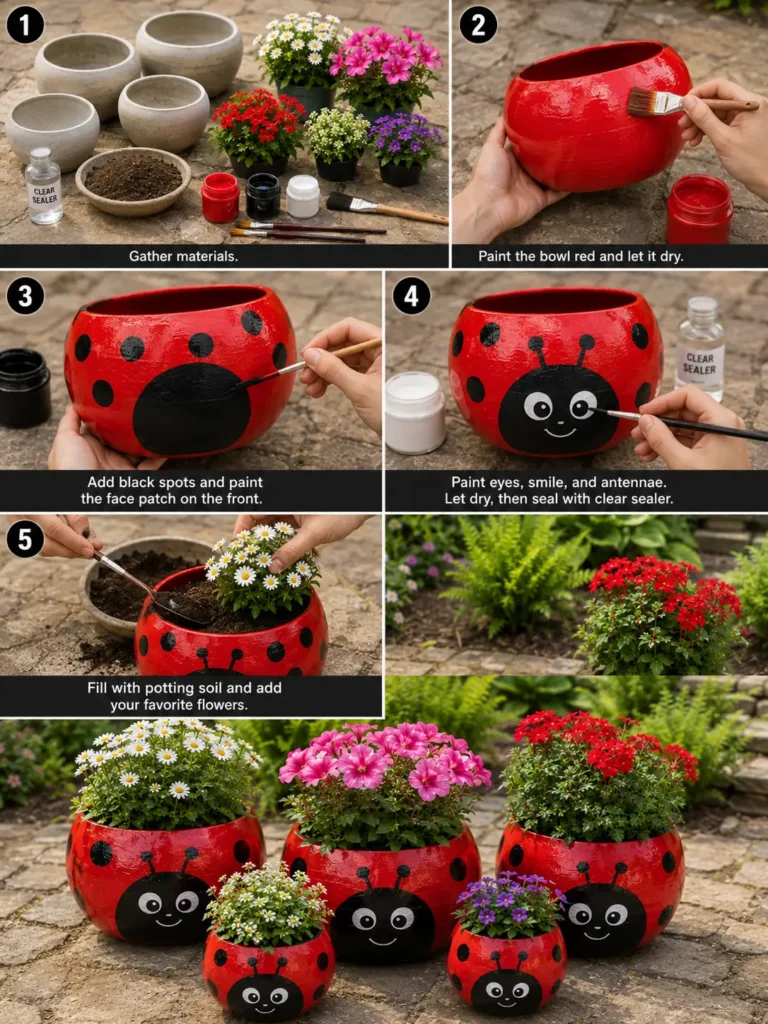
- Prepare the recycled container as the butterfly body and planter.
- Cut two pairs of symmetrical wings from your chosen lightweight material.
- Paint the body and wings with bold colors and patterns.
- Shape antennae from wire and attach them securely.
- Glue the wings to the back and add a strong wall-hanging point.
- Fill the body with soil and flowering plants before mounting.
Products Recommendations
16. Rainbow Tin Can Herb Garden Set
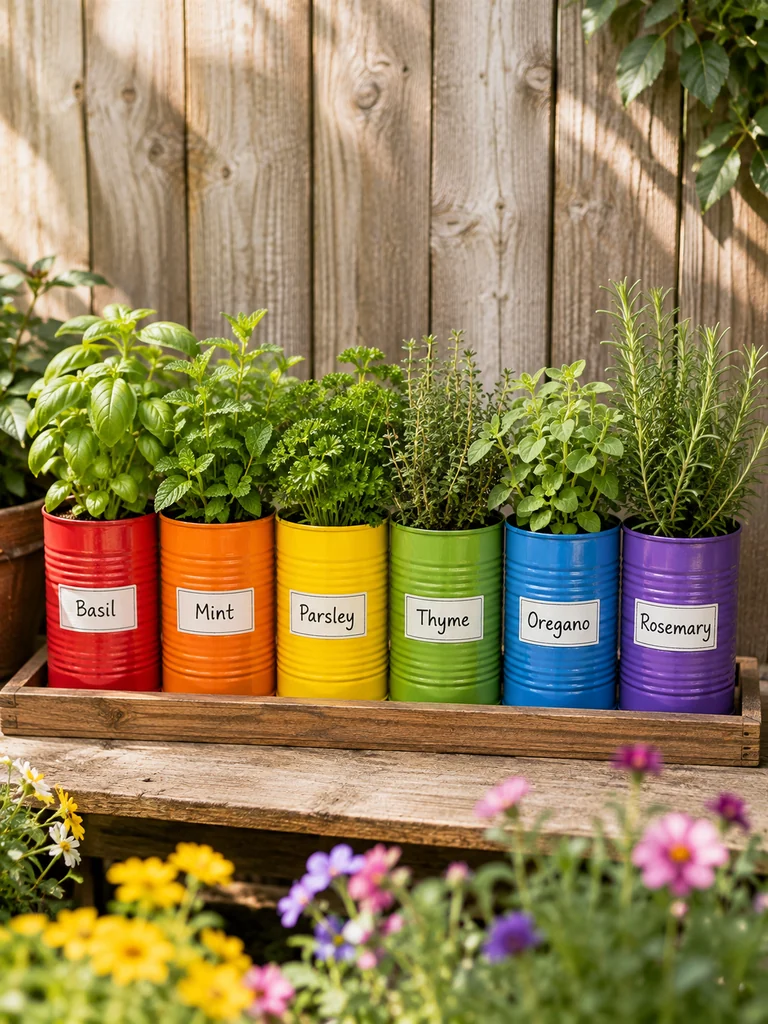
A row of rainbow-painted tin cans makes herbs easy to identify and creates a neat, colorful display. Small chalkboard-style tags add a practical finishing touch.
Things You Need
- Six clean tin cans
- Rainbow acrylic paints
- Jute twine
- Small chalkboard labels
- Mini clothespins or waterproof glue
- Potting mix
- Herb plants
Making Process
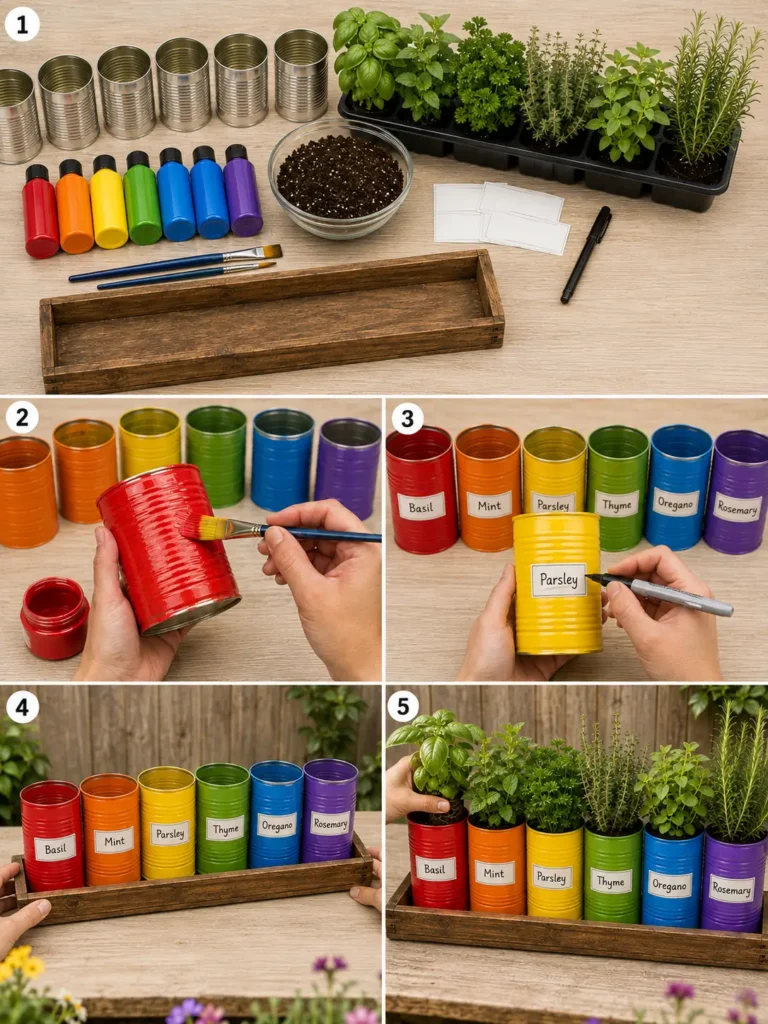
- Clean the cans and smooth any sharp edges.
- Paint one can in each rainbow color.
- Wrap jute twine around the upper rim and secure it.
- Attach a small chalkboard label to each can.
- Add drainage holes if the cans will be watered directly.
- Fill with potting mix and plant basil, mint, parsley, thyme, oregano, or rosemary.
Products Recommendations
17. Teacup-Style Cute Face Planters
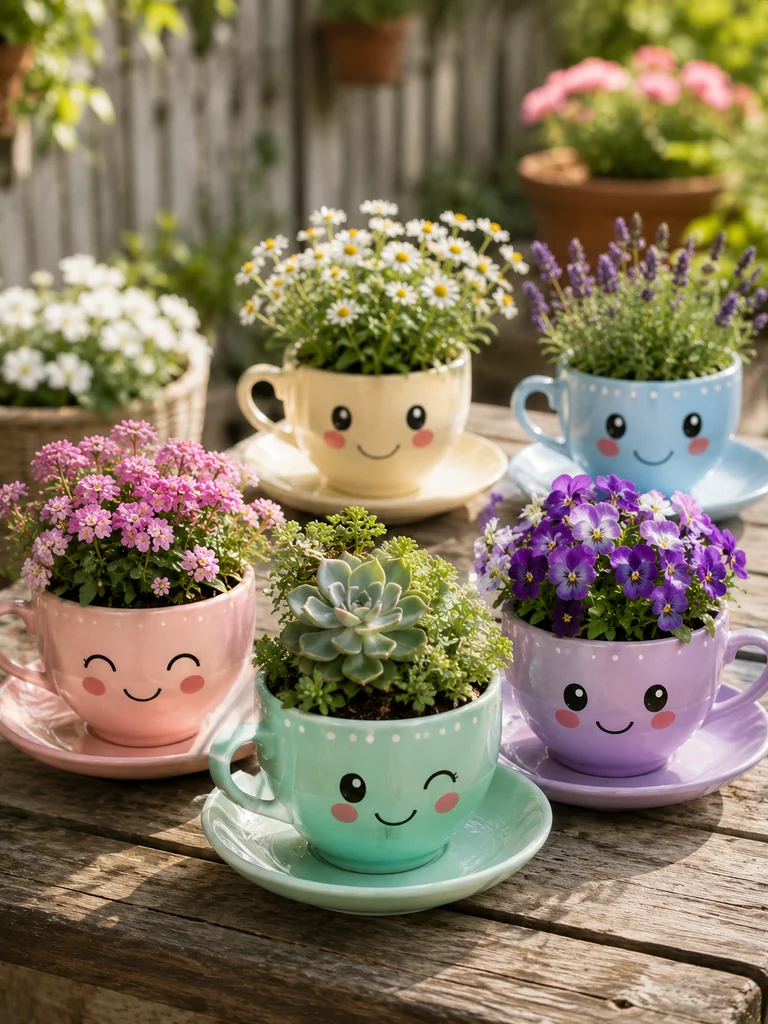
Unused teacups and saucers make sweet mini planters for succulents and small flowers. Painted kawaii-style faces make them especially appealing for a patio table or sunny windowsill.
Things You Need
- Old teacups and saucers
- Multi-surface acrylic paint
- Black paint marker
- Small drill bit suitable for ceramics, optional
- Potting mix
- Small succulents or flowers
Making Process
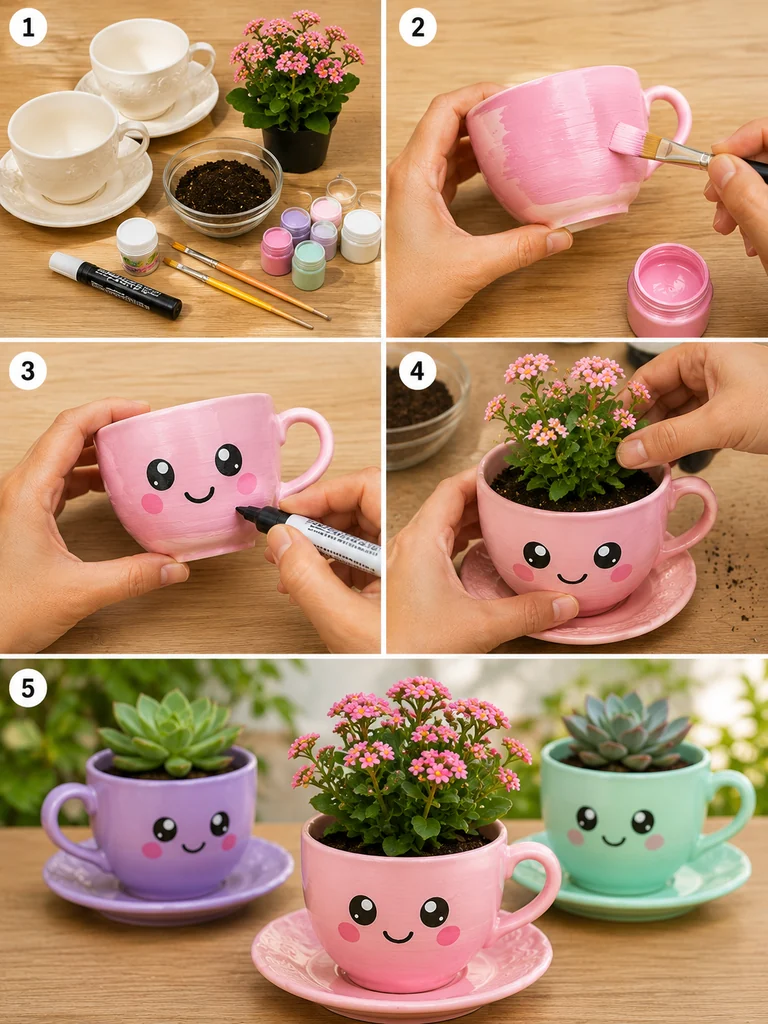
- Clean and dry the teacups and saucers.
- Paint the outside in pastel colors if you want a fresh base.
- Add simple eyes, smiles, and rosy cheeks with a paint marker.
- Create drainage carefully if the cup can be drilled safely; otherwise use a nursery pot insert.
- Add a small amount of potting mix.
- Plant compact succulents or flowers and set each cup on its saucer.
Products Recommendations
18. Hanging Rope Basket Planters With Decorative Beads
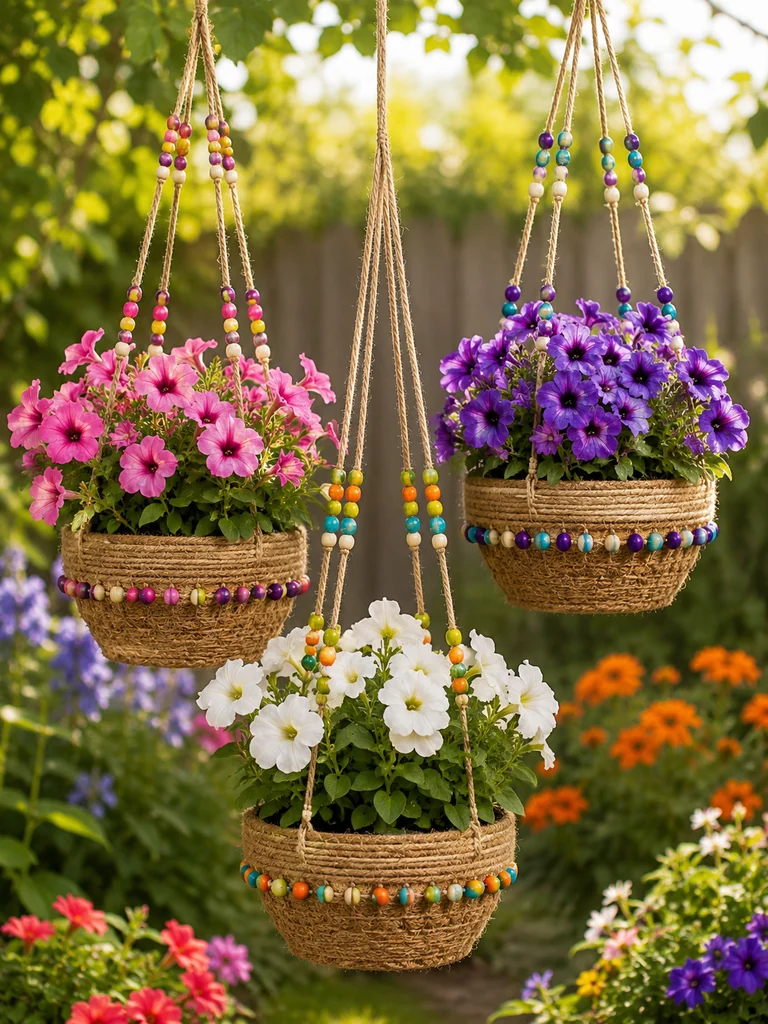
A thrifted basket or old bowl becomes a boho hanging planter when wrapped with rope and finished with colorful wooden beads. The result feels handmade but polished.
Things You Need
- Old basket or sturdy bowl
- Jute rope
- Wooden beads
- Scissors
- Hot glue gun or strong craft glue
- Pot liner
- Potting mix
- Flowers
Making Process
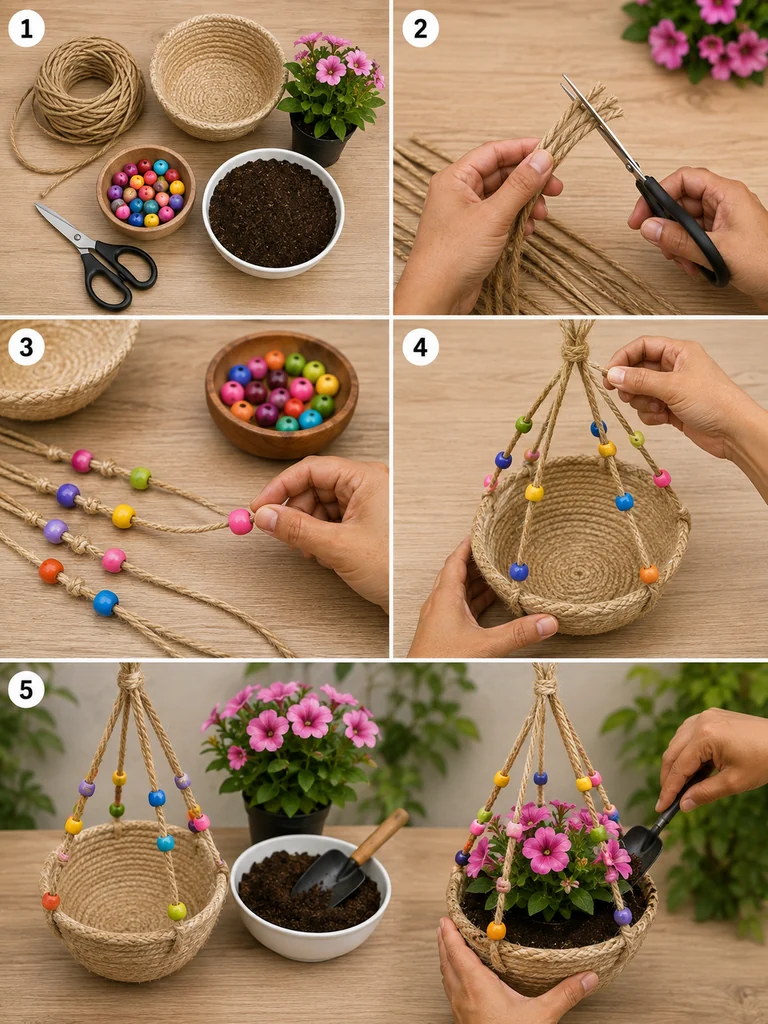
- Cut four equal lengths of jute rope.
- Thread colorful beads onto the ropes, spacing them with knots.
- Tie the ropes evenly around or through the basket edge.
- Gather and knot the ropes securely at the top to form a hanger.
- Add a waterproof liner with drainage where appropriate.
- Fill with potting mix and flowering plants, then hang from a strong hook.
Products Recommendations
19. Mosaic Bottle Planters for a Boho Garden Look
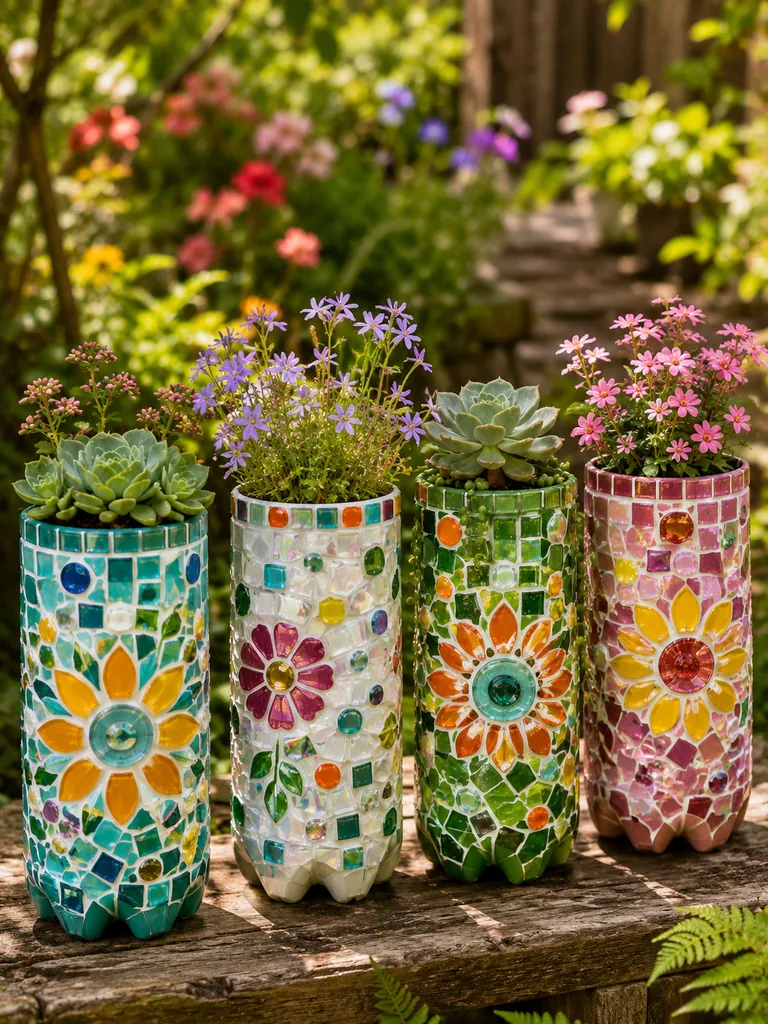
Cover recycled bottles with tiny mosaic tiles to create jewel-like planters that look far more expensive than the materials suggest. Floral patterns are especially pretty in a sunny garden.
Things You Need
- Sturdy bottles or containers
- Small mosaic tiles or glass pieces
- Tile adhesive
- Premixed grout
- Sponge
- Protective gloves
- Potting mix
- Succulents or small plants
Making Process
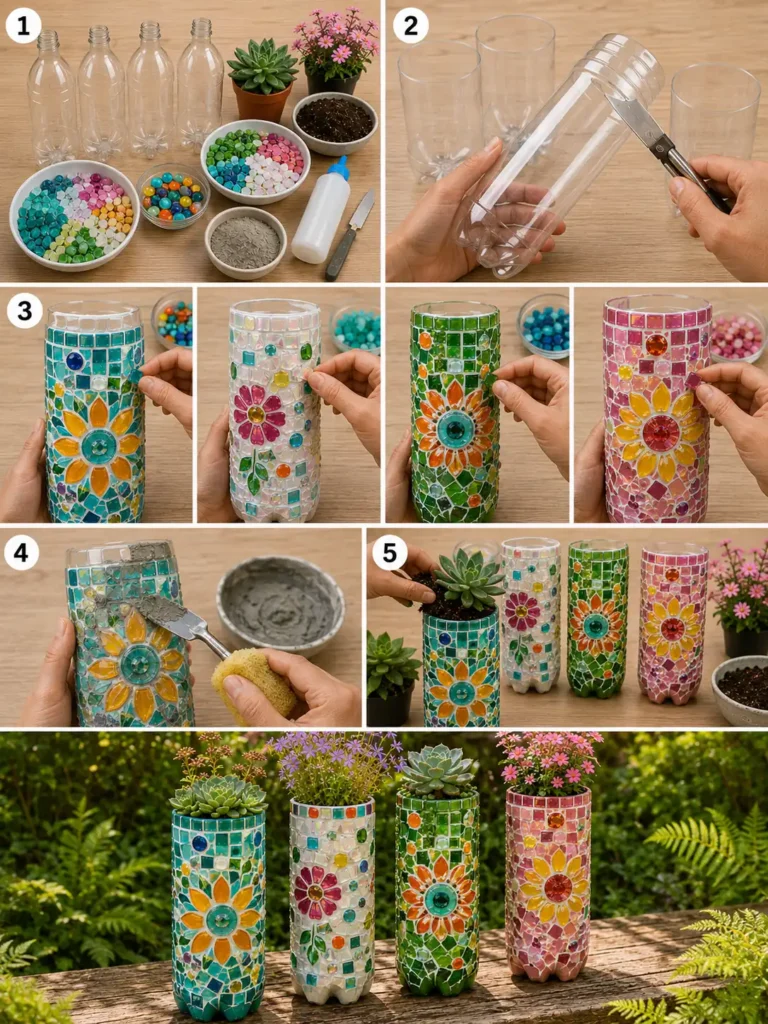
- Clean the container and lightly roughen the surface if needed.
- Spread tile adhesive over a small section at a time.
- Press mosaic pieces into the adhesive to form a floral or geometric pattern.
- Let the adhesive cure, then work grout into the gaps.
- Wipe the surface clean with a damp sponge and let the grout cure.
- Add soil and plants once the planter is fully dry.
Products Recommendations
20. Mini Vertical Garden Using Recycled Bottles and a Wooden Frame
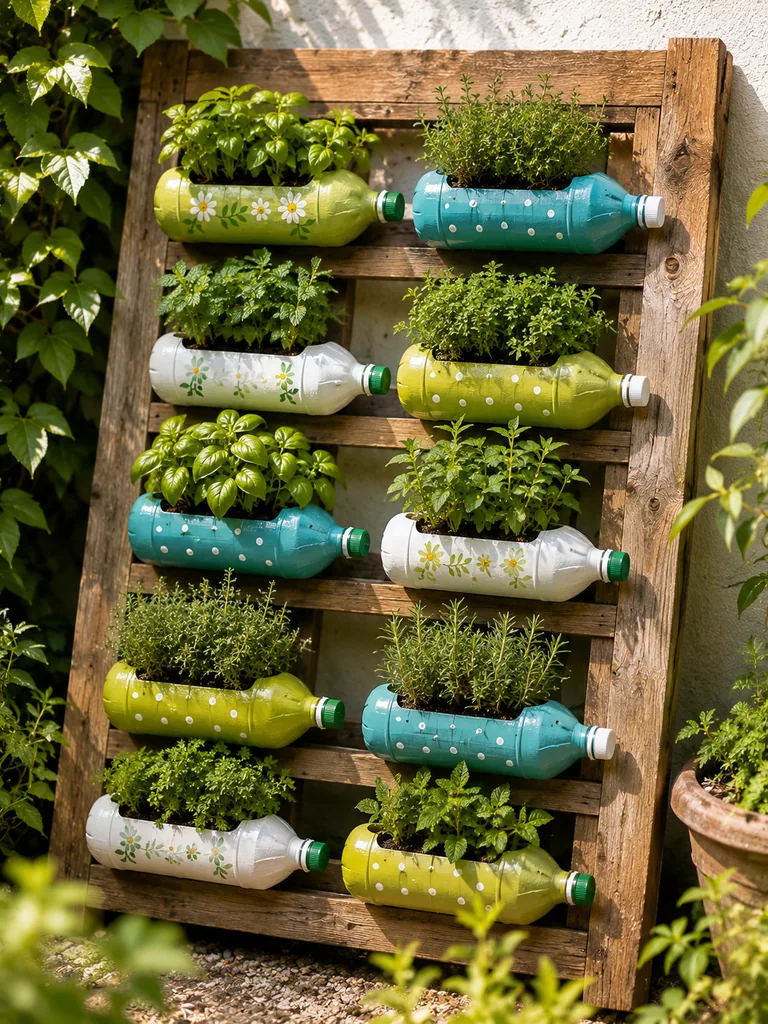
A simple wooden ladder-style frame turns horizontal recycled bottles into a space-saving herb wall. It is ideal for a small patio, balcony, or narrow side yard.
Things You Need
- Large plastic bottles
- Reclaimed or new wood strips
- Exterior wood screws
- Drill
- Utility knife
- Heavy zip ties or brackets
- Outdoor paint marker
- Potting mix
- Herbs
Making Process
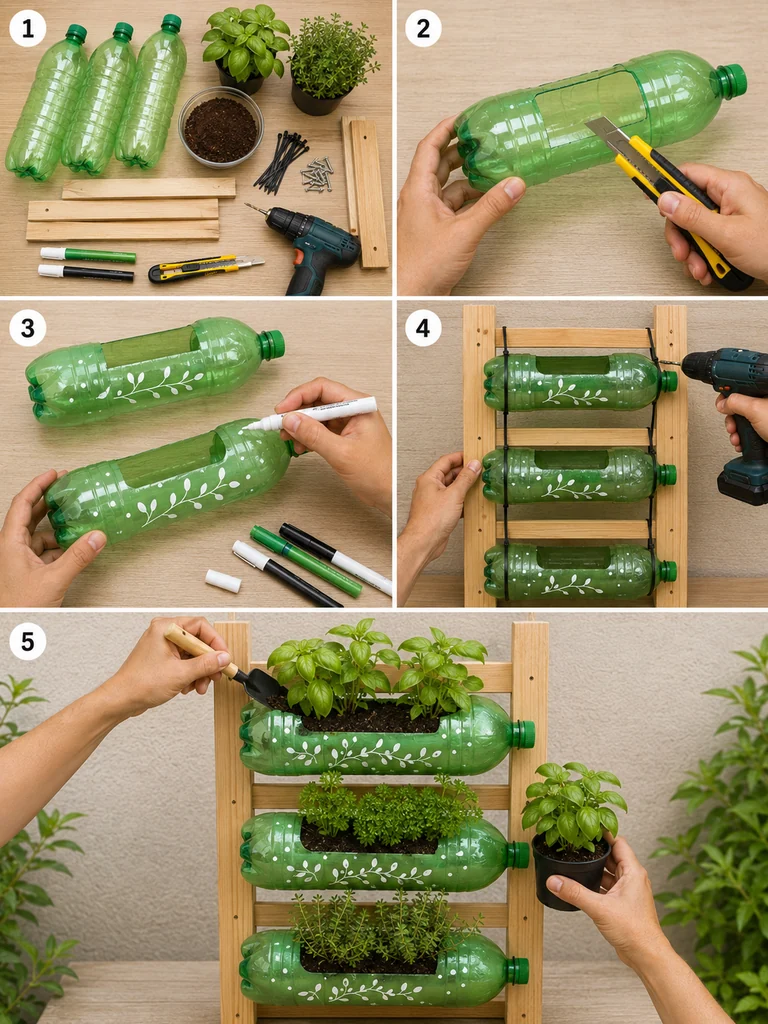
- Build a sturdy rectangular frame with several horizontal support slats.
- Cut a wide planting window into each clean bottle.
- Decorate the bottles and add drainage holes.
- Attach the bottles horizontally to the frame with UV-resistant ties or brackets.
- Fill every planter with potting mix.
- Add herbs, check stability, and position the vertical garden where it receives suitable light.
Products Recommendations
45 Creative Wall Planter Ideas for a Gorgeous Outdoor Garden Display

45 Small Tropical Garden Ideas That Make Your Yard Feel Like a Resort
45 Balcony Garden Ideas for a Dreamy Outdoor Space

45 Tropical Garden Design Ideas for a Backyard Paradise

46 Beautiful Indoor Pebble Garden Ideas for Modern Homes

10 Vegetables You Can Grow Indoors Without a Garden This Winter
Tips for Making Recycled Garden Decor Last Outdoors
- Choose exterior, multi-surface, or outdoor-rated paint whenever possible.
- Let every paint layer cure fully before adding soil or exposing the project to rain.
- Use a clear outdoor sealer on decorative painted surfaces that will receive regular weather exposure.
- Add drainage holes to planters unless you are using a removable nursery pot inside the decorative container.
- Use UV-resistant ties, exterior screws, and properly rated hooks for wall-mounted or hanging projects.
- Move lightweight recycled planters to a protected location during severe wind or storms.
Frequently Asked Questions
What paint is best for recycled outdoor planters?
Acrylic paint formulated for outdoor or multi-surface use is a good choice for many plastic, metal, and wood crafts. Some slick plastics and metals benefit from a compatible primer first. Finish decorative surfaces with a weather-resistant clear sealer when appropriate.
Do recycled planters need drainage holes?
In most cases, yes. Drainage helps prevent roots from sitting in excess water. If you do not want to drill the decorative container, place a smaller nursery pot with drainage inside it and remove the inner pot when watering.
How do I keep plastic bottle planters from fading?
Use outdoor-rated paint, allow it to cure fully, apply a UV-resistant clear topcoat, and place the planter where it receives the amount of sun appropriate for both the paint system and the plant.
Which of these projects are best for beginners?
The tin can herb garden, character succulent cans, teacup planters, ladybug pots, and painted recycled container planters are among the easiest because they require less structural assembly than hanging or vertical projects.
Final Thoughts
These 25 DIY Garden Decor Ideas show how much potential can hide in everyday containers and leftover craft materials. Start with one small planter, then use the same colors or decorative details across several projects to create a garden that feels coordinated, cheerful, and completely personal.

