 Skip to content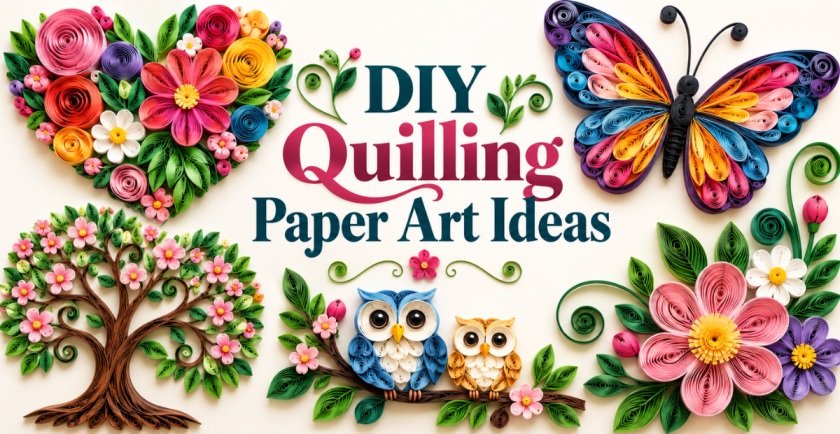
Paper quilling can turn narrow strips of colored paper into surprisingly detailed home decor. By rolling, pinching, curling, and shaping the strips, you can create flowers, animals, landscapes, monograms, botanical designs, and abstract patterns with real three-dimensional texture. These DIY quilling paper art ideas are designed to be approachable even if you are still learning the basic shapes, while giving you enough variety to create a full collection of handmade wall art.
Most of the projects below begin with the same small vocabulary of shapes: tight coils, loose coils, teardrops, marquise forms, open scrolls, and long curved strips. The difference comes from how those pieces are arranged and layered. Each idea includes a finished-art image and a separate six-panel making-process image, so you can see both the final look and the general construction sequence. Choose colors that suit your room, and feel free to simplify any project while you build confidence.
Basic Supplies for DIY Quilling Paper Art
You do not need a large professional tool kit to begin. A slotted quilling tool makes rolling easier, but many shapes can also be formed with a needle tool or even a fine toothpick. The most important supplies are clean paper strips, a controlled amount of glue, sturdy cardstock, and tweezers for positioning small pieces. A circle template helps when you want consistent coil sizes, while a shadow-box frame protects dimensional work without flattening it.
- Colored quilling paper strips in several widths
- Slotted quilling tool or needle tool
- Precision craft glue
- Fine-tip scissors
- Tweezers
- Heavyweight cardstock or mounting board
- Pencil, ruler, and eraser
- Quilling circle template
- Toothpicks for applying tiny amounts of glue
- Shadow-box frame for dimensional finished art
1. Colorful Quilled Floral Heart Wall Art
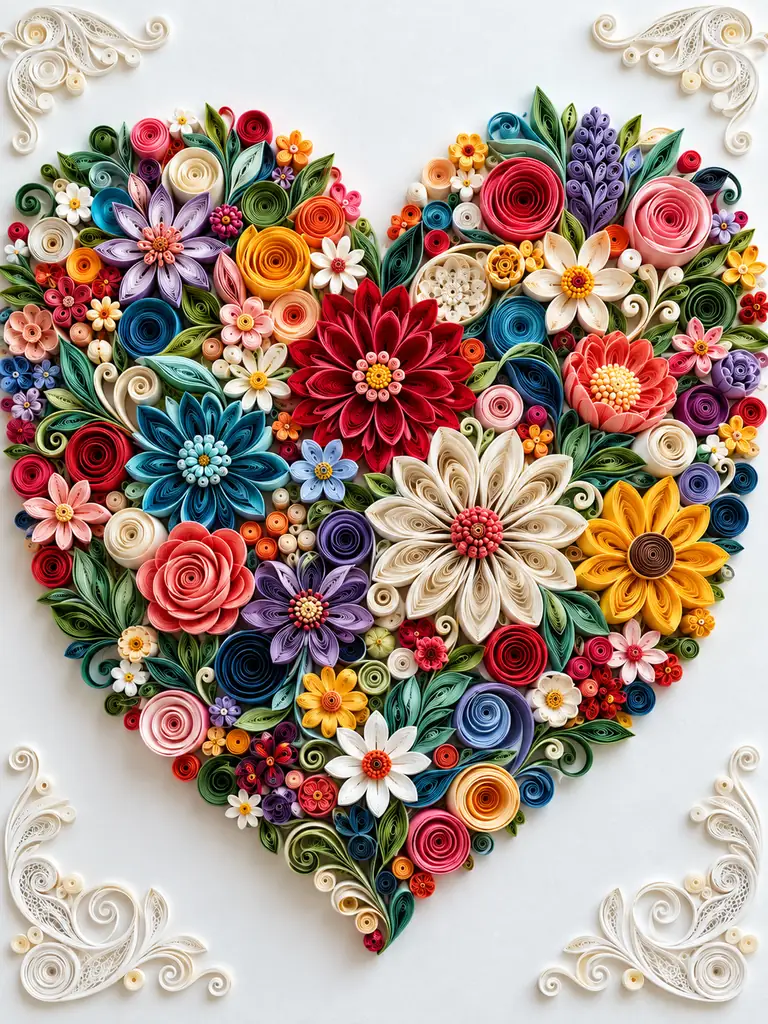
A flower-filled heart is an easy way to turn basic quilling shapes into a bold piece of handmade wall decor. The design looks intricate because it mixes large focal flowers with dozens of tiny coils, leaves, buds, and scrolls, but each component is made separately before being arranged. Use several.
Items Needed
- Multicolored quilling paper strips
- White heavyweight cardstock
- Slotted quilling tool
- Craft glue and toothpick
- Fine tweezers
- Pencil and heart template
How to Make
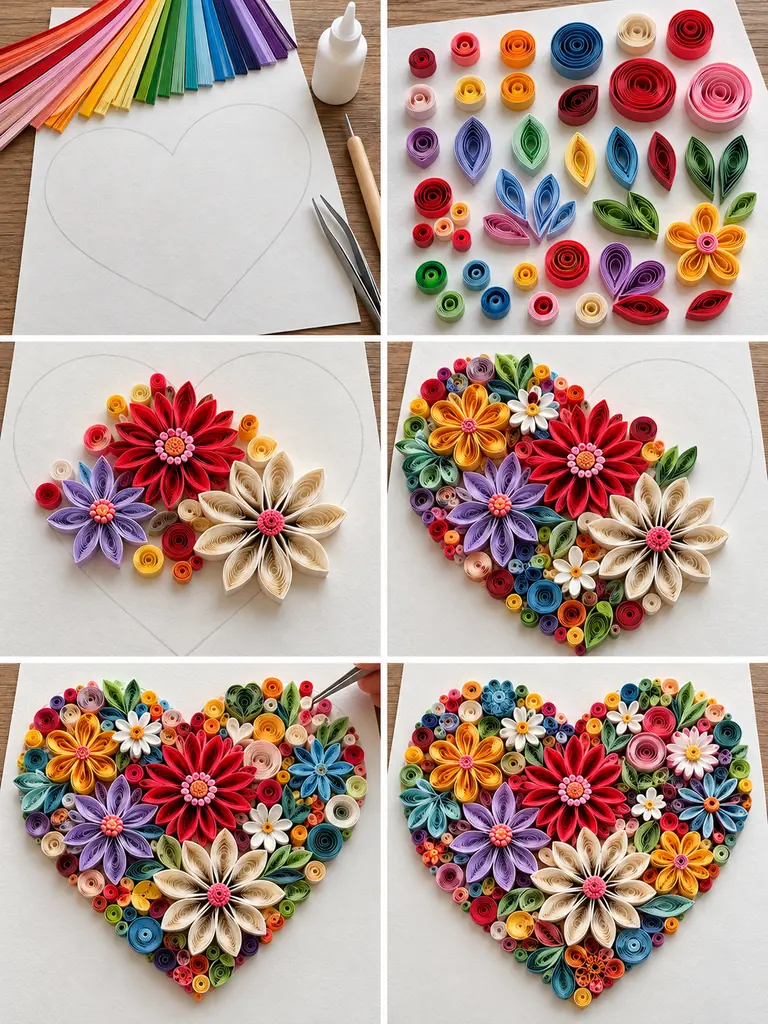
- Lightly trace a large heart on the cardstock, keeping the pencil line faint enough to.
- Make several larger flowers first using teardrop and marquise petals, then prepare spiral roses, tight.
- Place the largest flowers around the center and upper sections of the heart before gluing.
- Fill progressively smaller spaces with miniature flowers, leaves, coils, and curls until the heart silhouette.
2. Cute Quilled Sheep Nursery Art
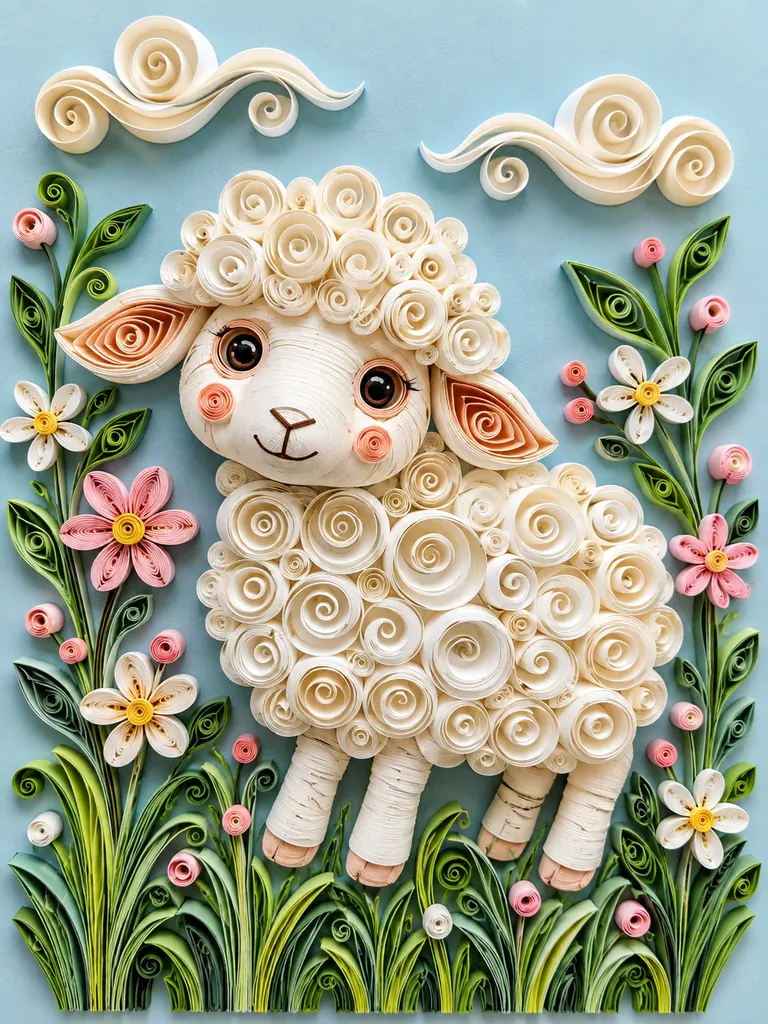
A fluffy quilled sheep is a sweet beginner-friendly project because the body relies mostly on simple loose coils. The repeated white and ivory spirals naturally resemble curly wool, while a few shaped pieces form the face, ears, legs, and surrounding flowers. Using slightly different coil sizes prevents the fleece from.
Items Needed
- White and ivory quilling strips
- Cream, beige, pink, and green strips
- Pastel blue cardstock
- Black paper for eyes
- Quilling tool
- Glue and tweezers
How to Make
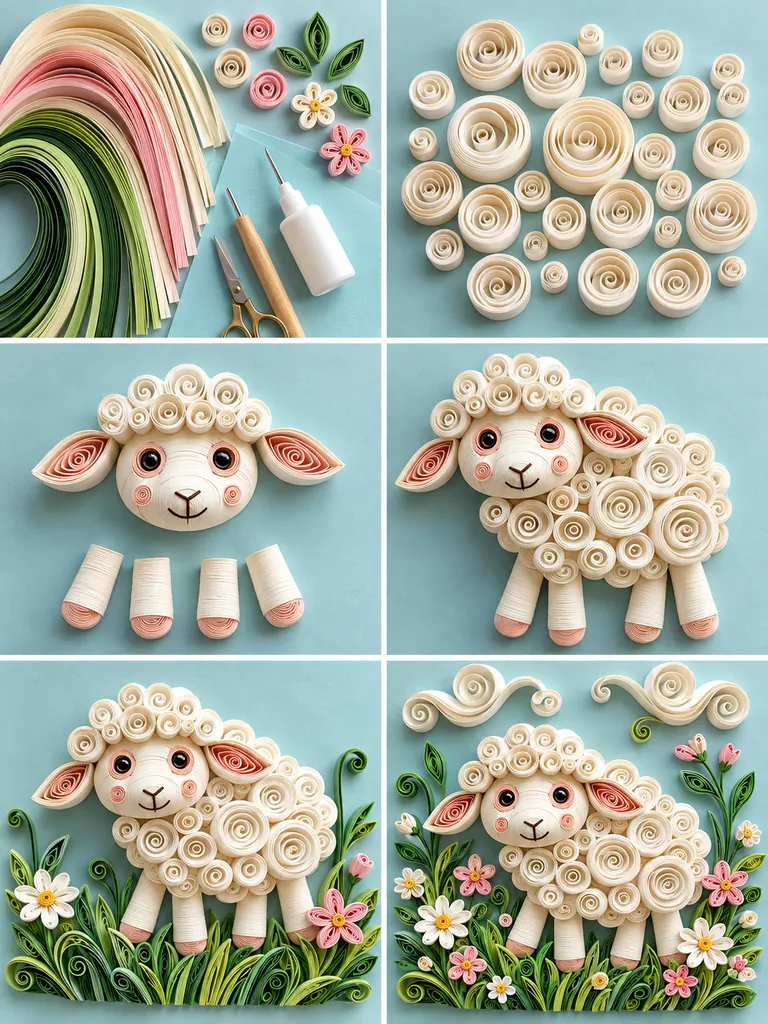
- Sketch a simple sheep silhouette very lightly so you have a guide for the head.
- Roll many white and ivory loose coils in several sizes. Pinch a few beige pieces.
- Build the face first, adding dark eyes, a tiny mouth, soft cheek details, and the.
- Fill the body closely with overlapping white coils, then attach the legs and add grass.
3. Quilled Flowering Tree Wall Art
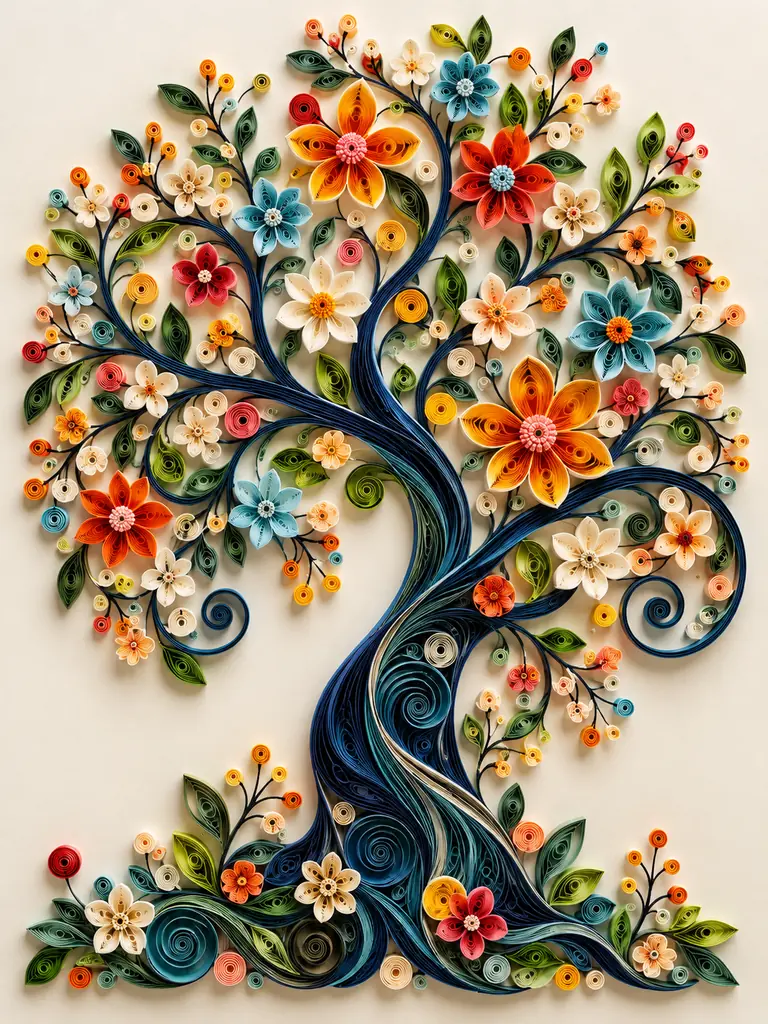
A flowing flowering tree is one of the most versatile DIY quilling paper art ideas because the shape can be adapted to almost any color palette. Long navy or deep-teal strips create a graceful trunk that separates into sweeping branches, while dozens of small flowers add movement and color. The.
Items Needed
- Dark navy and teal paper strips
- Assorted floral-color strips
- Green quilling strips
- Warm ivory cardstock
- Glue
- Quilling tool and tweezers
How to Make
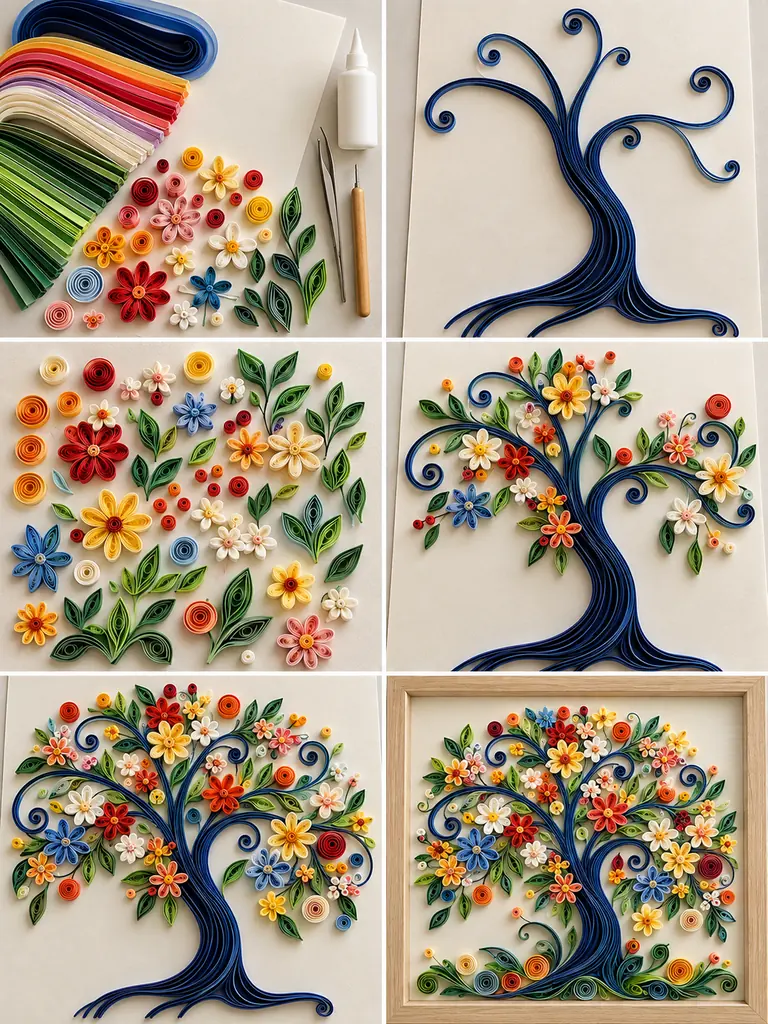
- Arrange several long dark strips side by side and curve them upward to establish the.
- Separate the upper strips gradually into branches, allowing some to curl gently rather than making.
- Prepare small flowers using tight centers and teardrop petals, plus green marquise leaves and miniature.
- Attach the largest flower clusters around key branches, then distribute smaller blossoms and leaves while.
4. Moonlight Quilled Cat Silhouette
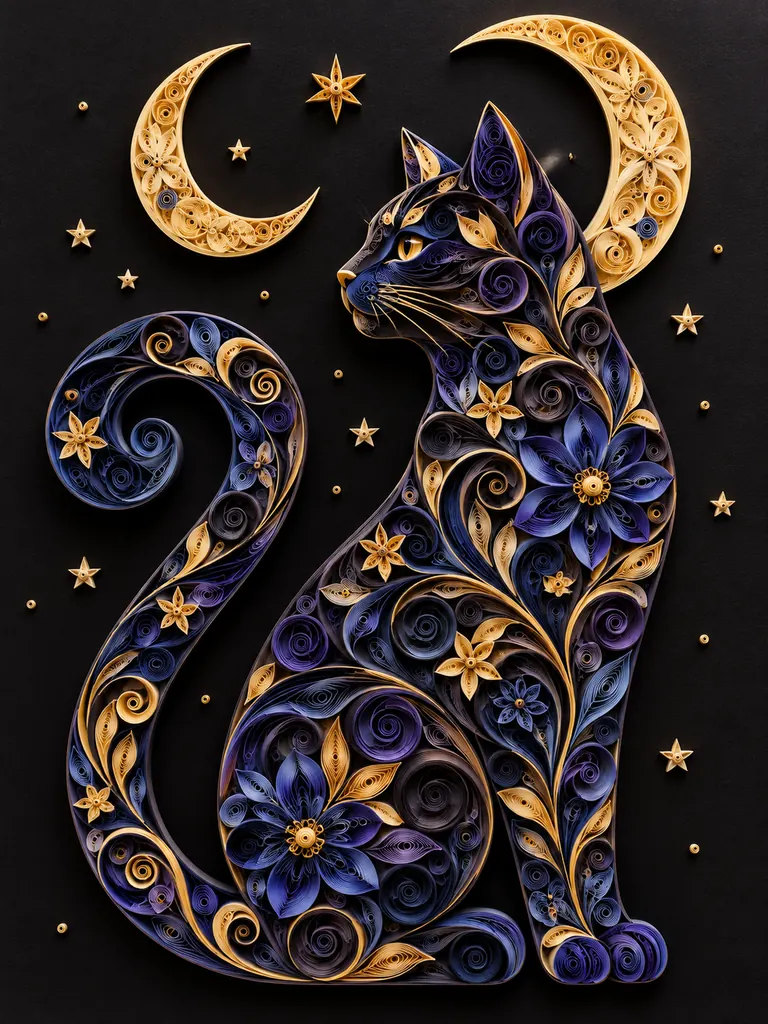
Dark paper quilling becomes especially dramatic when it is arranged on black cardstock. This moonlight cat combines midnight-blue, indigo, charcoal, and violet coils to build a sitting feline silhouette, then uses pale-gold crescents and tiny stars as highlights. The body should not be filled with identical spirals; combining scrolls, teardrops.
Items Needed
- Black cardstock
- Black, navy, indigo, and violet strips
- Pale-gold or metallic-gold strips
- Quilling tool
- Fine tweezers
- Precision glue
How to Make
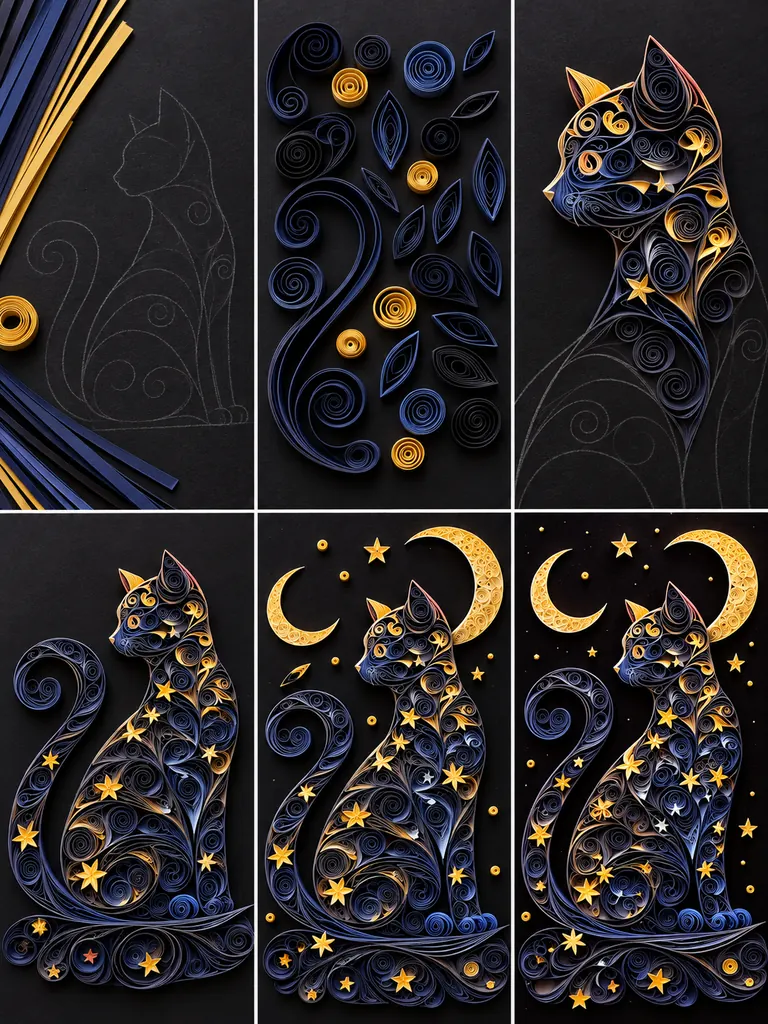
- Lightly map the cat silhouette on the black background, including the curved tail and pointed.
- Prepare a collection of dark coils, marquise pieces, teardrops, and open scrolls in several blue-black.
- Build the head and chest first, then fill the body with larger spirals and flowing.
- Construct the long tail from sweeping strips and nested coils, making it curve naturally beside.
5. Quilled Lavender and Wildflower Frame
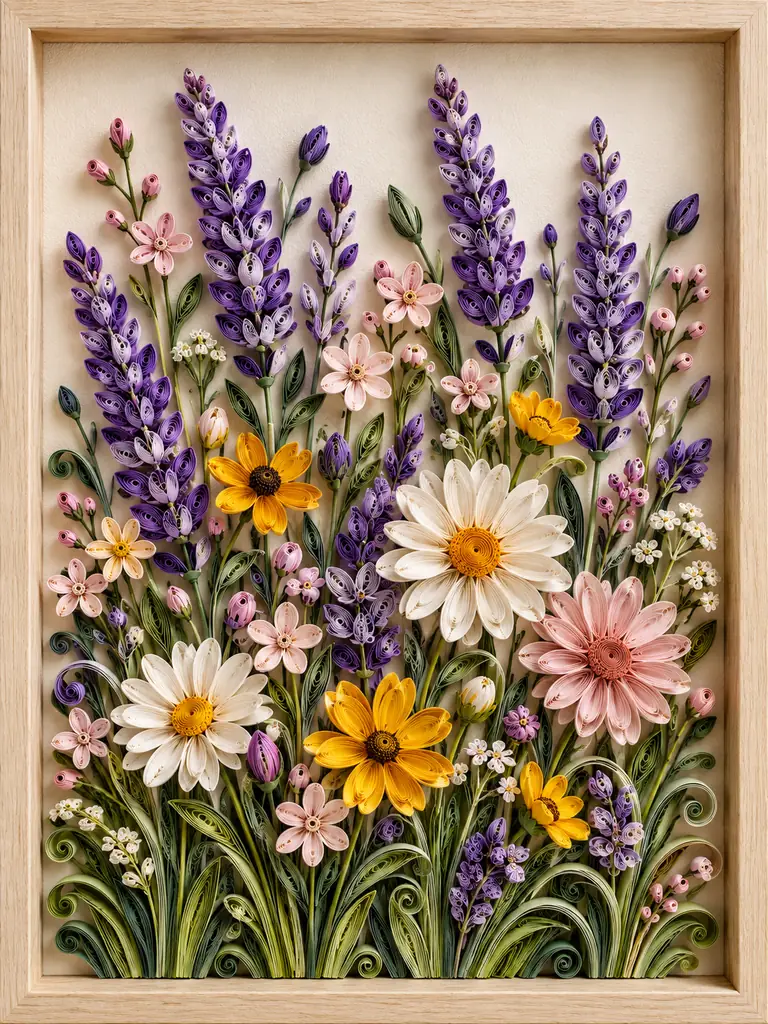
This cottage-style botanical design combines tall lavender spikes with daisies, small pink flowers, yellow accents, and layered green grasses. The different flower heights make it look like a garden growing from the bottom of the frame rather than a formal bouquet. Lavender is particularly easy to translate into quilling: repeated.
Items Needed
- Purple and violet strips
- Pink, white, and yellow strips
- Several green shades
- Cream cardstock
- Quilling tool
- Glue, tweezers, and a deep frame
How to Make
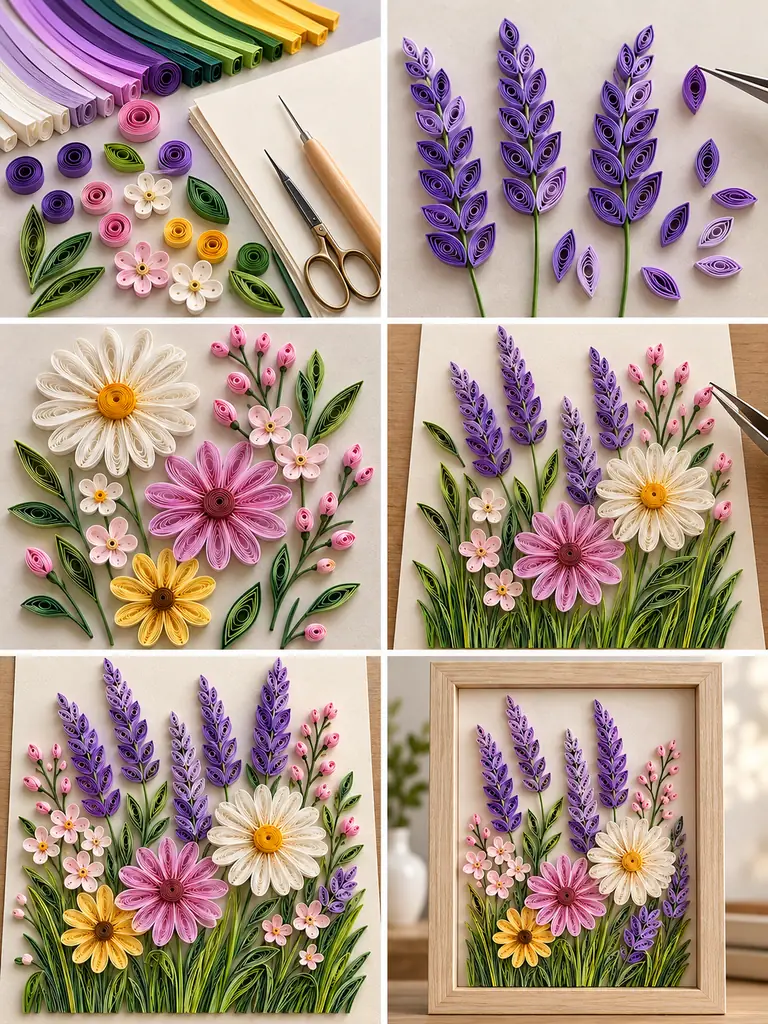
- Make narrow purple marquise coils and arrange them in tapered rows along long green stems.
- Prepare larger daisies and pink flowers separately, varying the number and length of petals so.
- Glue the tallest stems first, then add medium-height flowers and clusters closer to the bottom.
- Fill the base with narrow leaves, grasses, small buds, and tiny blossoms while leaving breathing.
6. Enchanted Quilled Forest Sunset
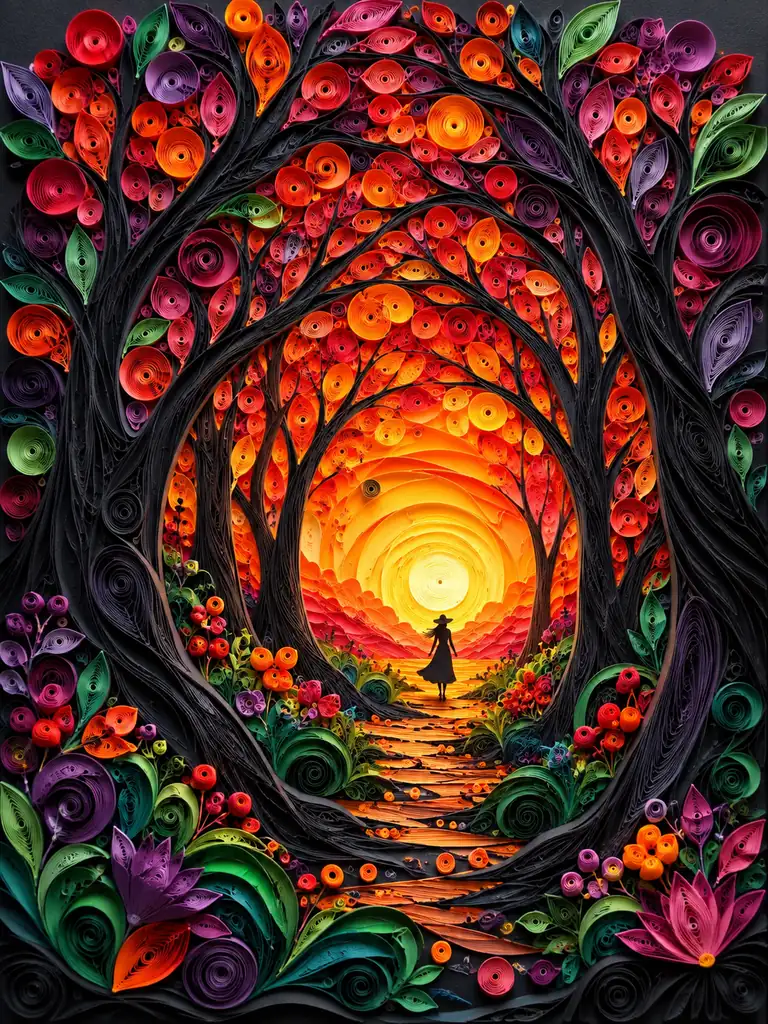
For a more dramatic piece, build a glowing sunset from warm paper spirals and surround it with nearly black tree trunks. The contrast between the yellow-orange center and the dark forest creates depth even though the entire picture is made from flat cardstock and narrow paper strips. Curving branches from.
Items Needed
- Dark mounting board
- Black and charcoal strips
- Yellow, amber, orange, coral, and red strips
- Green, teal, purple, and magenta strips
- Quilling tool
- Glue and fine tweezers
How to Make
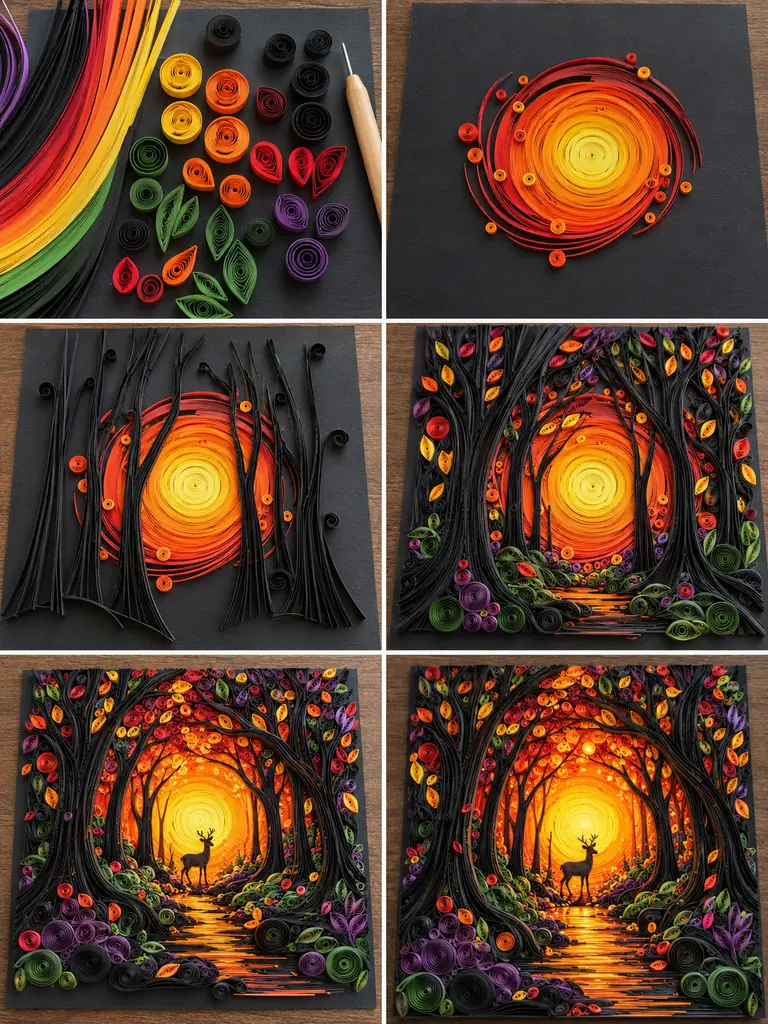
- Create the glowing center first using concentric warm coils and curved strips, moving from pale.
- Build tall dark tree trunks on both sides with long layered strips, bending their branches.
- Add colorful coils and leaf shapes around the lower and outer forest, keeping the central.
- Layer additional dark branches over some of the warm background coils to increase the sense.
7. Quilled Sunflower Bouquet
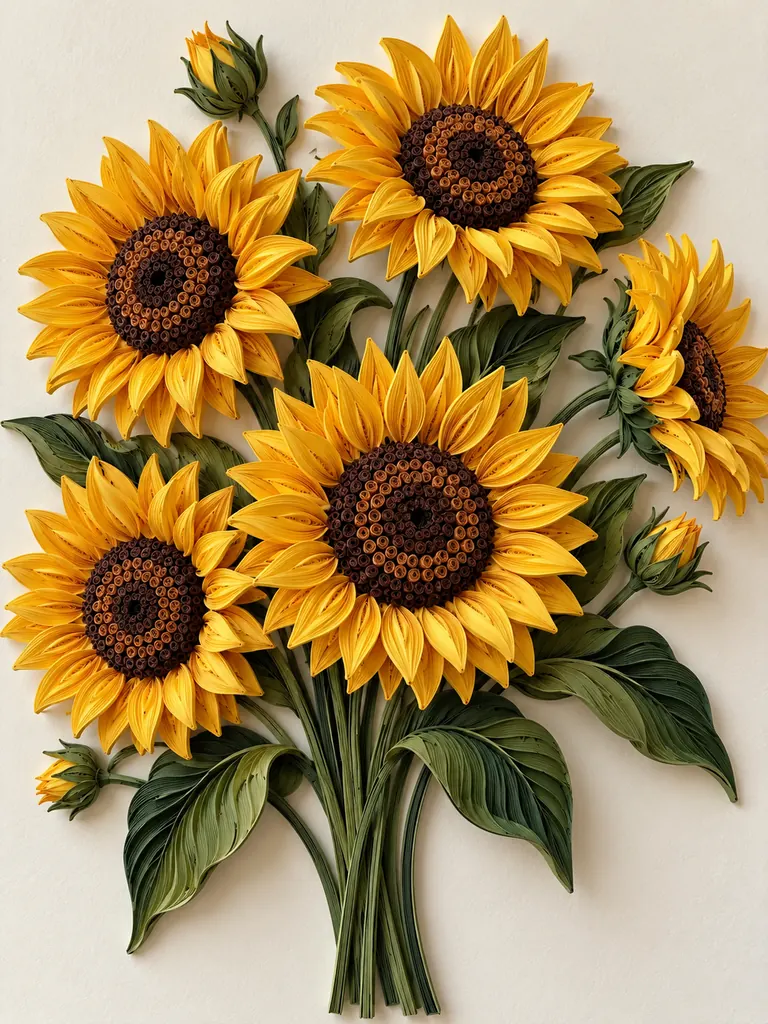
Sunflowers are ideal for quilling because their bold petals and large circular centers are instantly recognizable. A bouquet of five flowers gives you enough repetition to practice consistent marquise petals while still allowing each flower to look slightly different. Mix dark brown and caramel coils in the centers, then surround.
Items Needed
- Golden-yellow quilling strips
- Dark brown and caramel strips
- Olive and deep-green strips
- Off-white cardstock
- Quilling tool
- Glue and tweezers
How to Make
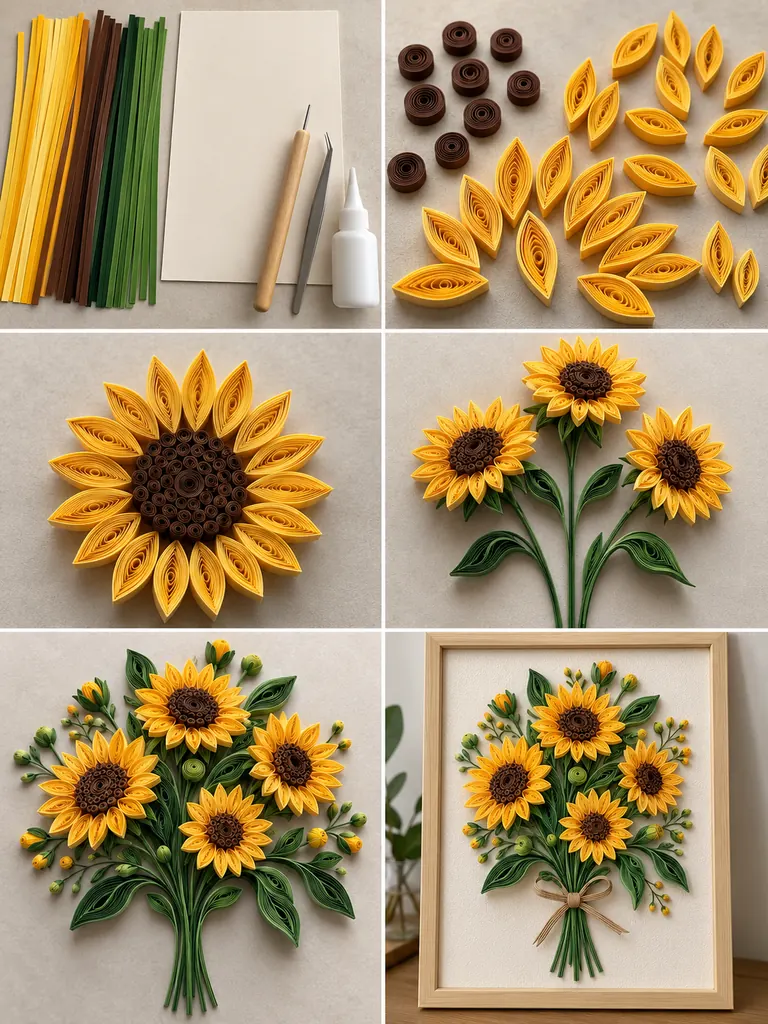
- Roll large brown centers, layering dark and caramel tones for a textured sunflower disk.
- Make many elongated yellow marquise petals and sort them by size before assembly.
- Build each sunflower separately, adding an inner and outer ring of petals around the brown.
- Attach long curved green stems to the background and position five flowers at slightly different.
8. Quilled Butterfly Garden
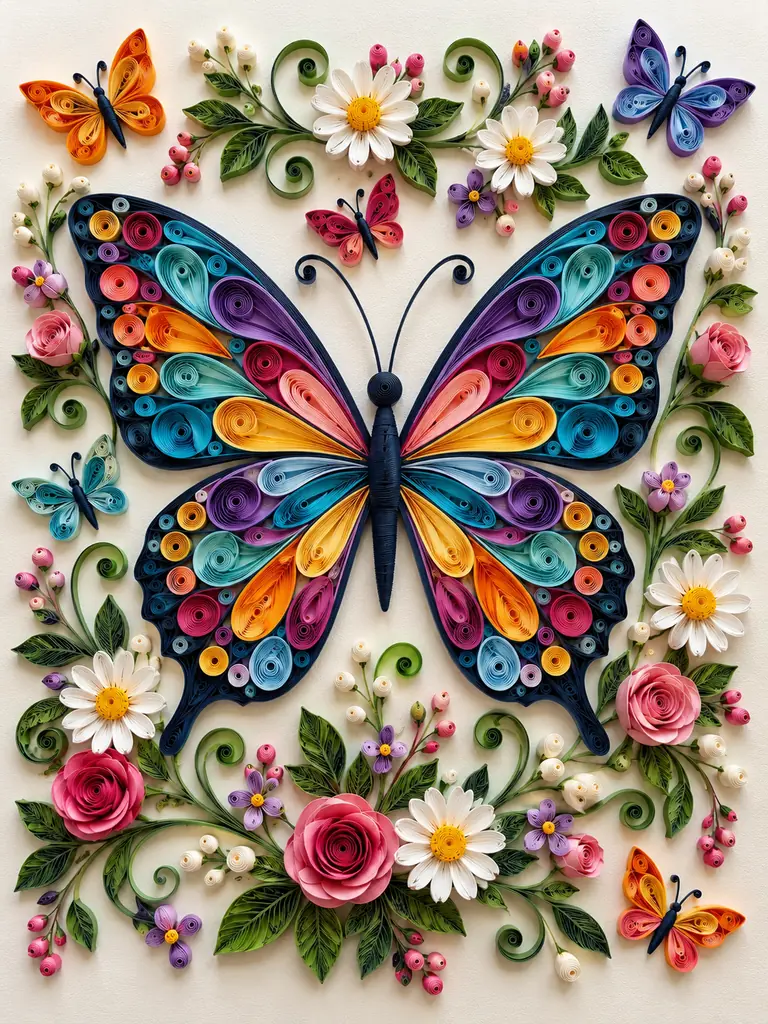
A large colorful butterfly surrounded by tiny flowers creates a lively spring-inspired focal point. Start with a dark navy outline so the wing shape remains clear even after it is filled with many colors. Inside the wings, use matching pairs of teardrops, marquise coils, loops, and spirals so the left.
Items Needed
- Dark navy quilling strips
- Bright multicolored strips
- Green strips for foliage
- Ivory cardstock
- Quilling tool
- Glue and tweezers
How to Make
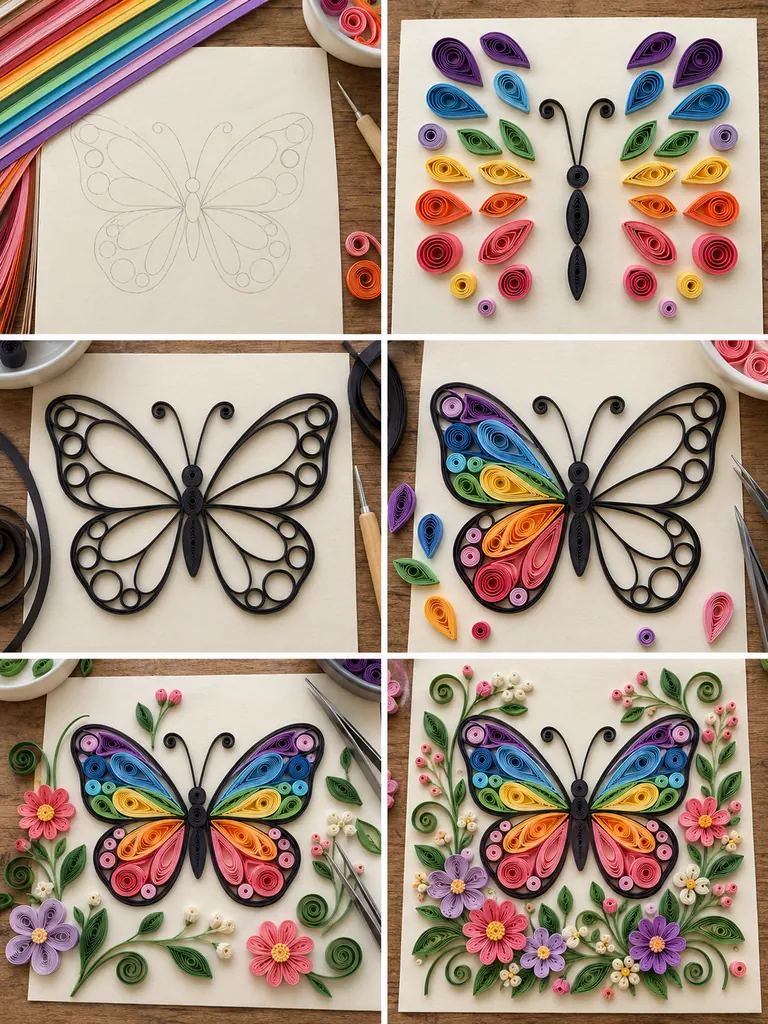
- Sketch a light butterfly guide and build the outer wing frames and narrow body from.
- Prepare pairs of colorful teardrops, marquise shapes, open loops, and spiral coils for the wing.
- Fill the upper and lower wings gradually, mirroring major colors and shapes on both sides.
- Add curled antennae and check that the butterfly silhouette stays clear from a distance.
9. Quilled Peacock Feather Artwork
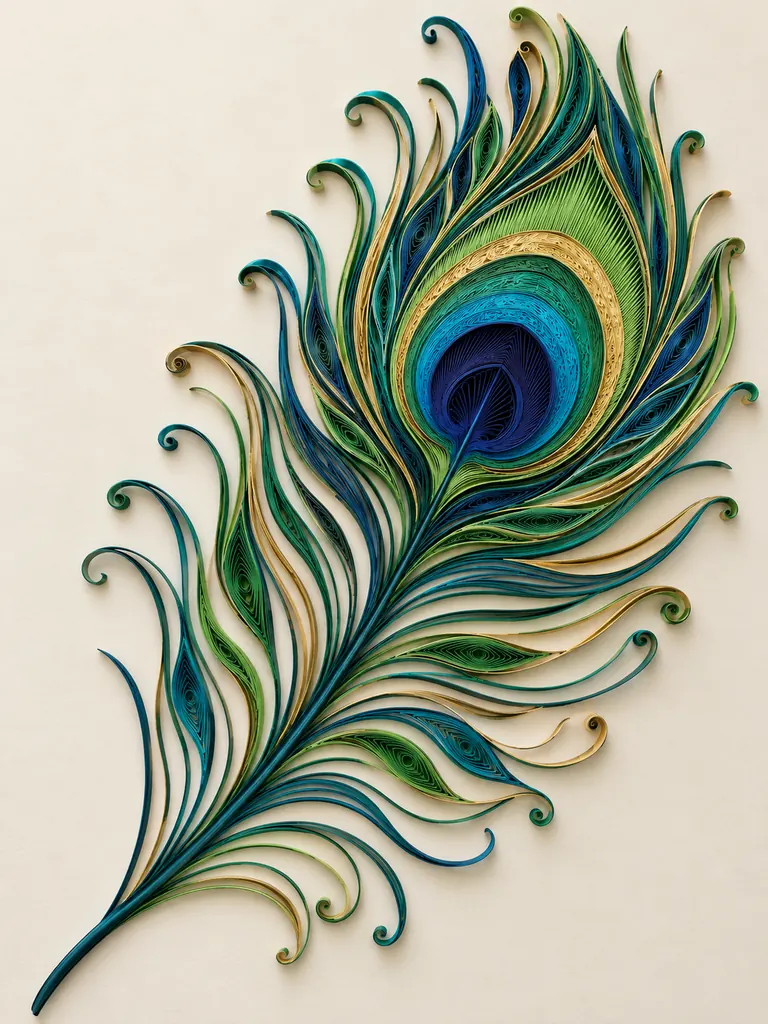
A single oversized peacock feather can look sophisticated even in a minimalist room. The recognizable “eye” is built from concentric teardrop and coil shapes in deep navy, royal blue, turquoise, emerald, lime, and muted gold. Long curved loops and marquise pieces then radiate from the center to suggest the delicate.
Items Needed
- Deep navy and royal-blue strips
- Turquoise and emerald strips
- Lime and muted-gold strips
- Cream cardstock
- Quilling tool
- Precision glue and tweezers
How to Make
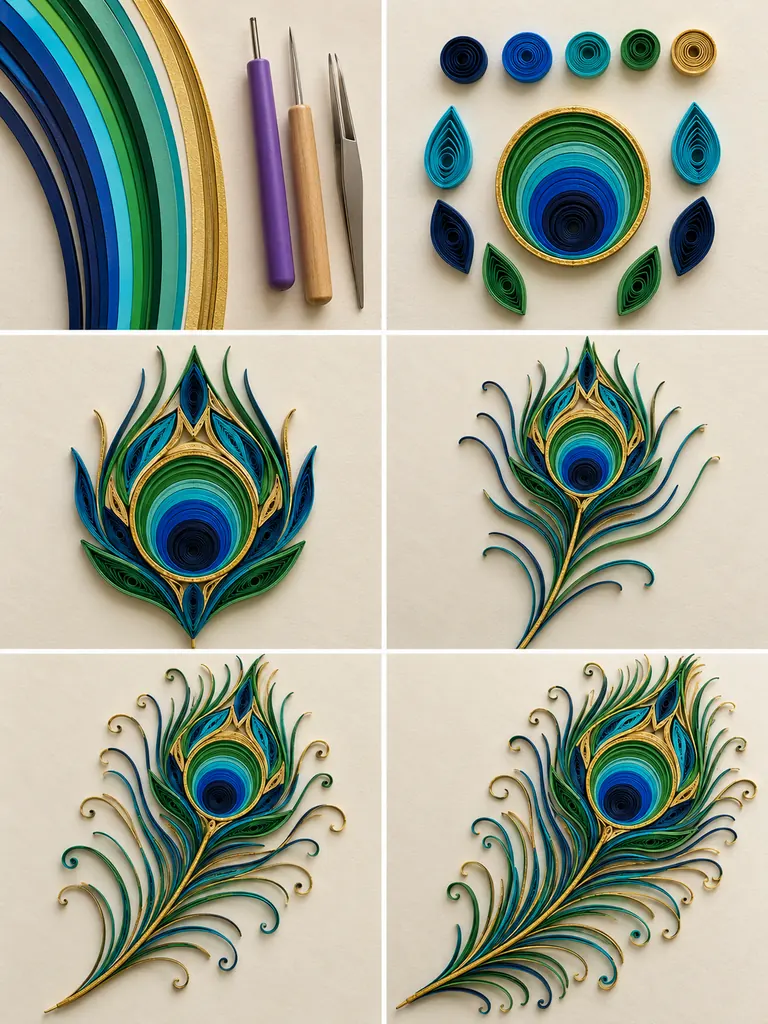
- Build the feather eye first with nested circular and teardrop shapes, keeping each color band.
- Add the long central shaft using a dark teal strip that curves gently from the.
- Prepare elongated marquise shapes and open loops in several blues and greens.
- Attach the feather barbs along both sides of the shaft, gradually shortening them toward the.
10. Quilled Tree of Life
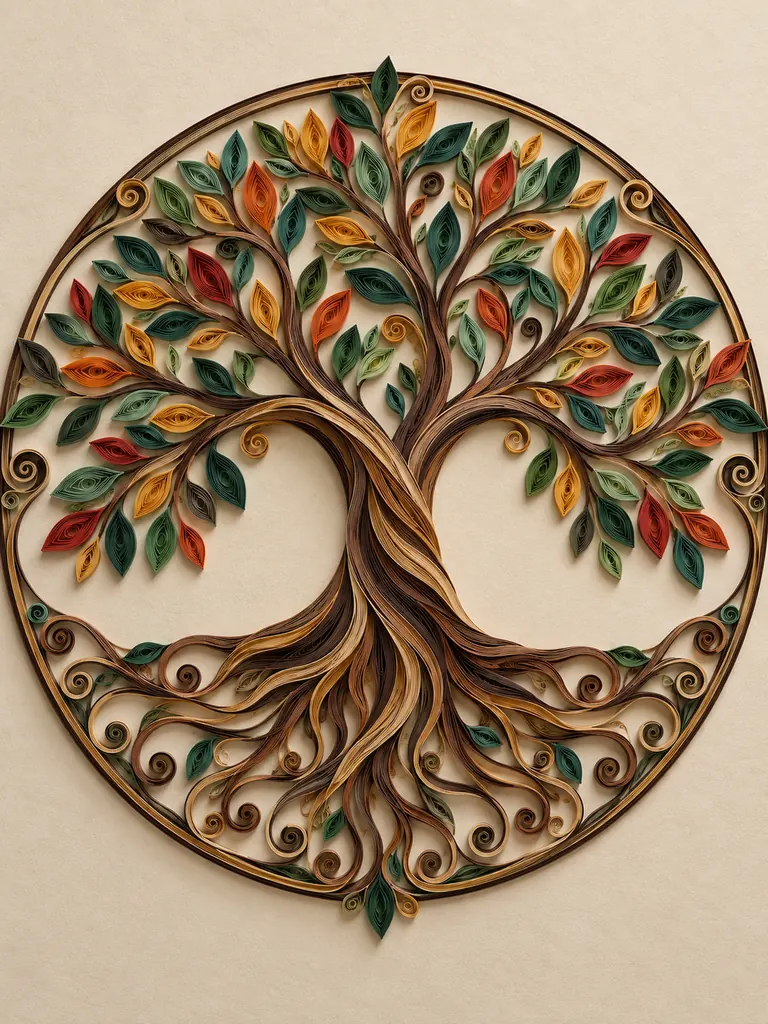
The Tree of Life is a natural match for quilling because paper strips can flow continuously from roots to trunk and branches. Enclosing the design inside a circle makes the artwork feel balanced and symbolic while also giving you a clear boundary for the composition. Use layered brown strips for.
Items Needed
- Brown and muted-gold strips
- Green, teal, mustard, orange, and red strips
- Light beige cardstock
- Circular template
- Quilling tool
- Glue and tweezers
How to Make
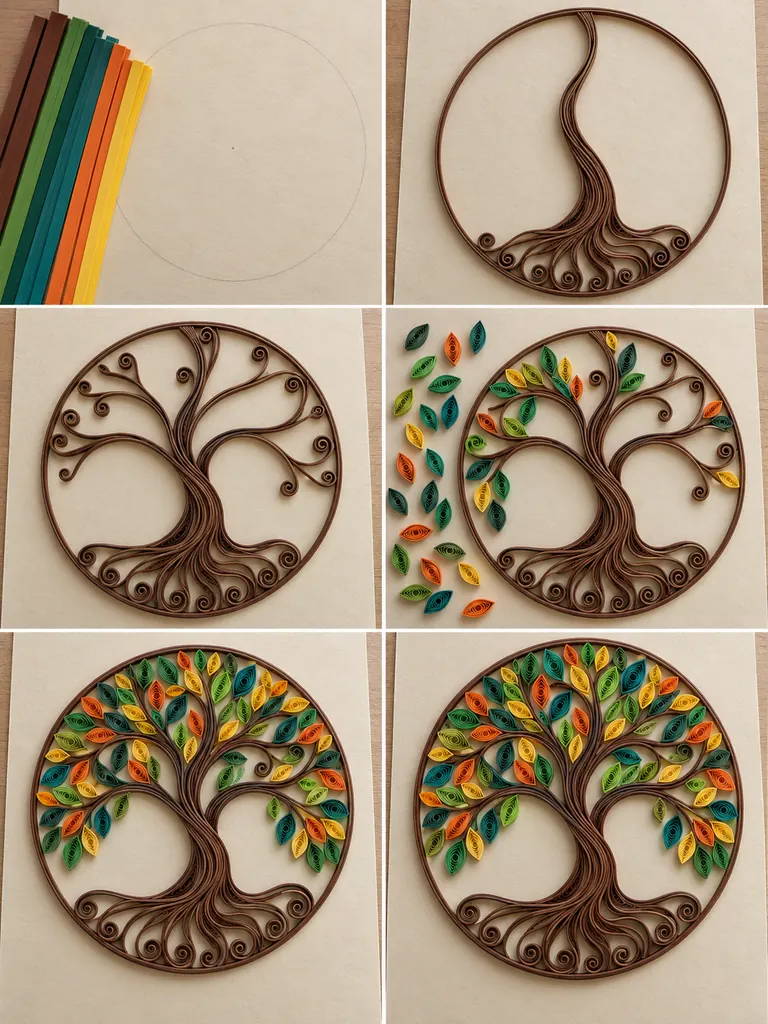
- Trace a light circle and build the outer border with brown and muted-gold strips.
- Form the main trunk from several layered strips, twisting them upward into branches and downward.
- Prepare many leaves in mixed colors and two or three sizes so the canopy has.
- Attach leaves in balanced clusters around the branches, keeping some wood visible between them.
11. Quilled Hummingbird and Flowers
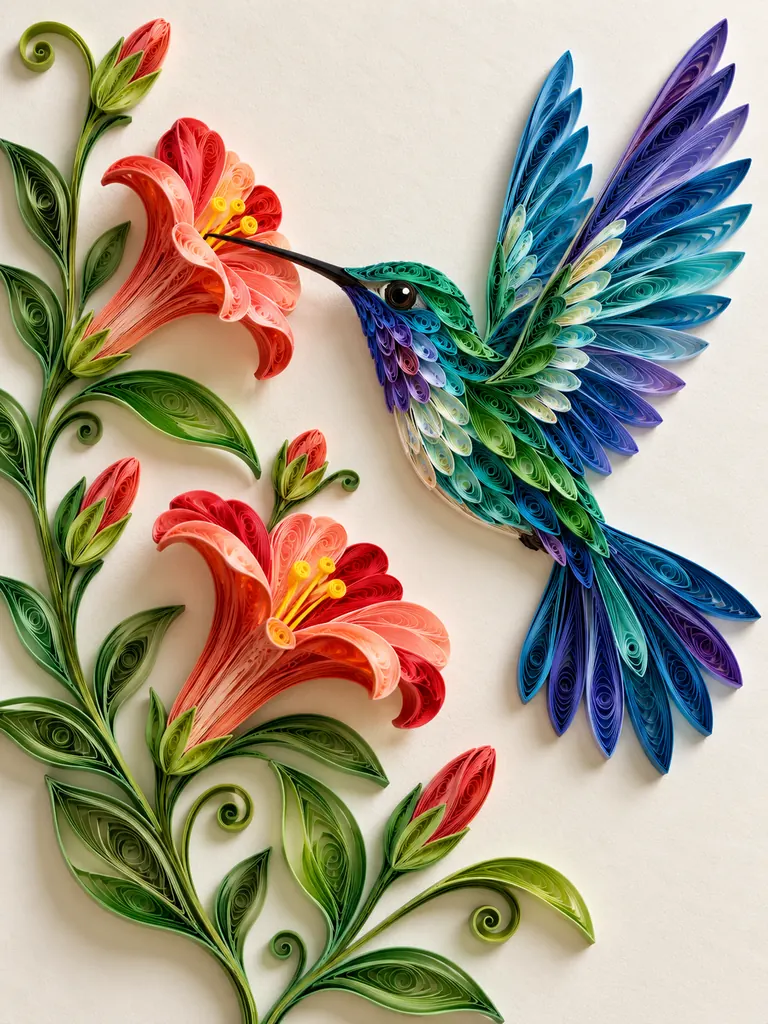
A hovering hummingbird gives quilling art a sense of motion. Build the bird from overlapping green, turquoise, cobalt, and violet teardrops so the paper resembles iridescent feathers, then add a long narrow beak aimed toward coral and red trumpet-shaped flowers. The wings should be larger and more open than the.
Items Needed
- Emerald, turquoise, blue, and violet strips
- Pink and red floral strips
- Green strips
- Black strip for the beak
- Warm-white cardstock
- Glue, quilling tool, and tweezers
How to Make
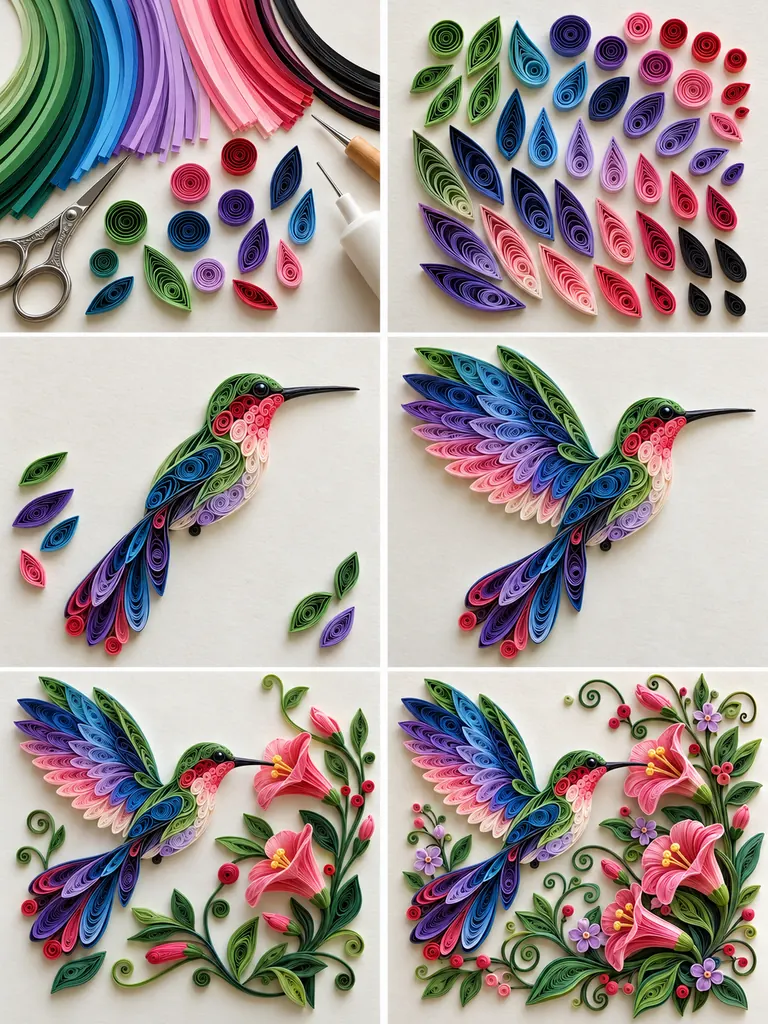
- Make a collection of small teardrop and marquise shapes in green, blue, turquoise, and violet.
- Assemble the curved body and head first, then attach a long narrow black beak and.
- Layer the two raised wings with elongated feather pieces and add a fan-shaped tail.
- Construct trumpet-shaped coral and red flowers on curling green stems beside the bird.
12. Quilled Daisy Meadow
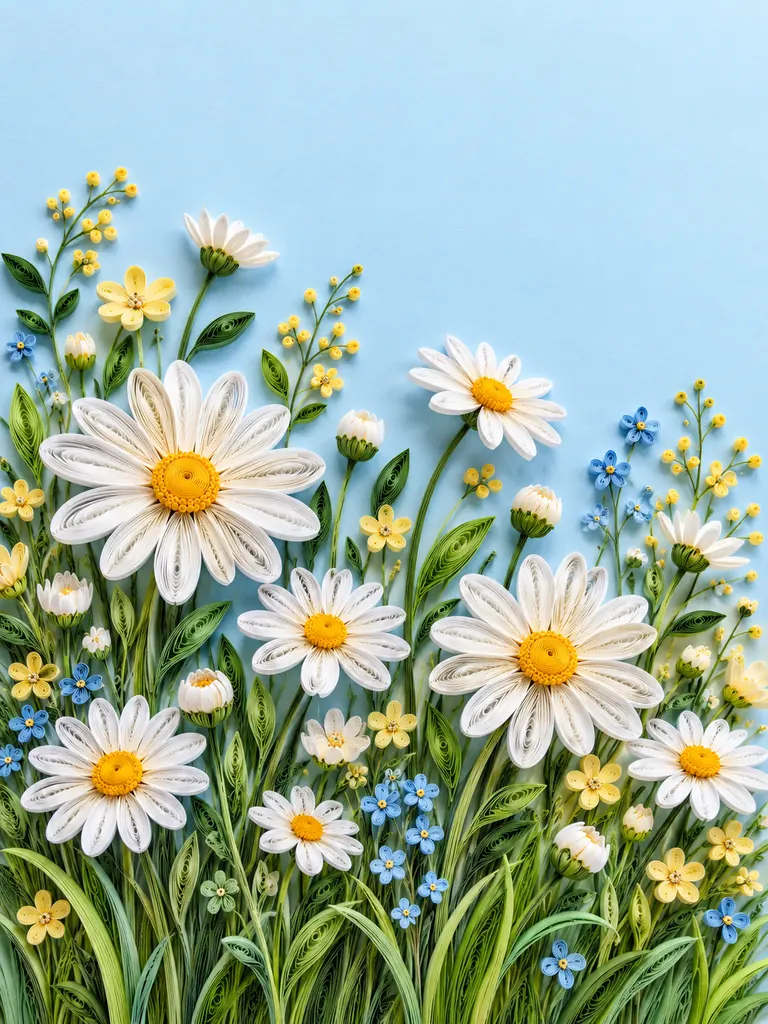
A daisy meadow is one of the easiest botanical projects to practice because the basic flower repeats throughout the design. Each daisy needs a tight yellow center and a ring of white teardrop petals, but changing the flower size and stem height keeps the scene natural. Fill the lower two-thirds.
Items Needed
- White quilling strips
- Yellow strips
- Several green shades
- A few pale-blue strips
- Pale sky-blue cardstock
- Quilling tool and glue
How to Make
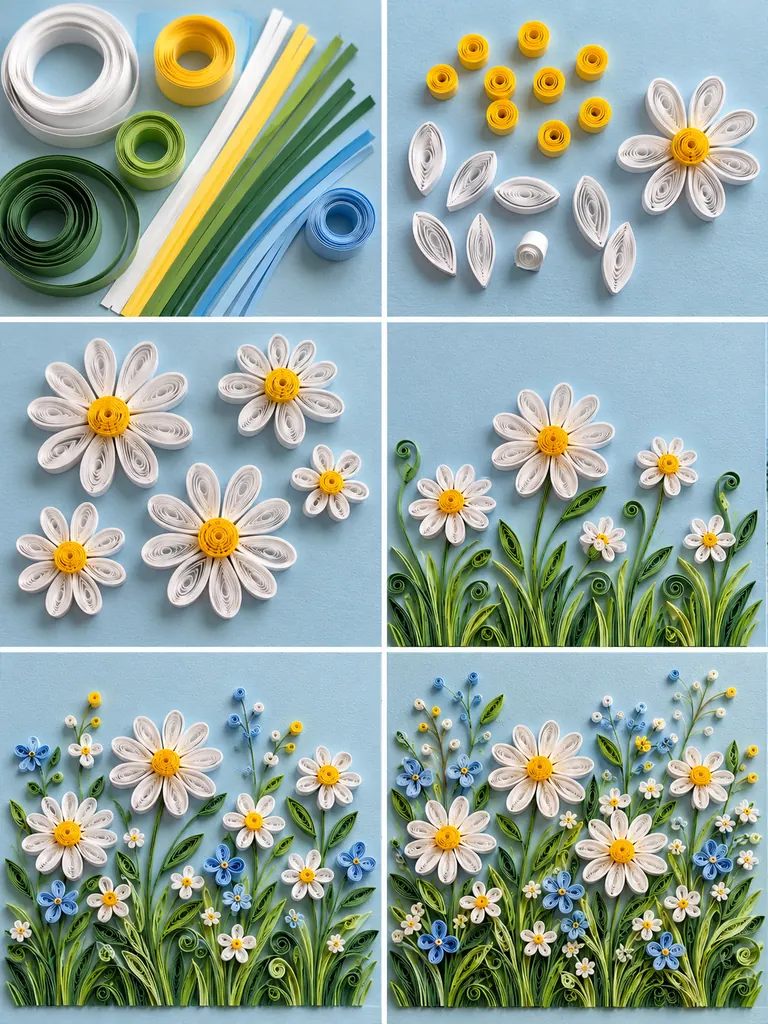
- Roll several tight yellow centers and prepare sets of white teardrop petals in different lengths.
- Assemble daisies in small, medium, and large sizes before placing them on the background.
- Glue narrow green stems across the lower cardstock, varying their height and direction.
- Attach the daisies, then add pointed leaves, curled grass blades, and tiny filler flowers between.
13. Quilled Mandala Wall Art
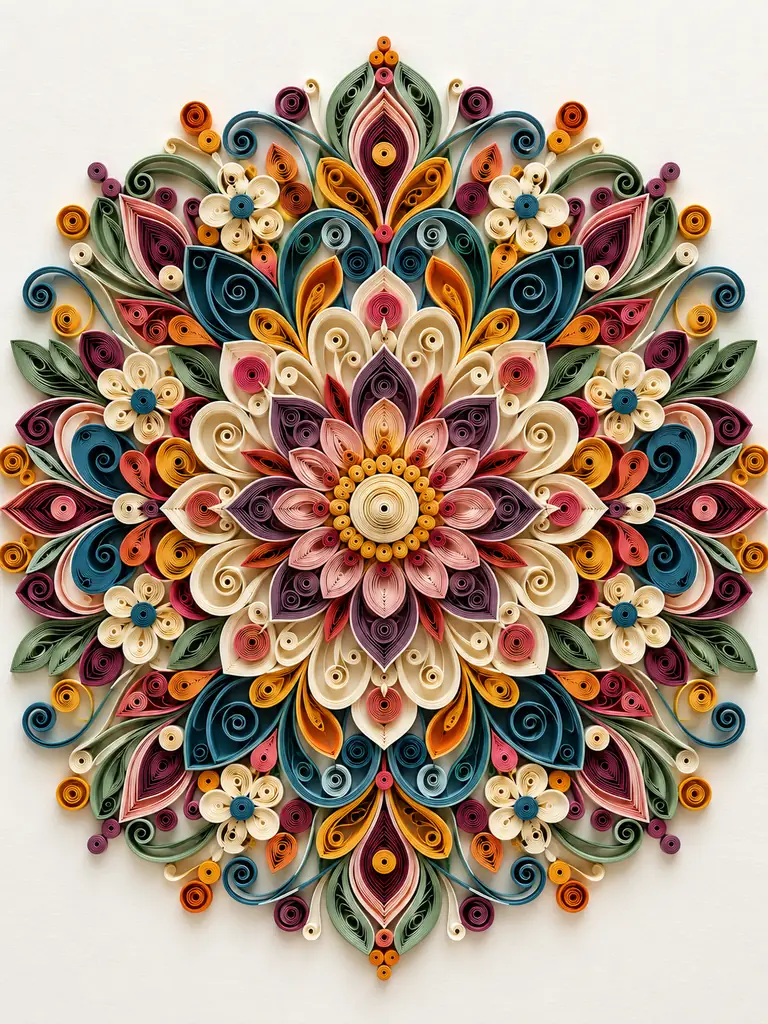
A mandala is a satisfying project for anyone who enjoys symmetry and repetition. The design begins with a flower-like center and expands through rings of teardrops, marquise coils, hearts, scrolls, loops, and tight spirals. Using a limited but varied palette—dusty rose, plum, deep teal, sage, mustard, burnt orange, cream, and.
Items Needed
- Coordinated quilling strips
- Warm-white cardstock
- Compass or circle template
- Pencil and ruler
- Quilling tool
- Glue and fine tweezers
How to Make
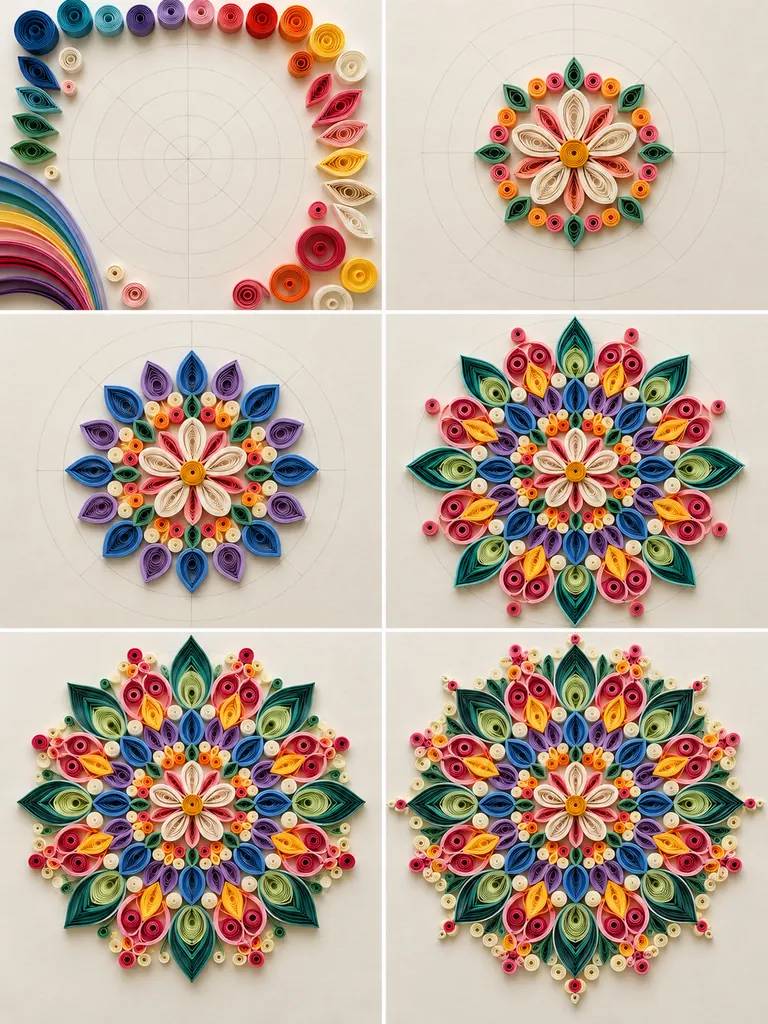
- Draw faint concentric circles and radial guides to establish the center and repeated sections.
- Build a compact central flower and glue it precisely in the middle of the page.
- Create the next rings using repeated teardrops, marquise shapes, tight coils, and small scrolls at.
- Continue expanding outward with larger leaf-like forms and complementary spiral details, checking symmetry after each.
14. Quilled Hot Air Balloon Scene
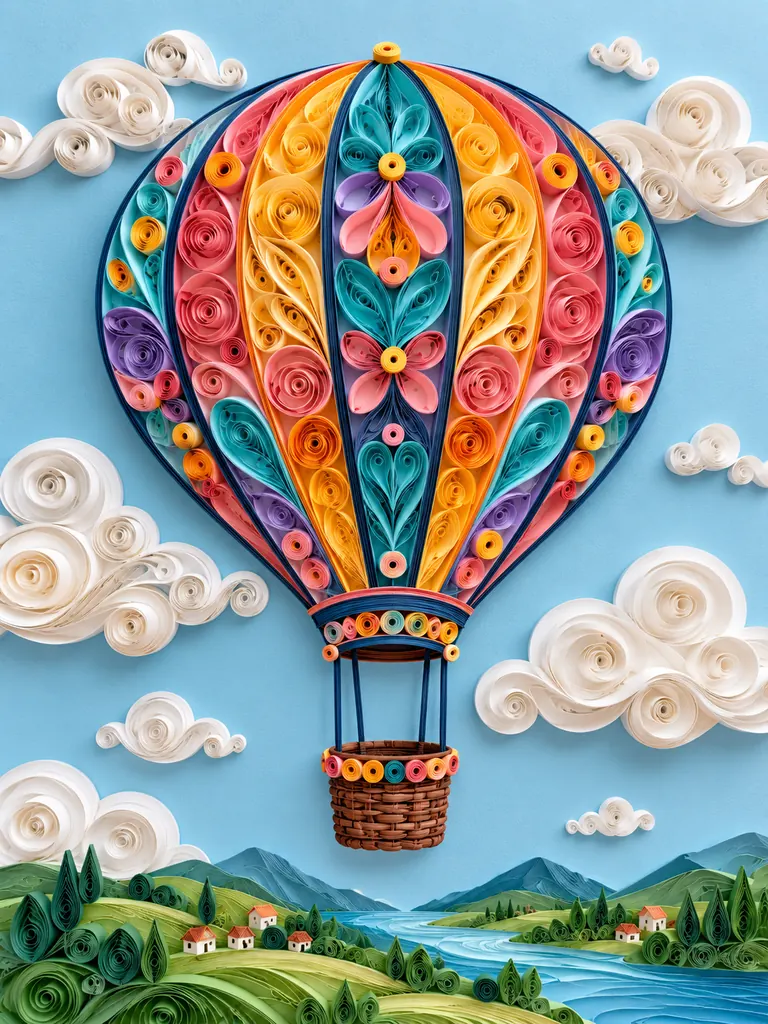
A hot air balloon provides a large shape that can hold many decorative quilling patterns. Divide the balloon into vertical sections and fill each area with coral, orange, yellow, turquoise, teal, purple, and pink coils, scrolls, flowers, and teardrops. A dark navy outline keeps the silhouette clean, while a small.
Items Needed
- Bright multicolored quilling strips
- Dark navy outline strips
- Brown strips for the basket
- White strips for clouds
- Sky-blue cardstock
- Glue, quilling tool, and tweezers
How to Make
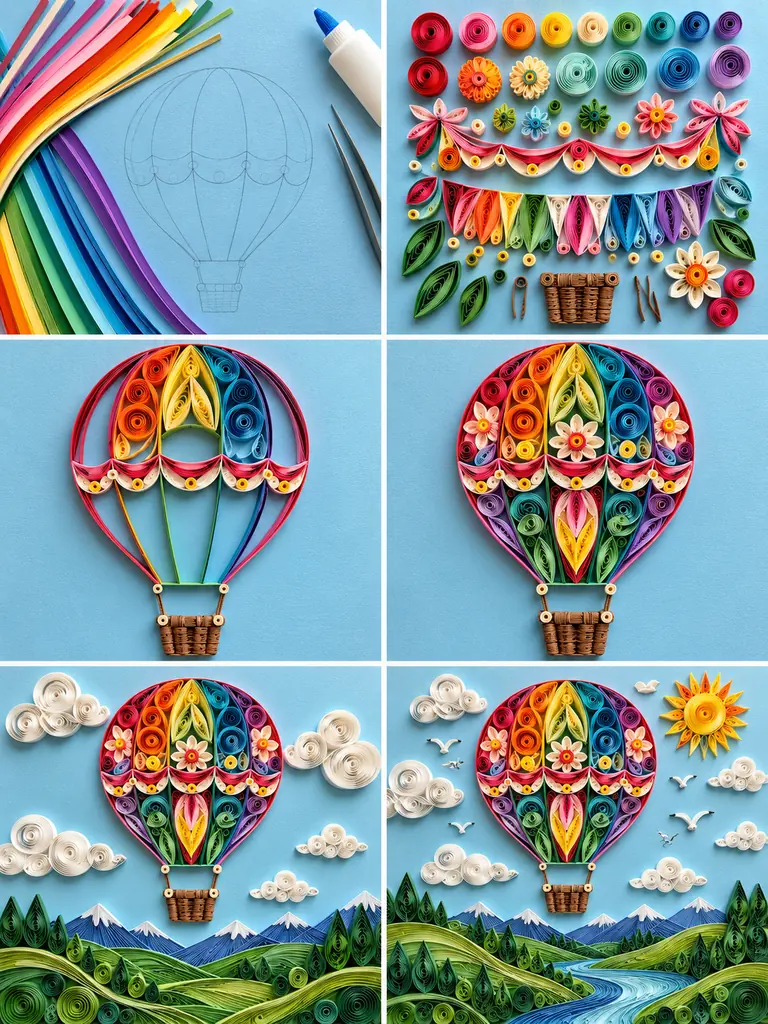
- Sketch a rounded balloon and divide it into decorative vertical sections with faint guidelines.
- Build the dark outer frame and prepare colorful coils, petals, and scrolls for each section.
- Fill the balloon from the center outward, maintaining a balanced color sequence, then attach the.
- Make cloud clusters from loose white coils and place them around the balloon without hiding.
15. Quilled Tropical Leaf Collection
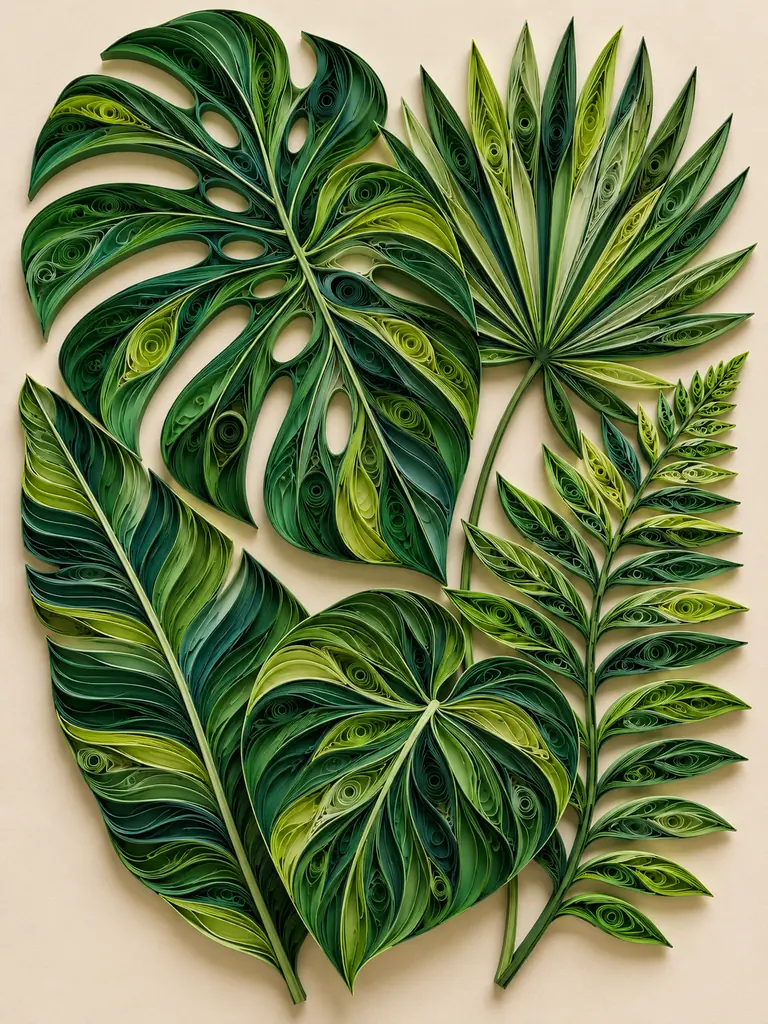
If you prefer modern botanical decor, create a collection of tropical leaves rather than flowers. Combine five recognizable silhouettes: a monstera with cutouts, a fan palm, a long fern frond, an elongated banana-style leaf, and a rounded philodendron-inspired leaf. Use forest, emerald, sage, olive, lime, and blue-green strips so the.
Items Needed
- Several shades of green quilling strips
- Blue-green and lime strips
- Warm beige cardstock
- Quilling tool
- Precision glue
- Tweezers and scissors
How to Make
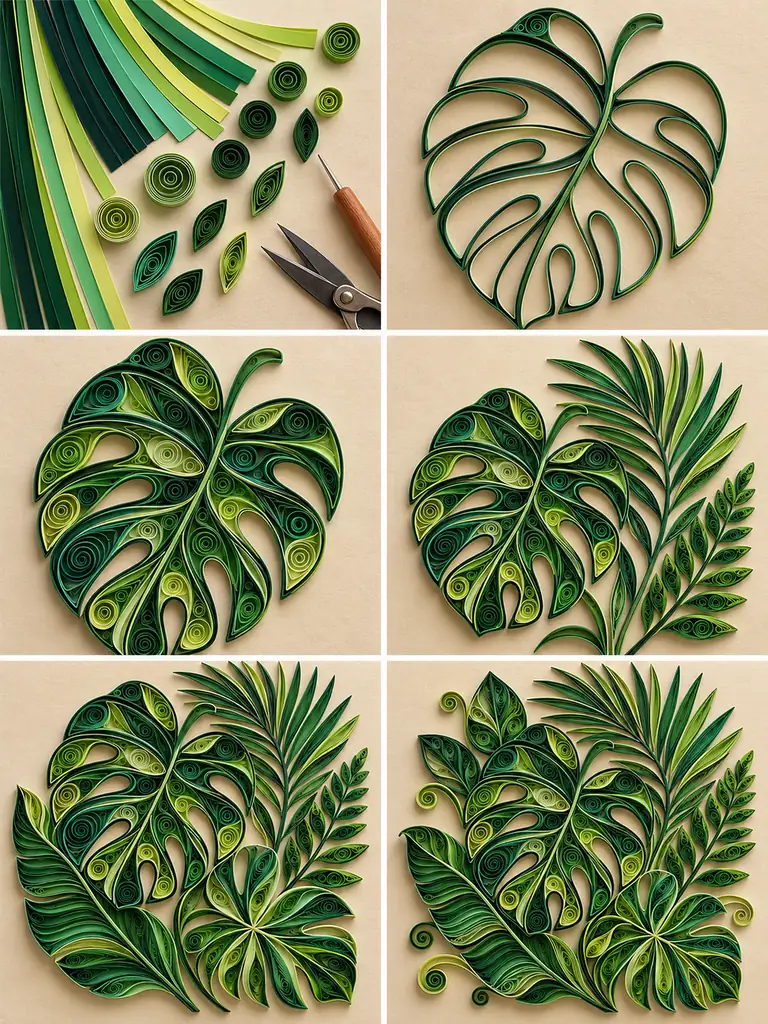
- Start with the large monstera, forming its outer contour, main vein, and characteristic cutouts from.
- Fill the monstera sections with mixed green coils and elongated shapes while keeping the holes.
- Build the palm from narrow pointed segments and the fern from repeated small marquise leaflets.
- Add the banana-style and rounded philodendron leaves using long flowing internal veins and layered green.
16. Quilled Owl on a Branch
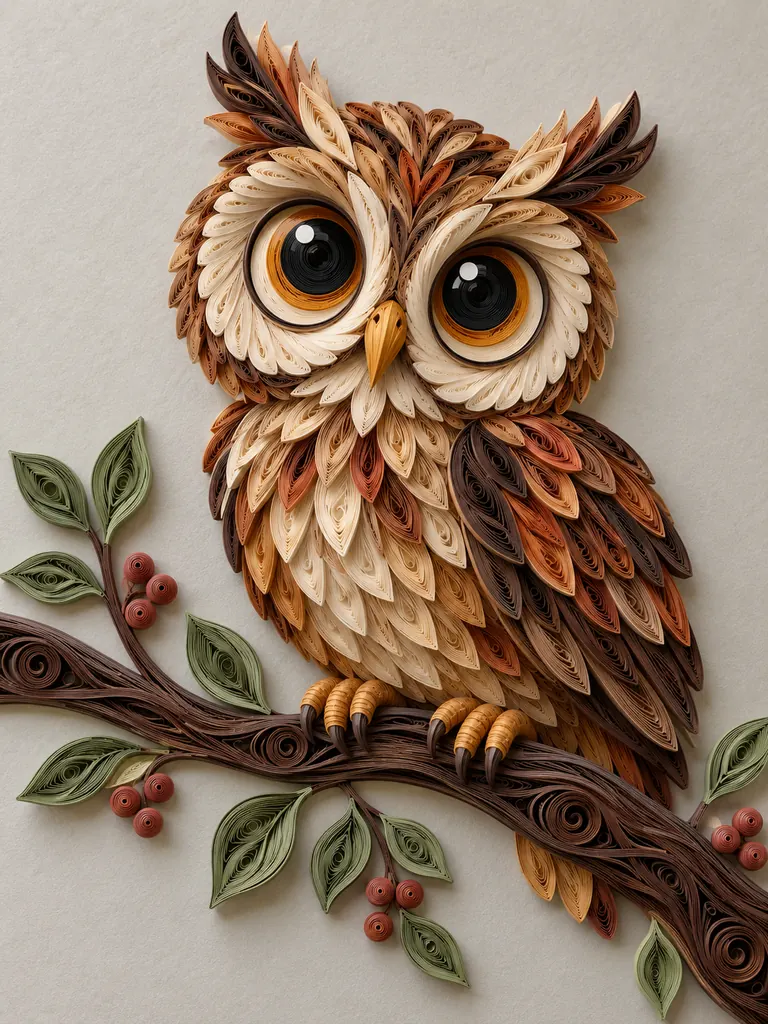
An owl is particularly fun to make with quilling because its large circular eyes naturally suit concentric coils. Use cream, amber, brown, and black rings for the eyes, then surround them with layers of tan, caramel, cream, rust, and dark-brown feather shapes. Pointed ear tufts and a small ochre beak.
Items Needed
- Brown, tan, cream, rust, and amber strips
- Black strips for eye centers
- Sage-green strips
- Small red-brown strips for berries
- Warm light-gray cardstock
- Quilling tool, glue, and tweezers
How to Make
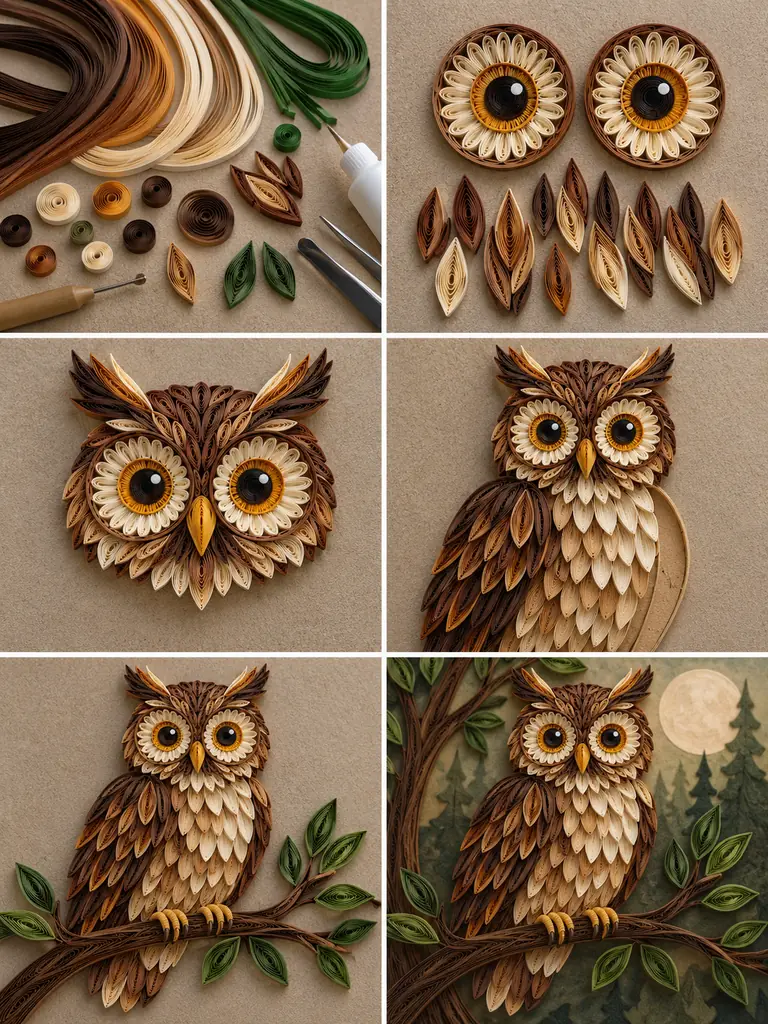
- Build two matching concentric eyes first, using black centers surrounded by amber, cream, and brown.
- Prepare many teardrop feather pieces in several warm neutral colors and sizes.
- Construct the head around the eyes, adding pointed ear tufts and a small ochre beak.
- Layer chest and wing feathers from top to bottom so each row overlaps the previous.
17. Quilled Cherry Blossom Branch
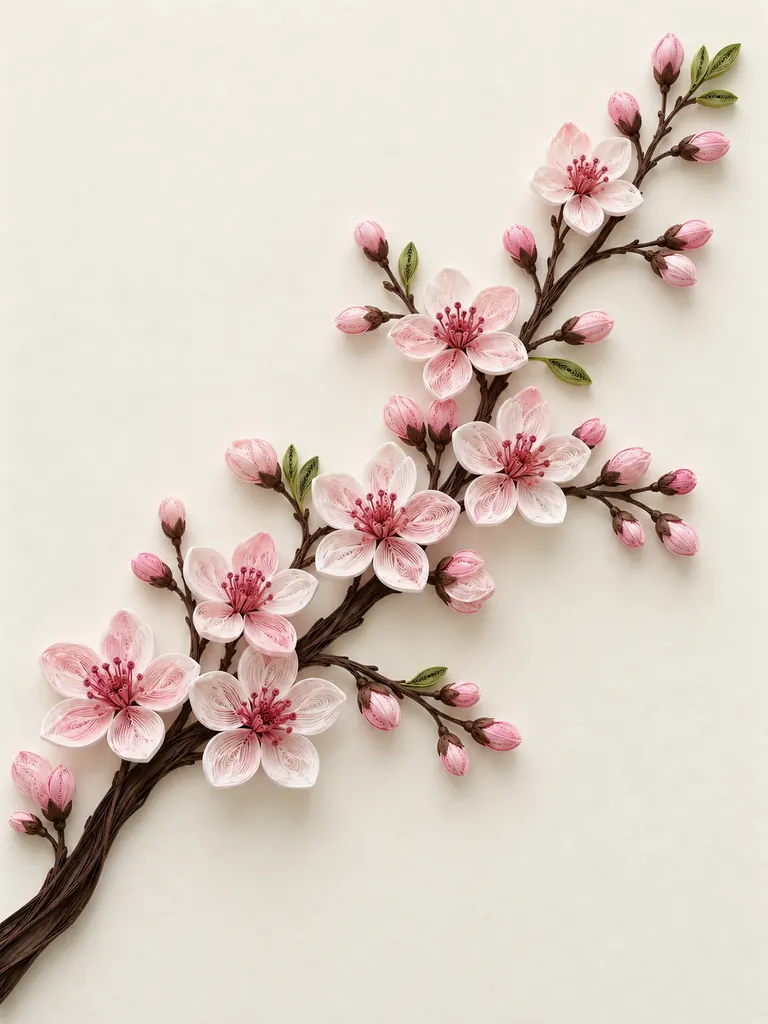
A single cherry blossom branch proves that quilling art does not need to fill the whole page to feel complete. The graceful diagonal branch provides structure, while pale pink and white five-petal blossoms create soft focal points. Darker rose centers and unopened buds add contrast, and just a few small.
Items Needed
- Dark-brown quilling strips
- Pale pink and white strips
- Rose-pink strips
- A small amount of green paper
- Ivory cardstock
- Glue, quilling tool, and tweezers
How to Make
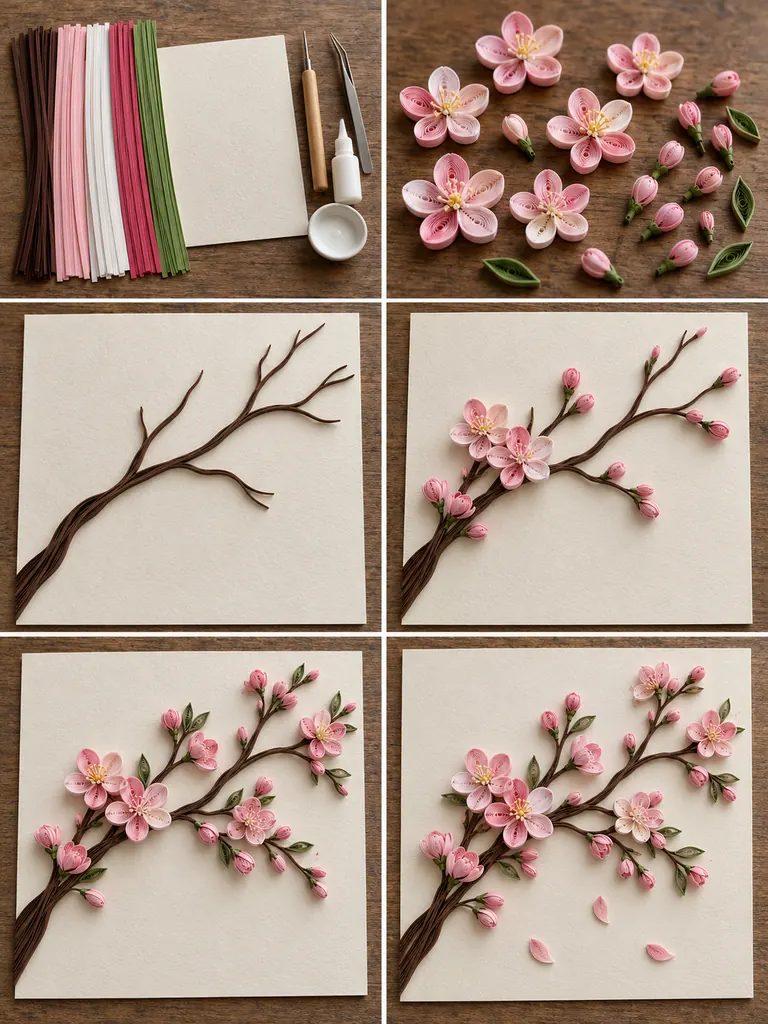
- Build the main diagonal branch from several layered brown strips and add thinner offshoots in.
- Create five-petal blossoms using softly pinched pale-pink and white coils with darker rose centers.
- Prepare small closed buds and a few tiny green leaves before gluing any flowers to.
- Attach flower clusters at branch junctions and tips, mixing open blossoms with buds to create.
18. Quilled Rainbow and Clouds
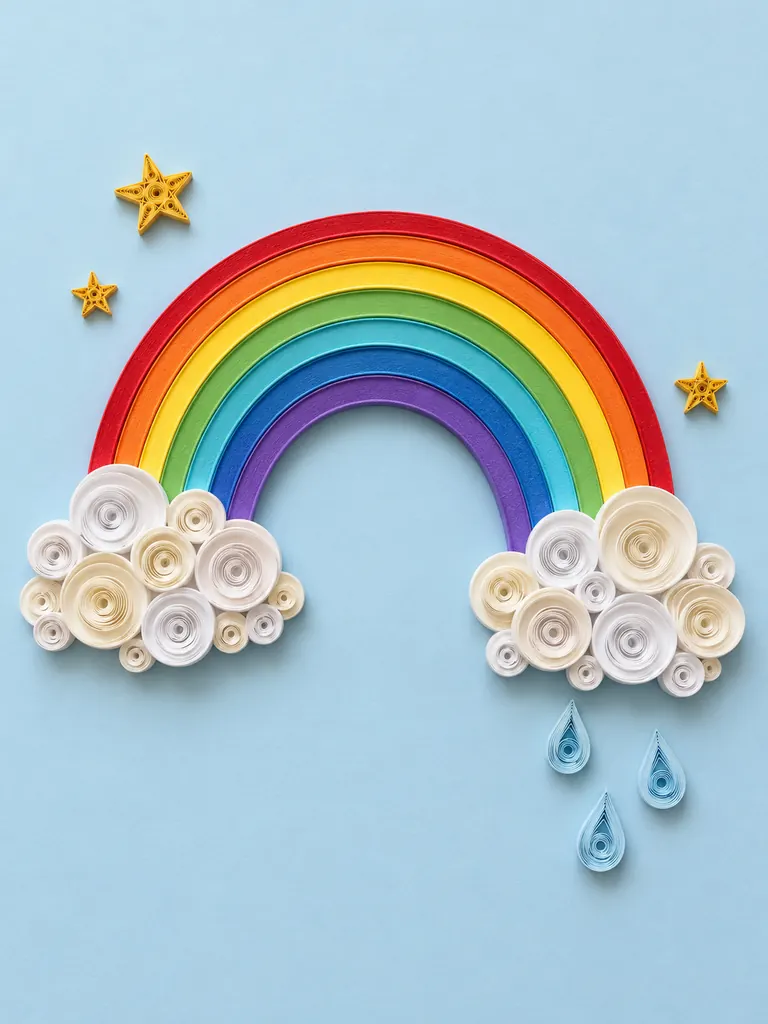
A raised paper rainbow is cheerful, simple, and perfect for modern nursery decor. Instead of filling each band with coils, use seven smooth parallel strips—red, orange, yellow, green, turquoise, blue, and violet—to create crisp arches. Loose white and ivory coils clustered at both ends become fluffy clouds, while tiny golden.
Items Needed
- Seven rainbow-color strips
- White and ivory strips
- Golden-yellow strips
- Pale-blue strips
- Powder-blue cardstock
- Glue and basic quilling tools
How to Make
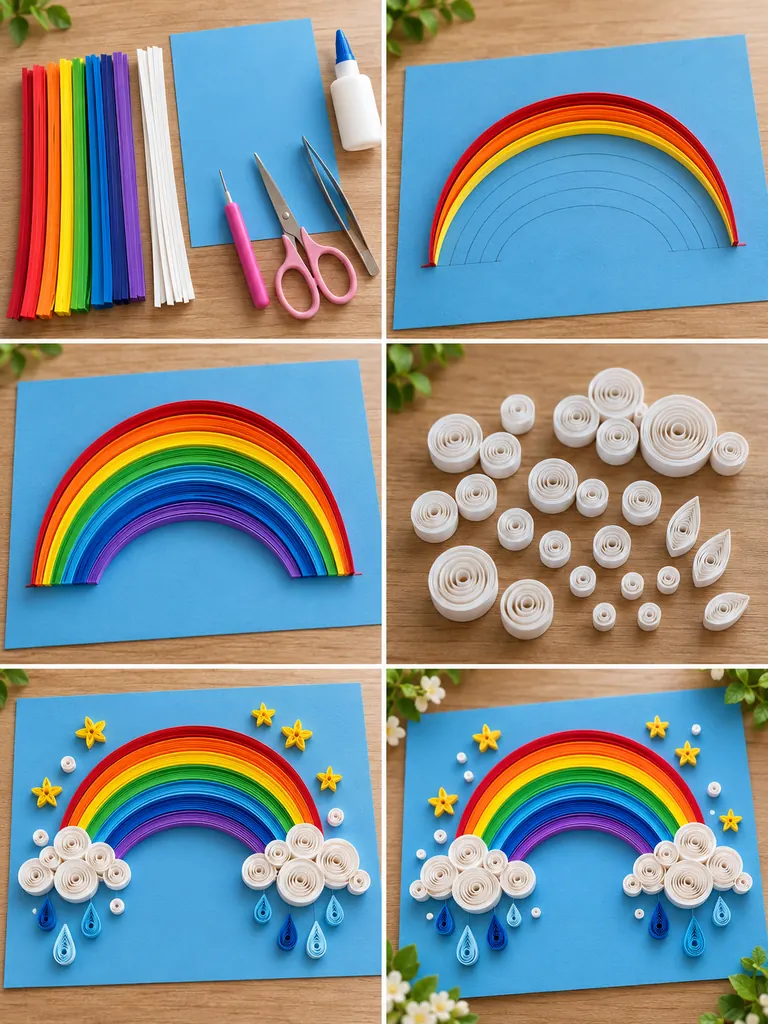
- Draw very light parallel arch guidelines to keep all seven rainbow bands evenly spaced.
- Attach the colored strips from the outer red arch inward, following each curve smoothly without.
- Roll white and ivory loose coils in several sizes for the cloud puffs.
- Cluster the coils at both ends of the rainbow, overlapping some sizes to give the.
19. Quilled Ocean Wave Artwork
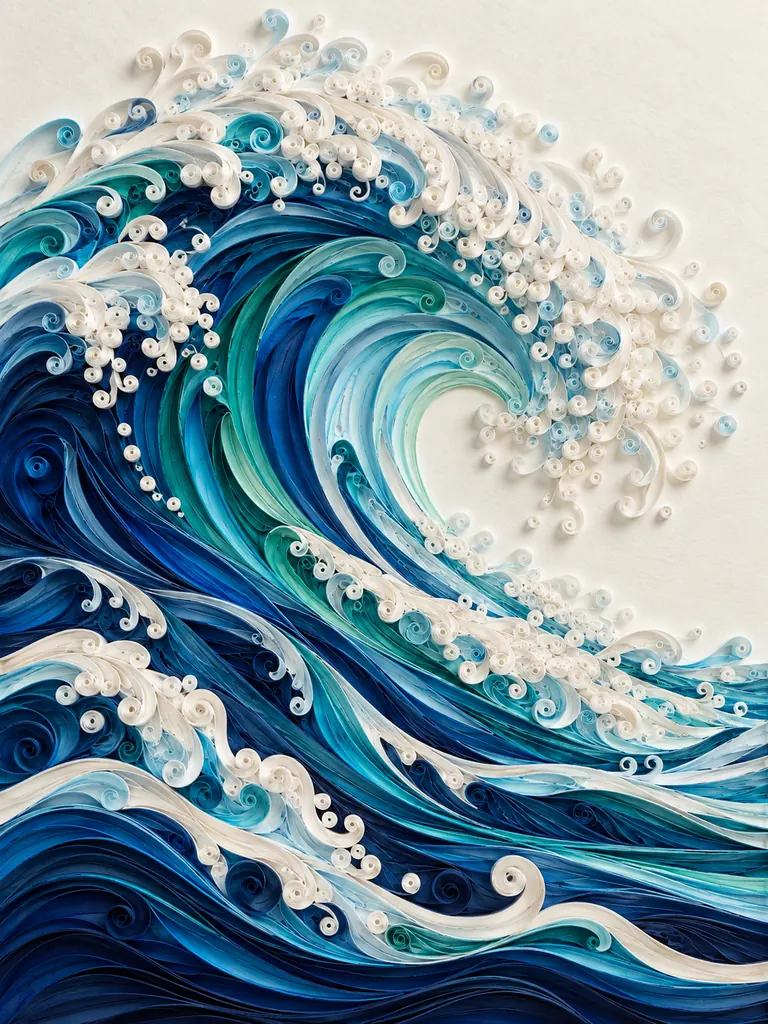
Quilling strips naturally mimic the curved movement of water, making an ocean wave an excellent subject for flowing paper art. Start with a strong navy outline and fill the body with long bands of cobalt, turquoise, teal, aqua, and pale blue. Near the crest, tighter blue spirals create turbulence, while.
Items Needed
- Deep navy and cobalt strips
- Turquoise, teal, aqua, and pale-blue strips
- White paper strips
- Off-white cardstock
- Quilling tool
- Glue and fine tweezers
How to Make
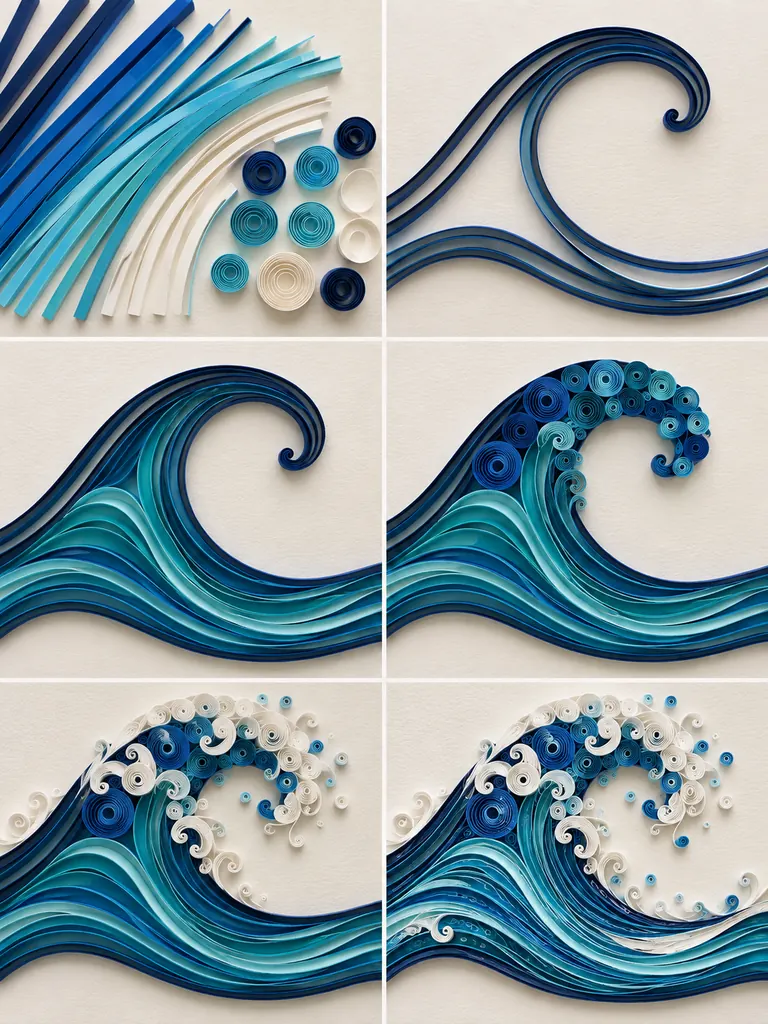
- Shape the main sweeping wave outline from several long navy strips, including the large inward.
- Fill the body with layered teal, turquoise, and blue strips that follow the same flowing.
- Add tight and loose blue spiral coils around the curling crest to create more visual.
- Build foam from white coils, open curls, and thin sweeping strips, concentrating the brightest details.
20. Quilled Floral Initial Monogram
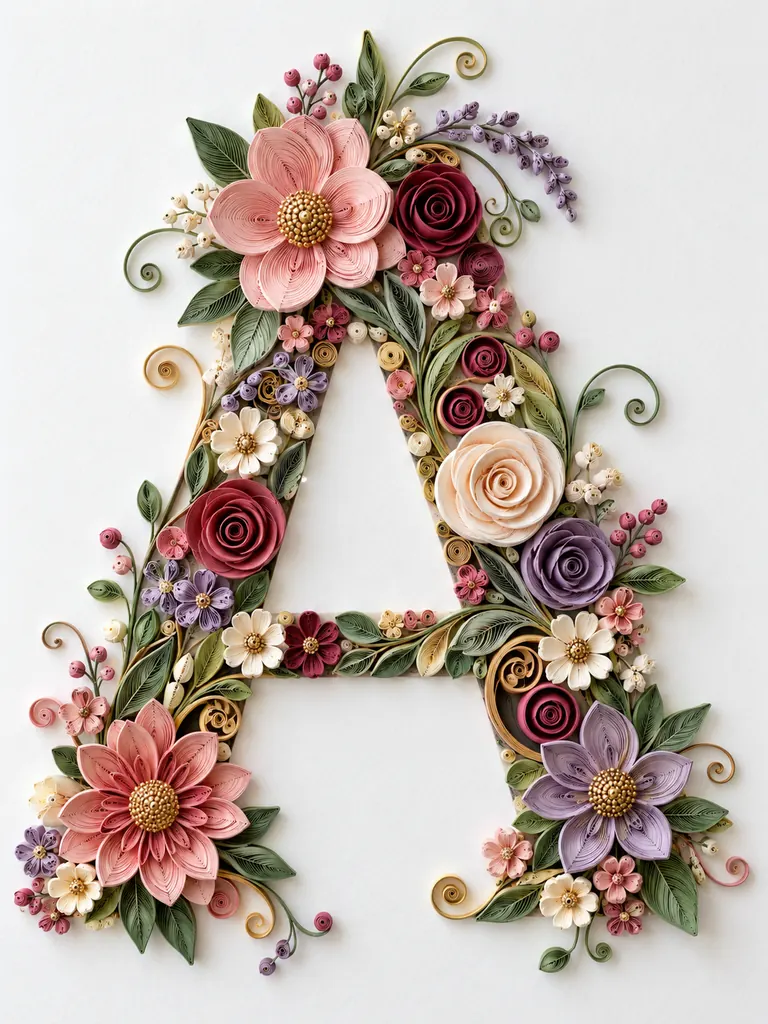
A floral monogram combines personalized decor with the variety of a botanical quilling project. This example uses a large capital A, but the same method can be adapted to any letter. Begin with a faint outline, place a few larger roses and flowers at important anchor points, then fill the.
Items Needed
- Printed or drawn capital-letter template
- Blush, rose, coral, burgundy, lavender, and cream strips
- Sage-green strips
- Muted-gold strips
- White cardstock
- Quilling tool, glue, and tweezers
How to Make
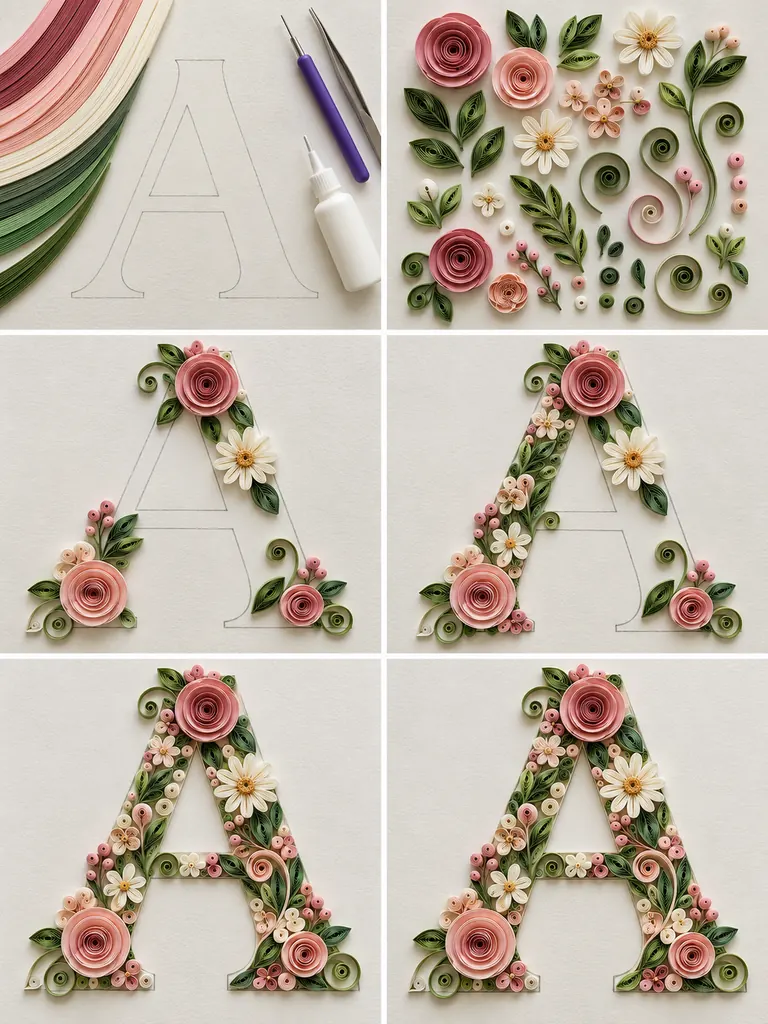
- Trace a large capital A very lightly on the cardstock, including the inner opening and.
- Prepare several focal roses and larger flowers, then make smaller daisies, leaves, buds, tight coils.
- Position the largest flowers at the top, lower corners, and selected points along the letter.
- Fill the remaining letter shape with smaller botanical elements, following the outline carefully so the.
21. Quilled Autumn Tree
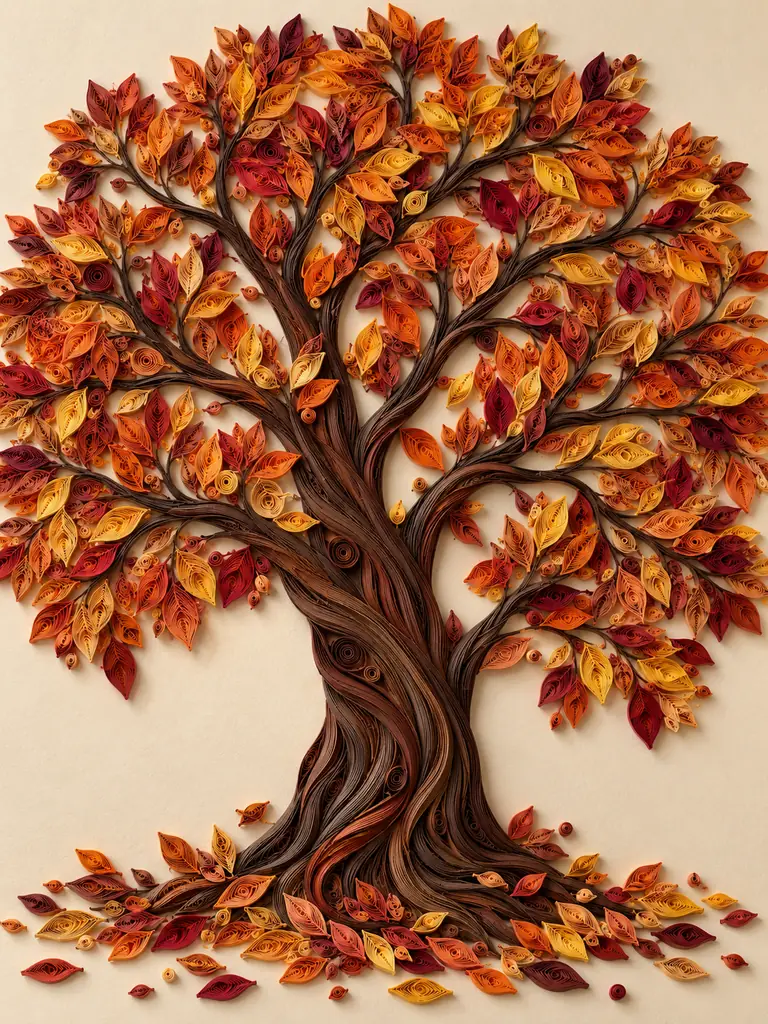
An autumn tree turns a simple trunk-and-canopy composition into rich seasonal wall art. The broad trunk is made from layered dark-brown and chestnut strips that twist upward into many visible branches. Hundreds of small marquise leaves, teardrops, and tiny spirals in burnt orange, rust, mustard, deep red, burgundy, copper, and.
Items Needed
- Dark-brown and chestnut strips
- Orange, rust, mustard, red, burgundy, and gold strips
- Warm cream cardstock
- Quilling tool
- Glue
- Tweezers
How to Make
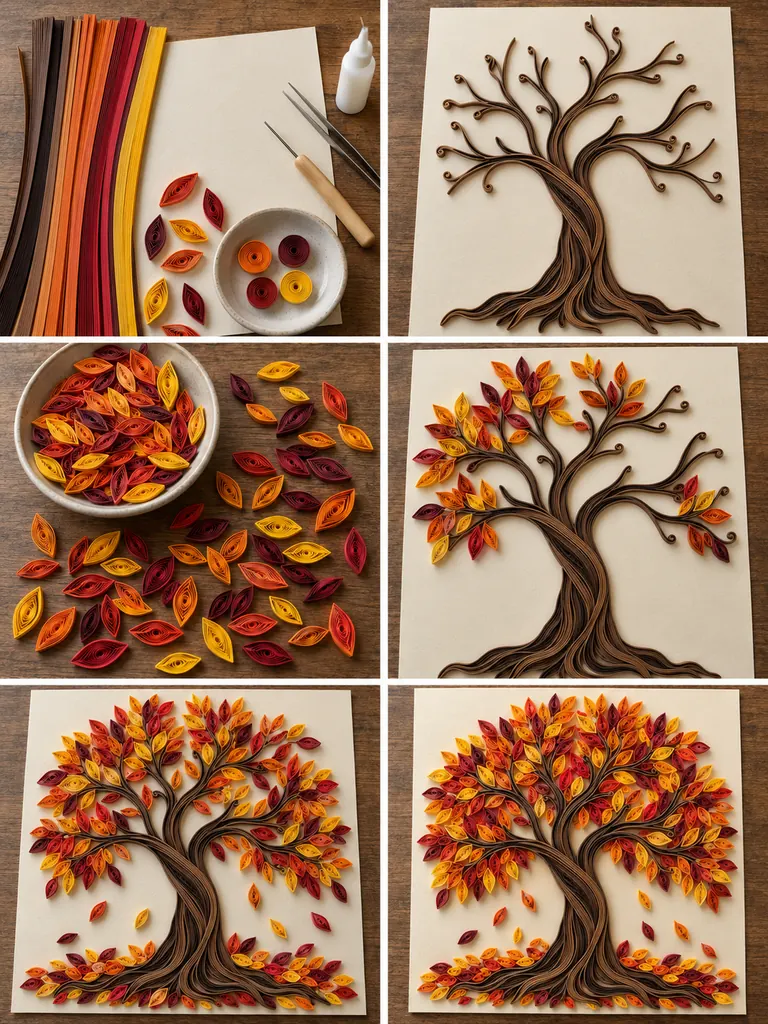
- Build a broad twisting trunk from several layered brown strips and divide the upper ends.
- Prepare a large batch of autumn leaves in different colors, using marquise, teardrop, and small.
- Attach the first leaf clusters near the main branch junctions, distributing colors so no single.
- Continue filling the canopy while leaving occasional branches visible and preserving an organic outer edge.
22. Quilled Vase of Flowers
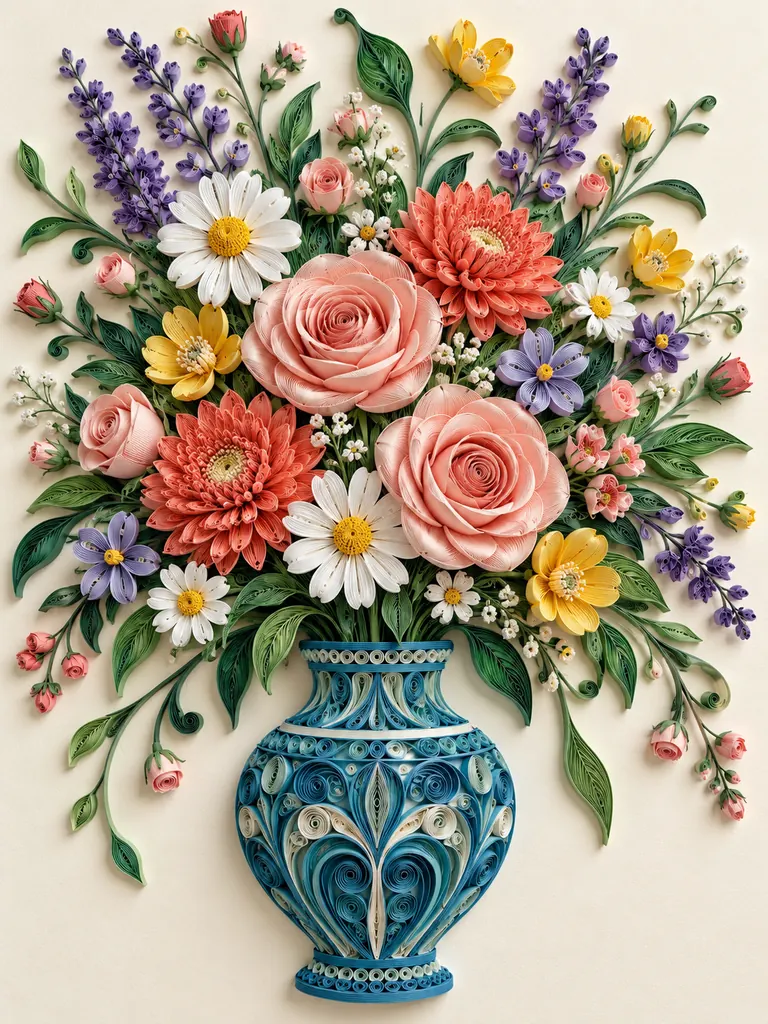
A vase bouquet lets you practice several different quilling flowers within one cohesive project. The rounded vase is built first from turquoise and muted-blue curved strips, tight coils, and decorative scrolls. Above it, combine large blush roses, white daisies, coral chrysanthemums, lavender flowers, yellow blooms, tiny pink buds, and several.
Items Needed
- Turquoise and muted-blue strips
- Pink, coral, white, yellow, and lavender strips
- Several green shades
- Light ivory cardstock
- Quilling tool
- Glue and tweezers
How to Make
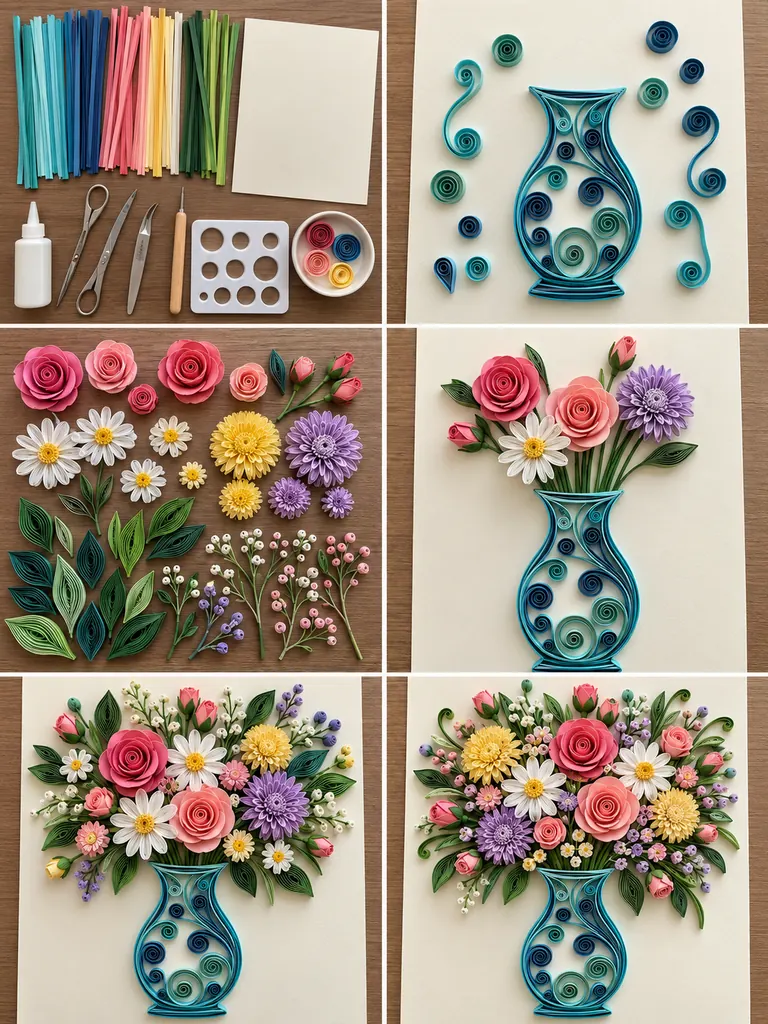
- Construct the rounded vase outline first, adding decorative blue and turquoise coils and scrolls inside.
- Prepare the major flowers separately: spiral roses, white daisies, layered coral chrysanthemums, yellow flowers, and.
- Attach long green stems rising from the vase and position the largest blooms at varying.
- Add leaves, smaller flowers, buds, and filler sprigs around the outside so the bouquet widens.
23. Quilled Birds on Flowering Branches
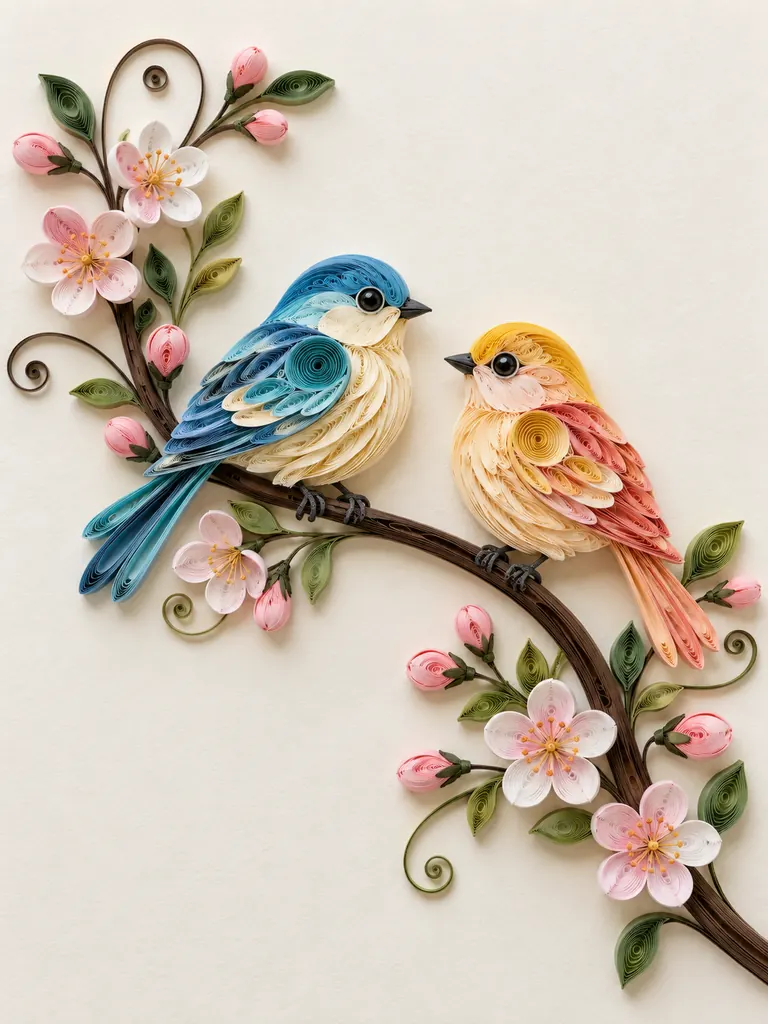
Two small birds perched on a flowering branch make a peaceful final project for this collection. One bird uses blue, turquoise, and cream quilled shapes, while the second combines soft yellow, coral, and pale peach. Rounded coils establish the head and body, and layered teardrops create wings with visible feather.
Items Needed
- Blue, turquoise, cream, yellow, coral, and peach strips
- Brown strips for the branch
- Pink and white floral strips
- Green strips
- Warm-white cardstock
- Quilling tool, glue, and tweezers
How to Make
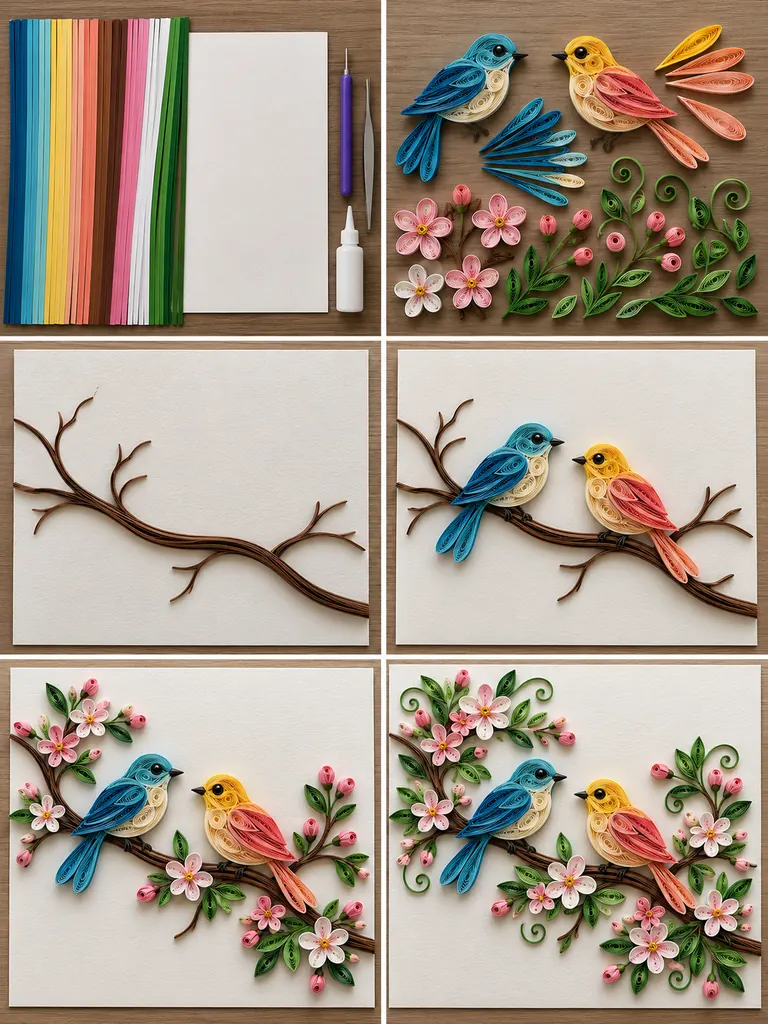
- Prepare the bird components separately, including rounded body coils, head coils, layered wing pieces, narrow.
- Build a long curved branch with several thinner twigs and glue it to the warm-white.
- Assemble and place the blue-turquoise bird and the yellow-coral bird on the branch, turning them.
- Add five-petal pink and white blossoms, small green leaves, and closed buds along the branch.
Tips for Making Quilling Art Look Professional
Small finishing choices make a noticeable difference in paper quilling. Keep similar petals and leaves close in size when they belong to the same flower, but allow some natural variation across a larger composition. A quilling circle template is useful when you need repeated coils. Use less glue than you think you need; a tiny dot applied with a toothpick is usually enough. Excess glue can dry shiny or spread beyond the paper edge, which distracts from the delicate construction.
Plan the largest shapes before permanently attaching them. Place the focal flowers, birds, tree trunks, or main outlines on the cardstock first, step back, and check the balance. Then fill smaller spaces with leaves, coils, buds, and scrolls. Mixing tight coils with loose coils and open curves gives the artwork more depth. Also keep your hands and work surface clean, especially when using white or pastel strips, because light paper easily picks up pencil, glue, and dust marks.
How to Display Quilling Paper Art at Home
Because quilling is dimensional, ordinary picture frames may press against the raised paper and damage the coils. Shadow-box frames are usually the safest choice because they leave a gap between the artwork and the protective glazing. Small botanical pieces can be grouped into a gallery wall, while larger designs such as the floral heart, mandala, Tree of Life, ocean wave, or enchanted forest work well as single statement pieces. Nursery designs can be displayed in children’s rooms, and personalized monograms make thoughtful housewarming, wedding, or birthday gifts.
When choosing where to hang the artwork, avoid locations with persistent moisture or harsh direct sunlight. Paper can fade or warp over time, so a dry wall with indirect light is ideal. If you are creating several pieces for one room, repeat two or three colors across the collection so the designs feel connected even when the subjects are different.
Final Thoughts
These DIY quilling paper art ideas show how far you can go with simple paper strips and a few basic techniques. Start with an easy daisy, rainbow, or sunflower project, then move toward more detailed animals, landscapes, mandalas, and floral compositions as your control improves. You do not need to copy any design exactly. Change the palette, simplify a pattern, resize the flowers, or combine elements from multiple projects to create something that fits your own home. The handmade texture is what gives quilling its charm, so slight variations are part of the finished piece rather than flaws.

