Skip to content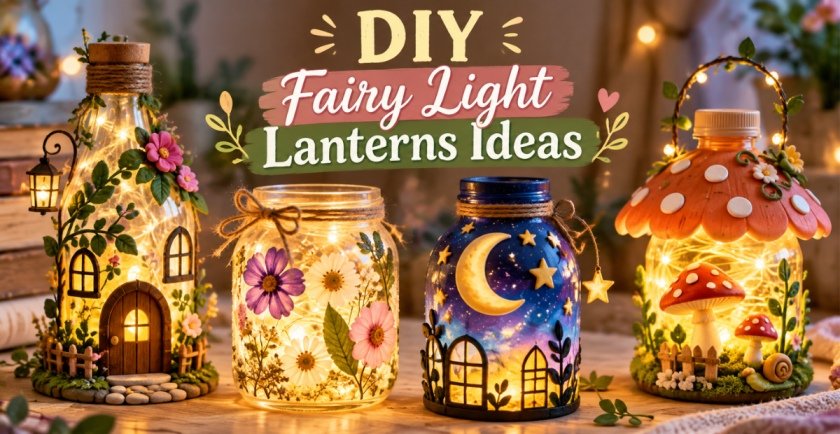
There is something irresistible about a tiny light glowing inside an ordinary bottle or jar. During the day, it looks like a handmade decoration; switch the lights on in the evening and suddenly it feels like a miniature world has come to life.
That is exactly why these DIY Fairy Light Lanterns Ideas are so enjoyable to make. You do not need expensive supplies or specialist tools. Clear bottles, old mason jars, scrap cardstock, leftover ribbon, pebbles, moss, twine and a short strand of LEDs can be enough to build a lantern that feels personal and completely different from something bought in a store.
The projects below range from quick floral jars to mushroom cottages, moonlit woodland scenes, a hanging jellyfish and a full fairy castle. Most use battery-powered micro LEDs because the wire is thin and easy to hide. For anything that will stay outdoors, use lights and materials rated for outdoor conditions.
Before You Start
Test every light strand before building around it, and always leave the switch or battery compartment accessible. Low-heat LED fairy lights or flameless LEDs are the right choice for these projects. Do not place real flames inside lanterns made with plastic, paper, moss, dried flowers, twine, foam or enclosed glass.
For a more professional finish, avoid covering the whole container. Clear areas are what let the light breathe. It also helps to build the large shapes first—the roof, door, base or silhouette—and save tiny flowers, beads and vines for the end.
1. Enchanted Fairy Cottage Bottle Lantern
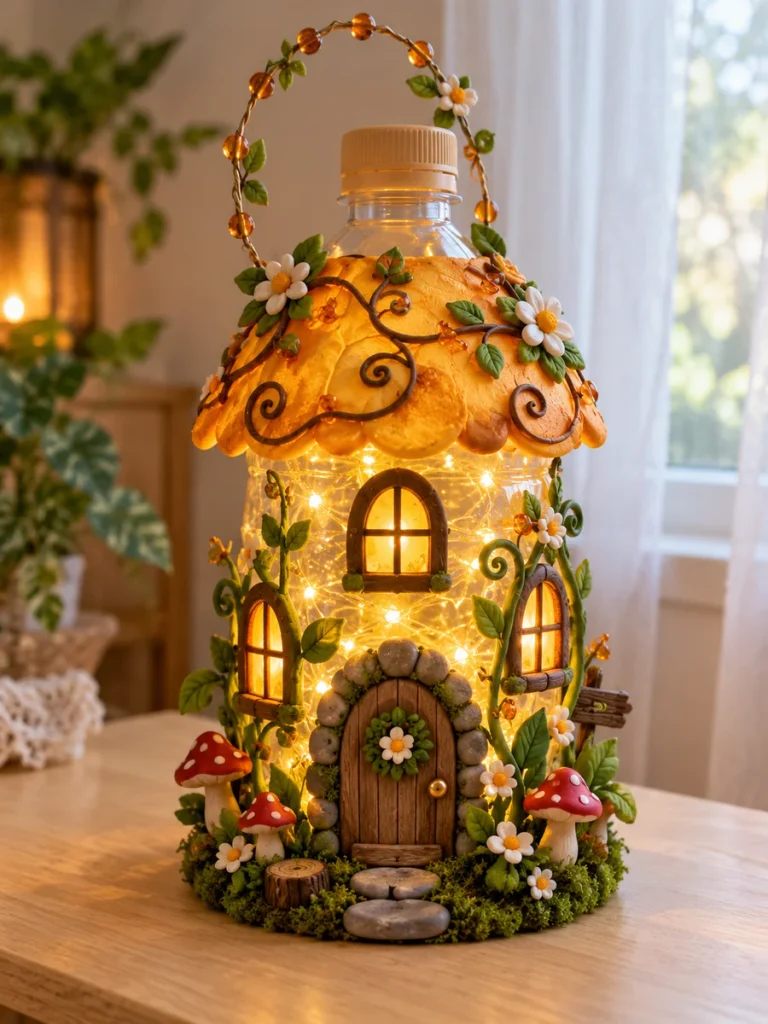
A clear bottle makes a wonderful base for a tiny cottage because the light can shine through the walls while the outside carries all the storybook details. This version keeps the bottle visible and uses an uneven roof, small windows, a rounded door and a garden-style base so it still looks handmade rather than like a store-bought ornament.
Things You’ll Need
- 1 large clear plastic bottle
- Warm-white battery micro fairy lights
- Lightweight air-dry clay or craft foam
- Acrylic paint and small brushes
- Dark cardstock or thin craft foam for windows
- Translucent paper for window backing
- Faux moss, miniature flowers and small pebbles
- Craft glue or low-temperature hot glue
How to Make It
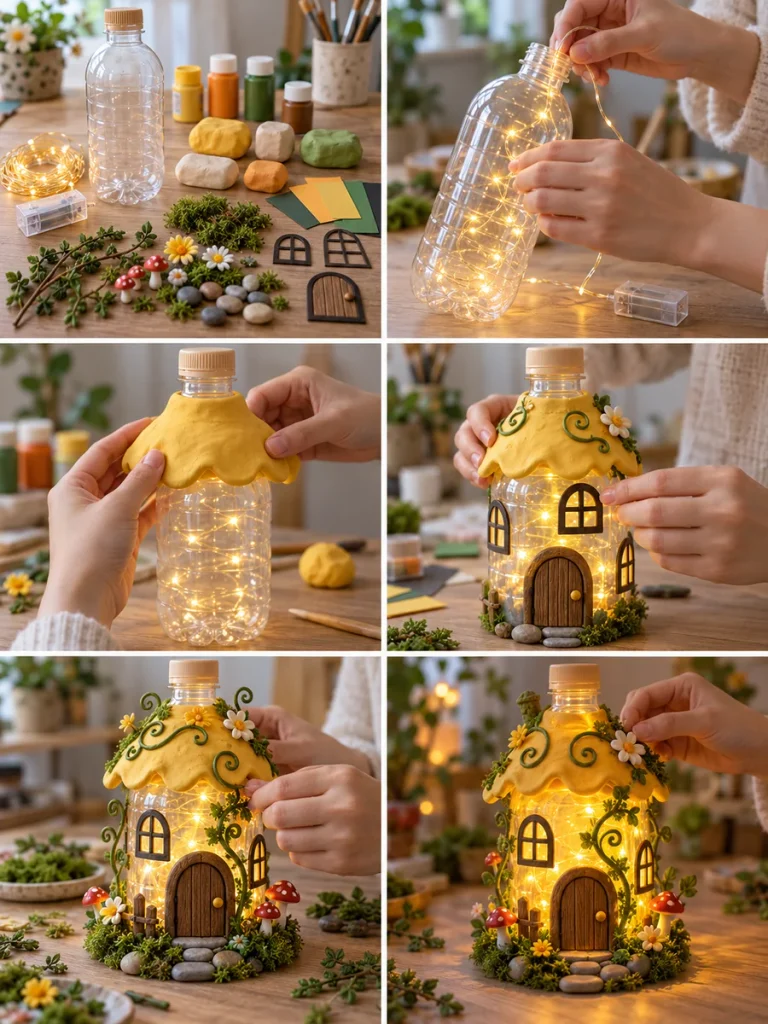
- Wash and dry the bottle completely. Test the fairy lights before feeding them loosely inside, keeping the battery pack where you can still reach it.
- Build the roof around the shoulder of the bottle with a thin layer of lightweight clay. Give the edge a soft, irregular shape instead of trying to make it perfectly even.
- Add a rounded door and two or three small windows. A piece of pale translucent paper behind each frame softens the glow.
- Create a narrow garden border around the base with moss and flowers, then add flat stones as a tiny path.
- Finish with a few vines or leaves climbing toward the roof. Stop before the bottle becomes too covered; the clear sections are part of the charm.
Finishing tip: A slightly crooked window or uneven stone path actually helps this project. Fairy cottages feel more convincing when every detail is not perfectly symmetrical.
Where it looks best: Bedroom shelves, reading corners, covered porches and plant displays.
2. Celestial Moon and Stars Bottle Lantern
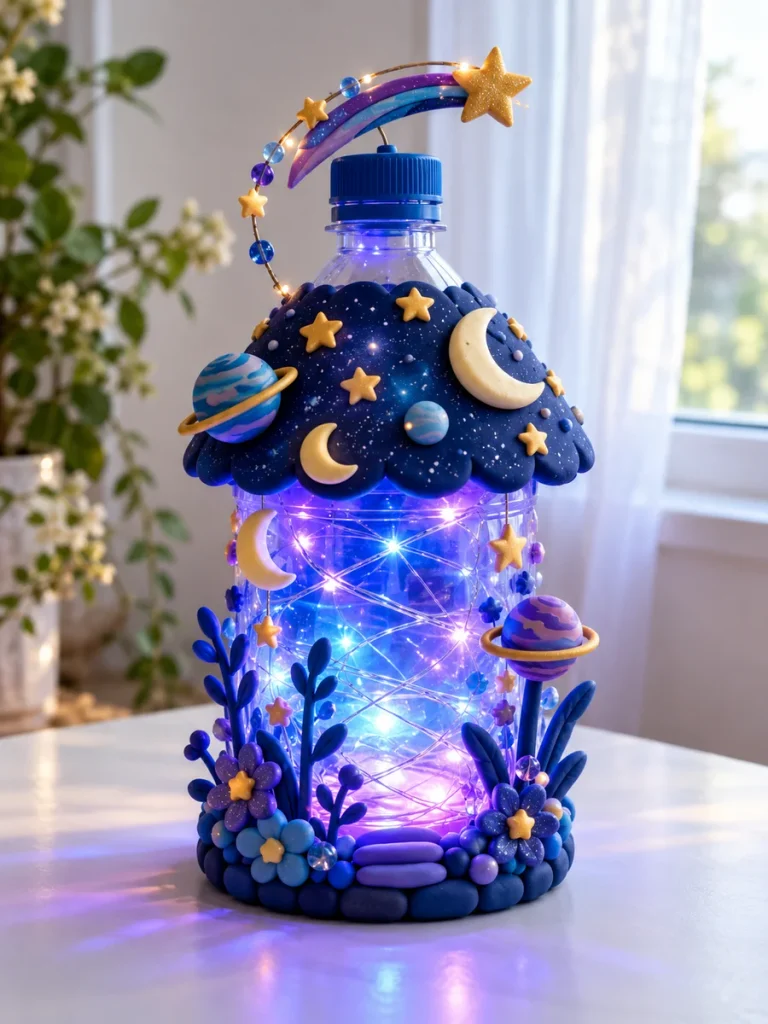
For a cooler, dreamier look, turn the same kind of clear bottle into a little night-sky lantern. Deep blue details, tiny moons and stars, and violet-blue light give it a completely different mood from the warm woodland designs.
Things You’ll Need
- Clear plastic bottle
- Blue, violet or cool-white micro LEDs
- Navy craft foam or cardstock
- Small clay or foam stars and moons
- Thin craft wire
- Acrylic paint
- Glue and scissors
How to Make It
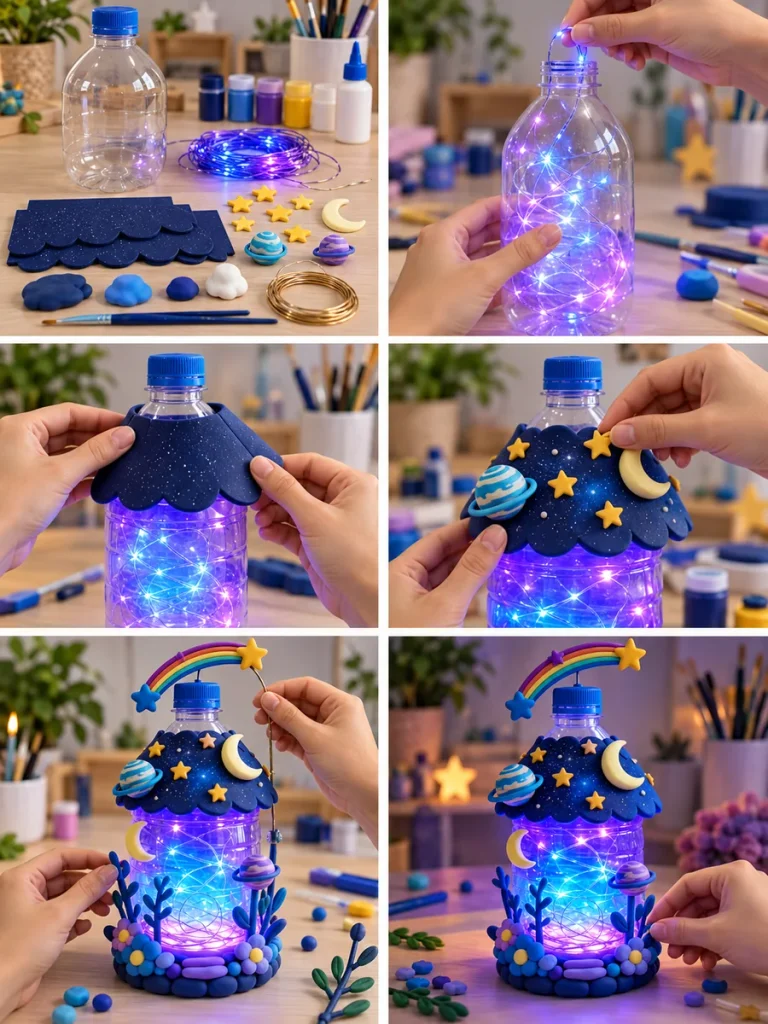
- Insert the lights first so you know where the brightest areas will be.
- Cut a dark-blue scalloped band or roof detail for the bottle shoulder.
- Make small celestial shapes—stars, crescent moons and simple planets—and space them rather than covering every inch.
- Bend thin wire into a gentle arch for one lightweight shooting-star detail if you want extra height.
- Keep the center of the bottle mostly transparent so the colored lights remain visible.
Finishing tip: Use only a little glitter or metallic paint. Too much reflective decoration can make the bottle look busy instead of dreamy.
Where it looks best: Bedrooms, desks, gaming rooms and night-themed party tables.
3. Hot Air Balloon Fairy Garden Lantern
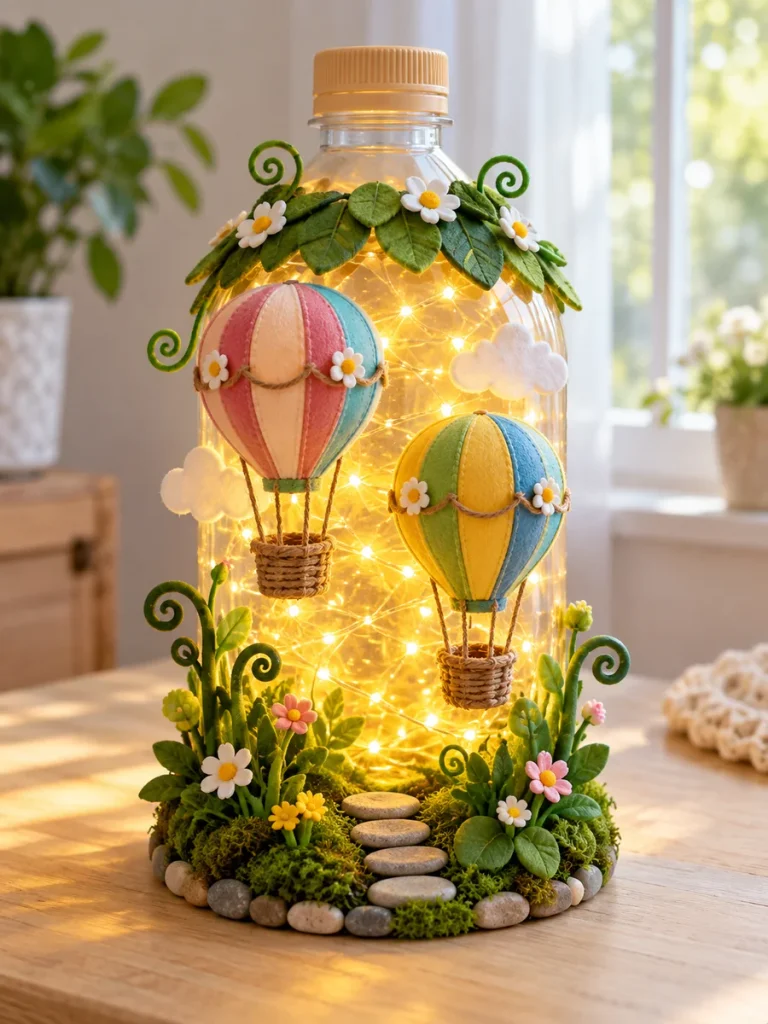
This cheerful lantern keeps the recycled bottle simple and lets two miniature hot-air balloons do most of the decorating. The revised version is intentionally achievable: no complicated cottage at the bottom, just flowers, moss, curled greenery and a small stepping-stone path.
Things You’ll Need
- Large clear bottle
- Warm-white fairy lights
- Lightweight clay or foam for balloons
- Acrylic paints
- Brown twine
- Small cardboard pieces for baskets
- Faux moss and greenery
- Tiny flowers and smooth pebbles
- Craft glue
How to Make It
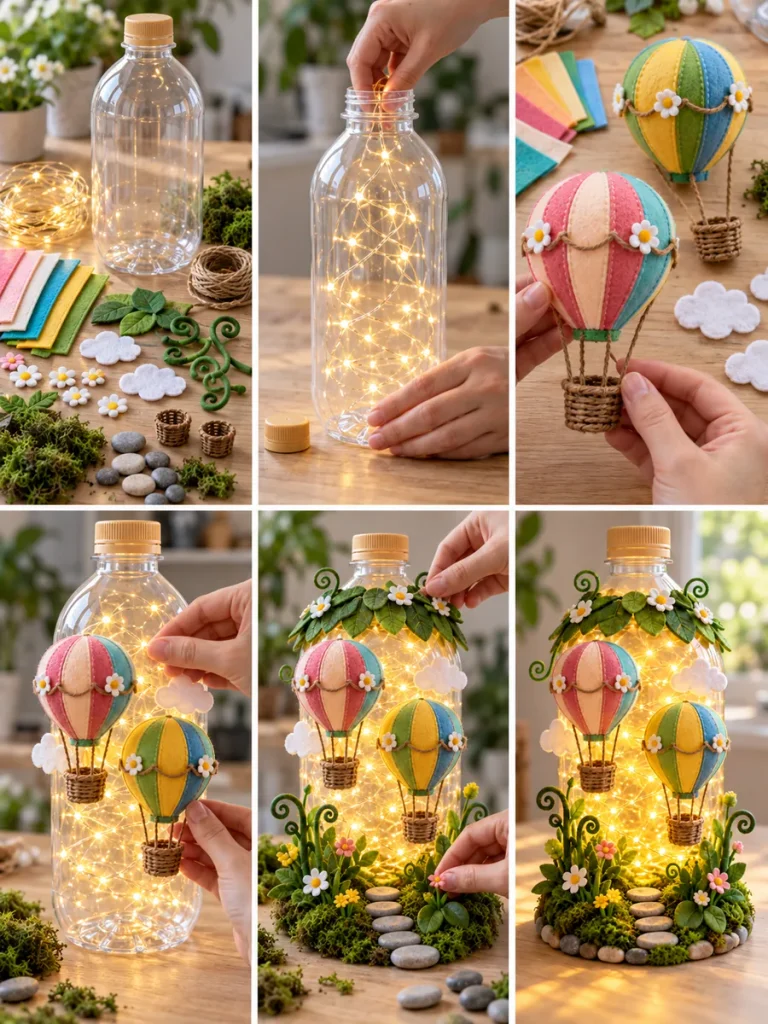
- Fill the clean bottle with warm fairy lights.
- Shape two lightweight balloons and paint each one in three or four vertical color sections.
- Make small baskets and suspend them beneath the balloons with short pieces of twine.
- Attach the balloons at different heights on the bottle so they look as if they are floating.
- Build a low garden border around the base with moss, leaves, flowers and a few flat stepping stones.
Finishing tip: Keeping the balloons lightweight matters more than adding extra detail. Heavy clay pieces can pull away from the bottle or make it unstable.
Where it looks best: Nurseries, playrooms, craft rooms and whimsical party decor.
4. Butterfly Fairy House Lantern
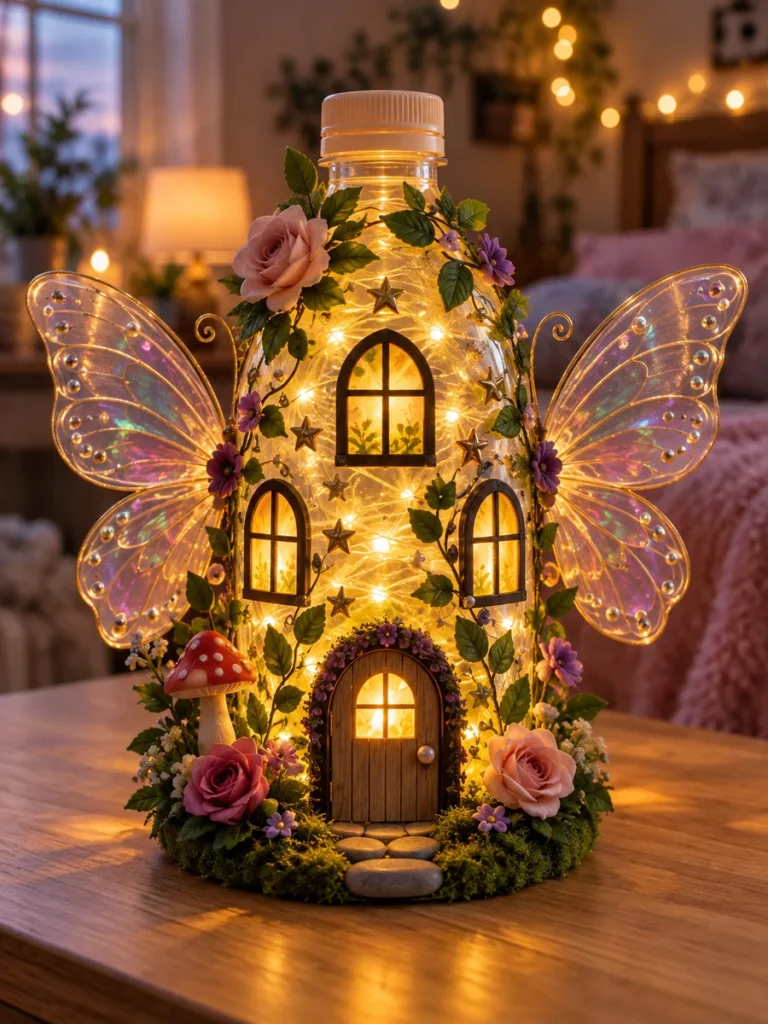
A butterfly fairy house works best when the wings feel delicate rather than bulky. The bottle still reads as a tiny house, but translucent wing shapes and floral vines make it feel lighter and more magical.
Things You’ll Need
- Clear bottle
- Warm micro LEDs
- Transparent acetate
- Fine permanent marker
- Dark cardstock for windows and door
- Small flowers and faux leaves
- Moss
- Glue and scissors
How to Make It
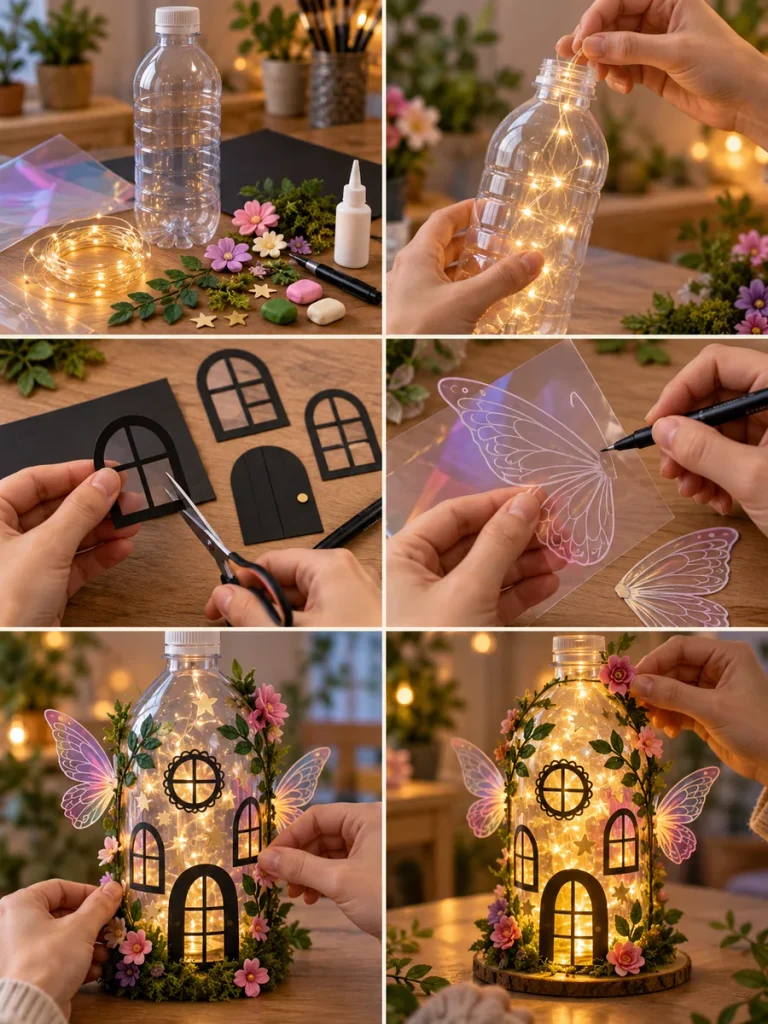
- Place the fairy lights inside the bottle.
- Cut a rounded door and several small arched windows, then attach them to the front and sides.
- Cut two butterfly wings from acetate and draw simple vein patterns with a fine marker.
- Attach the wings securely at the sides, keeping them slightly behind the front plane of the bottle.
- Add a restrained amount of flowers, leaves and moss around the lower edge and windows.
Finishing tip: Clear acetate with a few drawn lines looks more handmade and realistic than very thick glittery wings.
Where it looks best: Dressing tables, bedrooms and fairy-themed displays.
5. Pastel Flower Cottage Lantern
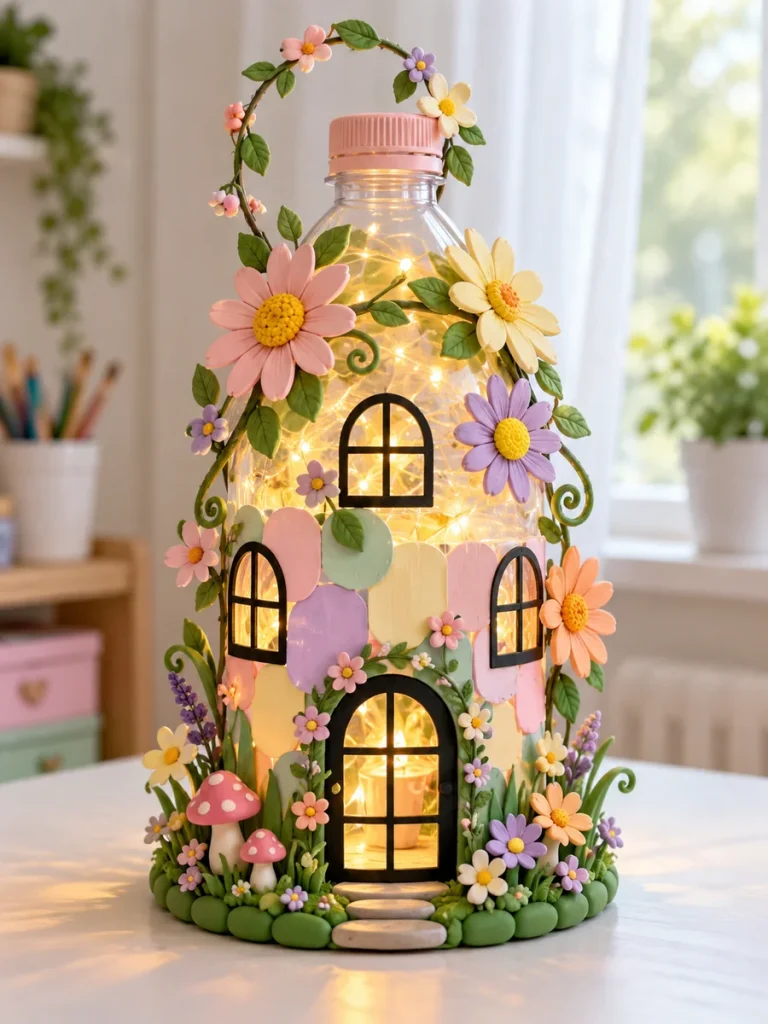
Pastel colors make this cottage feel bright enough for daytime decorating, while the fairy lights give it a second life after sunset. Soft pink, mint, lavender and cream work especially well together.
Things You’ll Need
- Clear plastic bottle
- Warm micro fairy lights
- Pastel cardstock or craft foam
- Green paper or foam
- Dark cardstock for window frames
- Translucent paper
- Paper or foam flowers
- Glue and scissors
How to Make It
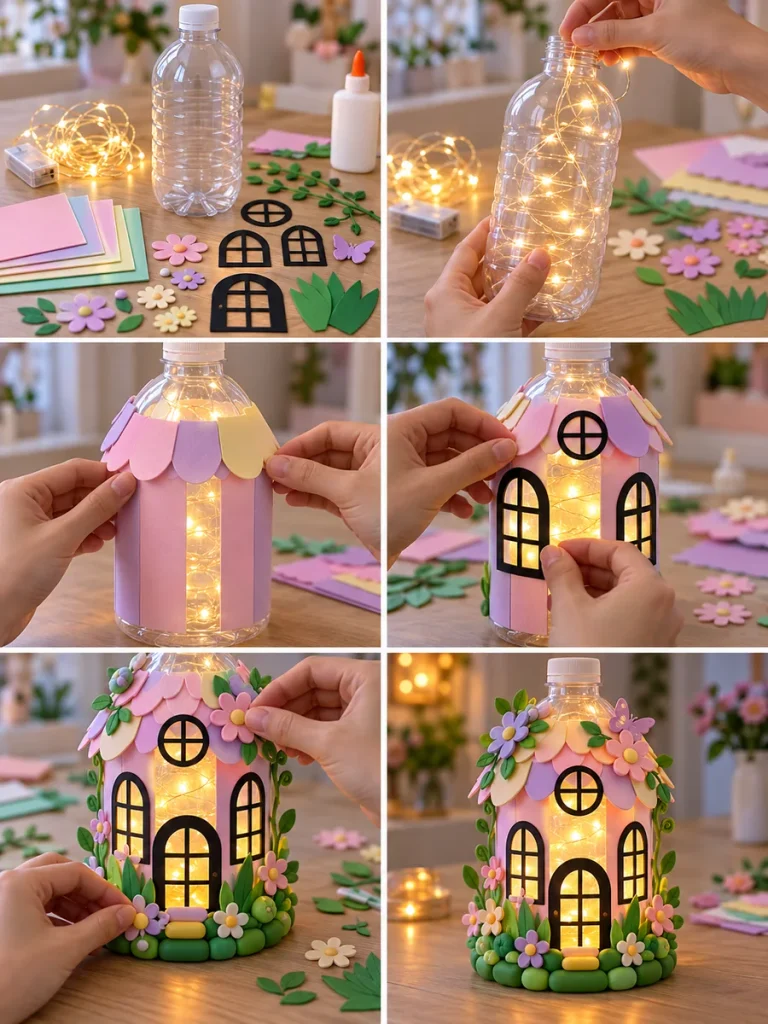
- Feed the lights into the bottle and test the glow.
- Cut small pastel panels and overlap them loosely around the lower area rather than making a perfectly uniform wall.
- Add dark arched windows with translucent backing so they remain visible at night.
- Create simple green leaves or grass around the base.
- Finish with a mix of large and small pastel flowers.
Finishing tip: Choose three or four main pastel colors and repeat them. Too many unrelated colors can make the design look toy-like.
Where it looks best: Spring displays, craft rooms and children’s bedrooms.
6. Mushroom Fairy House Lantern
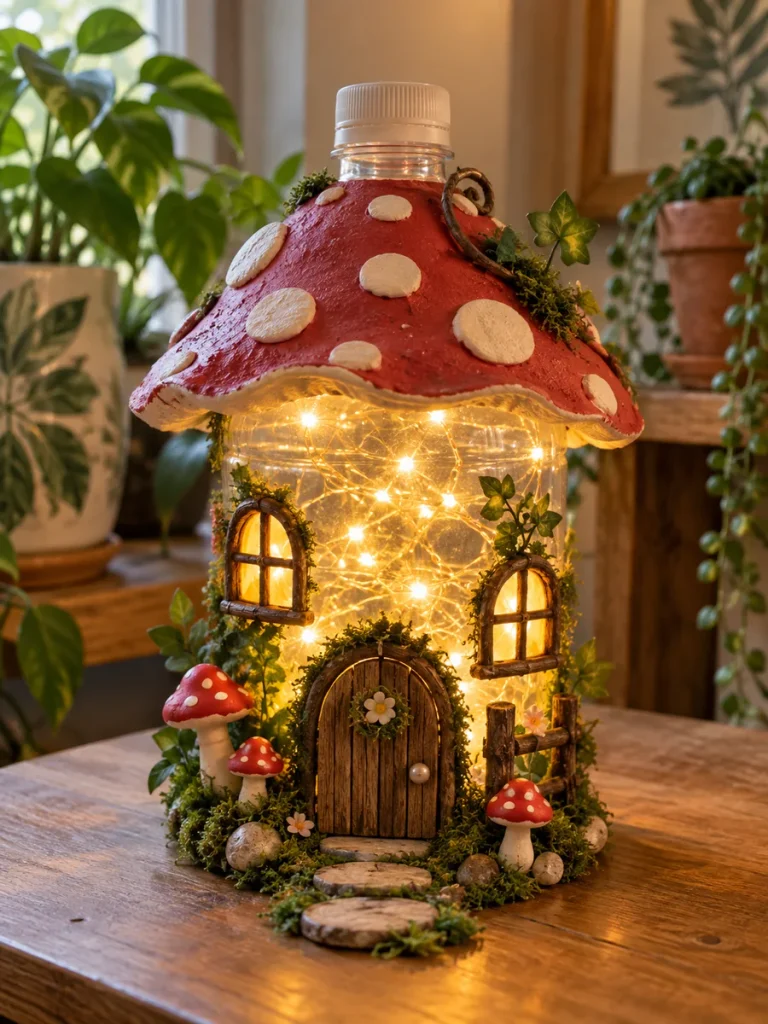
A mushroom roof instantly turns a bottle into a fairy-house shape. It is also a practical project because most of the decoration stays around the top and base, leaving the clear middle open for light.
Things You’ll Need
- Large clear bottle
- Warm-white LEDs
- Lightweight air-dry clay
- Red, cream and brown acrylic paint
- Small door and window pieces
- Faux moss
- Mini mushrooms and pebbles
- Glue
How to Make It
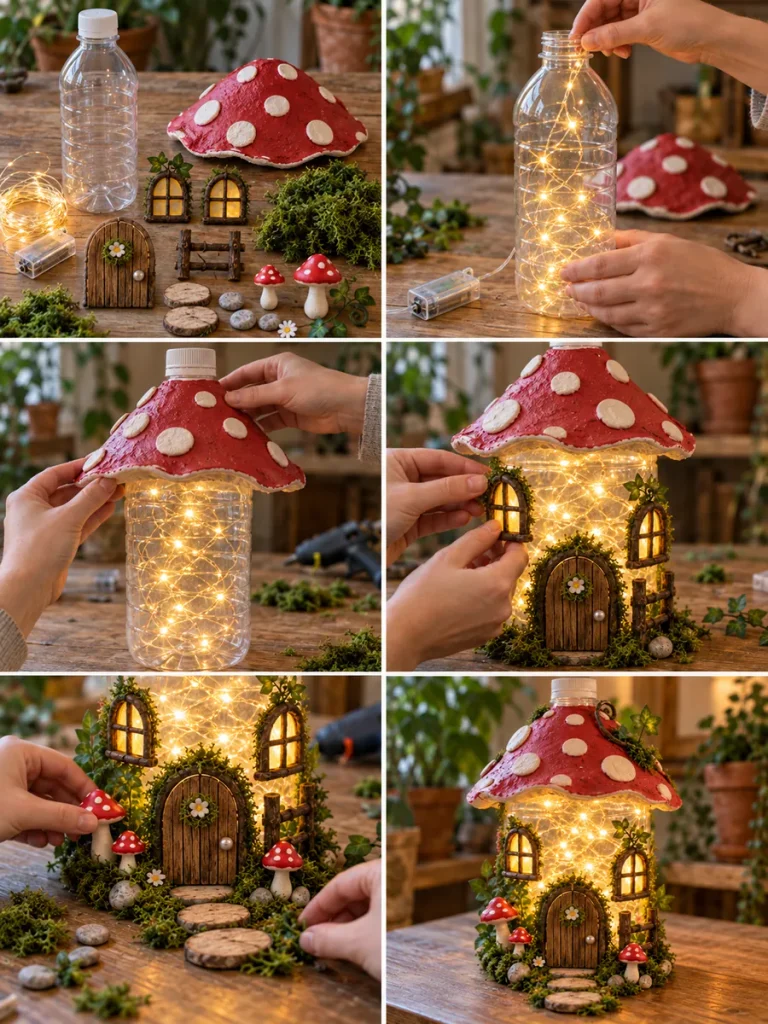
- Insert the lights.
- Shape a broad mushroom cap around the shoulder of the bottle, leaving enough overhang to read clearly as a roof.
- After drying, paint the cap and add contrasting spots.
- Attach a small door and two windows.
- Build a mossy base with pebbles and tiny mushrooms.
Finishing tip: A dusty red or muted coral roof generally looks more handcrafted than a very bright primary red.
Where it looks best: Fairy gardens, covered porches and woodland-style shelves.
7. Woodland Moss and Mushroom Lantern
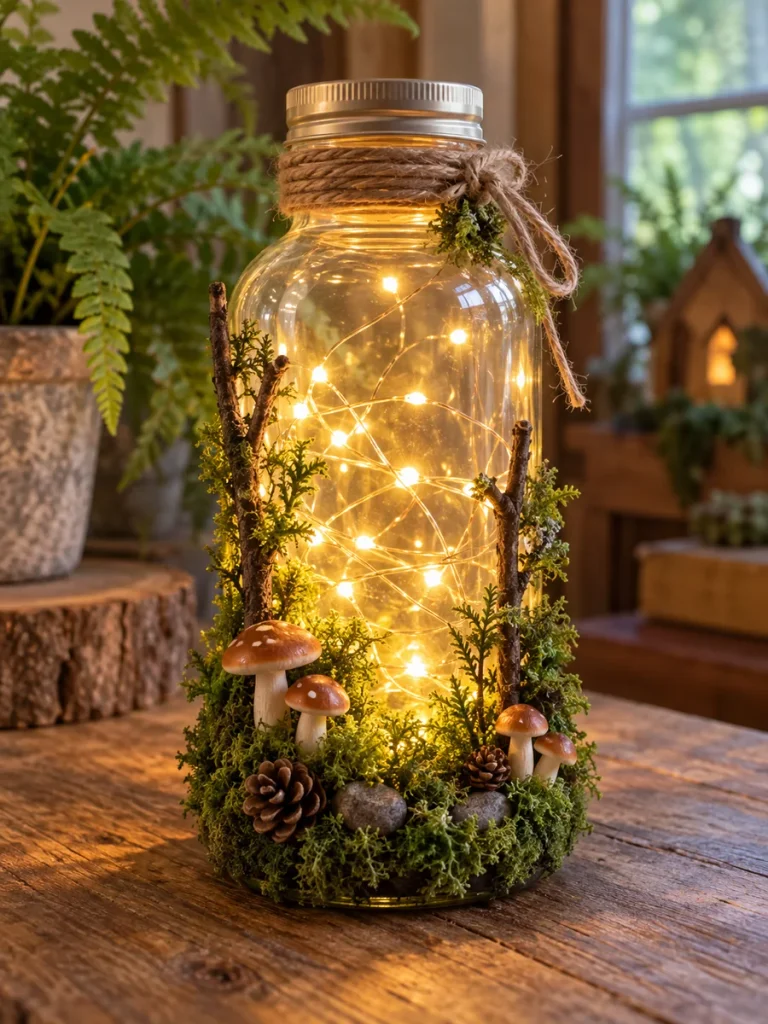
This one is less storybook cottage and more miniature forest floor. Moss, twigs, stones and mushrooms do the decorating, while the jar stays almost completely transparent.
Things You’ll Need
- Clear jar
- Warm micro LEDs
- Faux or preserved craft moss
- Thin twigs
- Miniature mushrooms
- Small pinecones
- Pebbles and faux leaves
- Jute twine
- Glue
How to Make It
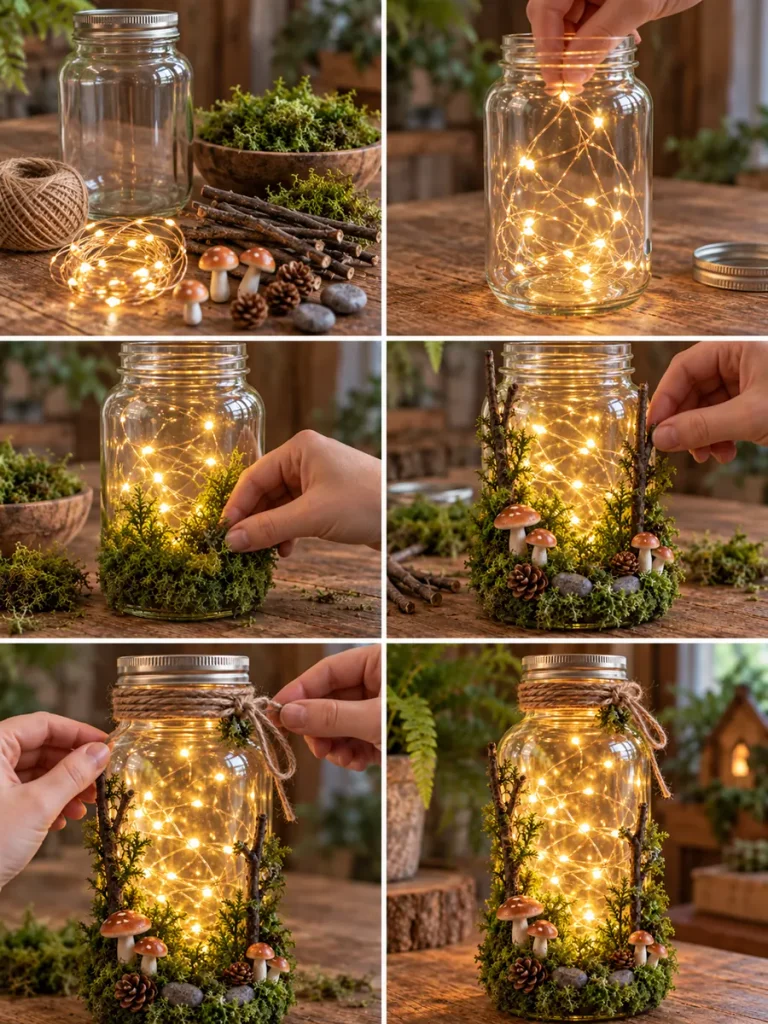
- Place the lights loosely inside the jar.
- Glue an irregular strip of moss around the lower quarter.
- Add pebbles, tiny pinecones and mushroom clusters.
- Stand a few narrow twigs vertically to suggest miniature trees.
- Wrap a little jute around the rim and leave the rest simple.
Finishing tip: Do not build the moss too high. The glowing glass should still be the largest visual area.
Where it looks best: Autumn mantels, cabins, plant corners and covered patios.
8. Miniature Fairy Garden Jar Lantern
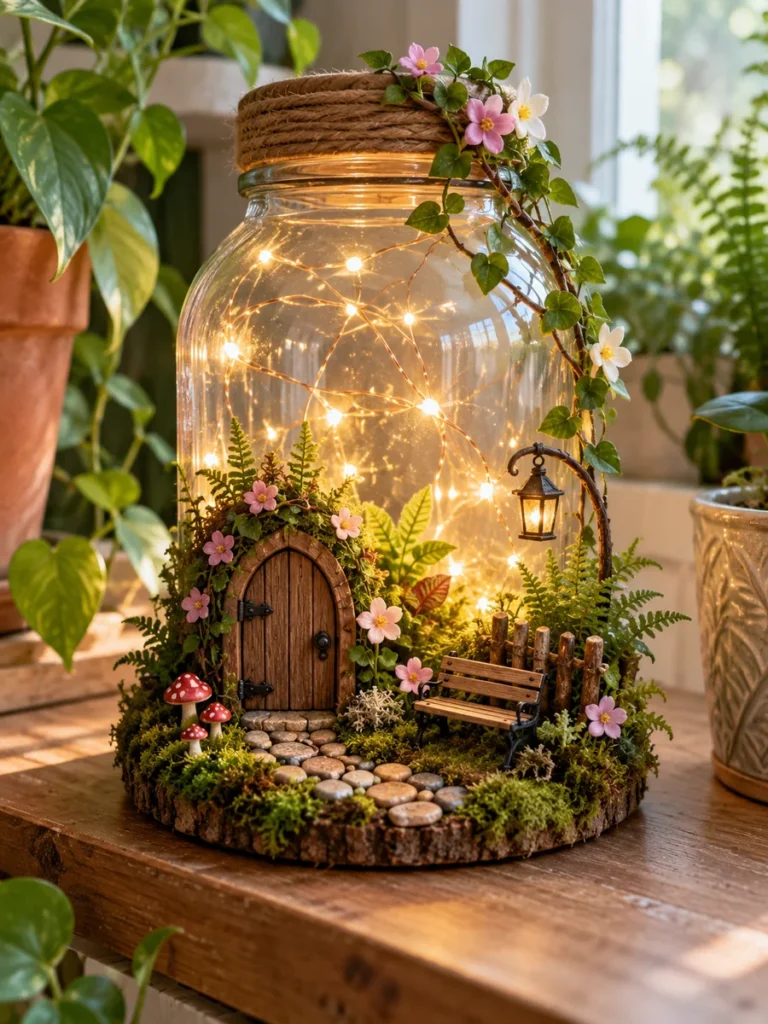
Instead of turning the whole jar into a house, this idea creates a small fairy garden around its base. The glowing jar becomes the backdrop for a door, path, bench and tiny plants.
Things You’ll Need
- Large clear jar
- Warm fairy lights
- Faux moss
- Miniature fairy door
- Craft sticks or mini bench
- Flat pebbles
- Miniature ferns and flowers
- Glue
How to Make It
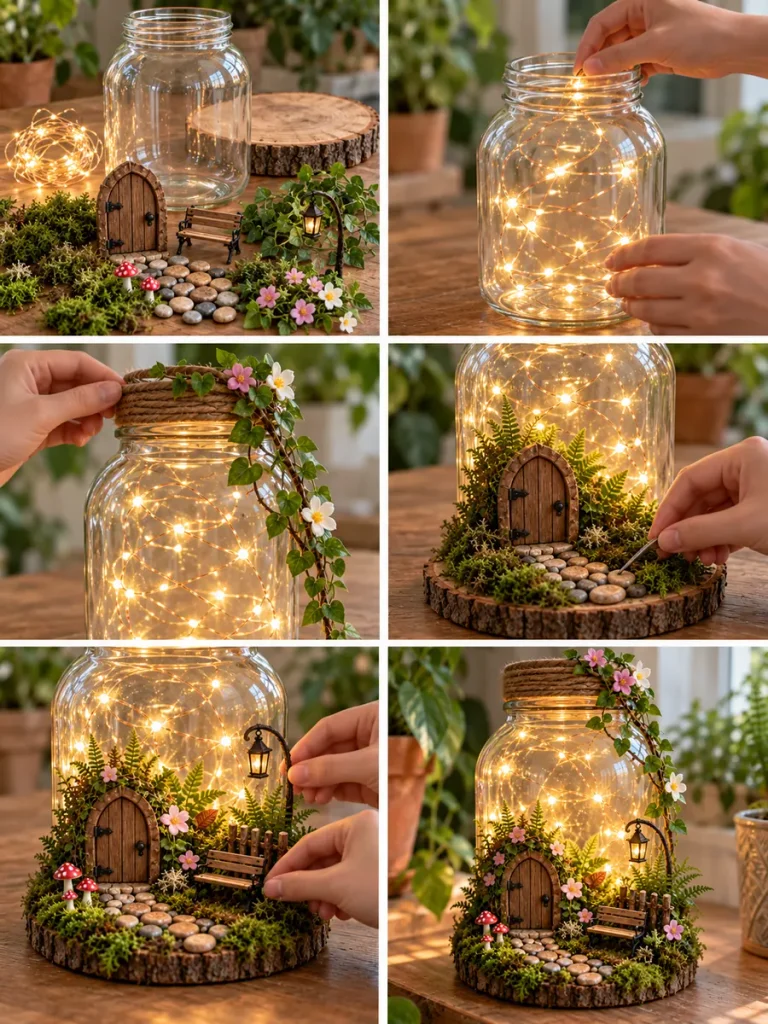
- Insert the lights.
- Make or position a small bench.
- Lay a curved pebble path around the front of the jar.
- Set the fairy door against the glass and surround it with moss.
- Fill empty spots with miniature flowers and fern-like leaves.
Finishing tip: Keep the garden asymmetrical. A bench on one side and taller plants on the other creates a more believable miniature landscape.
Where it looks best: Indoor garden shelves, patios and plant rooms.
9. Floral Vine Mason Jar Lantern
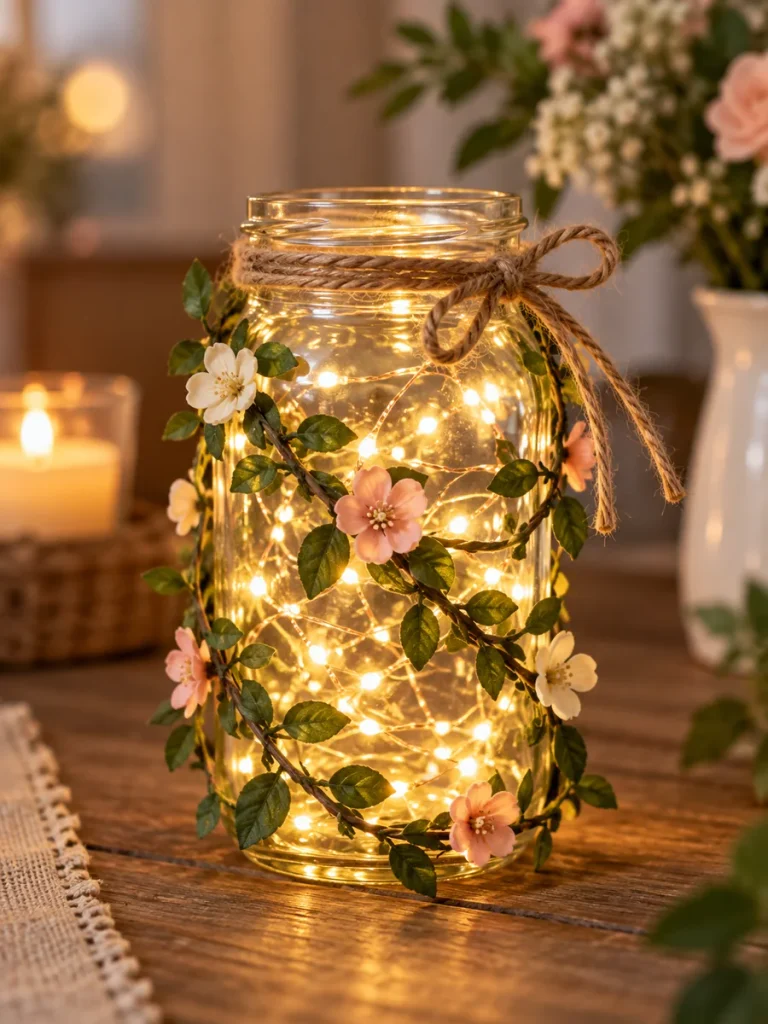
Not every lantern needs sculpting. A mason jar, a thin vine and a handful of small blossoms can create one of the easiest projects in the collection.
Things You’ll Need
- Clear mason jar
- Warm-white micro fairy lights
- Thin artificial vine
- Small cream or blush flowers
- Jute twine or ribbon
- Craft glue
How to Make It
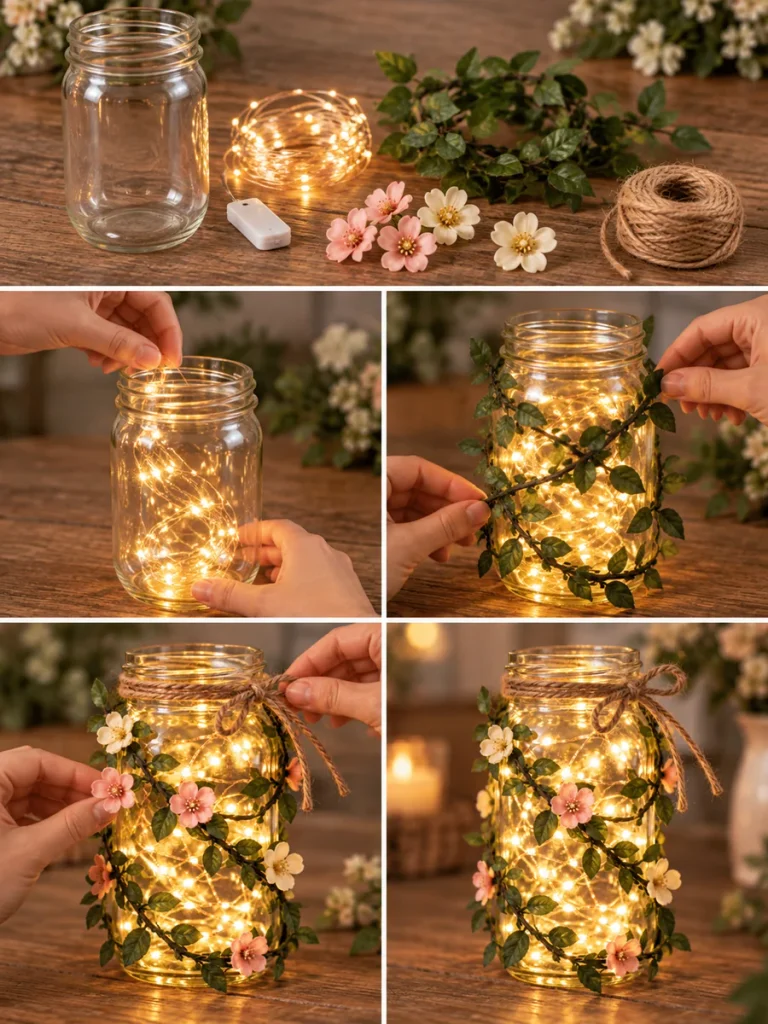
- Place the fairy lights inside the jar.
- Wrap the vine loosely around the glass, keeping plenty of clear space.
- Tuck in a few small flowers.
- Tie jute or ribbon around the rim.
- Adjust the wire inside so the lights are distributed rather than piled at the bottom.
Finishing tip: Small flowers suit the scale of a mason jar better than oversized blooms.
Where it looks best: Wedding centerpieces, dining tables, bedrooms and covered patios.
10. Lavender Garden Fairy Lantern
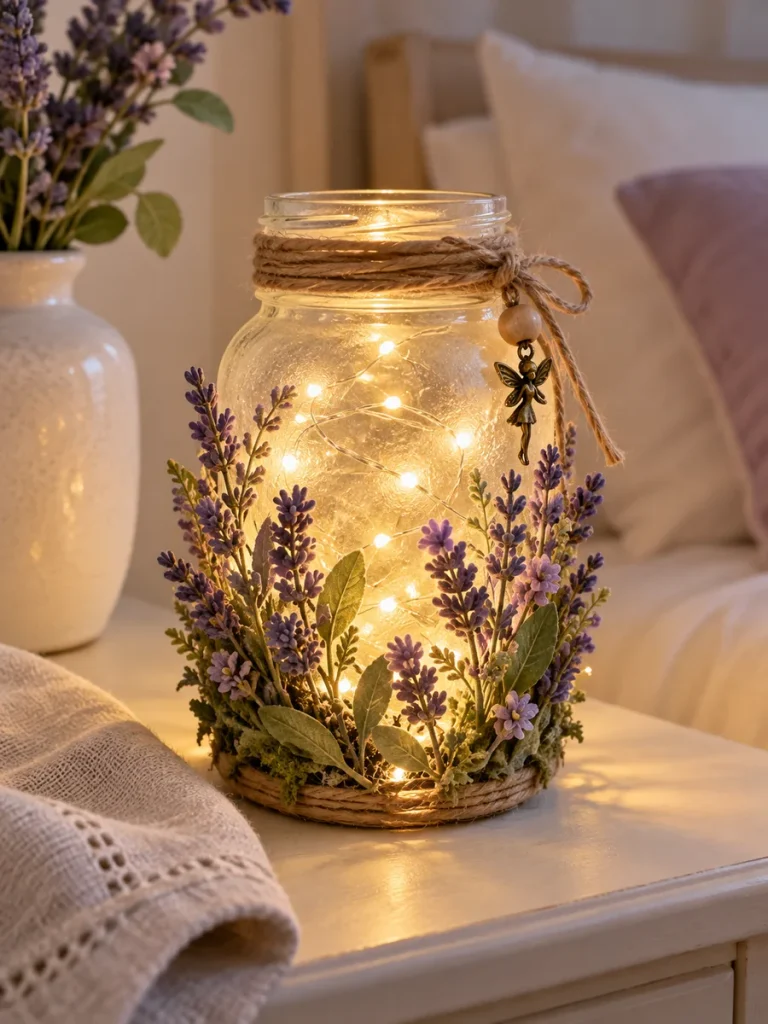
Lavender adds color without making a lantern feel overly busy. Combined with warm light and natural jute, it suits calm bedrooms and cottage-style interiors.
Things You’ll Need
- Clear or lightly frosted jar
- Warm-white LEDs
- Artificial lavender stems
- Muted greenery
- Jute twine
- Small wooden bead or charm
- Glue
How to Make It
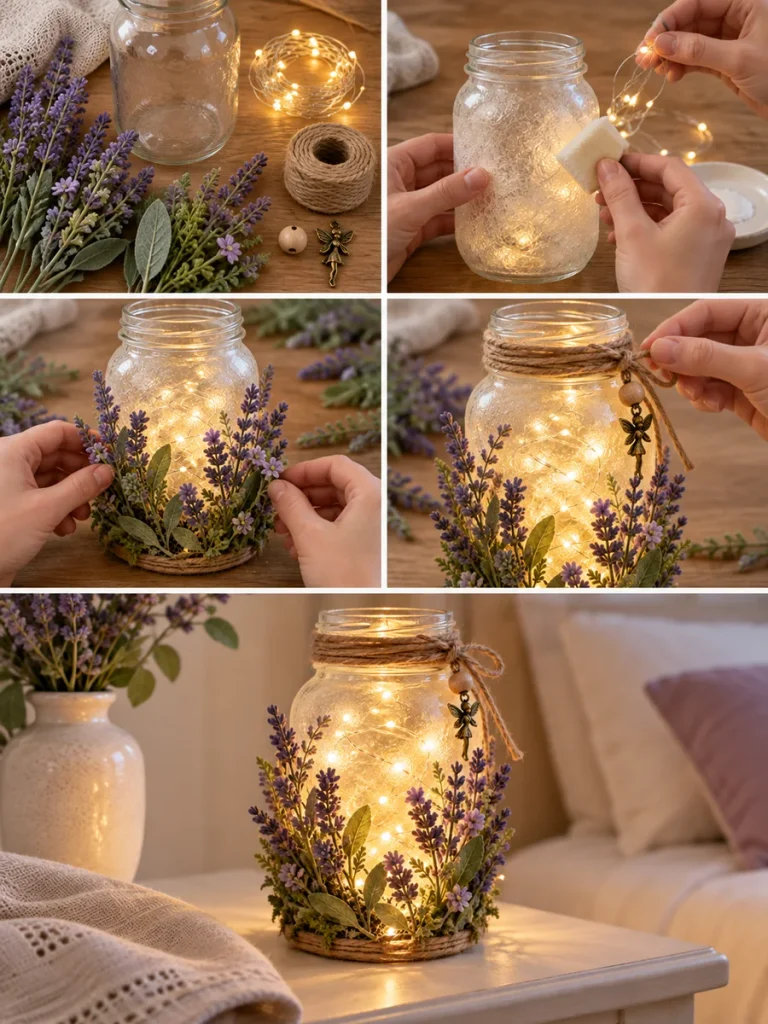
- Lightly frost part of the jar if you want softer illumination.
- Insert the light strand.
- Arrange lavender in loose clusters around the lower half.
- Wrap jute around the neck and add a small bead or charm.
- Tuck one small lavender sprig near the top to balance the composition.
Finishing tip: Leave the upper half mostly clear so the light has room to glow.
Where it looks best: Bedrooms, bathrooms and quiet reading corners.
11. Pressed Flower Fairy Light Lantern
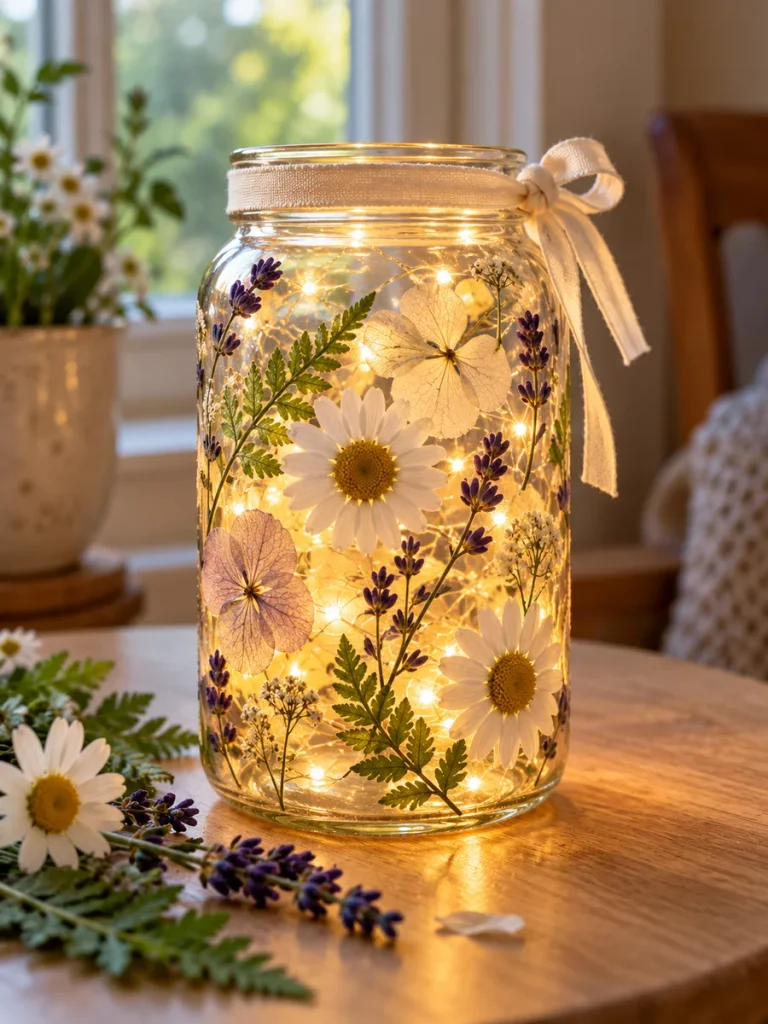
Pressed flowers are one of the prettiest ways to decorate a lantern because the petals become slightly translucent when the LEDs glow behind them.
Things You’ll Need
- Clear cylindrical glass jar
- Pressed daisies and small blossoms
- Pressed fern leaves
- Decoupage medium
- Soft brush
- Tweezers
- Warm micro LEDs
- Thin cream ribbon
How to Make It
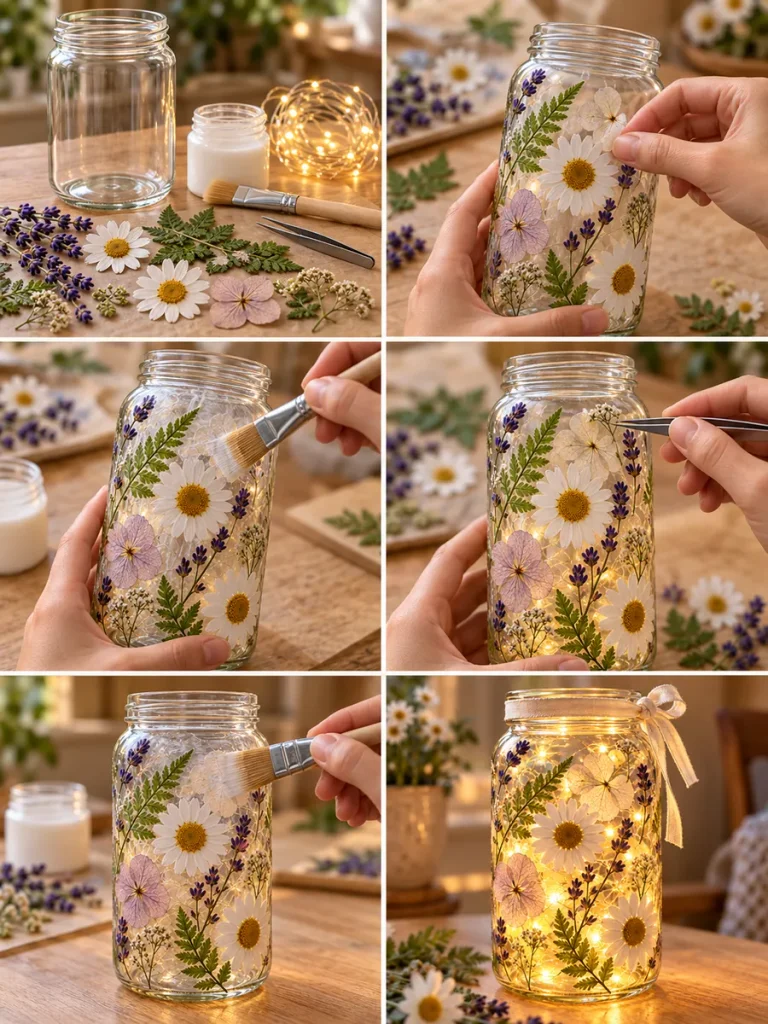
- Arrange the dried flowers on the glass before gluing anything.
- Brush on a very thin layer of decoupage medium.
- Use tweezers to position the most delicate flowers and fern pieces.
- Seal with another thin coat and let the jar dry fully.
- Add the lights and finish with a narrow ribbon around the rim.
Finishing tip: Leave generous clear gaps between flowers. The negative space makes every botanical piece easier to see.
Where it looks best: Spring tables, bedrooms, weddings and garden rooms.
12. Hanging Firefly Jar Lantern
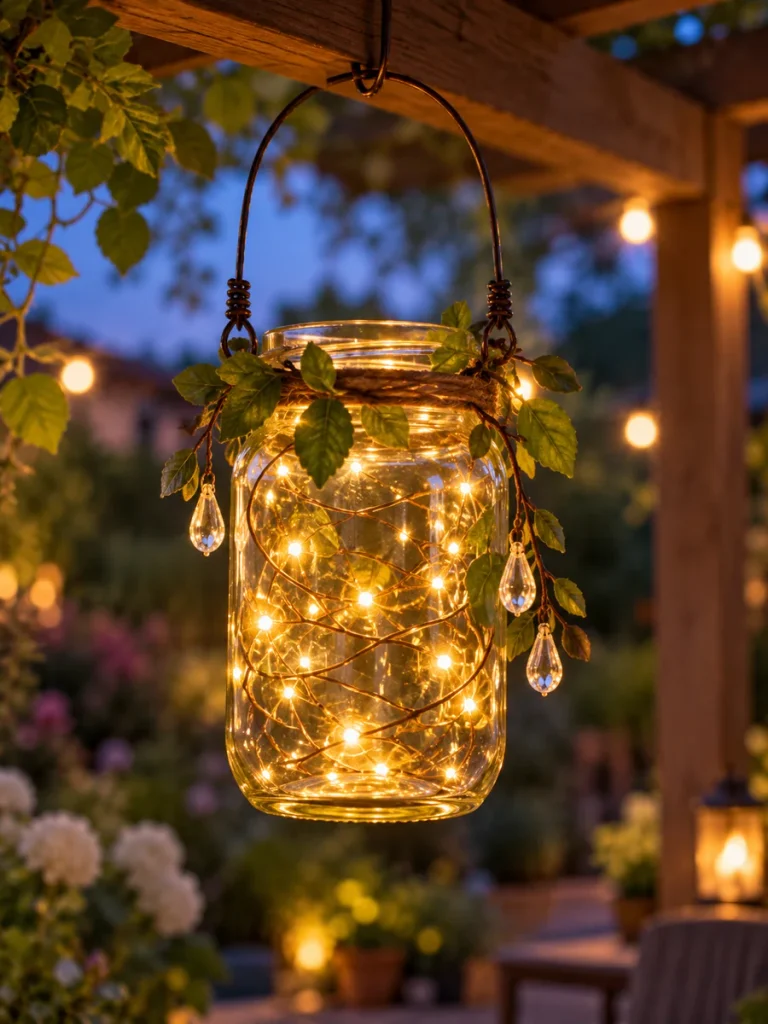
A hanging firefly jar is simple, but it becomes especially effective after dusk. Random points of warm light inside the clear jar create the illusion of tiny fireflies suspended in the air.
Things You’ll Need
- Clear glass jar
- Fine copper-wire warm LEDs
- Strong craft wire
- Pliers
- A few faux leaves
- Small clear beads or drops
- Optional jute
How to Make It
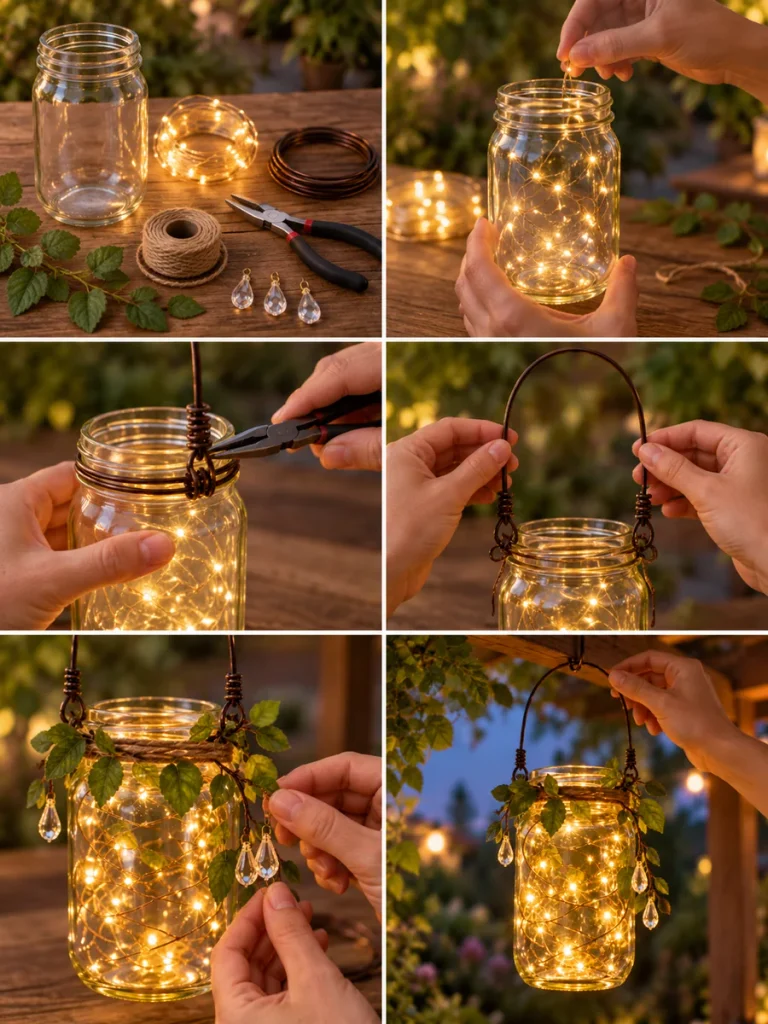
- Feed the lights in loosely rather than coiling them neatly.
- Wrap strong wire around the jar neck and secure both sides with pliers.
- Shape a smooth handle with enough room for hanging.
- Add a few leaves around the rim.
- Attach two or three clear beads where they can catch the light.
Finishing tip: Test the handle over a soft surface before hanging the lantern outdoors.
Where it looks best: Pergolas, balconies, covered patios and garden hooks.
13. Moonlit Forest Silhouette Lantern
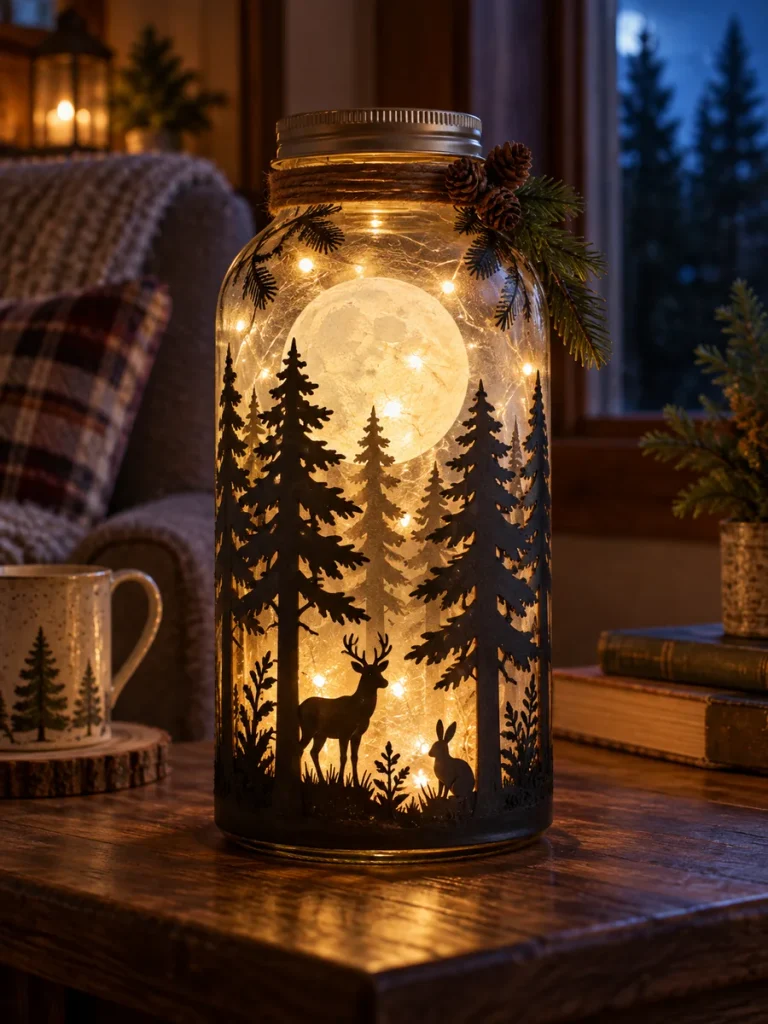
This silhouette lantern has a more grown-up, atmospheric look. Black pine trees, a deer and rabbit are layered around a glowing moon so the jar resembles a tiny nighttime forest.
Things You’ll Need
- Tall clear glass jar
- Black cardstock
- Pale translucent paper
- Warm or neutral-white LEDs
- Scissors or craft knife
- Glue
- Optional twine and pine sprig
How to Make It
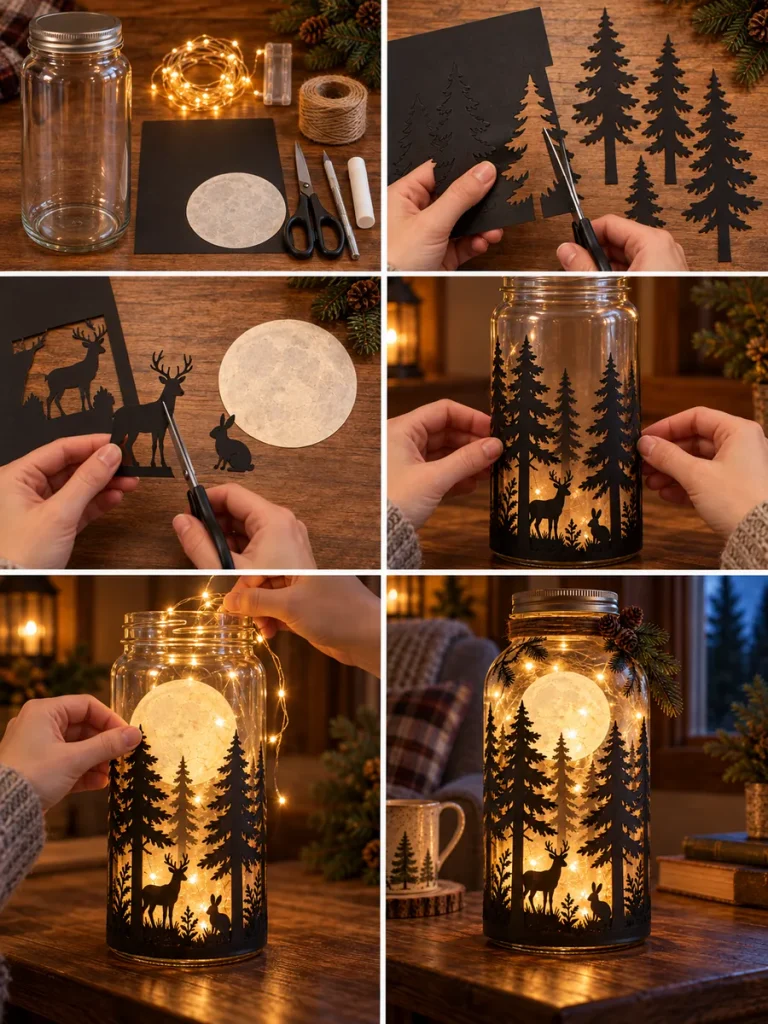
- Cut pine trees in several heights.
- Cut a small deer and rabbit silhouette.
- Make one large translucent moon circle.
- Attach the forest layer around the lower portion of the jar, with the moon positioned behind it.
- Add the fairy lights and finish the rim simply.
Finishing tip: Varying the tree heights creates depth. A single flat row will look more like a stencil than a forest.
Where it looks best: Reading corners, winter mantels and cabin-inspired rooms.
14. Fairy Door Tree Stump Lantern
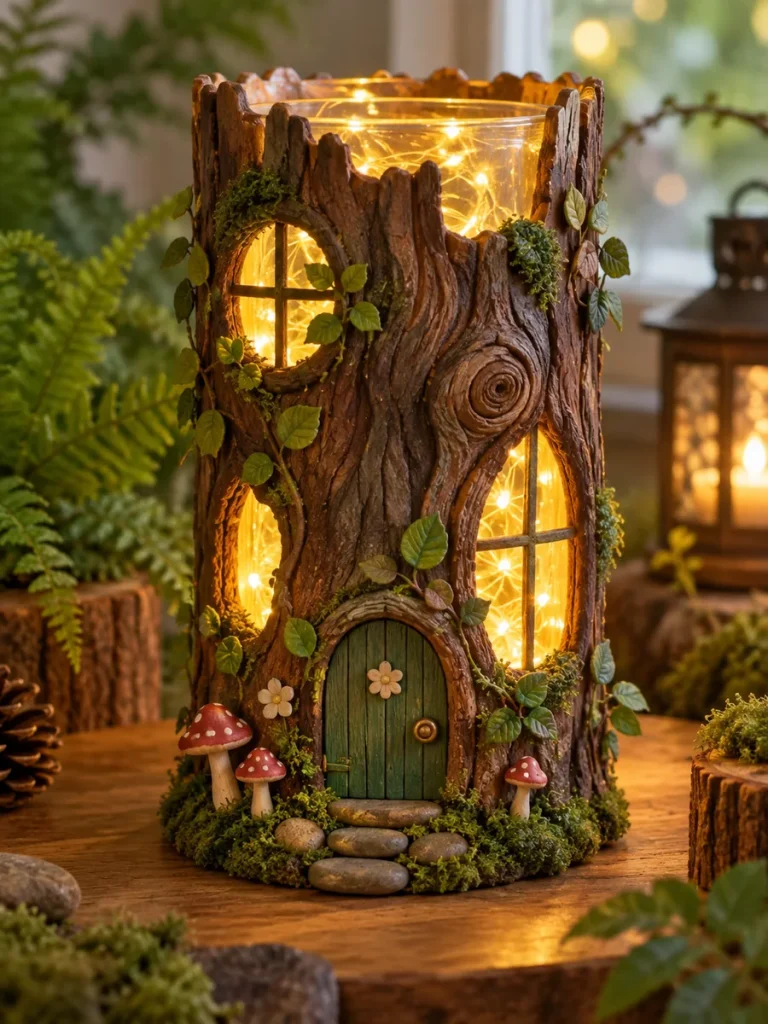
A tree-stump lantern is one of the most sculptural ideas here, but it is still manageable when the clay layer is kept thin. Clear gaps become glowing windows, while textured brown clay creates the bark.
Things You’ll Need
- Tall clear cylinder
- Air-dry clay
- Brown acrylic paints
- Small sculpting tool
- Warm fairy lights
- Rounded green fairy door
- Moss, mushrooms, leaves and pebbles
- Glue
How to Make It
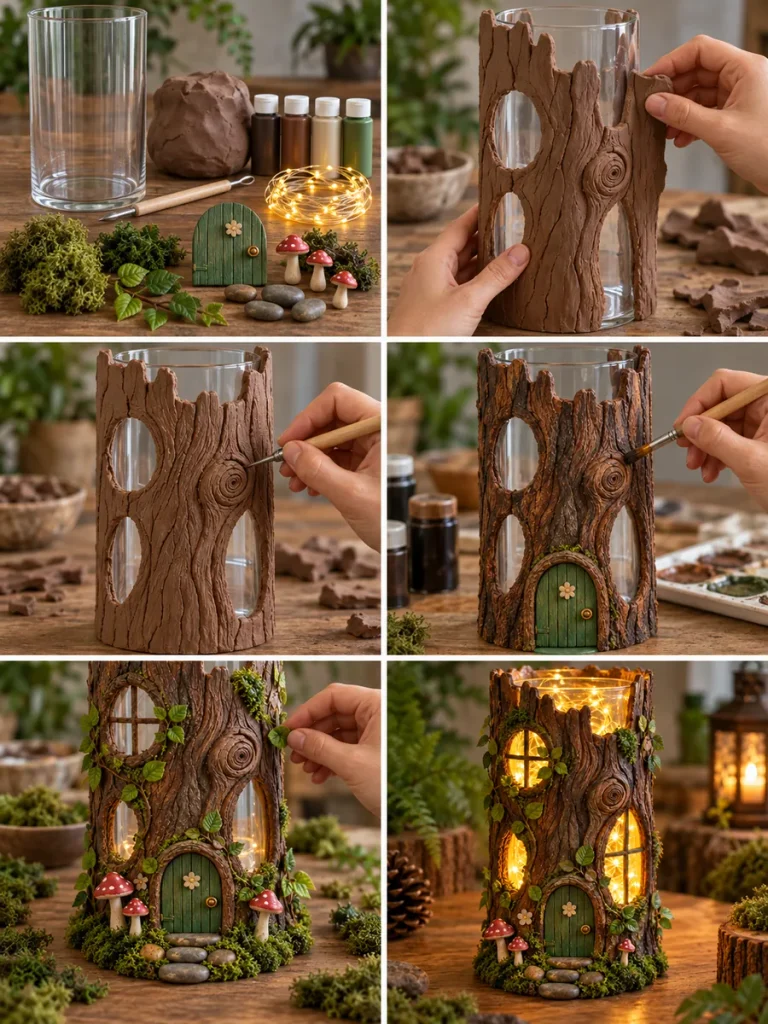
- Apply thin clay sections around the cylinder while deliberately leaving several clear openings.
- Scratch bark lines, knots and grooves into the clay.
- Paint with more than one shade of brown.
- Add the rounded door and simple window frames.
- Insert the lights and decorate the base with moss, mushrooms and stones.
Finishing tip: Dry-brush a lighter brown over the raised texture after the darker paint dries. It makes the bark look far more dimensional.
Where it looks best: Fairy gardens, woodland shelves and covered porch displays.
15. Ocean Mermaid Fairy Light Lantern
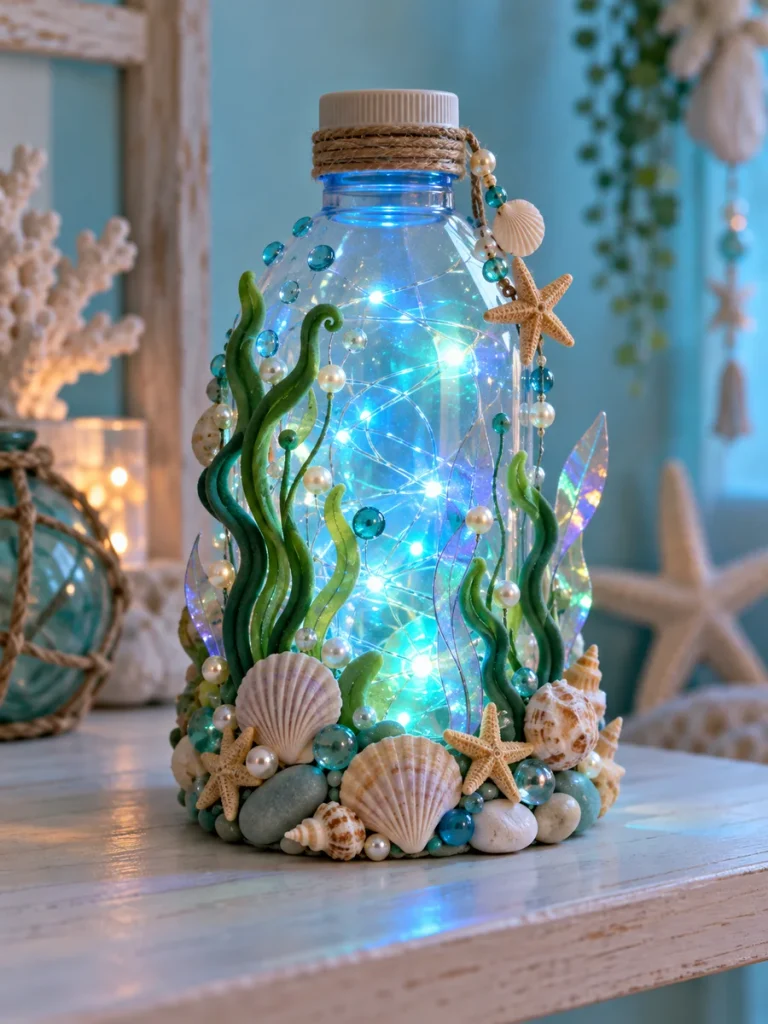
The revised ocean lantern stays focused on an underwater garden rather than using a large mermaid tail. Blue light, seaweed shapes, shells, pearls and starfish give the bottle a coastal fantasy feel while keeping the craft realistic enough to recreate.
Things You’ll Need
- Clear jar or bottle
- Blue and aqua micro LEDs
- Small seashells
- Faux pearls and aqua glass beads
- Mini starfish
- Green craft foam or lightweight clay
- Iridescent translucent material
- Smooth pale pebbles
- Clear glue
How to Make It
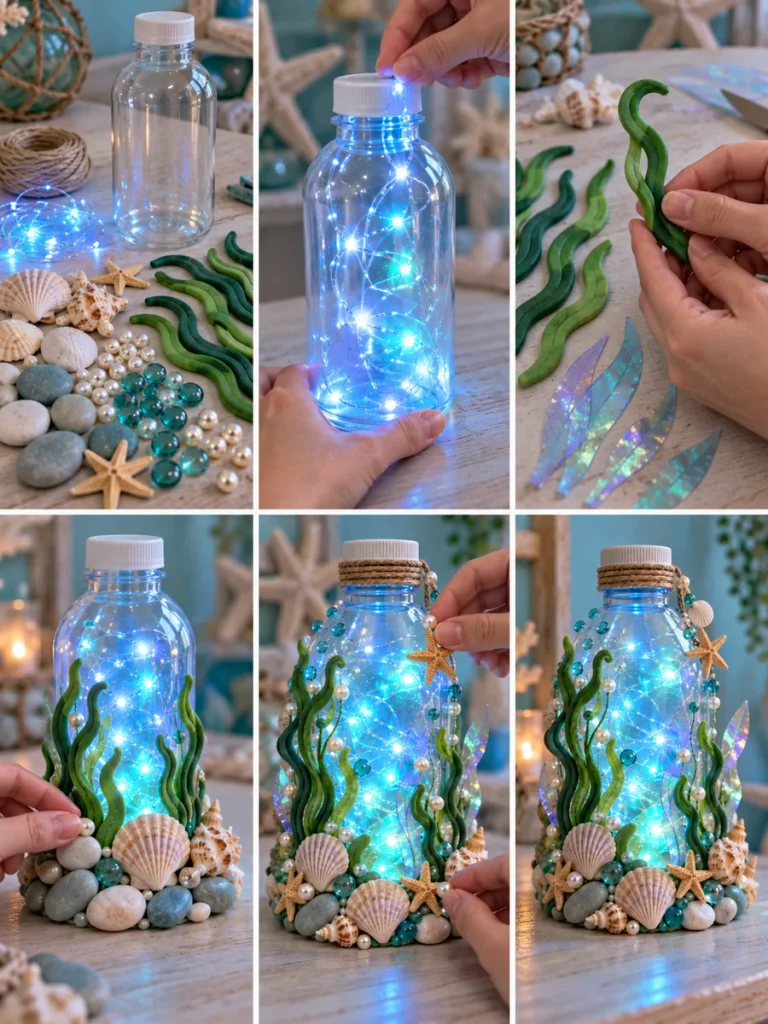
- Insert the blue lights.
- Cut or shape several curved seaweed pieces in different greens.
- Build a low base with pebbles, shells and pearls.
- Add seaweed vertically around the lower and middle areas.
- Finish with a few iridescent strips and small starfish, leaving plenty of clear glass visible.
Finishing tip: Use the largest shells low on the bottle and the smallest details higher up. That helps the scene feel grounded.
Where it looks best: Bathrooms, coastal bedrooms and summer party tables.
16. Under-the-Sea Jellyfish Lantern
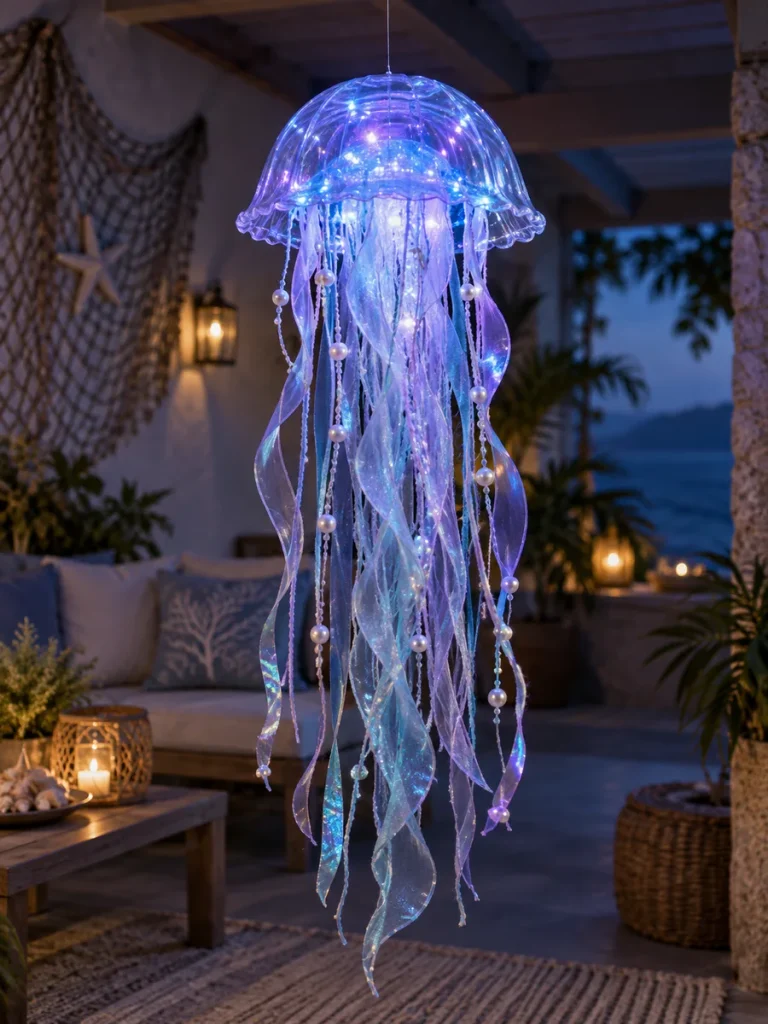
This project changes the silhouette completely. Instead of a jar, a transparent bowl becomes the jellyfish bell, with ribbons and fine cords hanging beneath it.
Things You’ll Need
- Clear lightweight plastic bowl
- Blue-violet battery LEDs
- Sheer lavender and iridescent ribbon
- Fine cord or yarn
- Pearl beads
- Clear fishing line
- Glue and scissors
How to Make It
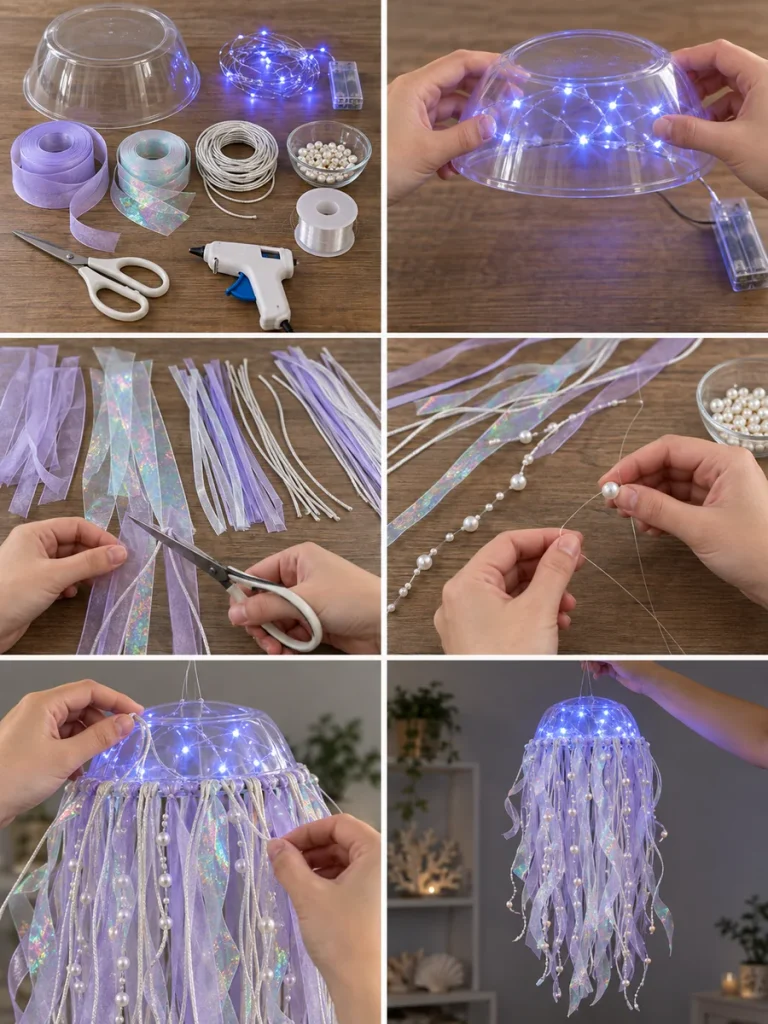
- Turn the bowl upside down and secure the LEDs underneath.
- Cut ribbon and cord into mixed lengths.
- Thread a few pearl beads onto selected strands.
- Attach the tentacles around the edge of the bowl.
- Add clear line at the top and test the balance before hanging.
Finishing tip: Mix straight and curled ribbons. Movement is what makes this lantern feel jellyfish-like.
Where it looks best: Covered patios, ocean-themed rooms and party decor.
17. Boho Macramé Fairy Light Jar Lantern
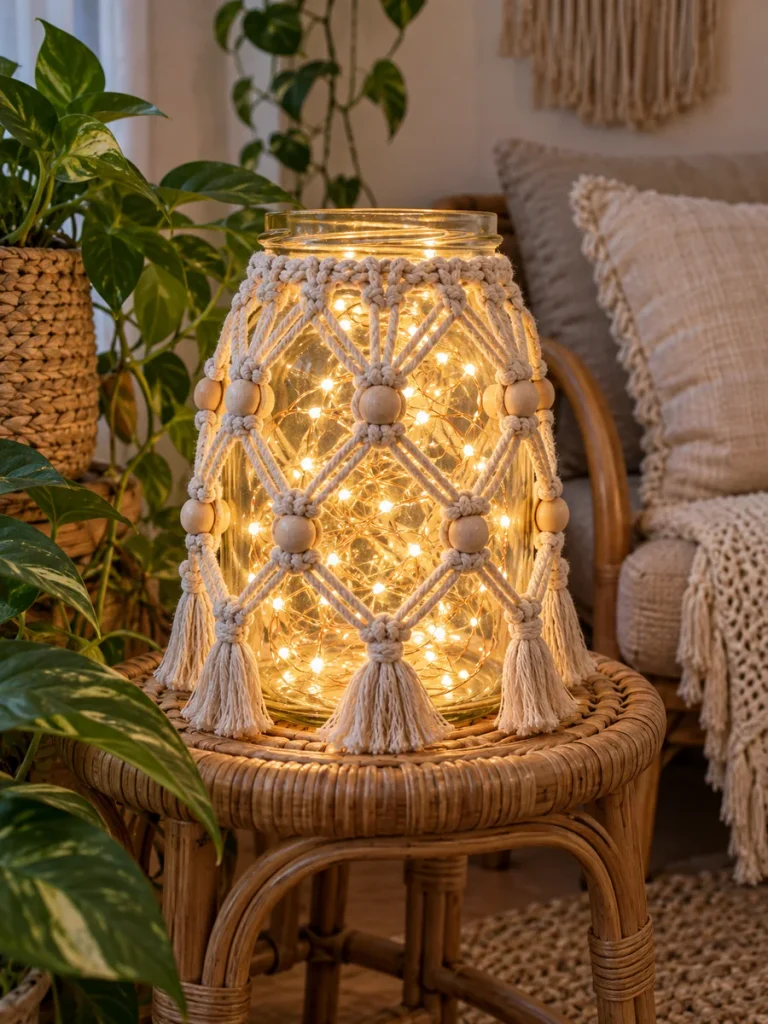
Macramé softens the hard surface of a glass jar and gives the lantern a relaxed boho look. Keep the knotting open so the lights remain visible.
Things You’ll Need
- Large clear jar
- Warm micro LEDs
- Natural cotton macramé cord
- Unfinished wooden beads
- Scissors
- Small comb for tassels
How to Make It
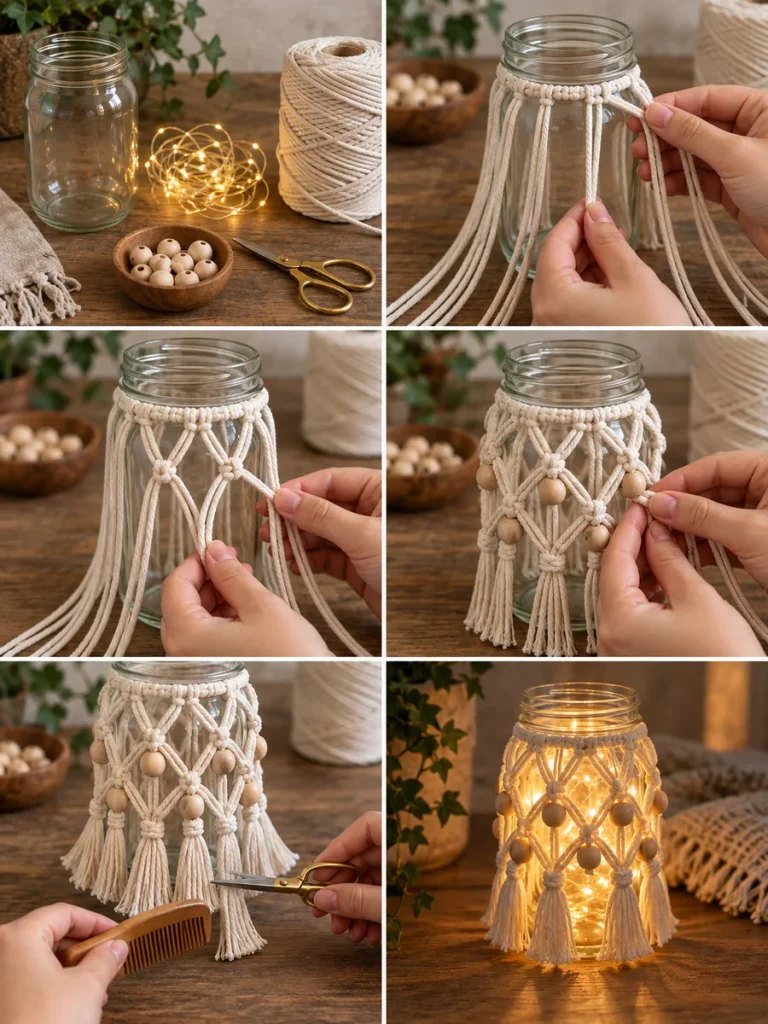
- Tie several equal cord lengths around the jar neck.
- Make a loose diamond pattern with simple knots.
- Slide wooden beads onto selected sections.
- Knot the lower points and leave short tassels.
- Trim and comb the tassels, then add the fairy lights.
Finishing tip: An open pattern photographs better and glows more strongly than dense knotting.
Where it looks best: Boho bedrooms, plant corners and reading nooks.
18. Rustic Jute and Lace Lantern
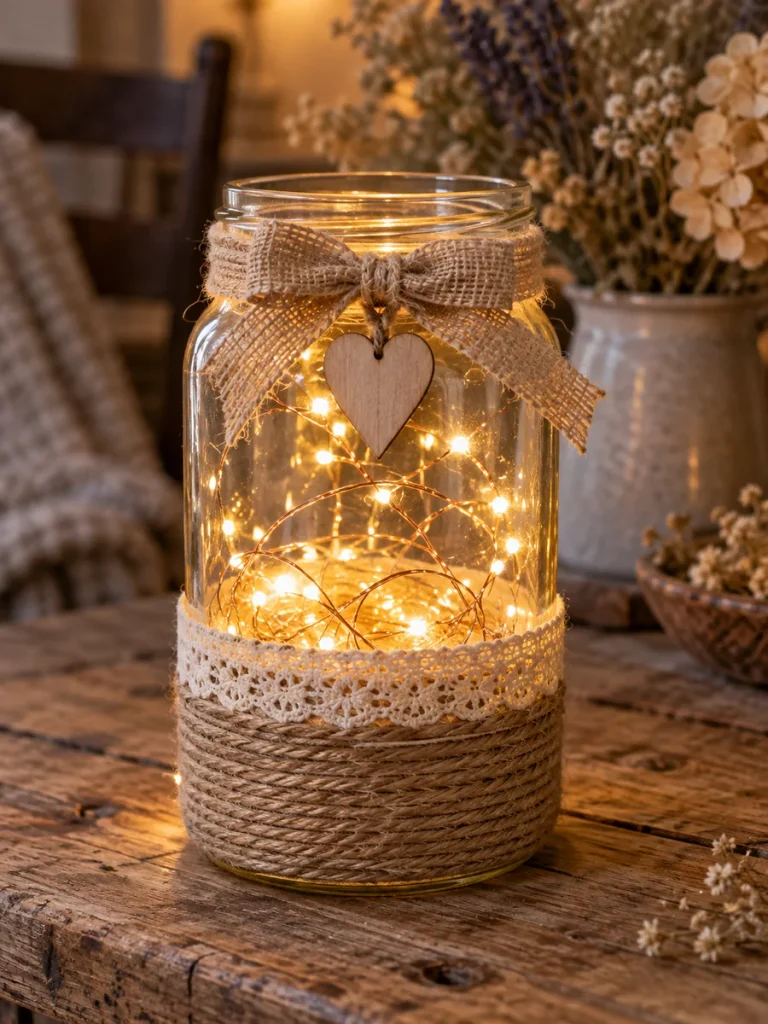
Jute and lace create a rustic lantern with very little work. The contrast between rough twine, soft lace and clear glowing glass is what makes it effective.
Things You’ll Need
- Clear glass jar
- Warm LEDs
- Jute twine
- Cream cotton lace
- Burlap ribbon
- Small wooden heart or star
- Glue and scissors
How to Make It
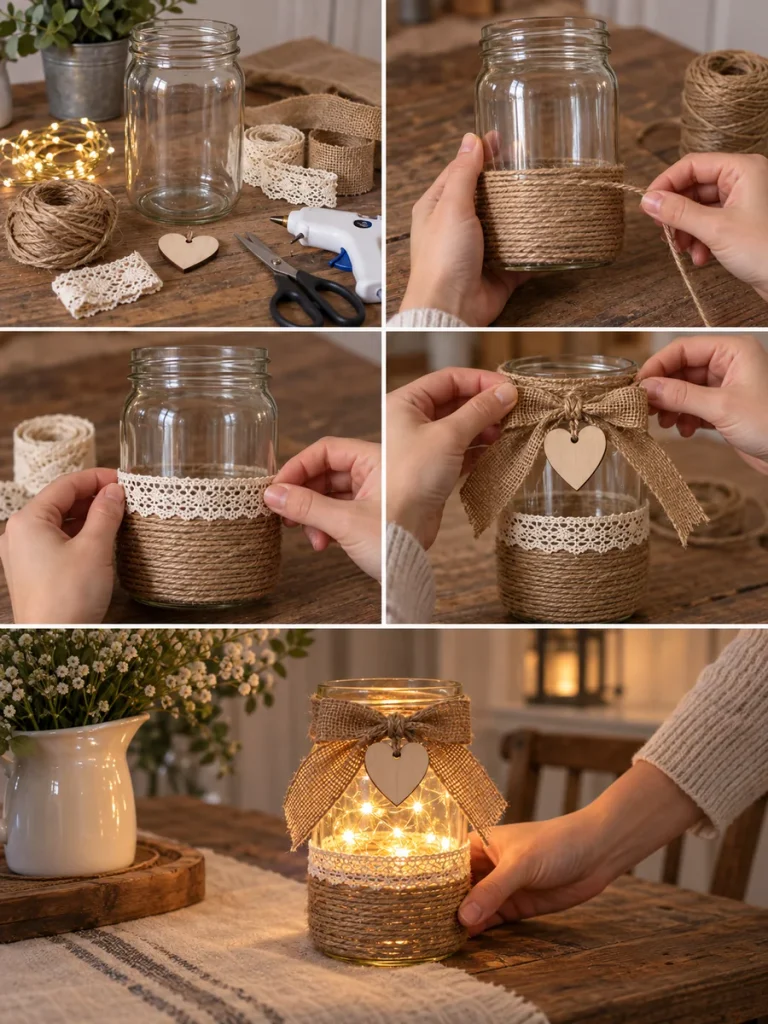
- Wrap the lower third of the jar with jute.
- Attach a narrow strip of lace just above it.
- Tie a burlap bow at the rim.
- Hang a small wooden heart from the bow.
- Place the lights inside and spread them loosely.
Finishing tip: Keep at least half of the glass completely uncovered.
Where it looks best: Farmhouse kitchens, rustic weddings and porch tables.
19. Rainbow Fairy Light Bottle Lantern
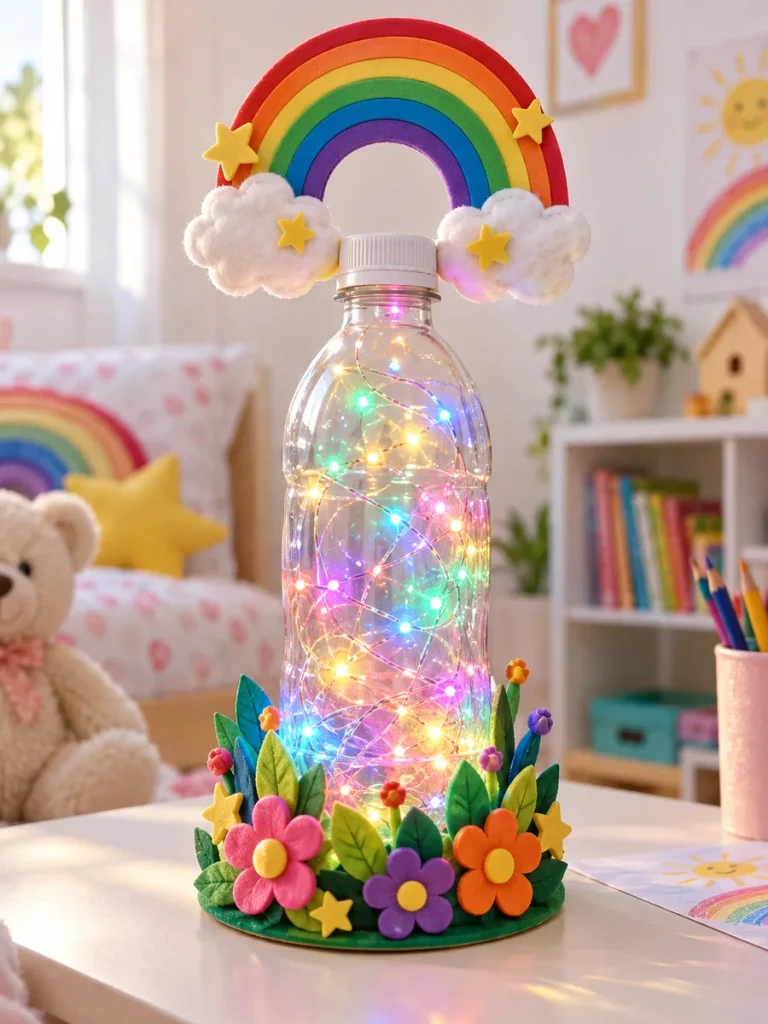
This bright bottle lantern is made for playful spaces. A raised rainbow arch, soft cloud shapes and a colorful flower border turn a plain bottle into a cheerful night light.
Things You’ll Need
- Clear bottle
- Multicolor micro LEDs
- Colored craft foam
- White foam or cotton for clouds
- Small stars
- Colorful flowers and leaves
- Glue and scissors
How to Make It
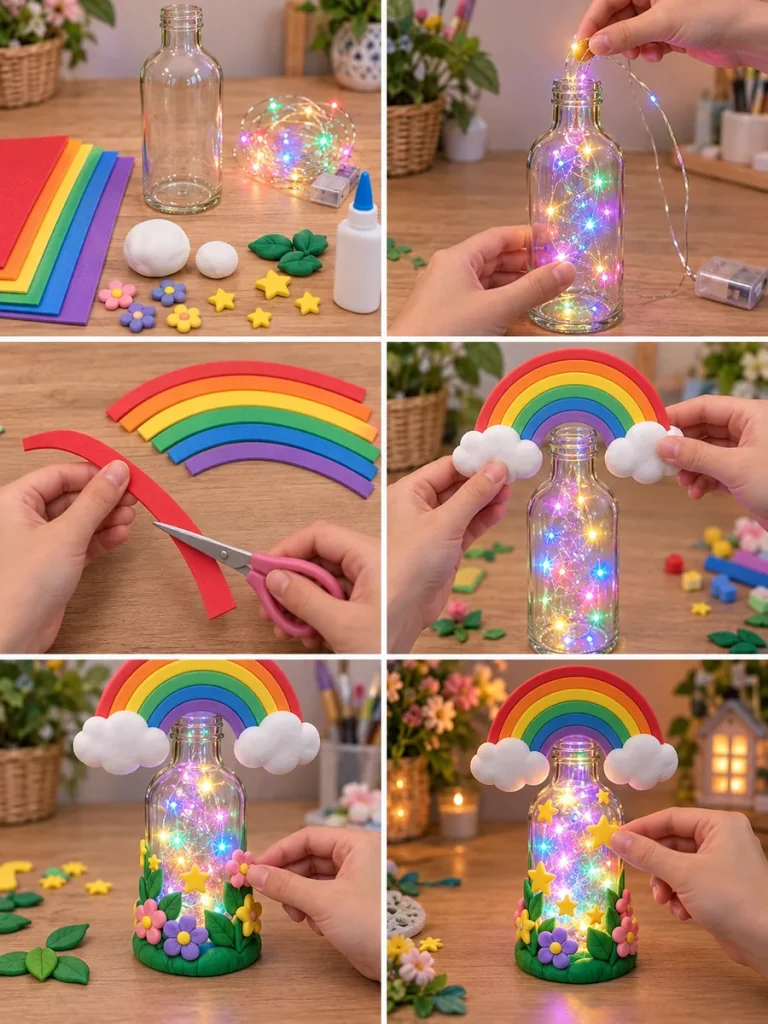
- Insert the multicolor lights.
- Cut curved strips for the rainbow and layer them carefully.
- Add cloud shapes to both ends.
- Secure the rainbow above the bottle neck.
- Create a low flower-and-leaf border around the base and finish with a few stars.
Finishing tip: Make the rainbow lightweight and support it from the back so it does not lean forward.
Where it looks best: Playrooms, children’s rooms and birthday displays.
20. Autumn Pumpkin Fairy Lantern
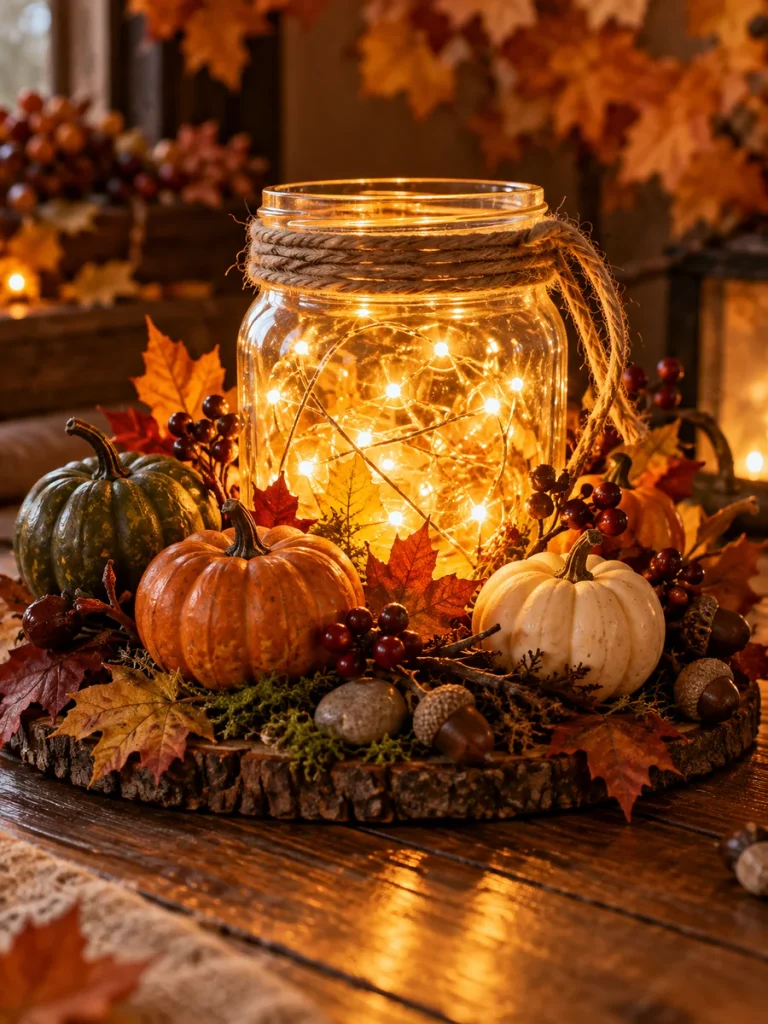
Autumn lanterns are all about texture: amber light, little pumpkins, berry stems, leaves, acorns and moss. Muted colors keep the result decorative rather than cartoonish.
Things You’ll Need
- Clear jar
- Warm or amber LEDs
- Miniature pumpkins
- Artificial autumn leaves
- Acorns and berries
- Twigs
- Faux moss
- Jute twine
- Glue
How to Make It
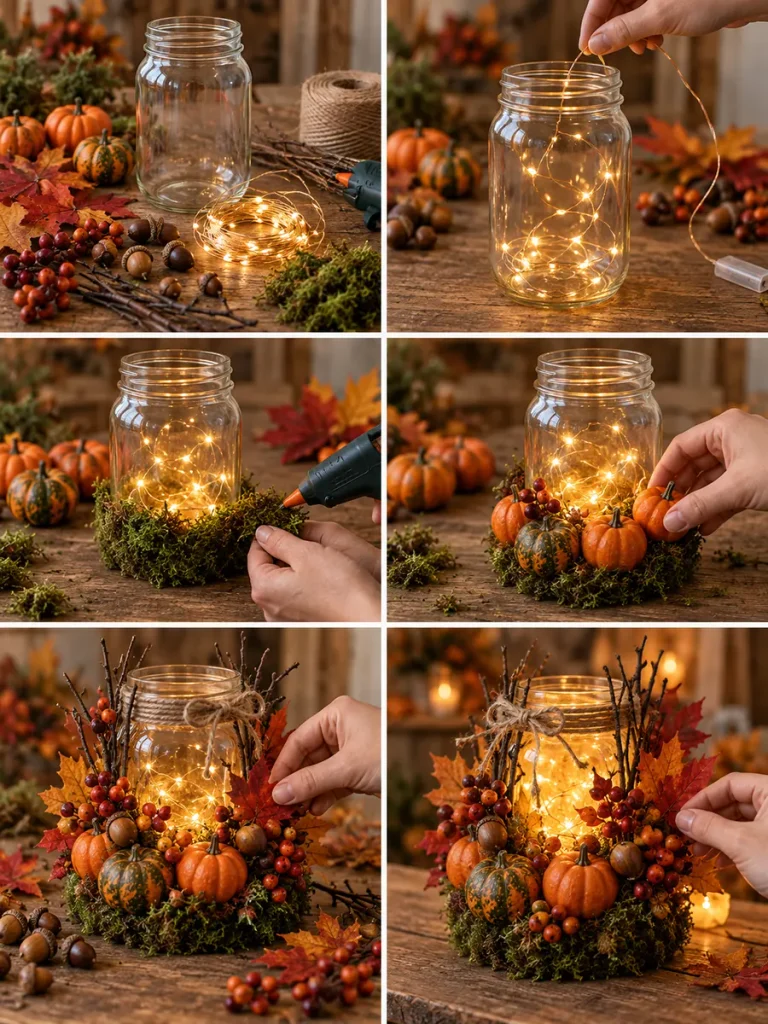
- Add the lights.
- Glue moss around the base.
- Arrange pumpkins in uneven groups.
- Fill gaps with berries, acorns and twigs.
- Add a few autumn leaves and tie jute around the rim.
Finishing tip: Mix orange with cream and dark green pumpkins for a richer fall palette.
Where it looks best: Thanksgiving tables, mantels and entry consoles.
21. Christmas Snowy Fairy Village Lantern
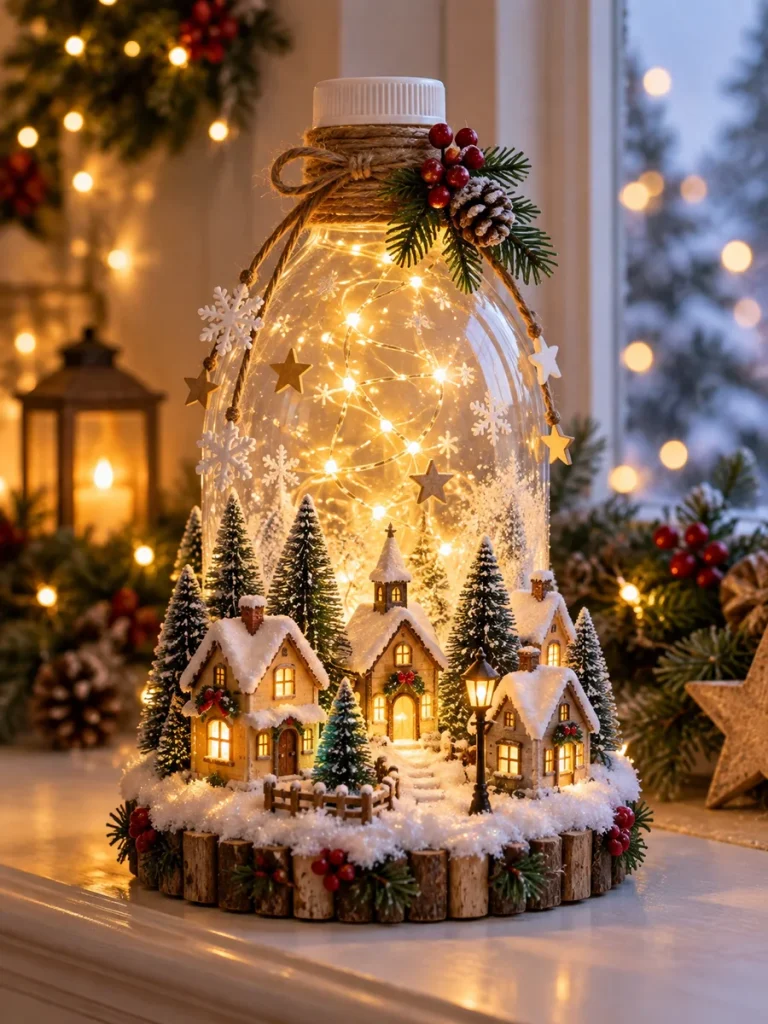
A Christmas village lantern is a miniature scene first and a jar craft second. Tiny houses and bottle-brush trees sit in faux snow while warm lights inside the bottle make the whole village feel illuminated.
Things You’ll Need
- Large clear bottle or jar
- Warm-white fairy lights
- Miniature houses
- Bottle-brush trees
- Faux snow
- Tiny stars or snowflakes
- Small wreaths or berries
- Glue
How to Make It
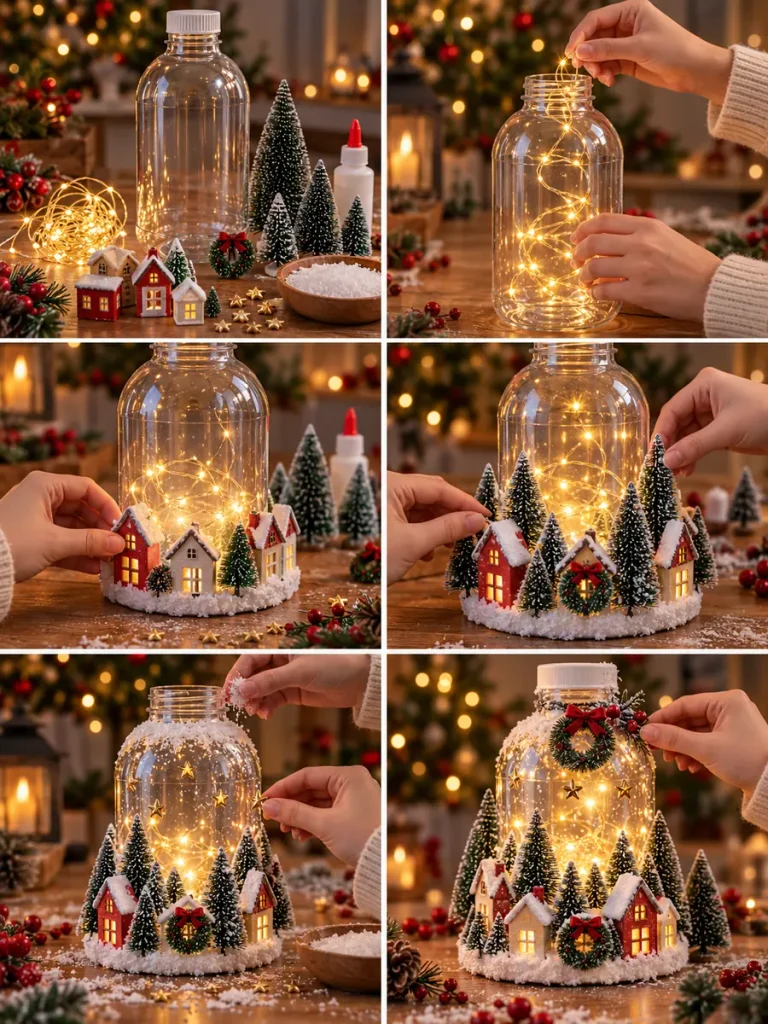
- Place the light strand inside the bottle.
- Arrange miniature houses around the base.
- Add trees in different heights between the houses.
- Apply faux snow around the ground and lightly on rooftops.
- Add a few stars or snowflakes higher on the bottle without covering too much glass.
Finishing tip: Leave small gaps in the snow so light can shine between the buildings.
Where it looks best: Christmas mantels, windowsills and holiday centerpieces.
22. Outdoor Solar Fairy Light Lantern
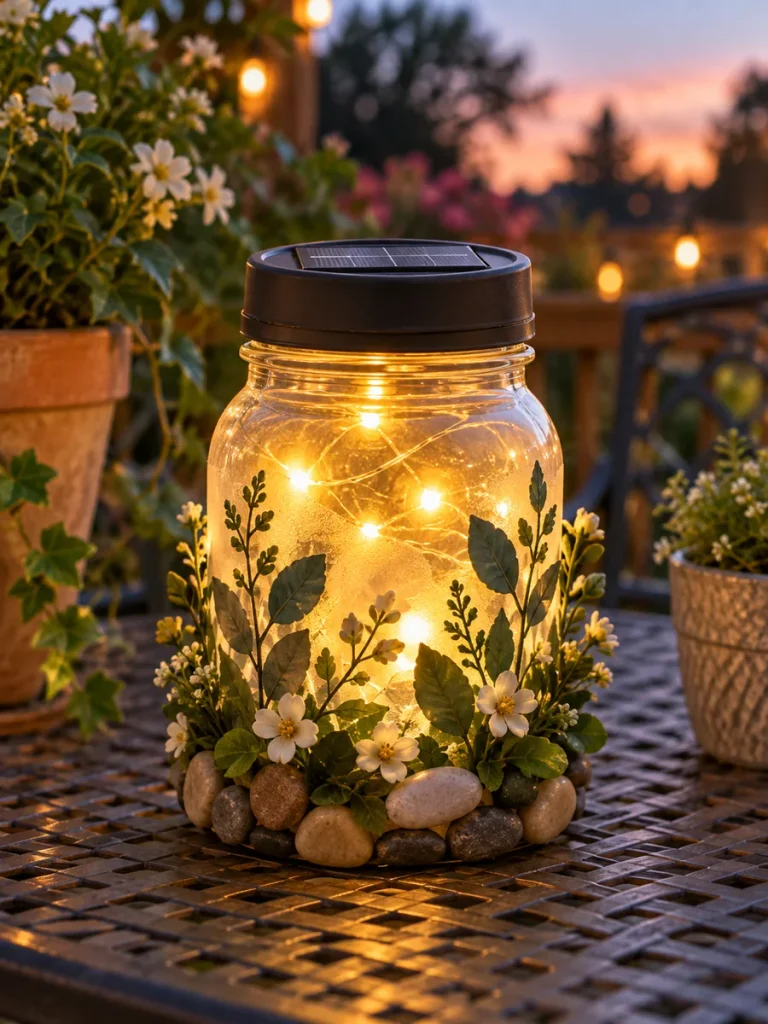
For regular outdoor use, a solar lid is the easiest solution. The revised design keeps the decoration simple—frosted glass, white flowers, green leaves and smooth pebbles—so the solar panel remains completely unobstructed.
Things You’ll Need
- Outdoor-safe glass jar
- Solar fairy-light lid
- Outdoor-safe greenery
- Small white flowers
- Smooth pebbles
- Outdoor adhesive
- Optional frosted-glass spray
- Clear outdoor sealer
How to Make It
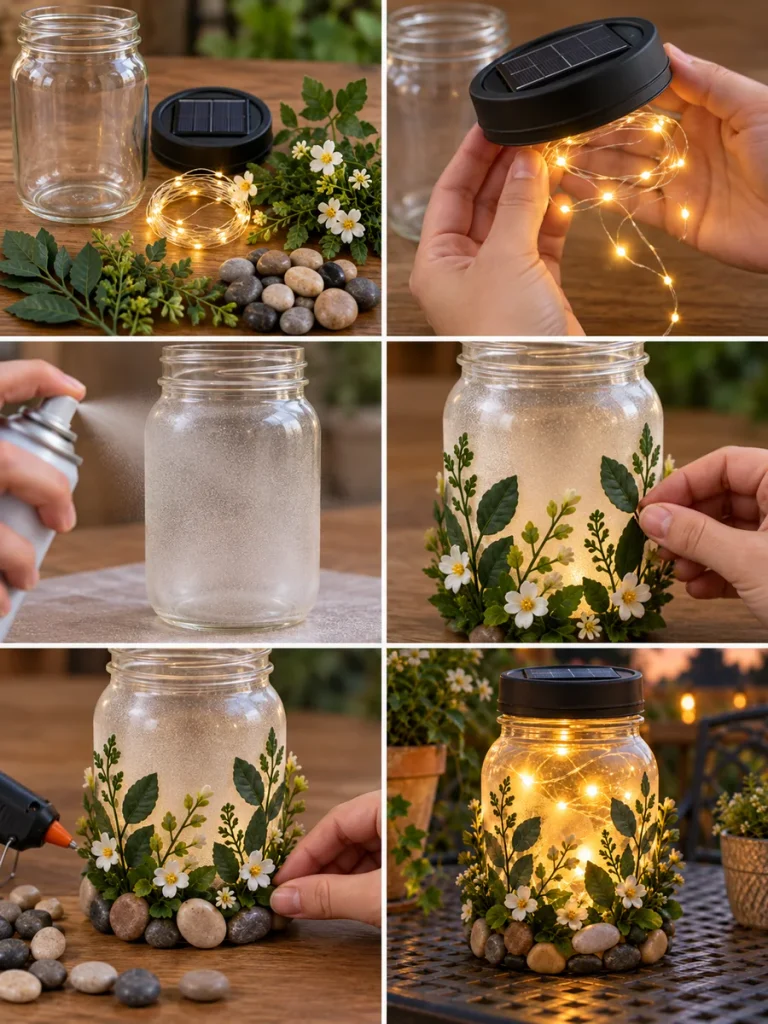
- Test the solar lid in daylight before decorating.
- Apply a light frosted finish to part of the jar, leaving some glass clear.
- Arrange pebbles around the lower edge.
- Add weather-resistant leaves and small flowers between the stones.
- Seal compatible decorations if needed, then fit the solar lid without covering the panel.
Finishing tip: Do not decorate over the top of the solar panel. Even a small obstruction can reduce charging.
Where it looks best: Patio tables, balconies, covered steps and garden seating areas.
23. Magical Fairy Castle Bottle Lantern
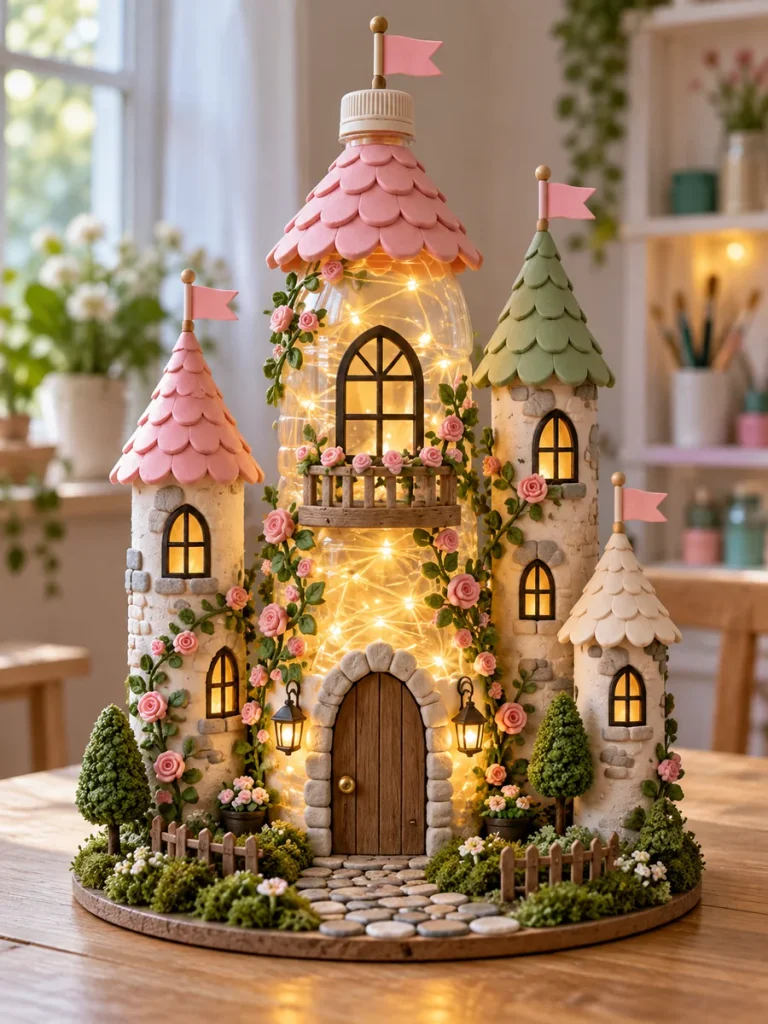
The final castle uses the recycled bottle as the glowing center tower, with lightweight side towers built around it. Pink and sage roofs, climbing roses, arched windows and a pebble path give it a finished fairytale look, while the process remains believable with cardboard tubes, clay and craft foam.
Things You’ll Need
- Large clear plastic bottle
- Warm micro fairy lights
- Cardboard tubes in several sizes
- Craft foam or lightweight card for roofs
- Air-dry clay
- Cream, pink and sage acrylic paint
- Dark cardstock for arched windows
- Faux moss, tiny flowers and vines
- Pebbles and craft sticks
- Glue, scissors and craft knife
How to Make It
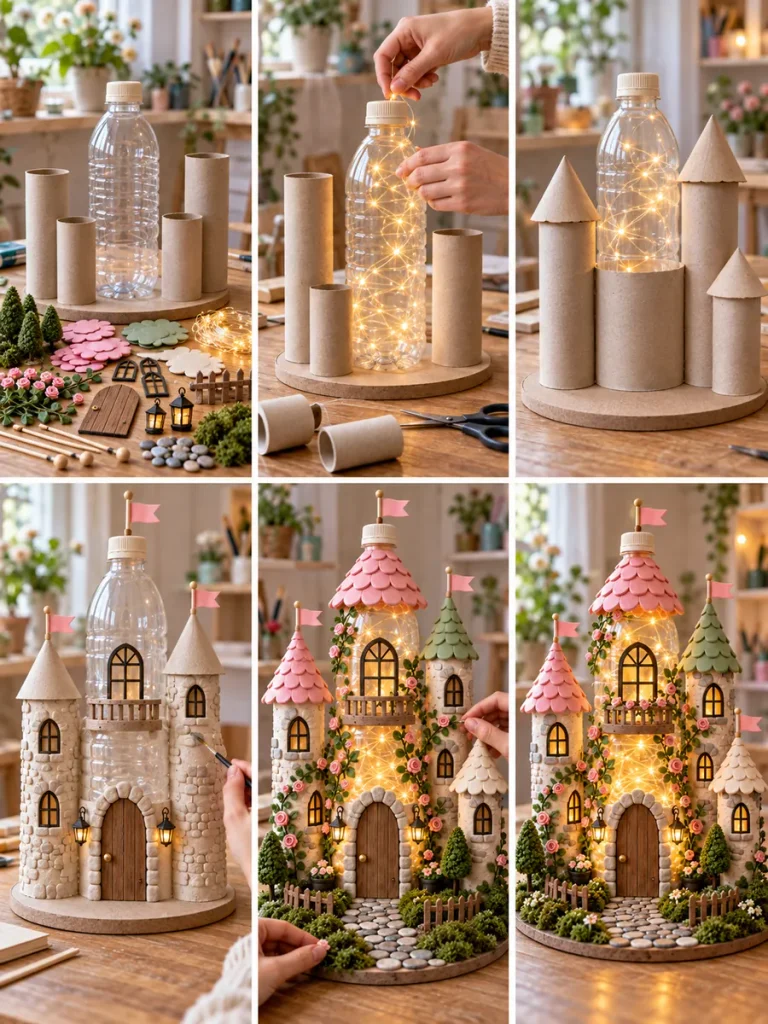
- Insert the lights into the central bottle and keep the battery access open.
- Cut cardboard tubes to different heights and arrange them around the bottle on a sturdy round base.
- Add roof forms and simple arched window openings.
- Cover selected areas with a thin clay layer and texture it like stone.
- Paint the towers and roofs, then add the main door, balcony or railing details.
- Finish with roses, vines, moss, small trees and a curved pebble path leading to the entrance.
Finishing tip: Different tower heights make the castle feel more convincing. Keep the center bottle partially visible so the recycled construction still makes sense.
Where it looks best: Large shelves, craft rooms, covered patios and fairy-themed party tables.
How to Make Your Fairy Light Lanterns Look More Professional
The battery box is usually the least attractive part of a fairy-light project, so plan for it from the beginning. A removable moss section, a false base, a rear panel or a roof detail can conceal it without making battery changes difficult.
Texture also matters. Smooth glass becomes much more interesting beside rough moss, jute, clay, pebbles or wood. Try combining two or three textures rather than covering everything with the same material. Most importantly, leave transparent areas. If every inch of the container is hidden, you lose the soft glow that makes a fairy lantern special.
Choosing the Best Fairy Light Color
Warm white is the most versatile choice for cottages, woodland designs, pressed flowers, rustic jars and autumn decor. Cool white works beautifully with winter scenes and moonlit silhouettes. Blue and aqua suit ocean projects, while purple adds a stronger fantasy feeling. Multicolor lights are best saved for rainbow and children’s designs where the playful effect is intentional.
Indoor Decorating Ideas
Fairy-light lanterns are easy to use because they do not require much space. A single cottage can brighten a bookshelf, while a pressed-flower jar works well on a bedside table or windowsill. For a stronger display, group two or three different heights rather than repeating the exact same lantern. A tall castle next to a simple floral jar, for example, feels collected rather than mass-produced.
Using Fairy Light Lanterns Outdoors
Covered patios, balconies and pergolas are ideal places for handmade lanterns. Delicate designs made with paper, fabric, moss or untreated clay should be treated as temporary outdoor decor and brought inside after use. For exposed garden areas, choose waterproof lights, weather-resistant decorations and a suitable outdoor sealer.
Frequently Asked Questions
What fairy lights are best for homemade lanterns?
Battery-operated micro LEDs are usually easiest because the wire is flexible and almost disappears against clear glass. They also let you place the lantern away from an outlet.
Can I use plastic bottles?
Yes. Large clear plastic bottles are especially useful for cottages, castles, celestial bottles and balloon designs because they are lightweight and easy to decorate.
How do I keep the fairy-light wire from looking messy?
Feed the strand in gradually and use a pencil or wooden skewer to move loops to different heights. A loose, irregular arrangement looks much better than one tight bundle at the bottom.
Can these lanterns be used outside?
Yes, but the lights and decorative materials must suit outdoor conditions. Highly detailed craft lanterns are usually best on a covered patio or brought indoors after use.
Can I use real candles?
For the projects in this article, use LED fairy lights or flameless candles instead. Many of the materials used here are not suitable around an open flame.
Final Thoughts
The nicest part of these DIY Fairy Light Lanterns Ideas is that the materials do not have to be expensive or perfect. A recycled bottle can become a glowing balloon garden, a jar can turn into a miniature forest, and a handful of cardboard tubes can grow into a fairytale castle.
Start with the idea that feels manageable, keep the light visible, and let the handmade details stay slightly imperfect. Those little irregularities are often what make the finished lantern feel charming rather than manufactured.