 Skip to content
Wooden Christmas gnomes bring a cozy handmade feeling to holiday decorating. With their oversized hats, fluffy beards, round noses, and rustic wooden bodies, these little characters can fit beautifully into farmhouse, traditional, woodland, Scandinavian, and whimsical Christmas themes.
The best part is that you do not need advanced woodworking skills to make most of them. Scrap lumber, leftover 2×4 pieces, wood slices, pallet boards, wooden pegs, and small branches can all be transformed into charming holiday decorations with a little paint and creativity.
These DIY wooden Christmas gnomes—sometimes searched for as “diy wooden christmas knomes”—include everything from tiny tree ornaments and tiered-tray decorations to oversized porch gnomes, Christmas signs, countdown decorations, and even a light-up gnome village.
Use the ideas exactly as described or customize the colors, hats, beard styles, and finishing details to coordinate with your own Christmas decor.
1. Rustic Triangle Scrap Wood Christmas Gnome
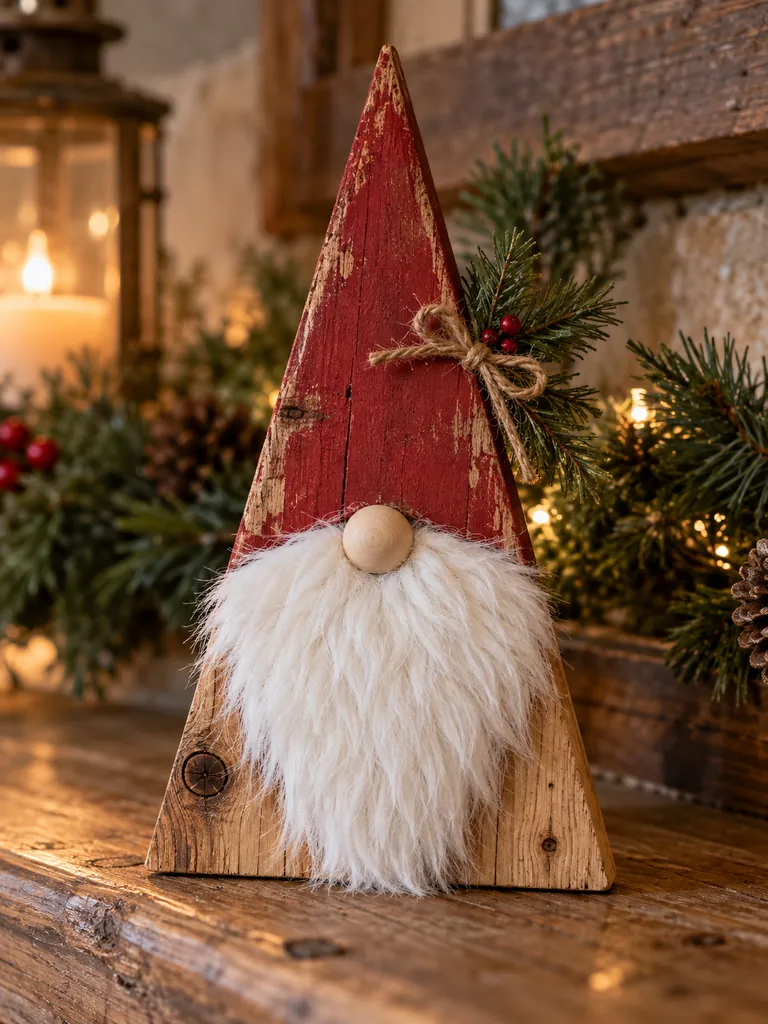
Turn an ordinary piece of scrap lumber into a simple rustic Christmas gnome that looks especially charming on a mantel, shelf, or entryway table. The triangular wooden body creates the shape of the hat naturally, which makes this one of the easiest designs for beginners.
Keep some of the wood grain visible and lightly distress the painted areas for an aged handmade appearance.
Items Needed
- Scrap wood board
- Saw
- Sandpaper
- Red or burgundy paint
- White faux fur
- Small wooden ball
- Hot glue
- Twine
- Paintbrush
How to Make
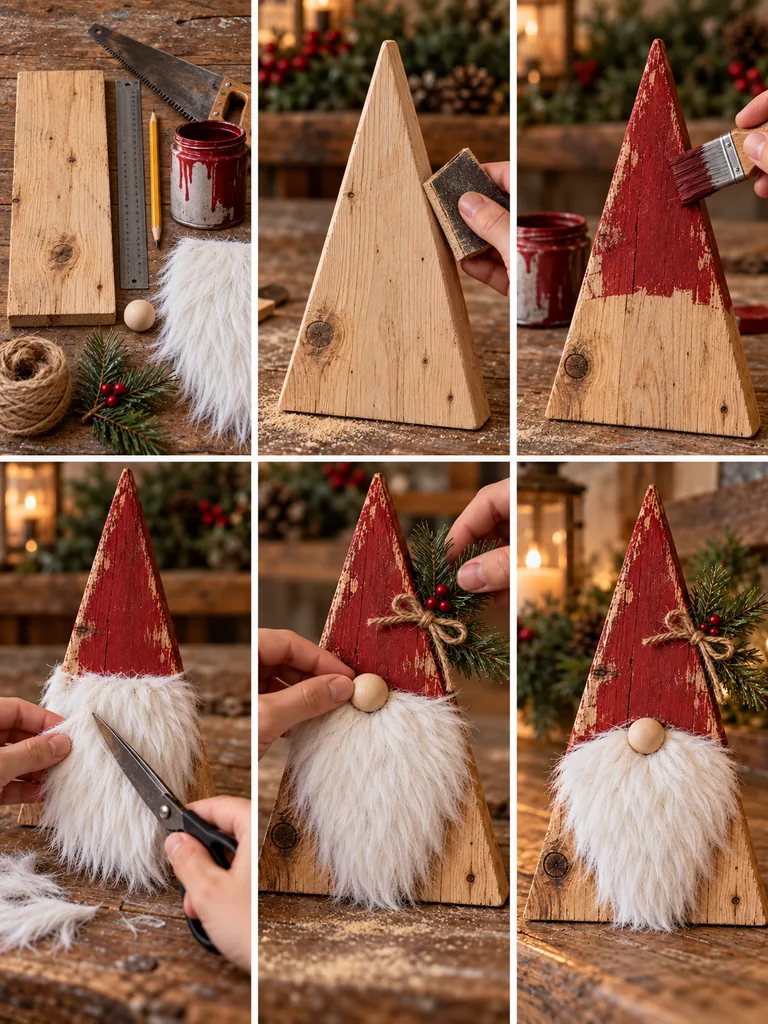
- Cut the scrap wood into a tall triangle with a flat bottom.
- Sand the edges until smooth while keeping a slightly rustic texture.
- Paint the upper portion red to create the gnome’s hat.
- Leave the lower portion natural or lightly whitewash it.
- Cut a triangular section of faux fur for the beard.
- Glue the beard below the hat line.
- Attach a small wooden ball over the beard for the nose.
- Finish with a small twine bow or wooden star if desired.
2. 2×4 Wooden Block Christmas Gnome
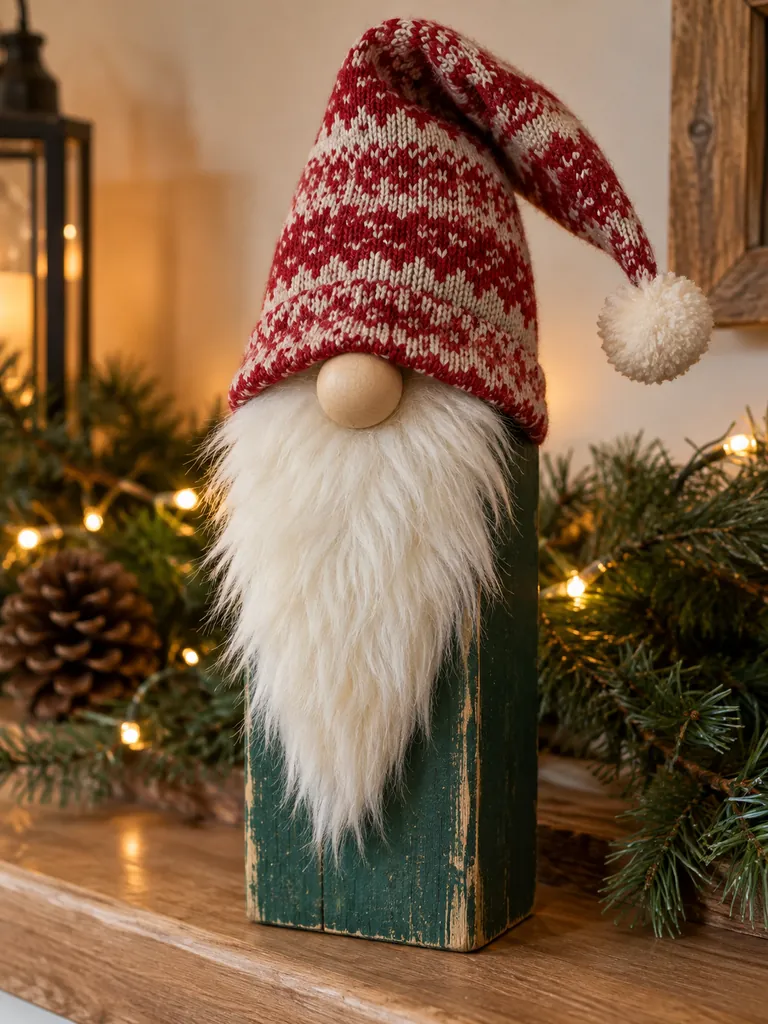
A leftover section of 2×4 lumber can become an adorable chunky Christmas gnome. Its sturdy rectangular shape makes it perfect for freestanding shelf or mantel displays.
Instead of hiding the block completely, let the painted wood remain visible so the project clearly looks handmade.
Items Needed
- Short 2×4 wood block
- Sandpaper
- Christmas-colored paint
- Felt or fabric
- Faux fur
- Wooden bead
- Hot glue
- Small pom-pom
How to Make
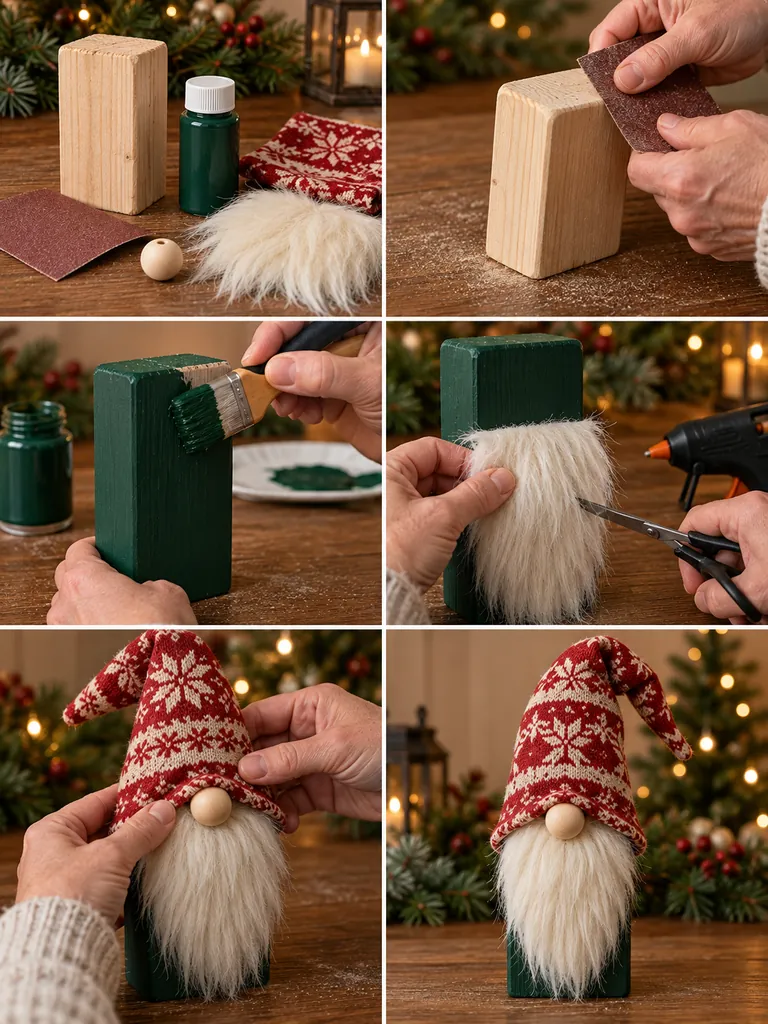
- Cut the 2×4 to your desired height and sand all edges.
- Paint the wooden block deep red, forest green, or warm white.
- Allow the paint to dry completely.
- Cut faux fur into a wide beard shape and glue it to the front.
- Make a tall pointed hat from felt or patterned fabric.
- Pull the hat over the top of the block and secure it with glue.
- Glue a round wooden bead where the hat overlaps the beard.
- Add a pom-pom to the tip of the hat.
3. Tall Wooden Porch Gnome
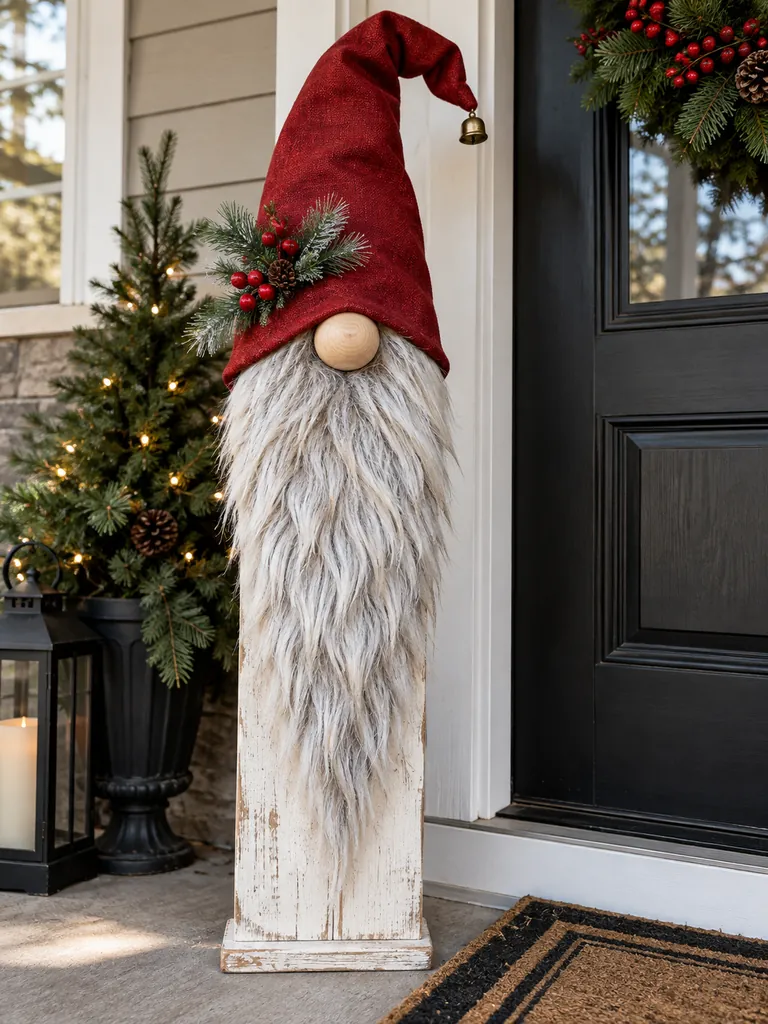
Create an oversized gnome that can stand beside your front door throughout the holiday season. A long wooden board provides the sturdy base, while an exaggerated beard and tall fabric hat make the finished decoration instantly noticeable.
This project looks especially effective when made around three to four feet tall.
Items Needed
- Long wooden plank
- Saw
- Exterior paint
- Outdoor-safe faux fur
- Large wooden ball
- Fabric for hat
- Staple gun or strong adhesive
- Decorative greenery
How to Make
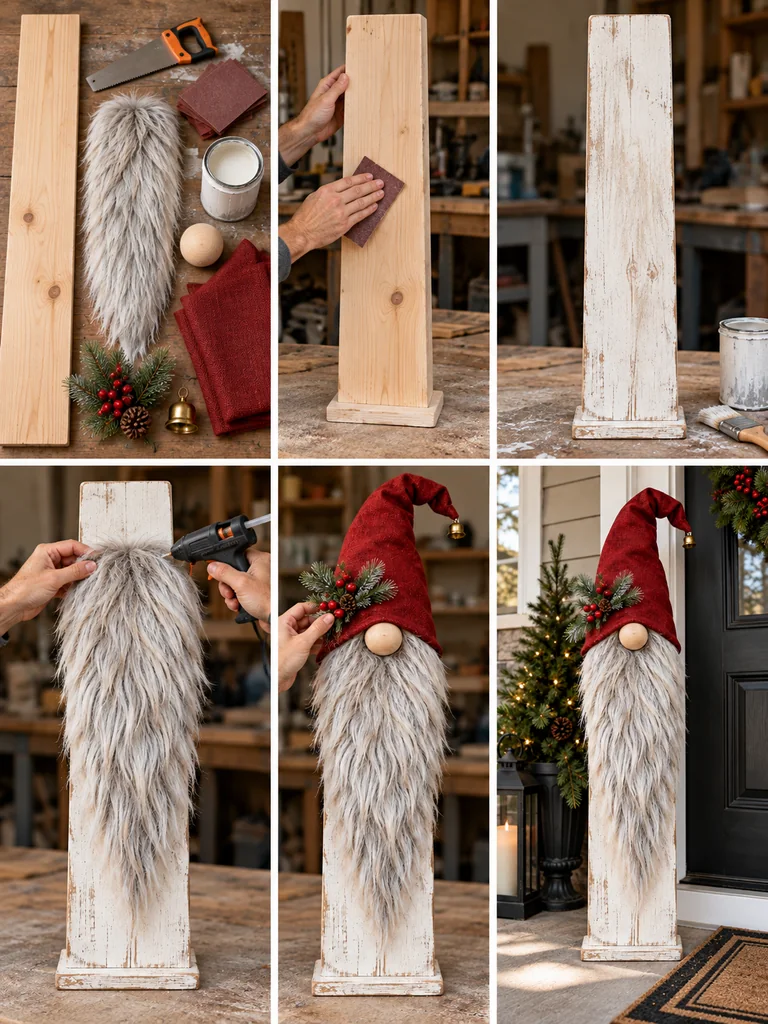
- Cut the plank to the desired height.
- Shape or angle the top slightly so the hat sits naturally.
- Sand the board before applying exterior-safe paint.
- Cut a large flowing beard from faux fur.
- Secure the beard to the lower half of the board.
- Create an oversized pointed hat from thick fabric.
- Attach a large wooden ball as the nose.
- Decorate the hat with faux pine, berries, or a small bell.
- Seal exposed painted wood if the gnome will remain outdoors.
4. Wood Slice Christmas Gnome Ornament

Natural wood slices make beautiful bases for small gnome ornaments because the bark edge adds instant woodland character. These are inexpensive enough to make in sets and can also be used as handmade gift tags.
Items Needed
- Round wood slices
- Small drill or pre-drilled slices
- Twine
- Mini felt pieces
- Faux fur
- Tiny wooden beads
- Hot glue
- Acrylic paint
How to Make
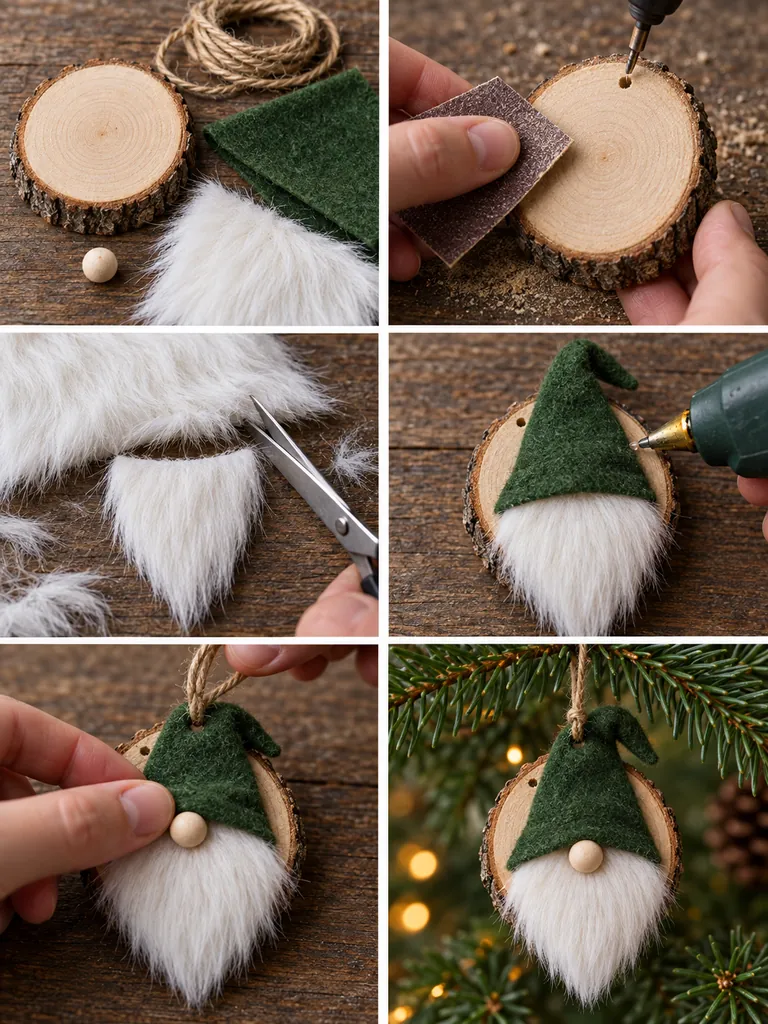
- Sand the face of each wood slice lightly.
- Paint the upper section in your chosen hat color.
- Cut a small piece of faux fur for the beard.
- Glue the beard across the lower portion of the slice.
- Attach a tiny wooden bead for the nose.
- Add a small felt hat over the painted section for extra dimension.
- Thread twine through the top hole.
- Tie the twine securely to create the hanging loop.
5. Stacked Wooden Block Gnome
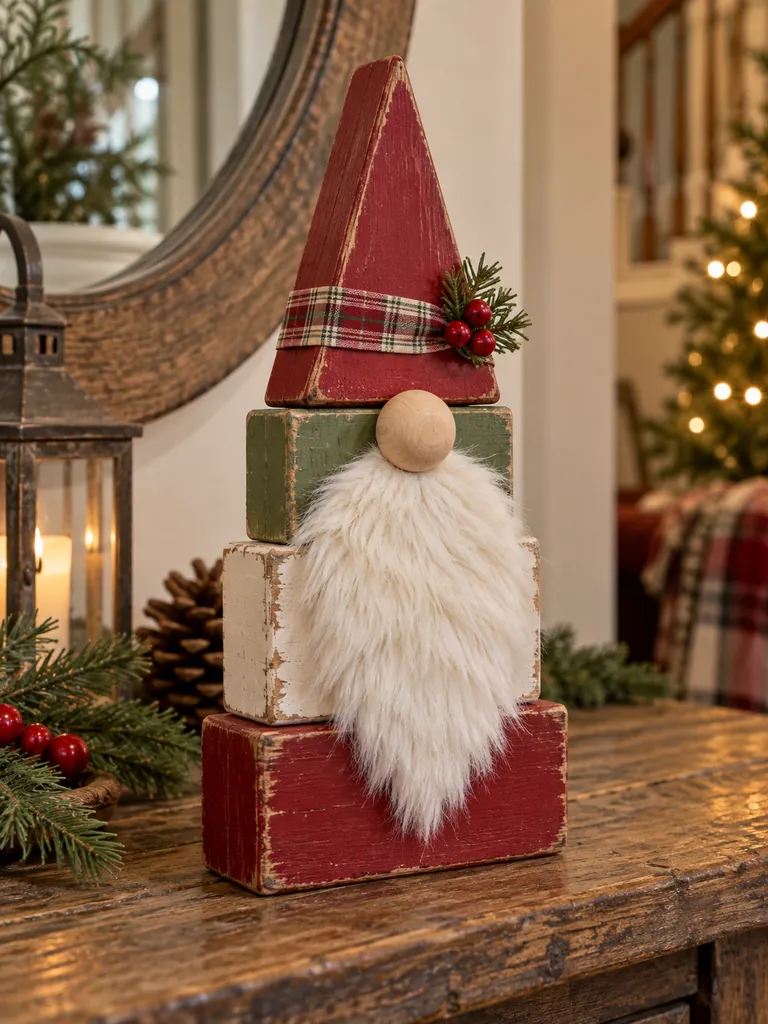
Instead of using one solid board, build a gnome from several stacked wooden blocks. Slight differences in block width create a fun layered silhouette and give the finished piece a handcrafted folk-art look.
Items Needed
- Three or four wood blocks
- Wood glue
- Sandpaper
- Acrylic paint
- Faux fur
- Wooden bead
- Small wood triangle
- Decorative ribbon
How to Make
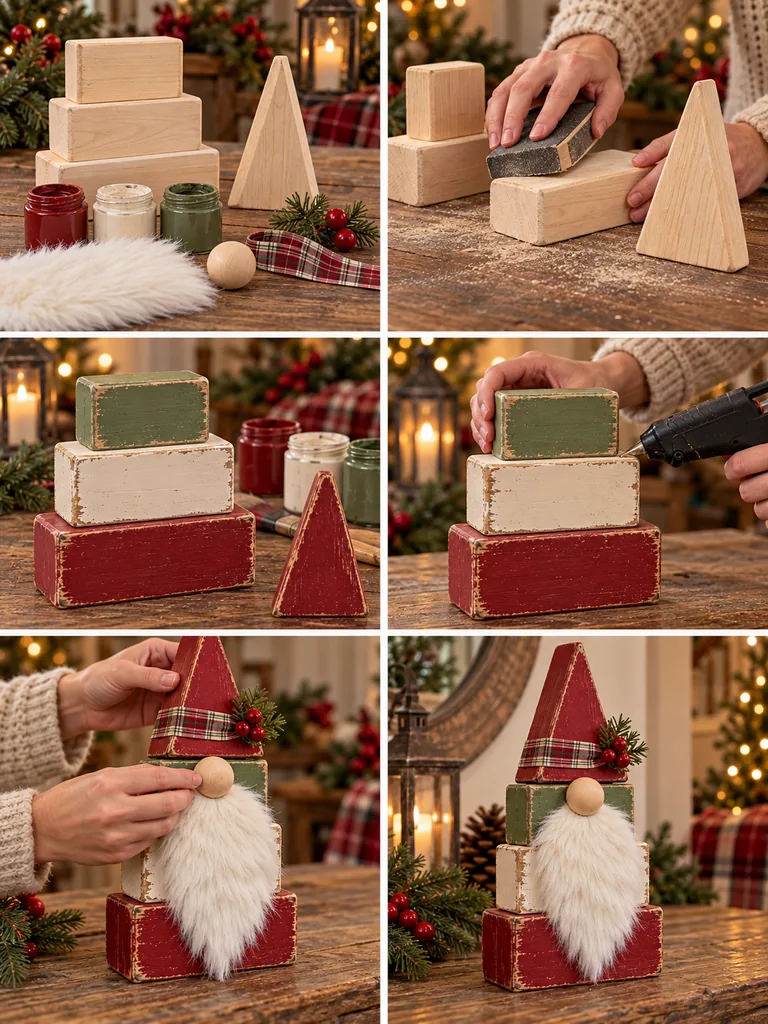
- Arrange the blocks from widest at the bottom to smallest at the top.
- Sand each piece before painting.
- Paint the blocks in coordinating Christmas colors.
- Glue them together once dry.
- Attach faux fur across the front of the center block.
- Glue a wooden bead above the beard.
- Cut or purchase a small wooden triangle for the hat.
- Paint the hat and attach it at the top.
- Add ribbon or a miniature wooden snowflake as decoration.
6. Farmhouse Whitewashed Wooden Gnome
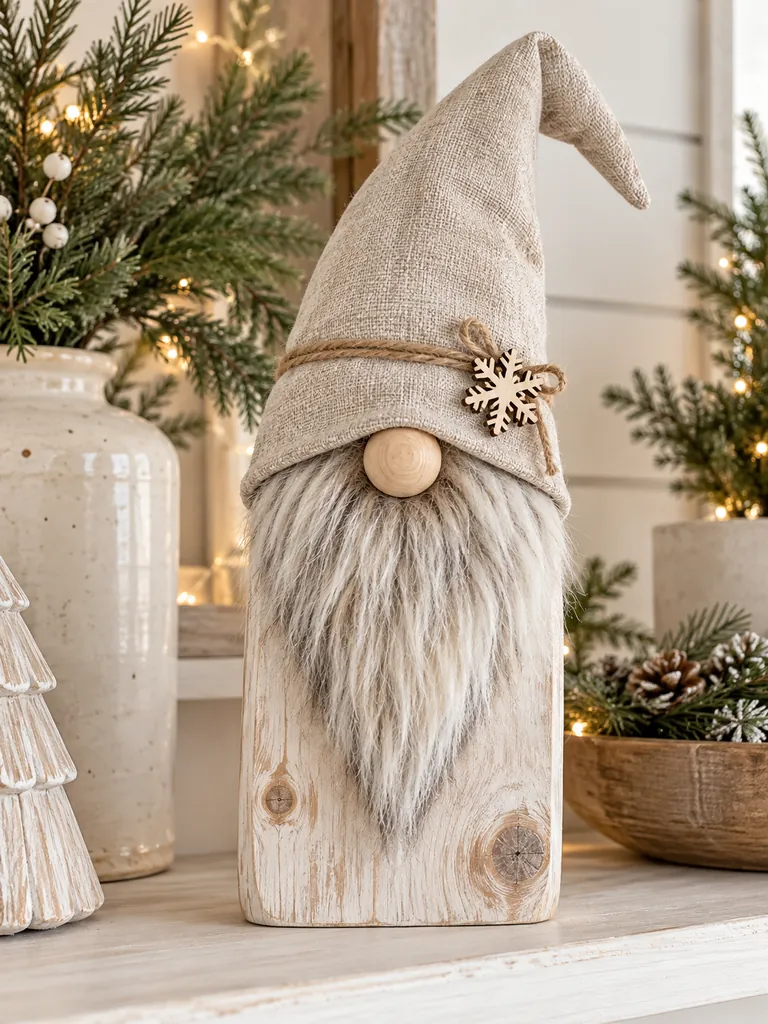
For neutral Christmas decor, create a gnome using whitewashed wood, beige fabric, and soft natural textures. The subtle palette works beautifully with farmhouse interiors where bright red decorations might feel too bold.
Items Needed
- Wooden board
- White paint
- Water
- Paintbrush
- Beige or gray fabric
- Faux fur
- Wooden bead
- Jute twine
How to Make
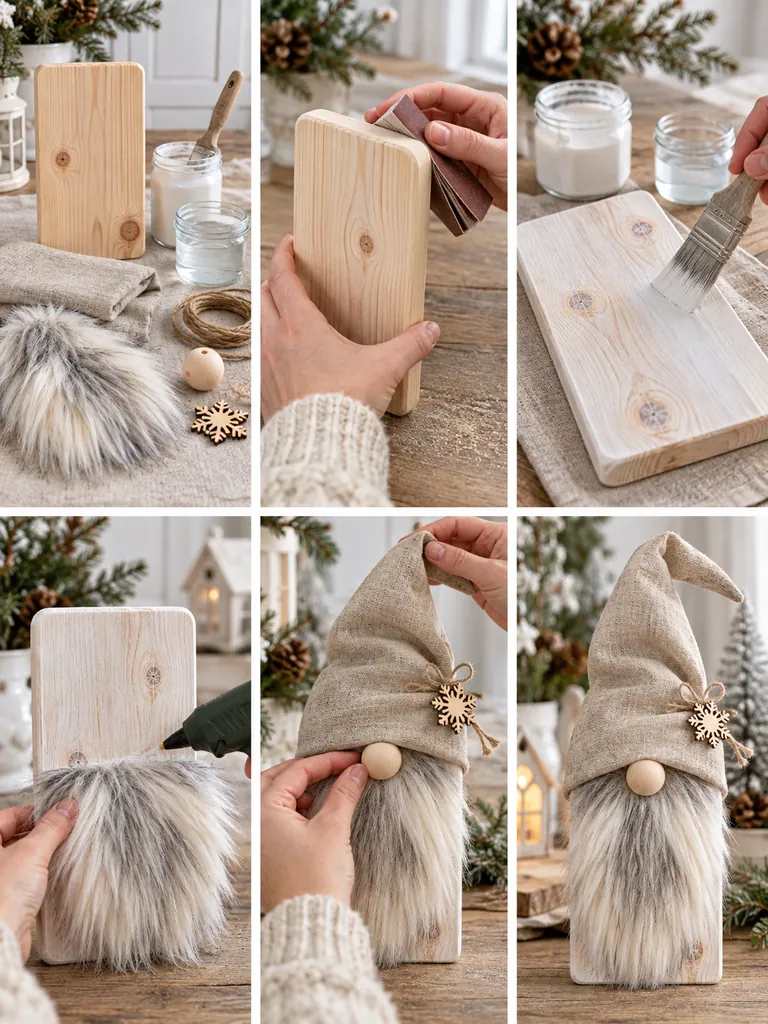
- Sand the wooden board and wipe away dust.
- Mix white paint with a little water to create a thin wash.
- Brush the mixture lightly over the wood so the grain remains visible.
- Allow the board to dry.
- Attach an ivory or gray faux-fur beard.
- Make a soft beige fabric hat.
- Position a natural wooden bead between the hat and beard.
- Finish with jute twine or a small wooden ornament.
7. Buffalo Plaid Wooden Christmas Gnome
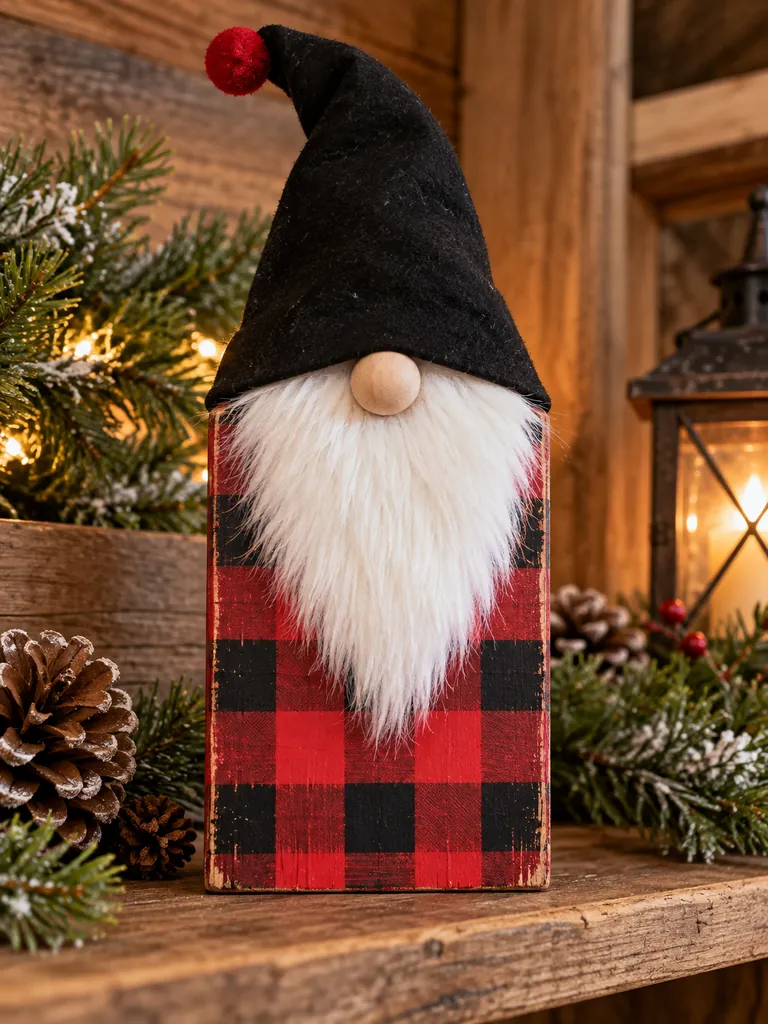
Red-and-black buffalo plaid instantly gives a wooden gnome a cozy cabin-inspired Christmas look. Use the pattern on either the body or hat so it remains decorative without becoming too busy.
Items Needed
- Wooden block or board
- Red paint
- Black paint
- Painter’s tape
- Small brush
- Faux fur
- Wooden bead
- Black felt
How to Make
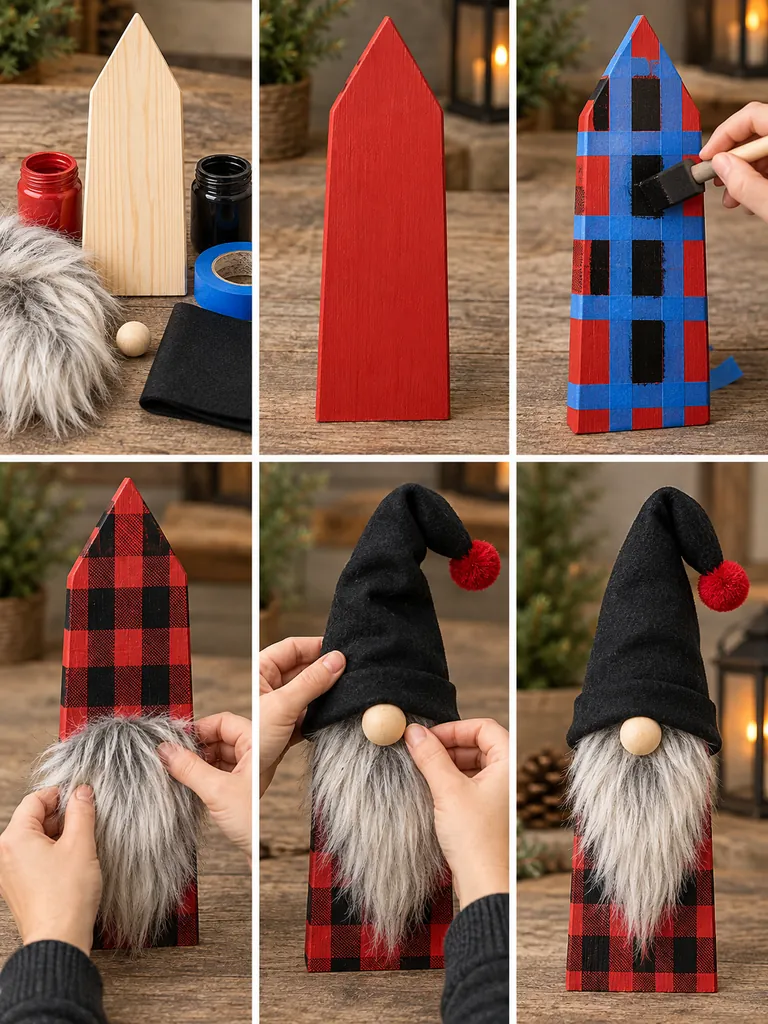
- Sand and paint the wooden surface red.
- Once dry, use painter’s tape to mark wide vertical stripes.
- Paint the stripes with watered-down black paint.
- Repeat in the opposite direction to form a plaid pattern.
- Let everything dry before removing the tape.
- Glue faux fur onto the lower front.
- Add the wooden nose.
- Make a simple black felt hat and attach it above the beard.
8. Reclaimed Pallet Wood Christmas Gnome
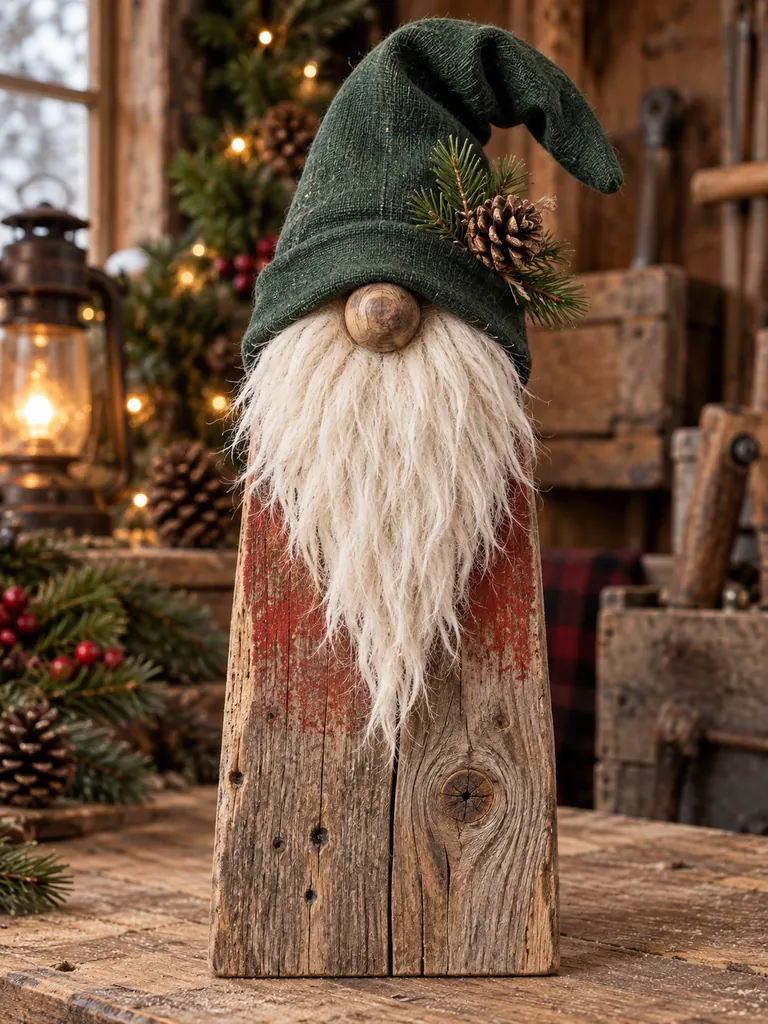
Give weathered pallet boards a second life by turning them into rustic Christmas gnomes. Knots, worn edges, and uneven grain make each finished project unique.
Items Needed
- Clean reclaimed pallet board
- Saw
- Sandpaper
- Red, green, or white paint
- Faux fur
- Wooden knob
- Fabric
- Wood glue
How to Make
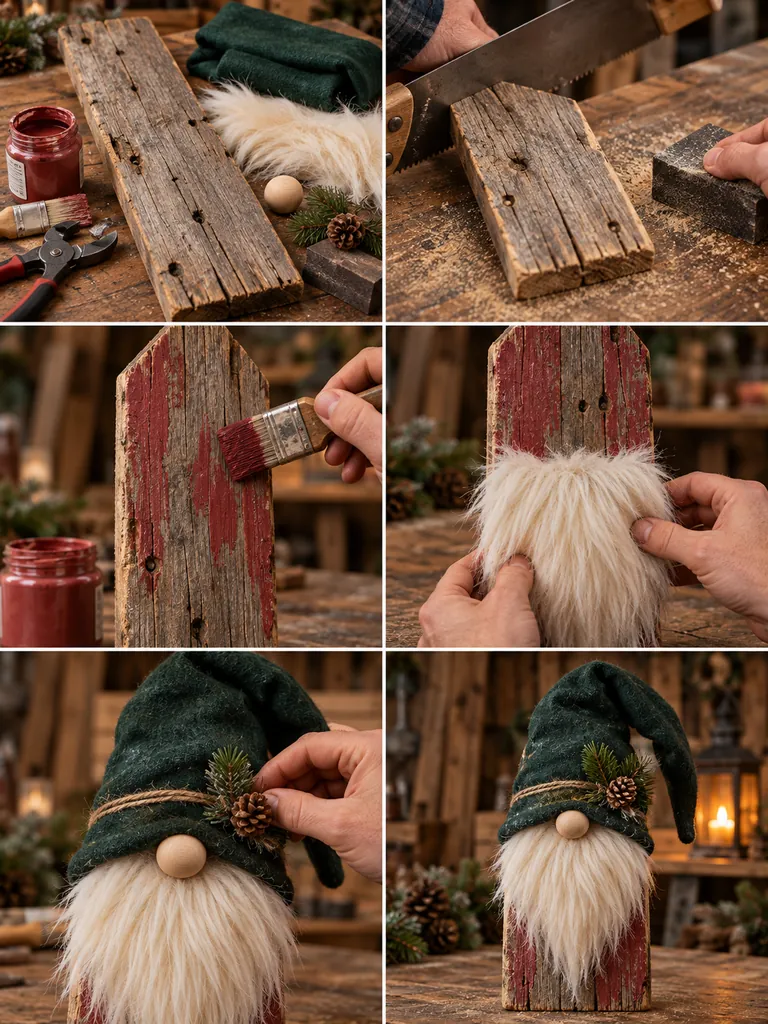
- Select a sound pallet board without damaged or unsafe sections.
- Cut it to the desired gnome height.
- Sand rough splinters while preserving some weathered texture.
- Dry-brush the wood with a small amount of paint.
- Add a wide faux-fur beard.
- Attach a wooden knob or ball for the nose.
- Make a slouchy fabric hat and secure it at the top.
- Add a small wooden star or greenery accent.
9. Mini Wooden Peg Christmas Gnomes

Miniature wooden peg dolls are perfect for creating a tiny family of Christmas gnomes. Display them on a tiered tray, around a miniature Christmas tree, or as part of a festive table centerpiece.
Items Needed
- Wooden peg dolls
- Acrylic paint
- Small paintbrushes
- Mini felt pieces
- Craft fur
- Tiny wooden beads
- Glue
How to Make
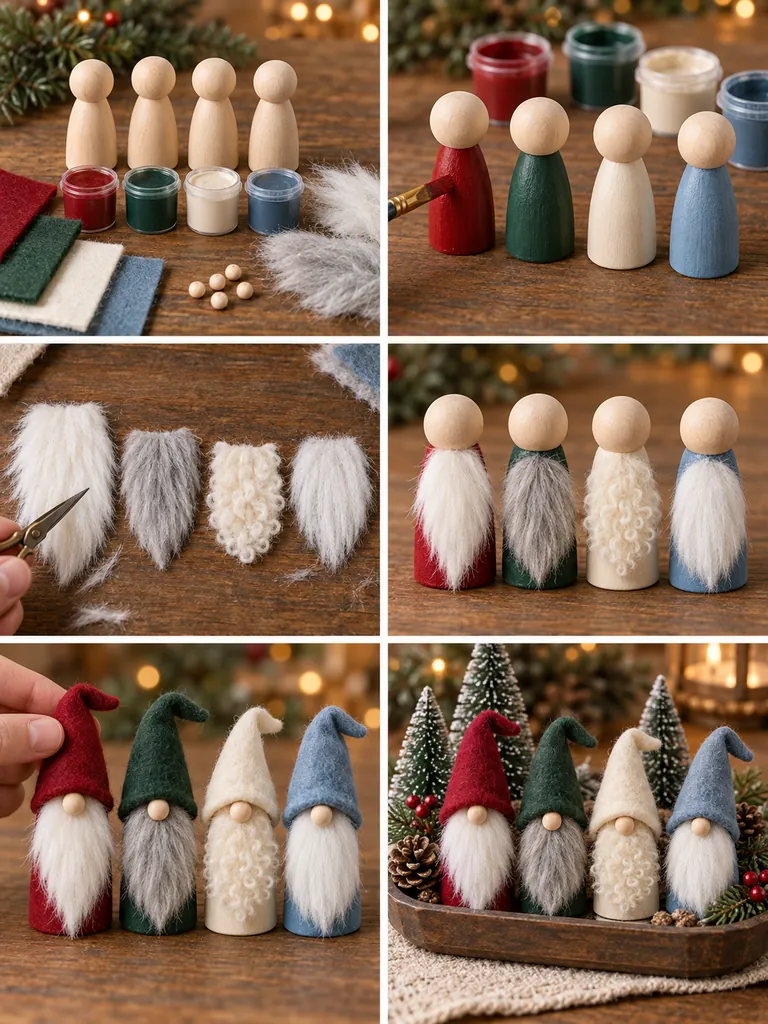
- Paint each wooden peg in a different Christmas color.
- Leave the top section unpainted where the nose will sit.
- Cut tiny pieces of fur for the beards.
- Glue the beards around the front of each peg.
- Attach a miniature bead above each beard.
- Roll felt into small pointed hats.
- Glue the hats onto the tops of the pegs.
- Make several sizes and colors for a coordinated gnome collection.
10. Layered Wooden Gnome Cutout
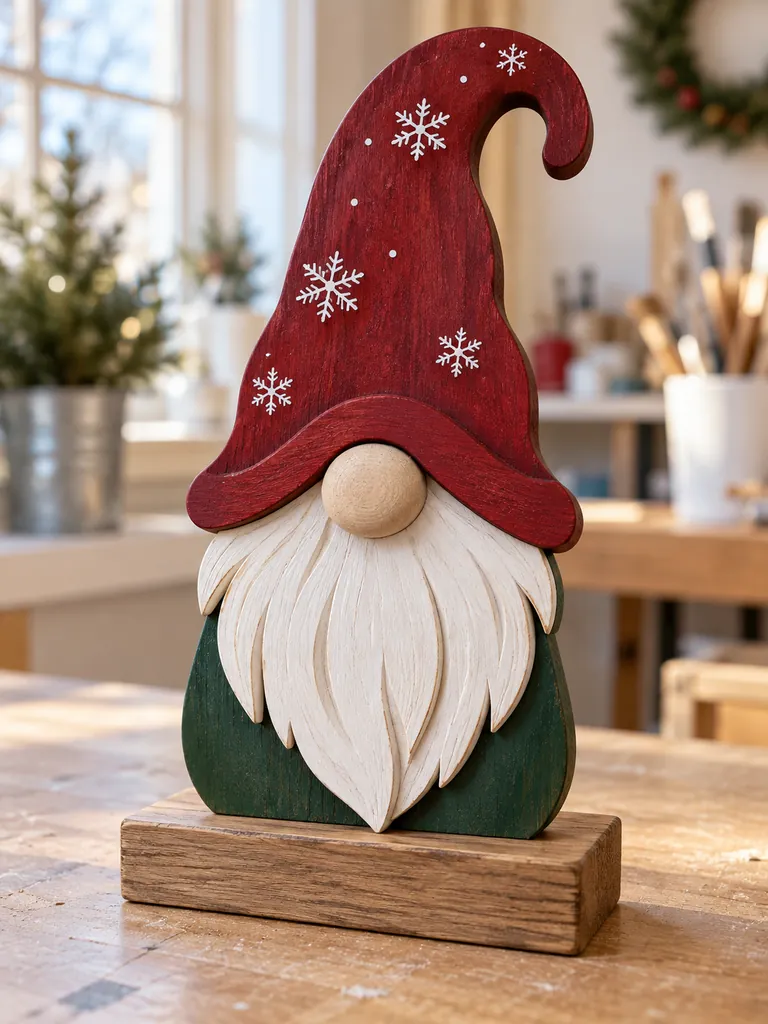
Build a dimensional gnome by stacking several separately cut wooden shapes. This technique gives the beard, nose, hat, and body noticeable depth and creates a more polished craft-store-style finish.
Items Needed
- Thin plywood or craft wood
- Jigsaw
- Sandpaper
- Wood glue
- Acrylic paint
- Pencil
- Gnome templates
How to Make
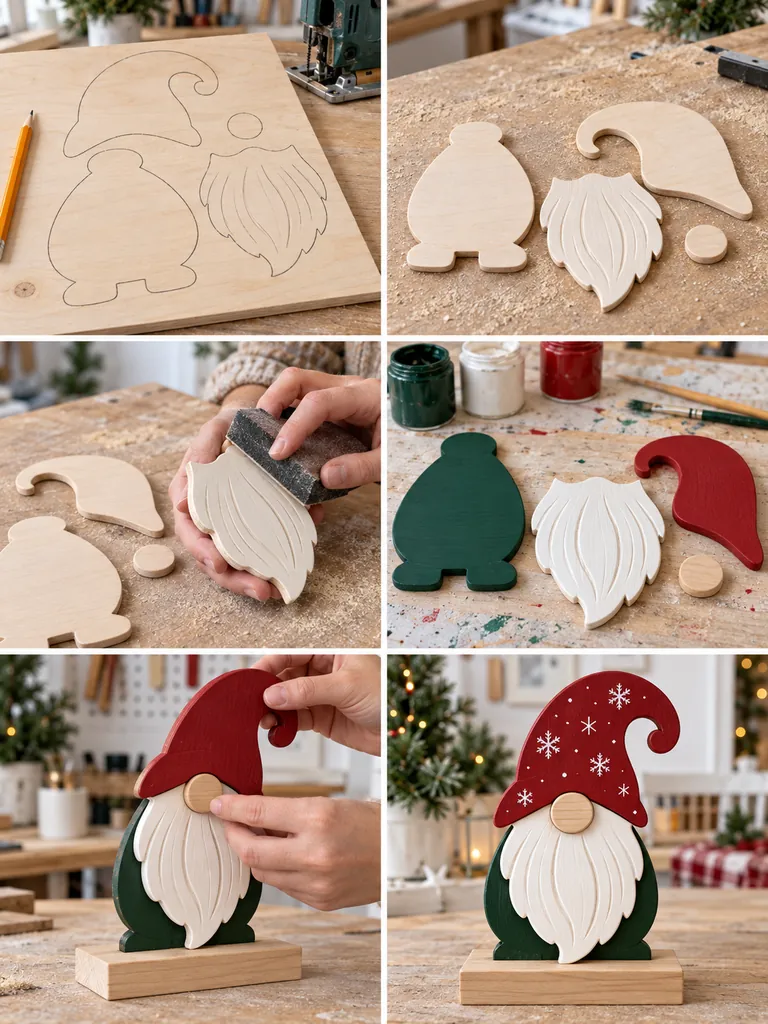
- Trace separate body, beard, nose, and hat shapes onto thin wood.
- Cut each shape carefully with a jigsaw.
- Sand all cut edges.
- Paint each component individually.
- Add simple carved or painted lines to the beard.
- Glue the beard onto the body.
- Layer the nose over the beard.
- Attach the hat last so it slightly overlaps the nose.
- Add a wooden base if you want the gnome to stand upright.
11. Natural Branch Christmas Gnome
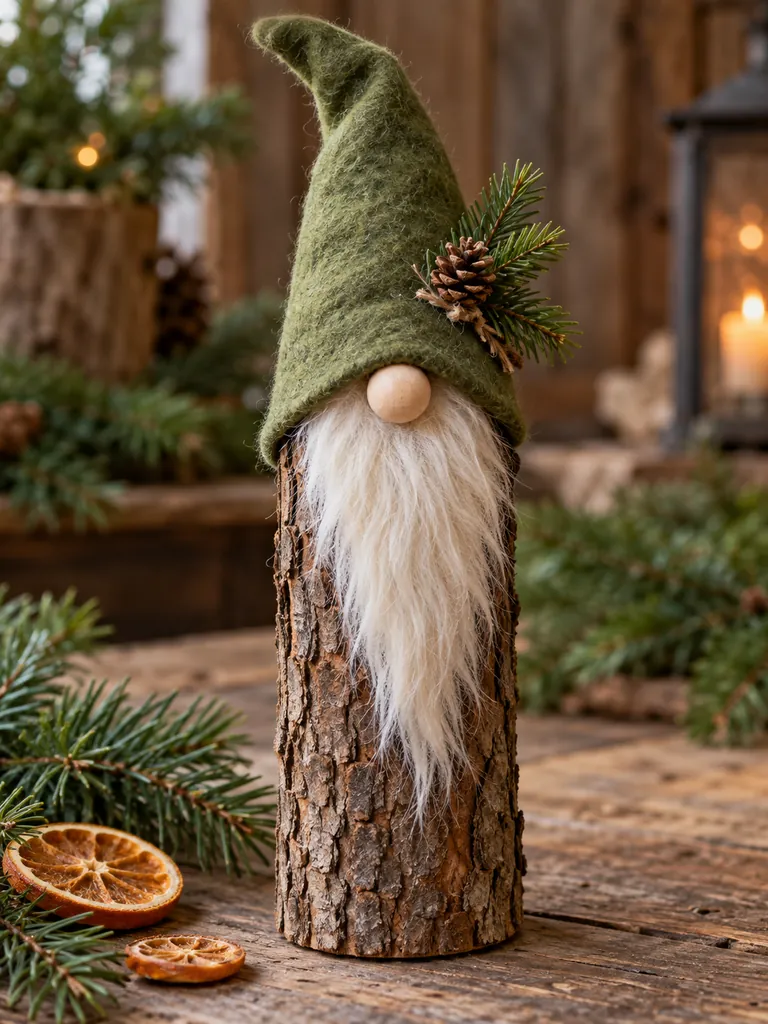
A thick branch or small log can become an earthy woodland gnome while retaining much of its natural bark. This is a wonderful option for rustic decorating because very little paint is required.
Items Needed
- Thick dry branch
- Saw
- Sandpaper
- Felt
- Faux fur or wool-look craft fiber
- Wooden bead
- Hot glue
- Faux greenery
How to Make
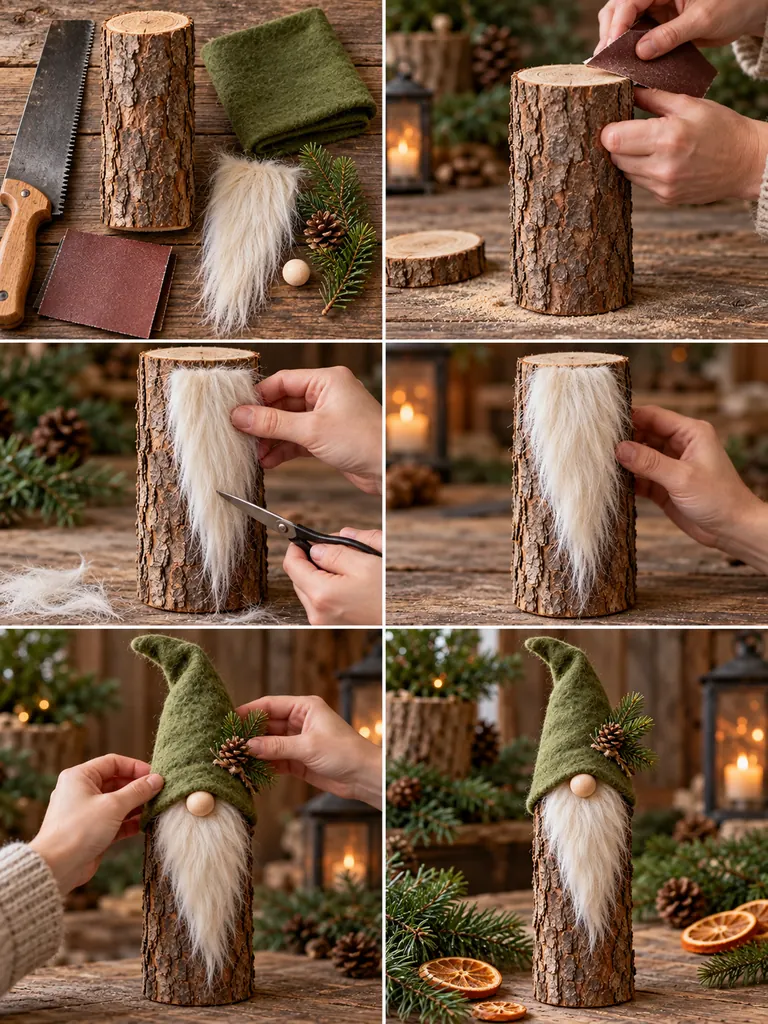
- Cut the branch so it stands flat on one end.
- Sand only the cut surfaces while leaving most bark intact.
- Cut a narrow beard and attach it to the front.
- Glue a round wooden bead above the beard.
- Make a tall felt hat large enough to fit over the branch.
- Secure the hat around the upper portion.
- Tuck a sprig of faux evergreen into the hat.
- Add a tiny pinecone for extra woodland character.
12. Wooden Gnome Christmas Tree Topper

Instead of a traditional star, place a lightweight wooden gnome at the top of your Christmas tree. The key is keeping the construction thin and light enough that it will not bend the tree’s upper branches.
Items Needed
- Thin craft plywood
- Saw
- Paint
- Lightweight faux fur
- Small wooden bead
- Felt
- Strong ribbon
- Glue
How to Make
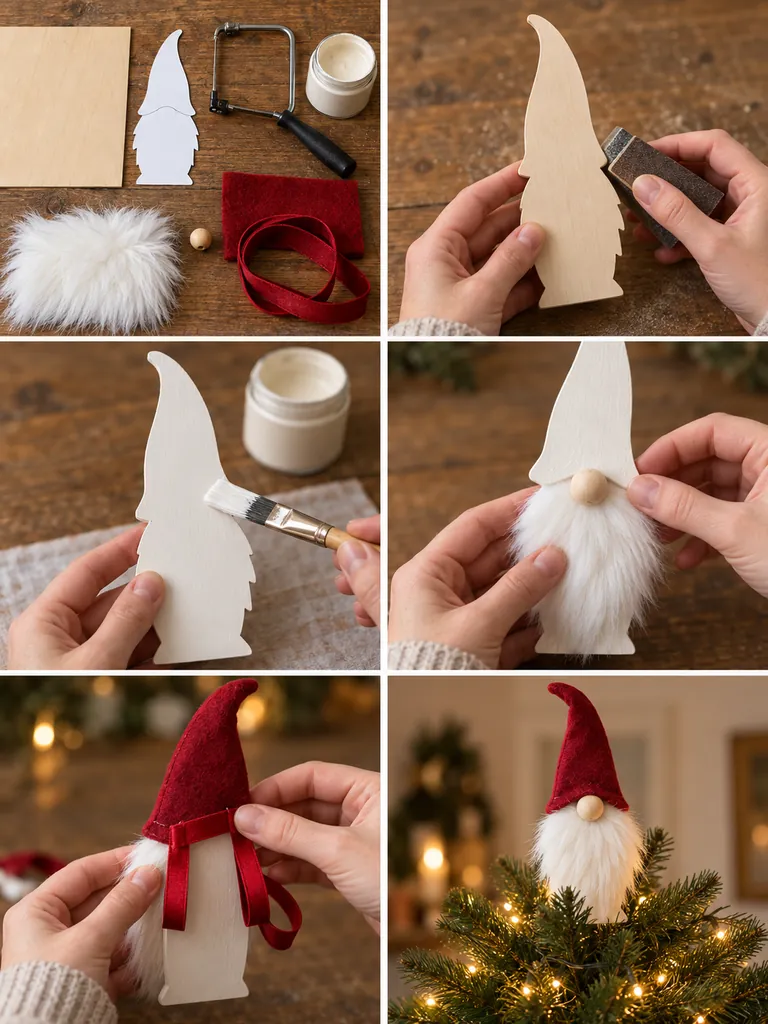
- Cut a simple narrow gnome body from lightweight plywood.
- Sand and paint the front.
- Attach a small amount of faux fur for the beard.
- Glue on the wooden nose.
- Make a narrow felt hat that points upward.
- Secure the hat to the wooden base.
- Attach two strong ribbon loops to the back.
- Slide the loops over the tree’s central top branch until secure.
13. Candy Cane Wooden Christmas Gnome

Give your gnome a sweet holiday makeover with classic red-and-white candy cane stripes. The striped design can cover the body, the hat, or both.
Items Needed
- Wooden block
- White paint
- Red paint
- Painter’s tape
- Faux fur
- Wooden bead
- Mini wooden candy cane
- Glue
How to Make
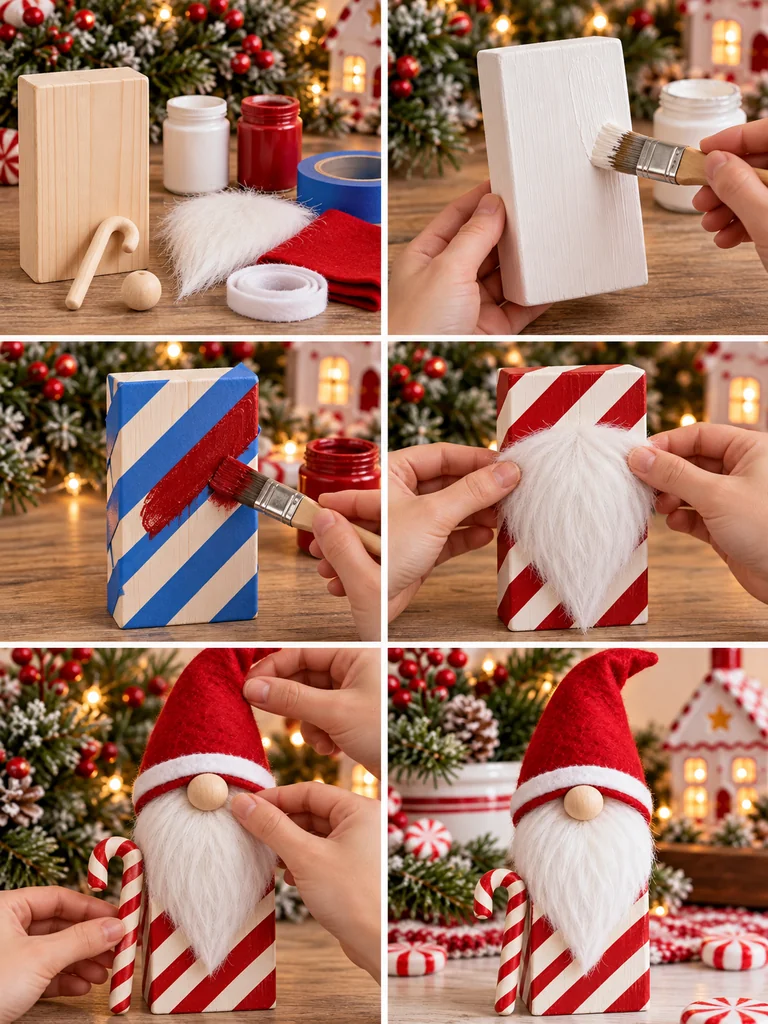
- Paint the entire wooden block white.
- Allow it to dry completely.
- Apply painter’s tape diagonally across the surface.
- Paint the exposed stripes bright Christmas red.
- Remove the tape when the paint is dry.
- Add the faux-fur beard and wooden nose.
- Make a red or striped hat.
- Attach a miniature wooden candy cane beside the gnome for a playful finishing detail.
14. Snowy Winter Wooden Gnome

Not every Christmas gnome needs traditional red and green. Pale blue, frosty white, and silver details can create a beautiful winter-themed gnome that works throughout the entire season.
Items Needed
- Wooden board
- Pale blue paint
- White paint
- Faux snow
- White faux fur
- Wooden bead
- Light blue felt
- Snowflake embellishments
How to Make
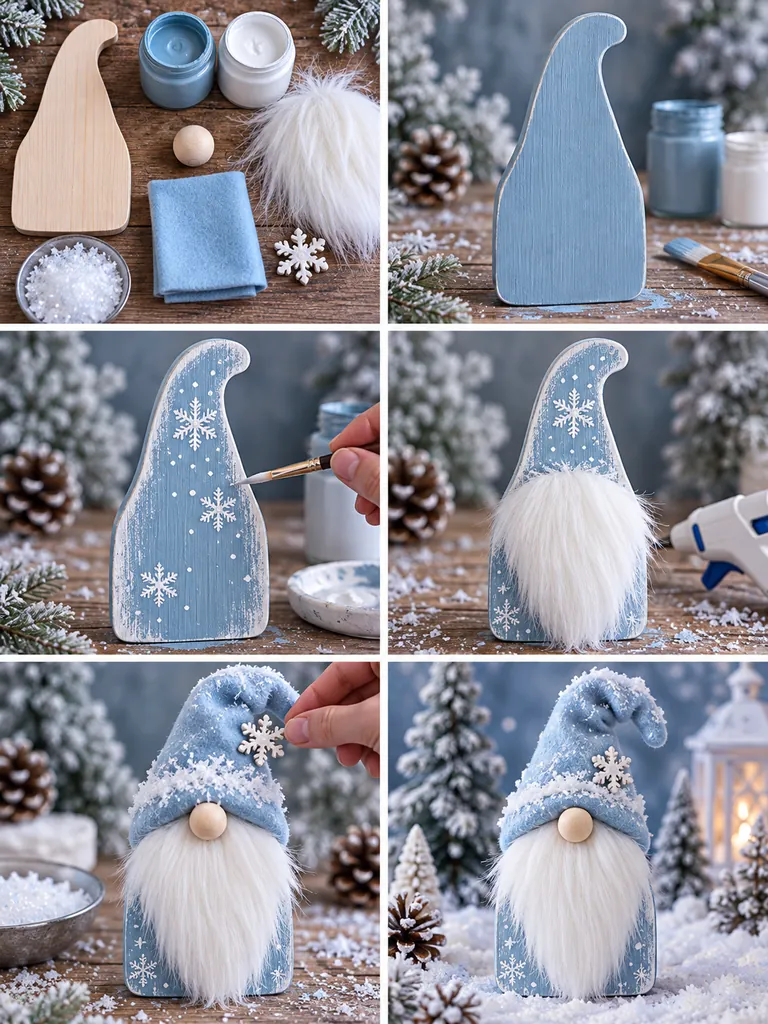
- Paint the wooden body pale icy blue.
- Dry-brush white paint around the edges for a frosted effect.
- Add small painted snowflakes if desired.
- Glue the white beard onto the lower front.
- Attach the wooden nose.
- Make a light blue pointed hat.
- Brush a small amount of faux snow around the bottom and hat edge.
- Finish with a tiny wooden or glitter-free snowflake ornament.
15. Wooden Gnome LED Candle Holder
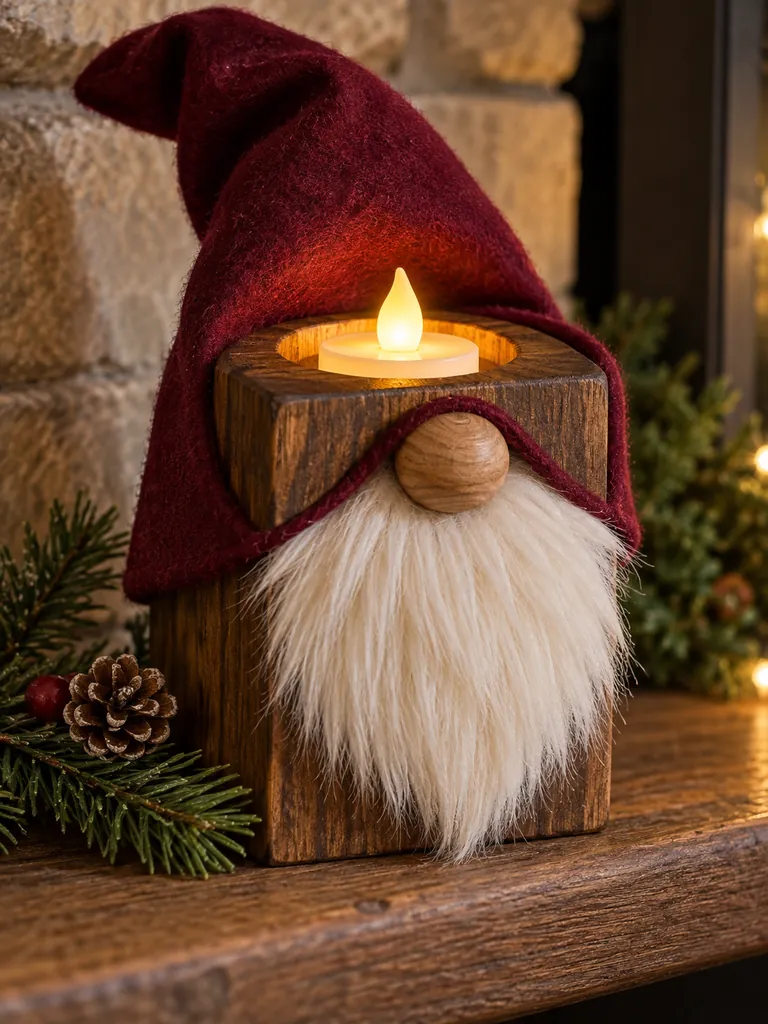
Combine decorative woodworking with warm Christmas lighting by creating a wooden gnome designed to hold a removable battery-operated LED candle. Use only flameless candles for this craft.
Items Needed
- Thick wooden block
- Drill or hole saw
- Sandpaper
- Paint
- Faux fur
- Wooden bead
- Felt
- Battery-operated LED candle
How to Make
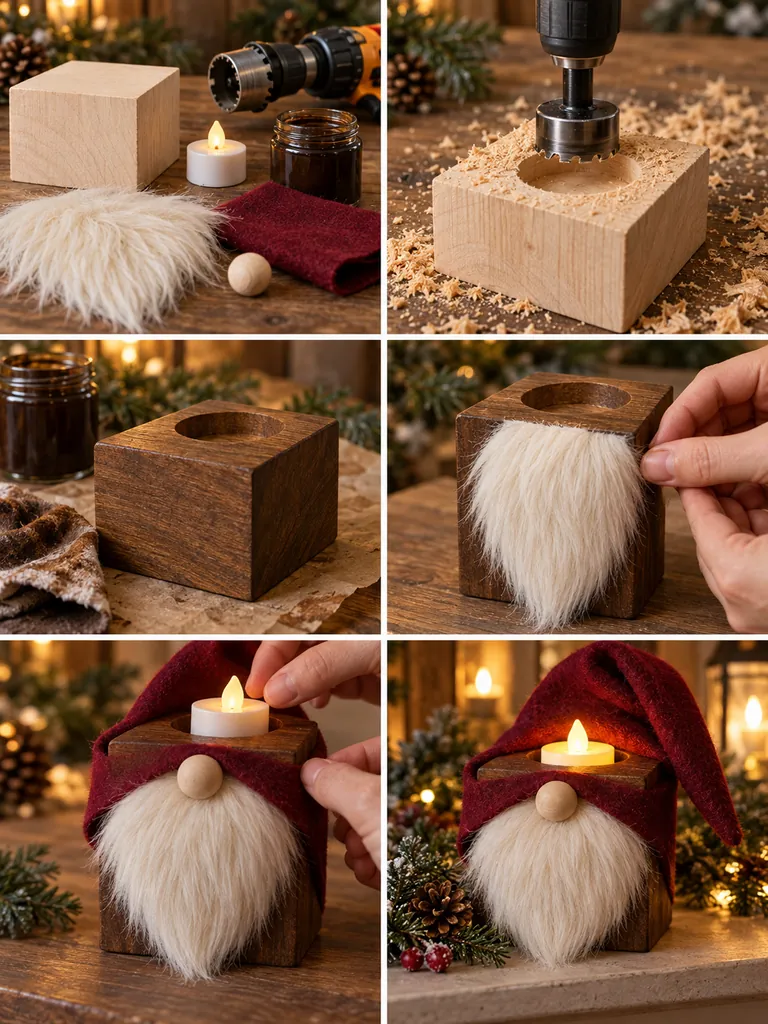
- Mark the center of the top of the wooden block.
- Drill a shallow recess sized to fit the LED candle securely.
- Sand the block and recessed opening.
- Paint the wooden body.
- Attach the beard to the front while keeping the candle opening clear.
- Add the nose and fabric hat.
- Decorate with greenery if desired.
- Insert the battery-operated LED candle once the project is finished.
16. Wooden Gnome Family
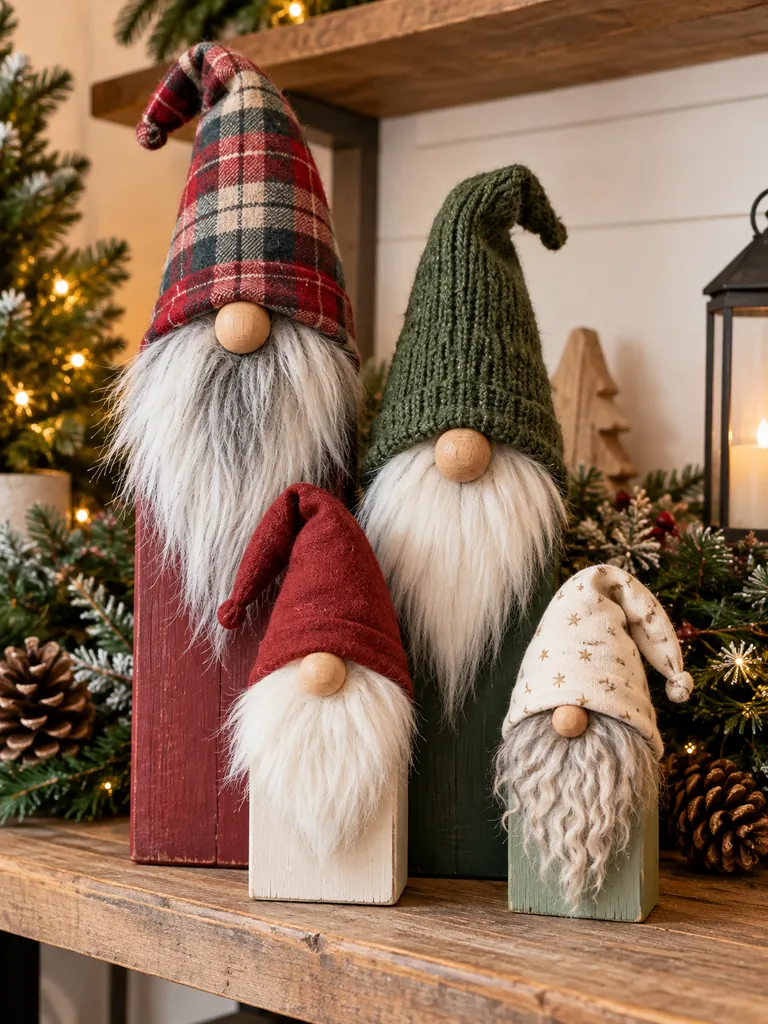
Create several gnomes in different heights to make an adorable Christmas gnome family. Using related colors and materials keeps the collection coordinated while different hats and beard shapes give each character personality.
Items Needed
- Wood blocks in several heights
- Paint
- Faux fur
- Wooden beads
- Assorted fabrics
- Glue
- Small Christmas embellishments
How to Make
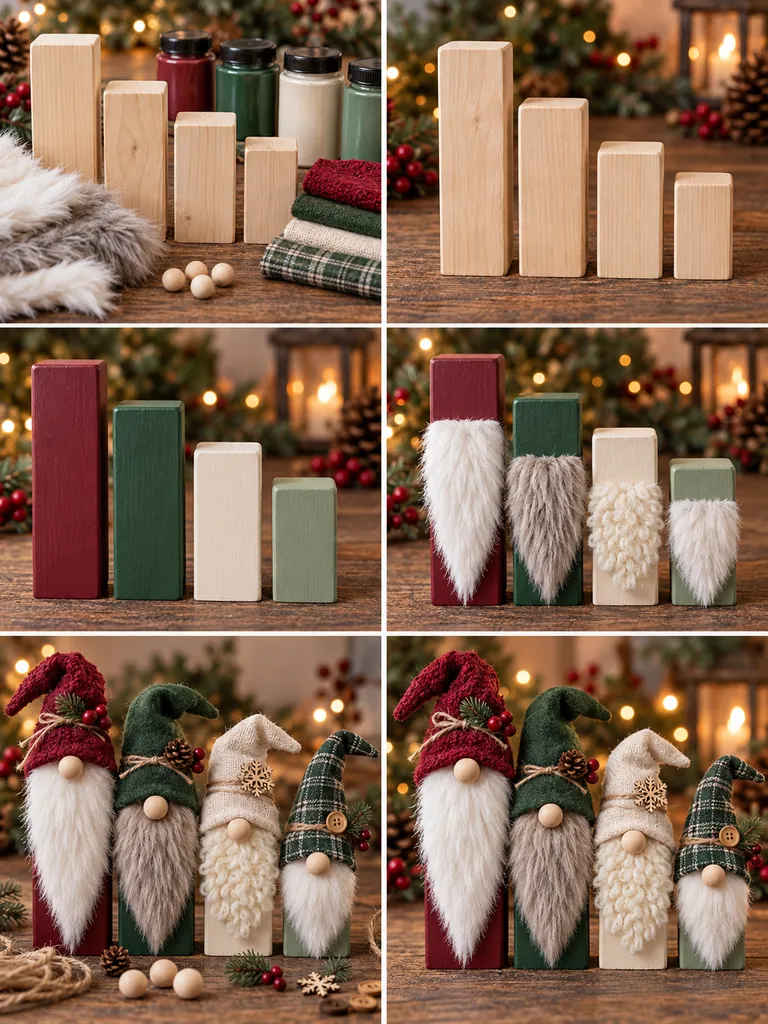
- Cut three or four wooden blocks into different heights.
- Sand and paint each one in coordinating colors.
- Cut different beard shapes for each gnome.
- Attach the beards to the blocks.
- Add wooden noses in slightly different sizes.
- Make individual hats using different fabrics or patterns.
- Decorate one hat with greenery, another with a bell, and another with a pom-pom.
- Arrange the finished gnomes together as one family display.
17. Wooden Gnome Christmas Sign
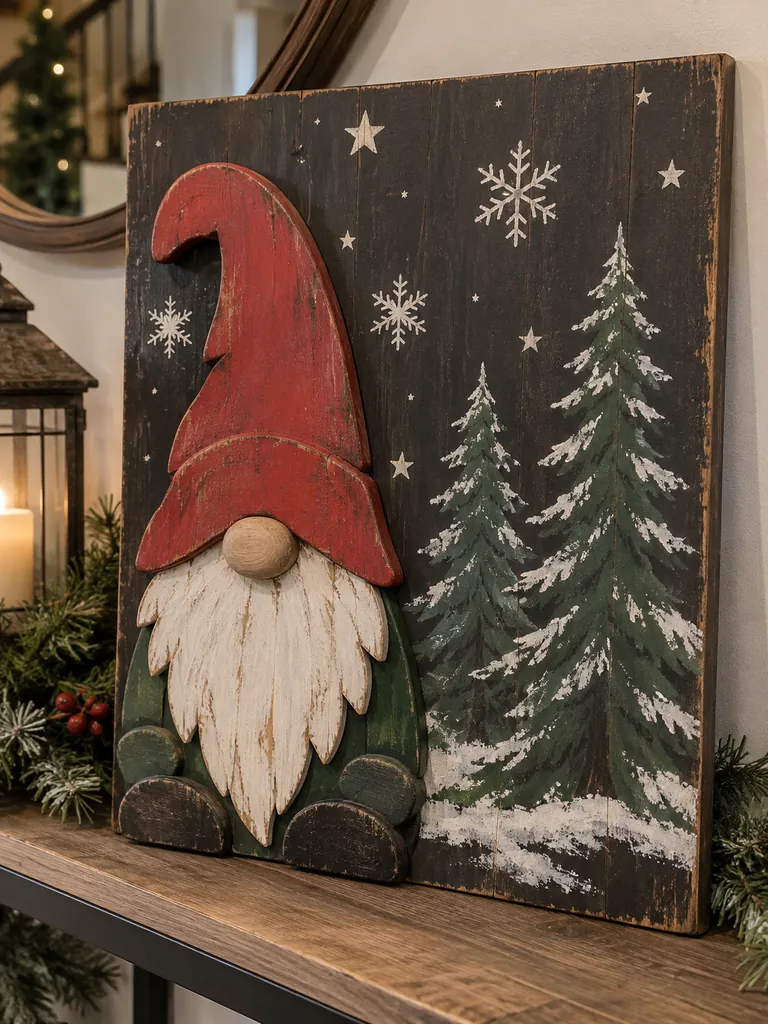
Combine a traditional wooden Christmas sign with a dimensional gnome. The gnome can sit along one side of the sign while the remaining space is decorated with painted snowflakes, trees, or simple festive motifs.
Items Needed
- Rectangular wooden sign board
- Thin craft wood
- Jigsaw
- Paint
- Faux fur
- Wooden bead
- Wood glue
- Hanging hardware
How to Make
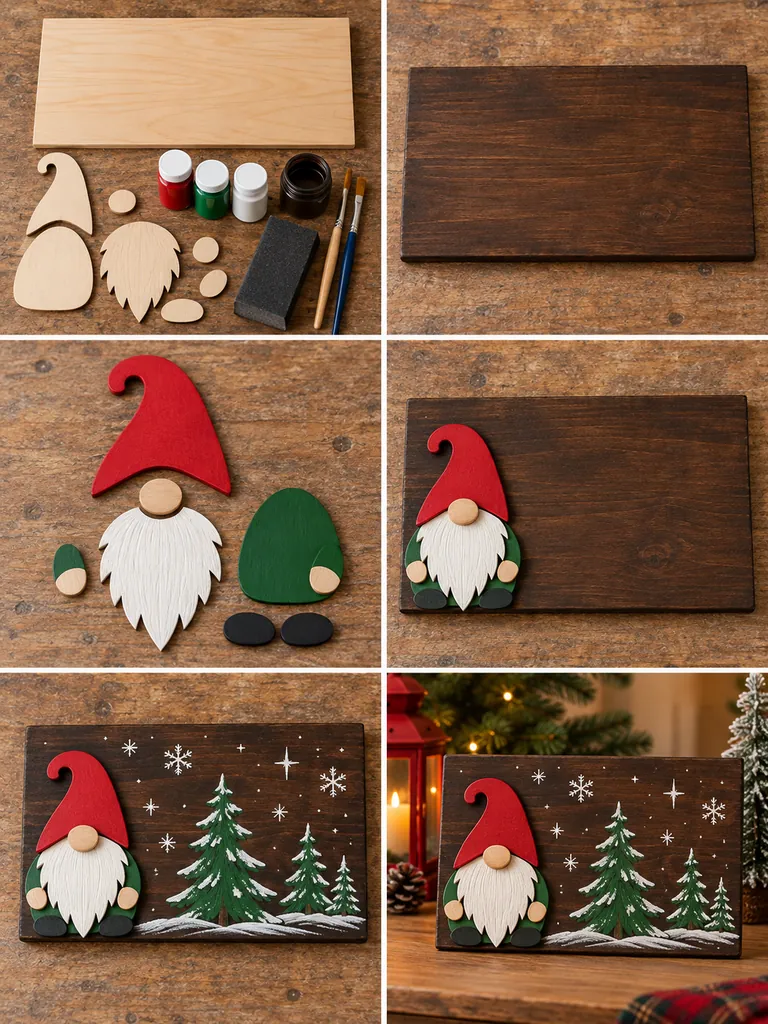
- Sand and paint the main sign board.
- Cut a simple gnome body from thin wood.
- Paint the gnome separately.
- Add faux fur and a wooden nose.
- Attach the finished gnome to one side of the sign.
- Paint simple Christmas trees, stars, or snowflakes in the remaining area.
- Distress the edges lightly for a rustic finish.
- Add hanging hardware or a rear easel stand.
18. Interchangeable Seasonal Wooden Gnome

Create one wooden gnome base and make removable accessories so the decoration can be reused beyond Christmas. Magnets or hook-and-loop fasteners make it easy to change hats and small seasonal accents.
Items Needed
- Wooden gnome base
- Paint
- Faux fur
- Wooden bead
- Small craft magnets
- Felt
- Wood shapes
- Strong glue
How to Make
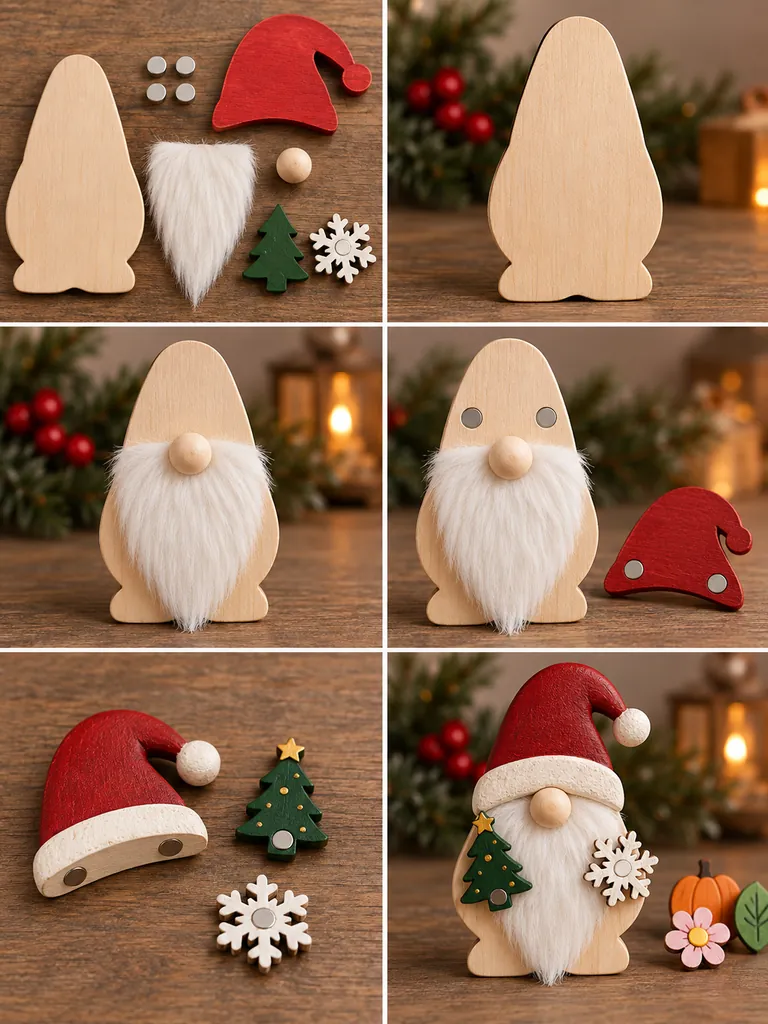
- Cut and paint a simple wooden gnome body.
- Add a permanent beard and wooden nose.
- Attach a small magnet near the top of the body.
- Create a Christmas hat from wood or reinforced felt.
- Add a matching magnet to the back of the hat.
- Make removable Christmas accessories such as a tree, snowflake, or candy cane.
- Attach magnets to those pieces as well.
- After Christmas, replace them with accessories for another season.
19. Wooden Gnome Christmas Countdown
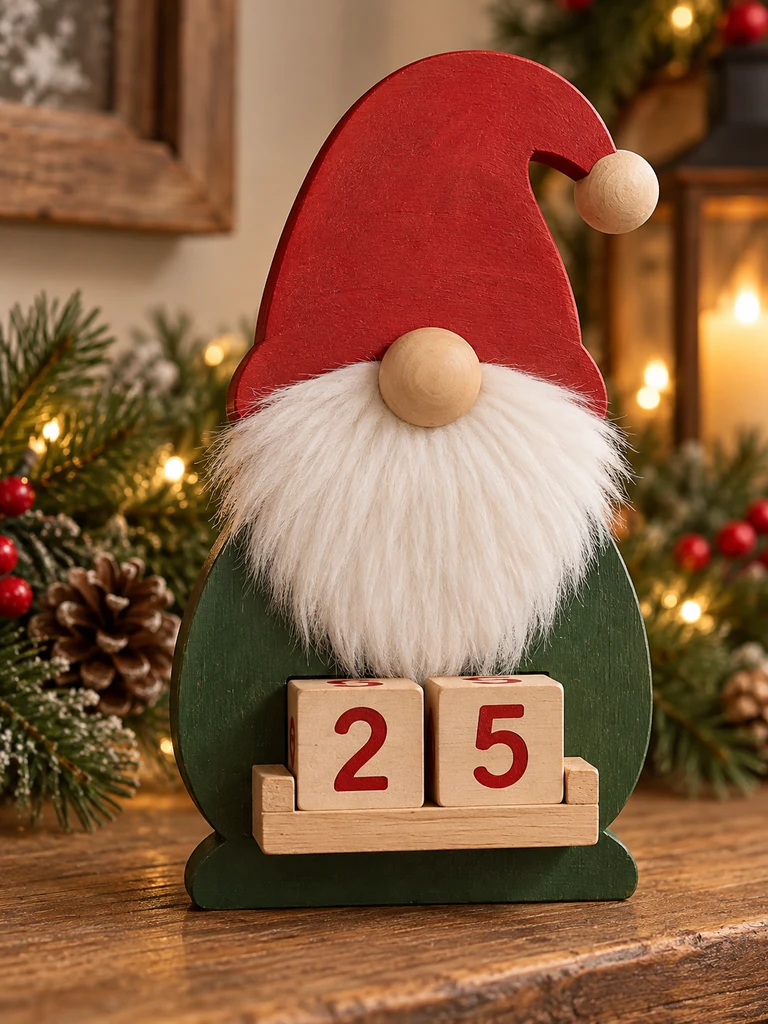
Make the weeks leading up to Christmas more fun with a gnome-shaped countdown decoration. Two rotating wooden number cubes can display the number of days remaining.
Items Needed
- Wooden board
- Two small wood cubes
- Acrylic paint
- Number stencils
- Faux fur
- Wooden bead
- Felt
- Small wood ledge
How to Make
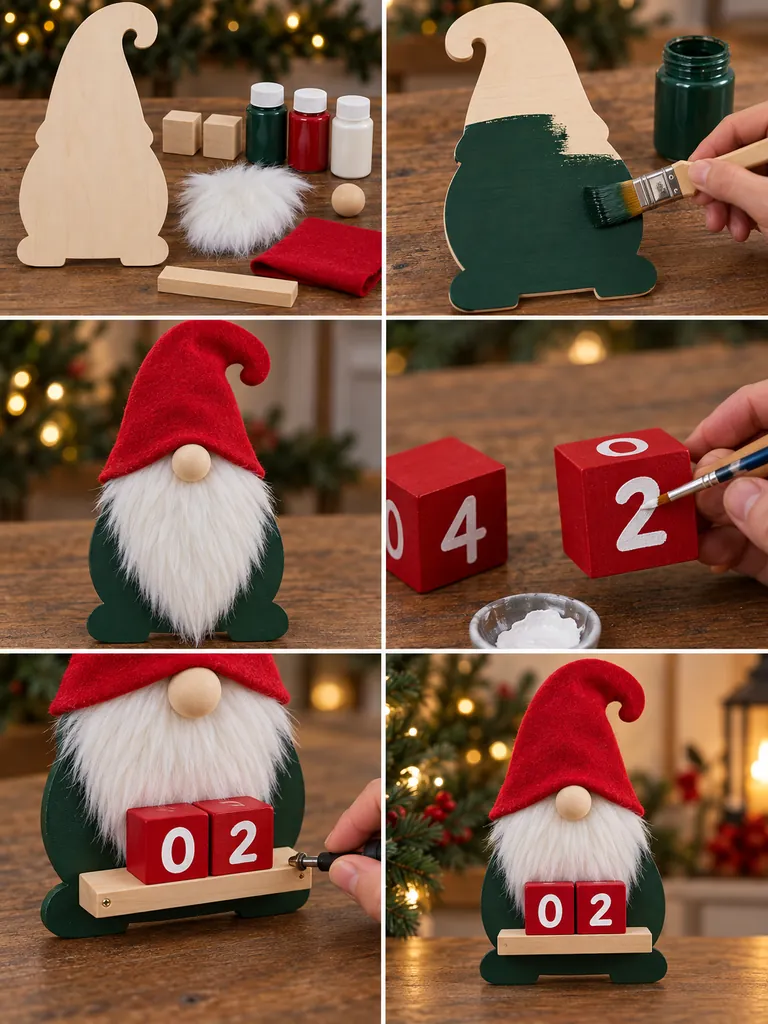
- Cut the main board into a gnome silhouette.
- Sand and paint the body.
- Attach the beard, nose, and hat.
- Paint two wooden cubes in a coordinating color.
- Add the necessary countdown numbers to the cube faces.
- Attach a small wooden ledge across the lower front.
- Place the two number cubes on the ledge.
- Turn the cubes each day to count down toward Christmas.
20. Freestanding Wooden Gnome With Lantern
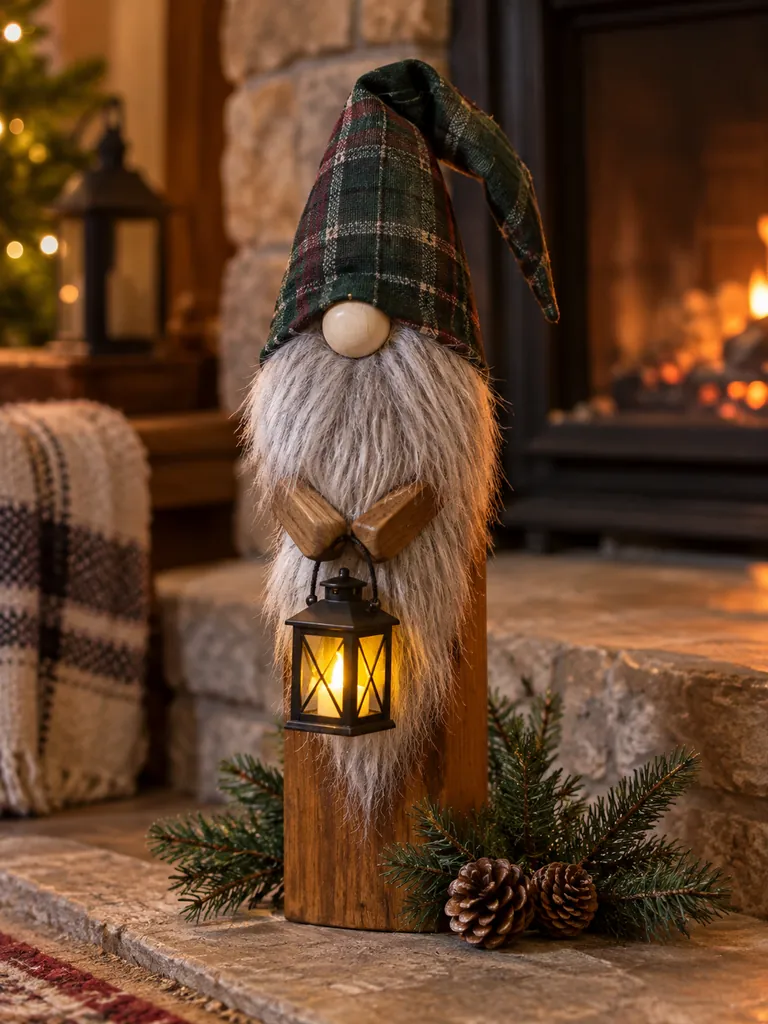
A rustic gnome carrying a miniature glowing lantern makes an especially cozy decoration near a fireplace, console table, or front entry.
Items Needed
- Medium wooden board
- Paint or wood stain
- Faux fur
- Wooden bead
- Fabric
- Mini battery-operated lantern
- Small wooden arm pieces
- Glue
How to Make
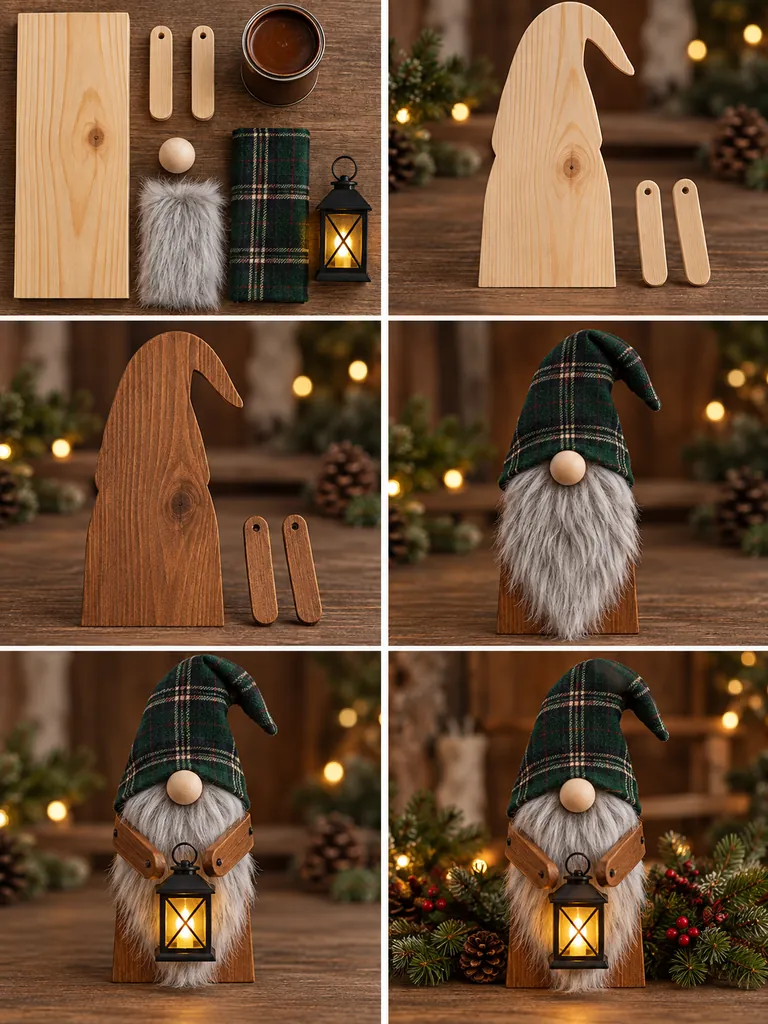
- Cut and sand the wooden gnome body.
- Paint or stain the wood.
- Add the faux-fur beard and wooden nose.
- Make and attach a soft fabric hat.
- Cut two small wooden pieces to resemble simple arms.
- Glue the arms along the sides of the body.
- Secure a lightweight miniature LED lantern between the hands.
- Add pine greenery around the base for a finished Christmas display.
21. Christmas Tree-Shaped Wooden Gnome
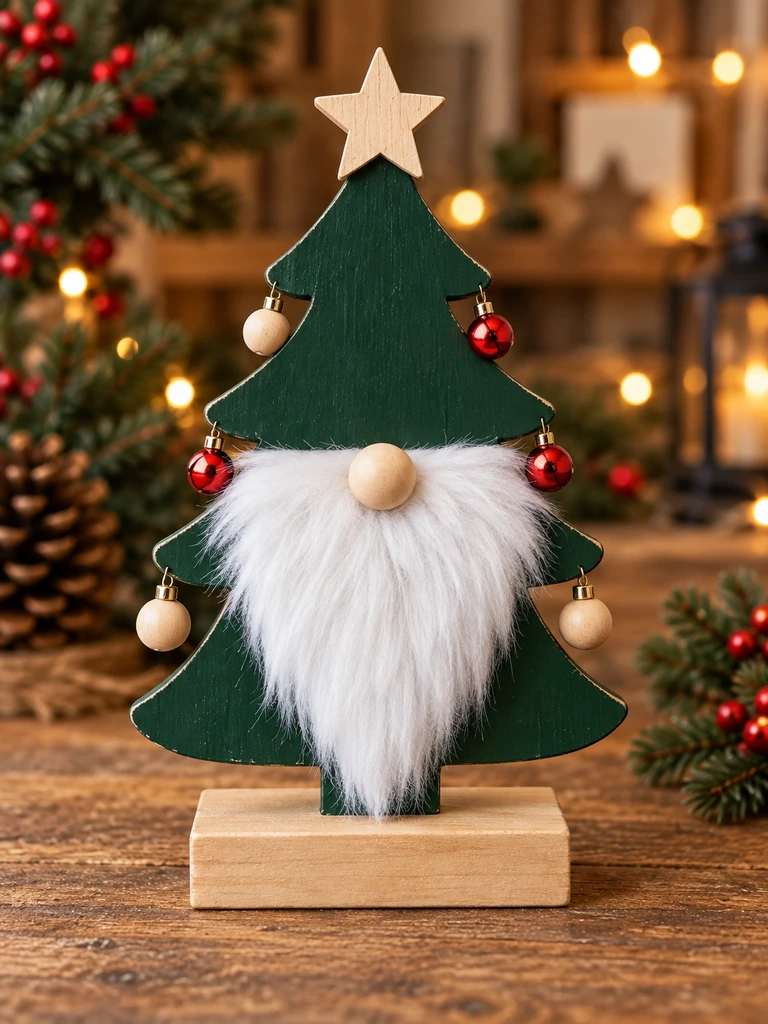
Combine two holiday icons by turning a Christmas-tree-shaped wooden cutout into a gnome. The triangular evergreen body doubles as the gnome silhouette, making this design instantly different from traditional block gnomes.
Items Needed
- Wood board
- Jigsaw
- Green paint
- Faux fur
- Wooden bead
- Mini wooden ornaments
- Wood star
- Glue
How to Make
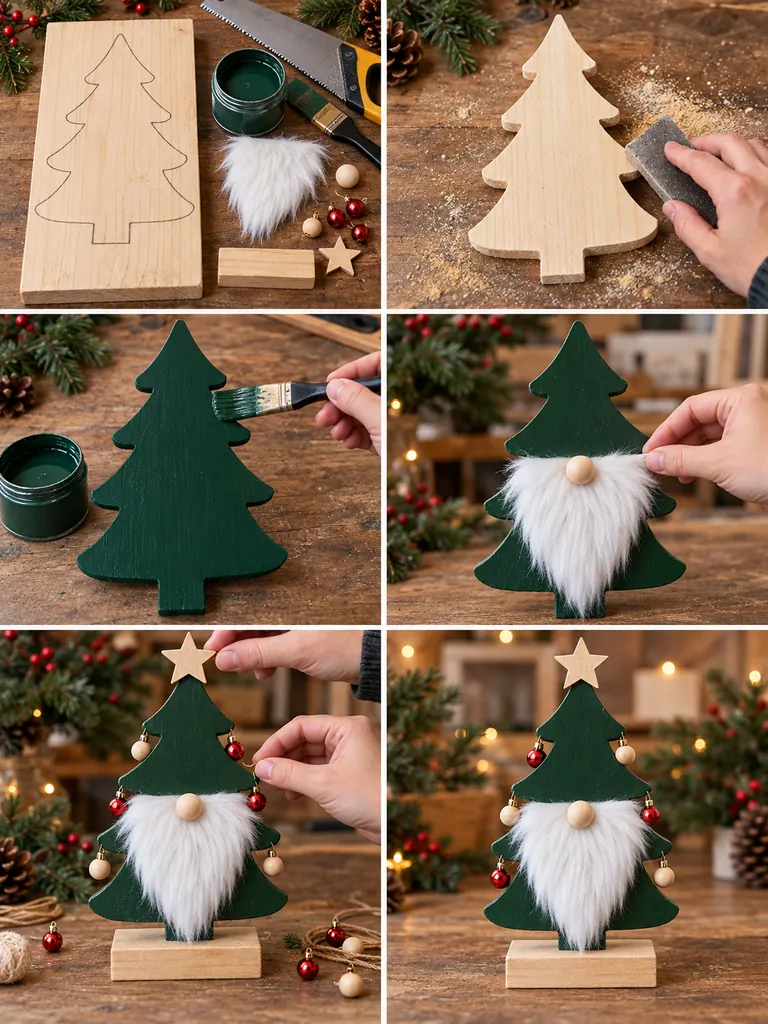
- Draw a simple Christmas tree silhouette on the board.
- Cut out the shape and sand the edges.
- Paint the tree deep forest green.
- Attach a white beard across the middle.
- Place a wooden bead above the beard for the nose.
- Add tiny wooden ornaments to the lower branches.
- Attach a small wooden star near the top.
- Mount the gnome tree onto a flat wooden base so it stands upright.
22. Wooden Skiing Christmas Gnome

Bring a playful alpine feel to your decorations with a wooden gnome standing on miniature skis. This project looks especially charming as part of a winter village or chalet-themed display.
Items Needed
- Small wooden block
- Two craft wood strips
- Thin wooden dowels
- Paint
- Faux fur
- Wooden bead
- Felt
- Glue
How to Make
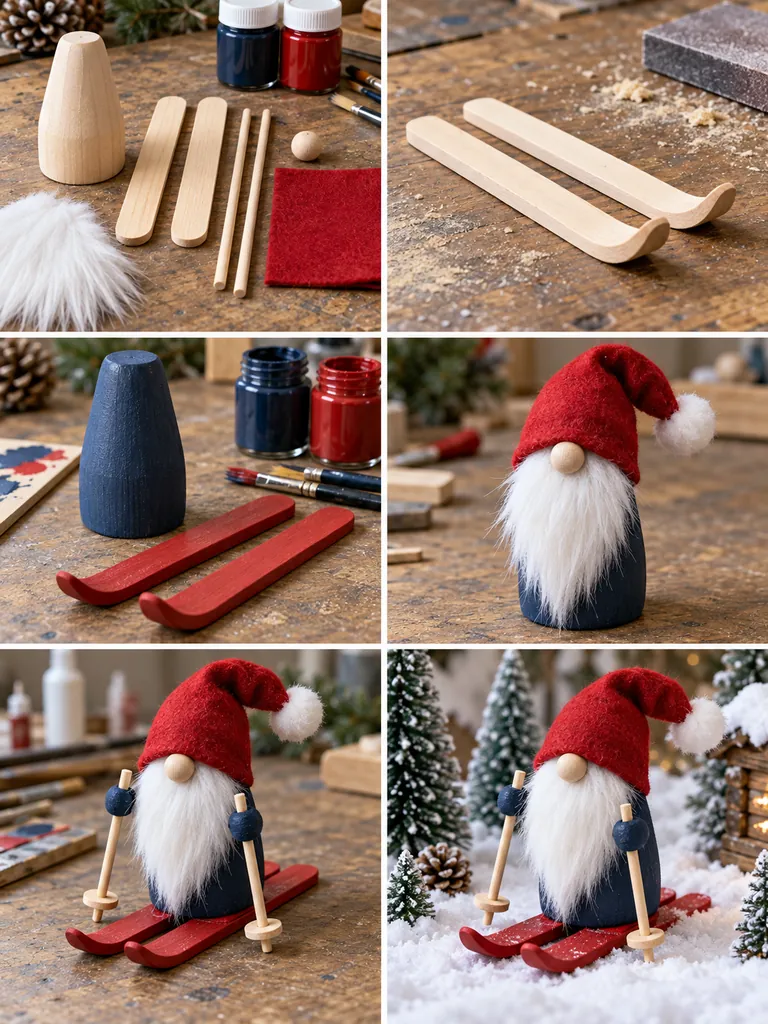
- Paint the wooden block to create the gnome’s body.
- Cut two narrow wood strips into matching ski shapes.
- Round and sand the front ends of the skis.
- Paint the skis and attach the gnome body on top.
- Add faux fur, the wooden nose, and a warm felt hat.
- Cut two short dowels for ski poles.
- Attach tiny circles or stars near the ends of the poles.
- Position the poles beside the gnome to complete the skiing pose.
23. Light-Up Wooden Christmas Gnome Village

Finish the collection with a more detailed tabletop project featuring several miniature wooden gnomes gathered around tiny houses and warm LED lights. This becomes a complete Christmas centerpiece rather than a single decoration.
Items Needed
- Flat wooden base
- Thin craft plywood
- Small wood blocks
- Mini wooden gnomes
- Acrylic paint
- Faux snow
- Mini battery-operated LED lights
- Faux trees
- Wood glue
How to Make
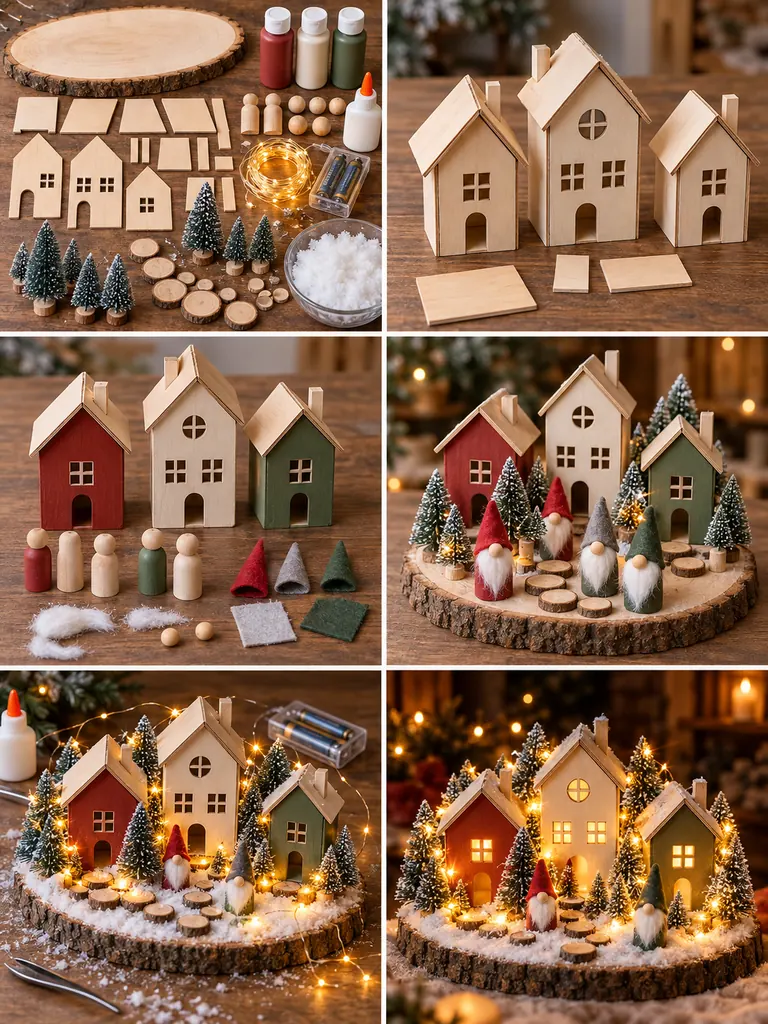
- Cut a wide wooden base for the entire village.
- Create two or three simple miniature houses from thin craft wood.
- Paint the houses in warm Christmas colors.
- Make several tiny wooden gnomes using miniature blocks or pegs.
- Arrange the houses and gnomes on the base before gluing.
- Add miniature evergreen trees between the structures.
- Weave battery-operated micro LED lights through the village.
- Glue everything securely once you are satisfied with the arrangement.
- Finish the base with faux snow, tiny wood slices, and miniature festive details.
Final Thoughts
DIY wooden Christmas gnomes are a fun way to turn simple pieces of wood into festive decorations that feel much more personal than mass-produced holiday decor. Whether you prefer farmhouse neutrals, bright traditional Christmas colors, rustic woodland textures, or whimsical designs, there is plenty of room to make each gnome your own.
Start with one of the easy scrap-wood or 2×4 projects if you are new to DIY woodworking, then experiment with more detailed projects such as the countdown gnome, lantern holder, layered cutout, or light-up village.
You can also adjust almost any of these designs to suit the space you are decorating. Make tiny versions for ornaments and tiered trays, medium versions for shelves and mantels, or oversized wooden gnomes for the porch.
Most importantly, save those leftover wood pieces from other projects. With a little paint, a fluffy beard, and a festive hat, even the simplest scrap can become an adorable Christmas gnome you will enjoy bringing out year after year.

