
A handmade Christmas village can turn a mantel, console, shelf, or dining table into a warm holiday focal point. You do not need expensive collectibles: cardboard, foam board, craft sticks, cardstock, bottle-brush trees, faux snow, and battery-operated lights can become beautiful miniature cottages, shops, churches, and complete winter scenes.
The 23 DIY Christmas Village Houses Ideas below range from simple paper luminaries to layered landscapes with bridges, lakes, trains, and tiered platforms. For illuminated projects, use battery-operated LEDs rather than real candles or open flames.
1. Popsicle Stick Christmas Cottage
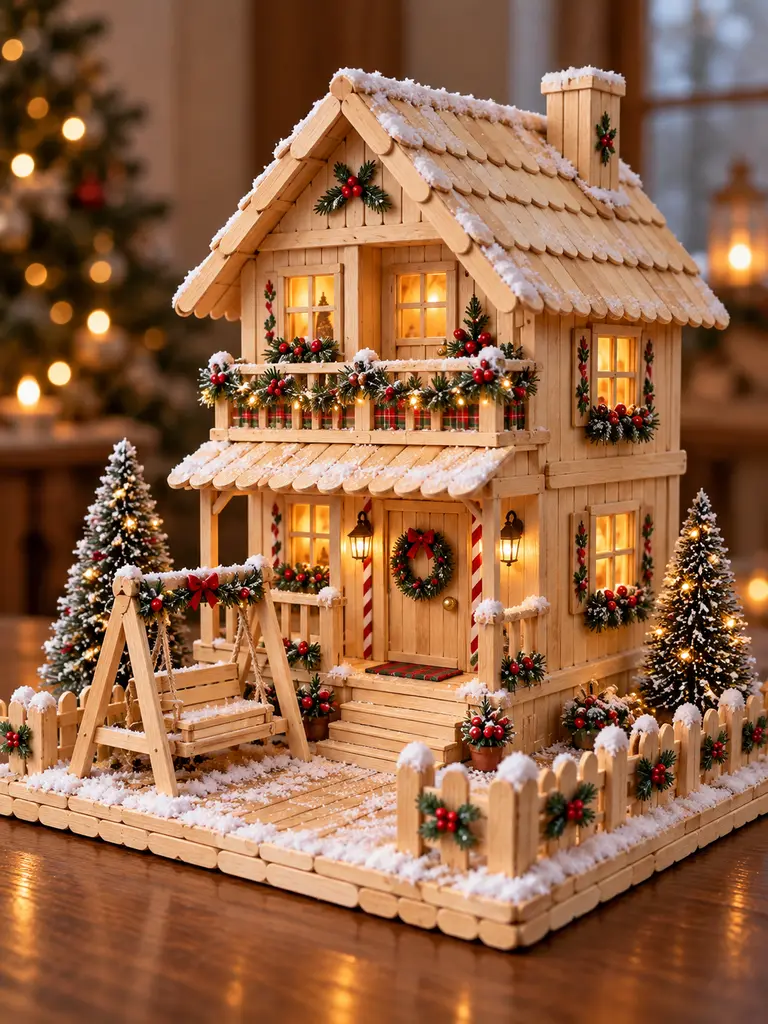
A popsicle-stick cottage is one of the most charming ways to make a handmade Christmas village house.
Items Needed
- Popsicle or craft sticks
- Cardboard for inner walls and base
- Wooden coffee stirrers
- Hot glue gun
- Craft knife and ruler
- Brown acrylic paint or light wood stain
- Tracing paper or thin translucent plastic
- Mini wreaths and artificial greenery
- Bottle-brush trees
How to Make
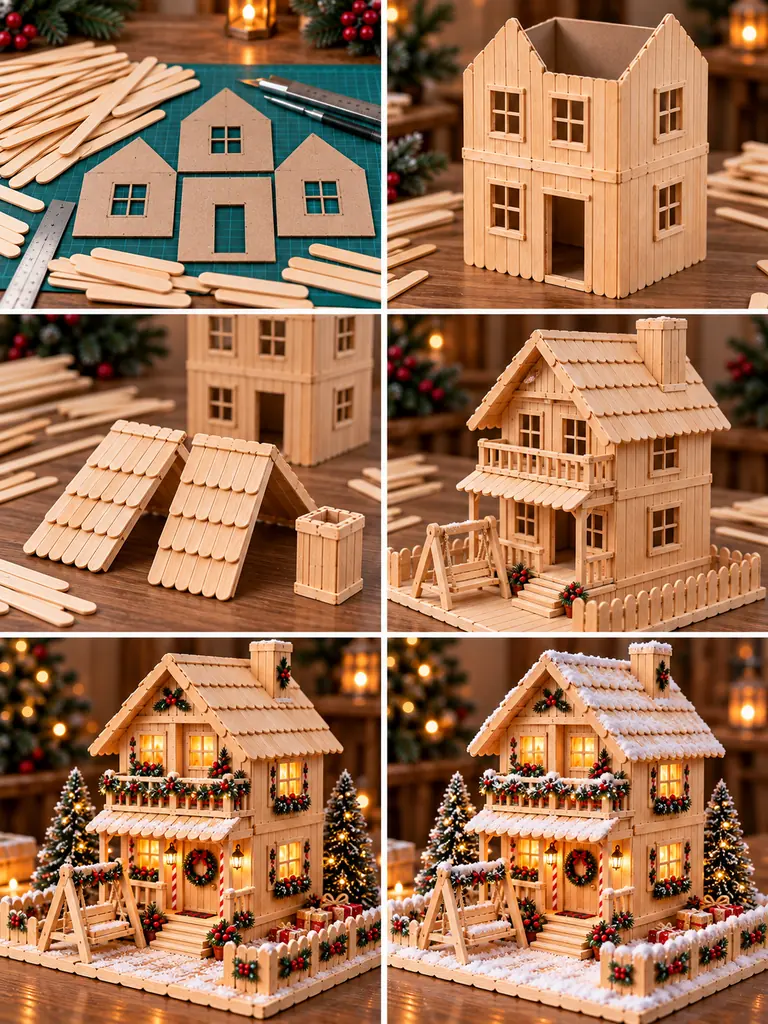
- Cut front, back, and side wall panels from cardboard, then cut out the door and window openings before assembly.
- Glue the wall panels together and reinforce the inside corners so the two-story shell stays square.
- Cover the exterior with trimmed craft sticks, keeping the window and door openings clear.
- Build two roof panels and overlap short craft-stick pieces like shingles; add a small chimney.
- Make the porch, upper balcony, steps, picket fence, and A-frame swing from thin wooden sticks.
- Back the windows with tracing paper and place warm micro LEDs inside the cottage.
- Decorate the door and balcony with miniature wreaths, garlands, red berries, and small bows.
- Attach the house and yard pieces to a sturdy base, then add bottle-brush trees.
- Apply faux snow unevenly to the roof, porch, fence, swing, and ground for a believable winter finish.
2. Snowy Cardboard Cottage With Glowing Windows
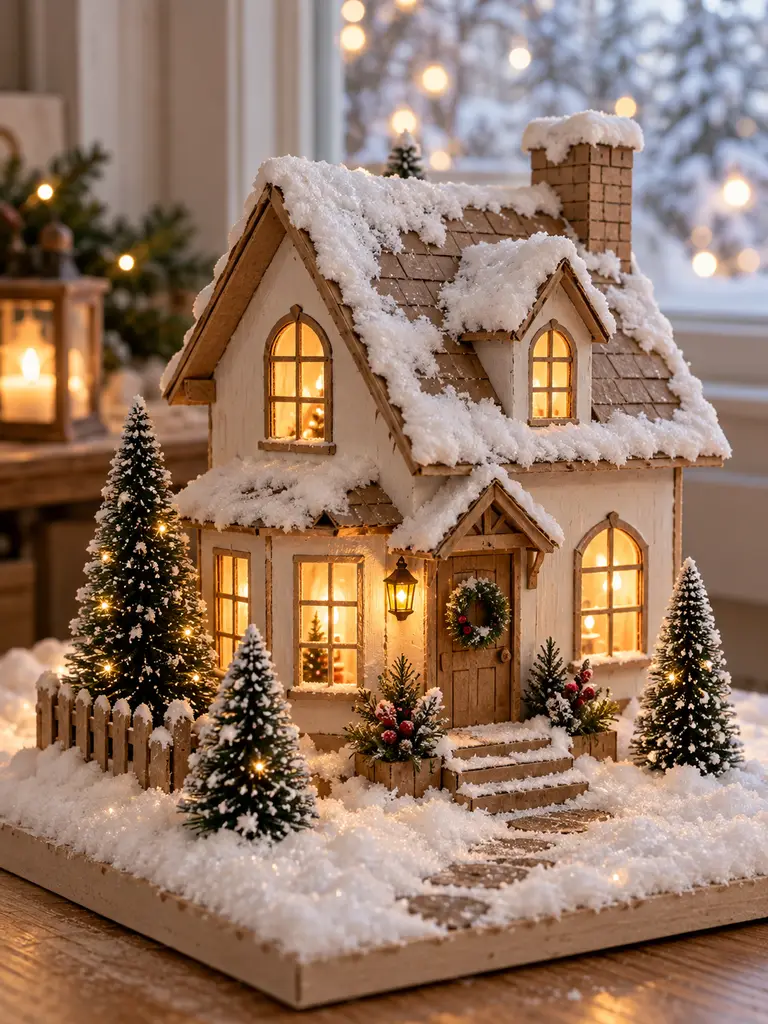
Simple cardboard can become a surprisingly beautiful Christmas village cottage once it is painted, illuminated, and layered with faux snow.
Items Needed
- Thick cardboard
- Craft knife and metal ruler
- Hot glue
- Warm ivory and brown acrylic paint
- Thin cardstock
- Tracing paper
- Battery-operated LED tea light
- Bottle-brush trees
- Faux snow
How to Make
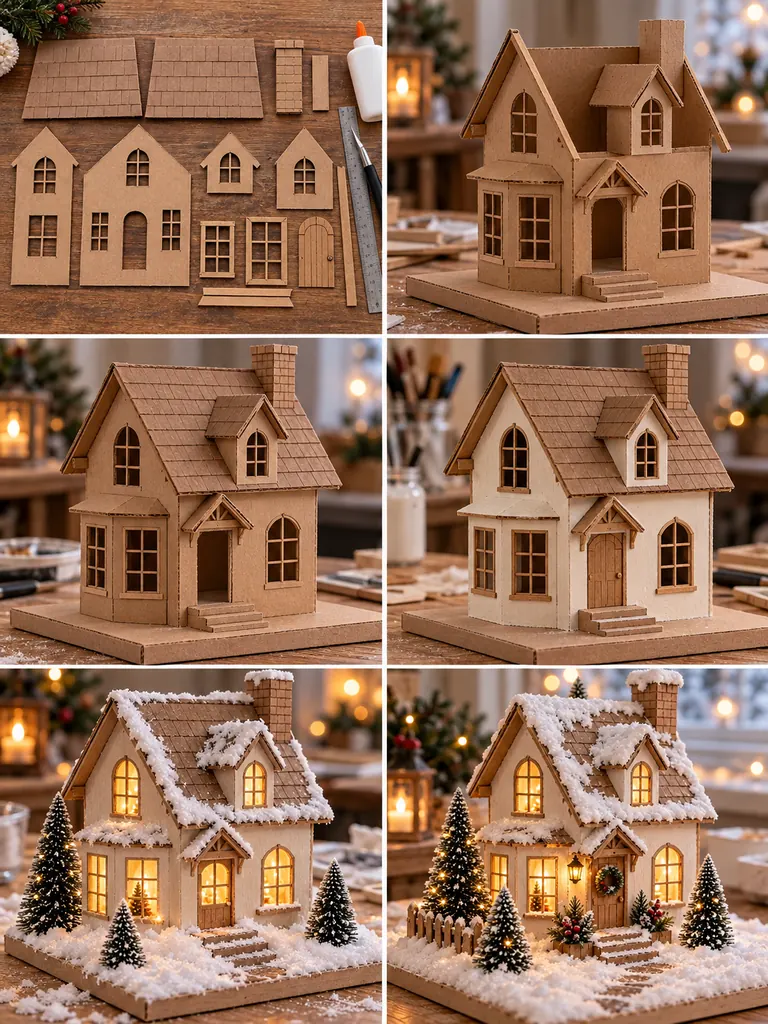
- Draw and cut two peaked end walls and two rectangular side walls from thick cardboard.
- Cut the doorway and windows while all pieces are still flat.
- Glue the four walls together, keeping the roof completely separate during this stage.
- Attach two brown cardboard roof panels and add a small chimney once the wall shell is stable.
- Paint the walls warm ivory and add narrow cardstock frames around the windows and door.
- Glue tracing paper behind each window so the light will diffuse softly.
- Place a battery LED inside and test the glow before sealing or decorating the base.
- Arrange three bottle-brush trees and a simple path around the cottage.
- Brush glue or snow paste over the roof edges, chimney, and ground, then sprinkle with fine faux snow.
3. Scandinavian Red-Roof Christmas House
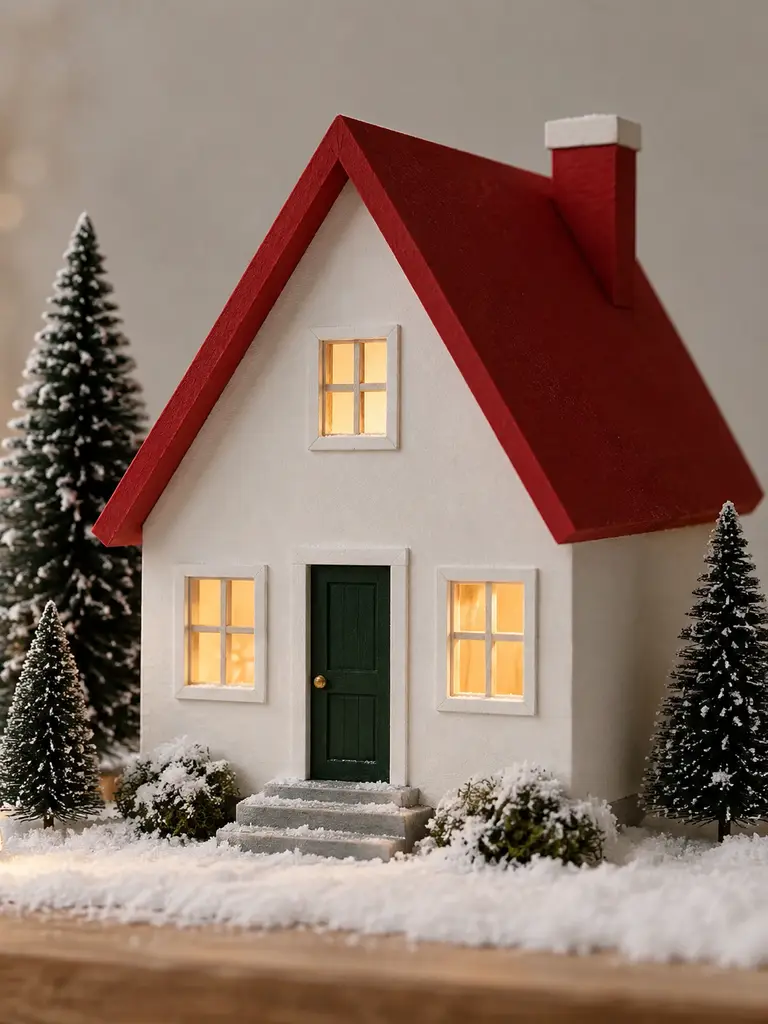
A Scandinavian-inspired house is ideal when you want a cheerful Christmas village without heavy ornamentation.
Items Needed
- Foam board or thick cardstock
- White acrylic paint
- Red acrylic paint
- Forest-green paint
- Craft knife
- Hot glue
- Thin cardstock strips
- Tracing paper
- Warm LED light
How to Make
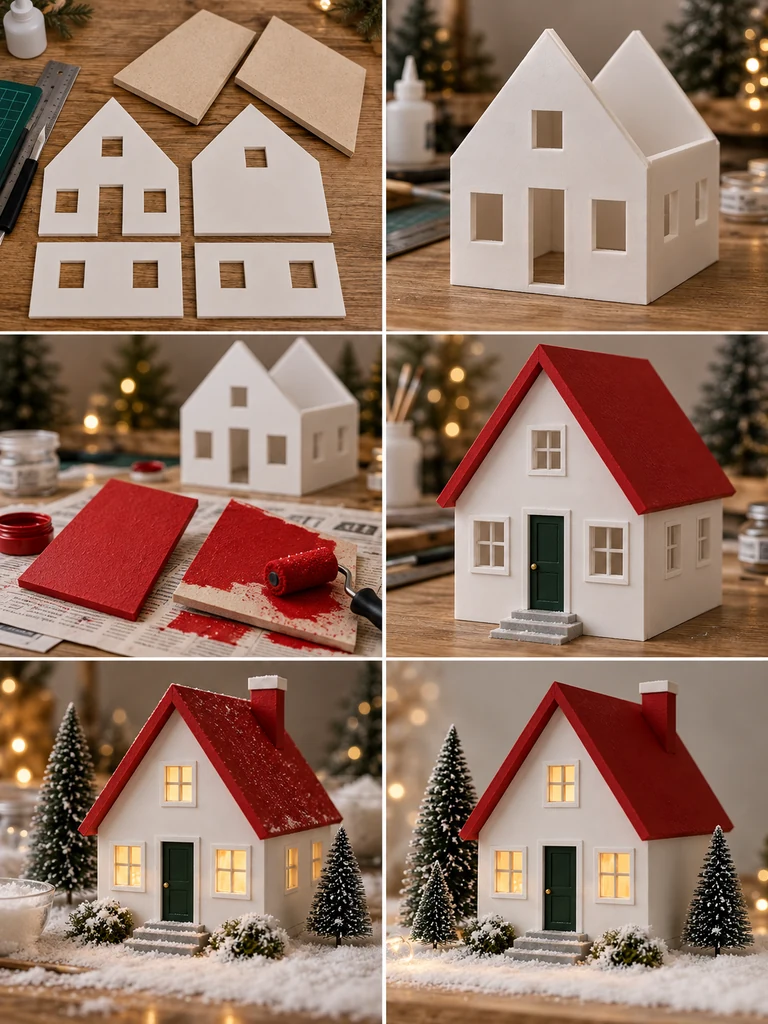
- Cut the white wall panels with simple square windows and prepare two separate unpainted roof panels.
- Assemble only the wall shell first; do not attach the roof yet.
- Paint the two loose roof panels a rich traditional Christmas red and let them dry fully.
- Attach the painted roof panels to the white house and keep the overhang neat and even.
- Add a dark green front door and simple white window frames.
- Place translucent paper behind the windows and add a warm LED inside.
- Arrange several dark-green bottle-brush trees around the house.
- Use only a light dusting of snow along the roof edges and foundation so the strong red-white-green palette remains the focus.
4. Candy Cane Porch Christmas Cottage
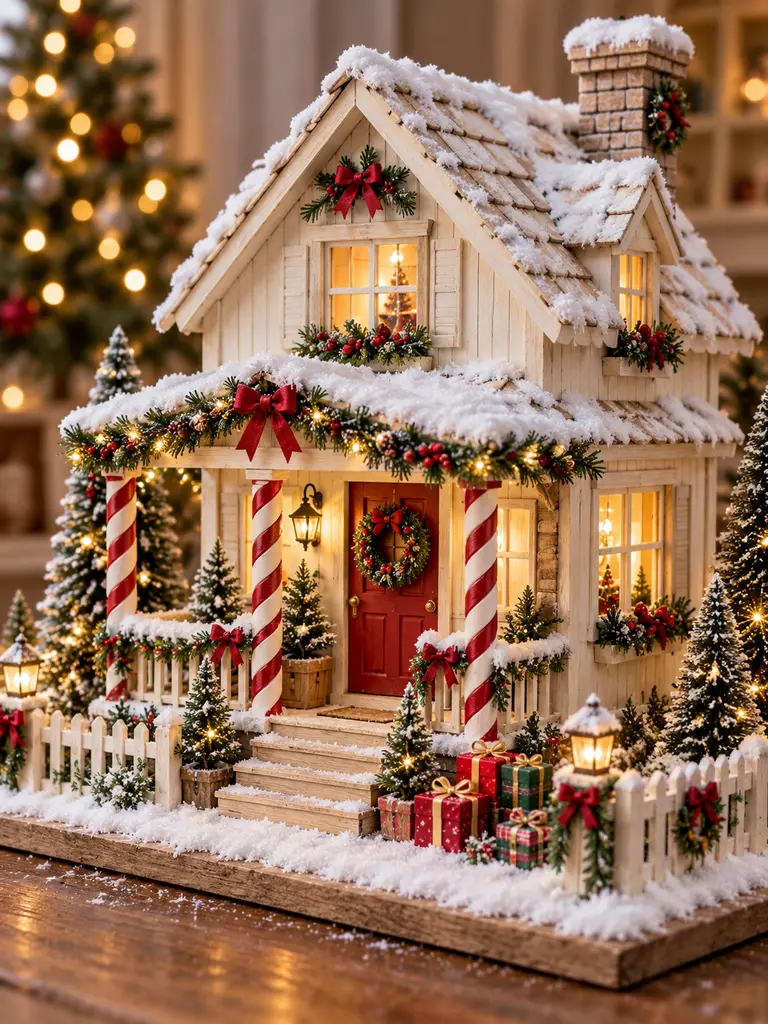
The candy-cane porch turns a basic miniature cottage into a playful Christmas centerpiece.
Items Needed
- Foam board
- Wooden dowels
- Red and white acrylic paint
- Cardstock
- Hot glue
- Mini wreath
- Artificial garland
- Tiny gift boxes
- Tracing paper
How to Make
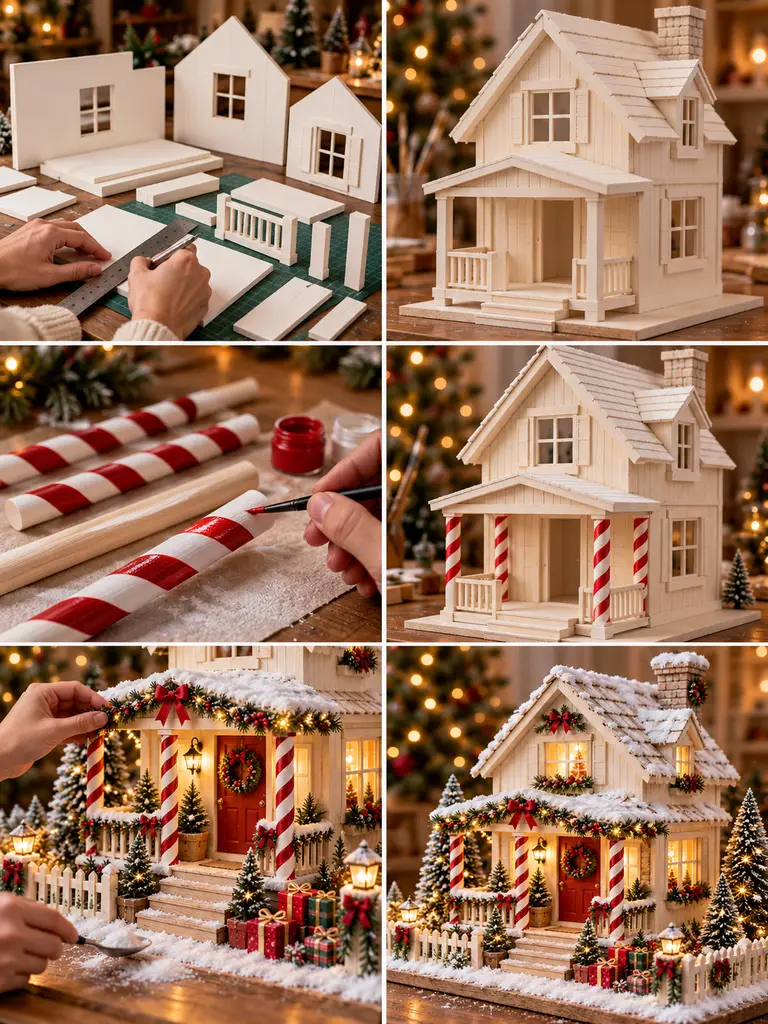
- Cut the cottage walls, roof pieces, porch floor, porch canopy, and plain wooden dowels.
- Assemble the house and attach the porch floor and canopy, leaving the columns off for now.
- Paint each dowel white and add clean diagonal red stripes to create candy-cane-style posts.
- Install the striped posts under the porch canopy and add the porch railing and steps.
- Paint the front door deep red and finish the window frames before adding lights.
- Back the windows with translucent material and install warm LEDs inside.
- Add the wreath, greenery, bows, and a few tiny wrapped gifts around the porch.
- Finish the roof, porch edge, and ground with fluffy faux snow while keeping the striped columns clearly visible.
5. Rustic Woodland Log Cabin
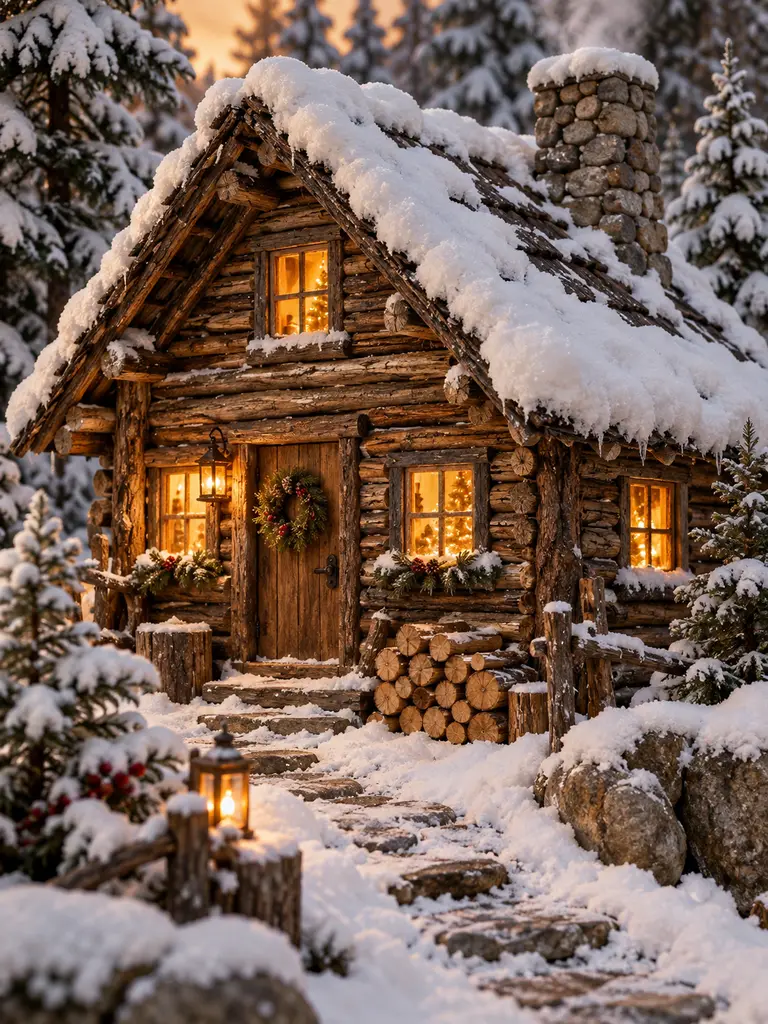
A tiny log cabin brings a cozy forest-retreat feeling to a Christmas village.
Items Needed
- Cardboard or foam-board cabin shell
- Thin natural twigs or wooden dowels
- Brown acrylic paints or stain
- Cardboard roof pieces
- Small pebbles or stone-texture pieces
- Craft glue or hot glue
- Tracing paper
- Warm LEDs
- Bottle-brush trees
How to Make
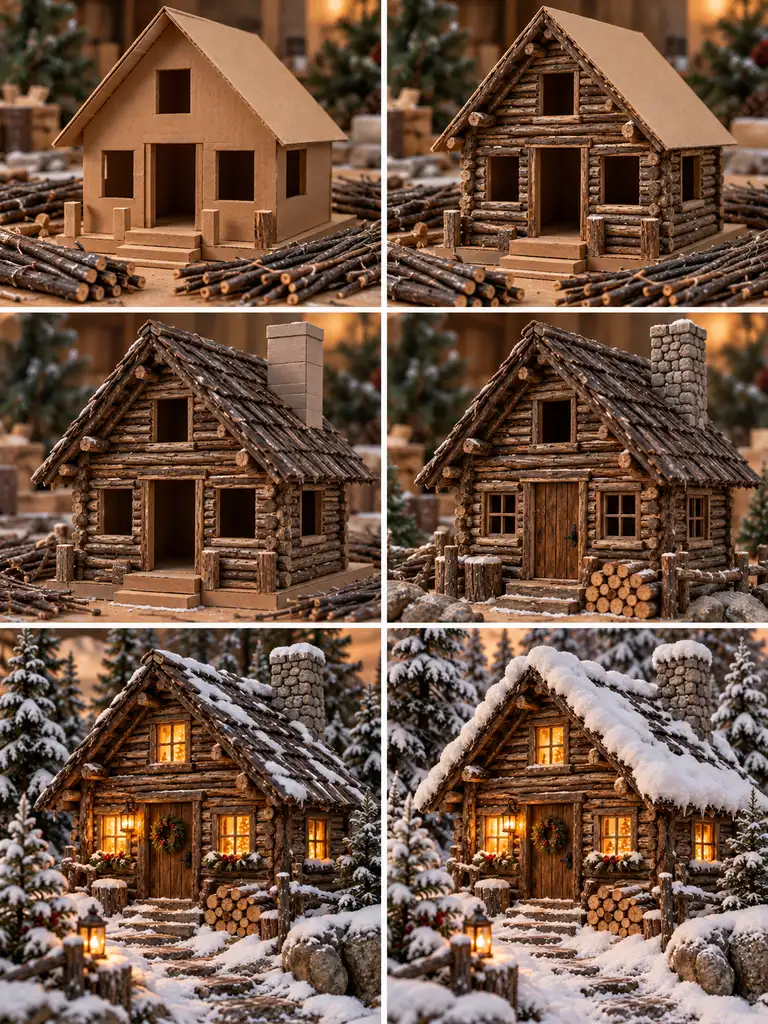
- Build a simple rectangular cabin shell with a pitched roofline and open windows.
- Cut twigs to length and glue them horizontally across the exterior like stacked logs.
- Add the dark rustic roof and a basic chimney form.
- Cover the chimney with tiny stone-texture pieces for a masonry effect.
- Make a wooden door, simple window frames, and a small stack of miniature firewood.
- Back the windows with translucent paper and install warm lights.
- Place the cabin on its base and add a narrow path, rocks, and groups of evergreen trees.
- Apply heavier snow to the roof and tree branches but leave enough wood visible to show the log construction.
6. White and Gold Christmas Manor
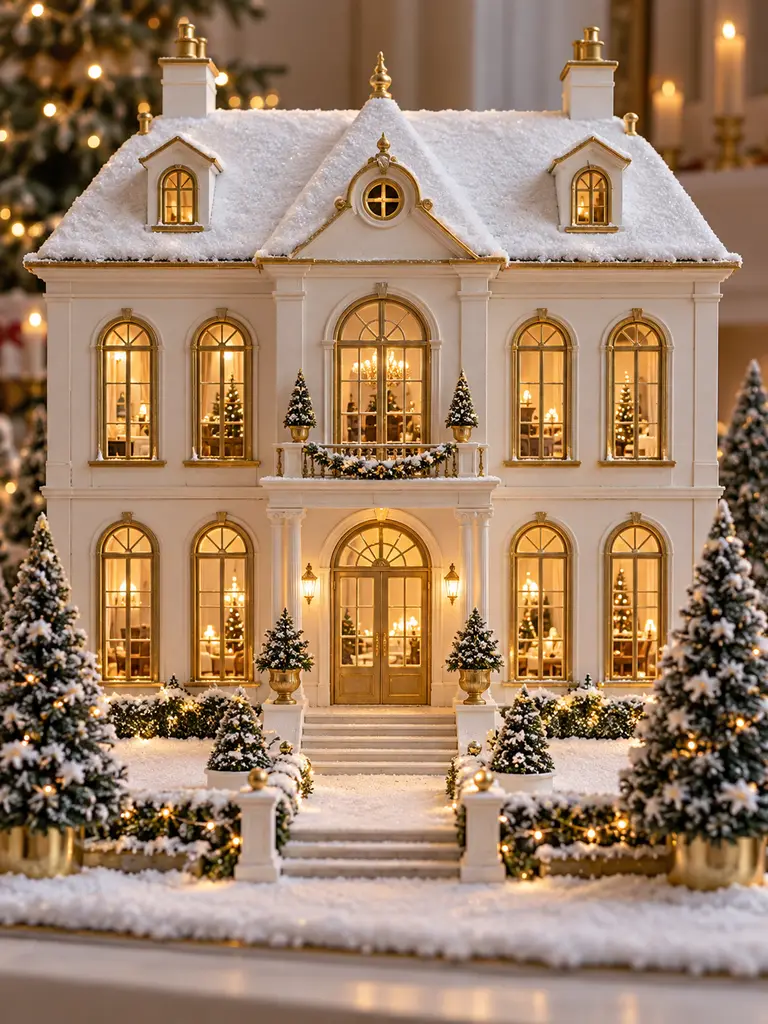
For a more elegant village, a white-and-gold manor adds a refined focal point without requiring expensive ceramic collectibles.
Items Needed
- Foam board
- White acrylic paint
- Metallic gold paint
- Thin cardstock
- Craft knife
- Hot glue
- Tracing paper
- Warm LEDs
- Fine faux snow
How to Make
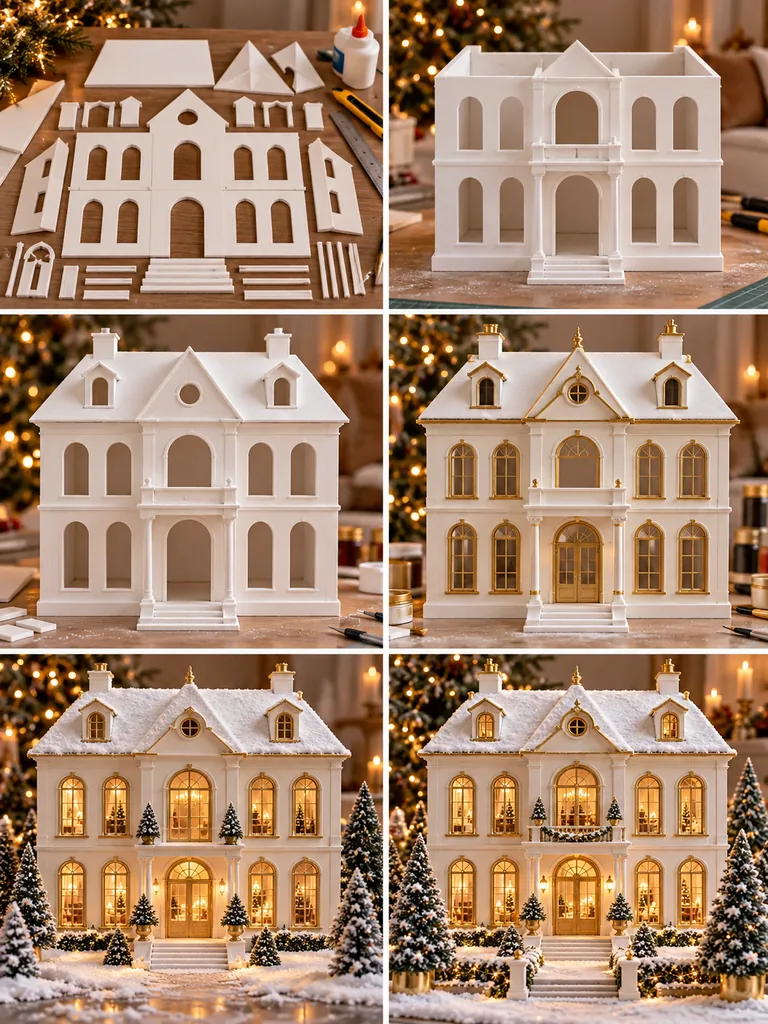
- Cut the two-story facade, side walls, arched window openings, entrance opening, and roof pieces.
- Assemble the plain two-story shell and reinforce the corners from inside.
- Attach the roof and basic architectural projections while the manor remains undecorated.
- Paint the exterior warm white and allow it to dry completely.
- Paint thin cardstock trims metallic gold, then add them around windows, doorway, and selected roof edges.
- Attach tracing paper behind the windows and position several warm LEDs inside.
- Apply a restrained layer of snow to the roof so the gold details are still visible.
- Arrange matching miniature trees symmetrically near the entrance to complete the formal look.
7. Mini Christmas Village Church
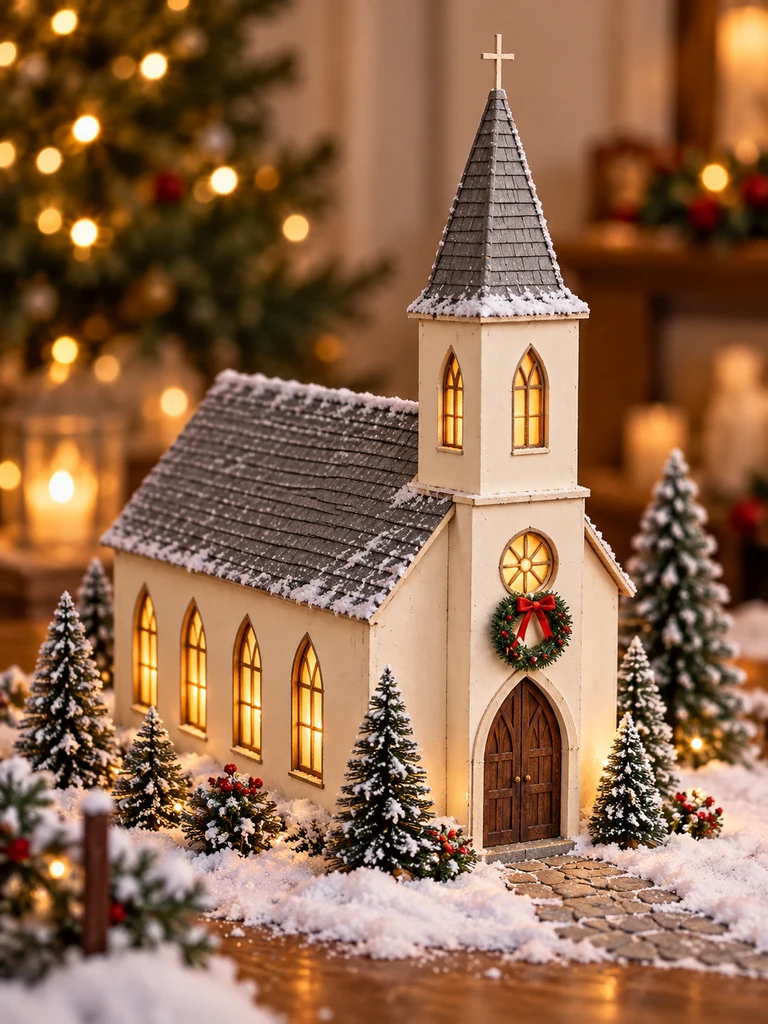
A miniature church gives a Christmas village an instant landmark and creates useful height among lower cottages.
Items Needed
- Foam board or cardboard
- Craft knife
- Ivory or stone-colored paint
- Cardstock for the steeple
- Thin wooden strips
- Tracing paper
- Mini wreath
- Battery LEDs
- Bottle-brush trees
How to Make
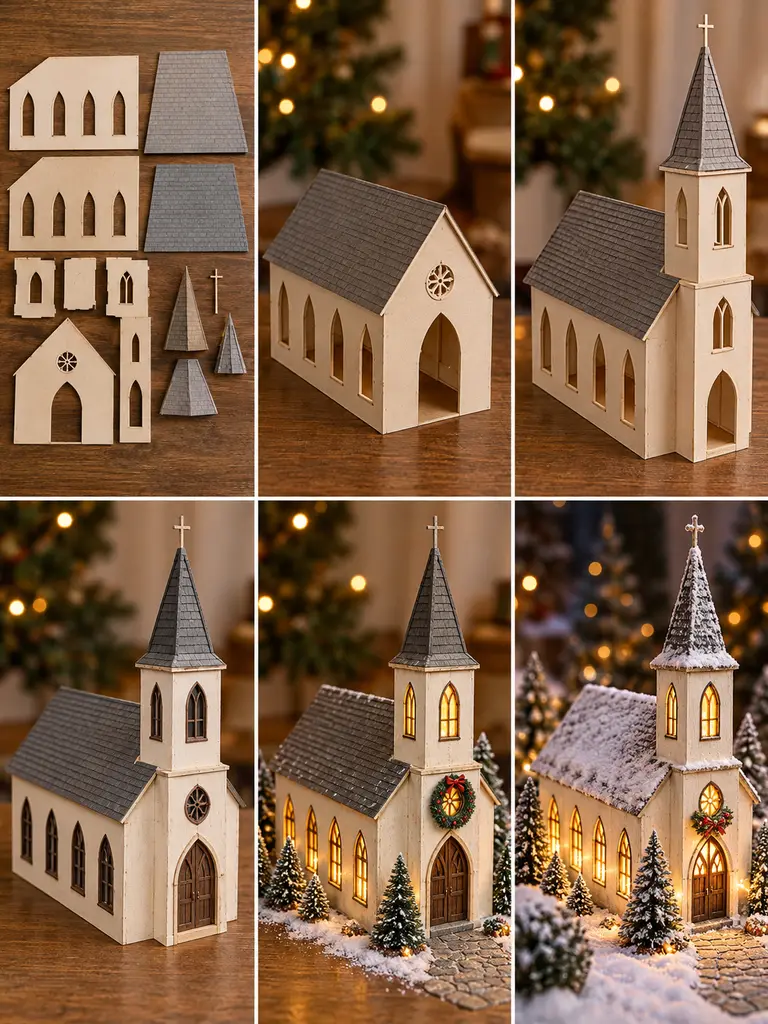
- Cut the long side walls with tall arched windows plus the front, back, roof, tower, and steeple pieces.
- Assemble the rectangular church body and attach the main pitched roof.
- Build the taller front tower and secure it to the existing church body.
- Fold and attach the pointed steeple, keeping it centered above the tower.
- Paint the church ivory and add dark double doors and simple arched window frames.
- Back the windows with translucent paper and install warm LEDs.
- Add a wreath above the entrance and make a narrow stone-style path from the doors.
- Place snowy trees around the church and lightly cover the roof and ground with faux snow.
8. Gingerbread-Style Christmas Village House
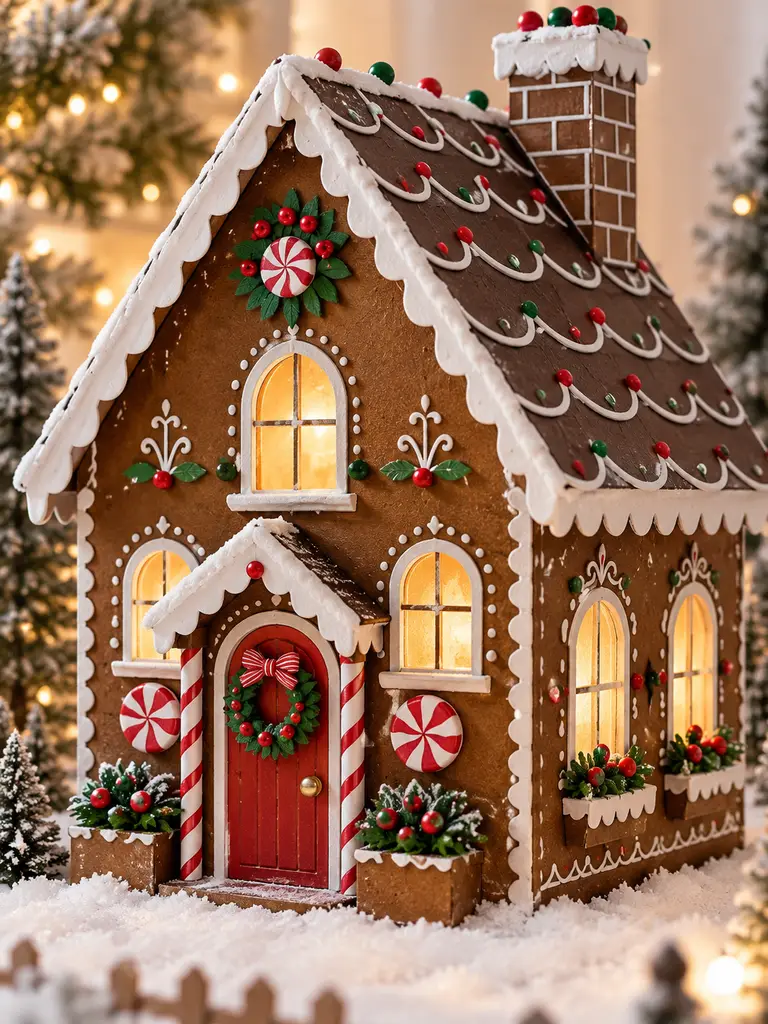
You can get the storybook charm of a gingerbread house without baking anything.
Items Needed
- Cardboard
- Warm brown acrylic paint
- Darker brown roof paint
- White dimensional craft paint
- Red and green beads or embellishments
- Peppermint-style decorations
- Hot glue
- Tracing paper
- LED tea light
How to Make
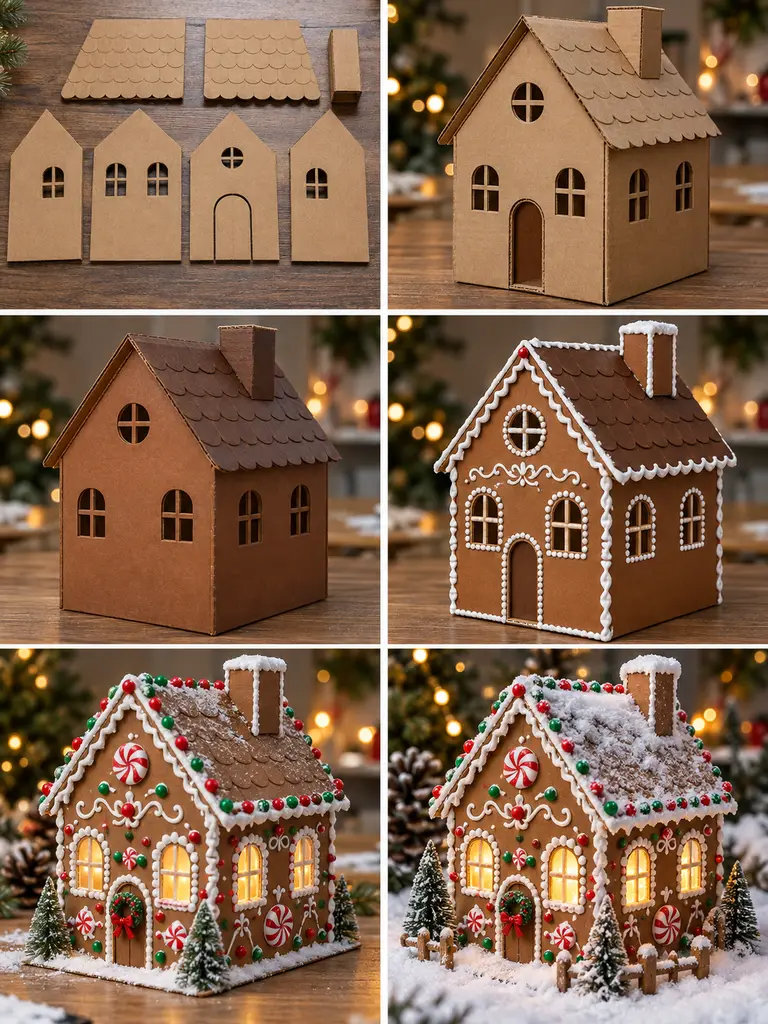
- Cut the wall and roof sections for a classic peaked cottage and assemble the plain shell.
- Paint the walls a warm gingerbread brown and the roof a slightly darker shade.
- Allow the paint to dry before decorating so the raised white details stay crisp.
- Apply dimensional white craft paint around windows, corners, roof edges, and the door like piped icing.
- Add scalloped white trim and small red and green candy-inspired embellishments.
- Place peppermint-style decorations near the entrance and selected windows.
- Back the windows with translucent material and place a warm LED inside.
- Add faux snow to the roof and base while keeping the project clearly non-edible and craft-made.
9. Farmhouse Christmas Village Cottage
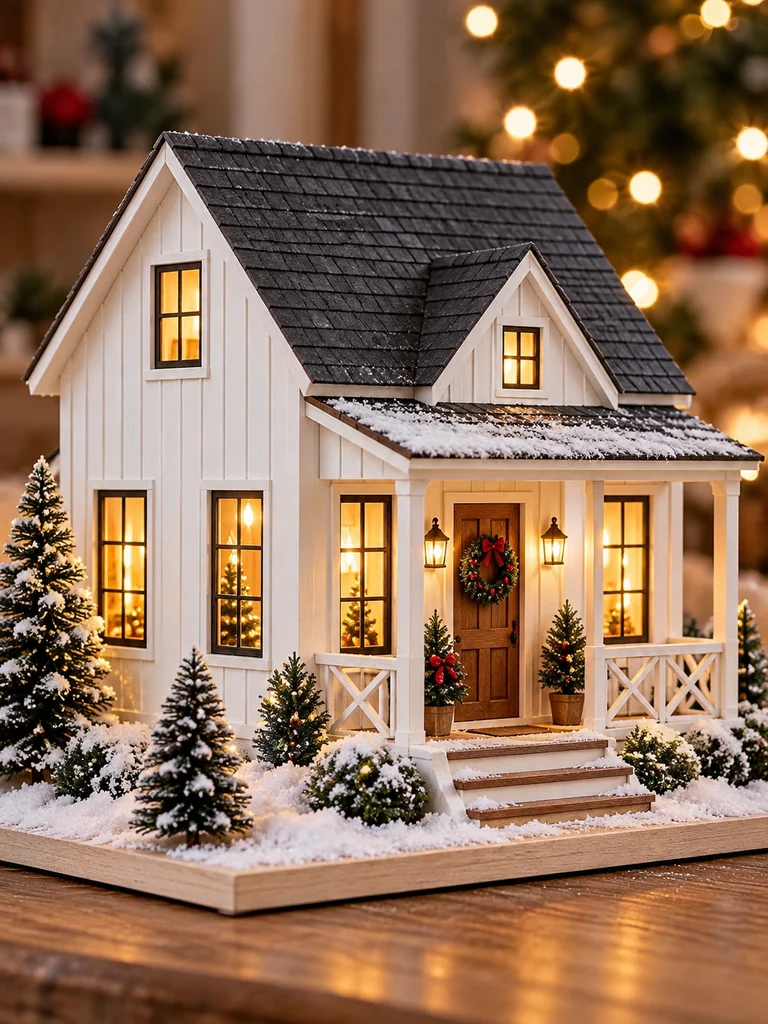
Modern farmhouse style works beautifully in miniature because it relies on simple shapes and a limited palette.
Items Needed
- Foam board
- Thin wooden or cardstock strips
- White acrylic paint
- Charcoal paint
- Natural wood stain or brown paint
- Black cardstock or paint
- Coffee stirrers
- Mini wreath
- Warm LEDs
How to Make
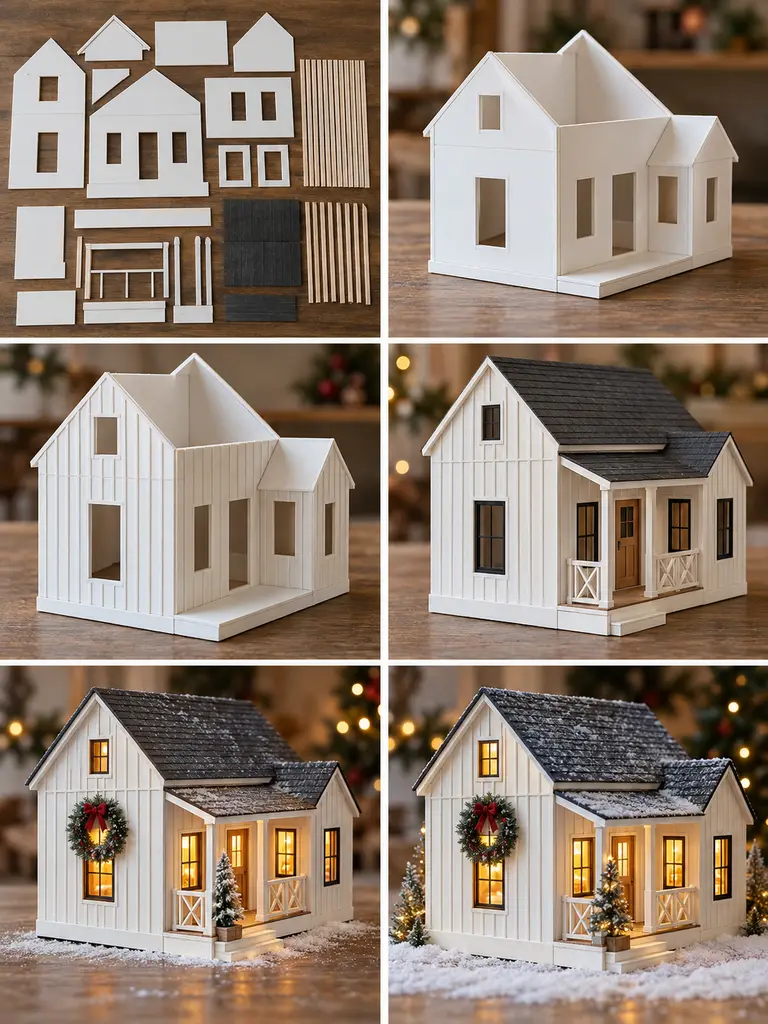
- Cut the house panels and prepare many narrow strips for the board-and-batten effect.
- Assemble the basic shell, keeping all window and door openings aligned.
- Glue the narrow strips vertically onto the exterior and paint the siding matte white.
- Install the charcoal roof and create the small front porch.
- Add a natural wood front door, porch posts, simple railing, and black window frames.
- Place translucent backing behind the windows and install warm lights.
- Hang a restrained green wreath and place one miniature tree on the porch.
- Add only a light layer of snow to the roof, steps, and foundation for a neat modern finish.
10. Paper Christmas House Luminaries
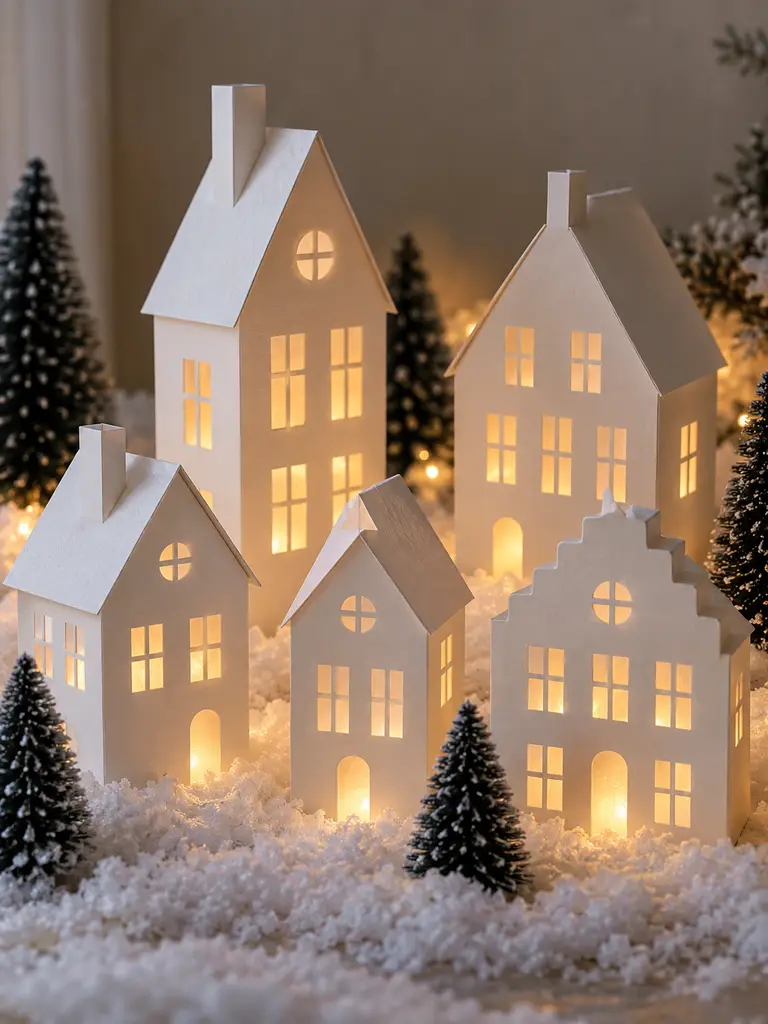
Paper luminaries are one of the easiest ways to create an entire village quickly.
Items Needed
- Heavy white cardstock
- Pencil and ruler
- Craft knife and cutting mat
- Scoring tool
- Paper glue
- Vellum or tracing paper
- Battery-operated LED tea lights
- Fine faux snow
- Minimal bottle-brush trees
How to Make
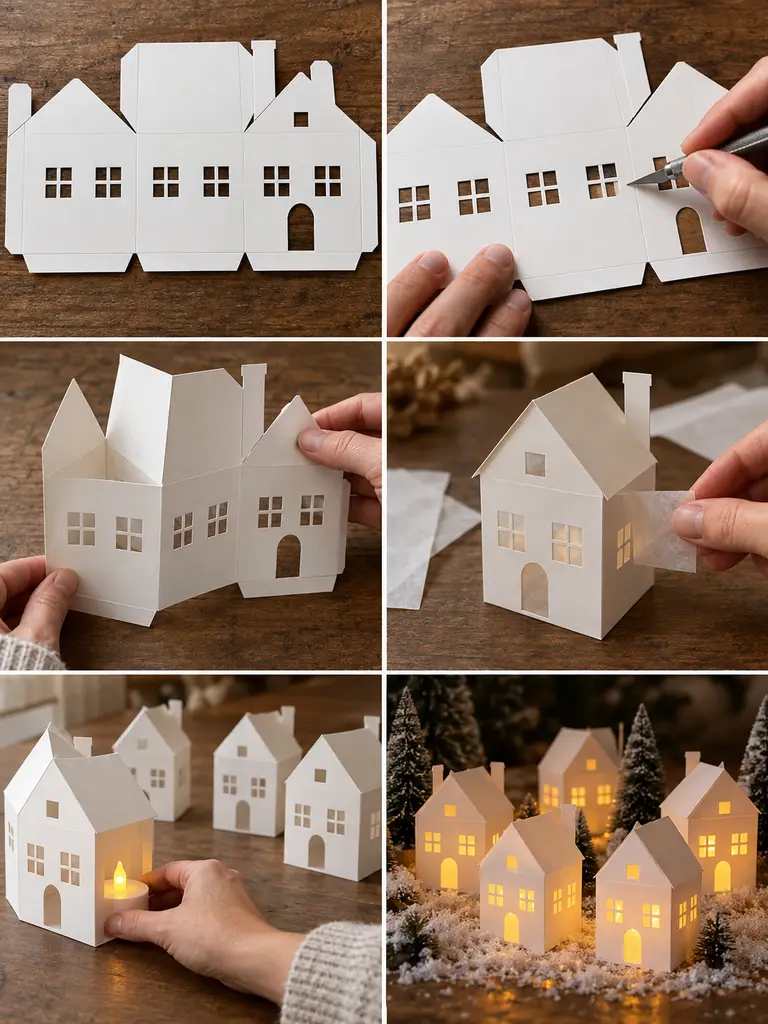
- Draw or print a simple house template with walls, roof sections, tabs, windows, and door openings.
- Cut the window and doorway shapes carefully while the cardstock remains flat.
- Score all fold lines so the walls and roof bend cleanly without cracking.
- Glue small pieces of vellum behind the openings to diffuse the light.
- Fold the walls into shape and secure the tabs, then close the roof.
- Repeat the process with several different heights and rooflines for variety.
- Place one battery LED tea light inside each finished house.
- Arrange the houses together with fine faux snow and a few minimalist trees, keeping the white paper architecture uncluttered.
11. Glittered Snow-Covered Cottage
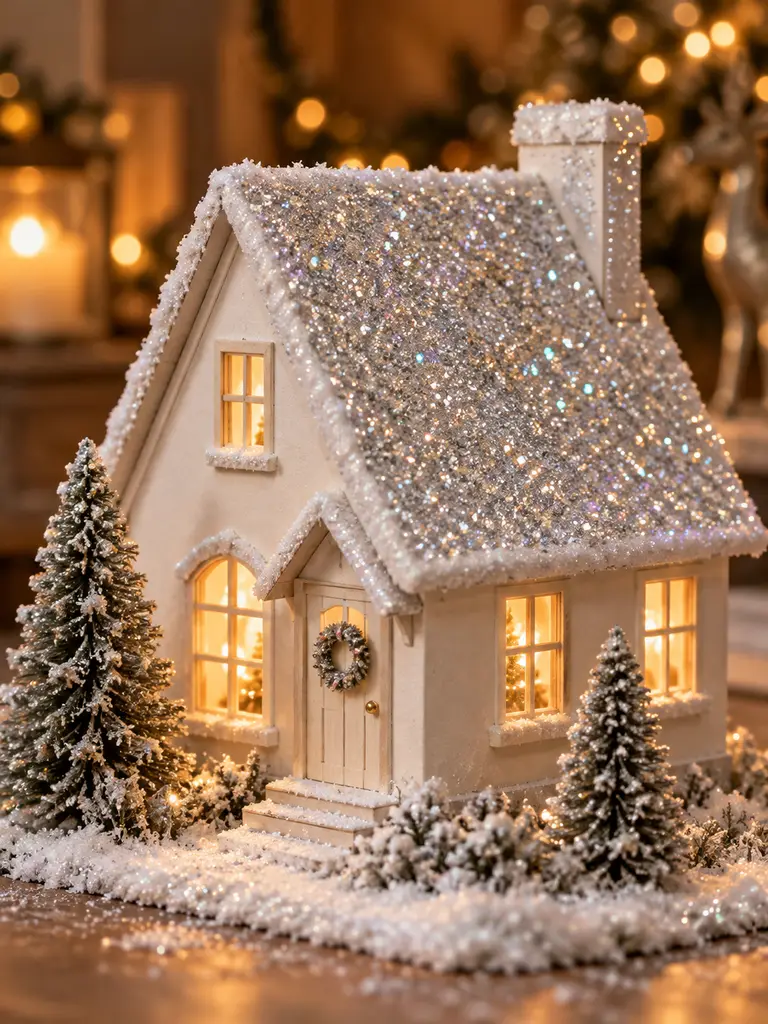
This cottage is designed around one defining finish: a sparkling silver-white roof.
Items Needed
- Foam board
- Ivory acrylic paint
- Fine silver or iridescent glitter
- Craft glue
- White snow paste
- Tracing paper
- Warm LEDs
- Two frosted bottle-brush trees
- Small wreath
How to Make
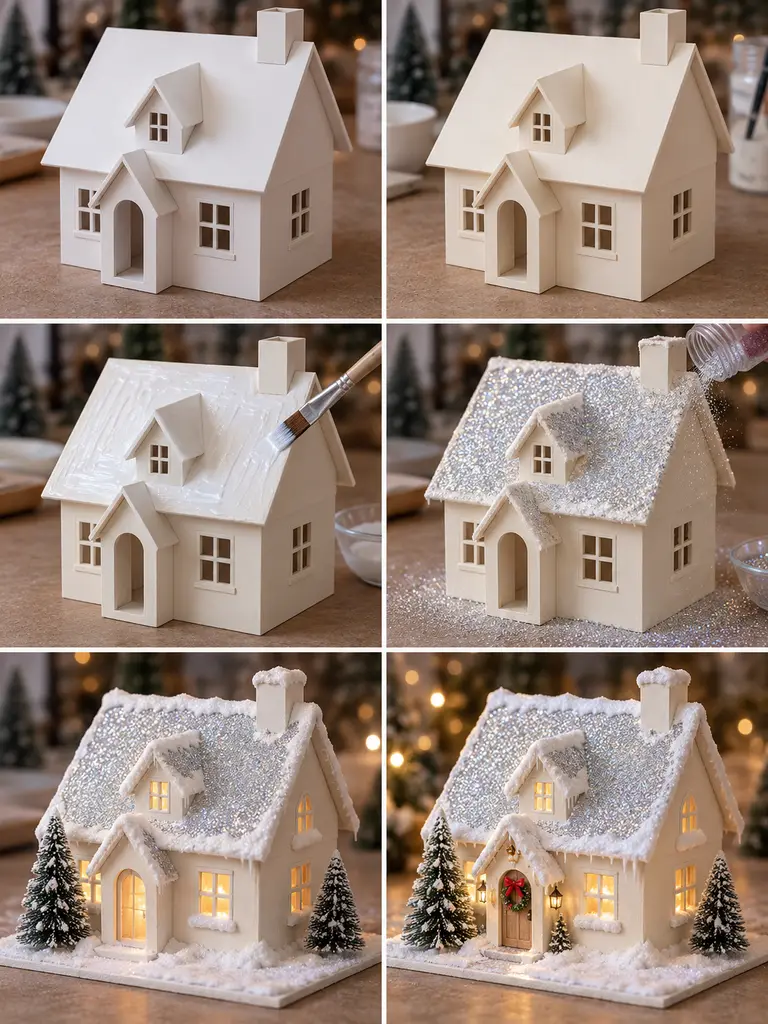
- Assemble a simple foam-board cottage shell with its roof securely attached.
- Paint the exterior matte ivory and let the surface dry completely.
- Brush a thin, even layer of craft glue over the roof only.
- Sprinkle fine silver-iridescent glitter across the glued roof and tap away the excess.
- Add translucent window backing and place warm LEDs inside.
- Apply snow paste along the eaves, chimney, window ledges, and ground.
- Position two frosted miniature trees beside the cottage and add a small wreath at the entrance.
- Keep the remaining decoration understated so the glittered roof stays the visual focus.
12. Christmas Village Bakery
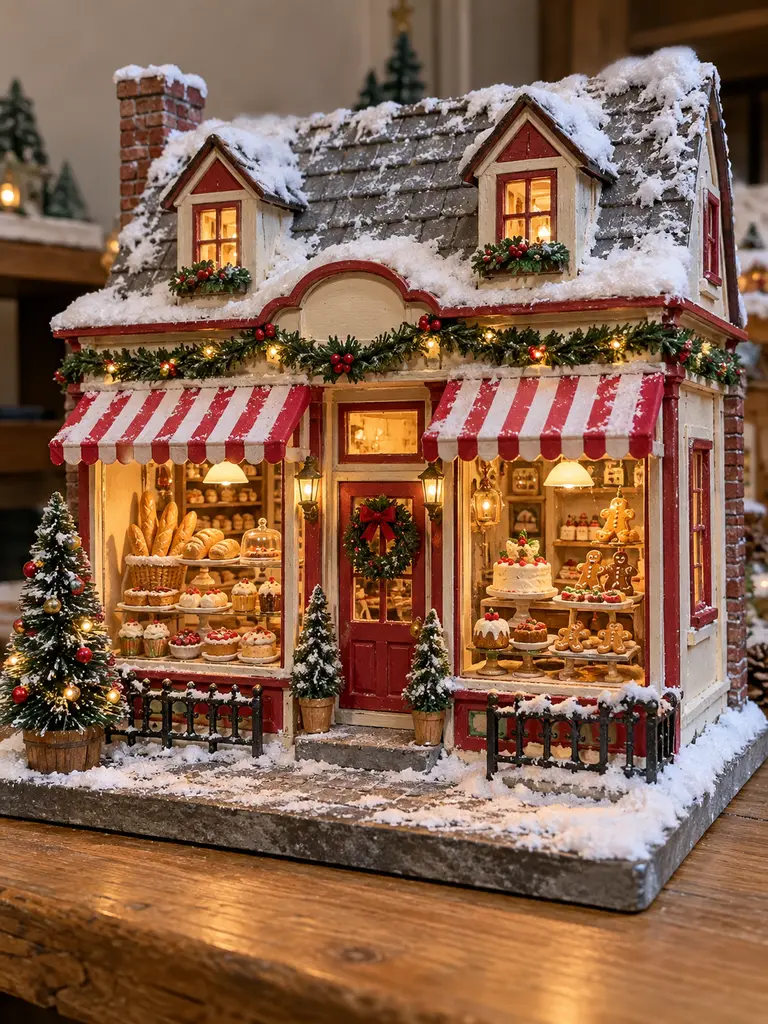
A miniature bakery makes a village feel like a real little town instead of a row of houses.
Items Needed
- Foam board
- Clear acetate
- Cream and muted-red paint
- Red-and-cream cardstock
- Thin wood strips
- Mini shelves
- Polymer clay, beads, or tiny craft pastries
- Mini wreath and garland
- Warm LEDs
How to Make
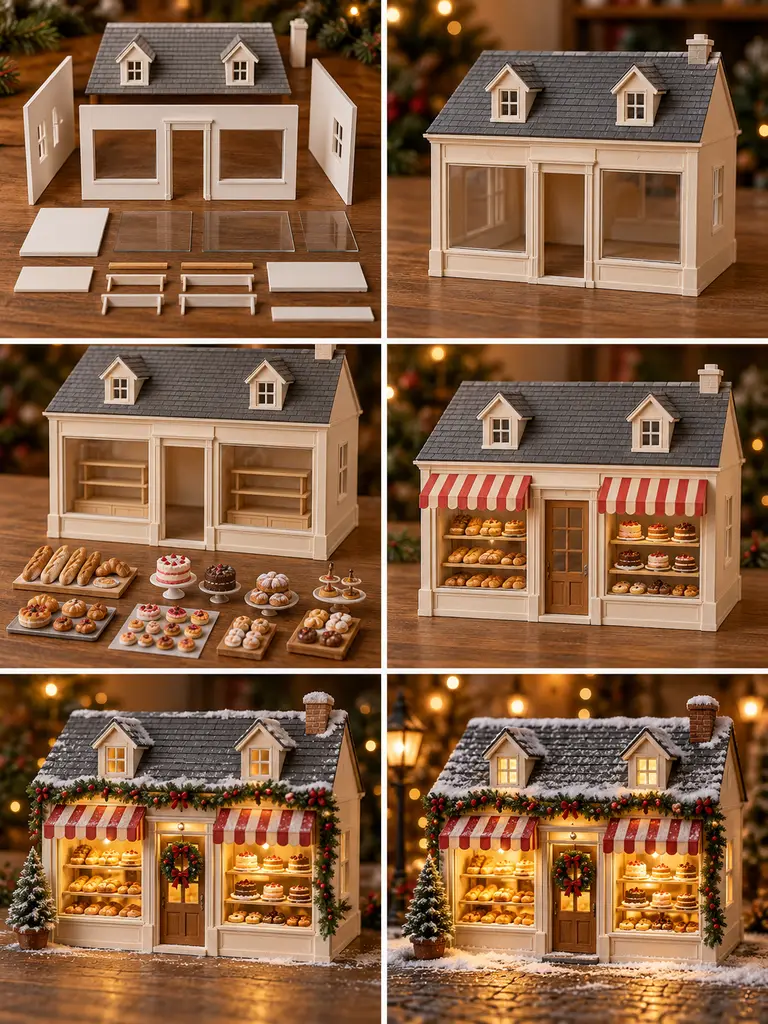
- Cut the storefront facade with two large display windows, a central doorway, side walls, and roof pieces.
- Assemble the shop shell and fit clear acetate into the two window openings.
- Build shallow shelves behind the windows so the miniature food will remain visible.
- Make tiny breads, cakes, cookies, and pastries from polymer clay or small craft pieces.
- Arrange the baked goods on the shelves and keep the displays balanced on both sides.
- Fold red-and-cream cardstock into striped awnings and attach them above the windows.
- Add warm LEDs, a wreath, garland, and one small Christmas tree.
- Finish the roof and sidewalk with faux snow, keeping the entire scene obviously miniature and tabletop-sized.
13. Tiny Christmas Toy Shop
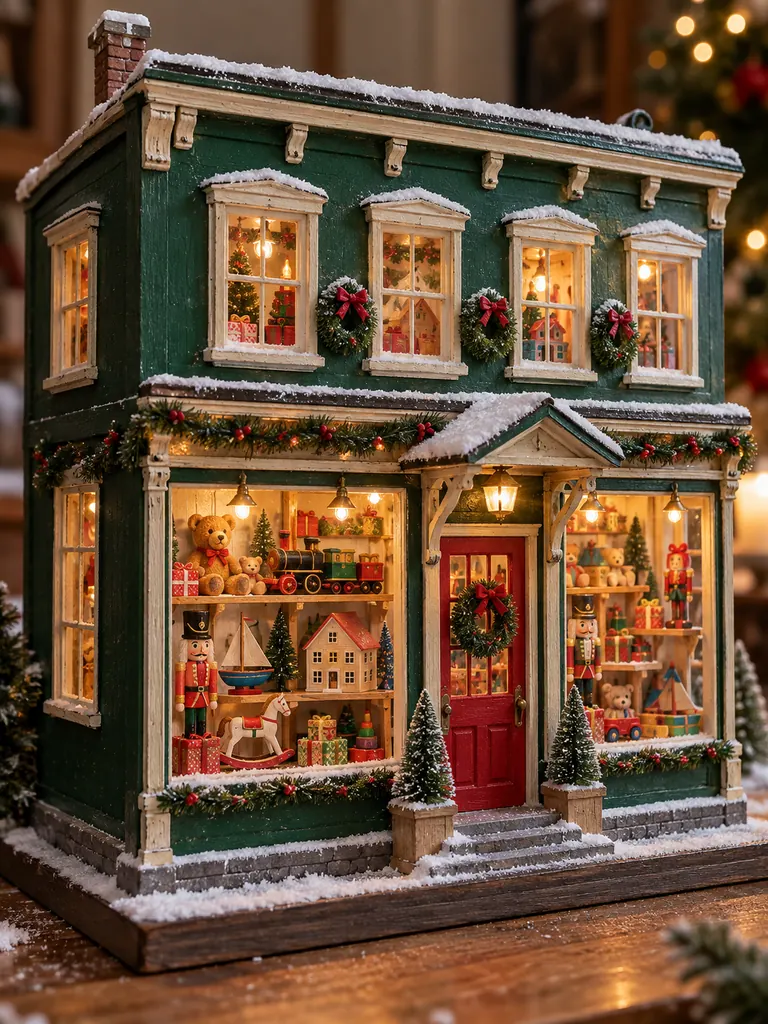
A toy shop adds color and personality to the village without needing complicated architecture.
Items Needed
- Foam board or cardboard
- Deep green paint
- Cream and red paint
- Clear acetate
- Thin strips for shelves
- Small wood blocks, beads, buttons, and toy miniatures
- Cardstock for gift boxes
- Mini garland
- Warm LEDs
How to Make
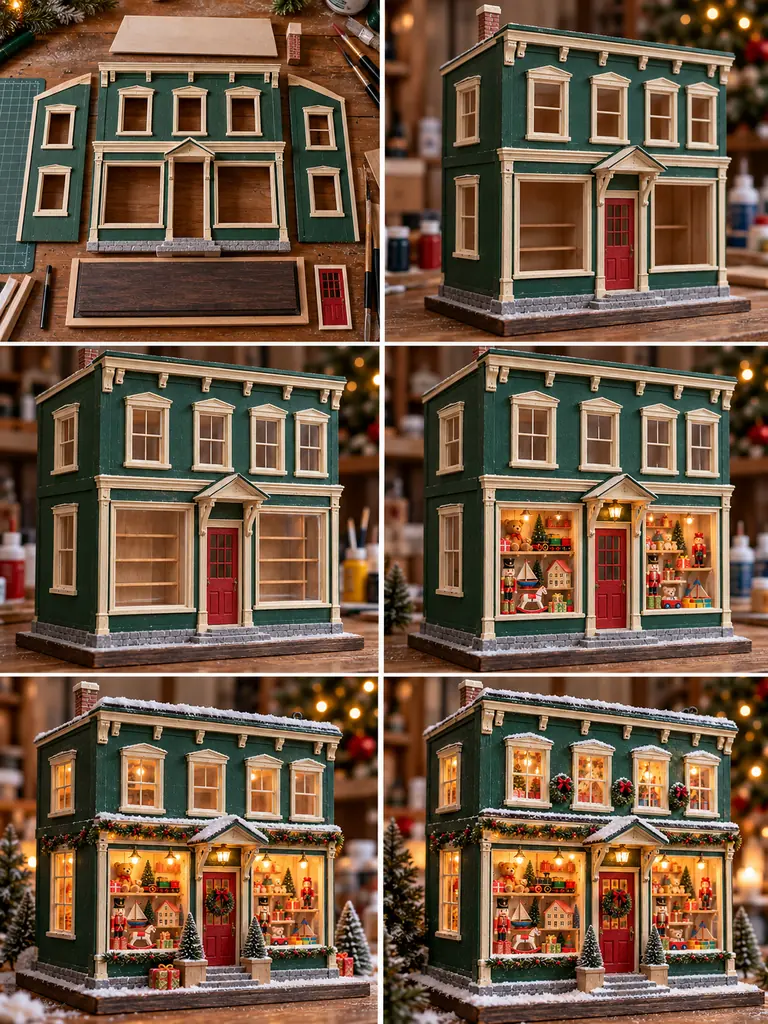
- Cut the two-story storefront with wide lower windows and smaller upper windows.
- Assemble the complete shell and paint the exterior deep green with cream trim.
- Fit clear acetate into the display windows and install shallow shelves directly behind them.
- Create tiny blocks, figures, toy trains, dolls, and wrapped packages from small craft materials.
- Arrange the mini toys logically on the shelves so each display window reads clearly.
- Add a small entrance canopy, red accents, garlands, and a few gifts outside the door.
- Install warm LEDs behind the upper windows and display areas.
- Add faux snow to the roof and tabletop base while preserving the visible handmade miniature scale.
14. Wood-Slice Hillside Christmas Village
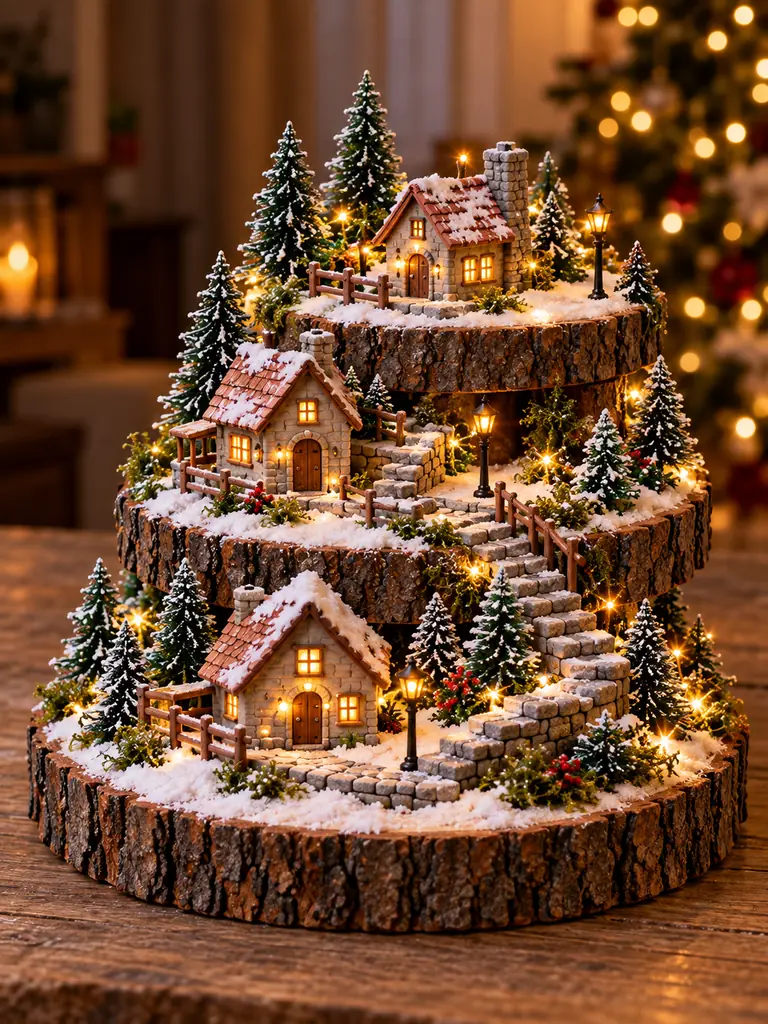
Stacked natural wood slices are an easy way to create height without building complicated scenery.
Items Needed
- Three bark-edged wood slices in decreasing sizes
- Strong adhesive
- Wooden spacer blocks or supports
- Several small cardboard cottages
- Coffee stirrers
- Mini stones
- Bottle-brush trees
- Moss
- Warm micro lights
How to Make
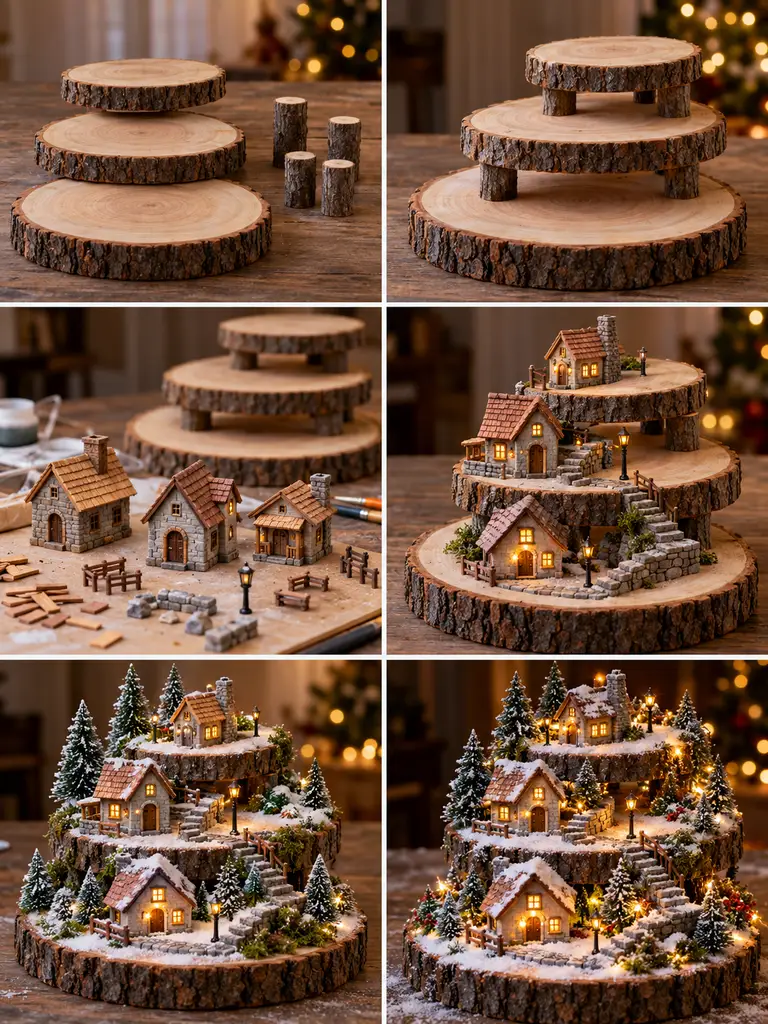
- Choose three sturdy wood slices and test-stack them so each lower terrace remains visible.
- Glue or screw strong spacer blocks between the slices to create three secure levels.
- Build several small cottages separately and vary their rooflines slightly.
- Place the cottages across the terraces, with larger buildings lower and smaller ones higher.
- Create narrow stairs from wood strips and tiny stone paths linking the levels.
- Add bottle-brush trees in uneven groups and tuck moss around the exposed bark and rocks.
- Hide warm micro lights behind the houses and along selected paths.
- Apply snow unevenly while leaving sections of natural wood and bark visible so the hillside construction remains obvious.
15. Tiered Christmas Tree Village
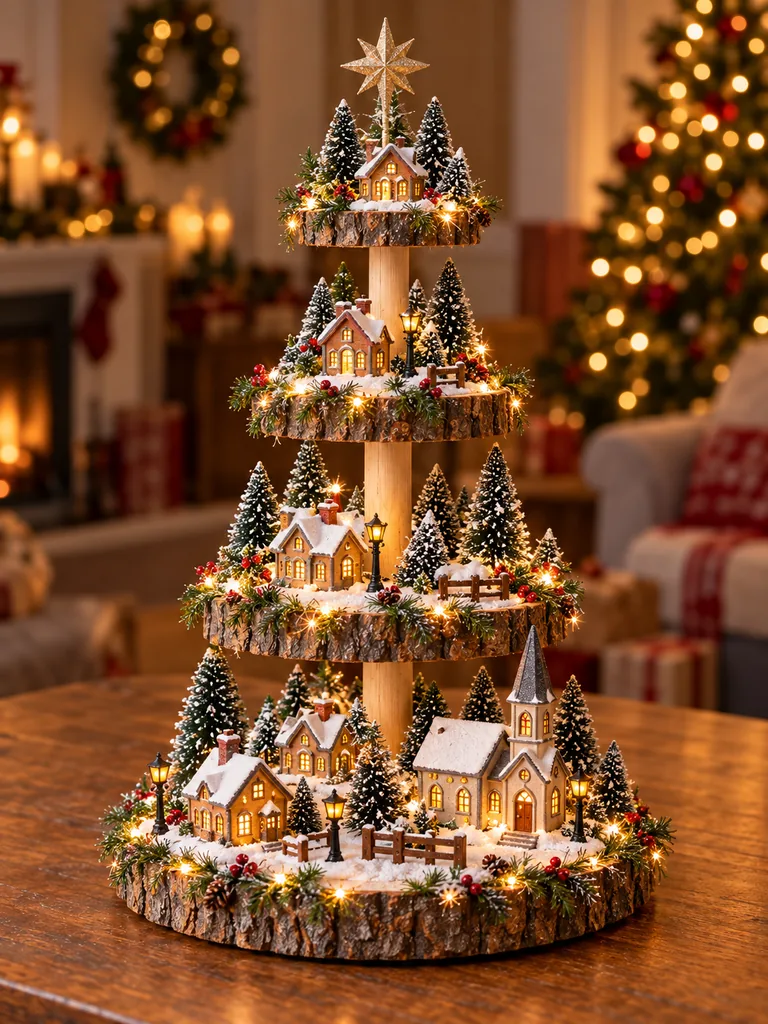
A tiered village is ideal when you want a large visual impact without using much tabletop width.
Items Needed
- Four progressively smaller platforms
- Strong central dowel or support
- Sturdy base
- Miniature cottages
- Bottle-brush trees
- Artificial greenery
- Battery fairy lights
- Hot glue
- Faux snow
How to Make
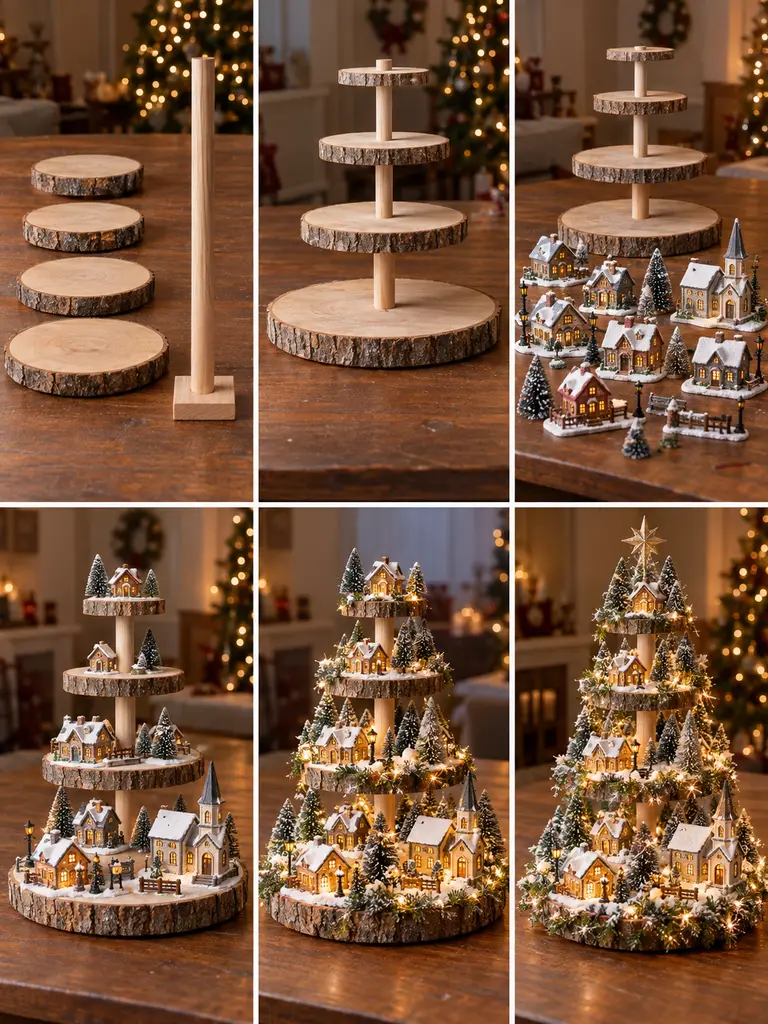
- Cut or prepare four platforms in clearly decreasing sizes and test their spacing around the central support.
- Secure the largest platform to the base and fix the vertical support firmly in the center.
- Attach the remaining platforms one above another, leaving enough height for the miniature buildings.
- Build or gather cottages in several sizes, with the smallest reserved for the top tier.
- Arrange the cottages across the existing platforms, using fewer buildings as the structure rises.
- Add bottle-brush trees and greenery without hiding the platform edges completely.
- Wind warm fairy lights discreetly around the tiers and behind the buildings.
- Apply snow to each level and finish the top with one small cottage, tall tree, or star so the entire structure tapers like a Christmas tree.
16. Mini Alpine Chalet Christmas House
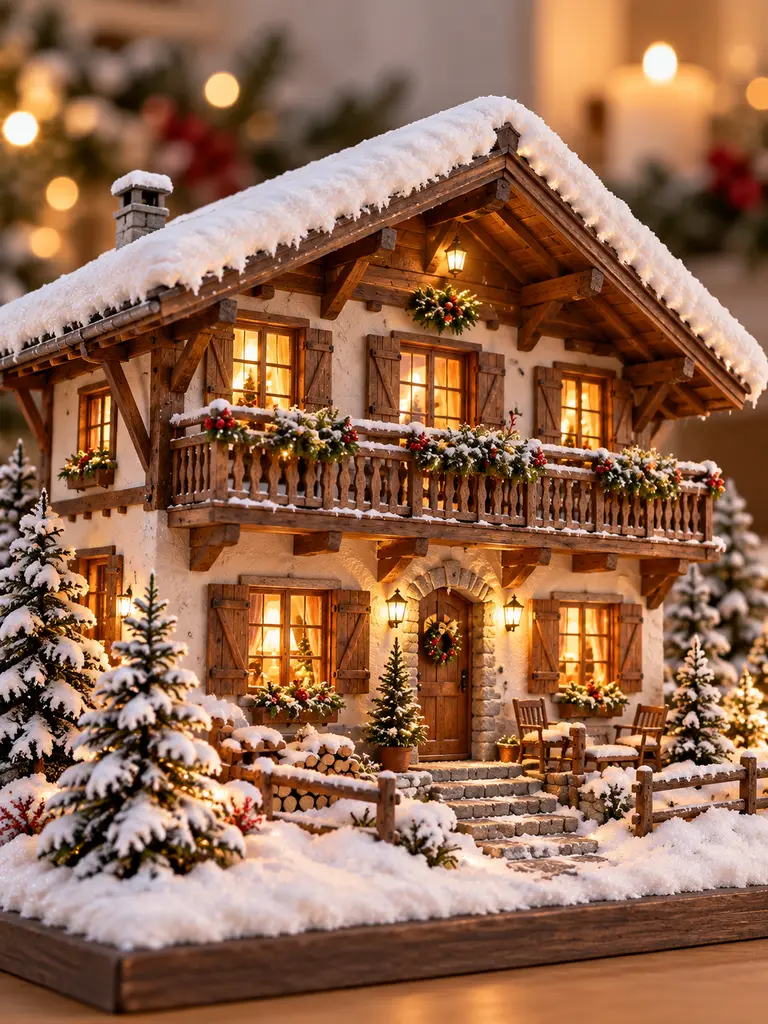
The Alpine chalet stands apart from a generic cottage because of its broad overhanging roof, exposed dark beams, full-width balcony, shutters, and deep snow.
Items Needed
- Foam board
- Broad roof panels
- Wooden coffee stirrers
- Brown stain or dark paint
- Cream paint
- Thin sticks for balcony railing
- Small shutters
- Tracing paper
- Warm LEDs
How to Make
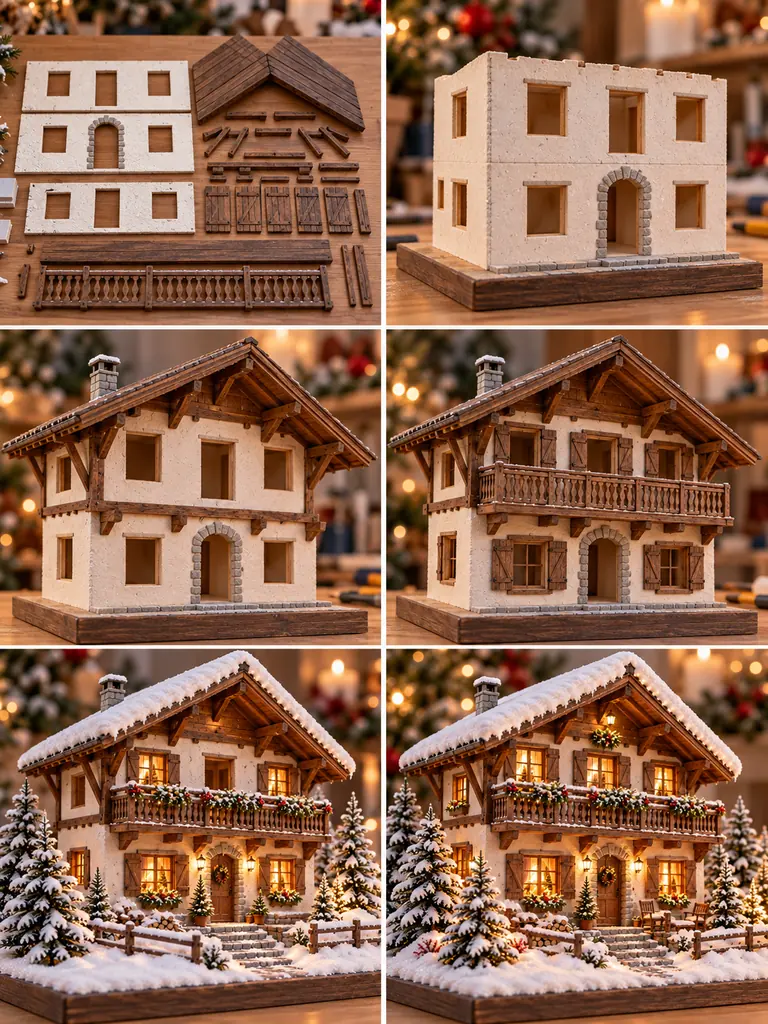
- Cut the two-story wall panels and broad roof pieces, plus the balcony floor and railing parts.
- Assemble the two-story shell without attaching the roof or balcony yet.
- Install the dramatically overhanging roof and add dark timber beams to the cream exterior.
- Build the full-width balcony from coffee stirrers and attach the thin wooden railing.
- Add matching shutters around the upper and lower windows.
- Back the windows with translucent material and install warm LEDs.
- Wrap subtle greenery along the balcony and place snowy pines around the tabletop base.
- Apply heavy roof snow and a narrow path while keeping the handcrafted model and base clearly visible.
17. Victorian Christmas Village House
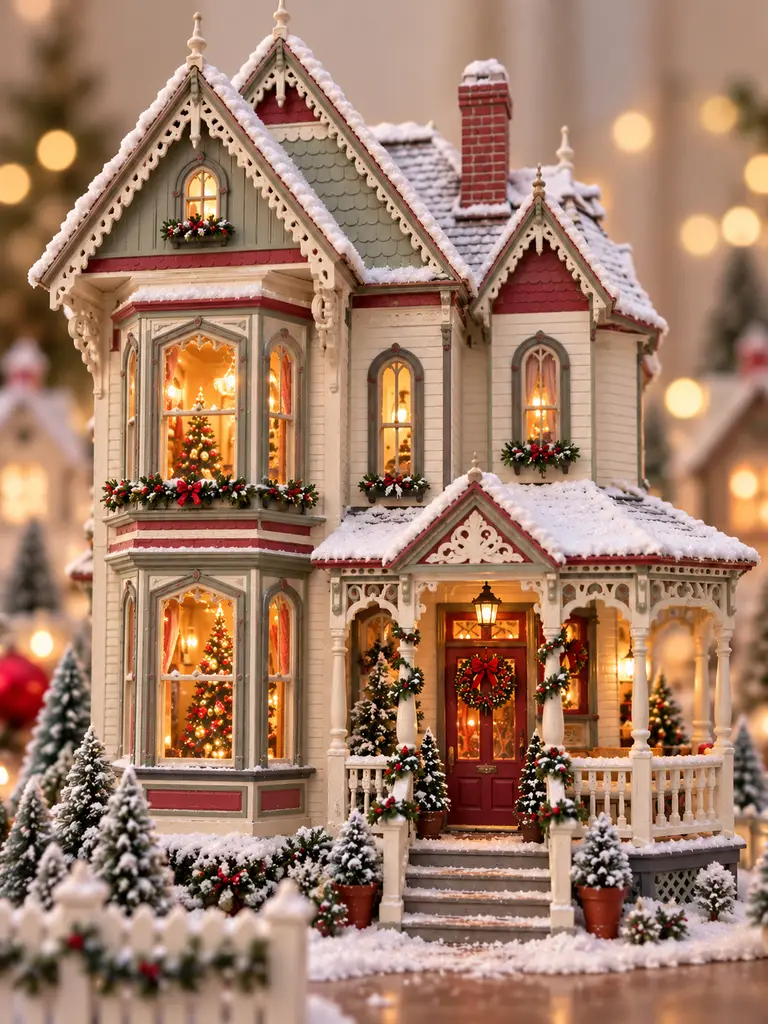
Victorian architecture is perfect for a statement house because the bay window, multiple steep gables, ornate porch, and scalloped trim create visual interest before any Christmas decoration is added.
Items Needed
- Foam board
- Thick cardstock
- Craft knife
- Cream acrylic paint
- Muted sage paint
- Dusty-red paint
- Thin decorative trim pieces
- Tracing paper
- Warm LEDs
How to Make
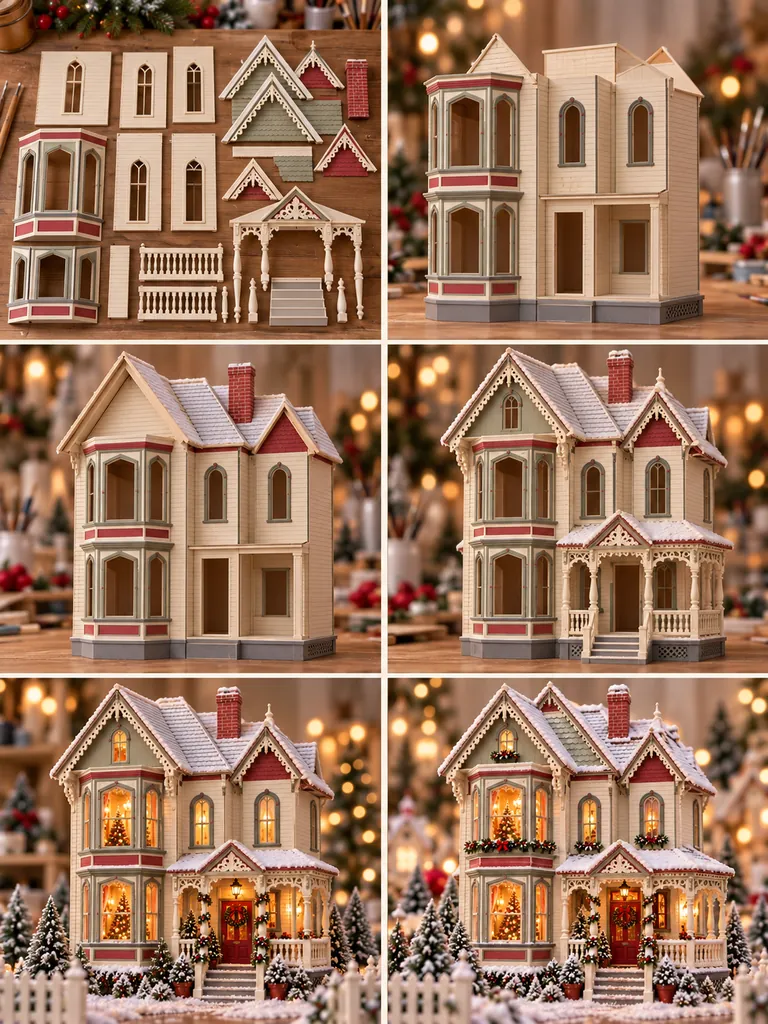
- Cut the main two-story wall panels together with the separate bay-window and gable components.
- Assemble the basic house shell and build the projecting bay window on the front.
- Attach the multiple steep roof sections, checking that each gable stays aligned.
- Build the covered porch and add decorative scalloped cardstock trim under the rooflines.
- Paint the walls cream and use muted sage and dusty red on selected architectural details.
- Add tall narrow window frames, translucent backing, and warm LEDs.
- Wrap a small amount of greenery around the porch and hang a wreath on the front door.
- Apply snow across the roof peaks and tabletop base while keeping the miniature construction visible.
18. Neutral Beige Christmas Village Houses
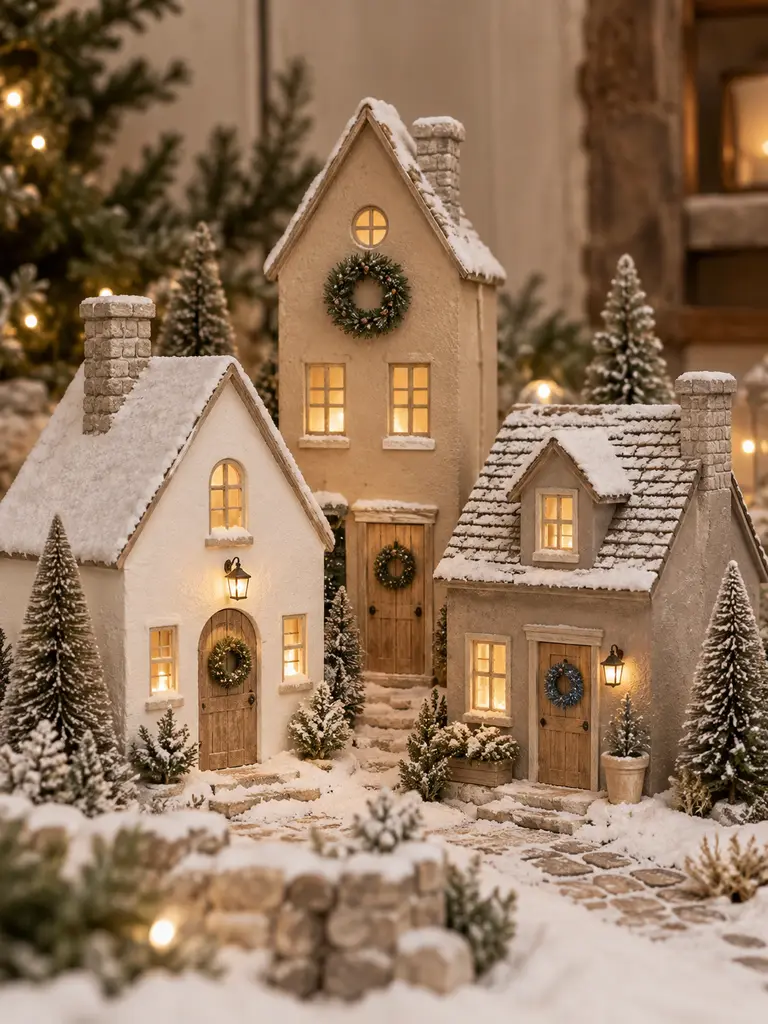
A neutral village works beautifully in modern interiors where bright red Christmas decor feels too strong.
Items Needed
- Cardboard or foam board
- Ivory paint
- Warm beige paint
- Muted taupe paint
- Natural wood strips
- Cream cardstock for roofs
- Tracing paper
- Warm LEDs
- Small deep-green wreaths
How to Make
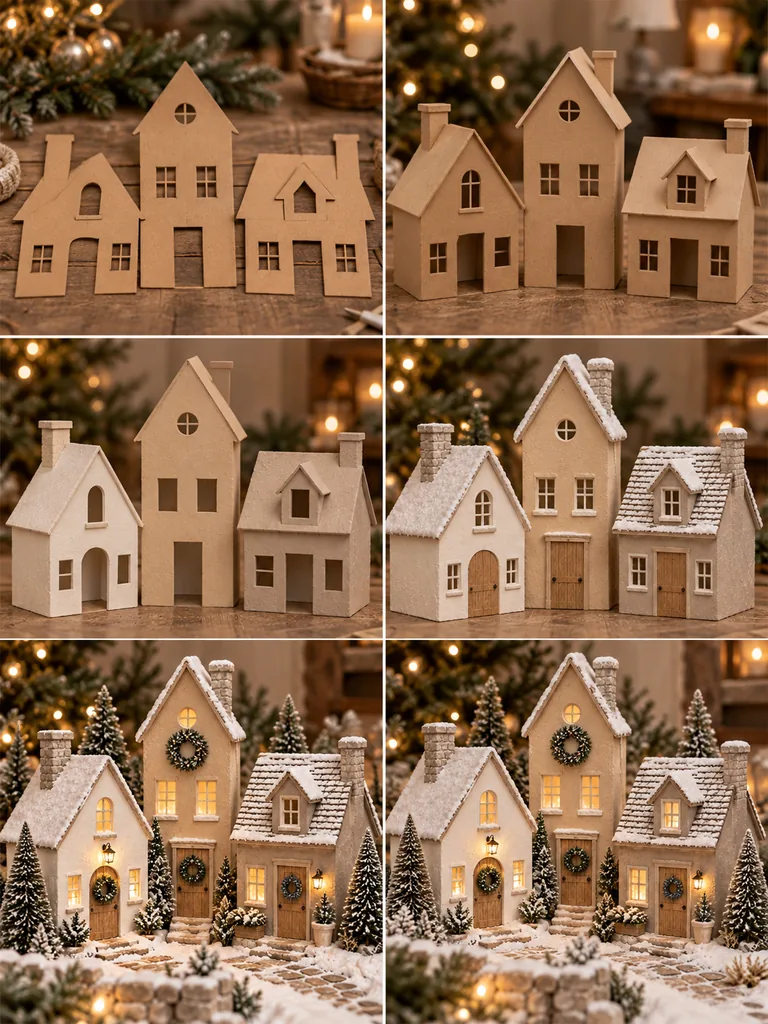
- Create three house templates in noticeably different heights and roof shapes.
- Assemble all three plain shells and keep their individual silhouettes distinct.
- Paint the first house ivory, the second warm beige, and the third muted taupe.
- Add cream roofs plus natural-wood doors and window frames to each house.
- Back the windows with translucent paper and place warm LEDs inside all three buildings.
- Hang one restrained green wreath on each facade.
- Arrange neutral bottle-brush trees around the coordinated group.
- Finish with fine faux snow and avoid bright red accents so the calm monochromatic palette remains consistent.
19. Snowy Forest Cottage With Footbridge
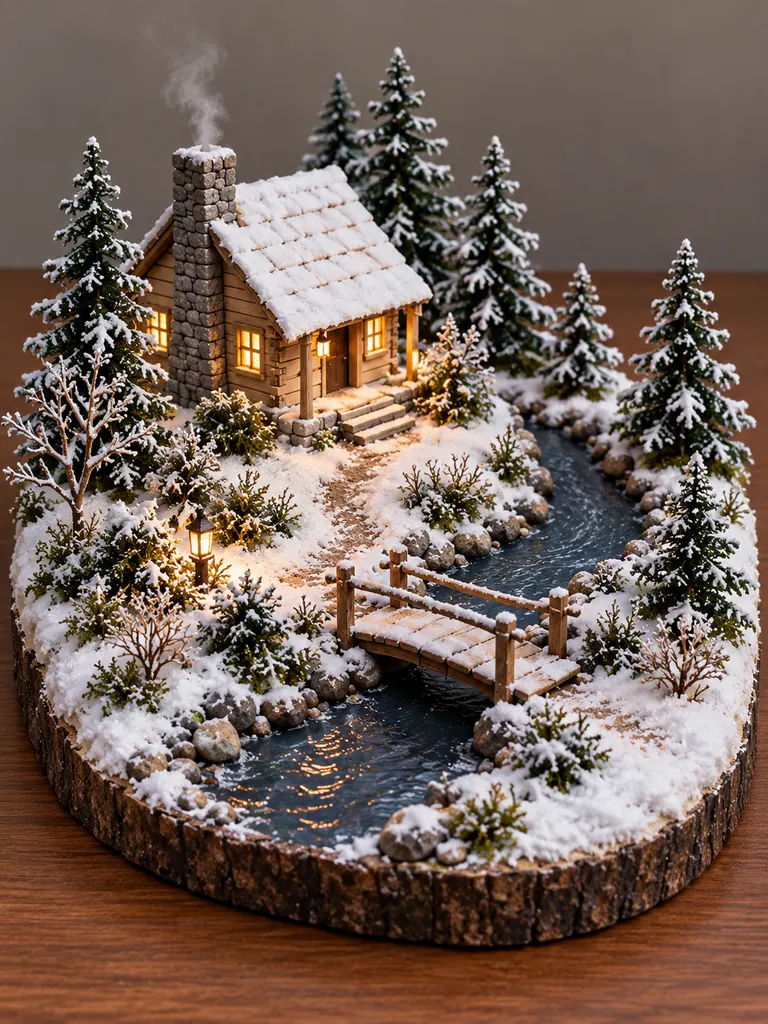
This project turns one small cottage into a complete storybook scene by adding a winding stream and a handmade wooden bridge.
Items Needed
- Miniature cottage shell
- Thick landscape base
- Dark blue-gray paint or glossy craft gel
- Small stones
- Coffee stirrers
- Thin twigs for bridge railing
- Bottle-brush trees
- Moss
- Warm LEDs
How to Make
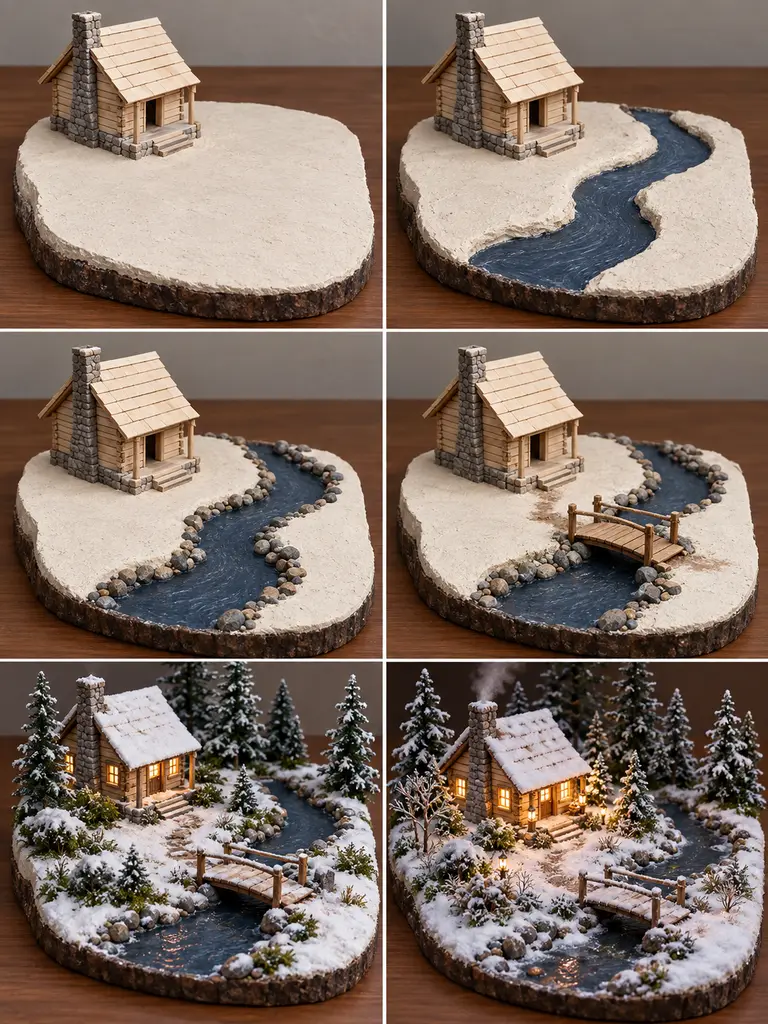
- Secure the simple cottage toward the back of a flat landscape base.
- Draw a curved stream from the foreground toward the cottage and form a shallow channel.
- Paint the stream dark blue-gray and add a glossy finish to suggest water.
- Glue small stones along both banks while keeping the water path open.
- Build a small footbridge from coffee stirrers and thin twig railings, then place it across the narrowest section.
- Create a snowy path from the bridge to the cottage entrance.
- Add pine trees, moss, rocks, and warm cottage lighting around the scene.
- Layer faux snow over the banks, bridge, path, and trees while leaving enough stream visible to remain the focal feature.
20. Mini Lakefront Christmas Village
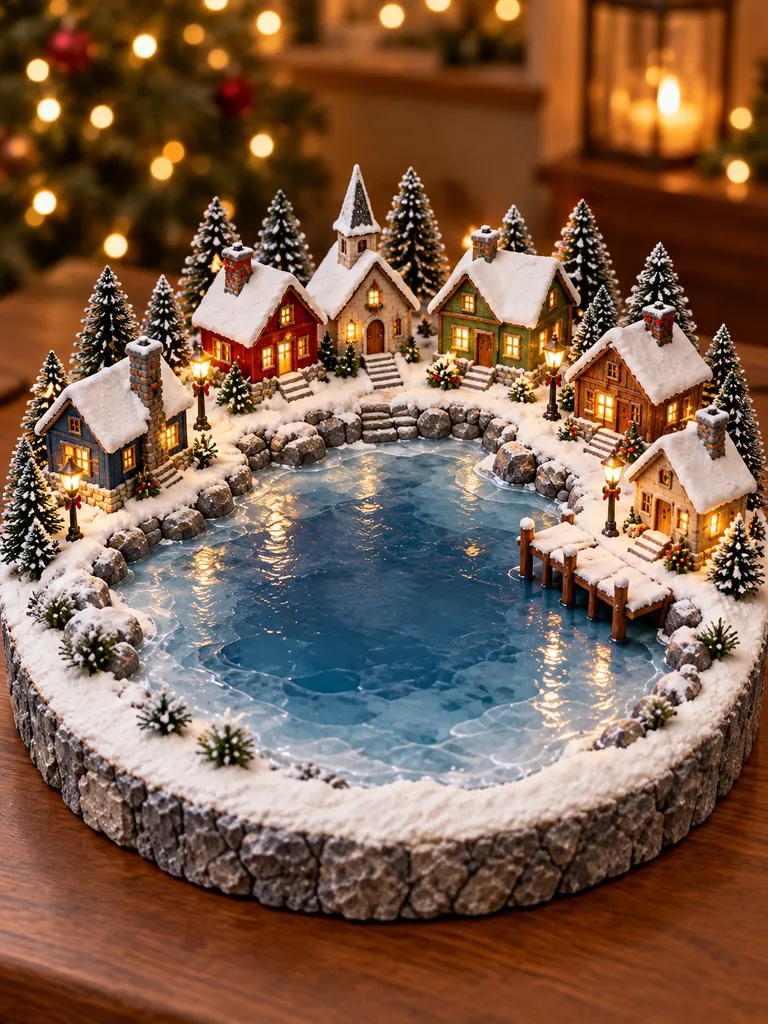
A frozen-looking pond gives this village a completely different layout from a forest scene.
Items Needed
- Circular sturdy base
- Blue-gray and white paint
- Gloss varnish or clear craft gel
- Six miniature cottages
- Small stones
- Wood strips for a dock
- Bottle-brush trees
- Tracing paper
- Warm LEDs
How to Make
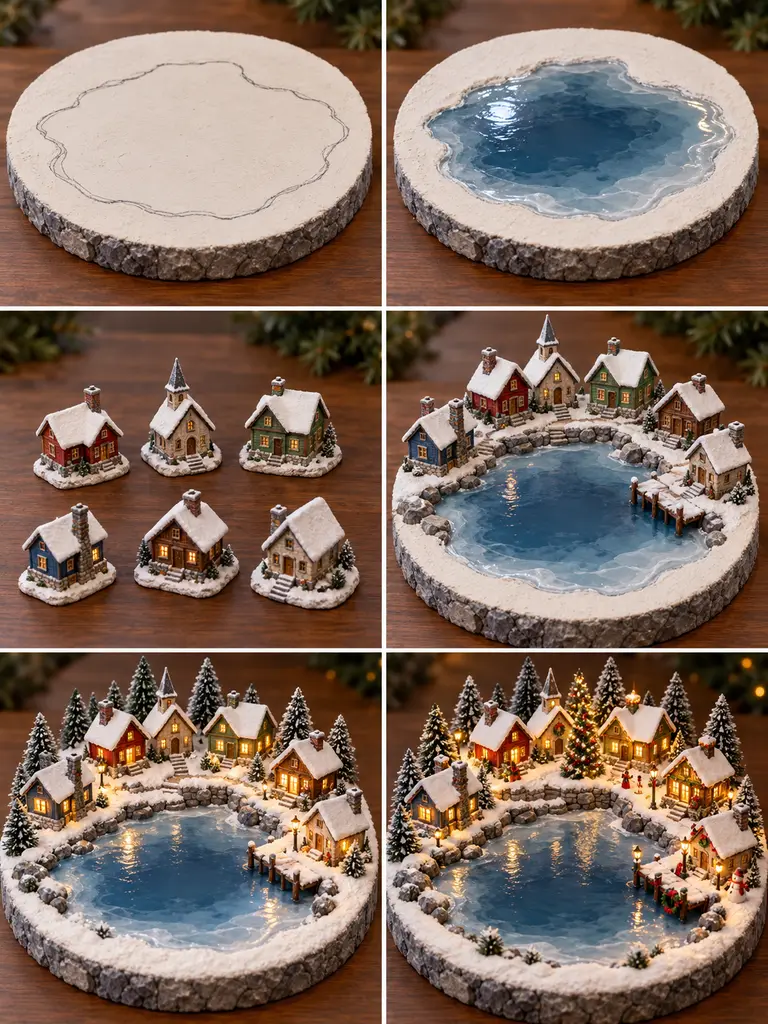
- Draw a large irregular pond shape in the center of the circular base.
- Paint the pond with layered blue-gray, pale blue, and white tones, then seal it with gloss.
- Build six simple cottages separately and keep them small enough to leave the pond open.
- Arrange the cottages around the back and side shoreline rather than filling the foreground.
- Build a tiny wooden dock and add stone edging around selected parts of the lake.
- Create narrow paths connecting the houses and place evergreen trees between them.
- Install warm lights inside each cottage.
- Add snow to the surrounding land and rooftops while keeping the frozen-looking pond clearly visible as the center of the scene.
21. Christmas House With Mini Swing Yard
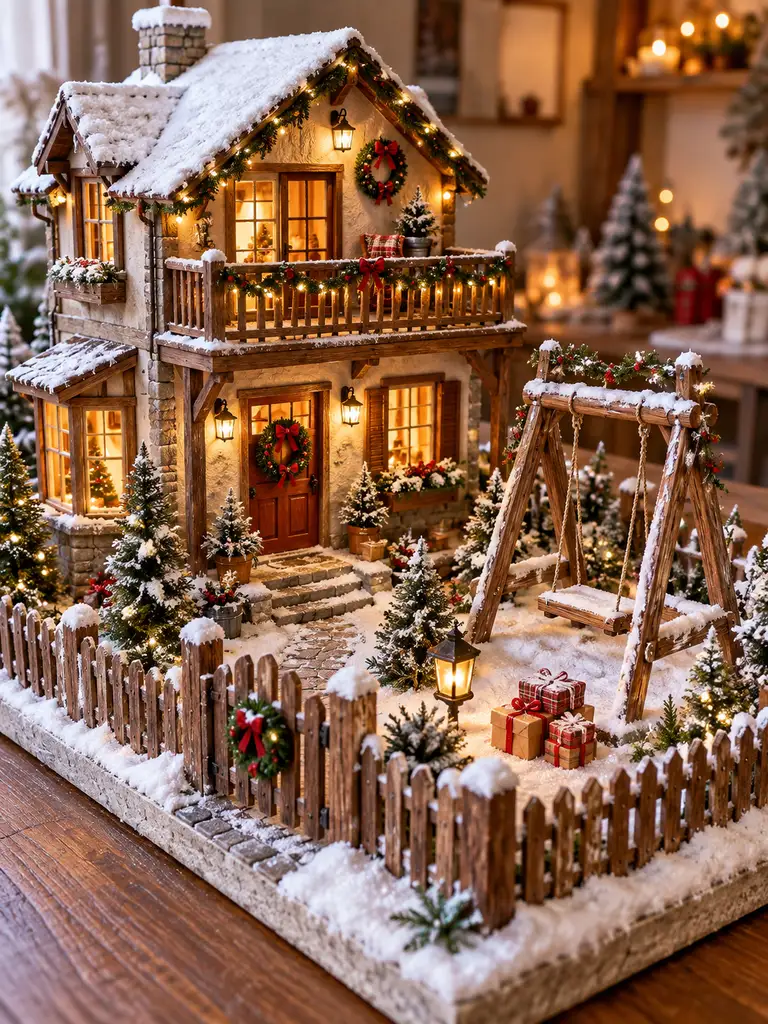
Small everyday details make a miniature house feel especially believable, and a freestanding swing is the defining feature of this project.
Items Needed
- Foam board or cardboard
- Popsicle sticks
- Thin wooden skewers
- Twine
- Hot glue
- Mini greenery and wreaths
- Red ribbon
- Warm LEDs
- Tiny gift boxes
How to Make
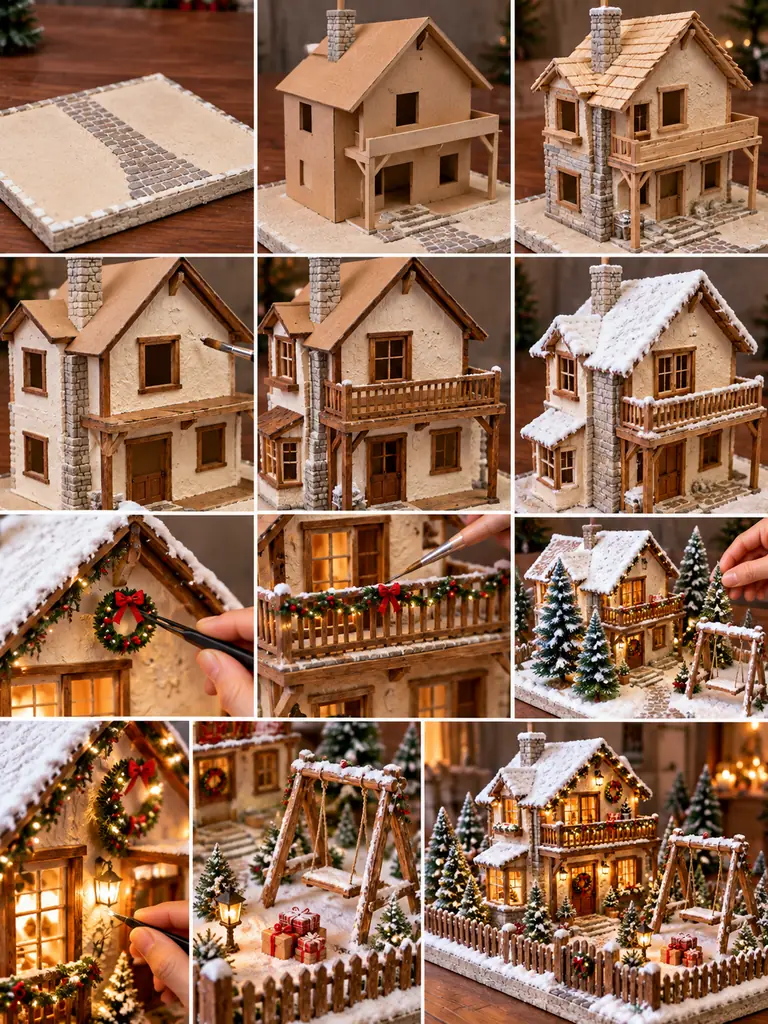
- Cut the two-story cottage walls and roof pieces, then assemble the complete house shell.
- Build and attach the upper balcony from craft sticks.
- Make a low picket fence around the front-yard portion of the base.
- Use four wooden supports and one top beam to create a freestanding A-frame swing.
- Cut a tiny plank seat and suspend it from the beam with two equal lengths of twine.
- Place the finished swing inside the fenced yard and check that it remains clearly visible.
- Add warm LEDs, wreaths, garlands, gifts, greenery, and a narrow path.
- Finish with snow across the roof, fence, swing, path, and trees while keeping the swing as a major focal detail.
22. Christmas Village With Mini Train
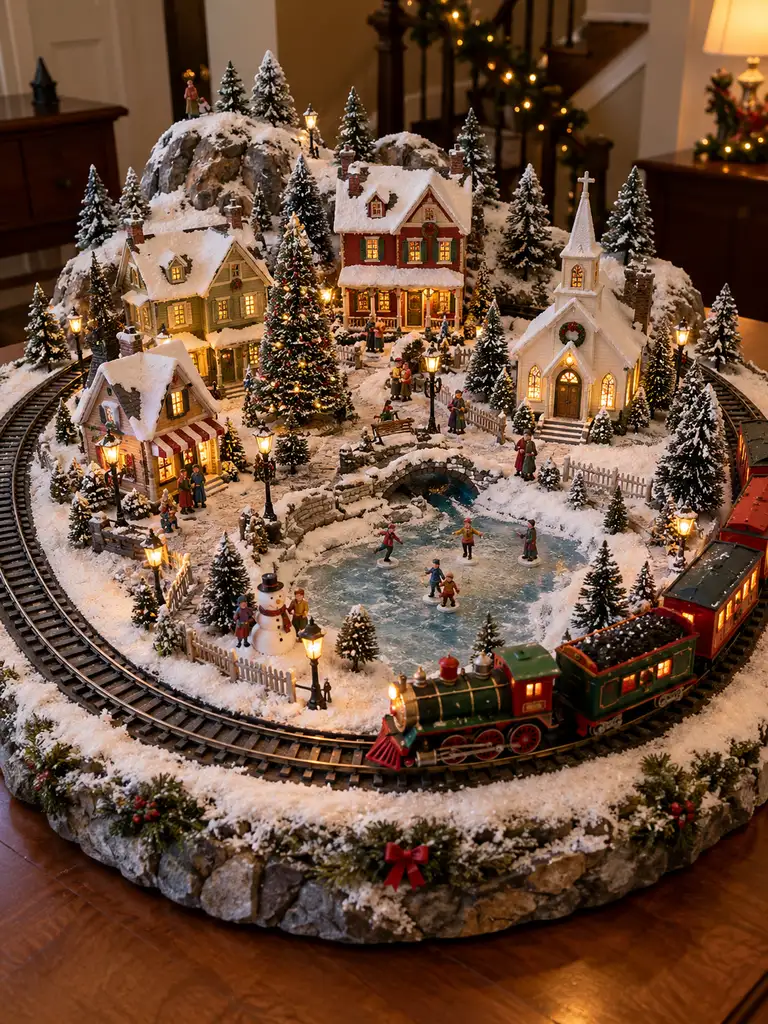
A circular railway immediately adds nostalgia and movement to a handmade Christmas village.
Items Needed
- Mini battery-operated train set
- Large sturdy circular or square base
- Cardboard or foam board
- Several miniature houses
- Small church
- Bottle-brush trees
- Materials for a tiny frozen pond
- Mini fencing and lamp posts
- Small figures
How to Make
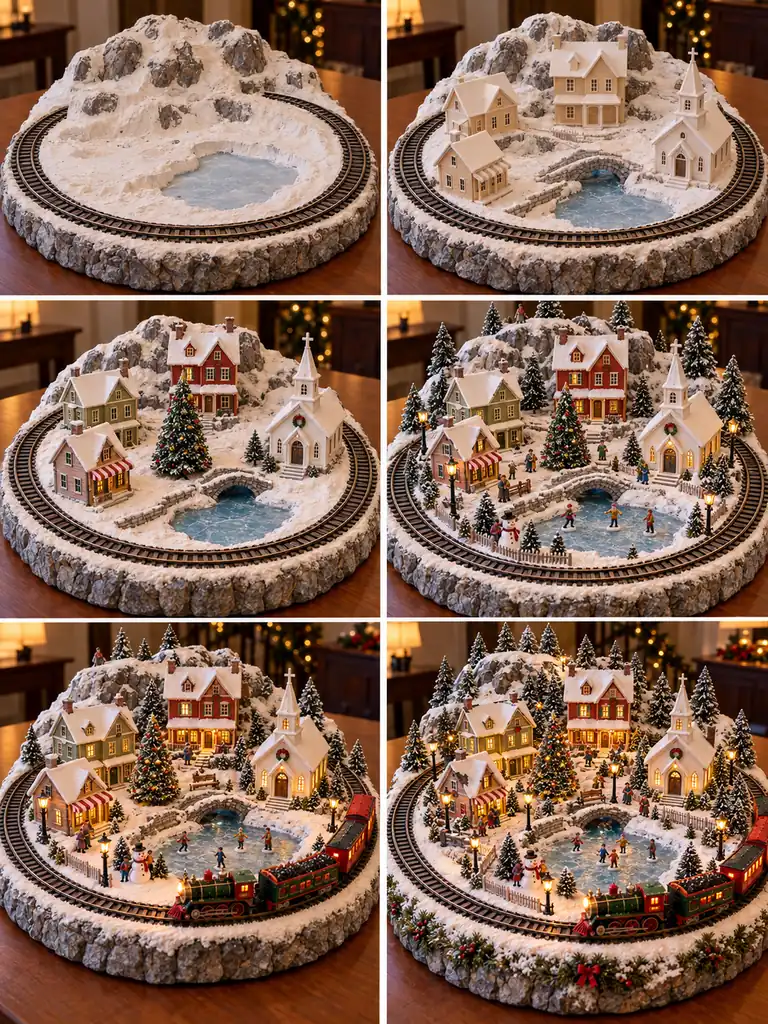
- Assemble the complete circular track on the empty base and test the train before adding scenery.
- Mark the usable interior area, leaving a generous safety margin around the rails.
- Build several simple houses and one small church separately.
- Position the buildings inside the track and verify that no roof, tree, or fence interferes with the train.
- Create a small central frozen pond and add pathways, trees, fences, and lamp posts.
- Install warm LEDs inside the buildings and add a few figures around the village square.
- Apply faux snow across the interior landscape while carefully keeping the track surface clear.
- Place the red-and-green train on the rails, run a final test, and adjust any decoration that comes too close to the moving cars.
23. Magical Mantel Christmas Village
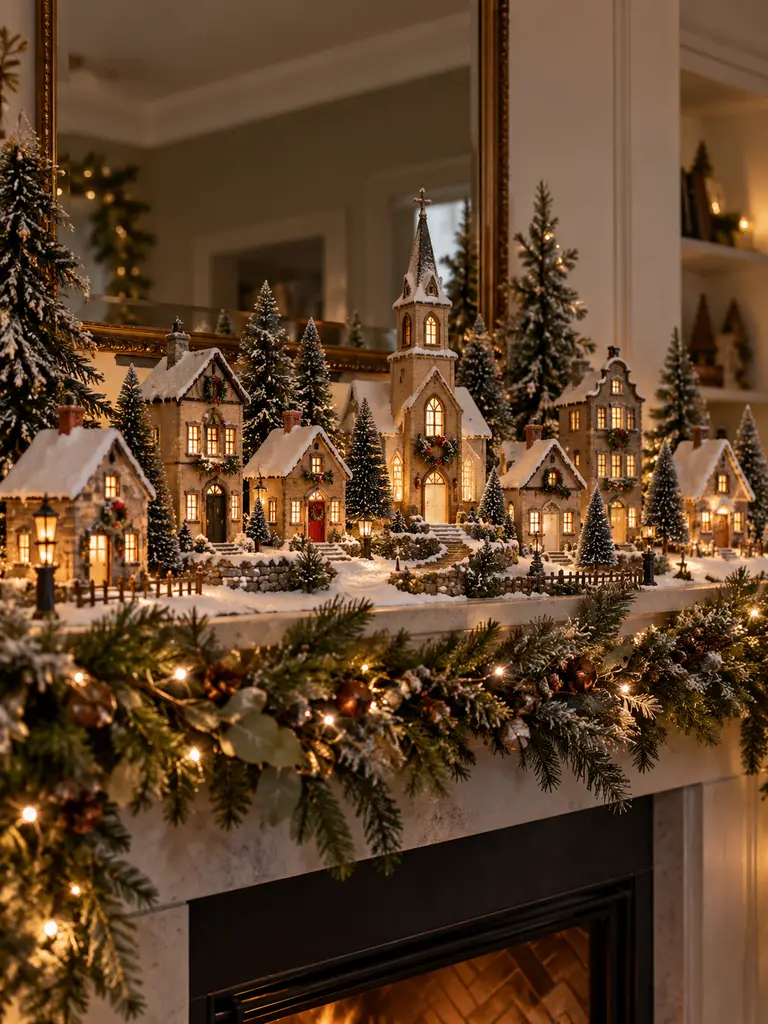
A long mantel display is a great way to bring several handmade houses together into one cohesive Christmas scene.
Items Needed
- Cardboard or foam board
- Seven house templates in varied sizes
- White, cream, soft-red, and natural-wood paints
- Thin cardstock and wood strips
- Warm micro fairy lights
- Bottle-brush trees
- Mini wreaths
- Artificial evergreen garland
- Fine gravel or cardstock for a path
How to Make
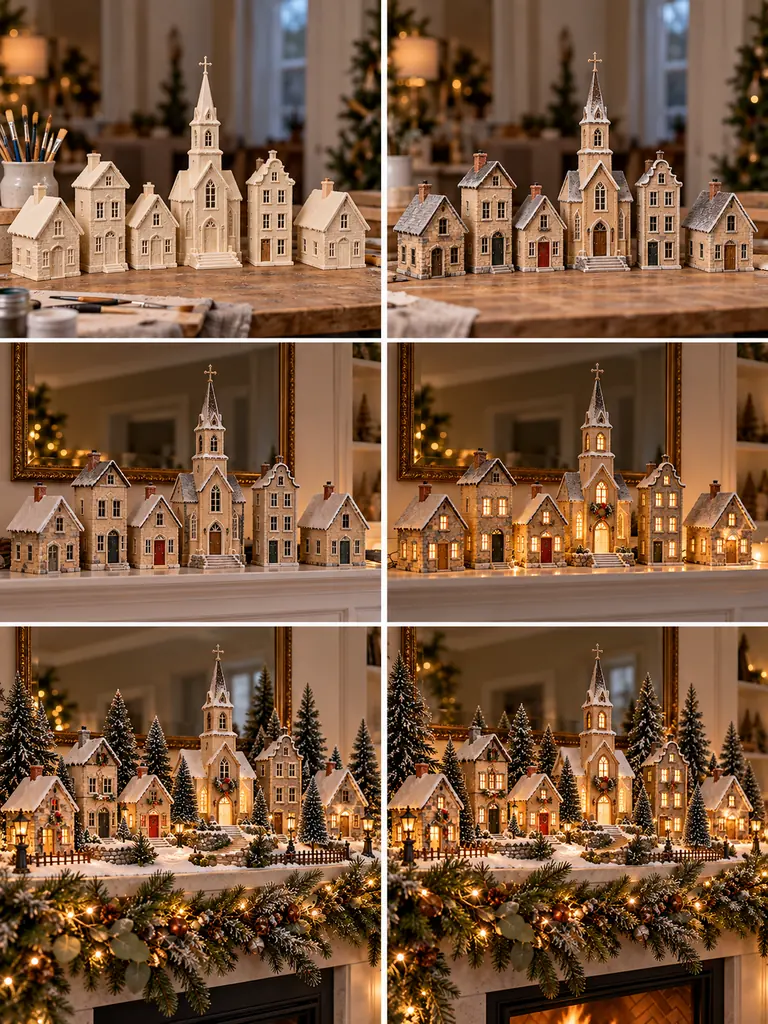
- Build seven miniature structures with clearly different heights and rooflines, including cottages, narrow townhouses, and one church or tower.
- Paint the buildings in a coordinated white, cream, soft red, and natural-wood palette.
- Add distinct doors and windows while keeping the overall architectural style related.
- Arrange all seven buildings across the long base with the tallest structure slightly off-center.
- Thread warm micro lights behind and inside the buildings without changing their arrangement.
- Add bottle-brush trees between structures and create one winding path through the village.
- Use wreaths selectively and layer evergreen garland behind the buildings for depth.
- Finish with faux snow across the base and rooftops, making sure every house remains visible and the display reads as one continuous handmade mantel village.
Final Thoughts
These 23 Easy DIY Christmas Village Houses Ideas for Festive Holiday Decor show how ordinary craft supplies can become a glowing winter town. Start with one simple house, then add shops, churches, bridges, trains, or layered landscapes as your confidence grows.
The handmade details—tiny windows, snowy paths, fences, wreaths, trees, and warm lights—are what give the finished village its personality and make it worth displaying year after year.
