 Skip to content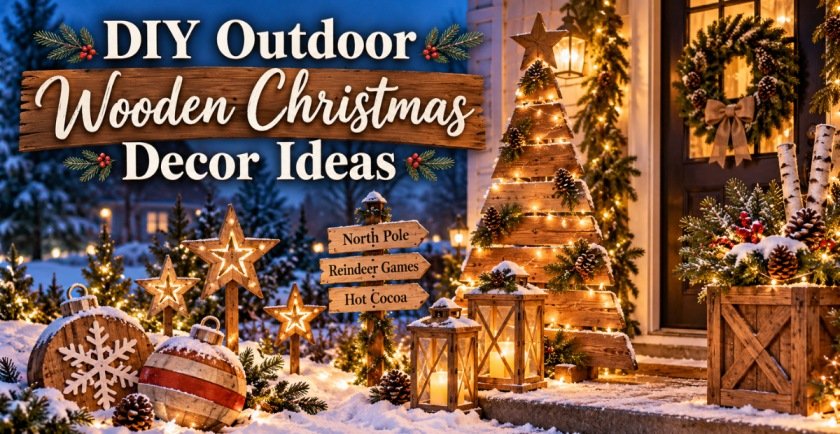
Handmade wooden Christmas decorations have a warmth that plastic yard décor rarely matches. Natural grain, softly glowing lights, evergreen branches, and a little weathered paint can make even a simple porch or pathway feel wonderfully festive. Better still, many of these projects can be built from pallet boards, leftover lumber, exterior plywood, logs, branches, and other inexpensive materials you may already have.
These DIY outdoor wooden Christmas decor ideas range from quick beginner projects to larger weekend builds. Every idea below includes the materials you will need and a practical making process. Use exterior-grade finishes and outdoor-rated LED lighting for winter exposure. The finished pieces can be adapted to many home styles.
1. Rustic Herringbone Wooden Christmas Tree
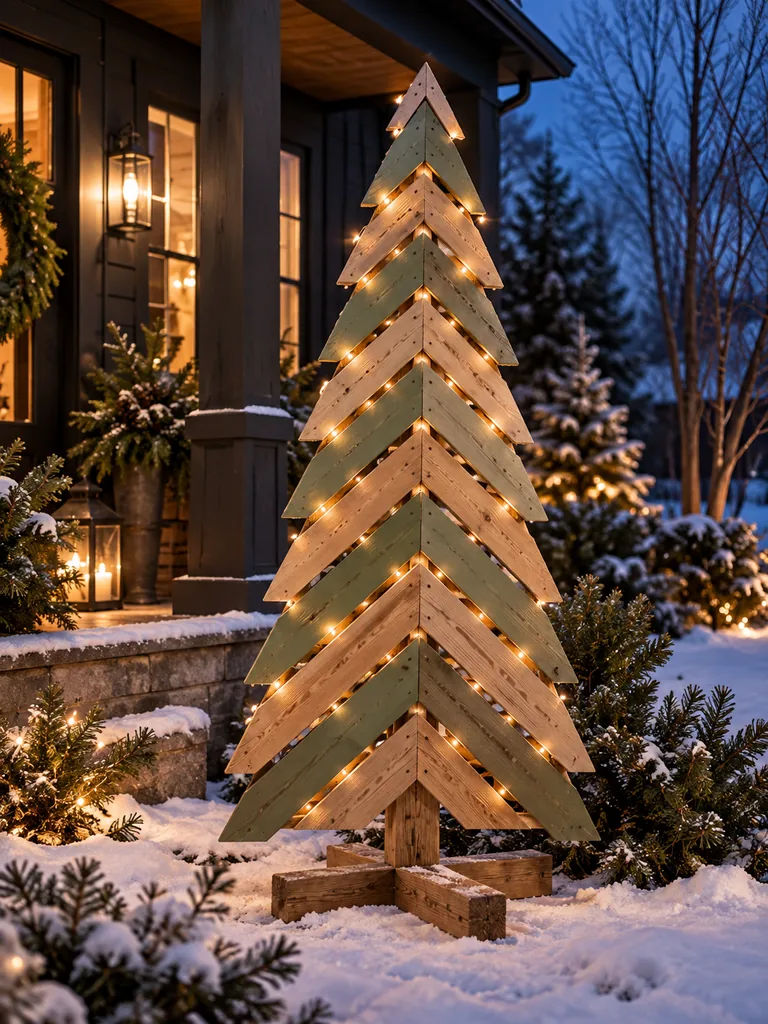
A herringbone tree gives reclaimed boards a crisp architectural pattern while keeping the cozy character of natural wood. Mixing warm timber with a few muted sage pieces makes the finished tree feel festive without becoming overly colorful.
Materials Needed
- Narrow pine or pallet boards
- Sturdy wooden center post
- Two base pieces for a cross stand
- Exterior wood screws
- Wood glue
- Sandpaper
- Natural wood stain
- Sage-green exterior paint
- Outdoor warm-white fairy lights
- Saw, drill, and measuring tape
How to Make It
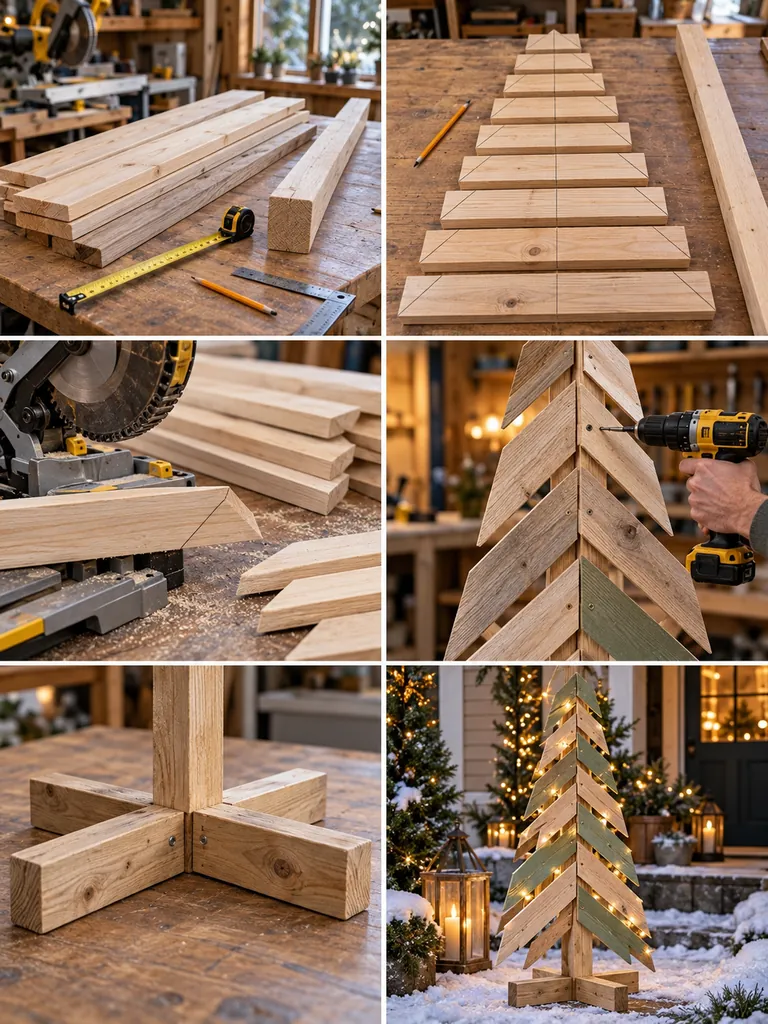
Cut the boards into gradually shorter lengths and trim the ends on matching diagonals. Starting near the bottom of the center post, attach the longest pieces first and alternate the direction to create the herringbone effect. Build a wide cross base so the tree stands securely. Stain most boards, paint a few sage green, and allow them to dry. Finally, weave warm micro lights between the overlapping layers so the shape glows without hiding the wood grain.
2. Tiered Pallet Christmas Tree With a Wooden Star
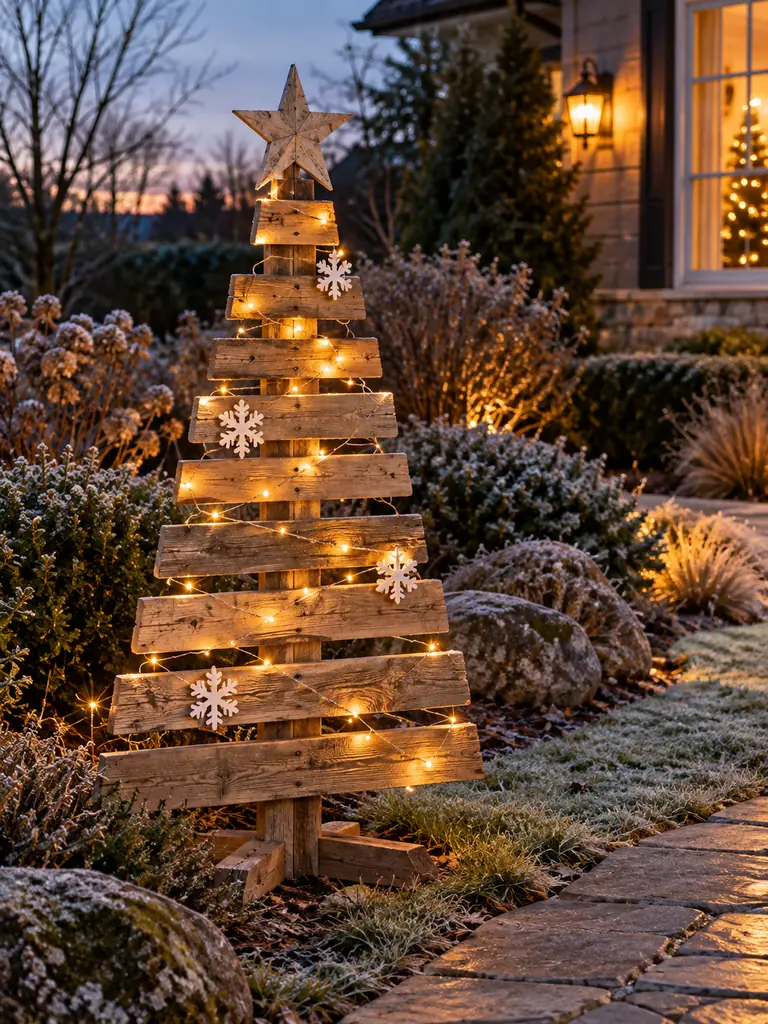
Weathered pallet boards are ideal for a relaxed farmhouse-style Christmas tree. Uneven grain and small imperfections add character, while a simple wooden star and restrained lighting keep the project polished.
Materials Needed
- Clean reclaimed pallet boards
- Two vertical wooden supports
- Scrap plywood for a star
- Exterior screws
- Sandpaper
- Wood stain
- Outdoor fairy lights
- Small wooden snowflakes
- Saw and drill
- Pencil and ruler
How to Make It
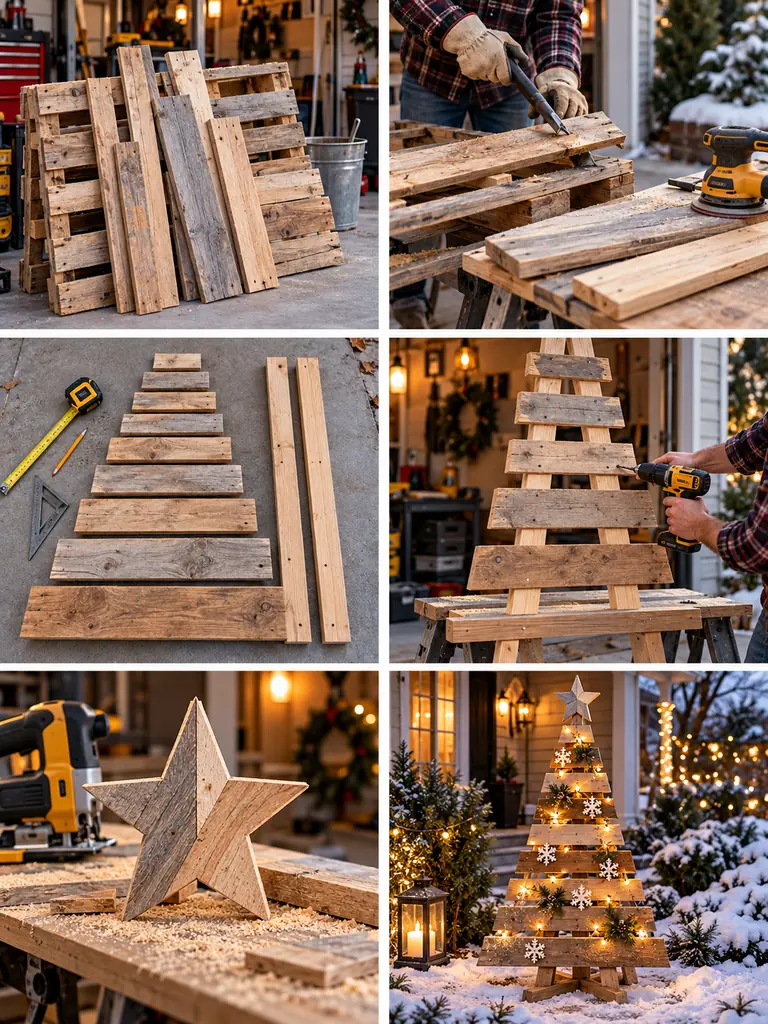
Remove usable boards from the pallet and sand away splinters. Cut the planks into progressively shorter lengths, then fasten them horizontally across the two supports with small gaps between tiers. Cut a five-point star from scrap plywood and mount it at the top. Leave the wood naturally weathered or brush on a light stain. Finish with loosely wrapped warm lights and only a few snowflake accents so the reclaimed texture remains the main feature.
3. Stacked Log Christmas Tree
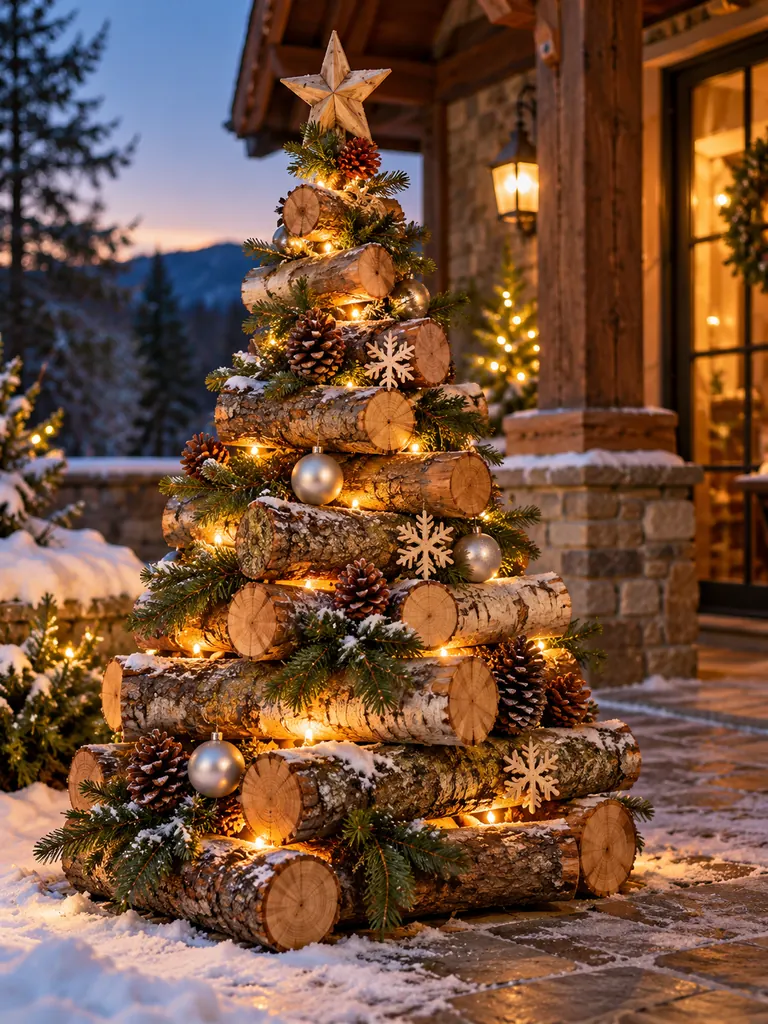
A stacked-log tree is a great choice for a woodland-style yard because the bark, cut ends, greenery, and lights already provide plenty of natural texture. It also makes good use of leftover firewood.
Materials Needed
- Logs in several lengths and diameters
- Heavy timber for a base
- Long exterior screws
- Drill and wood bit
- Saw
- Evergreen branches
- Pinecones
- Wooden snowflakes
- Outdoor ornaments
- Warm-white lights and wood sealer
How to Make It
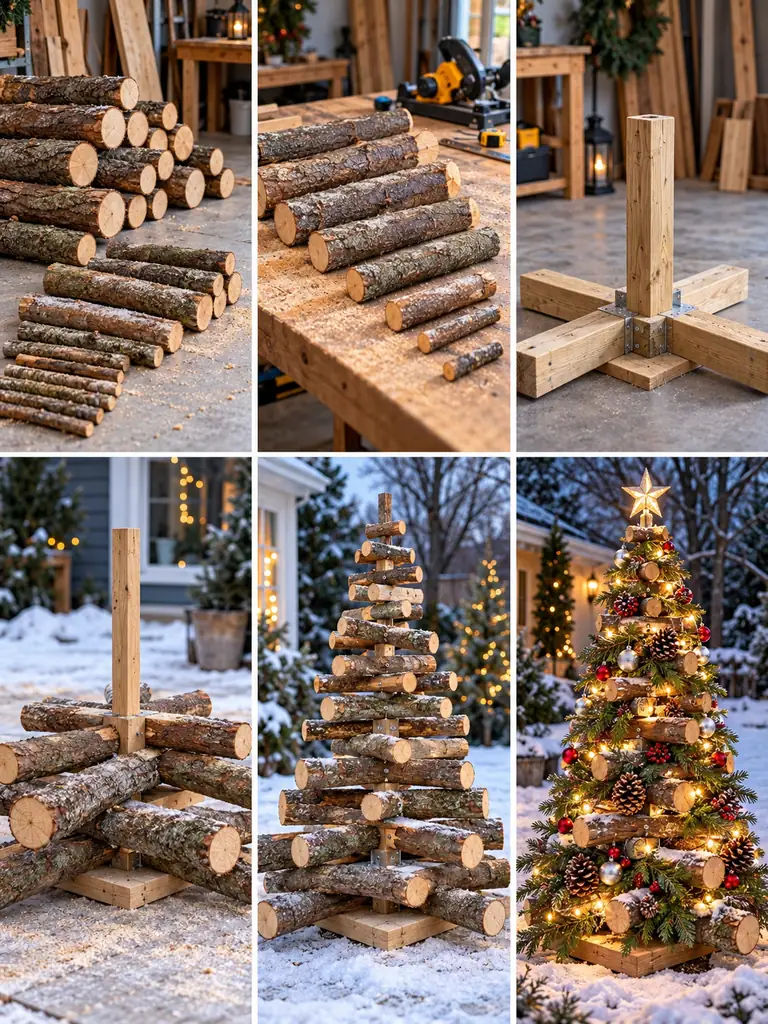
Cut the logs into graduated lengths and arrange the widest pieces across the bottom. Build upward with progressively shorter sections, securing each layer so nothing can roll or shift. Tuck evergreen sprigs into the open spaces, then add pinecones and a few weather-safe ornaments. Thread warm lights through the gaps before the final decorative pieces are added. A wooden star or snowflake topper completes the rustic silhouette while keeping the design natural and substantial.
4. Scandinavian Whitewashed Wooden Tree
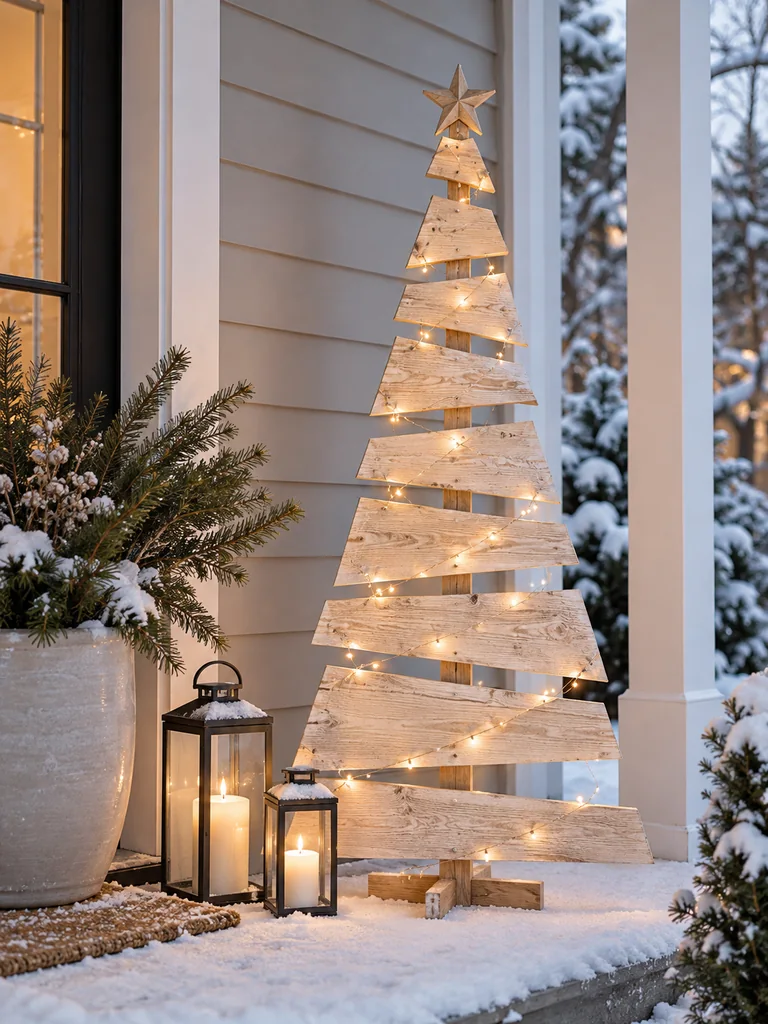
This minimalist tree works especially well on a bright porch or beside pale siding. A translucent whitewash softens the lumber while still letting knots and grain remain visible.
Materials Needed
- Exterior plywood or wide boards
- Wooden center post
- Lumber for the base
- White exterior paint
- Small container of water
- Paintbrush
- Sandpaper
- Exterior screws
- Warm micro lights
- Simple wooden star
How to Make It
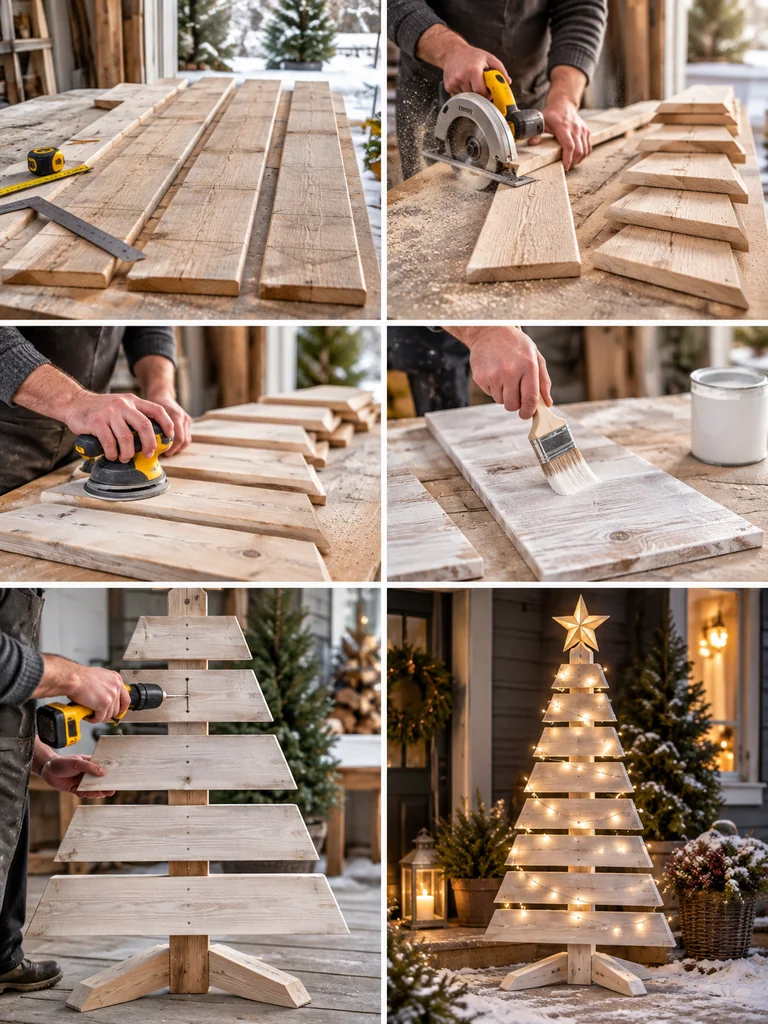
Cut several broad trapezoid or triangular layers, making each one smaller than the piece below it. Thin white exterior paint slightly with water and brush on a light coat rather than creating an opaque finish. When dry, attach the layers to the center post with narrow spaces between them and secure the post to a stable base. Add a plain wood star and a sparse string of warm lights. The uncluttered finish is what gives this project its Scandinavian character.
5. Red and Green Farmhouse Plank Tree
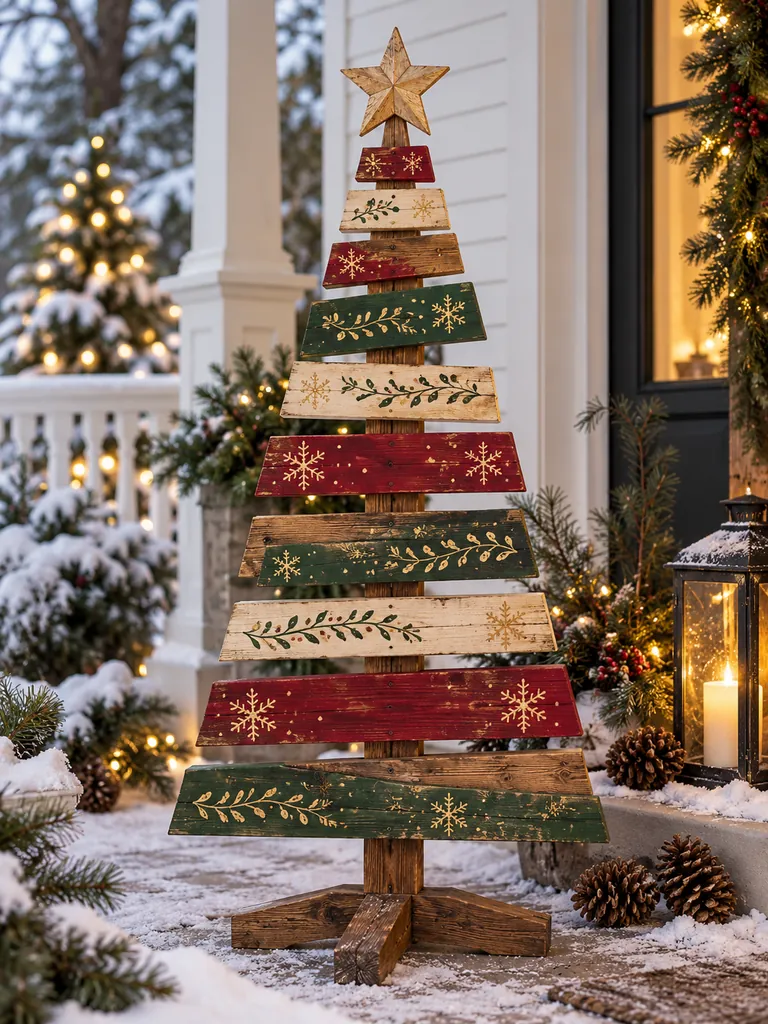
Traditional Christmas colors feel fresh when they are used on distressed wooden planks instead of glossy ornaments. Gold stenciled details give the tree a handcrafted farmhouse finish.
Materials Needed
- Wooden planks
- Central support board
- Cranberry-red exterior paint
- Forest-green exterior paint
- Cream exterior paint
- Gold paint
- Snowflake or botanical stencils
- Exterior screws
- Sandpaper
- Wooden star and outdoor clear sealer
How to Make It
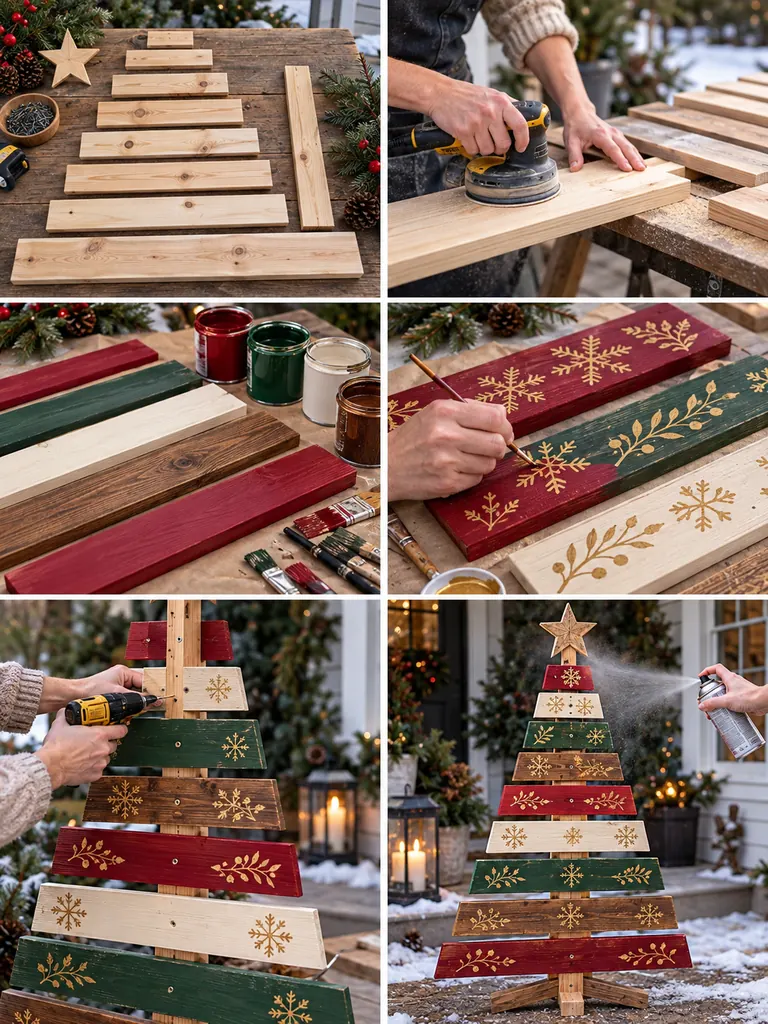
Cut the planks into graduated lengths and sand the faces and edges. Paint a selection red, green, cream, and natural brown, then add restrained gold snowflakes, dots, or botanical motifs after the base colors dry. Screw the longest board near the bottom of the center support and continue upward with shorter pieces. Lightly sand a few painted edges for a weathered look. Attach the star and finish the entire tree with a clear exterior coat before displaying it outside.
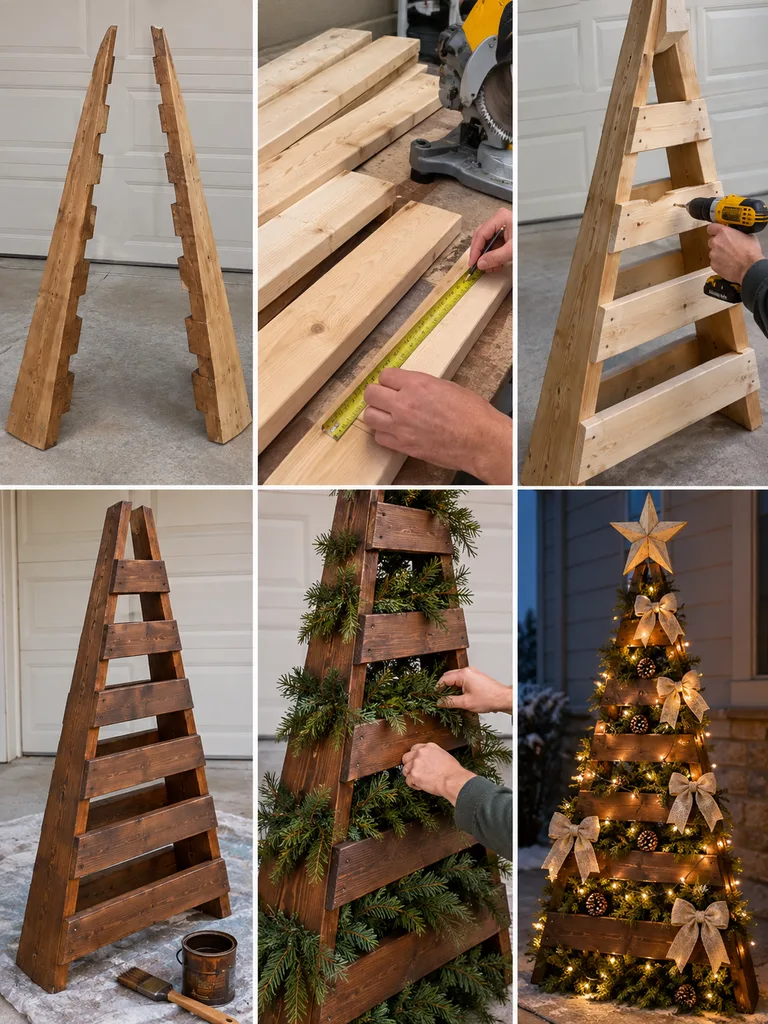
6. Wooden Ladder Christmas Tree
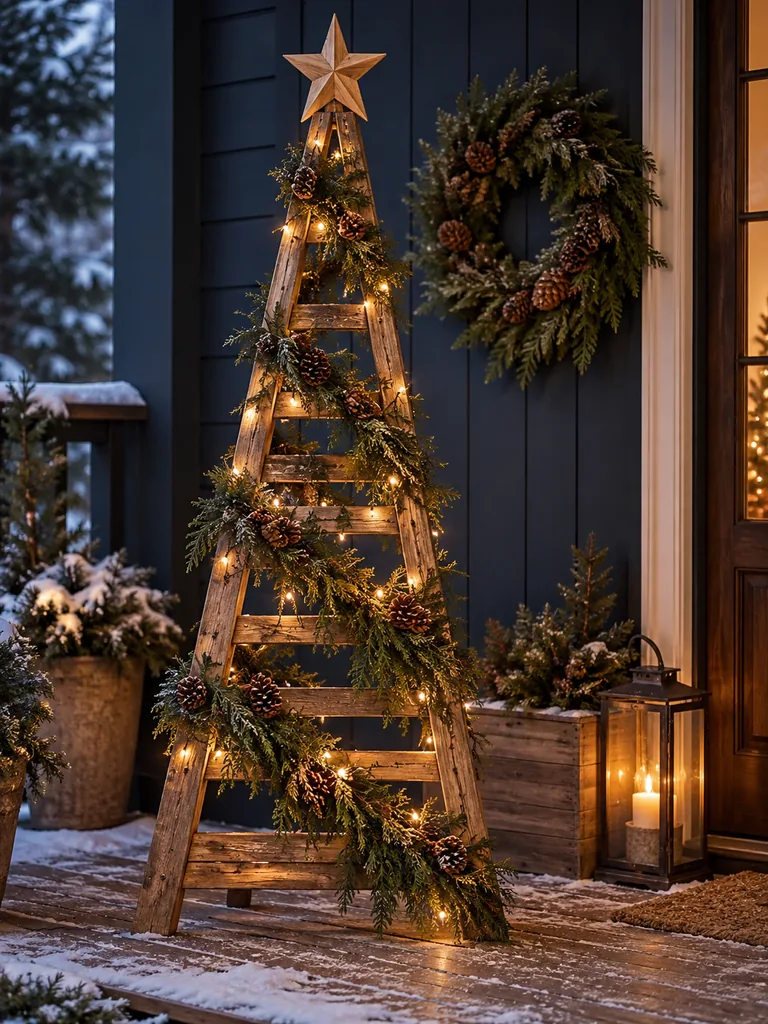
A narrow ladder-style Christmas tree has an open silhouette that leaves plenty of room for greenery and lights. It is particularly effective against a dark porch wall where the natural timber stands out.
Materials Needed
- Two long wooden side rails
- Short boards for rungs
- Exterior screws
- Wood stain
- Evergreen garland
- Small pinecones
- Outdoor string lights
- Carved wooden star
- Saw
- Drill and measuring tape
How to Make It
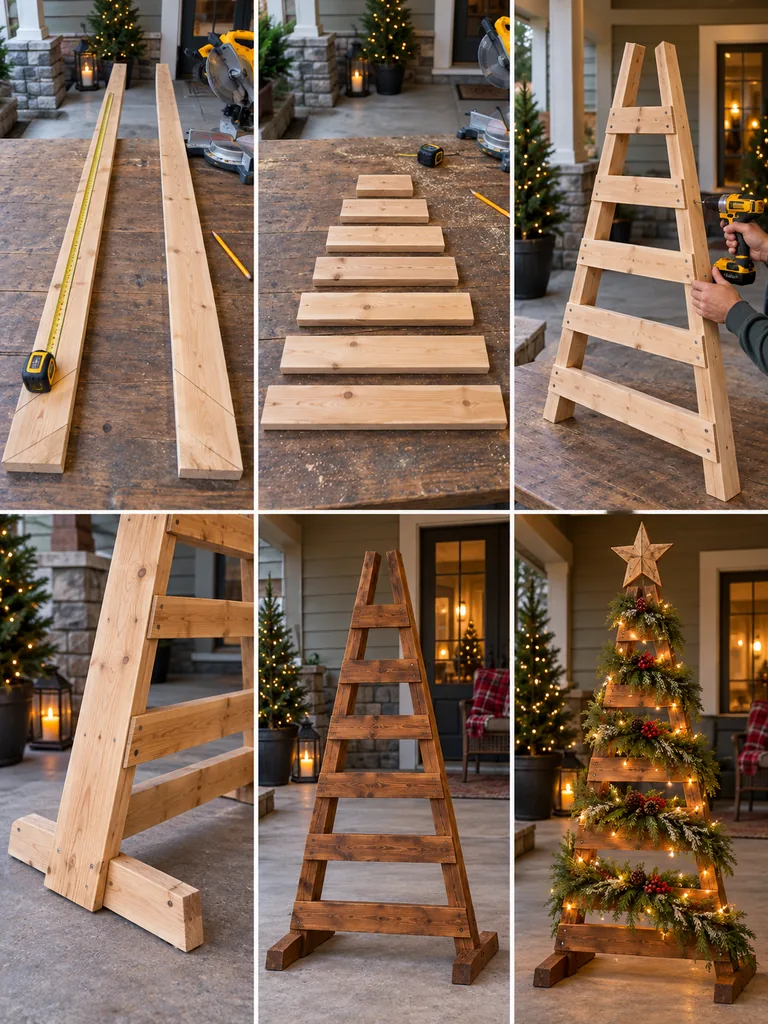
Angle the two long rails inward so they nearly meet at the top. Measure between them at several heights and cut horizontal rungs that become shorter toward the top. Screw the rungs firmly into the rails and add a stabilizing support at the bottom. Stain the finished frame and let it dry completely. Weave greenery loosely across selected rungs, tuck in pinecones, add warm lights, and finish with a wooden star rather than covering every part of the ladder.
7. Spiral Branch Christmas Tree
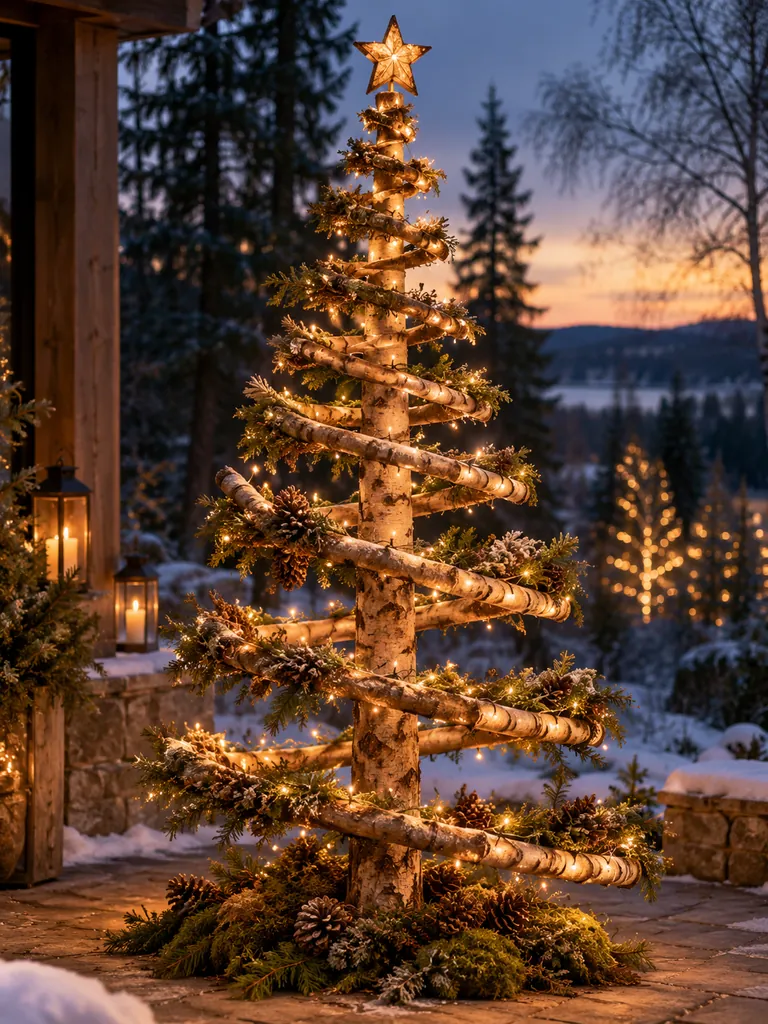
A spiral branch tree is more sculptural than a traditional plank tree. Rotating natural branches around one center pole creates a three-dimensional corkscrew form that looks beautiful from every angle.
Materials Needed
- Strong center pole
- Natural branches in graduated lengths
- Wooden base
- Exterior screws
- Drill
- Wood sealer
- Warm fairy lights
- Pinecones
- Evergreen clippings
- Small star topper
How to Make It
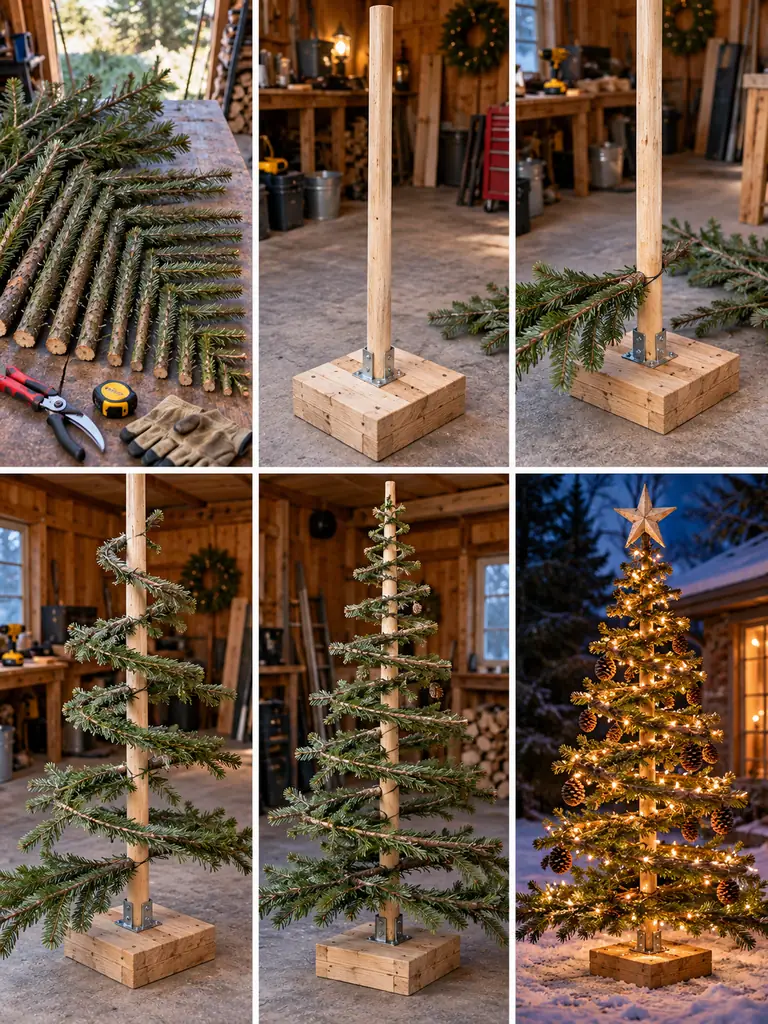
Sort branches from longest to shortest and secure the center pole into a heavy base. Attach the longest branch low on the pole, then rotate every new branch slightly as you work upward. Continue decreasing the length until a tapered spiral forms. Seal the wood if it will remain outdoors for several weeks. Wrap fine lights loosely through the branches, add a few evergreen clippings and pinecones near the lower levels, and finish with a small star that does not overpower the sculptural shape.
8. Wooden Christmas Tree Trio for the Front Porch
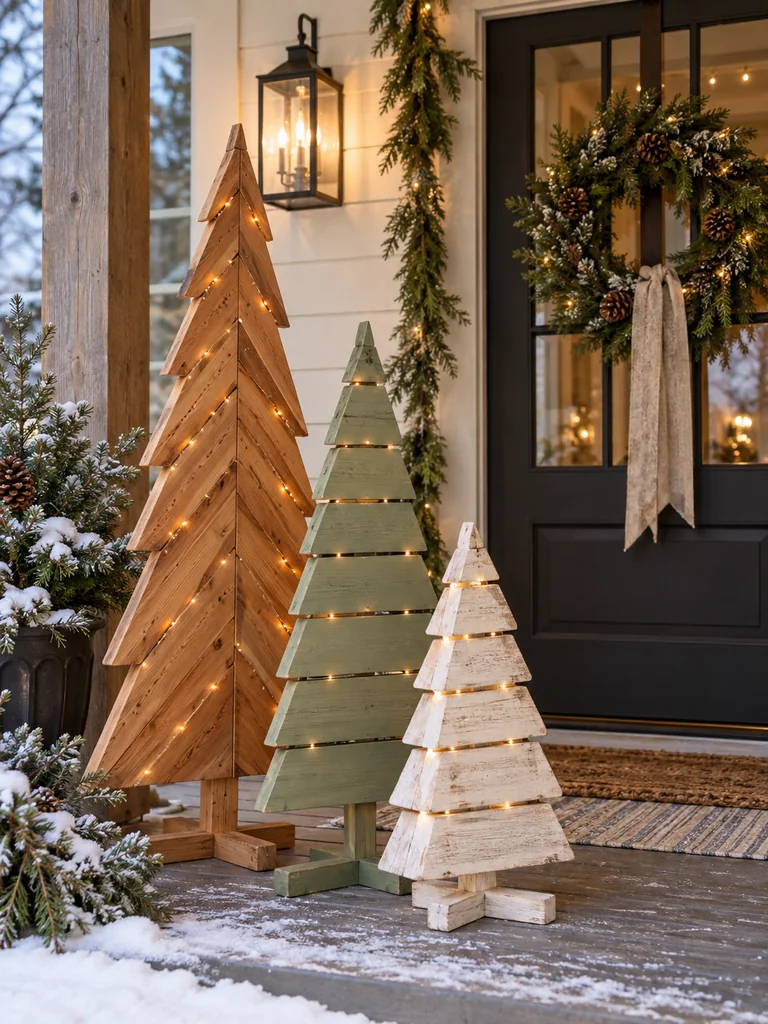
Three trees in coordinated finishes can fill a porch corner more effectively than one oversized decoration. Varying the height, color, and plank pattern keeps the group interesting while still looking intentional.
Materials Needed
- Wooden boards
- Three center posts
- Lumber for three bases
- Natural wood stain
- Muted sage exterior paint
- Soft white exterior paint
- Exterior screws
- Sandpaper
- Outdoor micro lights
- Saw and drill
How to Make It
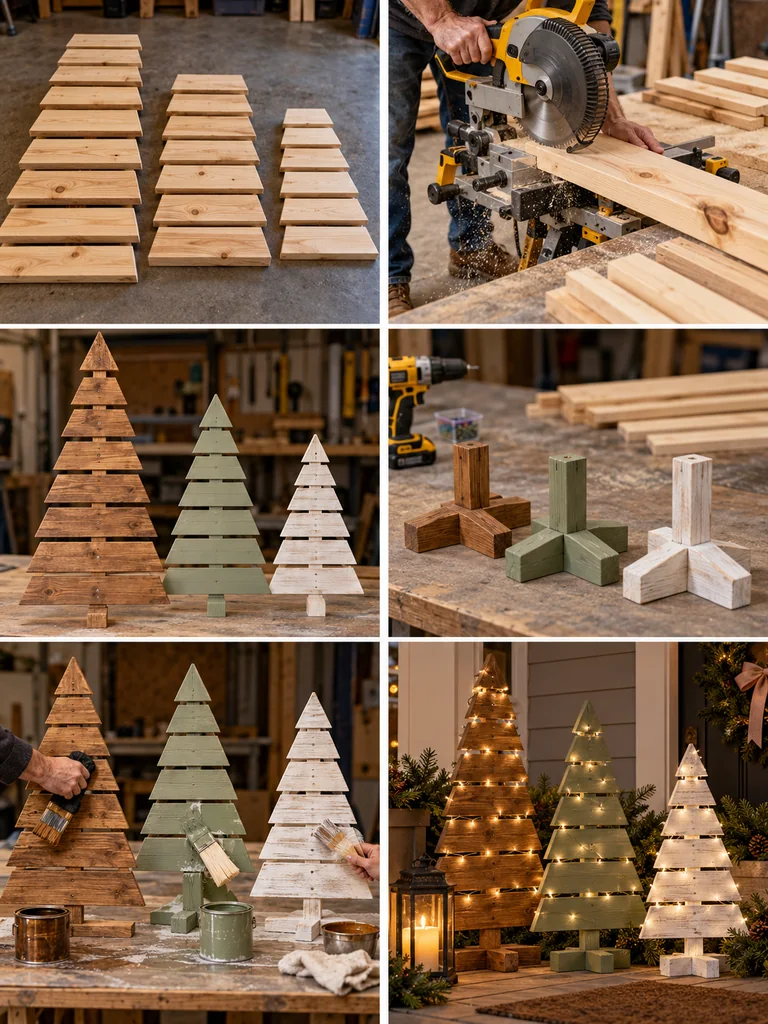
Build three freestanding trees in small, medium, and tall sizes. Give the tallest tree angled natural-wood slats, use horizontal sage boards on the medium tree, and create chunkier whitewashed layers for the smallest. Construct separate cross feet so each piece can be moved easily. After the finishes dry, arrange the tallest tree toward the back and the smallest forward. Add only subtle warm micro lights so the differences in wood, color, and scale remain easy to see.
9. Rustic Wooden Gift Box Decorations
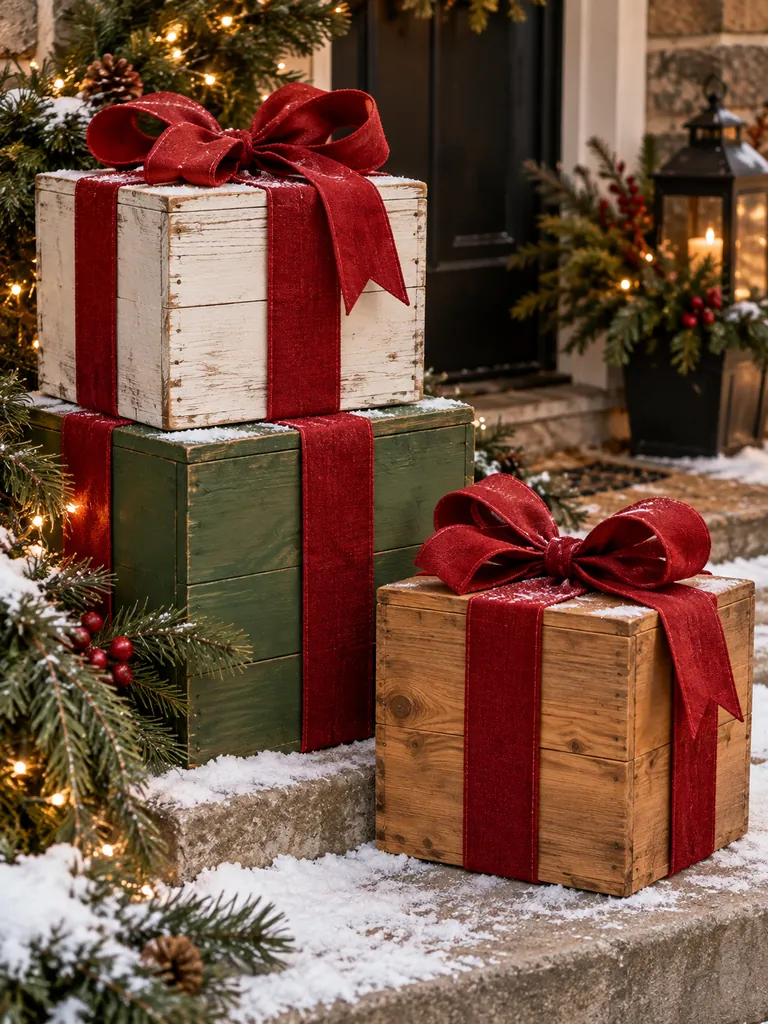
Oversized wooden presents are a fun way to break up a yard full of Christmas trees. Hollow boxes keep the project lighter while broad ribbon and structured bows create a strong festive shape.
Materials Needed
- Thin cedar boards or plywood
- Small timber corner strips
- Exterior screws
- Wood glue
- Sandpaper
- Forest-green exterior paint
- Cream exterior paint
- Wood stain
- Weather-resistant red ribbon
- Large outdoor bows
How to Make It
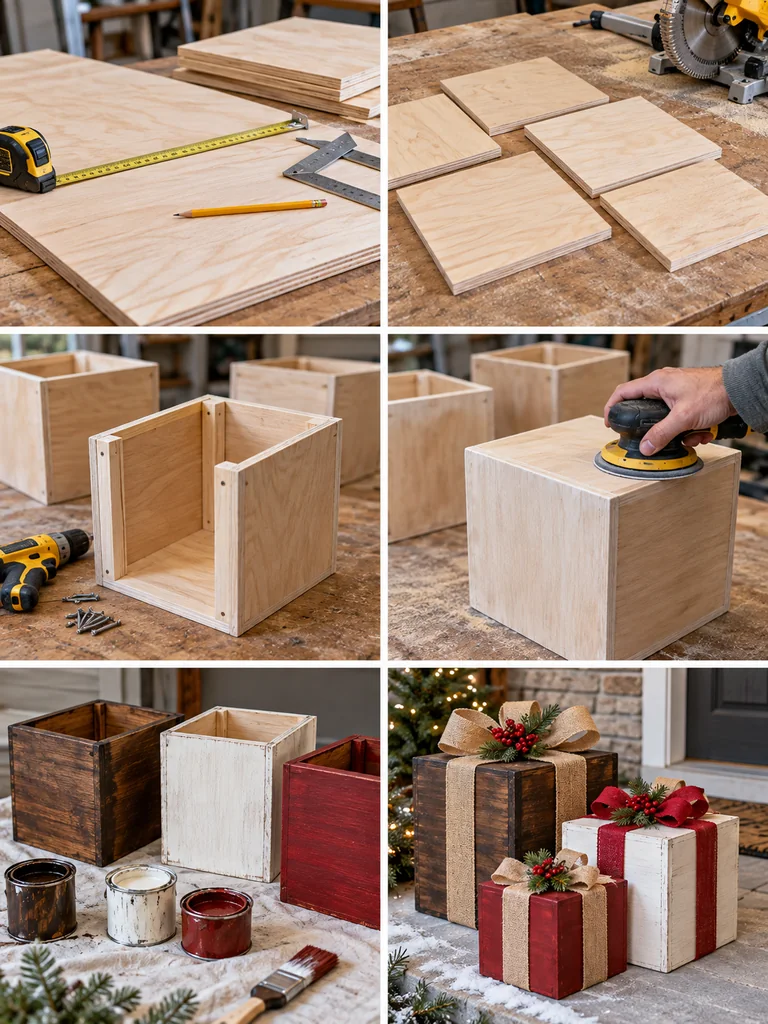
Cut panels for three hollow cubes in different sizes and join the corners with small interior timber strips. Sand every box and finish one in natural stain, one in muted green, and one in weathered cream. Once dry, wrap wide weather-resistant ribbon around each box in two directions and secure a large bow on top. Stack two boxes and position the third nearby. Because the pieces are hollow, they are easier to move and can be nested or stored compactly after Christmas.
10. Wooden Christmas Star Yard Stakes
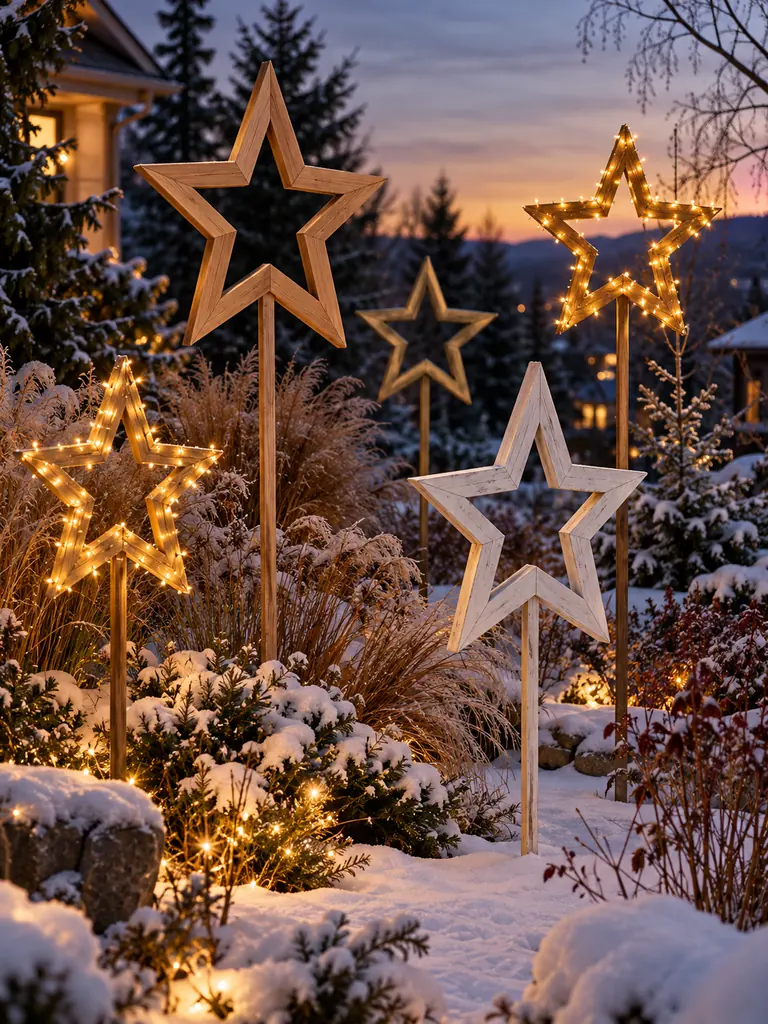
Simple star outlines can be repeated throughout a garden without making the display feel crowded. Changing the size and finish gives the group more depth, especially when only a few stars are illuminated.
Materials Needed
- Narrow wooden strips
- Exterior wood glue
- Exterior screws
- Long garden stakes
- Natural stain
- Chalky white exterior paint
- Muted antique-gold paint
- Outdoor micro lights
- Saw
- Drill
How to Make It
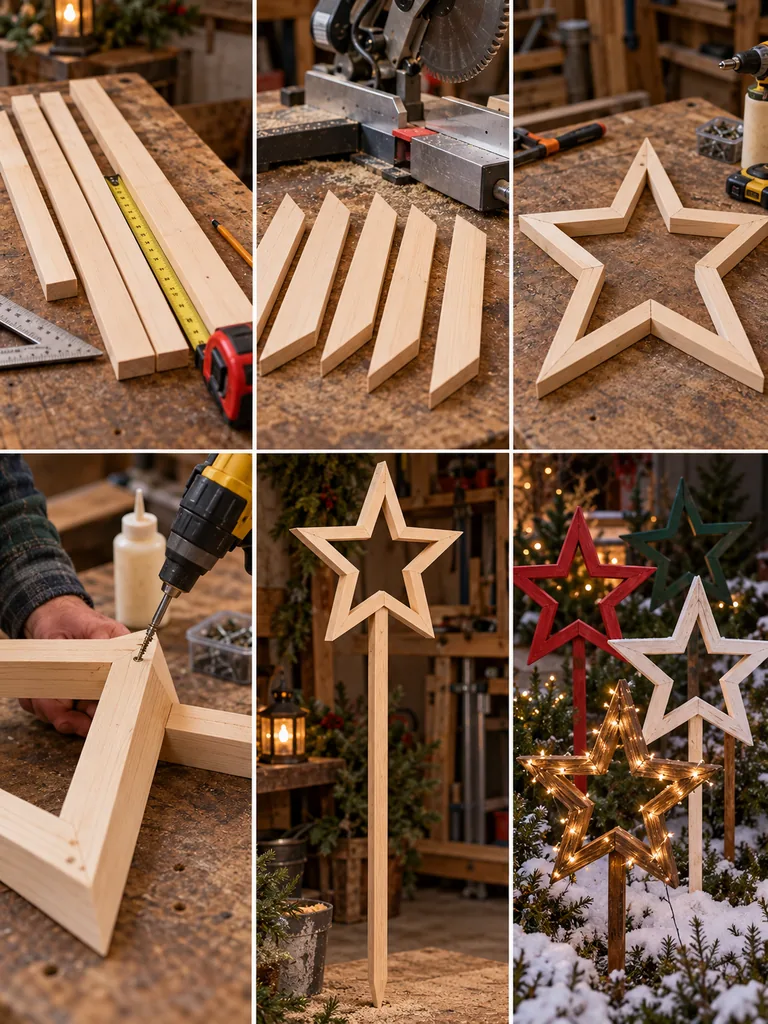
Cut five strips for each star, using matching angles so the points meet cleanly. Glue the joints and reinforce them with screws from the back. Attach each finished star to a long wooden stake and make several sizes rather than repeating one identical shape. Stain some stars, paint others white or muted gold, and let them cure. Wrap micro lights around only one or two pieces, then stagger the stakes among ornamental grasses and evergreen shrubs to create layered nighttime depth.
11. Pallet Wood Christmas Signpost
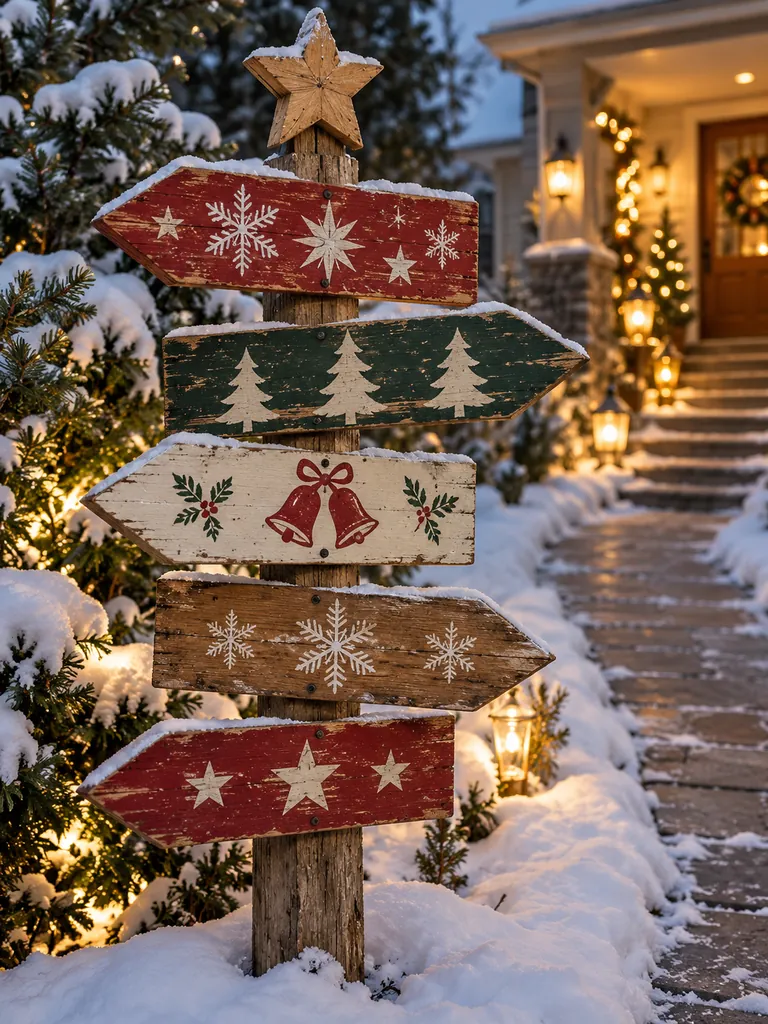
A festive signpost adds a playful North Pole feeling without relying on readable wording. Painted symbols such as stars, bells, trees, and snowflakes keep the design decorative and easy to use anywhere.
Materials Needed
- Reclaimed pallet boards
- Tall wooden post
- Heavy wooden base
- Red exterior paint
- Dark green exterior paint
- Cream exterior paint
- Natural stain
- Holiday symbol stencils
- Exterior screws
- Small wooden star and outdoor sealer
How to Make It
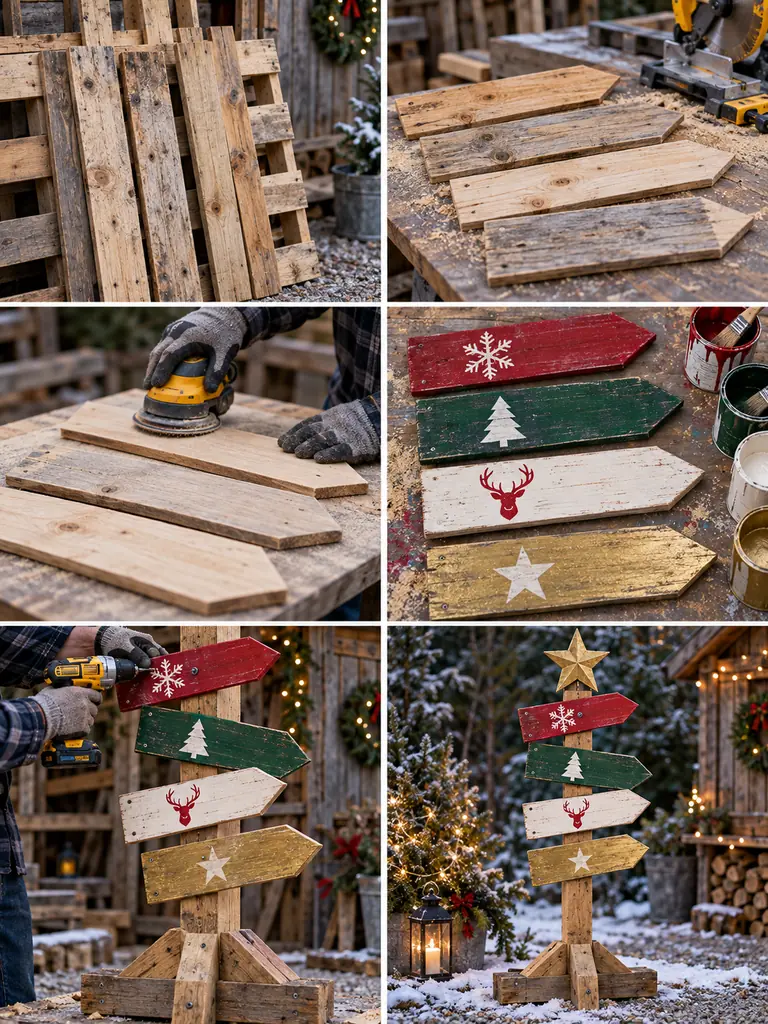
Cut several pallet boards into arrow shapes and sand the rough surfaces while preserving some weathered texture. Paint the arrows in cranberry, green, cream, and natural finishes. Add simple stenciled holiday symbols rather than words. Screw the arrows to the post at different heights and alternating directions, then reinforce the post in a wide wooden base. Add a star topper and coat the painted surfaces with outdoor sealer. Place the sign beside a walkway where the different arrows are easy to see.
12. Oversized Wooden Snowflake
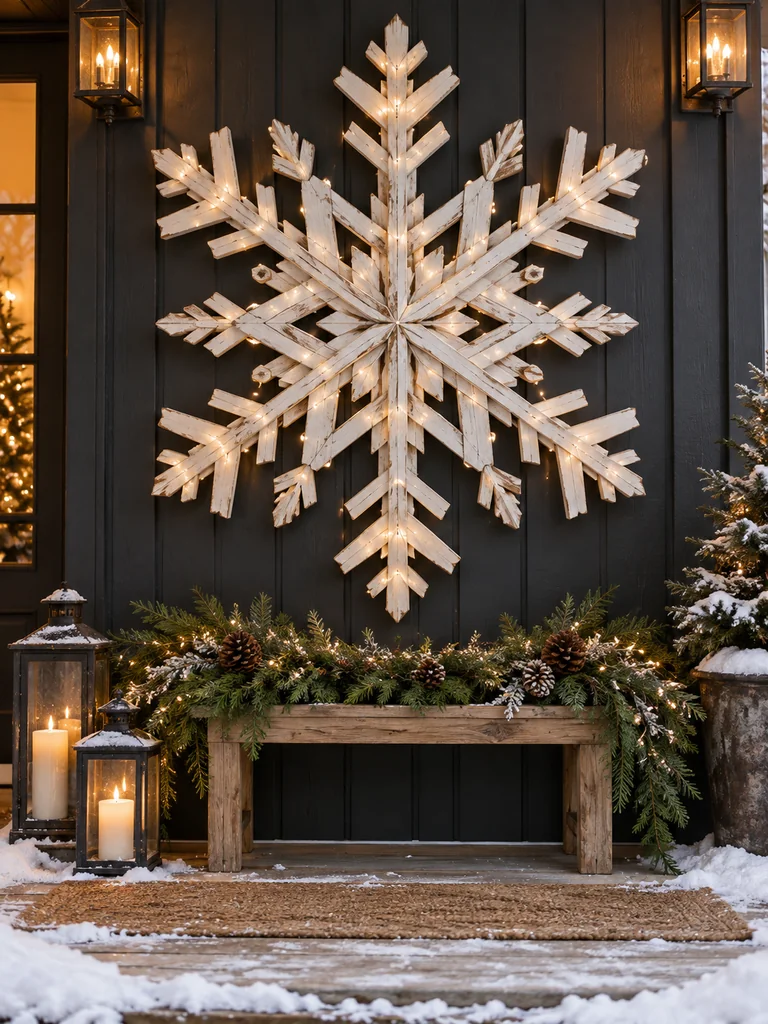
One large dimensional snowflake can fill an empty exterior wall with more impact than a cluster of small decorations. Layered cedar strips give it depth, while a weathered ivory finish keeps it elegant.
Materials Needed
- Narrow cedar strips
- Wood glue
- Small exterior screws or nails
- Measuring tape
- Saw
- Hexagonal center piece
- Ivory-white exterior paint
- Sandpaper
- Outdoor micro lights
- Strong hanging hardware
How to Make It
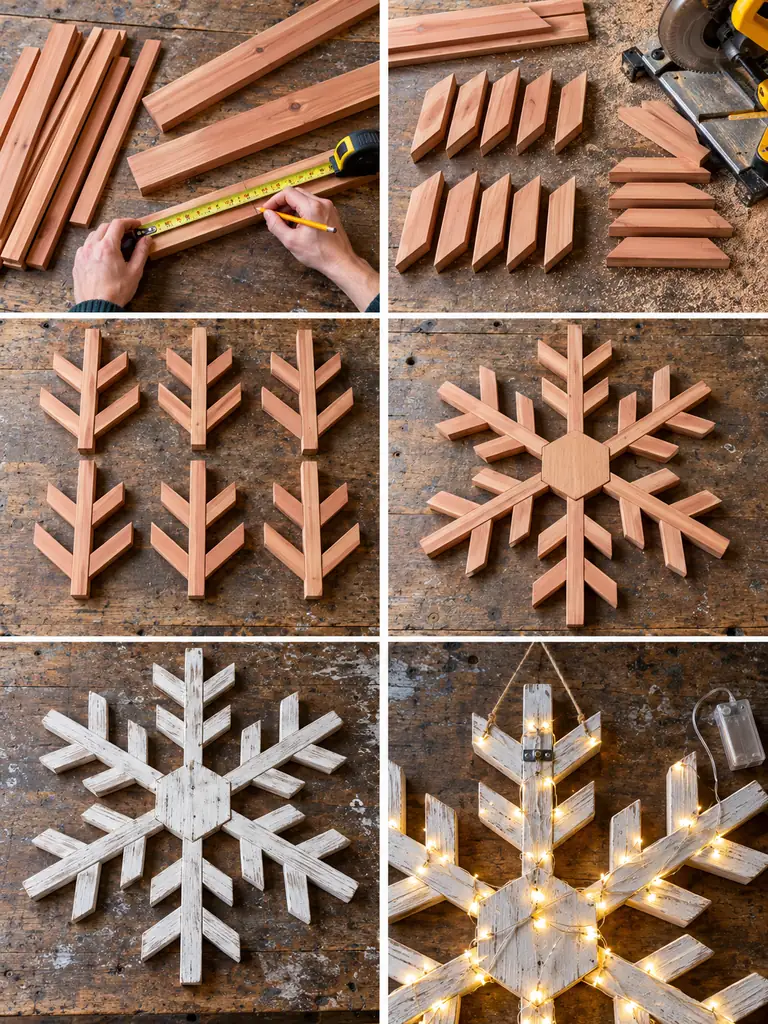
Measure and cut repeated angled pieces so all six arms match. Build each arm separately on a flat work surface, then join the six sections around a central hexagonal piece. Reinforce the back before lifting the snowflake. Paint it ivory white and lightly sand the edges to reveal touches of natural wood. Add secure outdoor hanging hardware and wrap very fine lights around selected branches rather than every strip. Mount it to a protected porch wall where the symmetrical shape can be viewed head-on.
13. Rustic Wooden Reindeer Silhouette
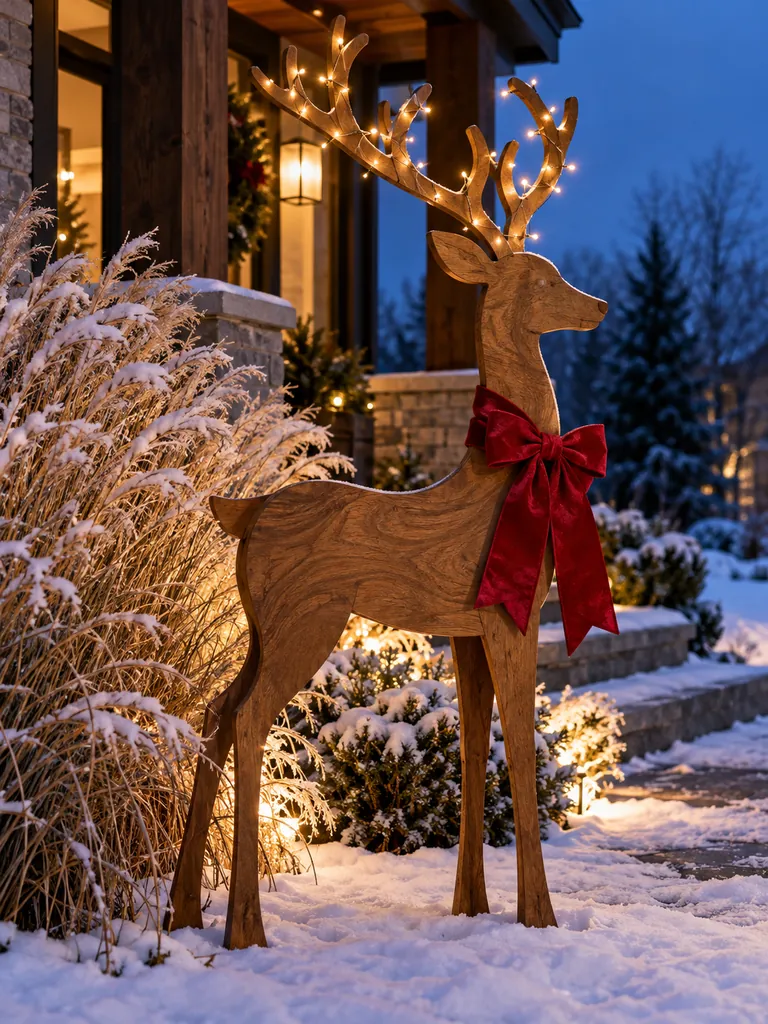
A simple plywood reindeer is instantly recognizable but still easy enough for a home workshop. A warm stain, red bow, and lights around the antlers provide all the decoration it needs.
Materials Needed
- Exterior plywood
- Reindeer template
- Pencil
- Jigsaw
- Sandpaper
- Medium-brown wood stain
- Outdoor clear sealer
- Timber support feet
- Deep red outdoor bow
- Small outdoor lights
How to Make It
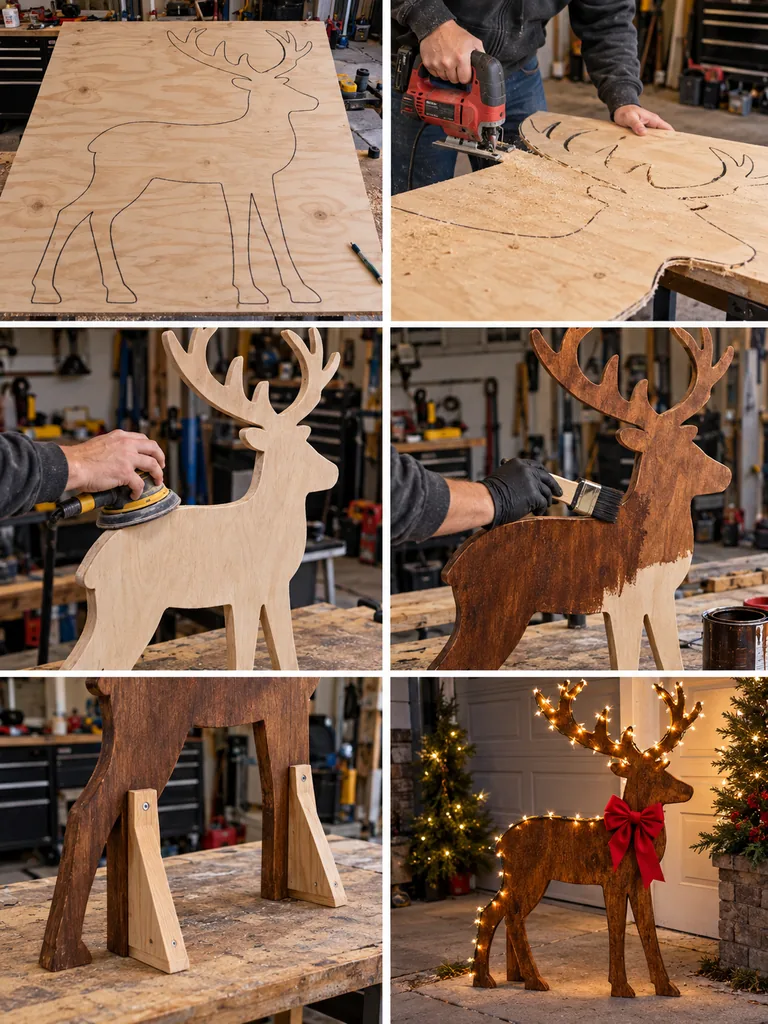
Trace a simplified reindeer profile onto exterior plywood, keeping the antlers bold enough to cut safely. Use a jigsaw to follow the outline, then sand every edge and narrow point. Apply a warm brown stain and protect it with outdoor sealer. Screw sturdy support feet behind the legs so the silhouette remains upright in the yard. Tie a weather-resistant red bow around the neck and wrap fine lights only around the antlers for a clean, elegant nighttime accent.
14. Wooden Christmas Lantern Boxes
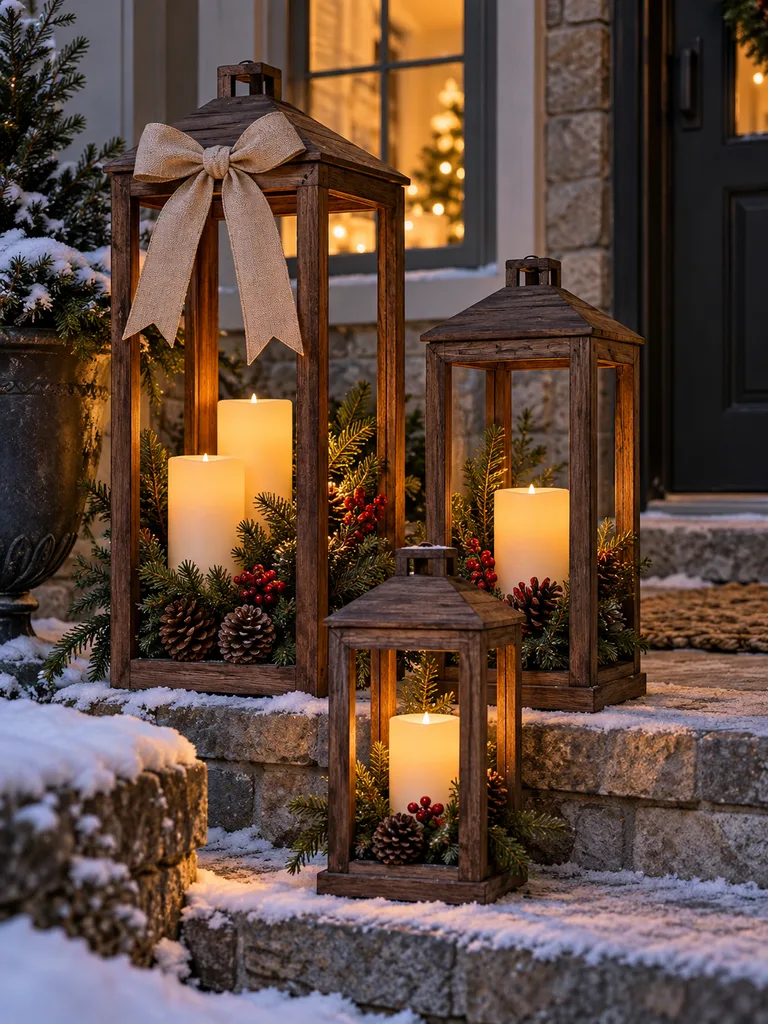
Tall open-frame wooden lanterns bring height and warm light to porch steps without using glass or metal. Building several sizes makes the group look collected rather than identical.
Materials Needed
- Square wooden dowels
- Thin boards for roof pieces
- Exterior screws
- Wood glue
- Dark walnut stain
- Battery-operated LED candles
- Evergreen clippings
- Pinecones
- Red berries
- Oatmeal-colored outdoor ribbon
How to Make It
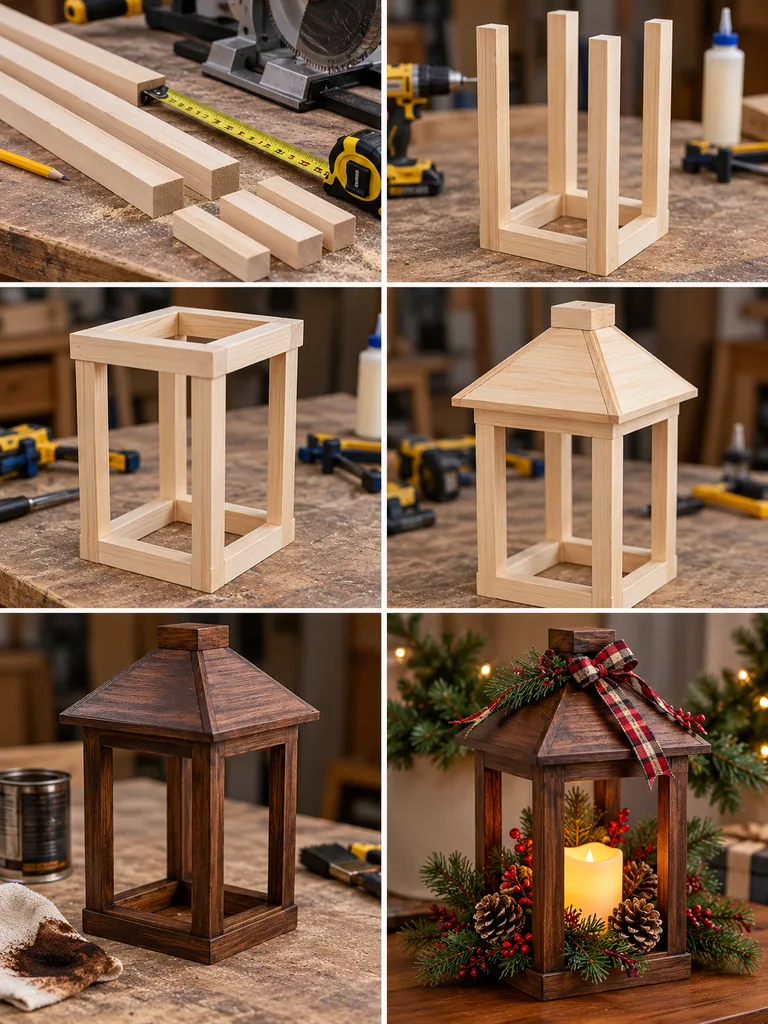
Cut four vertical posts for each lantern and connect them with square top and bottom frames. Add short angled roof pieces to create a simple peaked top, then reinforce the joints before staining everything dark walnut. Once dry, place flameless LED candles inside the frames and surround the bases with evergreen clippings, pinecones, and a few berries. Add one neutral fabric bow to the tallest lantern and leave the others simpler. Use only battery LEDs—never real flames—inside a wooden lantern.
15. Scrap Wood Offcut Christmas Tree
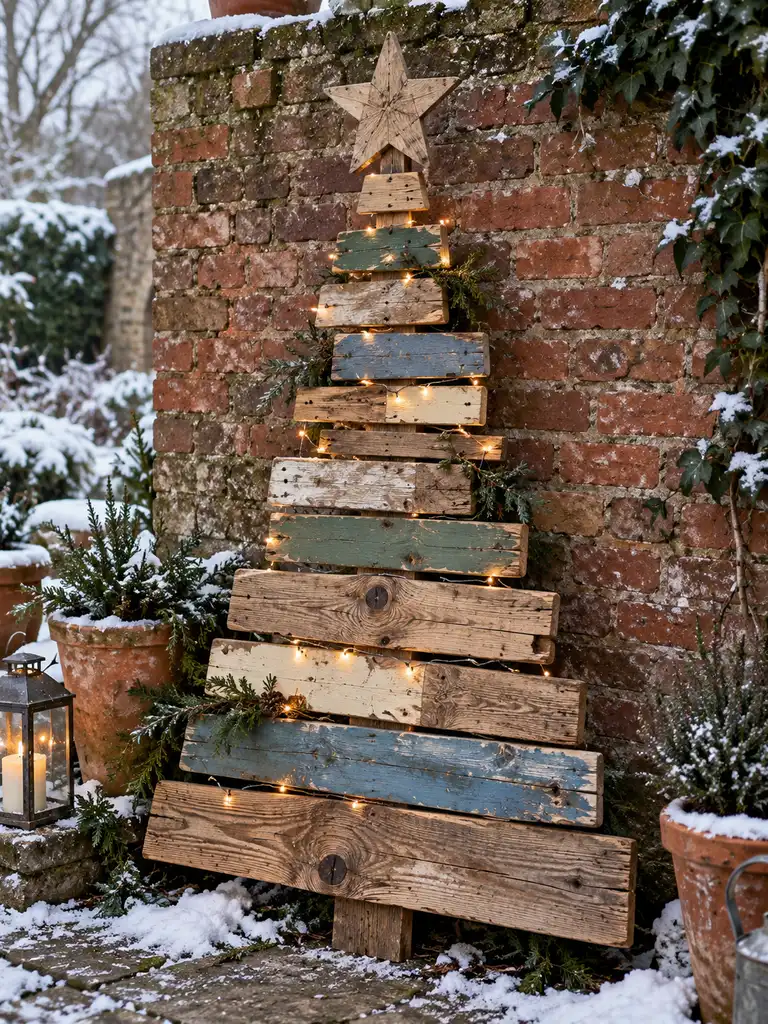
This tree turns mismatched leftovers into an intentionally recycled decoration. Different grains, chipped paint, knots, and board widths are part of the appeal rather than flaws that need to be hidden.
Materials Needed
- Assorted scrap wood offcuts
- Vertical backing board
- Exterior screws
- Wood glue
- Sandpaper
- Dusty-blue exterior paint
- Muted moss-green paint
- Warm cream paint
- Outdoor fairy lights
- Reclaimed wood for a star and base
How to Make It
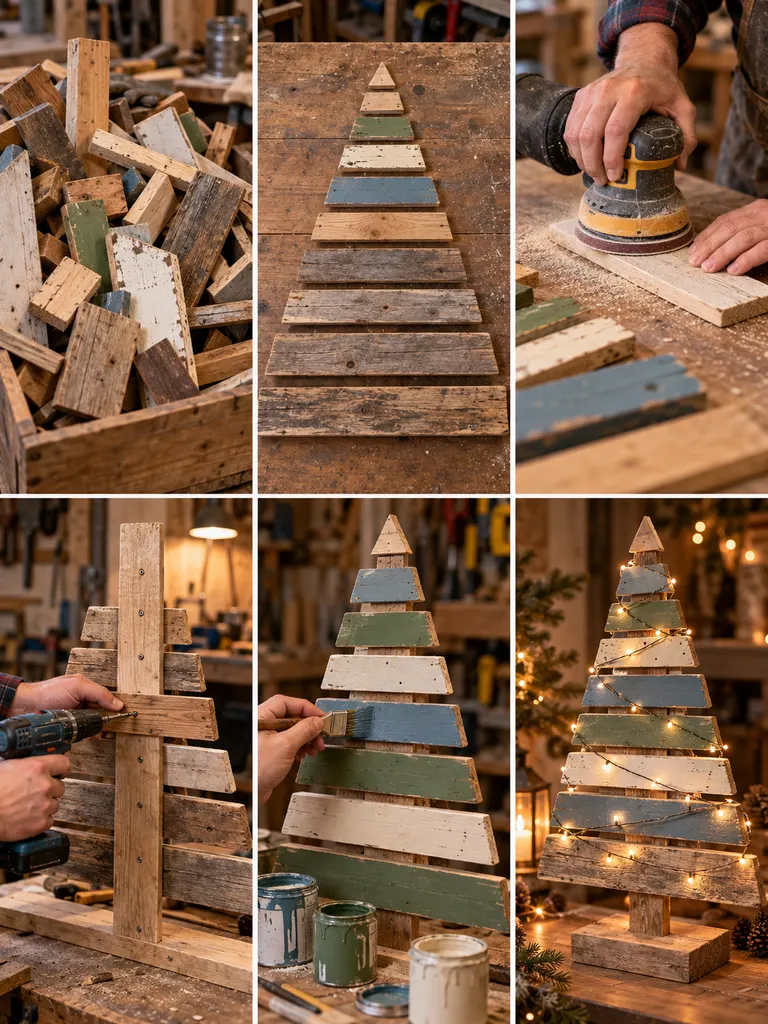
Sort the offcuts from longest to shortest and test the arrangement on a workbench before fastening anything. Sand sharp edges, but keep plenty of existing character. Screw the pieces horizontally across a central backing board to form a tapered tree. Paint only selected boards dusty blue, moss green, or cream and leave most natural. Add a reclaimed-wood star and a simple freestanding base. Finish with sparse warm lights, allowing the irregular widths and old wood texture to remain visible.
16. Wooden Christmas Village Yard Display
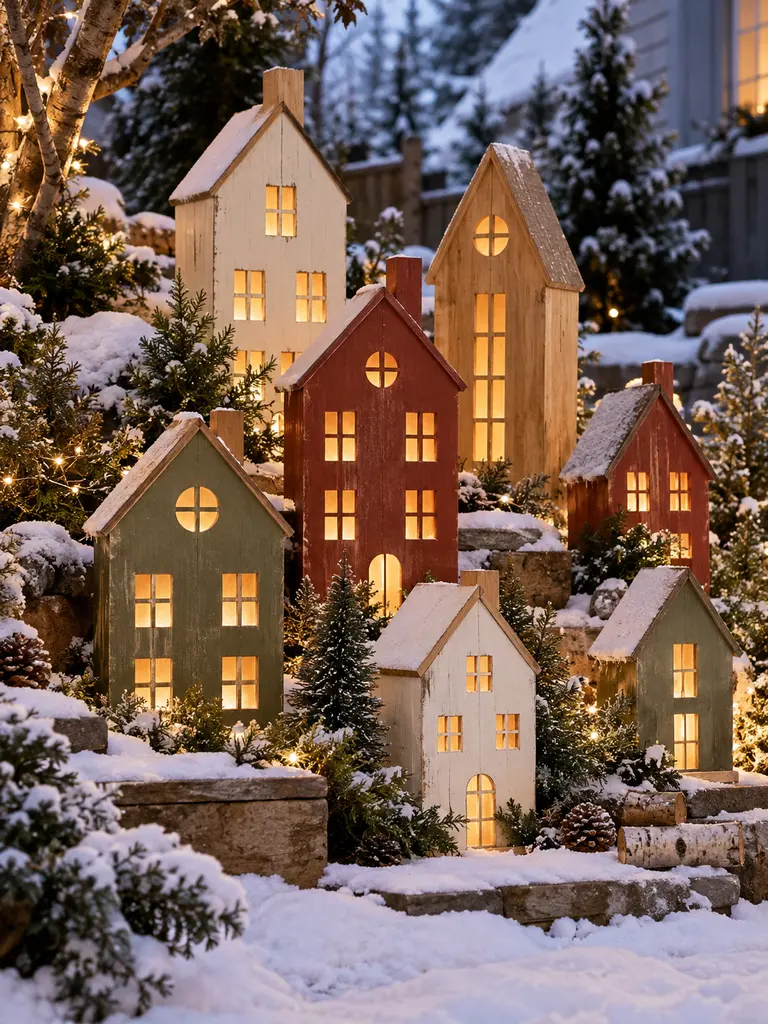
A group of glowing plywood houses can turn a garden bed into a small Christmas village. Mixing rooflines, heights, and muted colors helps the silhouettes feel like a collection of individual buildings.
Materials Needed
- Exterior plywood
- Pencil and ruler
- Jigsaw
- Drill or small cutting tool for windows
- Warm white exterior paint
- Sage exterior paint
- Faded brick-red paint
- Natural wood stain
- Back support blocks
- Battery-operated lights and outdoor sealer
How to Make It
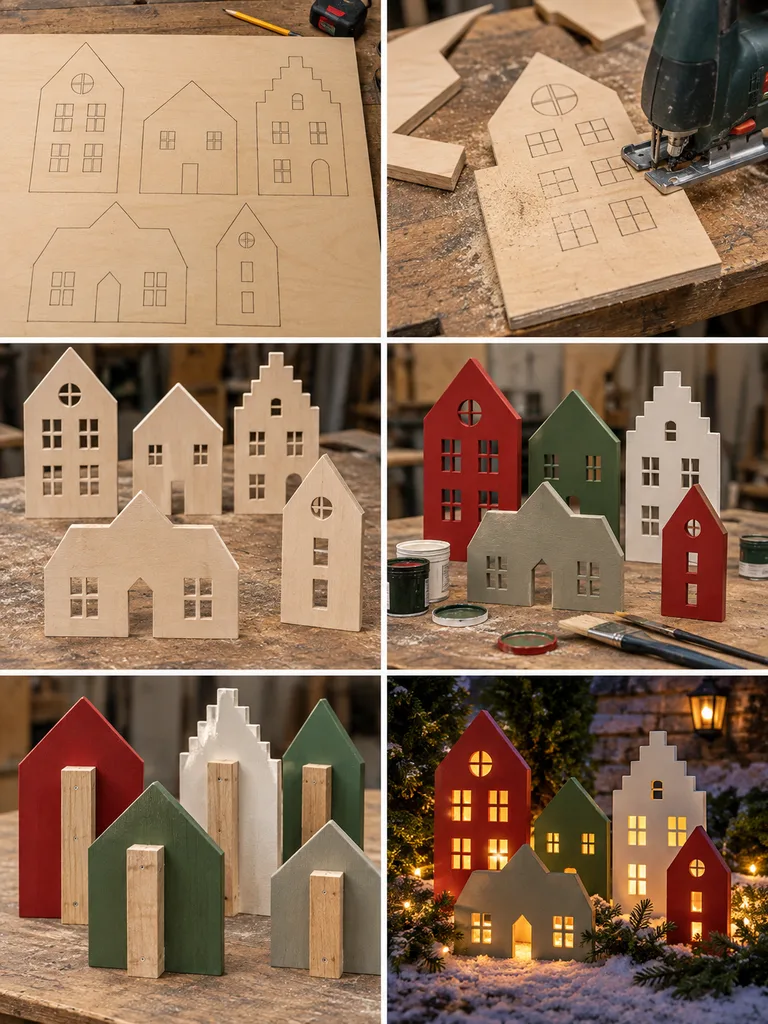
Sketch several house silhouettes directly onto the plywood, changing the roof shape and height from one house to the next. Cut the outer shapes and window openings, then sand the edges. Paint the houses in warm white, sage, faded red, and natural wood tones. Screw a sturdy support block to the back of each piece so it stands upright. Arrange the houses at staggered depths in a garden bed and place battery lights behind the window openings for a soft evening glow.
17. Rustic Wooden Porch Tree With Garland
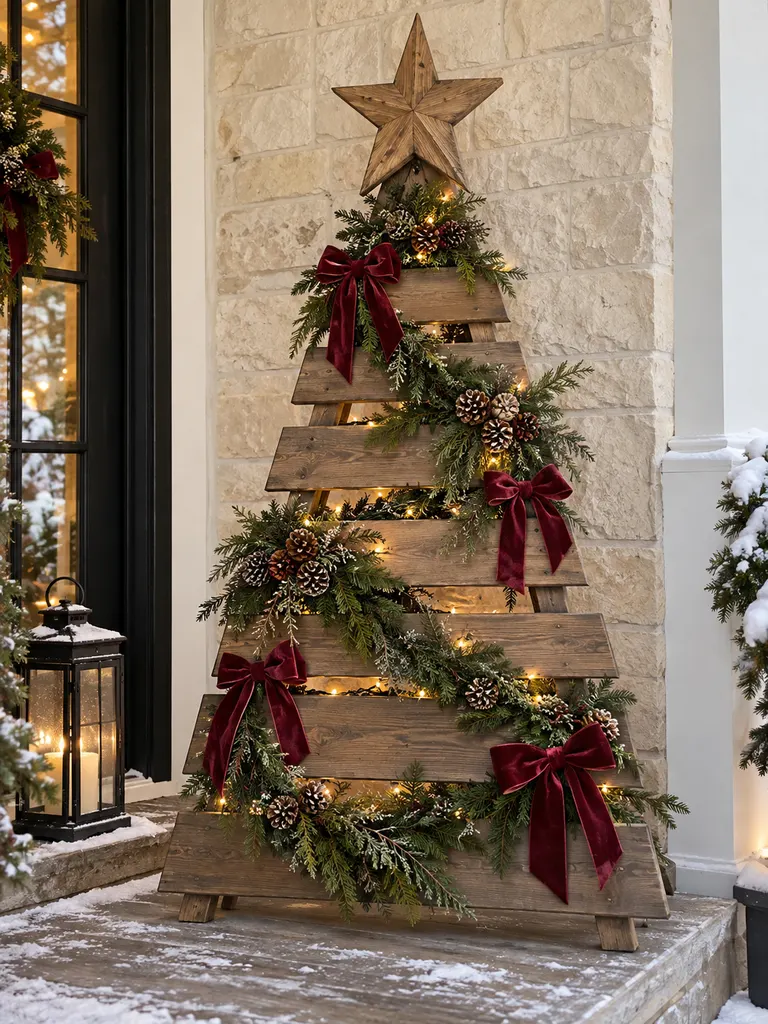
A wide plank tree makes a strong porch focal point while still leaving lots of natural wood visible. Burgundy bows and greenery add richness without turning it into a conventional artificial tree.
Materials Needed
- Two angled wooden side rails
- Thick horizontal planks
- Exterior screws
- Warm gray-brown stain
- Evergreen garland
- Deep burgundy outdoor bows
- Pinecones
- Warm outdoor lights
- Large wooden star
- Drill and saw
How to Make It
Prepare two side rails that angle inward and connect them with horizontal planks, using longer boards at the bottom and shorter boards toward the top. Check the frame for square and stability before staining it a warm gray-brown. Once dry, weave evergreen garland through alternate gaps while leaving much of the timber exposed. Add clusters of pinecones, hidden warm lights, and several deep burgundy bows. Finish with a large natural-wood star and position the tree against a sheltered porch wall.
18. Modern Black Wooden Christmas Tree
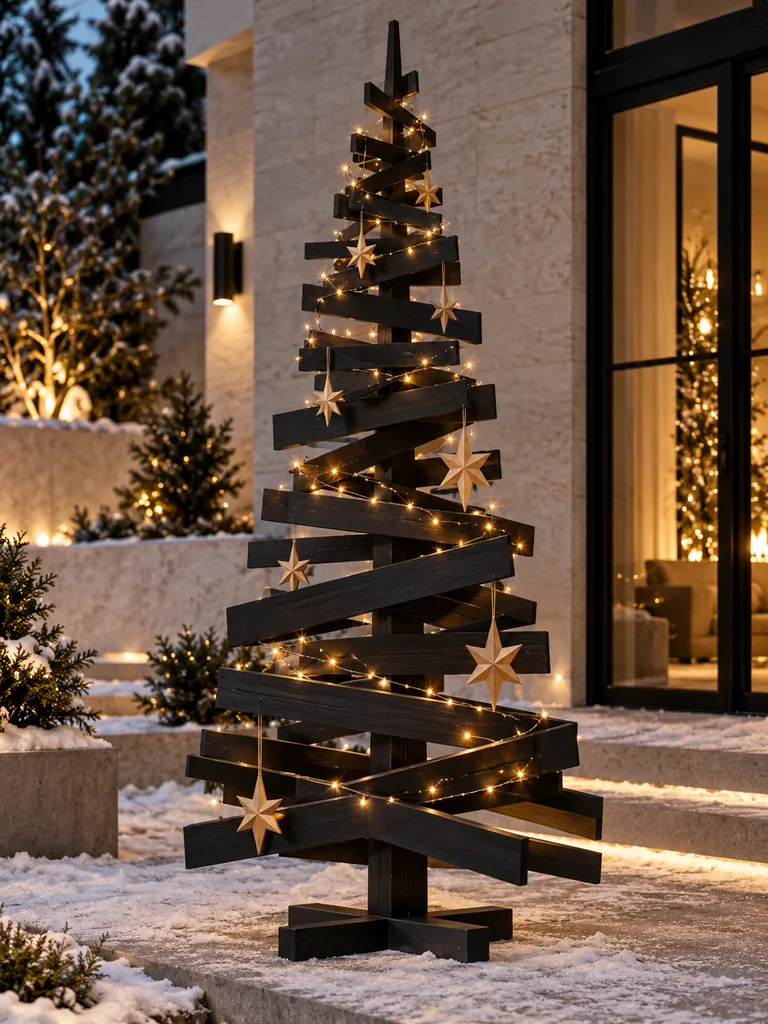
Matte charcoal turns a basic wood project into a contemporary statement piece. Irregular angular slats create a sharper architectural silhouette that pairs especially well with pale stone, concrete, and black-framed windows.
Materials Needed
- Smooth pine boards
- Central wooden support
- Base lumber
- Exterior screws
- Fine sandpaper
- Matte charcoal-black exterior paint
- Paintbrush
- Natural wooden star ornaments
- Warm micro lights
- Saw and drill
How to Make It
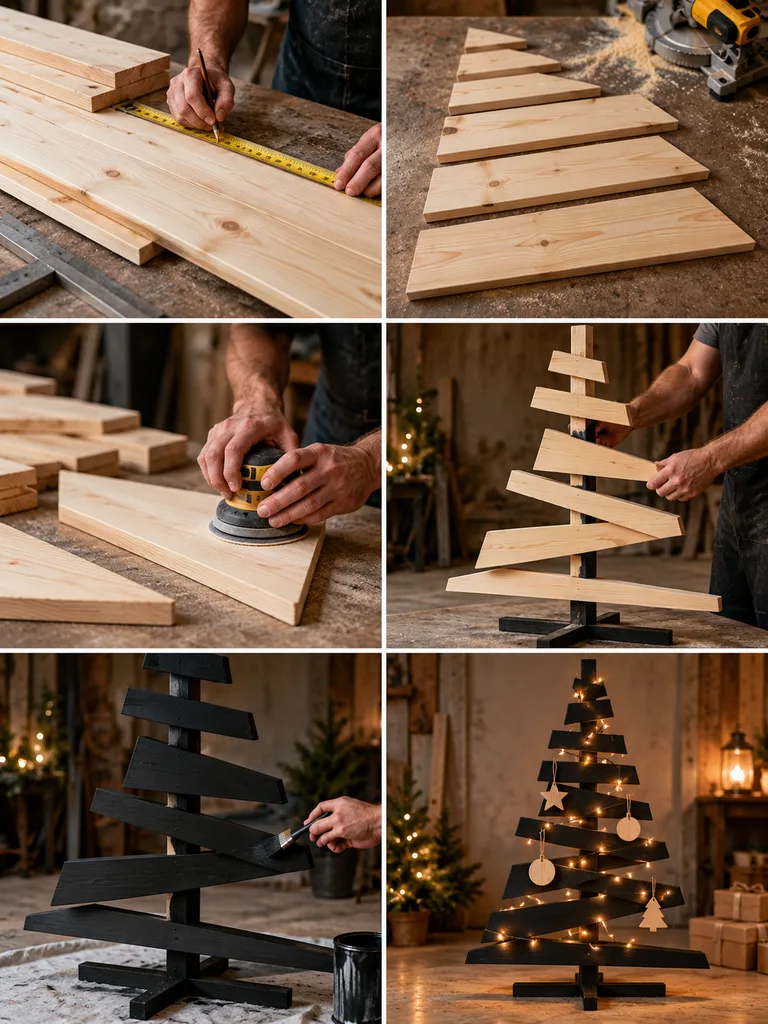
Measure and cut smooth pine boards into different angular lengths, then arrange them asymmetrically around a central support before fastening them permanently. Sand the entire structure carefully because dark paint makes rough edges more noticeable. Apply two thin coats of matte-black exterior paint and allow them to cure. Add a small number of natural wooden ornaments and one strand of warm micro lights. Keep the styling minimal so the unusual silhouette and contrast between black wood and golden light remain the focus.
19. Wooden Candy Cane Yard Stakes
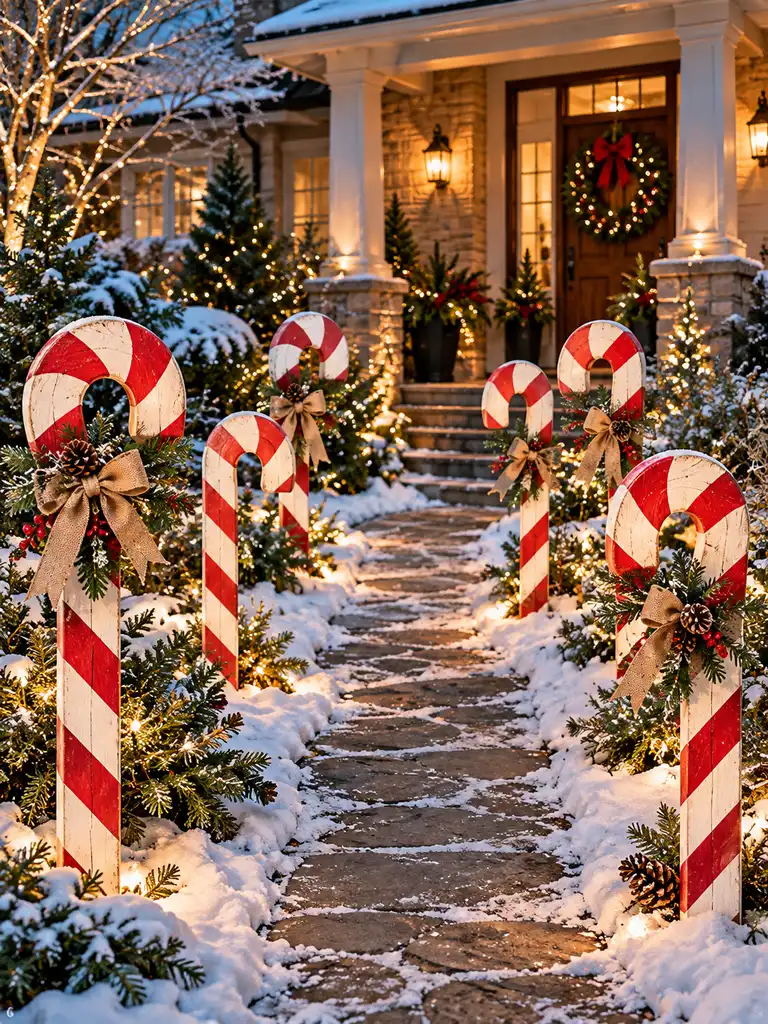
Oversized red-and-white candy canes make a cheerful walkway without looking cartoonish when the finish is matte and the decorations are restrained. Varying the height prevents the row from feeling too rigid.
Materials Needed
- Thick exterior plywood
- Candy cane template
- Pencil
- Jigsaw
- Sandpaper
- Warm-white exterior paint
- Matte red exterior paint
- Painter’s tape
- Long wooden stakes and exterior screws
- Evergreen sprigs and burlap bows
How to Make It
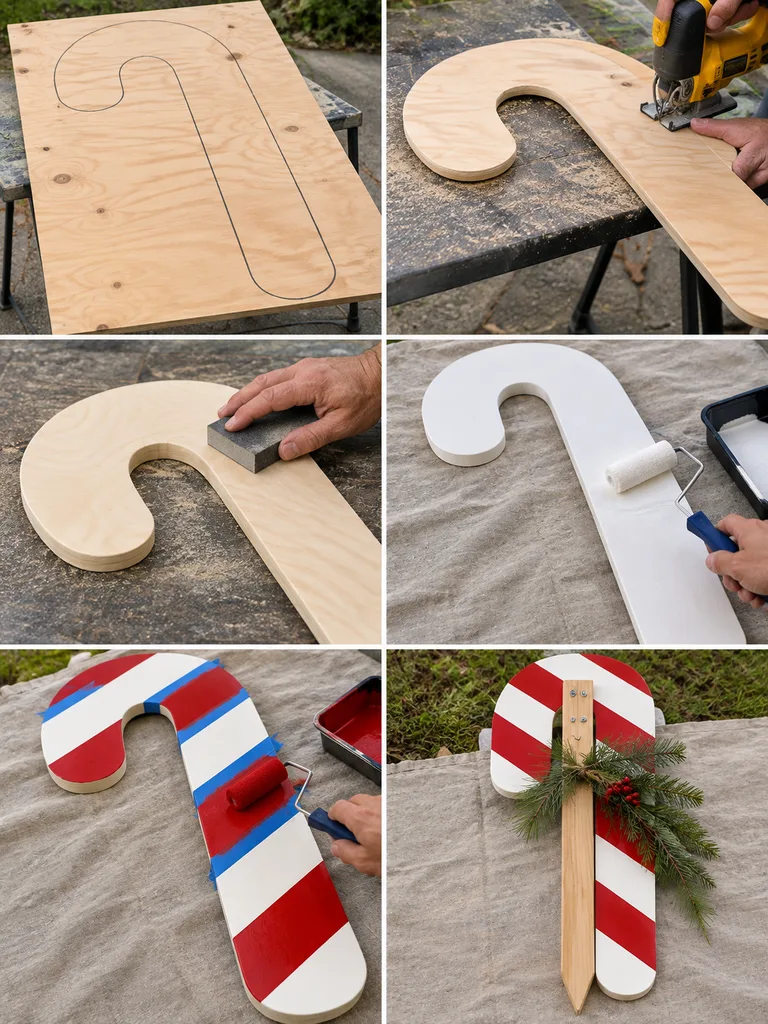
Trace a large candy cane shape onto plywood and cut it with a jigsaw. Sand the edges smooth, apply a warm-white base coat, and let it dry. Mask diagonal sections with painter’s tape and roll or brush on matte red stripes. Seal the finished candy cane, then screw a long wooden stake securely to the back. Make six pieces at slightly different heights. Add evergreen sprigs and burlap bows to every second cane and arrange three on each side of the path.
20. Oversized Wooden Ornament Yard Stakes
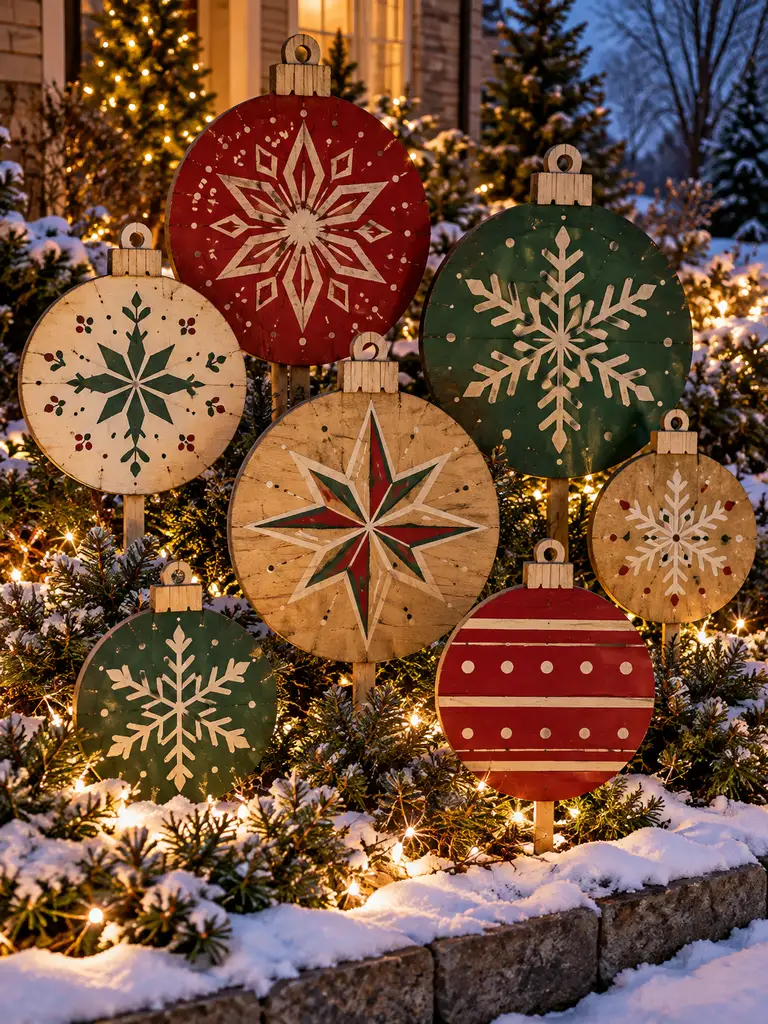
Giant ornament silhouettes bring bold color to a garden bed while staying flat enough to store easily. Different patterns and sizes make the display feel handmade rather than mass-produced.
Materials Needed
- Exterior plywood
- Pencil and circular templates
- Jigsaw
- Small rectangular wood pieces
- Wooden garden stakes
- Cranberry-red paint
- Forest-green paint
- Cream and muted-gold paint
- Holiday pattern stencils
- Exterior screws and clear sealer
How to Make It
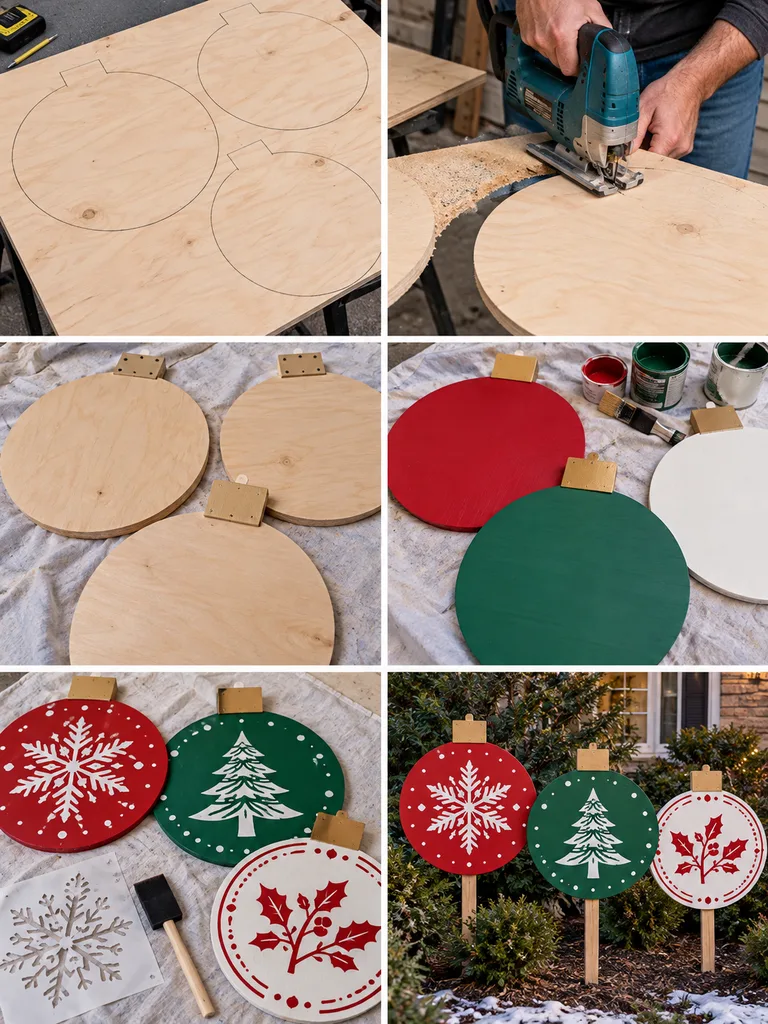
Mark several large circles on plywood and cut them carefully with a jigsaw. Add a small rectangular cap to the top of each circle, then sand and prime the pieces. Paint them in coordinated red, green, cream, gold, and natural finishes. Add simple snowflakes, stripes, dots, or geometric star motifs, avoiding any written words. Seal the surfaces and attach sturdy stakes to the backs. Arrange the finished ornaments at different heights between evergreen shrubs instead of placing them in one straight row.
21. Illuminated Wooden Christmas Arch
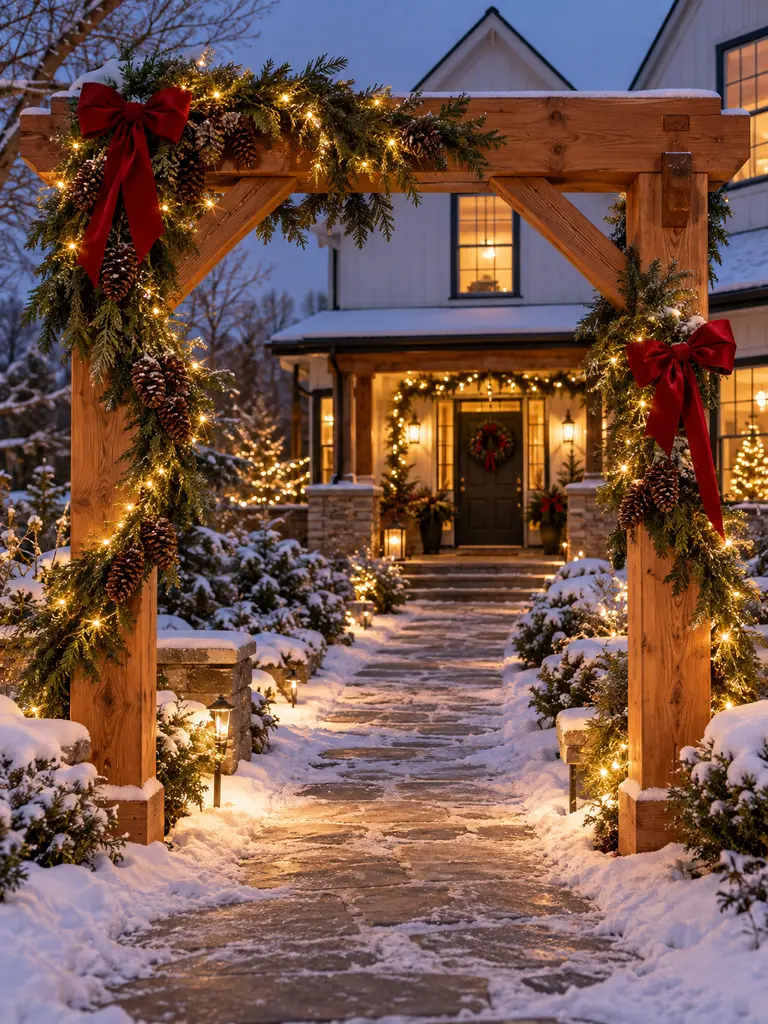
A wooden arch can turn an ordinary front path into a holiday entrance. Leaving much of the cedar visible gives the structure a handcrafted look, while asymmetrical greenery keeps it from feeling overly formal.
Materials Needed
- Two sturdy cedar posts
- Broad cedar top beam
- Diagonal brace lumber
- Exterior bolts and screws
- Metal post anchors
- Outdoor wood sealer
- Evergreen garland
- Warm outdoor LED lights
- Natural pinecones
- Two deep red weather-resistant bows
How to Make It
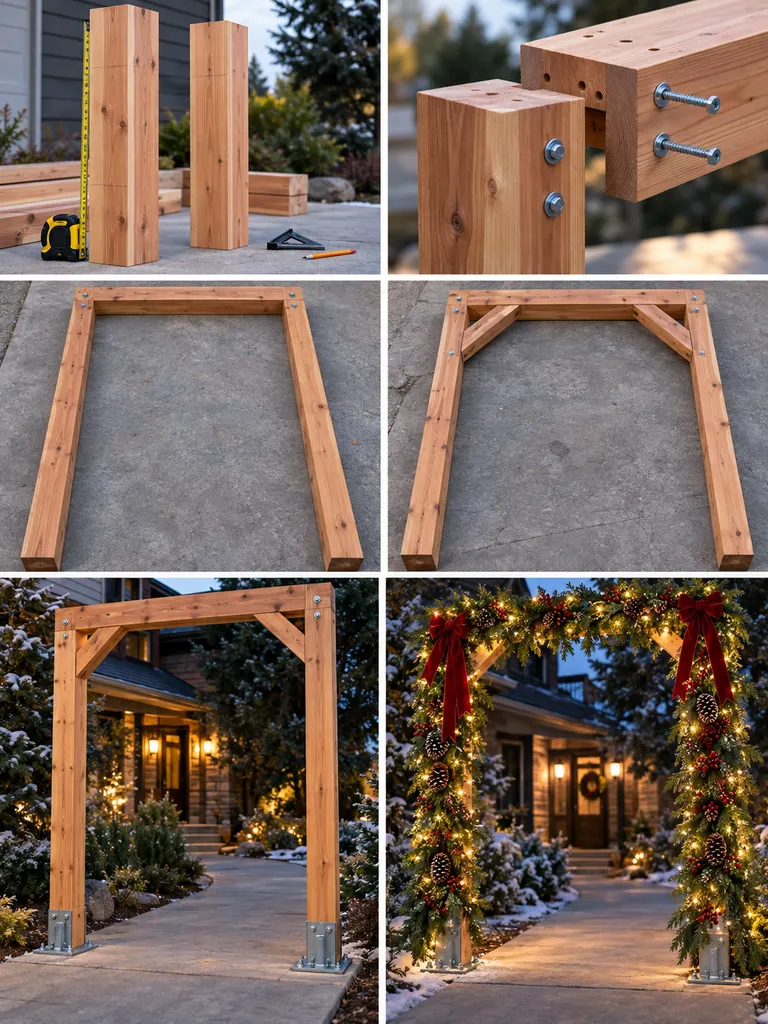
Measure and cut the posts and top beam, then pre-drill the main connections for exterior bolts. Assemble the rectangular frame flat and add diagonal braces at both upper corners. Raise the arch with help and anchor both posts securely to suitable bases before decorating. Seal the wood, then drape evergreen garland asymmetrically around the uprights and top corner areas. Add warm LED lights, pinecones, and two large red bows, keeping the center opening completely clear for safe passage along the walkway.
22. Wooden Christmas Tree Planter Box
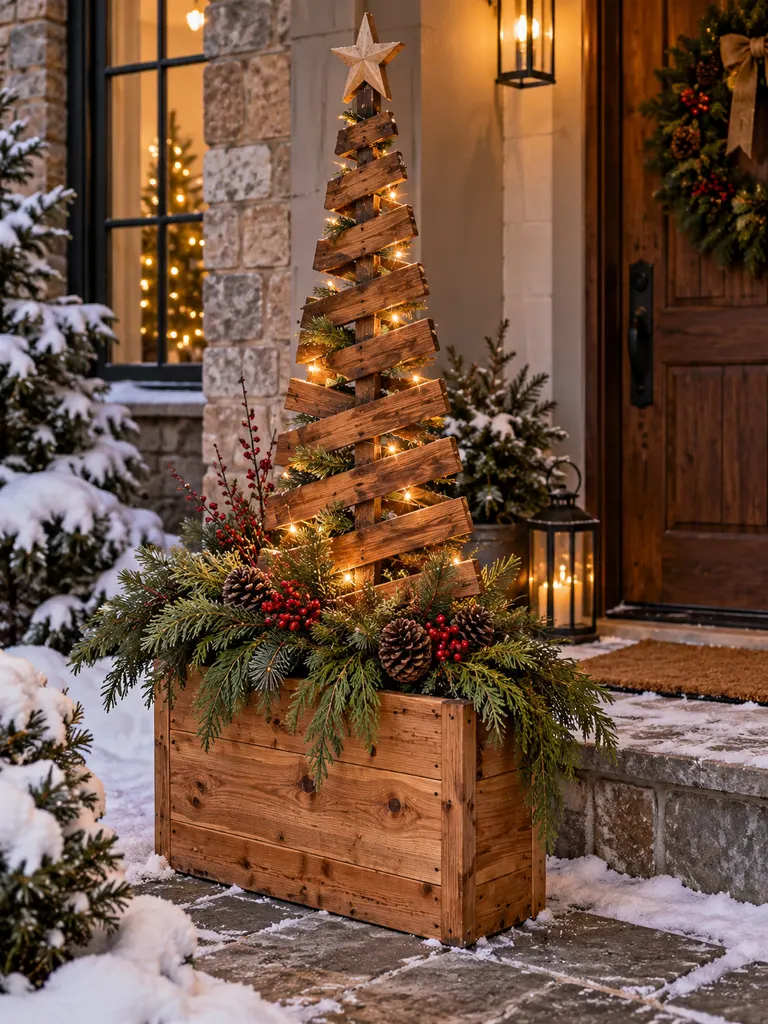
Combining a planter and a wooden tree creates a compact porch decoration with enough weight to handle winter weather. Fresh greenery around the base makes the geometric slats feel softer and fuller.
Materials Needed
- Cedar boards for the planter
- Narrow boards for the tree
- Interior corner blocks
- Exterior screws
- Metal mounting brackets
- Warm wood stain
- Heavy gravel
- Evergreen and cedar cuttings
- Pinecones and red berries
- Warm micro lights and wooden star
How to Make It
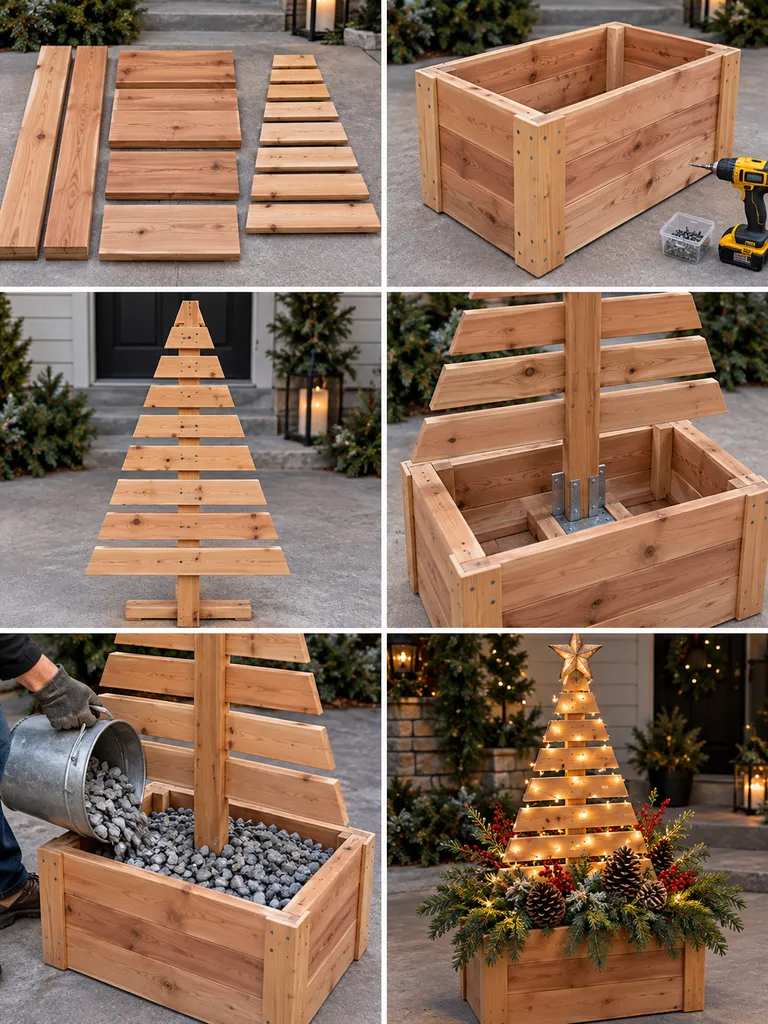
Cut the planter boards and assemble a strong rectangular box with reinforced corners. Build the narrow tree separately by fastening graduated slats to a central post. Stain the tree slightly darker than the planter, then secure the post inside the box with brackets. Add heavy gravel around the base for stability. Cover the visible gravel with evergreen and cedar cuttings, pinecones, and berry stems. Wrap warm micro lights through the wooden tree and finish the top with a simple carved star.
23. Large Wooden Christmas Yard Centerpiece
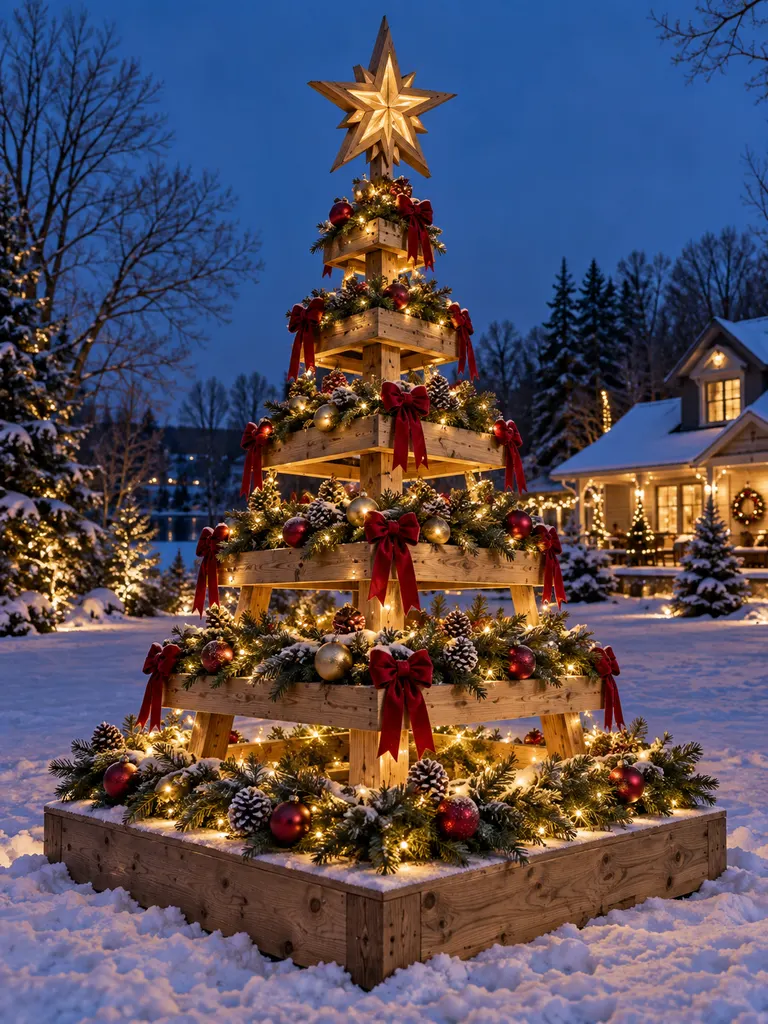
This final project is designed as the main focal point of a larger yard. Open square tiers create a distinctive architectural tree while still providing plenty of room for greenery, ornaments, bows, and lighting.
Materials Needed
- Heavy lumber for a square platform
- Central vertical support post
- Boards for graduated square tiers
- Diagonal brace lumber
- Exterior bolts and screws
- Wood stain or exterior sealer
- Evergreen garland
- Deep red outdoor bows
- Pinecones and outdoor ornaments
- Warm-white LEDs and oversized wooden star
How to Make It
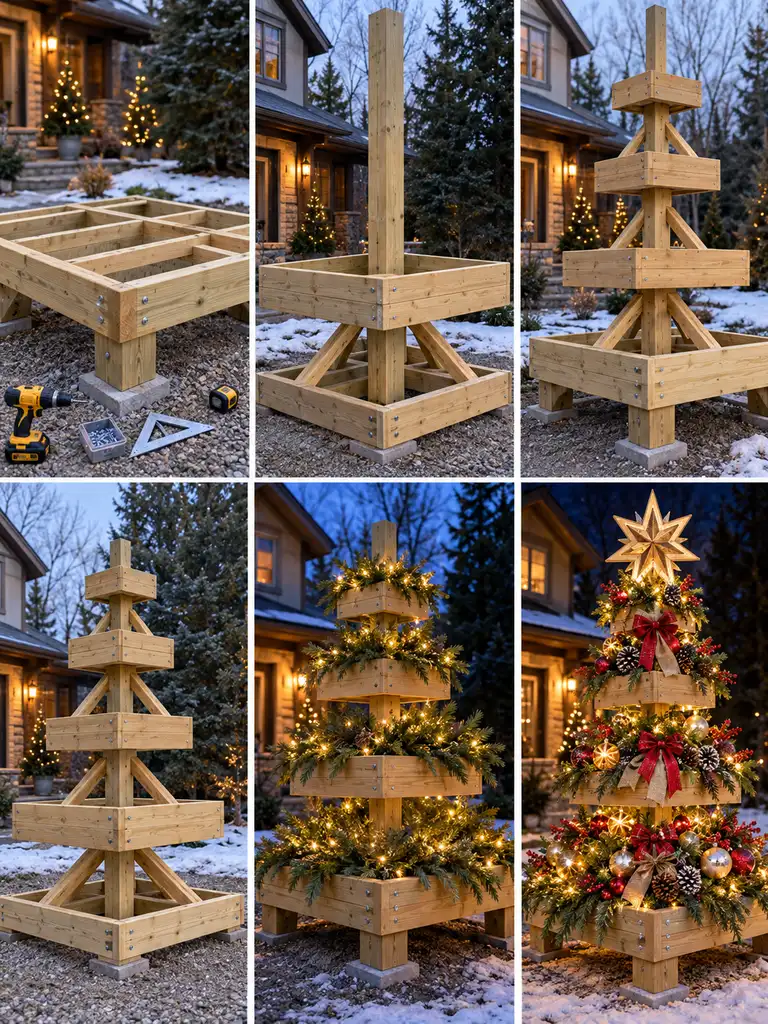
Build a strong square platform first and anchor the central support into it. Construct the largest open square tier near the bottom, brace it well, and add progressively smaller tiers as you move upward. Check the structure for movement before decorating. Weave evergreen garland around the tier edges while leaving substantial natural wood visible. Install warm lights first, then add pinecones, matte red and brushed-gold ornaments, and deep red bows. Crown the centerpiece with an oversized layered wooden star and place it on level ground.
Best Wood for Outdoor Christmas Decorations
Cedar is one of the easiest woods to use outdoors because it handles moisture well and weathers attractively. Pine is affordable, easy to cut, and ideal for beginner projects when it is sealed properly. Exterior-grade plywood works especially well for flat silhouettes such as reindeer, ornaments, village houses, and candy canes. Reclaimed pallet boards and scrap lumber are also excellent choices when you want a rustic finish, but inspect them carefully and avoid pieces that are rotten, moldy, chemically contaminated, or structurally weak.
How to Weatherproof Wooden Christmas Decorations
Sand exposed surfaces before painting or staining, and use exterior-grade products whenever the decoration will sit outside. Freshly cut edges deserve extra attention because they absorb moisture quickly. A clear outdoor sealer can protect stained or painted wood after the color has fully dried. Try to keep bases slightly above wet soil with feet, paving stones, or a stable platform. When the holiday season ends, let each decoration dry completely before storing it in a covered, ventilated location.
Outdoor Christmas Lighting Safety
Use only lights that are specifically rated for outdoor use. Keep plugs, battery packs, and electrical connections away from standing water, and protect connections from direct rain or snow whenever possible. Secure light strings so winter wind cannot pull them loose. Battery-operated outdoor lights are useful for decorations that sit far from an outlet. For wooden lanterns and enclosed decorations, use flameless LED candles rather than real flames. Large arches and tall centerpieces should also be checked for stability before lights and greenery are installed.
Final Thoughts
These DIY outdoor wooden Christmas decor ideas show how simple lumber, plywood, pallets, branches, and logs can become decorations that feel personal and reusable. Start with a straightforward project such as a star stake or scrap-wood tree, then move on to larger builds as your confidence grows. Adjust the dimensions, colors, greenery, and lighting to suit your own porch or garden rather than copying any example exactly. Even a few well-made wooden pieces can give an ordinary yard a warm, welcoming Christmas atmosphere.

