 Skip to content
There is something extra special about decorating for Christmas with pieces you made yourself. Handmade decorations bring warmth, personality, and a little story into every corner of your home. Better still, many beautiful Christmas decorations can be created using simple craft supplies such as jute rope, burlap, pinecones, wood slices, artificial greenery, berries, ribbons, ornaments, bells, and warm fairy lights.
These DIY Christmas Decor Ideas are designed for anyone who loves cozy, rustic, farmhouse, woodland, or traditional holiday decorating. Some projects are perfect for doors and walls, while others make charming table centerpieces, mantel decorations, or festive displays.
Each project includes a clear supply list and straightforward instructions so you can recreate the look at home. You can also customize the colors to coordinate with your existing Christmas decorations.
[Disclosure: This post may contain affiliate links. If you purchase through these links, we may earn a small commission at no extra cost to you. This helps support our content. If you want to read the boring stuff my full disclosure can be found here.]
1. Rustic Branch Christmas Ornament Tree
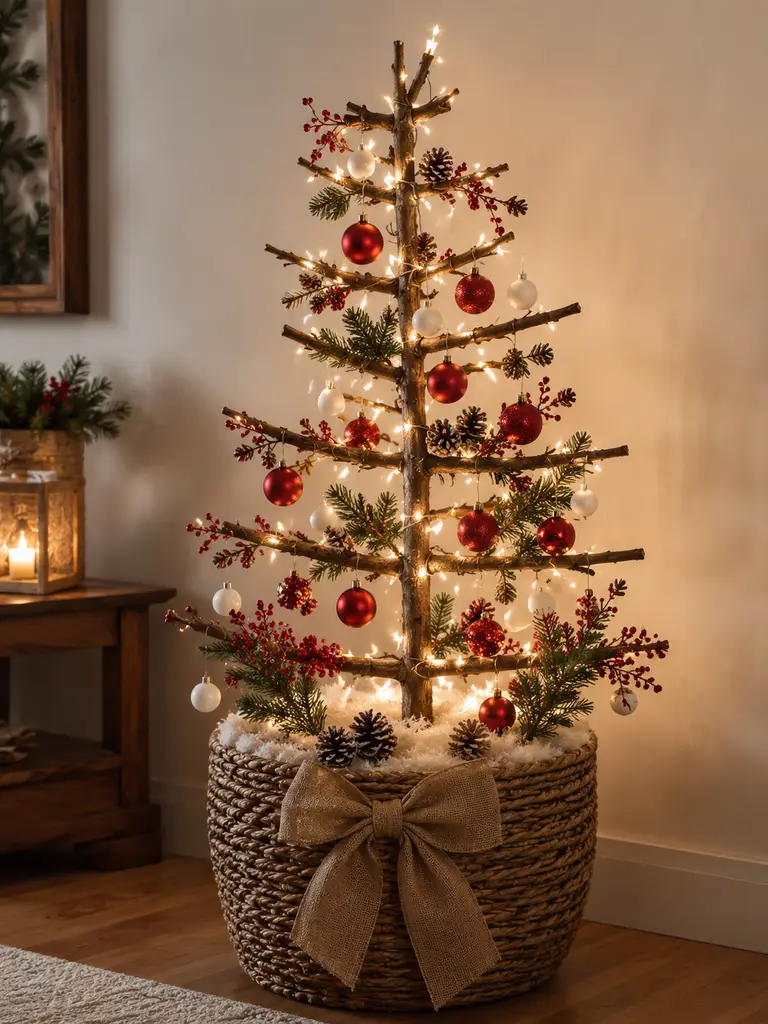
A rustic branch ornament tree gives you the sparkle of a Christmas tree without taking up as much visual space. Natural branches, warm lights, red and white ornaments, and a woven basket create an airy farmhouse look that works beautifully in an entryway or living-room corner.
Things You’ll Need
- Sturdy decorative branches
- Large woven basket or planter
- Floral foam
- Warm-white micro fairy lights
- Red and white shatterproof ornaments
- Artificial pine sprigs
- Red berry picks
- Faux snow
- Burlap ribbon
Friendly Supplies
- Battery-operated warm-white micro fairy lights
- Shatterproof red and white ornament set
- Artificial pine and berry picks
- Wide wired burlap ribbon
How to Make It
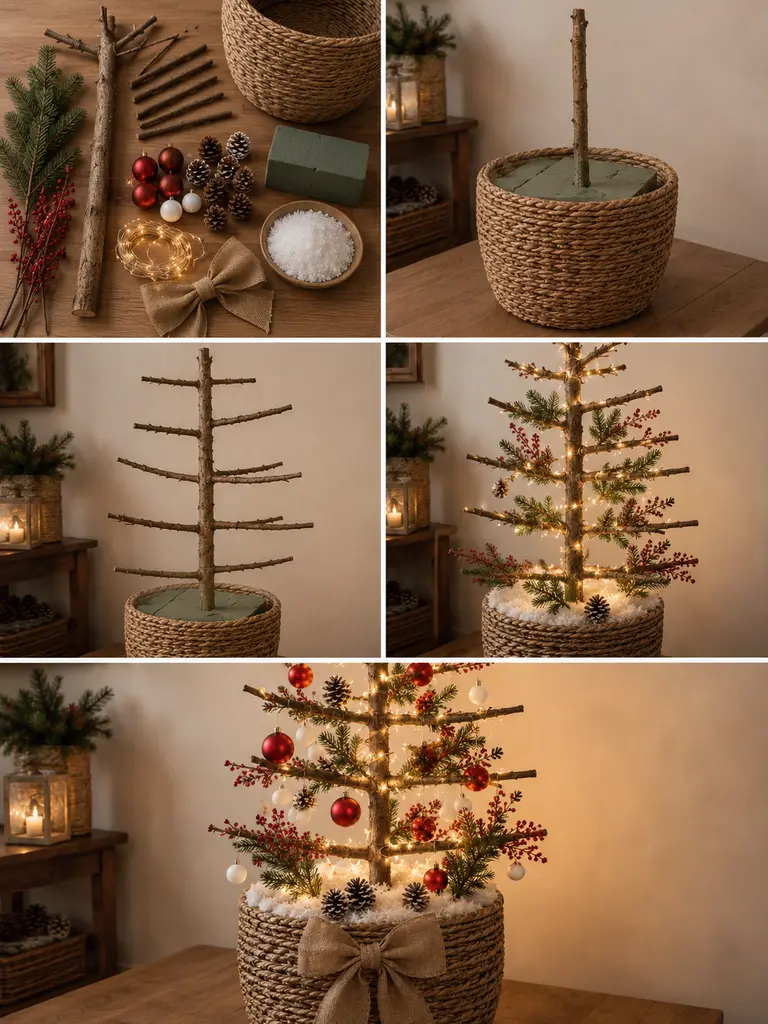
- Cut floral foam to fit tightly inside the basket.
- Insert the tallest branch in the center, then add smaller branches around it.
- Shape the branches into a loose tree silhouette.
- Wrap the trunk and branches with warm micro lights.
- Tuck pine sprigs and berry picks between selected branches.
- Hang ornaments at different heights so the tree feels balanced.
- Cover the foam with faux snow and finish the basket with a burlap bow.
DIY Tip: Keep the ornament palette to two or three colors for a more polished look.
2. Poinsettia and Bell Christmas Door Swag

Skip the traditional round wreath and make a lush poinsettia door swag instead. Pine greenery, red flowers, bells, berries, and hanging ornaments create a dramatic holiday accent for a front door or interior doorway.
Things You’ll Need
- Artificial pine stems
- Large faux poinsettias
- Red berry sprays
- Floral wire
- Decorative bells
- Red velvet ribbon
- Red and gold ornaments
- Wire cutters
- Door hook
Friendly Supplies
- Artificial Christmas pine spray bundle
- Large velvet poinsettia stems
- Gold Christmas bell set
- Wired velvet Christmas ribbon
How to Make It
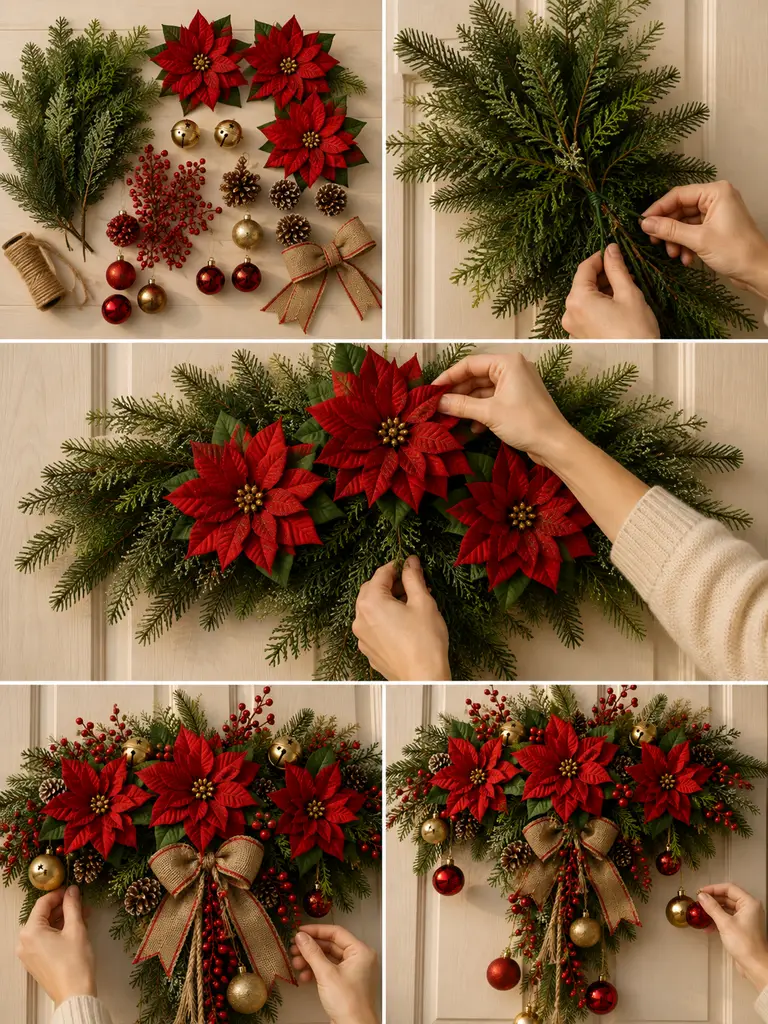
- Overlap several pine stems and secure them together with floral wire.
- Position three poinsettias across the greenery.
- Wire berry sprays between the flowers.
- Attach decorative bells below the poinsettias.
- Tie ornaments onto thin ribbon and hang them at staggered lengths.
- Add small velvet bows where needed.
- Attach a strong hanging loop and fluff the greenery before displaying.
DIY Tip: Wired ribbon holds its shape better and makes the swag look fuller.
3. Jute Hoop Poinsettia Door Hanging
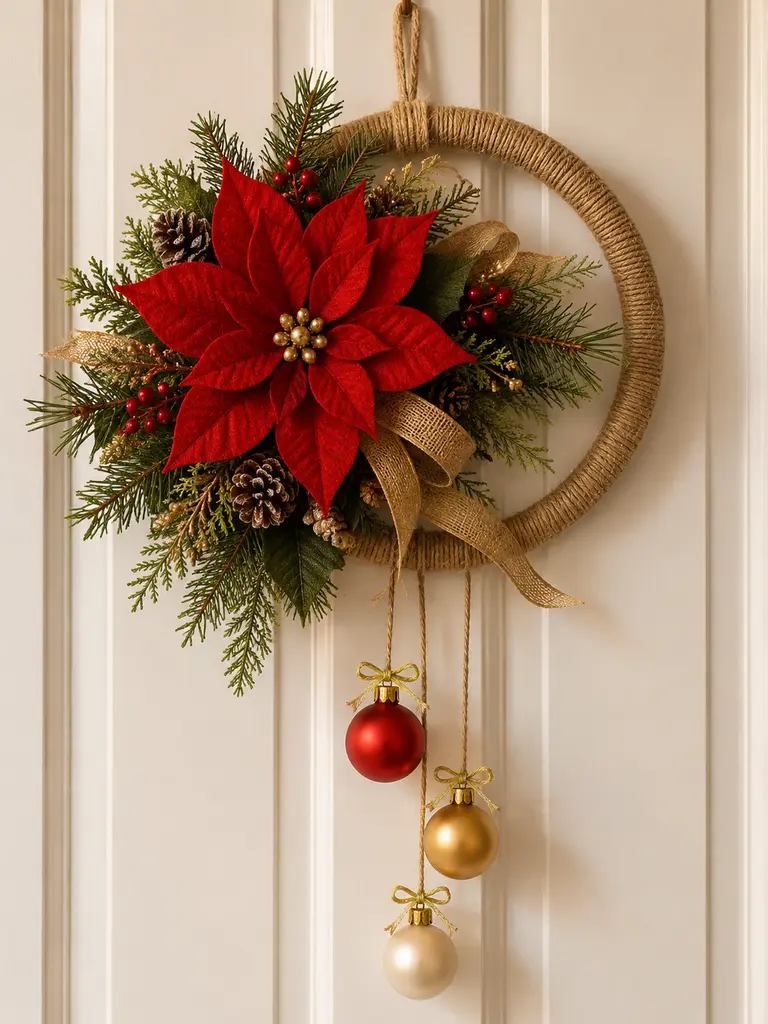
This lightweight hoop decoration combines rustic jute with a bold poinsettia and a few elegant hanging ornaments. It is easy to customize and looks especially pretty on white or neutral doors.
Things You’ll Need
- Metal or wooden hoop
- Natural jute rope
- Hot glue gun
- Artificial poinsettia
- Evergreen sprigs
- Gold wired ribbon
- Three lightweight ornaments
- Thin gold cord
Friendly Supplies
How to Make It
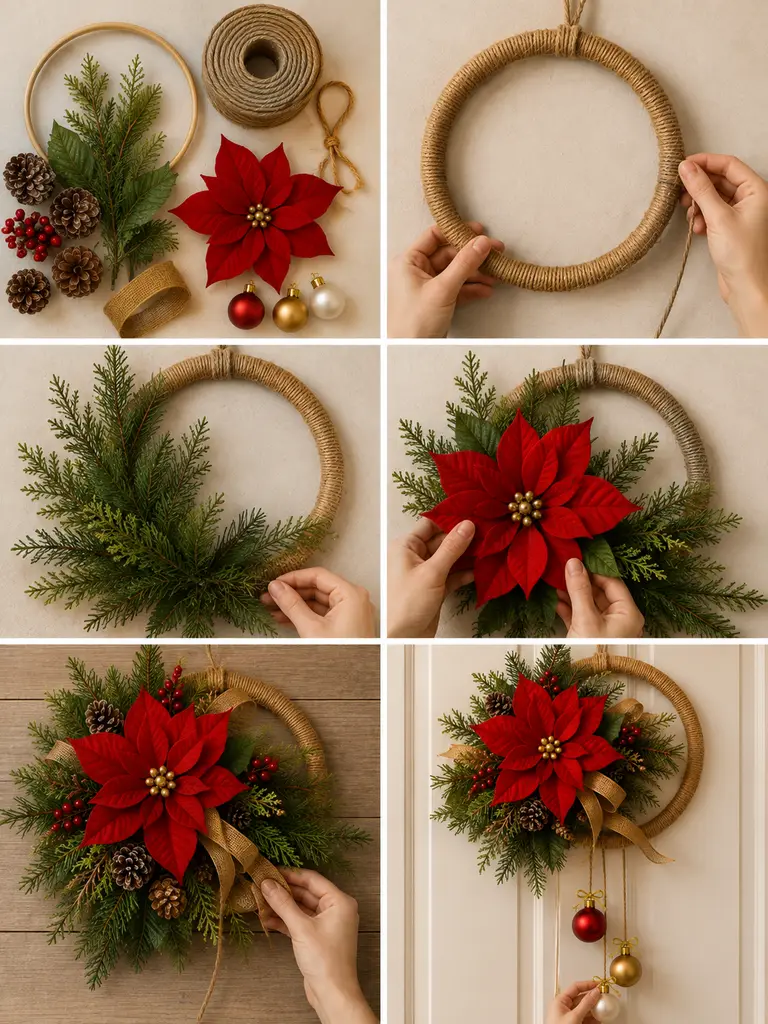
- Glue one end of the jute rope to the hoop.
- Wrap the hoop completely and secure the final end.
- Attach evergreen sprigs to the lower section.
- Place a large poinsettia over the stems.
- Add loose loops of gold ribbon behind the flower.
- Tie three ornaments to separate cords and attach them at different lengths.
- Add a jute hanging loop at the top.
DIY Tip: Use shatterproof ornaments so the decoration stays lightweight and door-safe.
4. Twine Ball Christmas Tabletop Tree
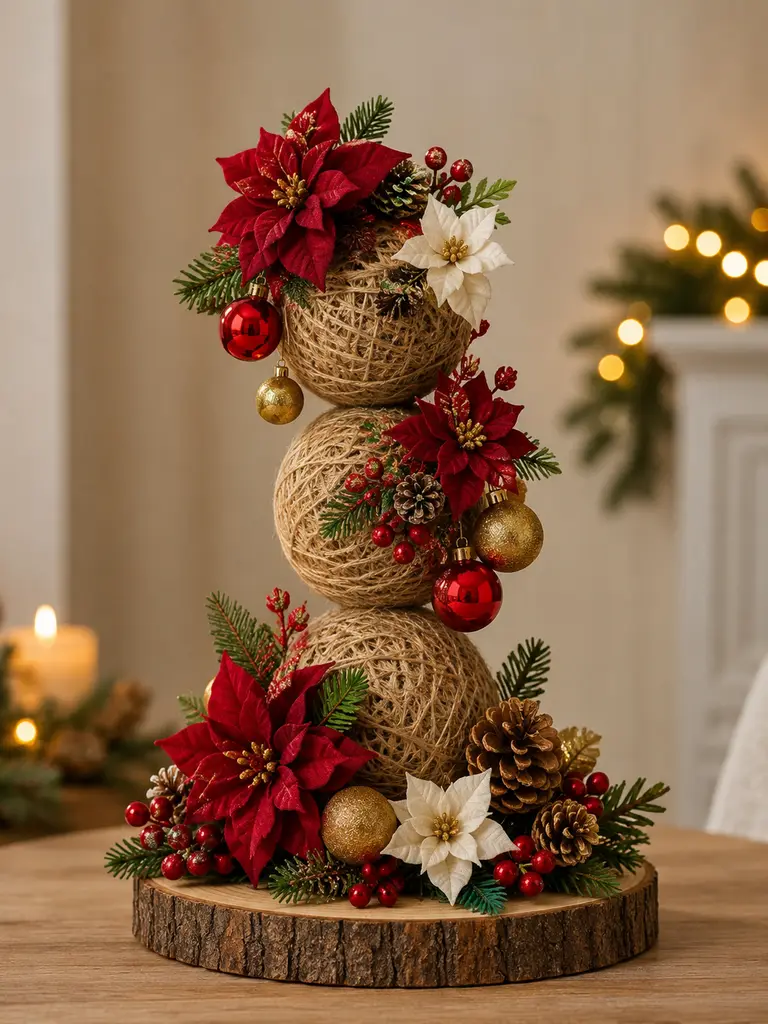
Three handmade twine spheres can become a sculptural tabletop Christmas tree with plenty of rustic texture. Add greenery, berries, pinecones, and ornaments to make it festive without losing the handmade look.
Things You’ll Need
- Jute twine
- Three balloons in different sizes
- White craft glue
- Disposable bowl
- Plastic wrap
- Hot glue gun
- Wood-slice base
- Mini greenery
- Pinecones
- Small ornaments
Friendly Supplies
How to Make It
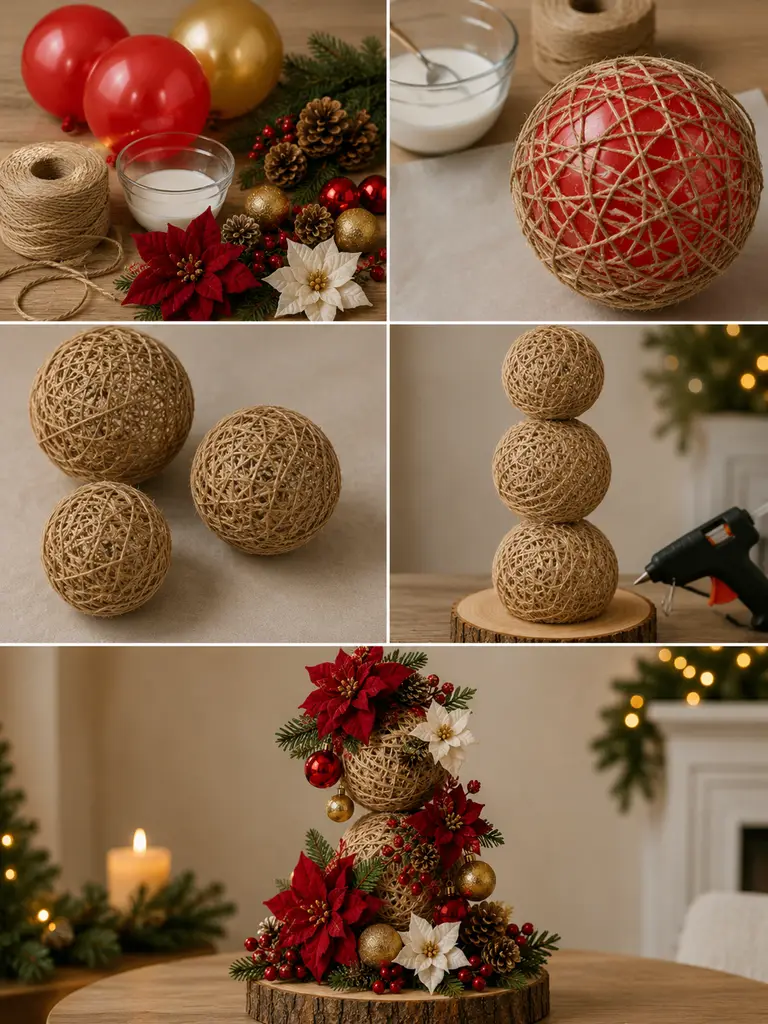
- Inflate three balloons in progressively smaller sizes.
- Thin craft glue slightly with water and soak sections of twine.
- Wrap the glue-coated twine around each balloon.
- Allow the spheres to dry completely, then pop and remove the balloons.
- Stack the spheres from largest to smallest and secure them with hot glue.
- Attach the tree to a wood-slice base.
- Decorate with greenery, berries, pinecones, flowers, and miniature ornaments.
DIY Tip: Leave visible gaps between the twine strands so the openwork texture remains attractive.
5. Burlap Christmas Bouquet Wall Art
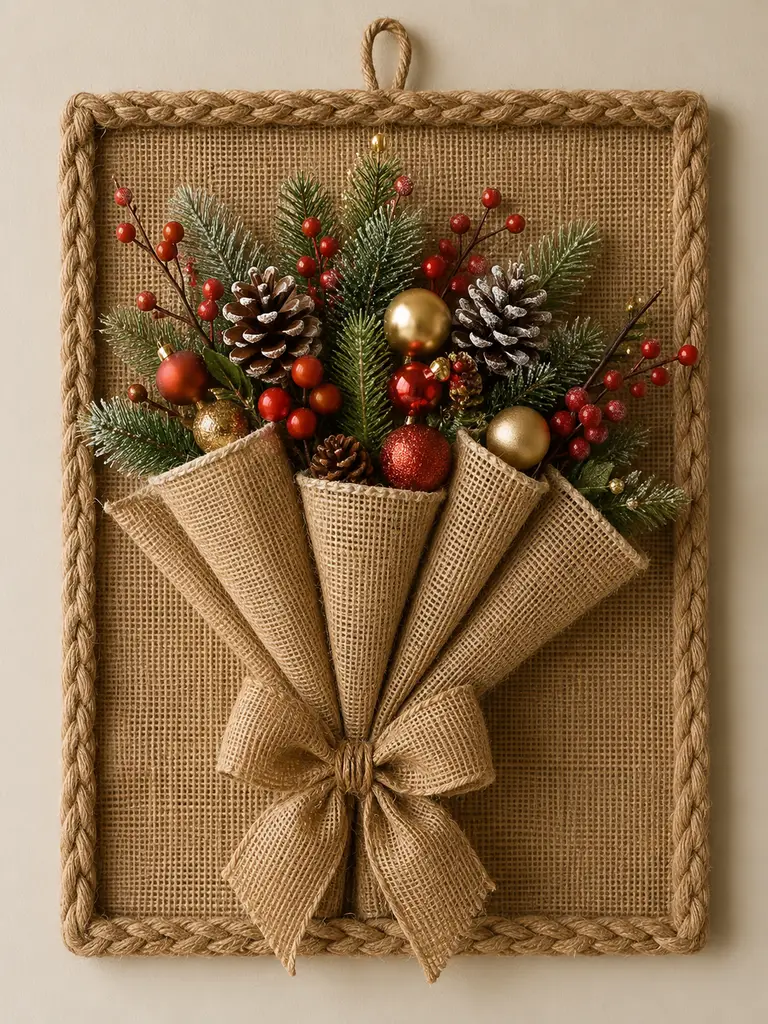
Turn burlap into dimensional wall art by creating folded pockets that hold greenery, pinecones, berries, and ornaments. The result looks like a rustic Christmas bouquet displayed inside a textile frame.
Things You’ll Need
- Rectangular rigid board
- Burlap fabric
- Thick jute rope
- Hot glue
- Pinecones
- Evergreen stems
- Berry clusters
- Small ornaments
- White fabric paint
- Hanging hardware
Friendly Supplies
How to Make It
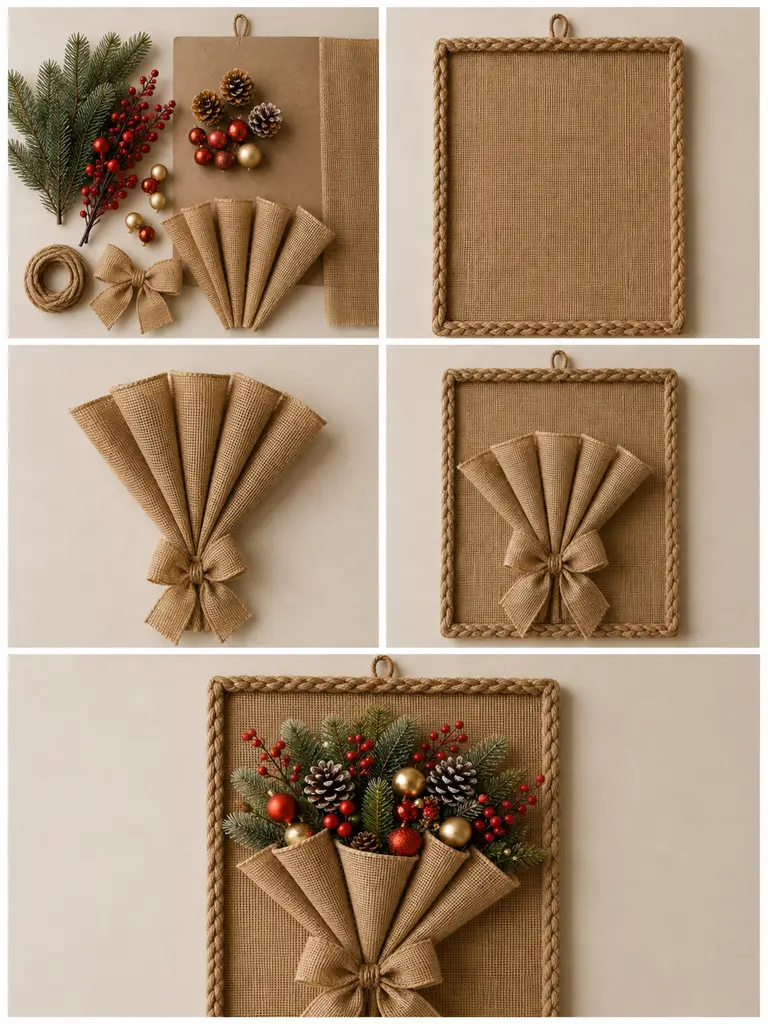
- Cover the backing board with burlap.
- Glue jute rope around the outer edge as a frame.
- Cut several pieces of burlap and roll them into cone-shaped pockets.
- Arrange the pockets in a fan across the lower half of the board.
- Fill them with evergreen stems, pinecones, berries, and ornaments.
- Add small painted snowflake accents if desired.
- Attach sturdy hanging hardware to the back.
DIY Tip: Mix matte, shiny, and natural textures so the arrangement has depth.

🎄 600+ Christmas Printable Sticker Mega Bundle
Get 12 festive collections packed with 600+ Christmas stickers for planners, crafts, gift tags, baking, journaling and more.
Only $4.99
🎁 Get the Mega Bundle6. Round Burlap Evergreen Wall Pocket
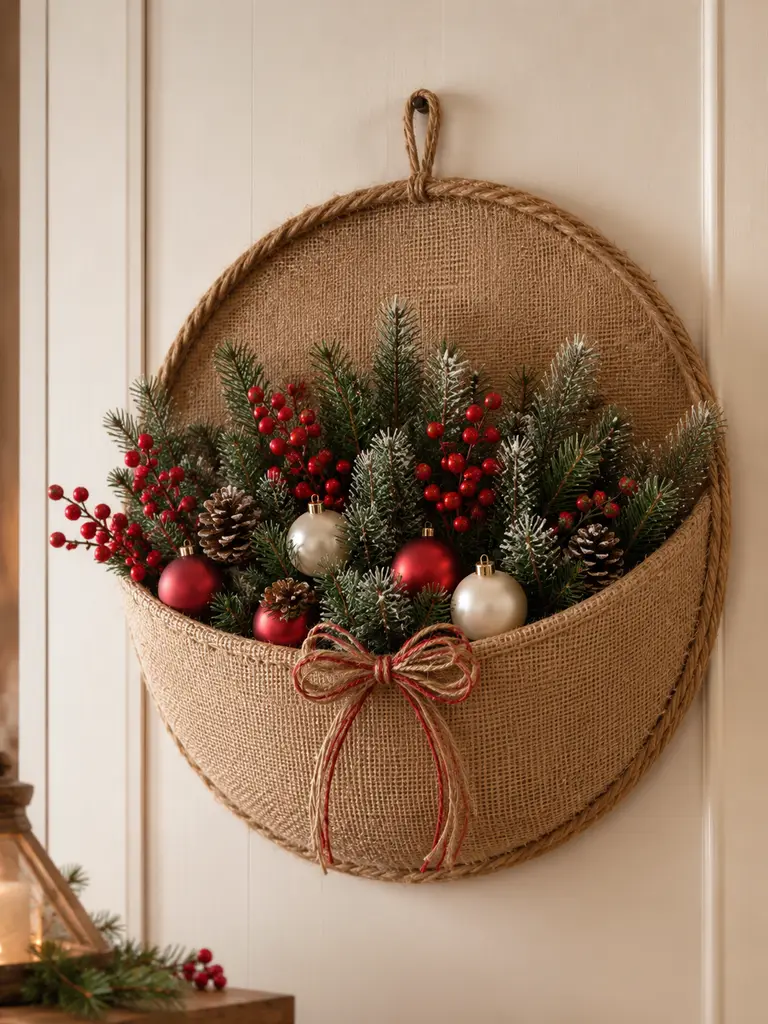
A round burlap wall pocket is a softer alternative to a wreath. Frosted greenery, red berries, pinecones, and ornaments spill from the pocket while the rope-trimmed hoop keeps the design neat and rustic.
Things You’ll Need
- Large embroidery hoop
- Burlap fabric
- Extra burlap for pocket
- Hot glue
- Evergreen picks
- Frosted pine stems
- Red berries
- Red and cream ornaments
- Pinecones
- Decorative twine
Friendly Supplies
How to Make It
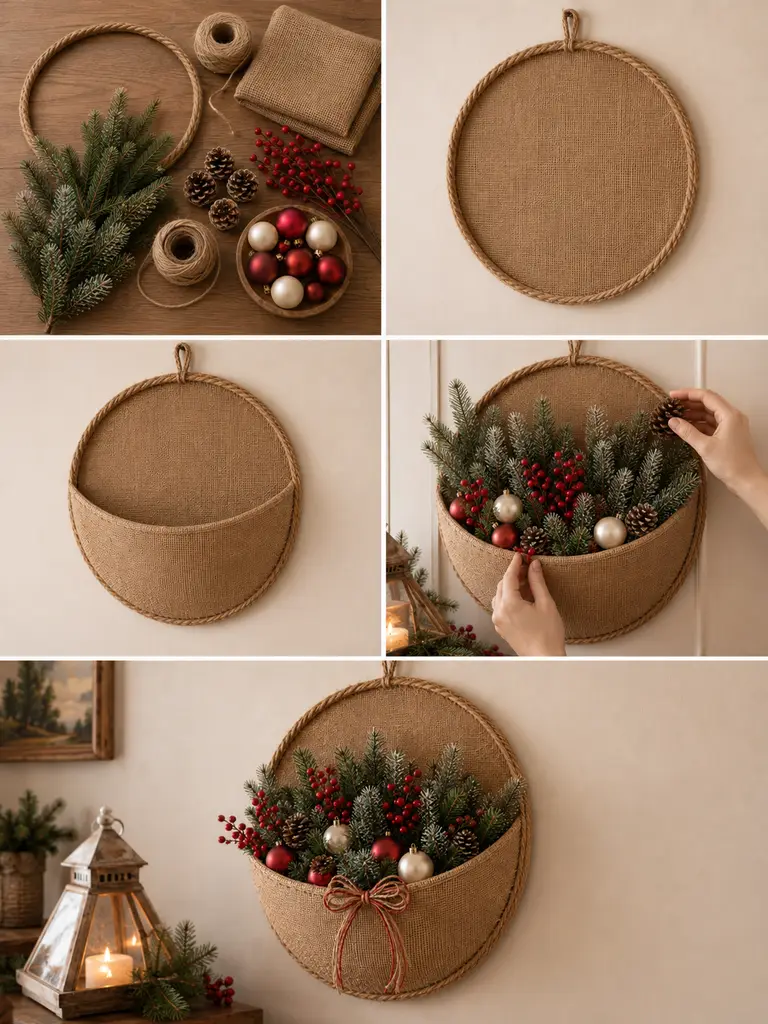
- Stretch burlap tightly across the embroidery hoop.
- Trim the excess fabric.
- Cut another piece of burlap into a semicircle.
- Glue the semicircle across the lower half to make a pocket.
- Arrange tall greenery at the back and shorter pieces toward the front.
- Add berry stems, pinecones, and ornaments.
- Finish with decorative twine and a hanging loop.
DIY Tip: Build from tallest at the back to shortest at the front so the pocket looks full, not bulky.
7. Rope Hoop Christmas Fairy-Light Hanging
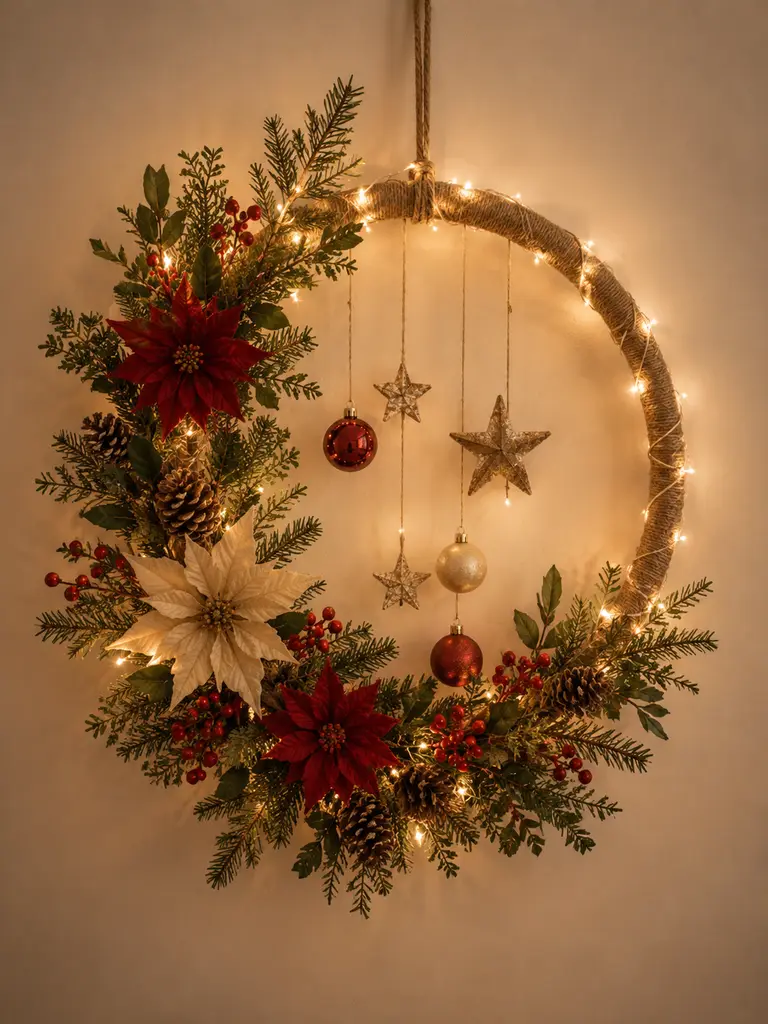
Warm fairy lights transform a simple rope-wrapped hoop into glowing Christmas wall décor. The asymmetrical greenery makes the project feel modern while poinsettias, pinecones, and ornaments keep it festive.
Things You’ll Need
- Large metal hoop
- Jute rope
- Warm fairy lights
- Evergreen branches
- Red and cream poinsettias
- Pinecones
- Red berries
- Floral wire
- Hanging ornaments
Friendly Supplies
How to Make It
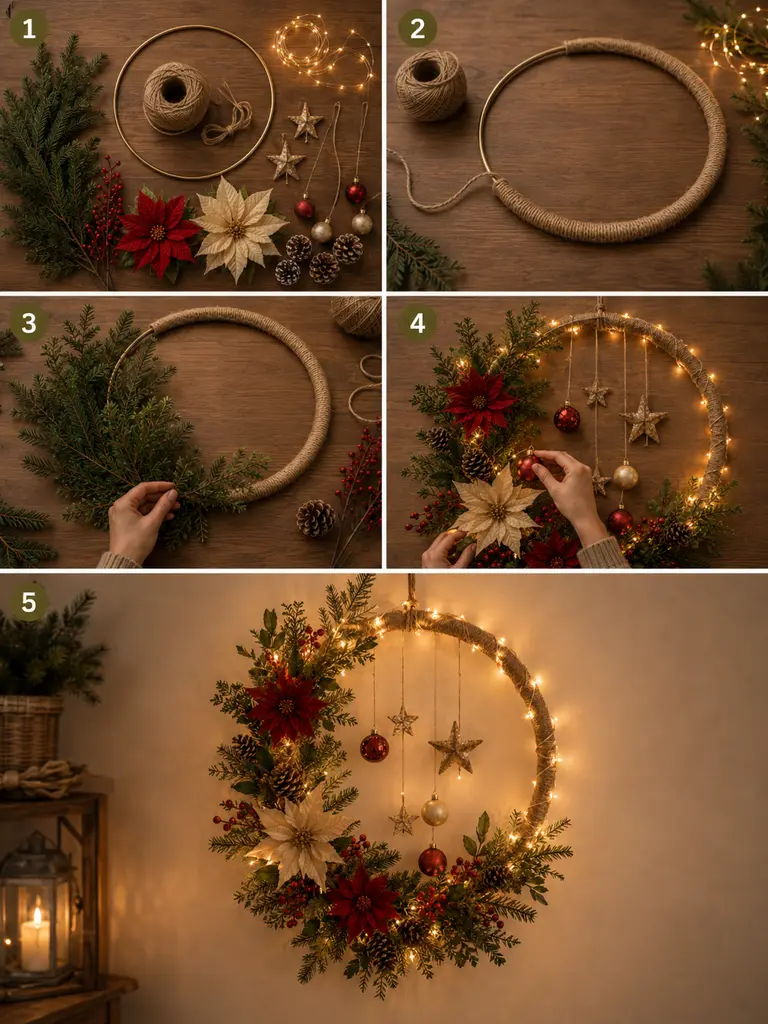
- Wrap the hoop with jute rope.
- Wind fairy lights around the hoop and test them.
- Wire greenery along one side and across part of the bottom.
- Add poinsettias at three different points.
- Fill gaps with pinecones and berry sprigs.
- Suspend several ornaments or stars inside the hoop.
- Hide the battery box behind the foliage and attach a hanging loop.
DIY Tip: Keep the battery box reachable so the lights are easy to switch on and replace.
More Festive Ideas

23 Easy DIY Christmas Village Houses Ideas for Festive Holiday Decor

24 Enchanting DIY Halloween Houses Ideas for Spooky Fall Decor

23 Easy DIY Outdoor Wooden Christmas Decor Ideas for a Festive Yard

23 Crochet Christmas Tree Ideas for Festive Home Decor

23 Creative DIY Winter Door Hanger Ideas You Can Make at Home

23 Creative DIY Christmas Wreath From Paper Ideas for Festive Decorating
8. Painted Pinecone Christmas Starburst
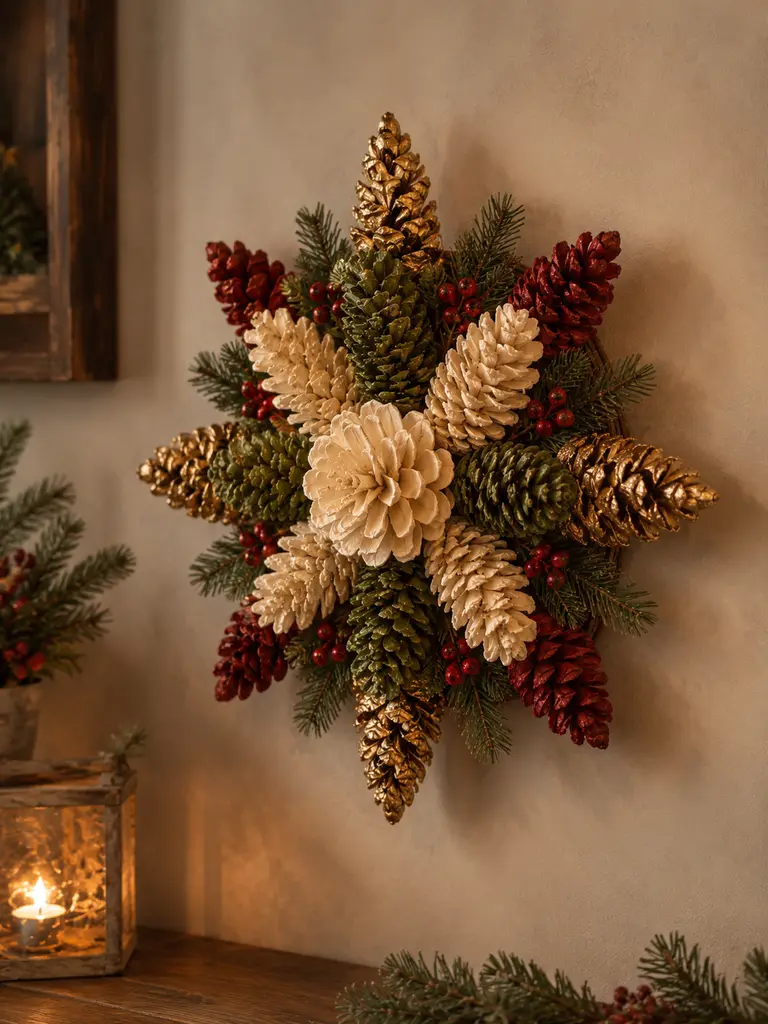
Painted pinecones become dramatic wall décor when arranged in a symmetrical starburst. Deep red, forest green, cream, and metallic gold create a traditional Christmas palette with a handcrafted twist.
Things You’ll Need
- Large pinecones
- Red, green, cream, and gold acrylic paint
- Paintbrushes
- Round wood or cardboard base
- Evergreen sprigs
- Red berries
- Hot glue gun
- Hanging hardware
Friendly Supplies
How to Make It
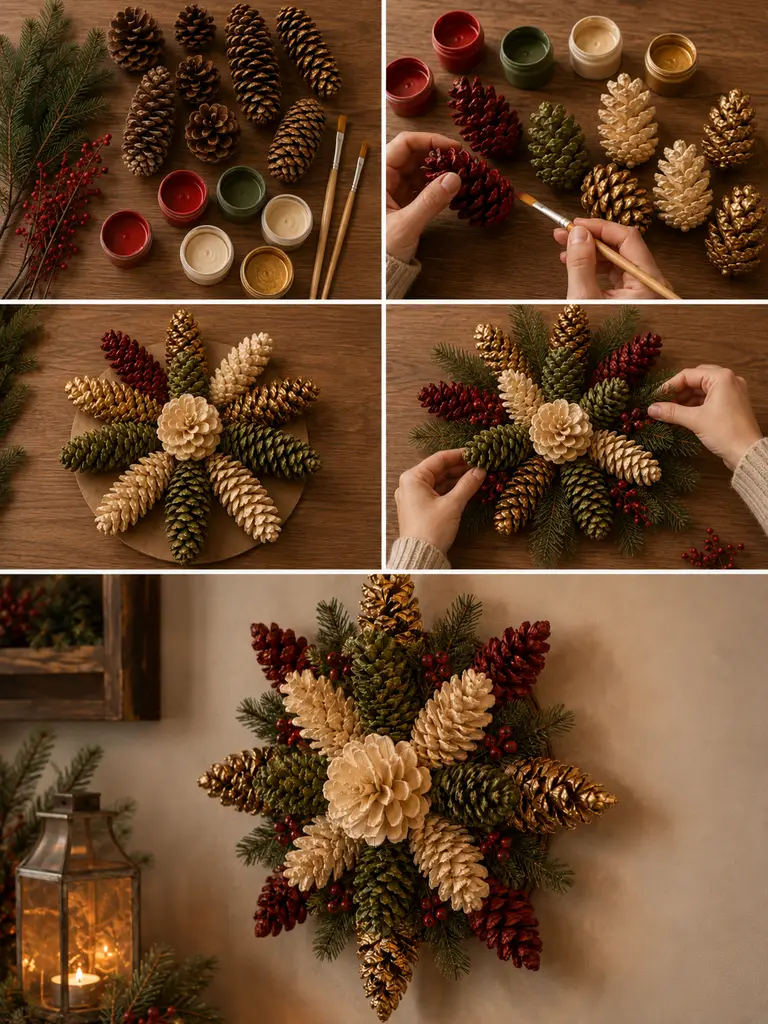
- Clean and dry the pinecones thoroughly.
- Paint groups of pinecones in the four chosen colors.
- Let all pieces dry completely.
- Arrange the pinecones radially on the round base before gluing.
- Glue each cone securely in place.
- Tuck evergreen sprigs and berries between selected cones.
- Attach strong hanging hardware to the back.
DIY Tip: Dry-brush metallic paint only onto the tips for a more refined finish.
9. Wood Slice Snowman Table Decor
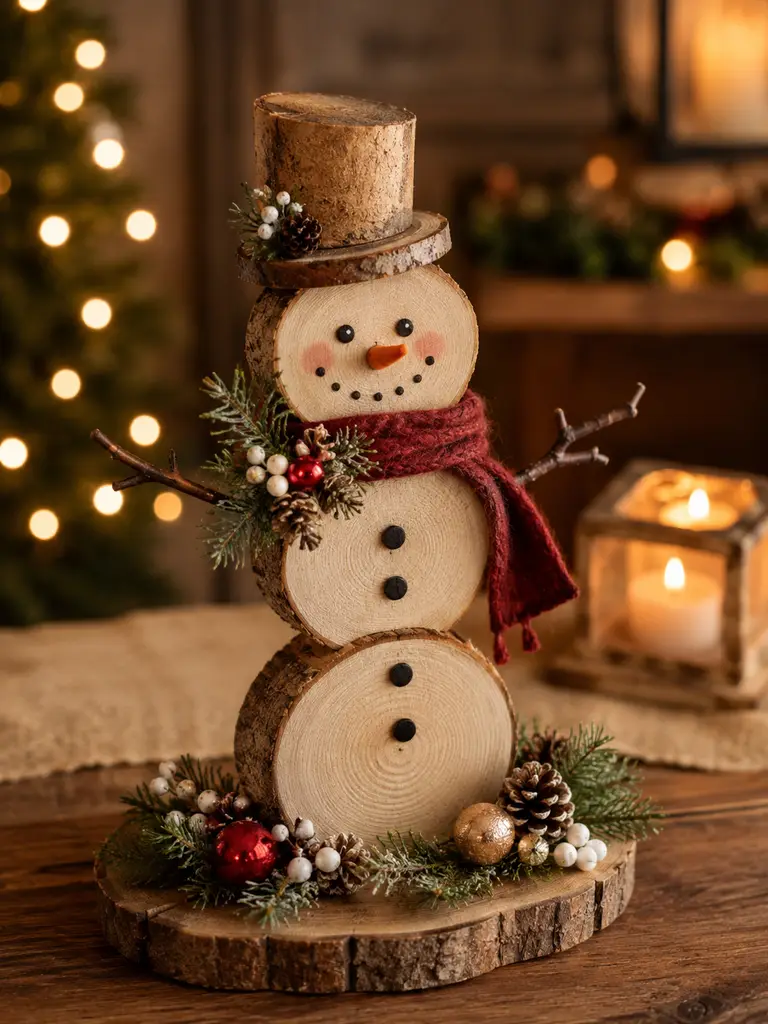
Wood slices make a cheerful snowman while keeping the rustic grain visible. A scarf, twig arms, greenery, and tiny ornaments turn this simple craft into a charming mantel or tabletop decoration.
Things You’ll Need
- Three graduated wood slices
- Thick wood-slice base
- Wood glue
- Black and orange acrylic paint
- Twig arms
- Small hat pieces
- Red scarf fabric
- Evergreen sprigs
- Mini ornaments
- Pinecones
Friendly Supplies
- Natural wood slice craft pack
- Acrylic paint marker set
- Artificial mini pine stems
- Strong wood craft adhesive
How to Make It
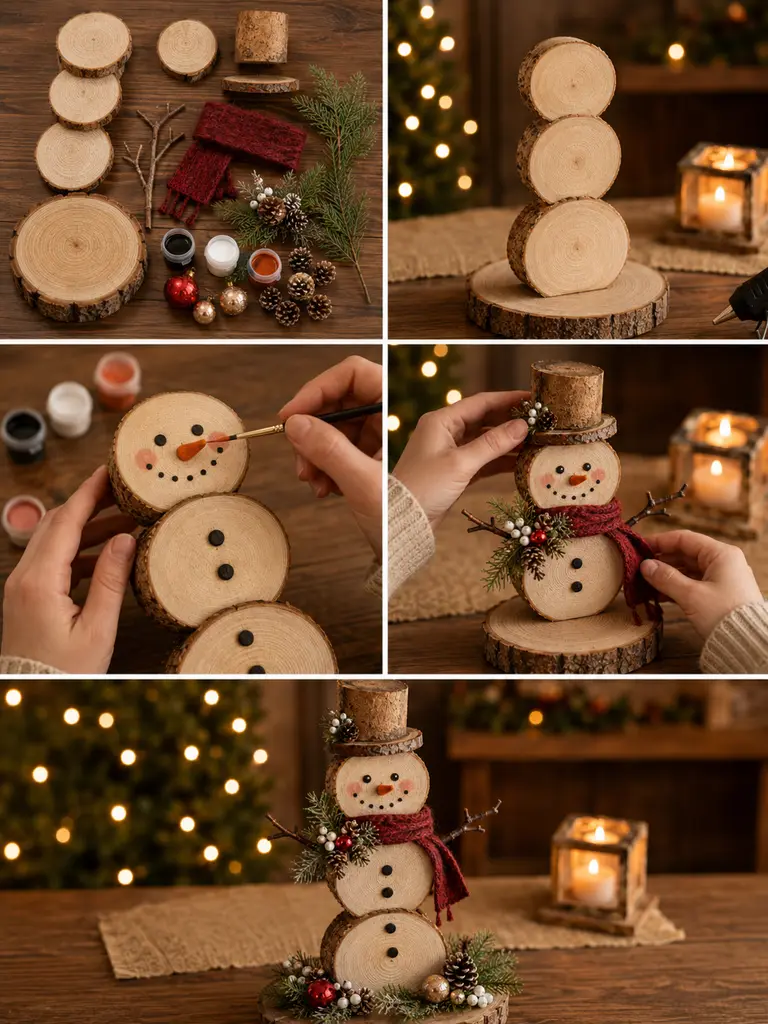
- Glue the largest wood slice upright onto the base.
- Attach the medium and small slices above it.
- Paint eyes, buttons, a dotted smile, and an orange carrot nose.
- Add twig arms to the sides.
- Create a small hat and attach it to the head.
- Wrap a scarf around the neck.
- Decorate the base with greenery, berries, pinecones, and mini ornaments.
DIY Tip: A clear matte craft sealer helps protect the painted face for future Christmas seasons.
10. Christmas Poinsettia Candle Centerpiece

A glass hurricane candle surrounded by poinsettias, pine, berries, and ornaments creates a dramatic holiday centerpiece. It works beautifully on a dining table, coffee table, or entry console.
Things You’ll Need
- Glass hurricane candle holder
- Flameless pillar candle
- Floral foam ring
- Red and cream poinsettias
- Evergreen stems
- Berry sprays
- Pinecones
- Red and gold ornaments
- Decorative leaves
- Floral wire
Friendly Supplies
- Glass hurricane candle holder
- Flameless LED pillar candle
- Artificial poinsettia picks
- Floral foam wreath ring
How to Make It
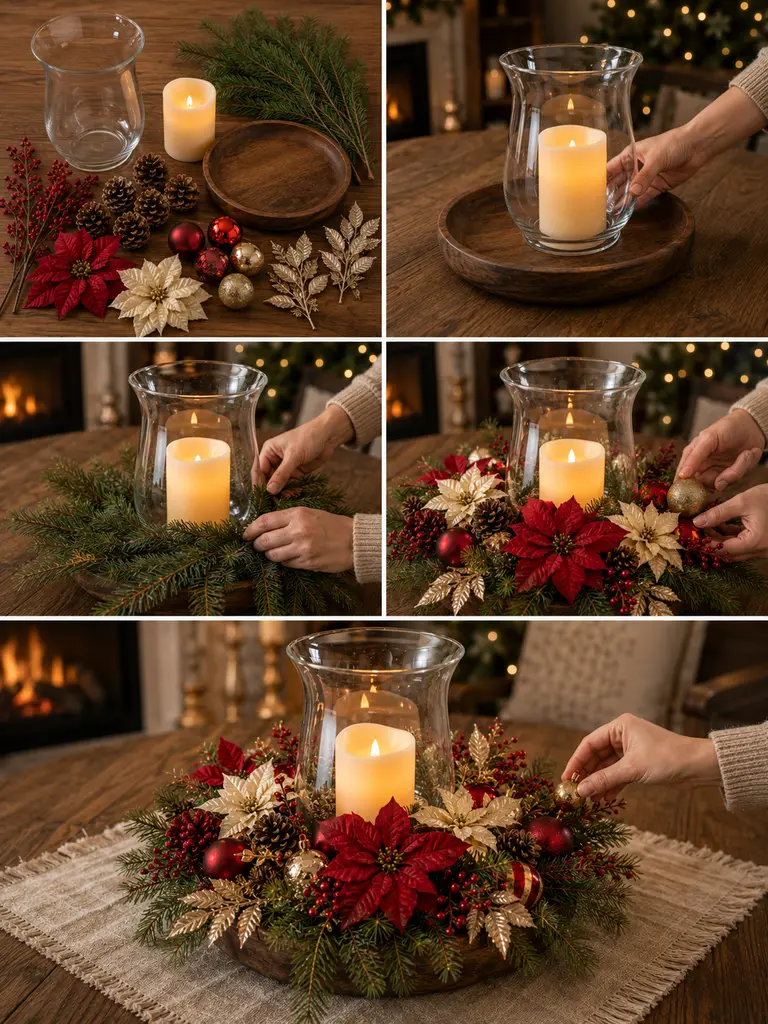
- Place the hurricane holder inside the floral foam ring.
- Insert evergreen stems evenly around the base.
- Position large poinsettias around the arrangement.
- Add decorative leaves, berries, and pinecones.
- Fill open spaces with red and gold ornaments.
- Secure loose pieces with floral wire.
- Place the flameless candle inside the glass and adjust the centerpiece from every side.
DIY Tip: Use flameless candles whenever fabric, greenery, or pinecones sit close to the candle holder.
11. Jute Rope Reindeer Christmas Family
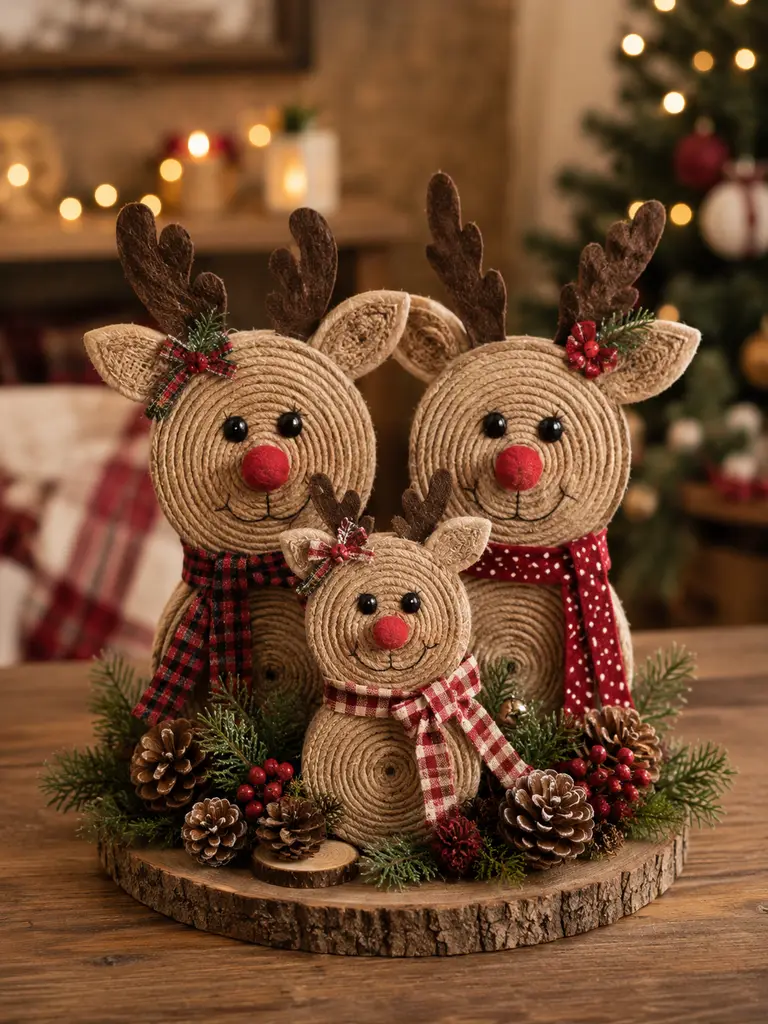
Coiled jute rope turns into an adorable reindeer family when paired with felt antlers, bead eyes, red noses, and gingham scarves. Group three different sizes together on a wood slice for a playful rustic display.
Things You’ll Need
- Thick jute cord
- Cardboard circles
- Hot glue
- Brown felt
- Black beads
- Red pom-poms
- Gingham ribbon
- Evergreen sprigs
- Pinecones
- Wood-slice base
Friendly Supplies
How to Make It
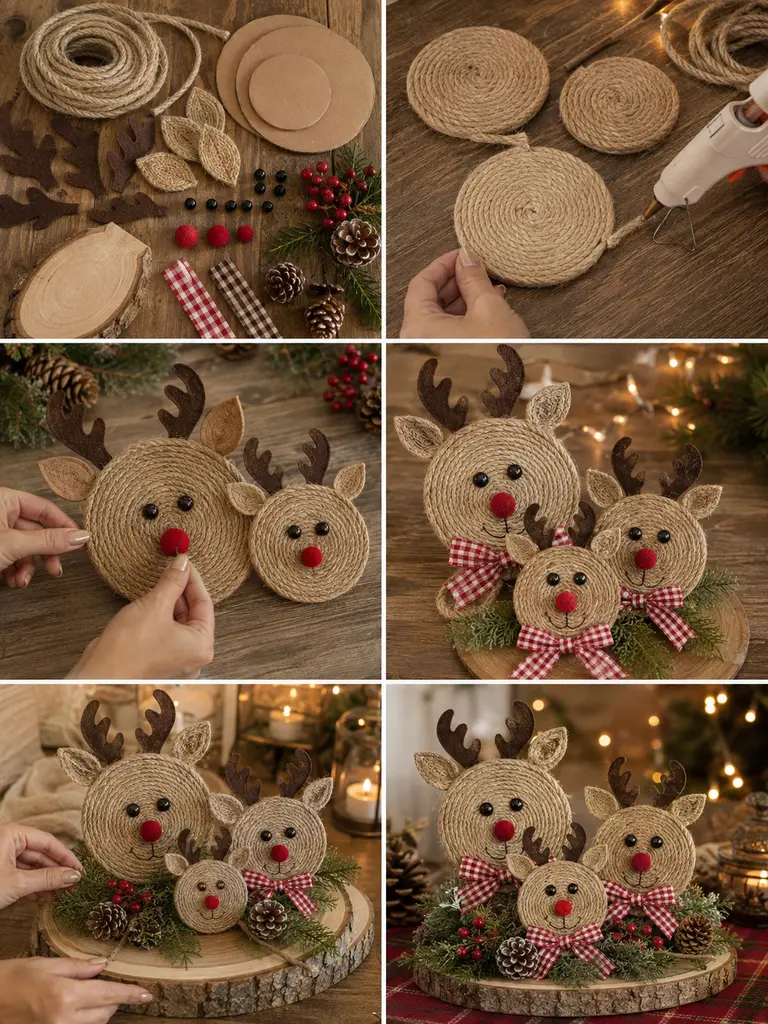
- Cut cardboard circles in several sizes for heads and bodies.
- Coil jute rope tightly over each circle and glue as you work.
- Cut ears and antlers from felt.
- Attach bead eyes and red pom-pom noses.
- Add ribbon scarves or bows.
- Arrange the three reindeer on the wood-slice base.
- Fill around them with greenery, berries, and pinecones.
DIY Tip: Vary the reindeer sizes and scarf patterns so the trio feels like a family.

🎄 600+ Christmas Printable Sticker Mega Bundle
Get 12 festive collections packed with 600+ Christmas stickers for planners, crafts, gift tags, baking, journaling and more.
Only $4.99
🎁 Get the Mega Bundle12. Felt Christmas Lantern Wall Banner
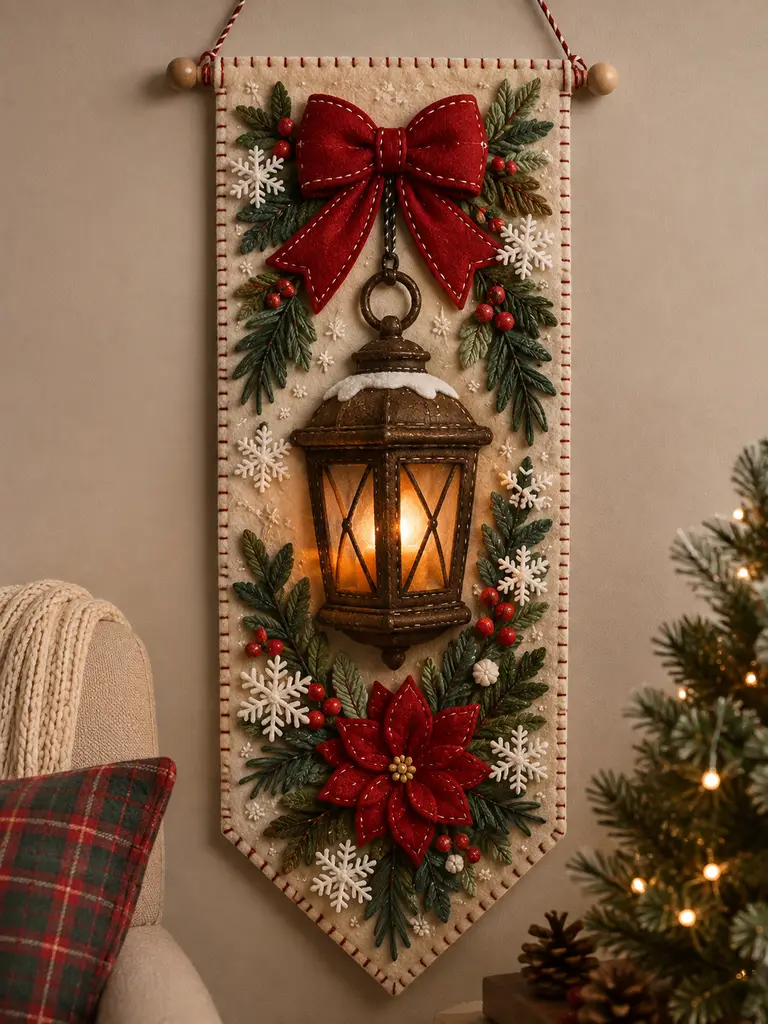
Layered felt creates a soft, dimensional Christmas banner with a glowing lantern as the centerpiece. A large red bow, evergreen appliqué, berries, and snowflakes make the finished piece cozy and detailed.
Things You’ll Need
- Cream felt
- Red felt
- Brown felt
- Green felt
- White felt
- Embroidery thread
- Fabric glue
- Wooden dowel
- Twine
- Mini warm LED light
Friendly Supplies
How to Make It
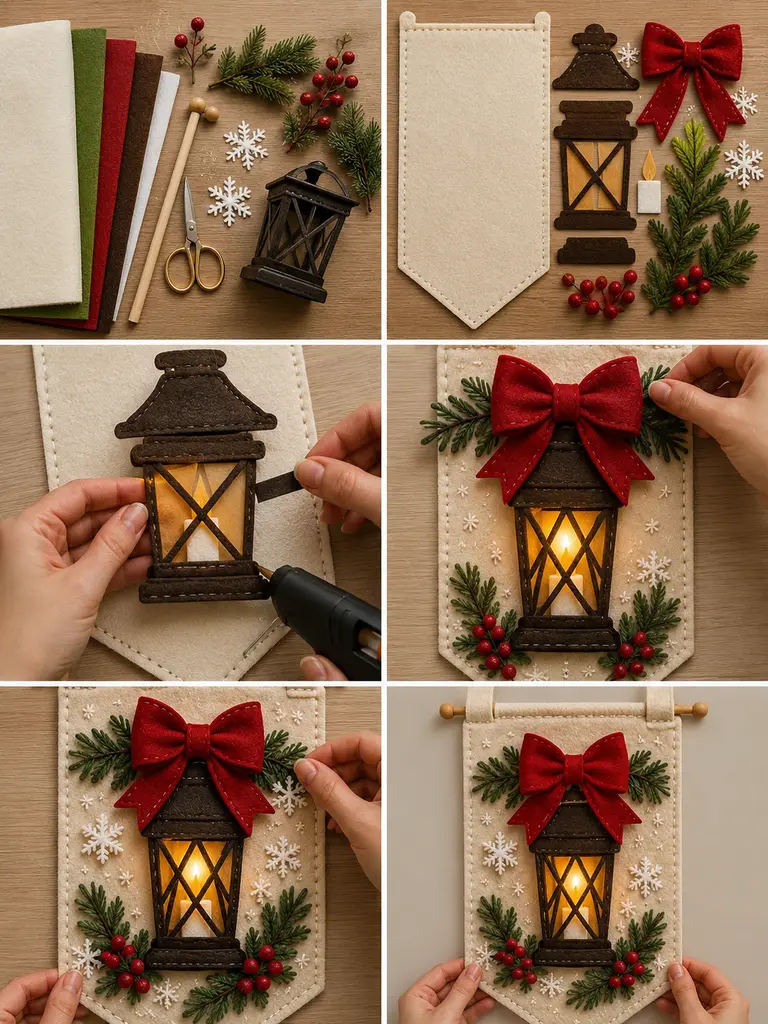
- Cut the cream felt into a long pointed banner.
- Stitch or glue a neat border around the edge.
- Cut and layer the brown lantern pieces in the center.
- Add a warm LED behind the lantern window if desired.
- Make a large red felt bow and attach it above the lantern.
- Add evergreen leaves, berries, and white snowflakes.
- Attach the top to a wooden dowel and add a hanging cord.
DIY Tip: Blanket stitching around appliqué pieces gives the banner a polished handmade finish.
13. Twig Frame Snowman Winter Scene
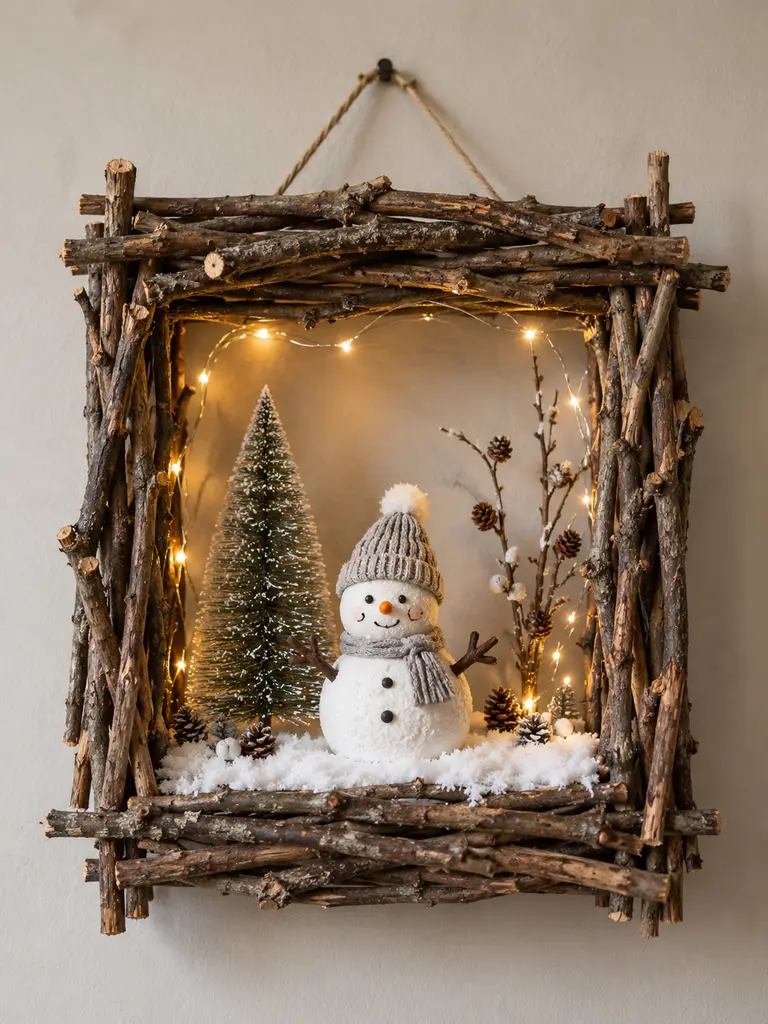
Create a miniature winter scene inside a rough twig frame using a handmade snowman, bottle-brush tree, faux snow, and tiny warm lights. It is perfect for woodland and rustic Christmas interiors.
Things You’ll Need
- Decorative twigs
- Rigid backing board
- Hot glue
- Air-dry clay
- Faux snow
- Bottle-brush tree
- Warm micro lights
- Acrylic paint
- Small pinecones
Friendly Supplies
- Natural craft twig bundle
- Air-dry modeling clay
- Bottle-brush Christmas tree set
- Artificial craft snow
How to Make It
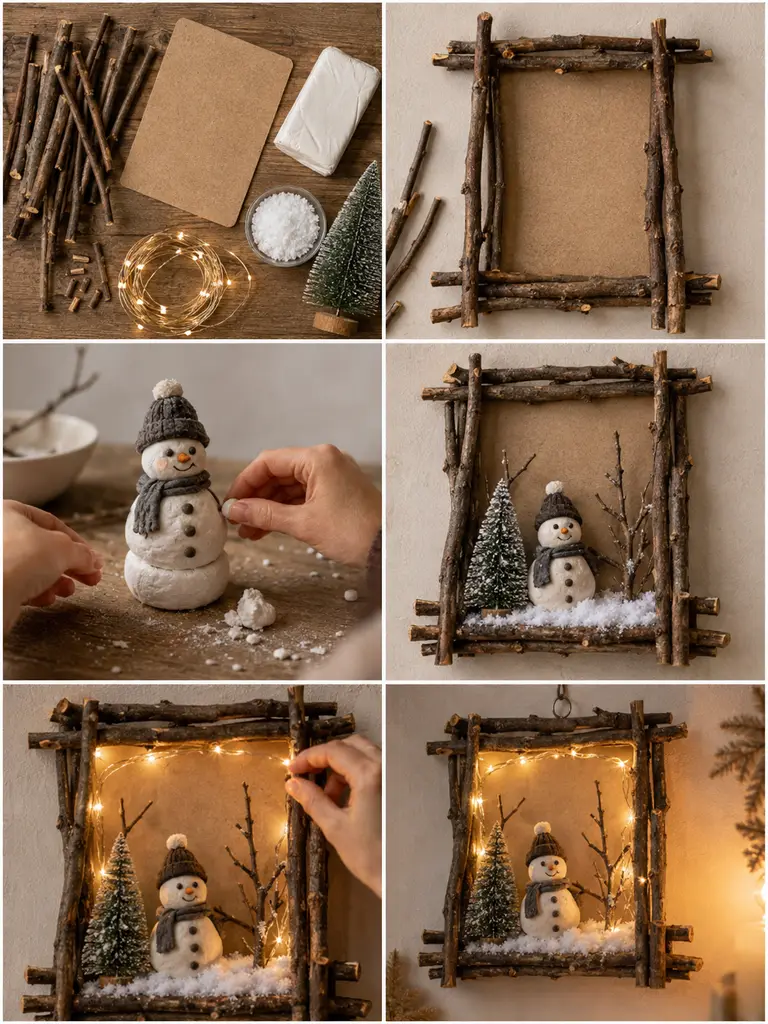
- Arrange twigs into a rectangular frame and glue the layers together.
- Attach a lightweight backing behind the frame.
- Shape a small snowman from air-dry clay and let it dry.
- Paint the face and accessories.
- Add faux snow along the bottom and place a bottle-brush tree beside the snowman.
- Add tiny pinecones or bare winter branches.
- Run warm micro lights around the inside edge of the frame.
DIY Tip: Mix thin and medium twigs so the frame looks naturally layered rather than uniform.
14. Pouring Mug Christmas Snow Scene
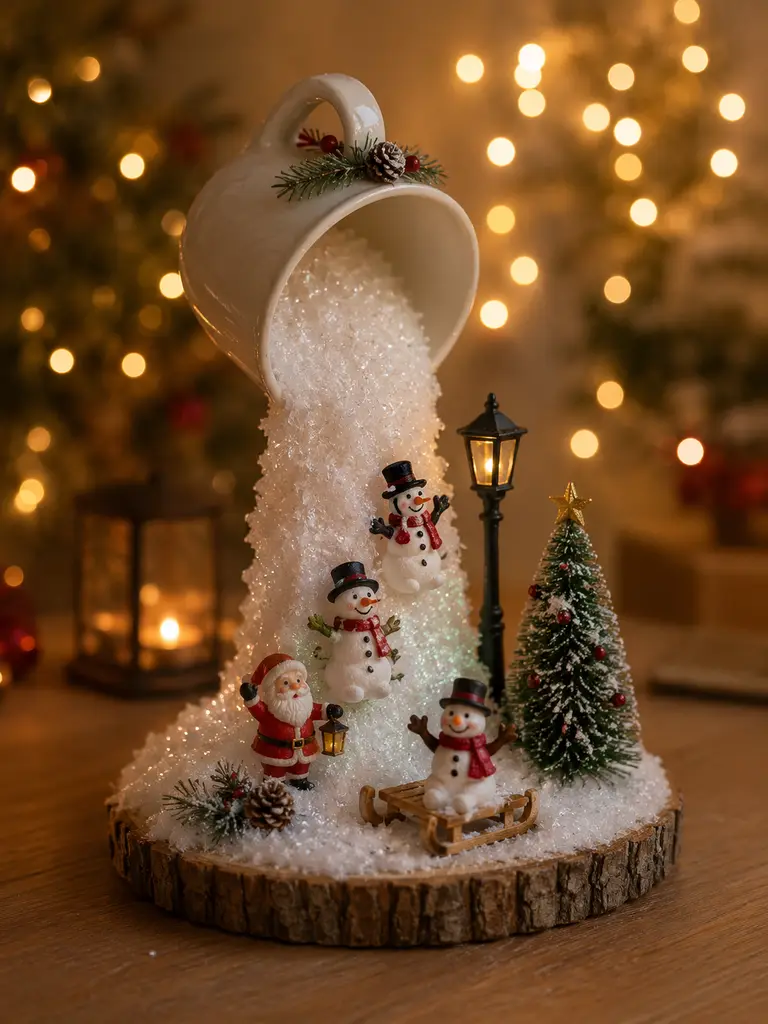
This illusion craft makes a mug appear to pour a sparkling stream of snow into a tiny Christmas world below. Mini snowmen, Santa, a lamppost, and a little tree make the scene especially whimsical.
Things You’ll Need
- Lightweight mug
- Heavy-gauge craft wire
- Wood-slice base
- Strong hot glue
- Faux snow crystals
- Mini snowmen
- Mini Santa
- Bottle-brush tree
- Mini lamppost
- Pinecones
Friendly Supplies
How to Make It
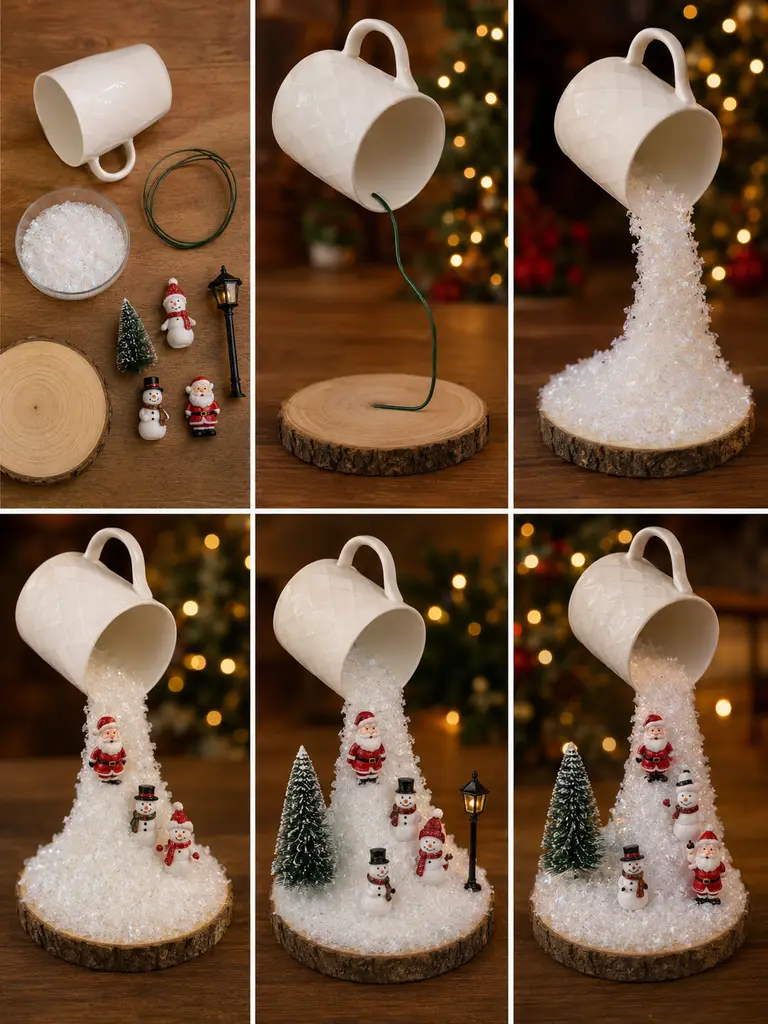
- Bend the craft wire into a support that rises from the base.
- Glue one end securely to the wood slice.
- Attach the mug sideways to the top of the support.
- Allow the adhesive to cure completely.
- Cover the visible wire with faux snow to create the pouring effect.
- Build a snowy mound at the base.
- Arrange miniature snowmen, Santa, the tree, and lamppost around the scene.
DIY Tip: Use a lightweight mug and a wide base so the finished illusion stays stable.
15. Christmas Village Wine Glass Terrariums

Large stemmed glasses can become elegant miniature winter villages. Faux snow, tiny houses, bottle-brush trees, and red ribbon create a centerpiece that feels festive without taking over the table.
Things You’ll Need
- Large decorative stemmed glasses
- Faux snow
- Bottle-brush trees
- Miniature houses
- Tiny figurines
- Mini lampposts
- Red ribbon
- Craft tweezers
Affiliate-Friendly Supplies
- Clear stemmed decorative glasses
- Miniature Christmas village houses
- Bottle-brush tree assortment
- Faux snow powder
How to Make It
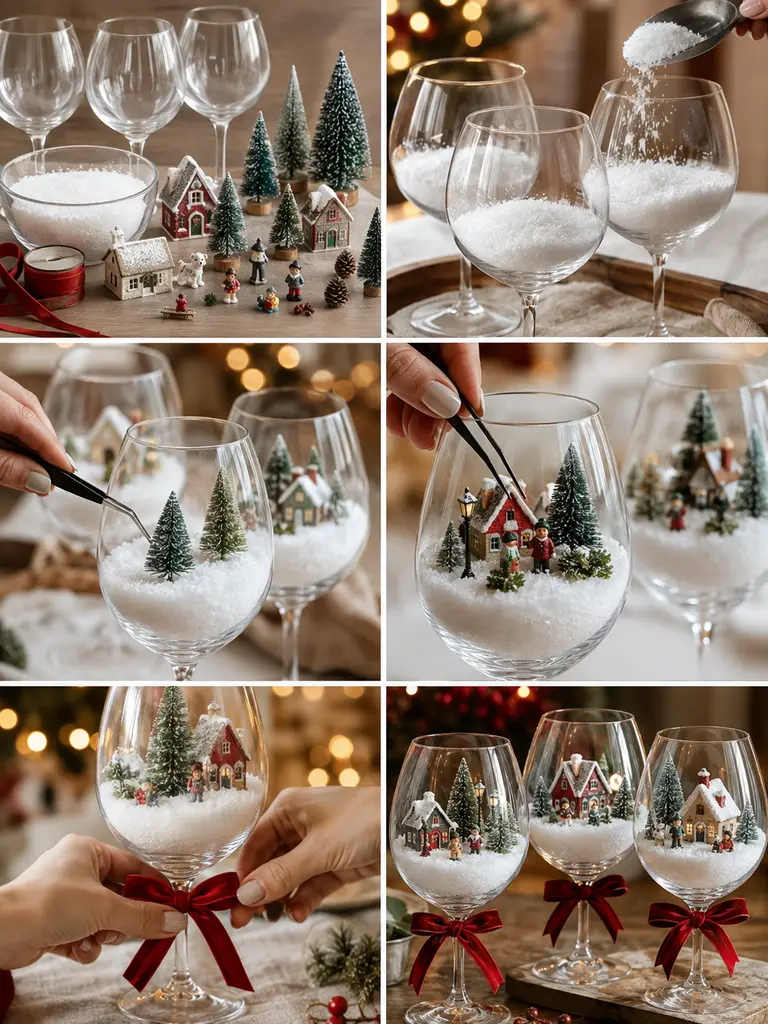
- Add a shallow layer of faux snow to each glass.
- Position a miniature house toward the back.
- Add bottle-brush trees in varying heights.
- Use tweezers to place tiny figurines and lampposts.
- Sprinkle extra faux snow around the miniatures.
- Tie a red ribbon bow around each stem.
- Group three glasses together for a layered centerpiece.
DIY Tip: Long craft tweezers make it much easier to position miniature pieces inside the glasses.
16. Evergreen Christmas Hoop Village

A large hoop with a deep green backing becomes a modern Christmas landscape when filled with cone trees, pearls, faux snow, gold ornaments, greenery, and tiny lights.
Things You’ll Need
- Large wooden hoop
- Dark green backing fabric
- Three cone craft forms
- Green, cream, and gold paint
- Faux snow
- Pearl beads
- Evergreen stems
- Gold ornaments
- Fairy lights
Friendly Supplies
How to Make It
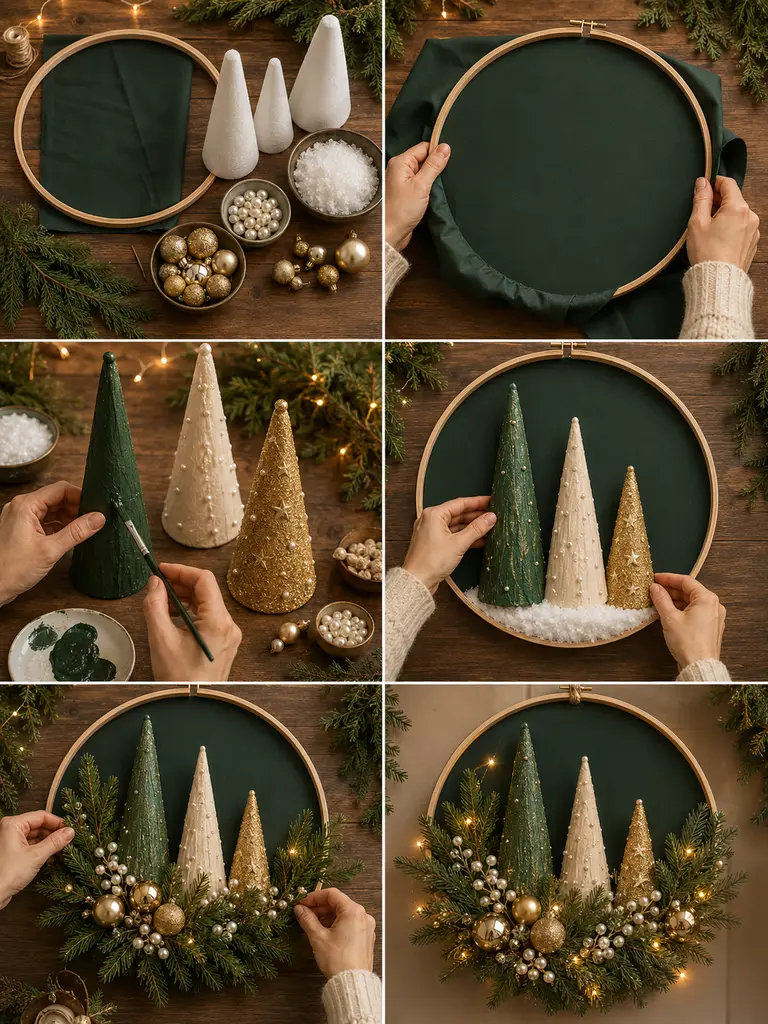
- Stretch dark green fabric tightly across the hoop.
- Paint the three cone forms in coordinating green, cream, and gold finishes.
- Decorate the cones with pearls, glitter, or faux snow.
- Attach the trees inside the lower half of the hoop.
- Add faux snow or pearl beads along the bottom.
- Arrange evergreen sprigs around part of the hoop.
- Add gold ornaments and weave warm micro lights throughout.
DIY Tip: Place the tallest tree slightly off center so the composition feels more natural.
You May Also Like
23 Easy DIY Christmas Village Houses Ideas for Festive Holiday Decor

45 DIY Seashell Wall Art Ideas for Beautiful Coastal Home Decor
24 Enchanting DIY Halloween Houses Ideas for Spooky Fall Decor

23 Handmade DIY Flower Pot Decoration Ideas You’ll Want to Recreate

23 Handmade DIY Clock Ideas to Give Your Walls a Unique Look
23 Easy DIY Outdoor Wooden Christmas Decor Ideas for a Festive Yard
17. Rustic Twig Christmas Tree Centerpiece
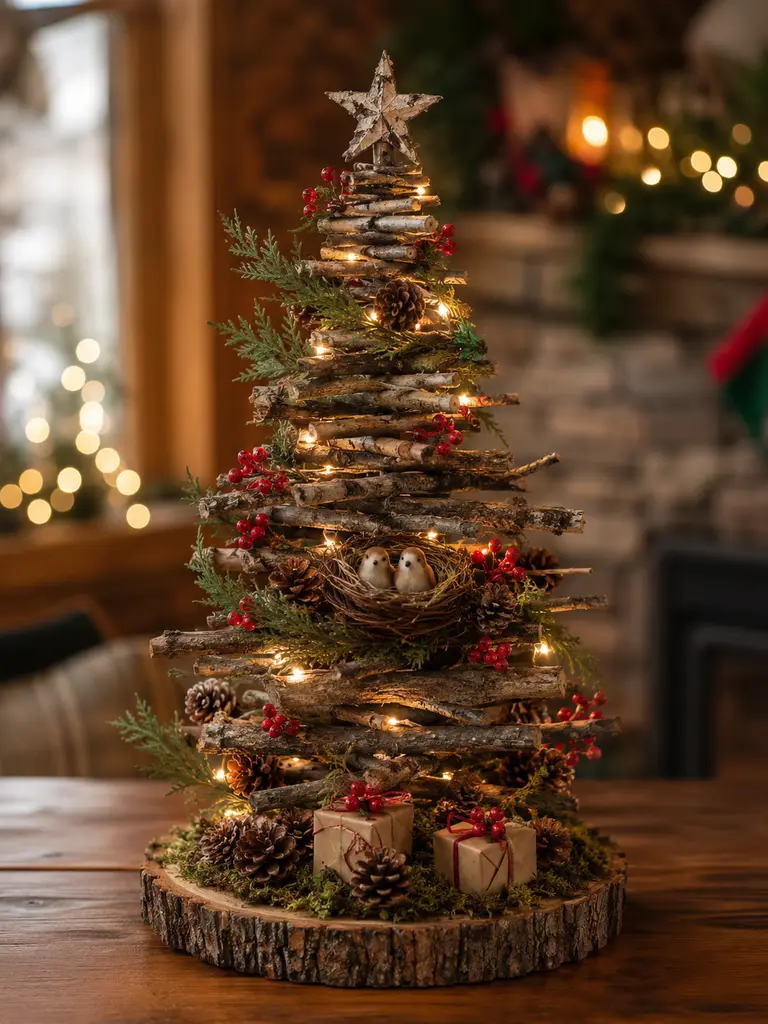
A triangular framework of twigs becomes a charming miniature Christmas tree when wrapped with lights and decorated with greenery, berries, a tiny bird nest, and little gifts.
Things You’ll Need
- Straight twigs
- Wood-slice base
- Strong glue
- Warm micro lights
- Evergreen sprigs
- Red berries
- Mini bird nest
- Two small bird ornaments
- Pinecones
- Mini gift boxes
Affiliate-Friendly Supplies
How to Make It
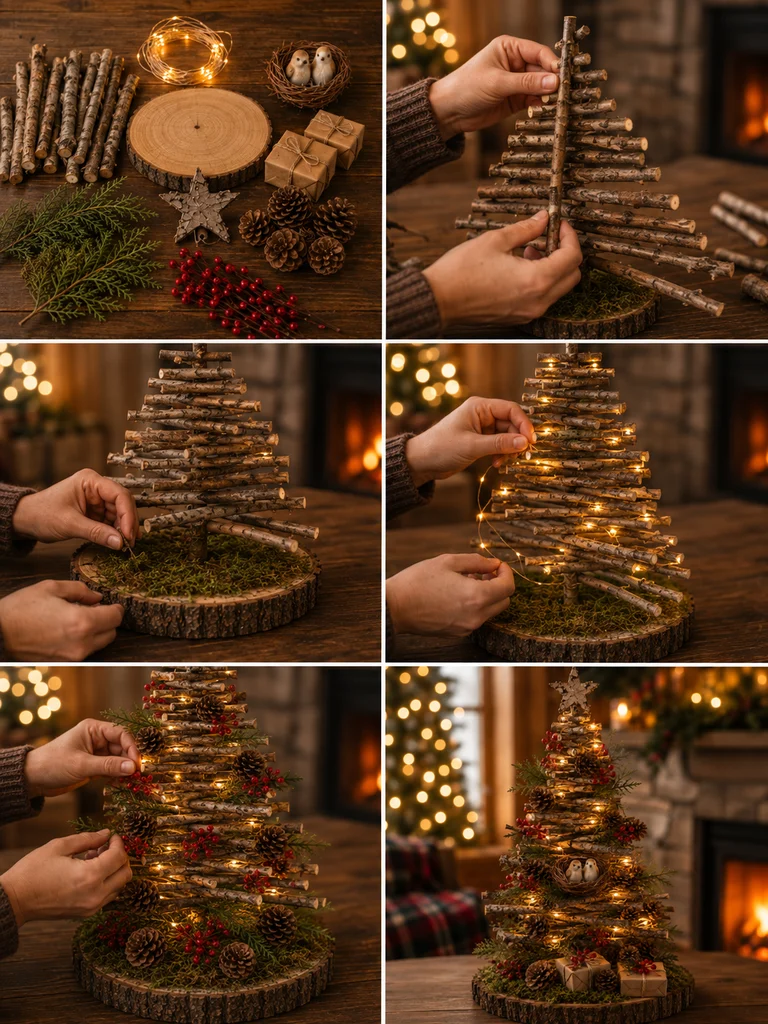
- Arrange two long twigs into a triangle and add horizontal twig rungs.
- Glue the framework securely.
- Attach the tree upright to a wood-slice base.
- Wrap the framework with warm micro lights.
- Tuck evergreen sprigs, red berries, and pinecones between the twigs.
- Place a miniature nest with two birds near the center.
- Decorate the base with moss and tiny wrapped gifts.
DIY Tip: Slightly uneven twig lengths make the project feel more convincingly woodland and handmade.
18. Pinecone Christmas Flower Basket
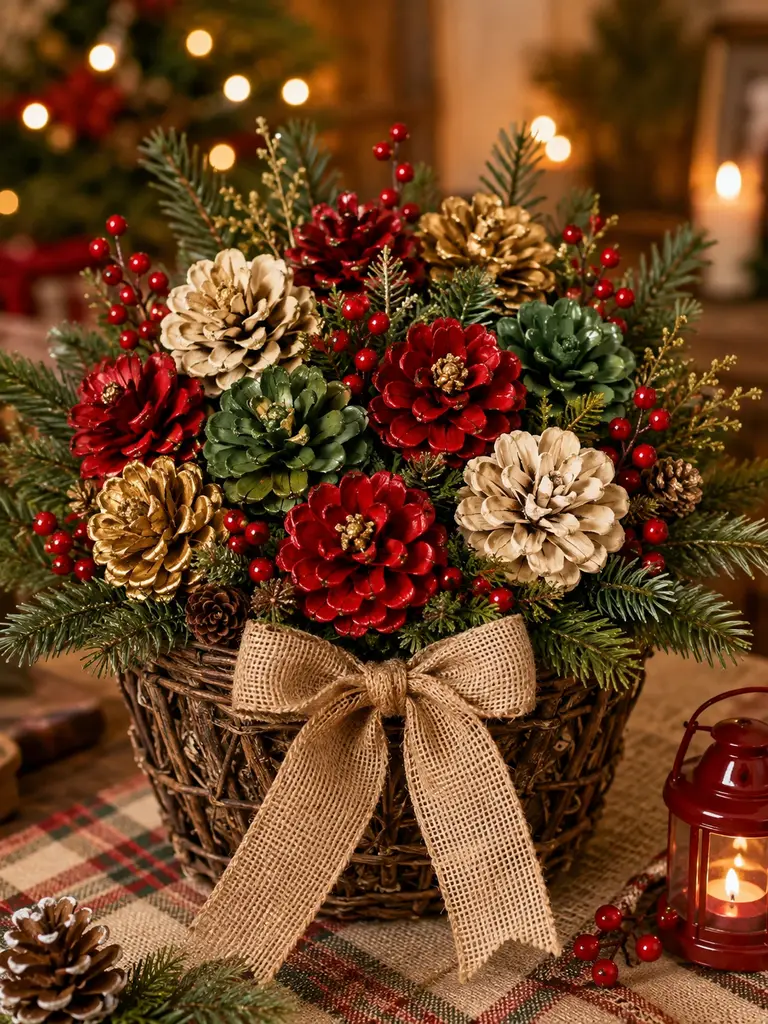
Painted pinecones look surprisingly floral when arranged on stems inside a rustic basket. Mix red, cream, green, and gold with evergreen branches and berries for a long-lasting Christmas bouquet.
Things You’ll Need
- Pinecones
- Red, cream, green, and gold paint
- Paintbrushes
- Wooden skewers
- Floral foam
- Rustic basket
- Evergreen stems
- Red berries
- Hot glue
- Burlap ribbon
Friendly Supplies
- Natural pinecone assortment
- Christmas acrylic paint set
- Artificial evergreen stems
- Floral foam blocks
How to Make It
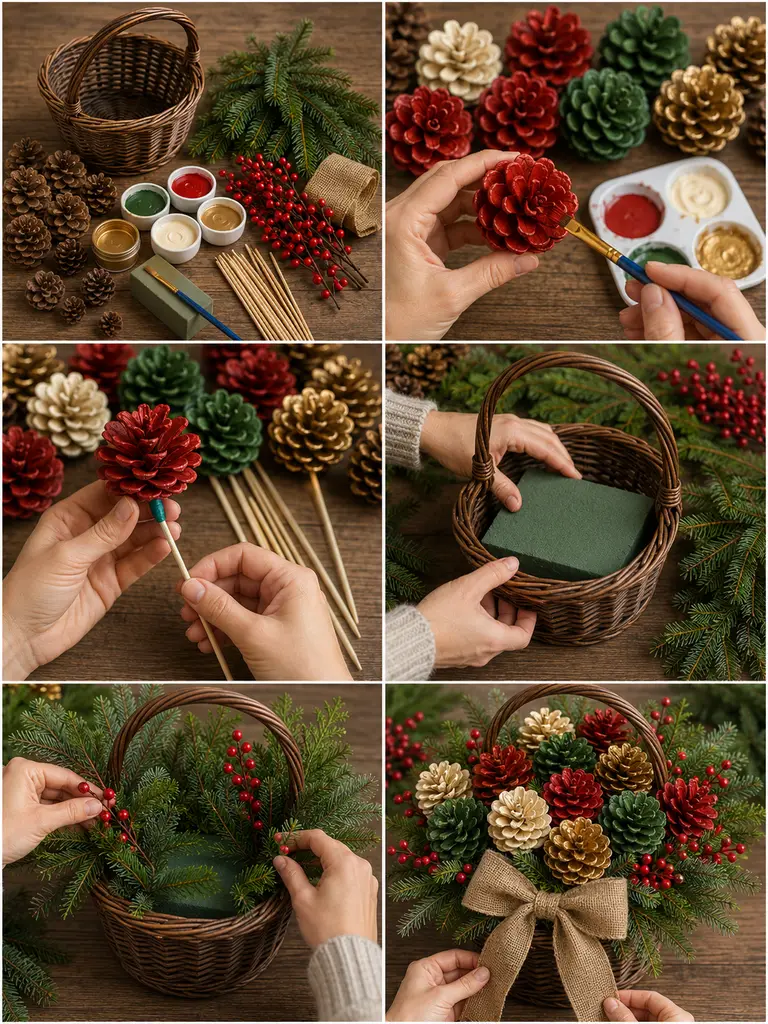
- Paint pinecones in the four Christmas colors and let them dry.
- Glue a wooden skewer to the base of each painted pinecone.
- Fit floral foam inside the basket.
- Insert evergreen stems first to create the overall shape.
- Add the pinecone flowers at different heights.
- Fill open spaces with berry stems and smaller greenery.
- Tie a large burlap bow to the front of the basket.
DIY Tip: Use pinecones in several sizes so the arrangement resembles a mixed flower bouquet.
19. Burlap Christmas Stocking Wall Pocket
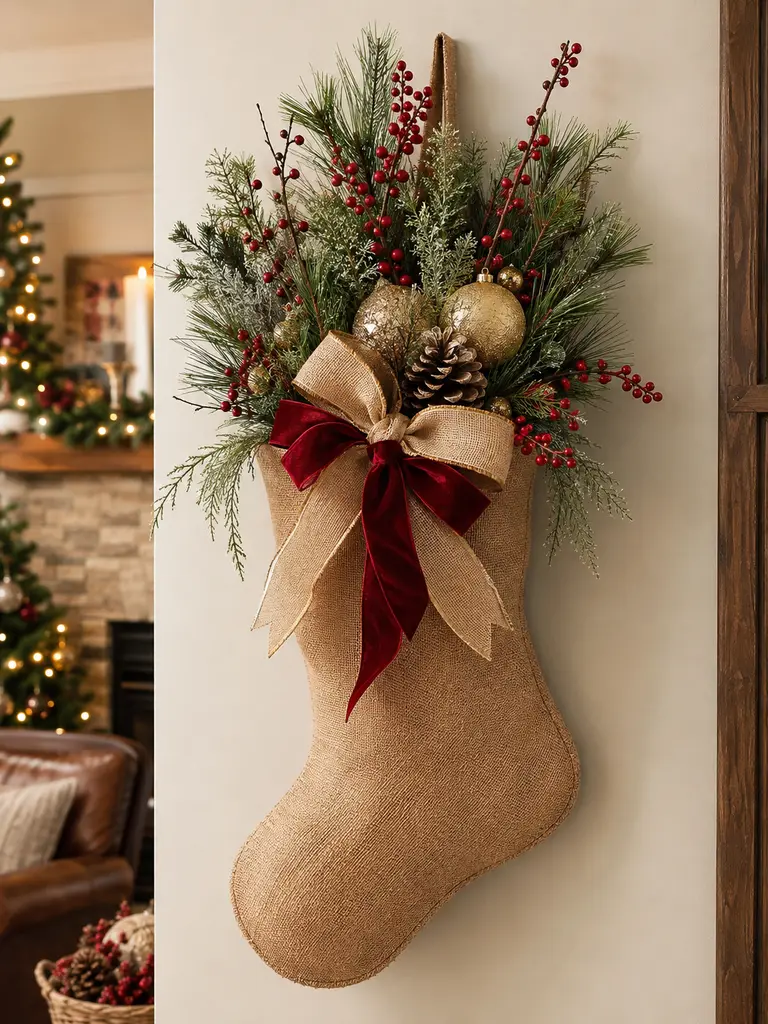
An oversized burlap stocking can become a wall pocket rather than a gift holder. Fill it with lush pine stems, berries, gold ornaments, pinecones, and ribbon for rustic farmhouse Christmas décor.
Things You’ll Need
- Burlap fabric
- Paper stocking template
- Sewing machine or fabric glue
- Cream lace or trim
- Evergreen stems
- Red berries
- Gold ornaments
- Pinecones
- Wide ribbon
- Hanging loop
Friendly Supplies
How to Make It
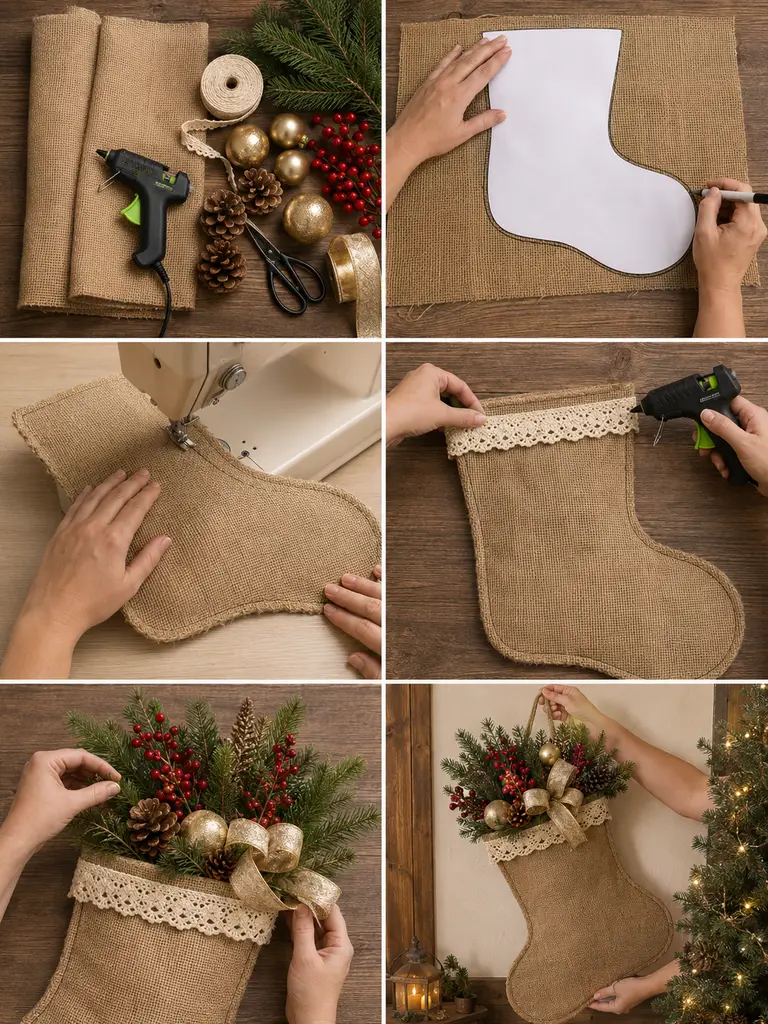
- Draw or print a large stocking template.
- Trace the template twice onto burlap and cut both pieces.
- Sew or glue around the edges, leaving the top open.
- Attach decorative cream trim around the opening.
- Fill the stocking with evergreen stems.
- Add berries, pinecones, and lightweight ornaments.
- Finish with a large bow and a reinforced hanging loop.
DIY Tip: Reinforce the hanging loop if you plan to use a heavy greenery arrangement.
20. Mason Jar Christmas Lantern Village
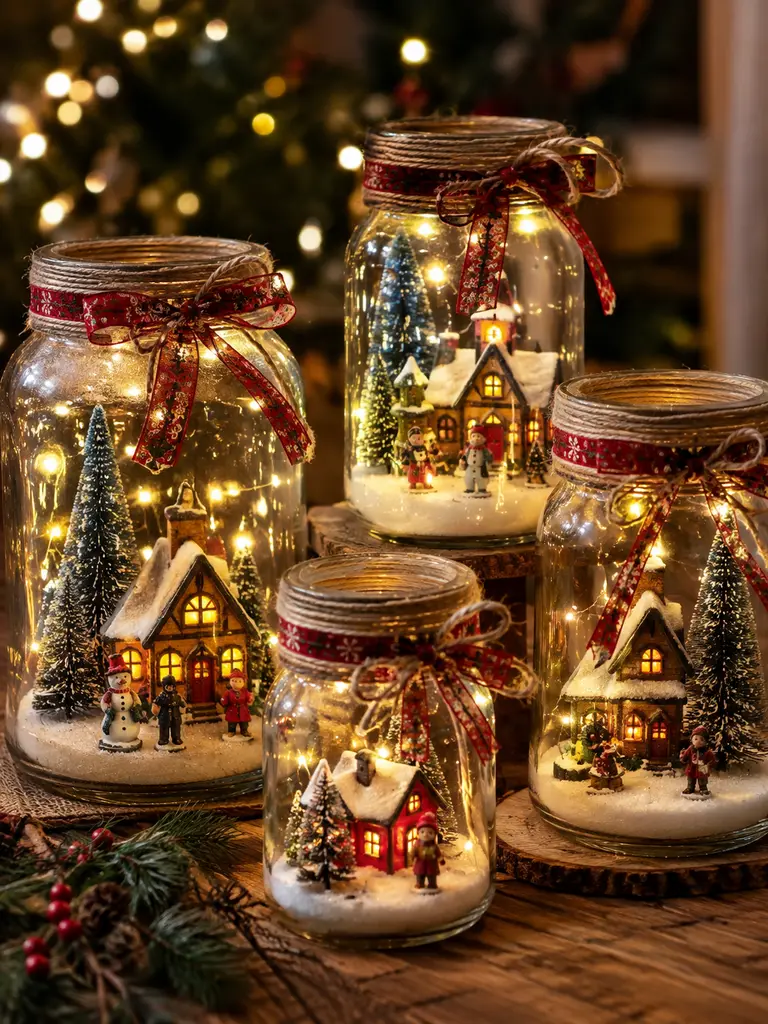
Wide-mouth mason jars make inexpensive miniature Christmas lanterns. Each one can hold a tiny house, tree, figurine, faux snow, and warm LED light to create a glowing little village.
Things You’ll Need
- Wide-mouth mason jars
- Faux snow
- Mini houses
- Bottle-brush trees
- Tiny figurines
- Battery LED tea lights
- Jute twine
- Red ribbon
- Mini pinecones
Friendly Supplies
- Wide-mouth mason jar set
- Miniature bottle-brush trees
- Battery LED tea lights
- Christmas village miniature set
How to Make It
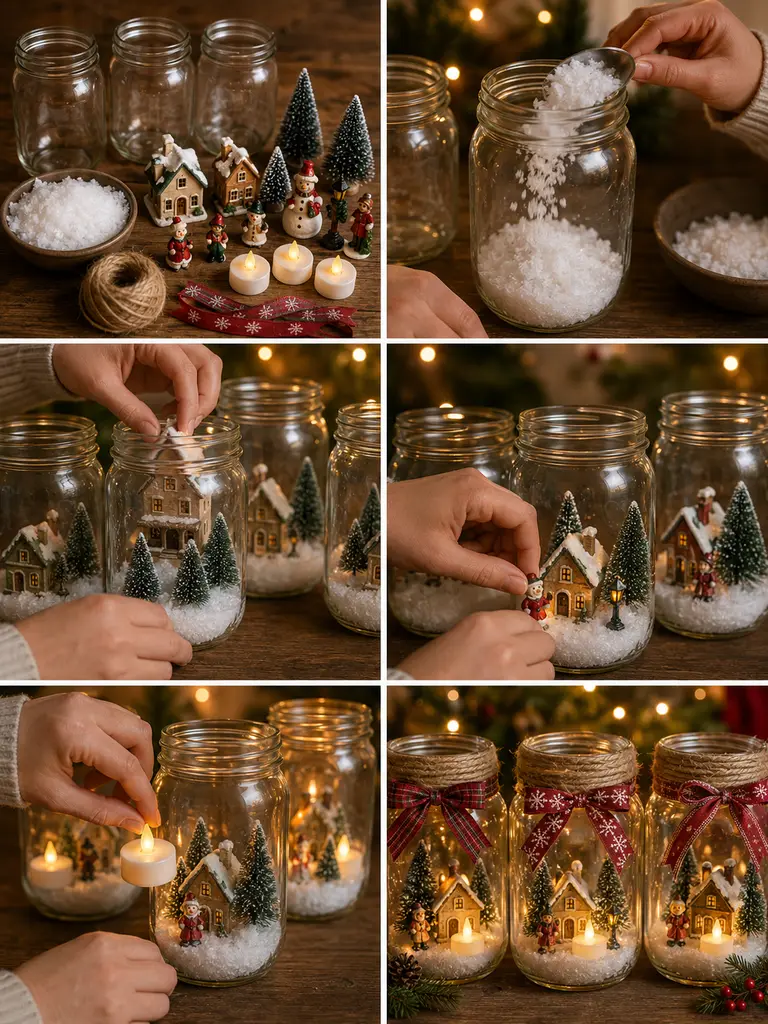
- Add a layer of faux snow to the bottom of each jar.
- Place a miniature house inside.
- Add one or two bottle-brush trees.
- Position tiny figurines or lampposts near the house.
- Insert a small battery LED light so it illuminates the scene.
- Wrap jute twine around the jar neck.
- Finish with red ribbon and display several jars together.
DIY Tip: Warm-white LEDs make the miniature houses feel much cozier than cool-white lights.
How to Make Your Handmade Christmas Decor Feel More Cohesive
One of the easiest ways to make handmade decorations look intentional is to repeat a few materials and colors throughout your home. For example, use natural jute, warm wood, red berries, evergreen branches, and touches of gold across several projects.
You do not need every decoration to match exactly. Choose a simple palette and let each craft interpret it differently. Red, forest green, cream, and gold create a classic Christmas look, while cream, muted green, natural burlap, warm wood, and antique brass feel softer and more farmhouse-inspired.
Warm-white fairy lights also help connect different decorations visually. Their gentle glow looks especially beautiful against jute rope, pinecones, evergreen branches, and wooden surfaces.
Where to Display These DIY Christmas Decorations
Spread these projects throughout your home instead of concentrating all of the Christmas decorating in one room. Branch trees work well in entryways and empty corners; door swags, wreaths, and wall pockets bring interest to doors and walls; candle arrangements and villages make beautiful table or sideboard centerpieces; snowmen, gnomes, and shadow boxes are perfect for mantels and shelves; and illuminated hoop decorations or lantern crafts can brighten darker corners.
Repeating small festive touches from room to room creates a more immersive holiday atmosphere without making the house feel overly decorated.
Final Thoughts
The best DIY Christmas Decor Ideas do not have to be complicated or expensive. A handful of basic craft materials can become something completely different with a little creativity.
Natural materials such as pinecones, jute, burlap, twigs, and wood slices are especially useful because they pair beautifully with classic Christmas greenery, red berries, ornaments, bells, ribbons, and warm lights.
Whether you make only one project or create several decorations for different rooms, handmade Christmas décor gives your home a personal touch that store-bought decorations cannot quite replicate. Choose the ideas that fit your style, adjust the colors to match your home, and enjoy creating decorations you can proudly display throughout the holiday season.

