Skip to content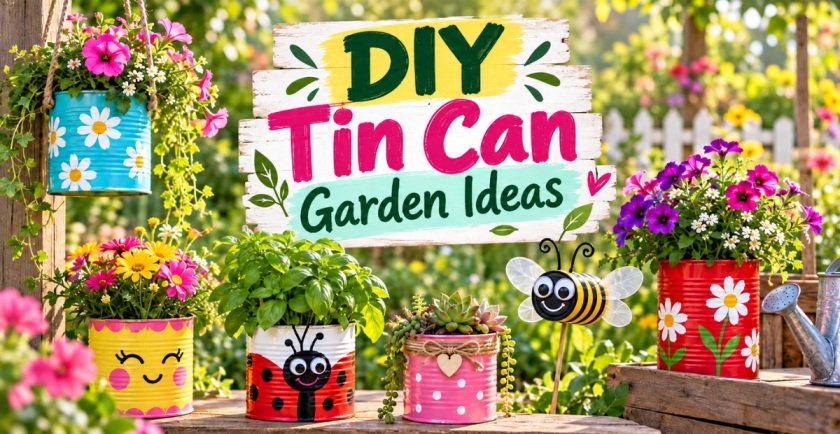
Old food cans can become some of the cutest planters in the garden with little more than paint, drainage holes, potting mix, and a bit of imagination. Instead of throwing empty cans away, you can turn them into colorful flower pots, hanging herb gardens, playful garden characters, succulent containers, and decorative fence displays.
These DIY Tin Can Garden Ideas are especially useful when you want to decorate a patio, balcony, fence, porch, windowsill, or small backyard without spending much money. Tin cans come in different sizes, they are easy to paint, and they work beautifully with compact flowers and herbs.
Some of the projects below are bright and whimsical, while others have a softer rustic or cottage-garden look. You will find hanging planters, ladybugs, bees, owls, strawberries, butterflies, herb gardens, and several easy painted designs. Most can be made over a weekend with basic craft and gardening supplies you may already have at home.
Before You Start: How to Prepare Tin Cans for Garden Projects
Clean the Cans Thoroughly
Remove the paper label and wash each can with warm water and dish soap. Sticky adhesive can usually be rubbed away after soaking. Allow the cans to dry completely before painting.
Check for Sharp Edges
The cut rim of a food can can be sharp. Wear work gloves while preparing cans and smooth rough areas with suitable sandpaper or cover exposed edges when necessary. This is especially important for projects that children may touch.
Add Drainage Holes
When a tin can will hold a living plant directly, drainage is essential. Turn the empty can upside down and carefully make several small holes in the base using an appropriate metal drill bit or a hammer and sturdy nail on a stable surface. Wear eye protection when drilling or punching metal.
Prepare the Surface for Paint
A clean, dry surface gives you a better finish. Depending on your paint, a metal-friendly primer can improve adhesion. For outdoor projects, use paint and clear sealer suitable for exterior conditions.
Choose Plants That Suit Small Containers
Most tin cans have limited root space, so compact plants are usually the best choice. Pansies, violas, alyssum, lobelia, compact marigolds, thyme, chives, parsley, oregano, basil, and small succulents are all useful options. Be prepared to transplant vigorous plants later.
1. Colorful Hanging Funny-Face Tin Can Flower Planters
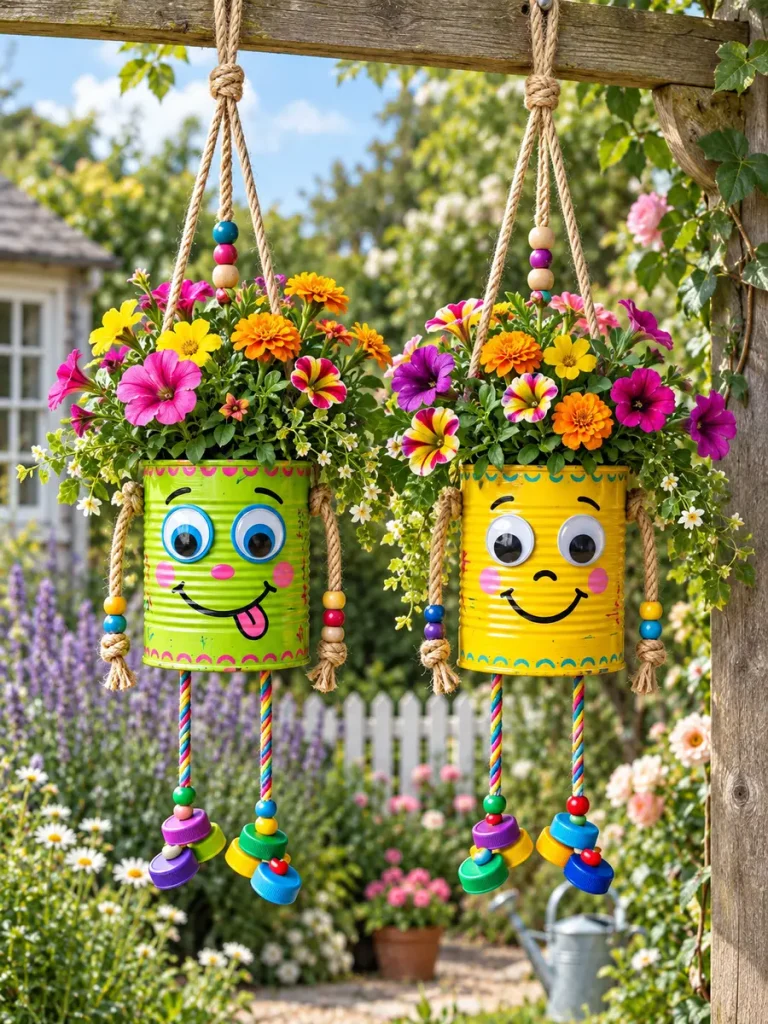
If you love cheerful garden decorations, start with a pair of funny-face hanging planters. Brightly painted cans with big eyes, smiles, rope arms, and dangling legs immediately give a plain patio wall more personality. Using two or three different facial expressions makes the group even more playful.
Things You’ll Need
- 2 large clean tin cans
- Outdoor paint in bright colors
- Paintbrushes
- Craft eyes or painted wooden circles
- Strong natural cord
- Wooden beads
- Waterproof craft adhesive
- Drill
- Potting mix
- Compact flowering plants
Making Process
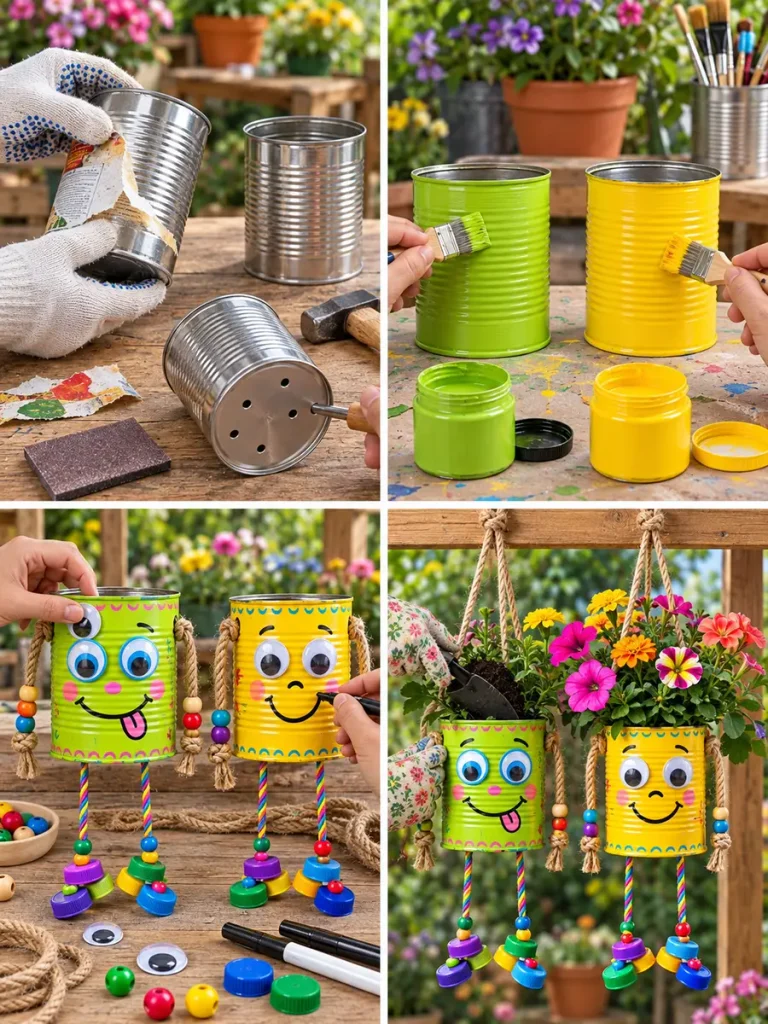
- Clean and dry two large cans.
- Smooth sharp rims and drill drainage holes.
- Make small side and bottom holes for rope limbs.
- Paint the cans in bright contrasting colors.
- Add eyes, smiles, cheeks, and other face details.
- Thread strong cord through the side holes for arms.
- Thread cord through the bottom holes for legs and add wooden beads.
- Fill with potting mix and plant petunias, marigolds, calibrachoa, or lobelia.
- Hang from sturdy outdoor hooks.
2. Frog Tin Can Flower Planter
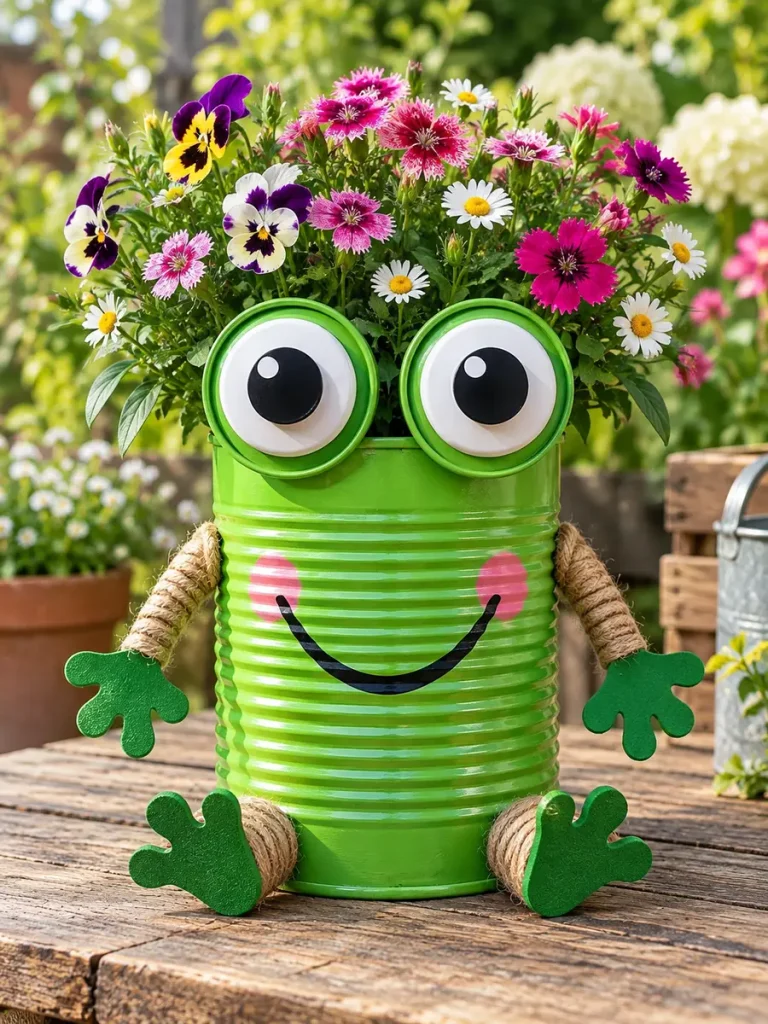
A frog planter is one of the most charming ways to turn a plain metal can into garden art. The oversized round eyes positioned above the rim make the design instantly recognizable, while the flowers growing from the top look like a colorful crown.
Things You’ll Need
- Large tin can
- Green exterior paint
- White, black, and pink paint
- Two raised circular eye pieces
- Strong rope
- Waterproof adhesive
- Green craft material or thin painted wood
- Potting mix
- Flowers
Making Process
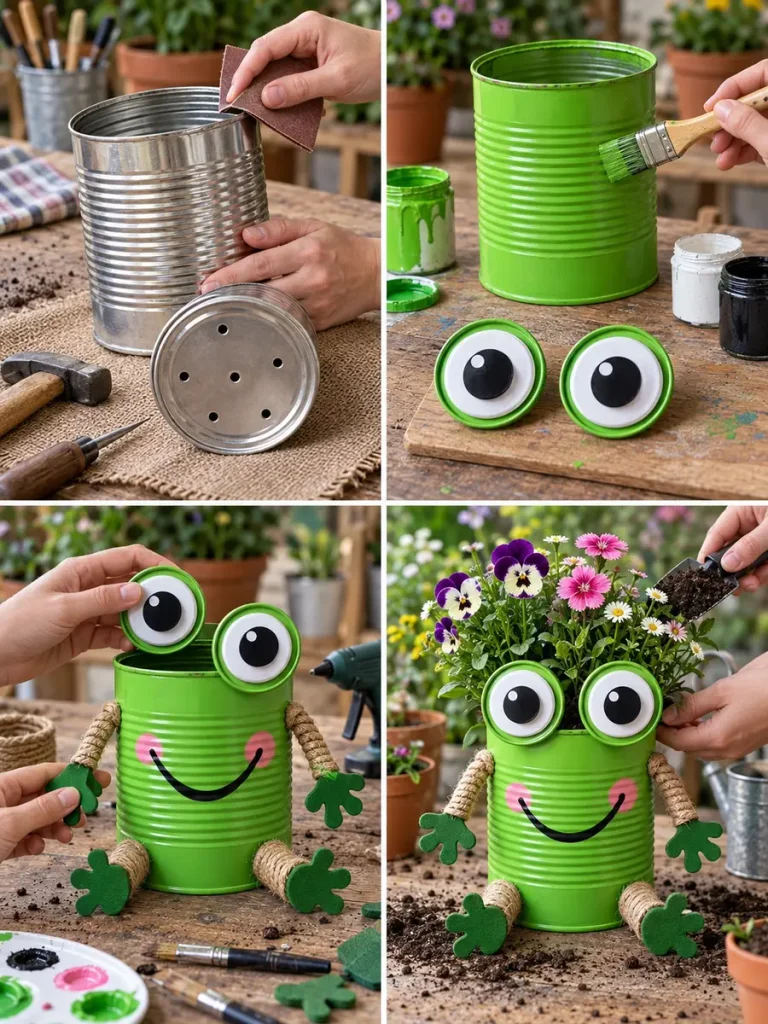
- Clean and dry one large can.
- Smooth the rim and drill drainage holes.
- Paint the entire can bright green.
- Paint two round pieces white with black pupils.
- Attach the raised eyes above the rim.
- Paint a curved smile and optional pink cheeks.
- Attach short rope arms and simple green hands and feet.
- Fill with potting mix.
- Plant violas, dianthus, alyssum, or daisies.
3. Bumblebee Tin Can Garden Stakes
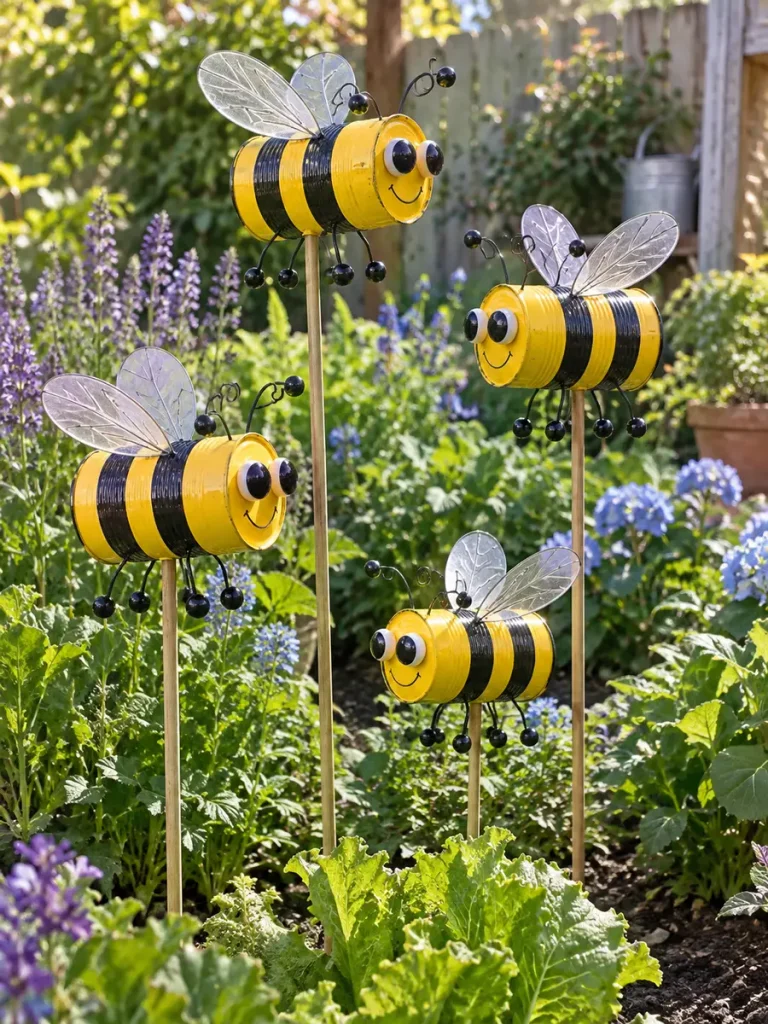
These little bee decorations can appear to hover above a vegetable patch or flower bed. Unlike a planter, this project uses the can horizontally as the bee’s body, making it a fun piece of recycled garden art.
Things You’ll Need
- Small tin cans
- Yellow and black outdoor paint
- Large craft eyes
- Thin wire for antennae
- Lightweight outdoor-safe material for wings
- Small decorative beads
- Wooden garden stakes
- Strong outdoor adhesive or suitable fasteners
Making Process
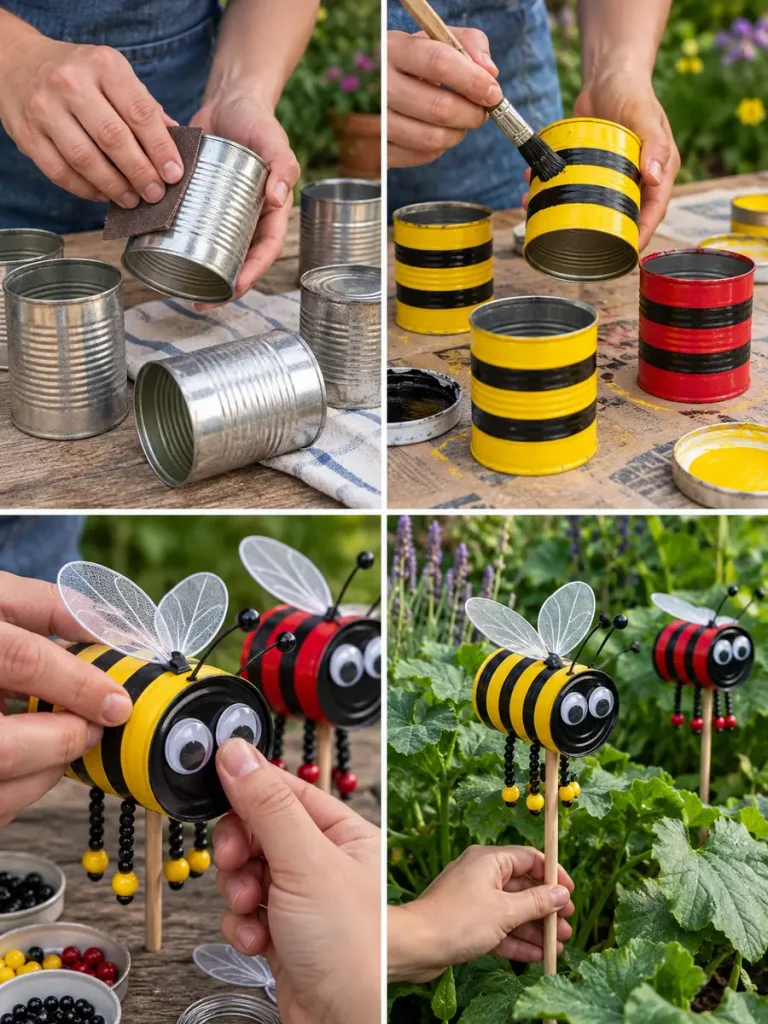
- Clean and lightly sand several small cans.
- Paint each can yellow.
- Add evenly spaced black stripes.
- Attach two eyes to the closed end.
- Bend thin wire into antennae.
- Cut and attach two lightweight wings.
- Add short dangling bead legs if desired.
- Secure each bee horizontally to a wooden stake.
- Push the stakes into a flower or vegetable bed at different heights.
4. Ladybug Tin Can Herb Planters
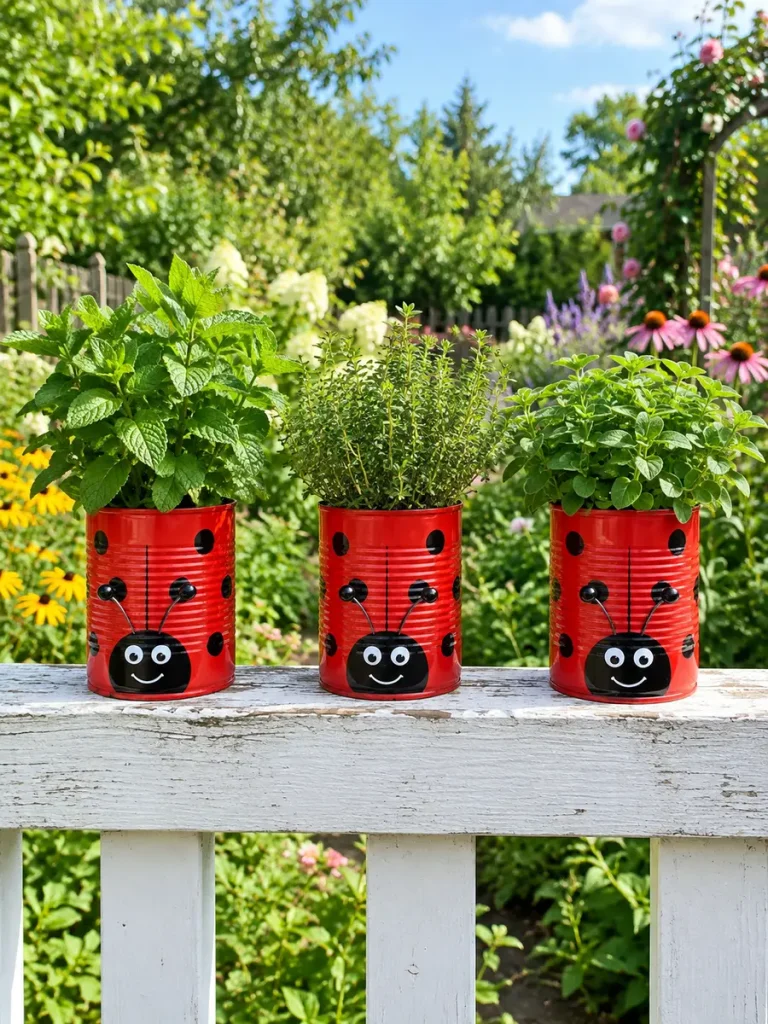
A row of red ladybug cans filled with green herbs creates a lovely contrast. This is a beginner-friendly design because the decoration mainly relies on red paint, black dots, and a simple face.
Things You’ll Need
- Medium tin cans
- Red and black outdoor paint
- Small brush
- Clear outdoor sealer
- Potting soil
- Herb plants
Making Process
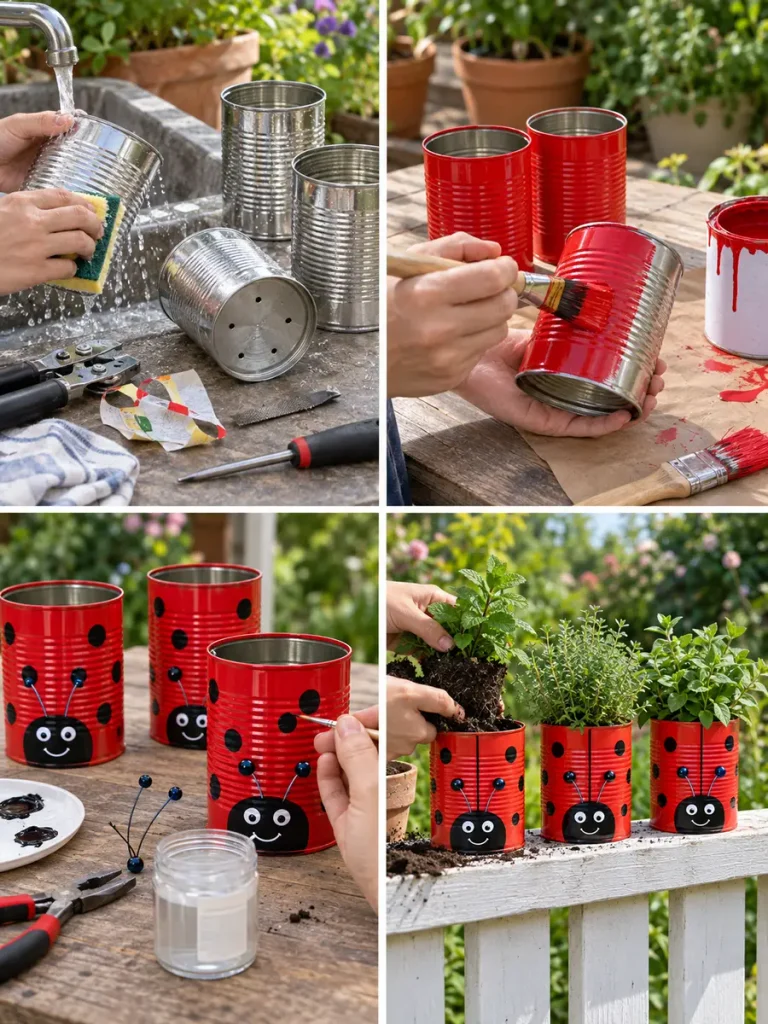
- Clean and dry the cans.
- Drill drainage holes in the base.
- Paint each can bright red.
- Add black ladybug spots.
- Paint a simple face and small antennae.
- Allow the design to dry and seal it for outdoor use.
- Fill with potting mix.
- Plant thyme, oregano, parsley, chives, or another compact herb.
- Arrange on a garden shelf, railing, or table.
5. Owl Tin Can Succulent Planters
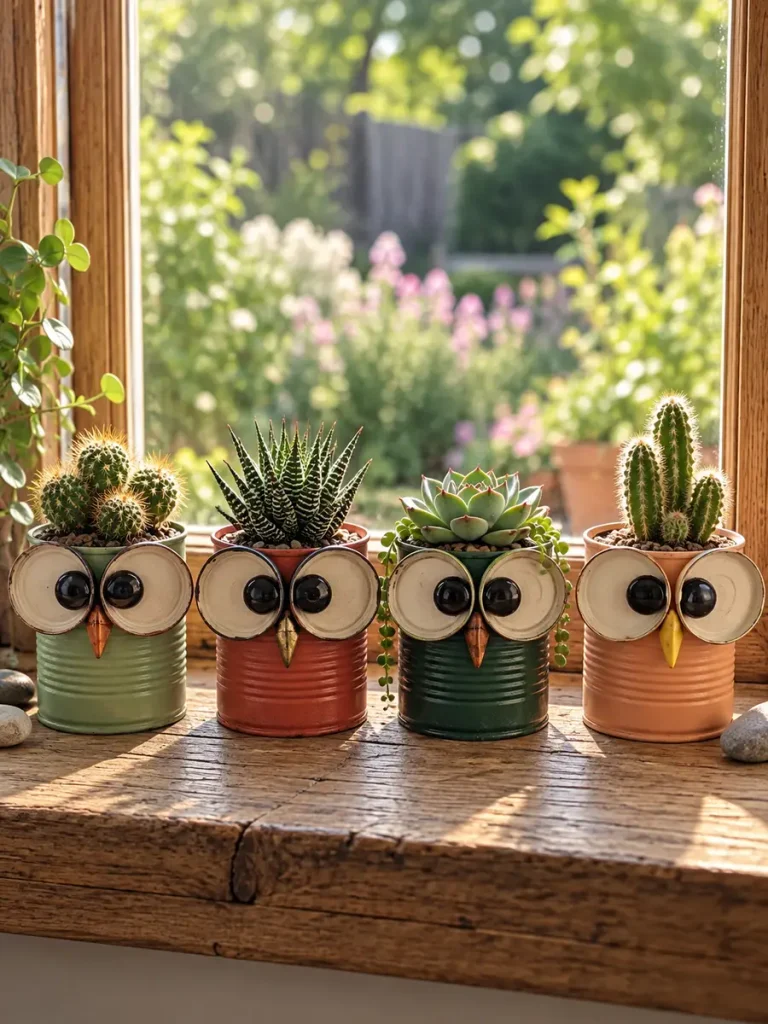
Tin cans are almost perfectly shaped for quirky owl planters. Oversized circular eyes make the design immediately recognizable, while small succulents or cacti on top look like funny feathered hairstyles.
Things You’ll Need
- Small or medium tin cans
- Paint in earthy or pastel shades
- Large circular pieces for owl eyes
- Black paint or buttons for pupils
- Small triangular pieces for beaks
- Cactus or succulent mix
- Small succulents
Making Process
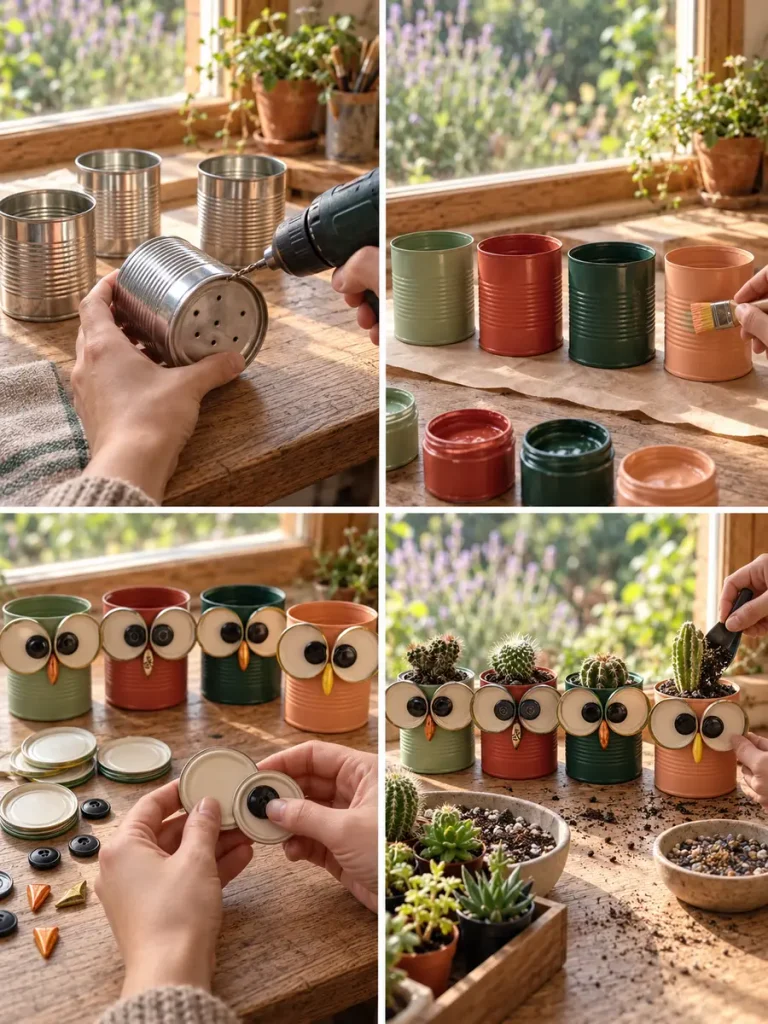
- Clean the cans and drill drainage holes.
- Paint each can in a muted or pastel color.
- Create two large layered circular eyes.
- Attach the eyes to the front.
- Add a small triangular beak.
- Fill with well-draining succulent mix.
- Plant echeveria, haworthia, sedum, or miniature cacti.
- Add decorative gravel if desired.
- Display on a sunny shelf or windowsill.
6. Red Polka-Dot Vertical Tin Can Flower Planters
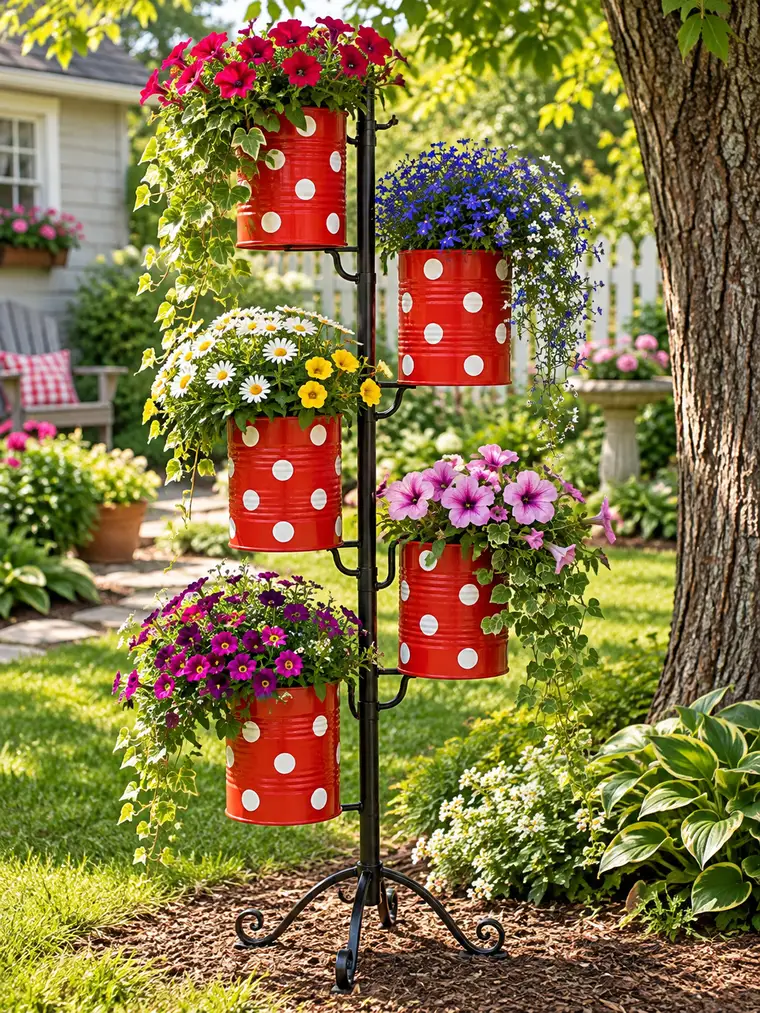
Red cans covered in large white dots are wonderfully cheerful and easy to spot against green foliage. Mounting several at different heights turns a few recycled containers into a striking vertical garden feature.
Things You’ll Need
- 4-6 medium tin cans
- Red paint
- White paint
- Round sponge dauber
- Secure outdoor mounting hardware
- Freestanding vertical support
- Potting mix
- Flowering plants
Making Process
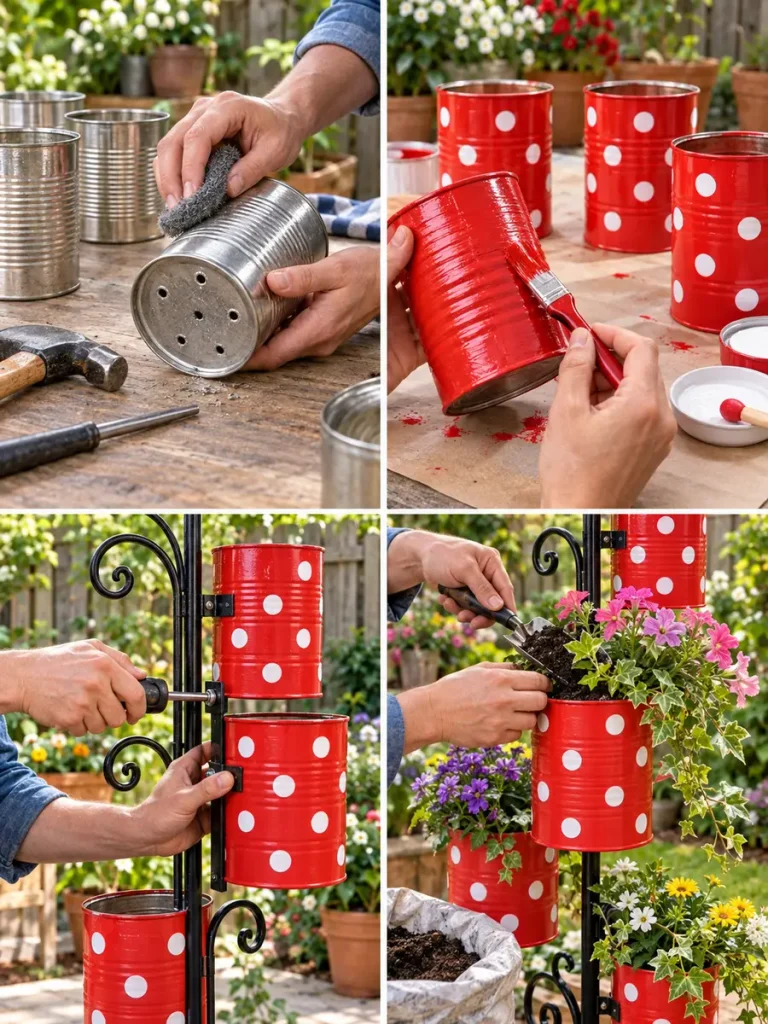
- Clean and dry 4–6 cans.
- Drill drainage holes.
- Paint every can bright red.
- Use a sponge dauber to add white polka dots.
- Allow the paint to dry and seal if desired.
- Prepare a freestanding vertical garden support.
- Attach secure holders or brackets.
- Fill each can with potting mix.
- Plant petunias, verbena, dianthus, or lobelia.
- Arrange the cans at different heights.
7. Pastel Hanging Tin Can Flower Baskets
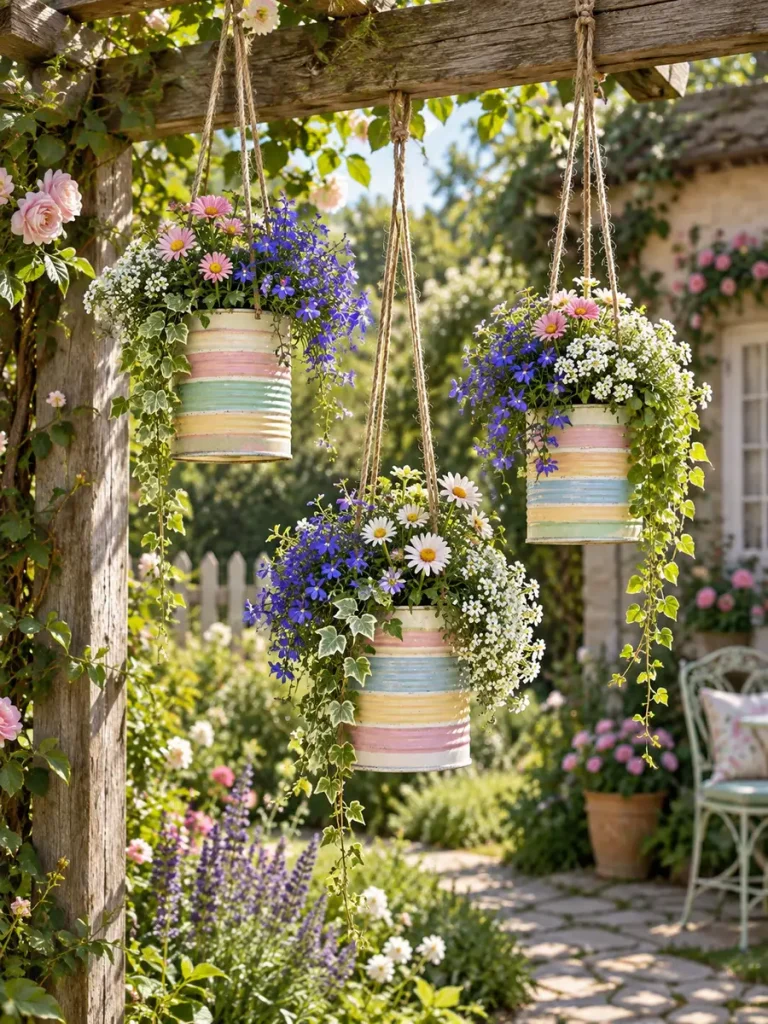
Soft pastel cans feel lighter and more romantic than brightly painted novelty planters. They are ideal for cottage gardens, pergolas, porches, or any space where a gentle hanging display suits the surroundings.
Things You’ll Need
- 3 tin cans
- Pastel paints
- Painter’s tape
- Strong hanging cord
- Drill
- Potting mix
- Trailing flowers
Making Process
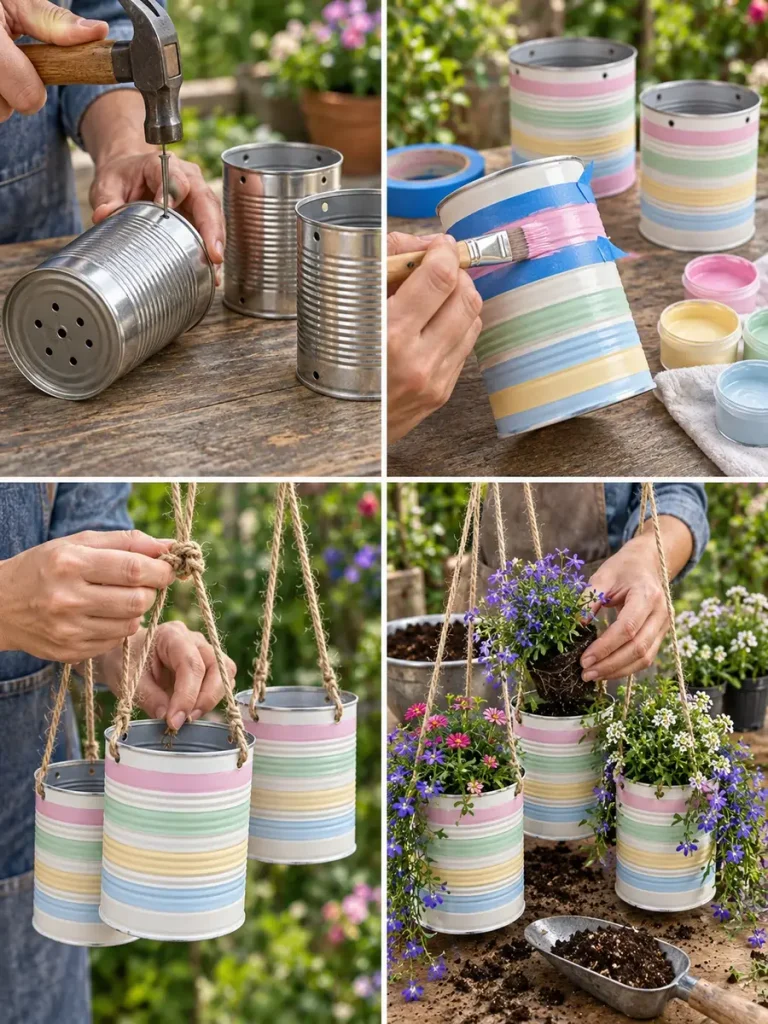
- Clean and dry three cans.
- Drill drainage holes and balanced hanging holes.
- Apply a pale base coat.
- Use painter’s tape to create horizontal stripes.
- Paint the exposed bands in soft pastel colors.
- Remove the tape after drying.
- Thread strong cord through the hanging holes and tie secure knots.
- Fill with potting mix.
- Plant lobelia, alyssum, or trailing flowers.
- Hang at slightly different heights.
8. Floral Painted Tin Can Fence Herb Garden
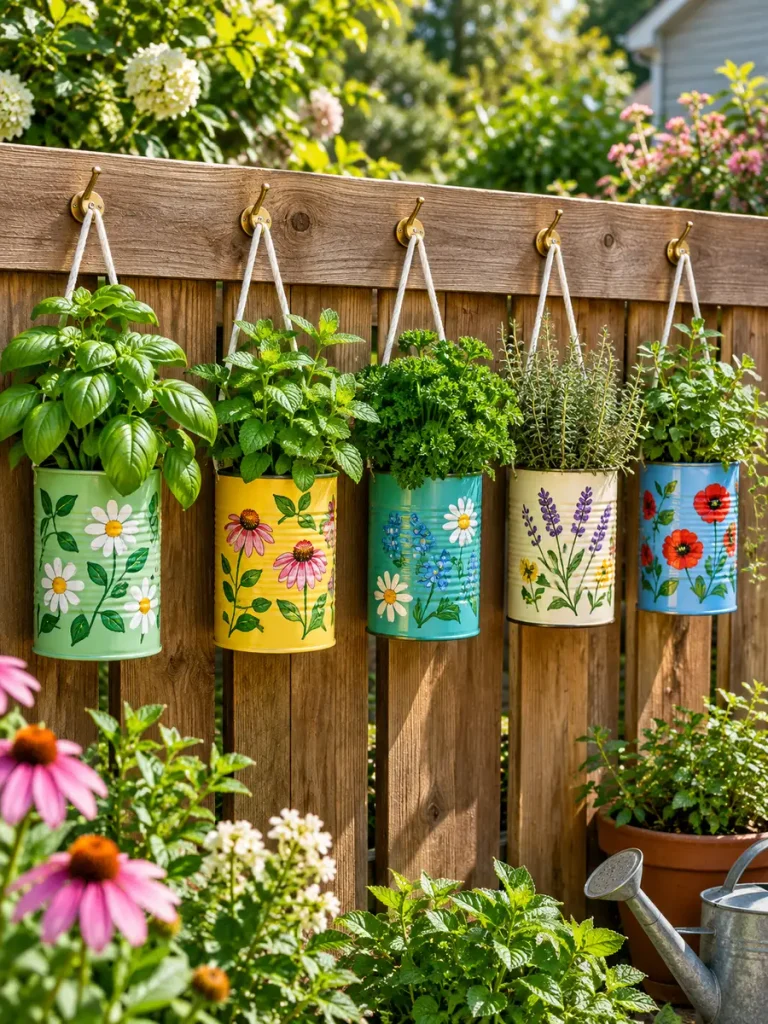
A wooden fence can become useful vertical growing space with a row of painted herb cans. Hand-painted flowers give the project an intentionally homemade look that fits beautifully into a backyard garden.
Things You’ll Need
- 4-6 cans
- Assorted exterior paints
- Fine paintbrushes
- Hanging cord
- Secure fence hooks
- Herb potting mix
- Herbs
Making Process
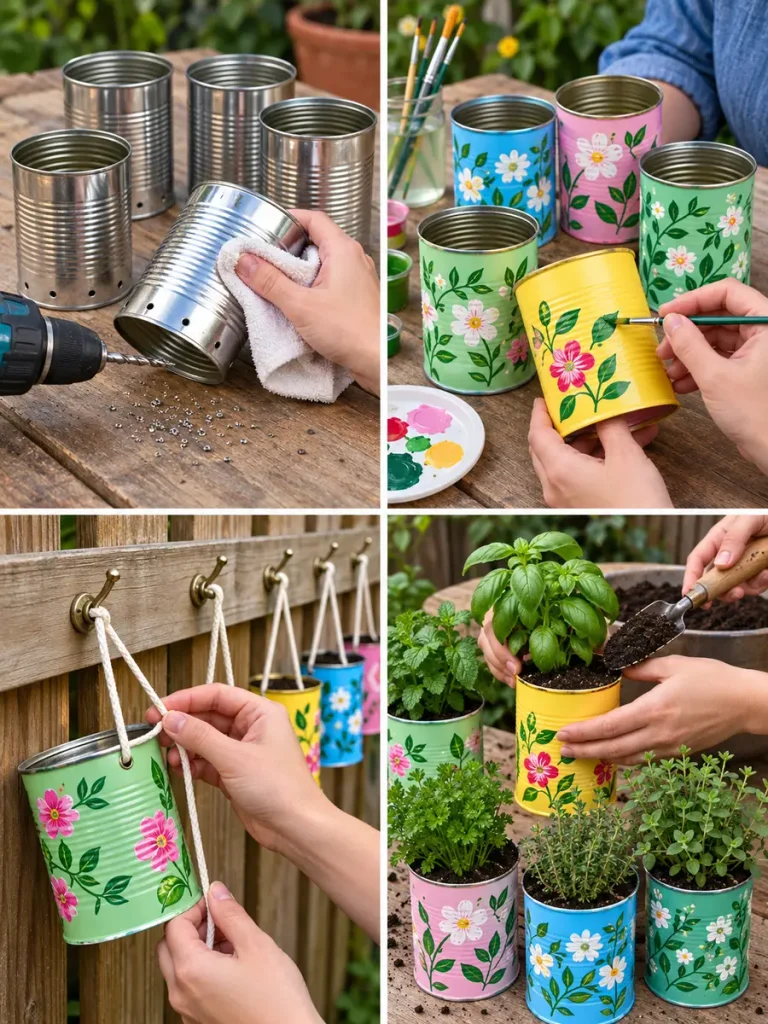
- Clean the cans and add drainage holes.
- Paint each can with a different base color.
- Paint flowers, leaves, or vines around the outside.
- Allow the artwork to dry.
- Make hanging holes near the rim.
- Thread strong cord through each can.
- Install sturdy hooks on the fence.
- Fill with herb potting mix.
- Plant basil, mint, parsley, thyme, or oregano.
- Hang the cans securely.
9. Hand-Painted Wildflower Tin Can Planters
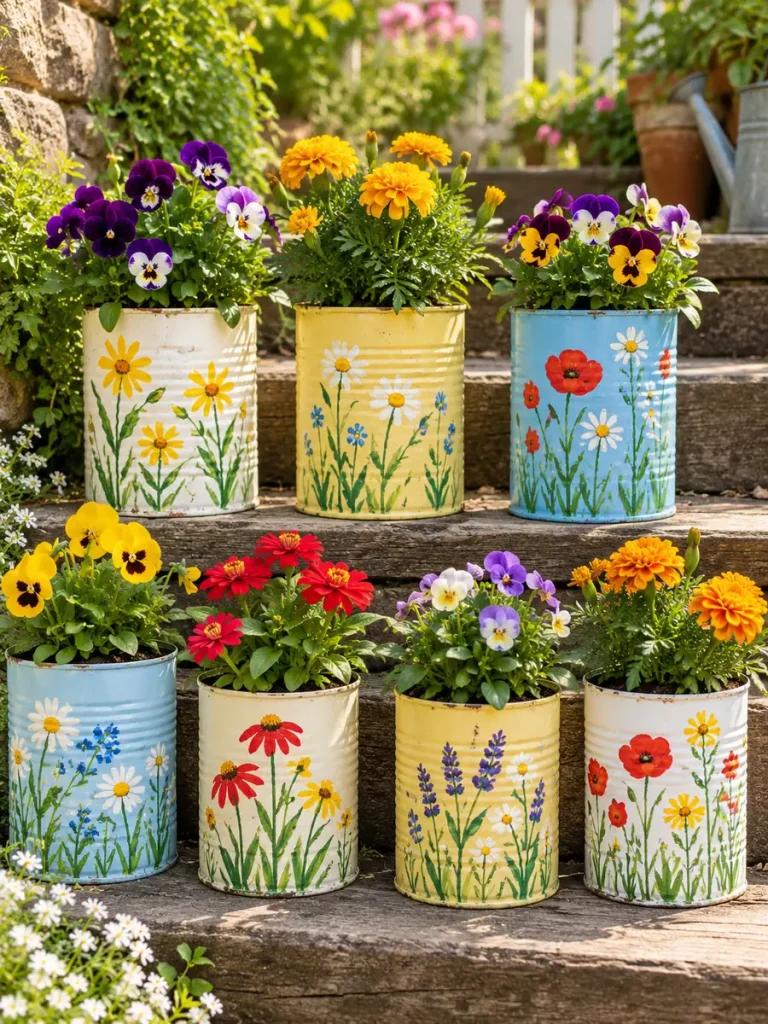
Loose hand-painted wildflowers often look more attractive than perfectly repeated motifs because small variations add handmade character. This design is especially effective when the real flowers echo the painted flowers below.
Things You’ll Need
- Tin cans in assorted sizes
- White or pastel base paint
- Green, red, yellow, pink, blue, and purple paint
- Fine and medium brushes
- Potting mix
- Flowers
Making Process
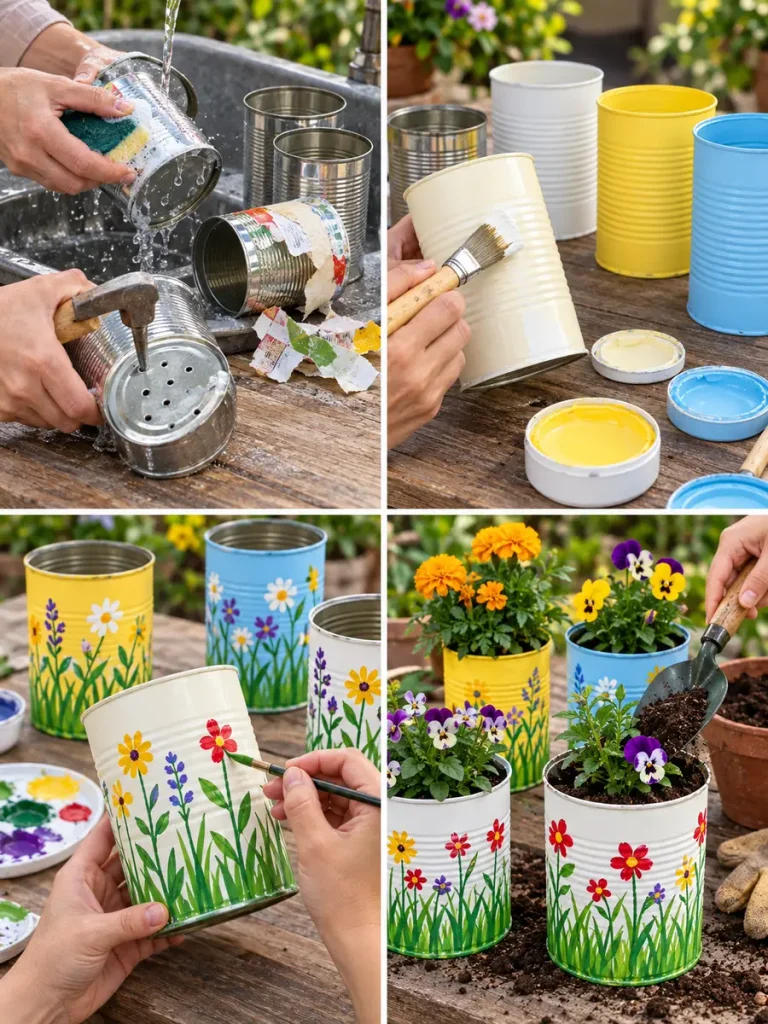
- Clean and dry assorted cans.
- Drill drainage holes.
- Apply a pale base coat.
- Paint thin green stems from the bottom upward.
- Add leaves and loose colorful flower shapes.
- Add small buds or dots for detail.
- Let the design dry and seal if needed.
- Fill with potting mix.
- Plant pansies, marigolds, violas, or compact zinnias.
- Group the finished cans on garden steps.
10. Polka-Dot Tin Can Flower Pot Collection
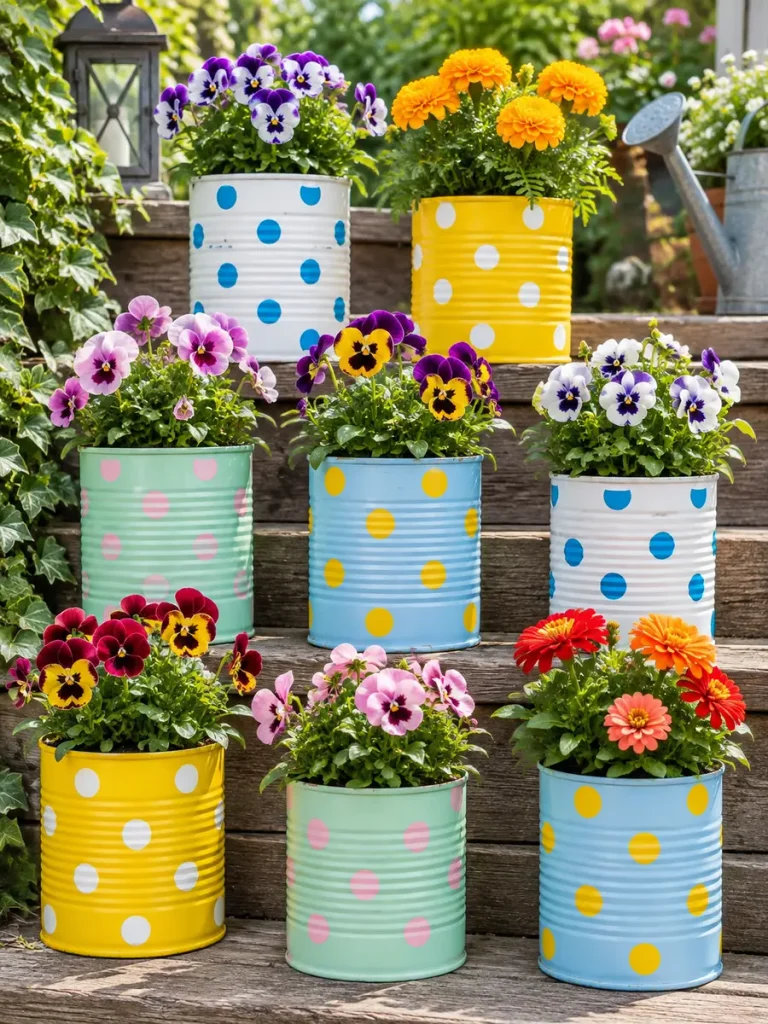
Polka dots are one of the easiest patterns to paint on tin cans, and they make mismatched recycled containers look like one coordinated garden collection.
Things You’ll Need
- Several tin cans
- Paint in 3-4 coordinating colors
- Round sponge daubers
- Potting mix
- Compact flowers
Making Process
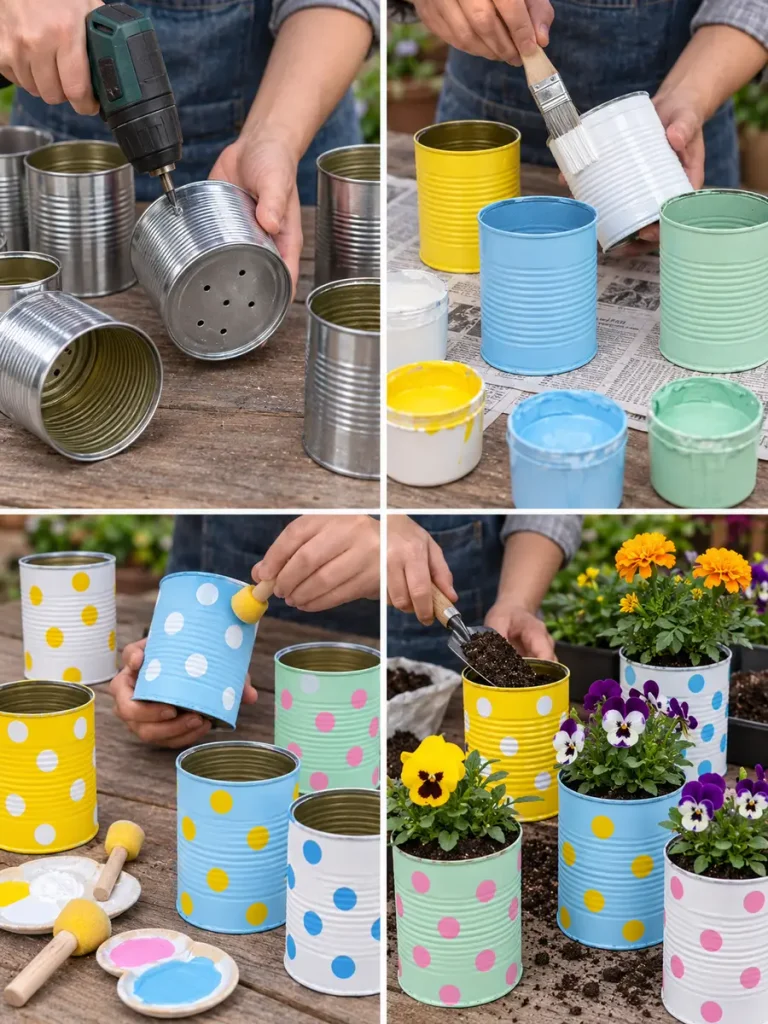
- Clean and dry several cans.
- Drill drainage holes.
- Paint each can with a solid base color.
- Let the paint dry fully.
- Use a round sponge dauber to stamp contrasting dots.
- Vary the dot size for a handmade look.
- Seal the painted surface if desired.
- Fill with potting mix.
- Plant pansies, marigolds, zinnias, or violas.
- Arrange on steps, a bench, or a patio table.
11. Striped Tin Can Planters
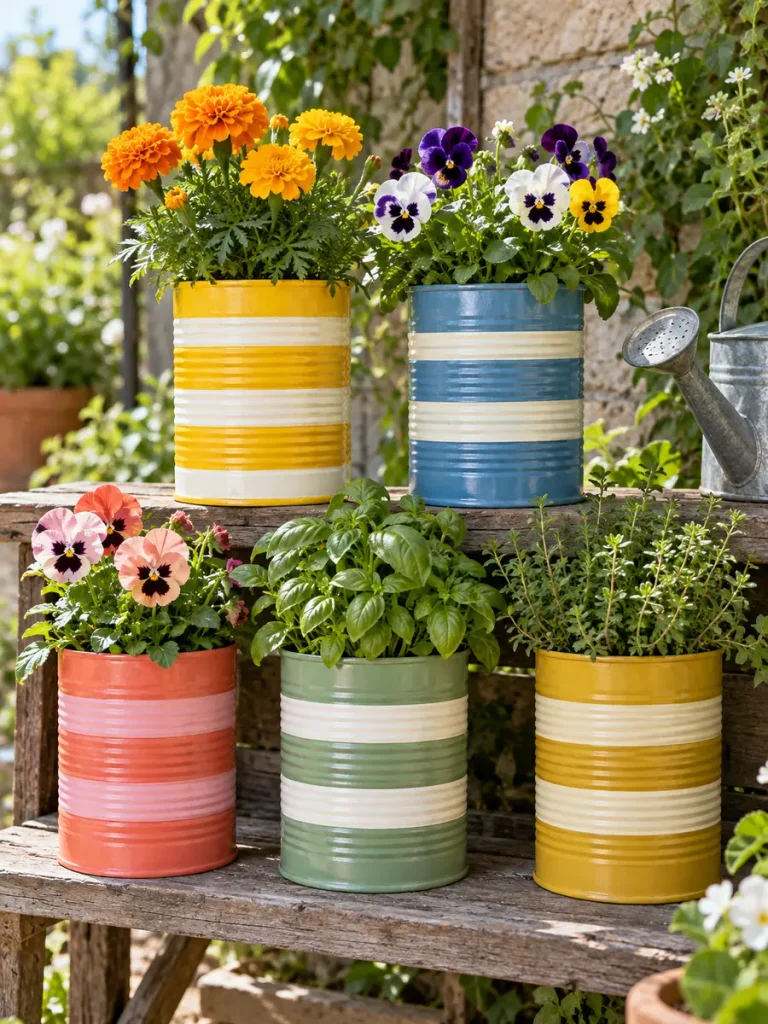
Striped cans have a clean graphic look that can suit both colorful and understated gardens. Horizontal bands work especially well with the natural ridges of food cans.
Things You’ll Need
- Tin cans
- Two paints per planter
- Painter’s tape
- Brushes
- Potting mix
- Flowers or herbs
Making Process
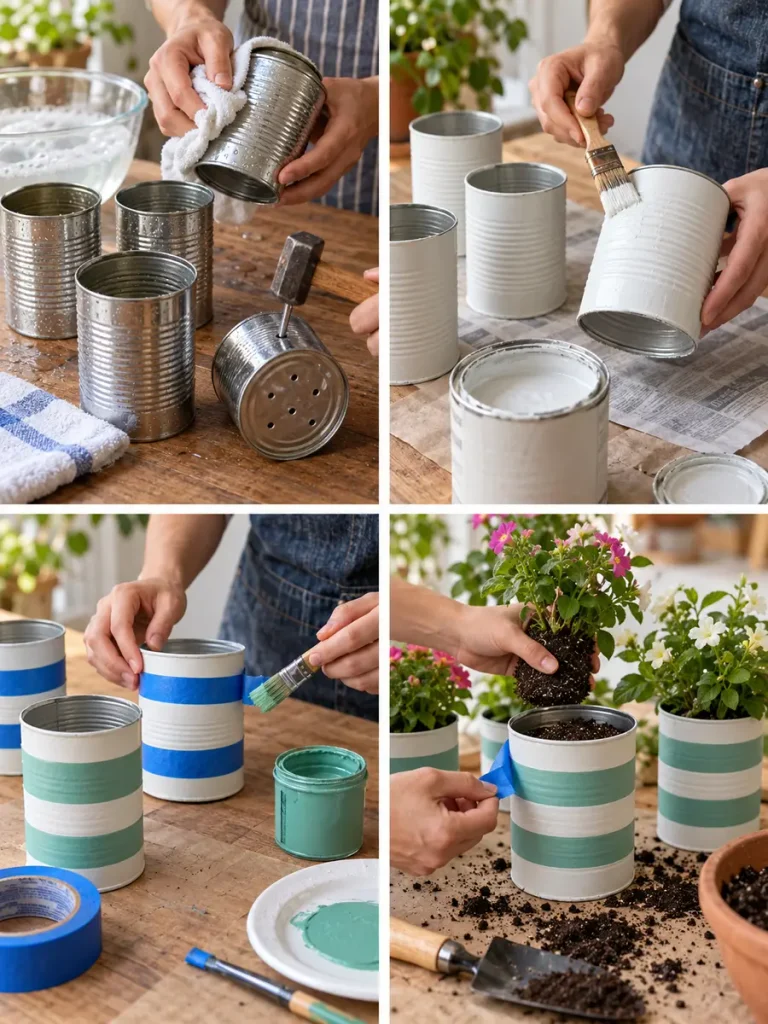
- Clean and dry the cans.
- Drill drainage holes.
- Apply the lighter base color.
- Let the paint dry completely.
- Wrap painter’s tape around the can to create bands.
- Paint the exposed sections in a contrasting color.
- Remove the tape carefully.
- Touch up uneven edges.
- Fill with potting mix.
- Plant flowers or compact herbs.
12. Rainbow Tin Can Herb Garden
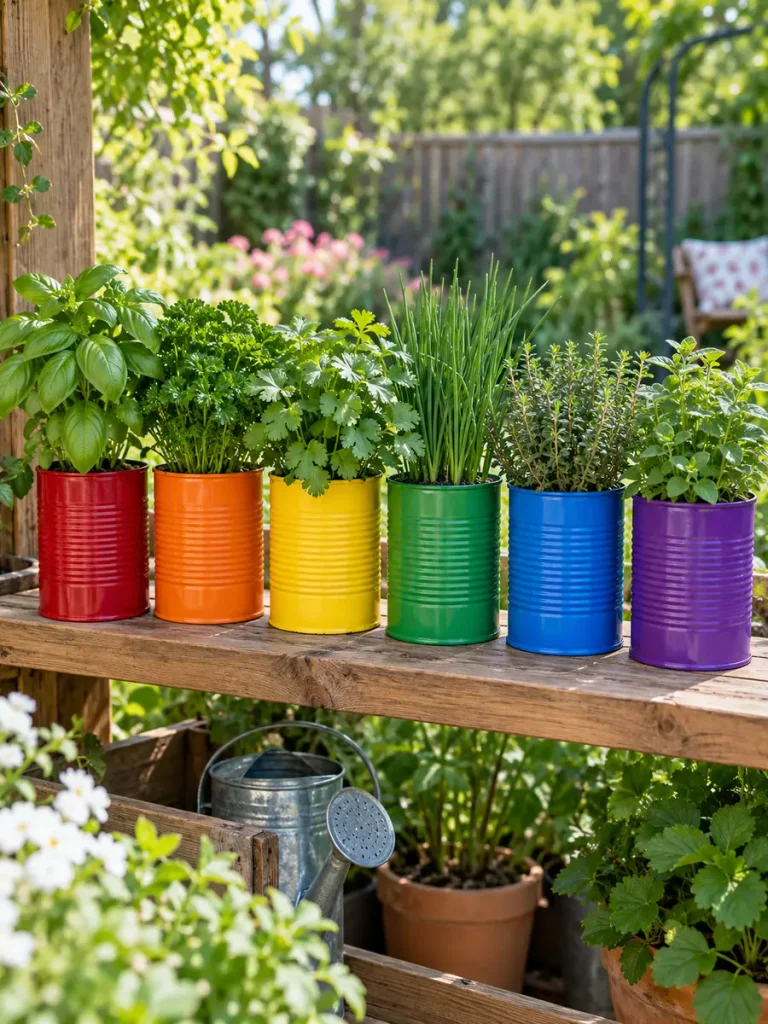
This project is simple, colorful, and practical. Each herb gets its own brightly painted container, while the entire collection forms a rainbow across a shelf or potting bench.
Things You’ll Need
- 6 or 7 matching tin cans
- Red, orange, yellow, green, blue, and purple paint
- Herb potting mix
- Herb seedlings
Making Process
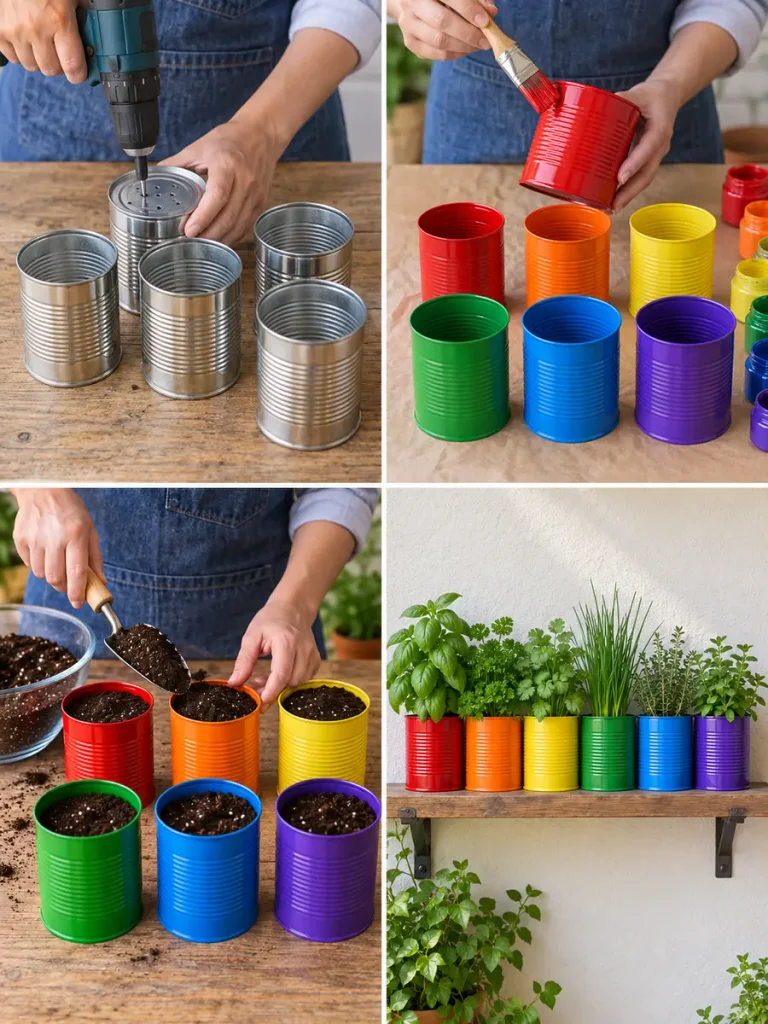
- Clean and dry six cans.
- Drill drainage holes.
- Paint the cans red, orange, yellow, green, blue, and purple.
- Let all cans dry.
- Fill each can with herb potting mix.
- Plant one herb in each container.
- Use basil, parsley, cilantro, chives, thyme, and oregano.
- Water lightly.
- Arrange the cans in rainbow order on a sunny shelf.
13. Rope-Wrapped Rustic Tin Can Planters
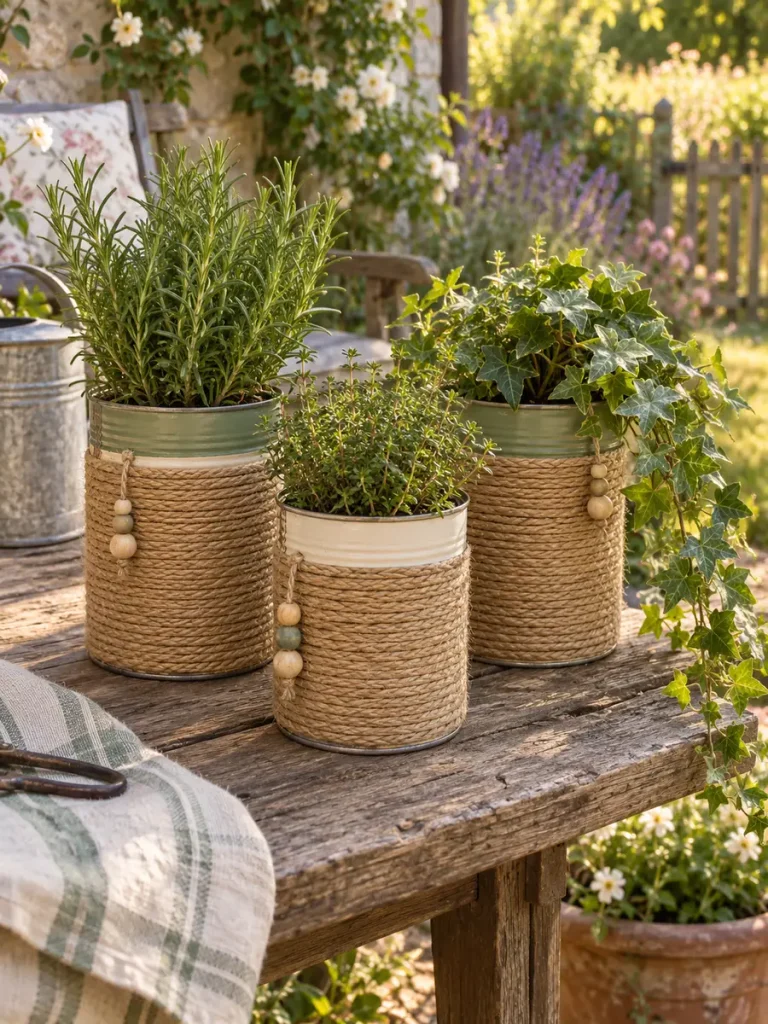
If bright paint is not your style, natural rope can soften the industrial appearance of a tin can. The combination works especially well with herbs and greenery in rustic, farmhouse, or cottage gardens.
Things You’ll Need
- Tin cans
- Natural cord or jute-style rope
- Weather-resistant adhesive
- Optional wooden beads
- Potting mix
- Rosemary, thyme, ivy, or succulents
Making Process
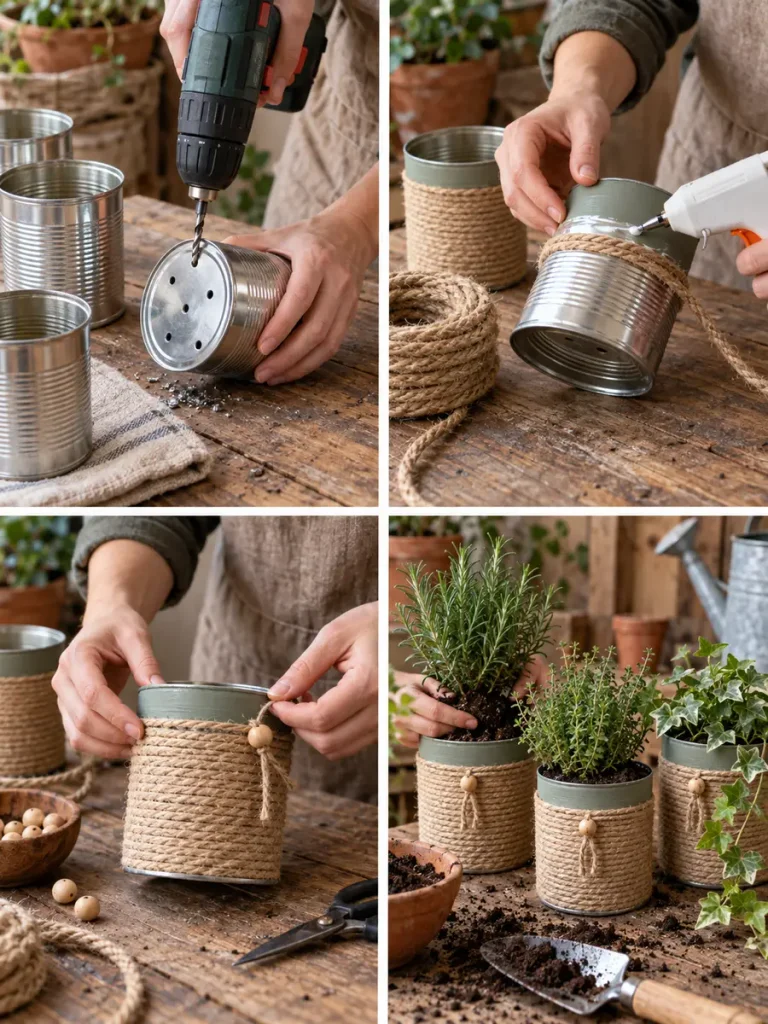
- Clean the cans and drill drainage holes.
- Paint the upper rim if you want some color to remain visible.
- Apply weather-resistant adhesive near the bottom.
- Wrap natural rope tightly around the can.
- Continue upward in neat rows.
- Secure and trim the rope end.
- Add wooden beads or a small tassel if desired.
- Fill with potting mix.
- Plant rosemary, thyme, ivy, or succulents.
14. Tin Can Hanging Herb Trio
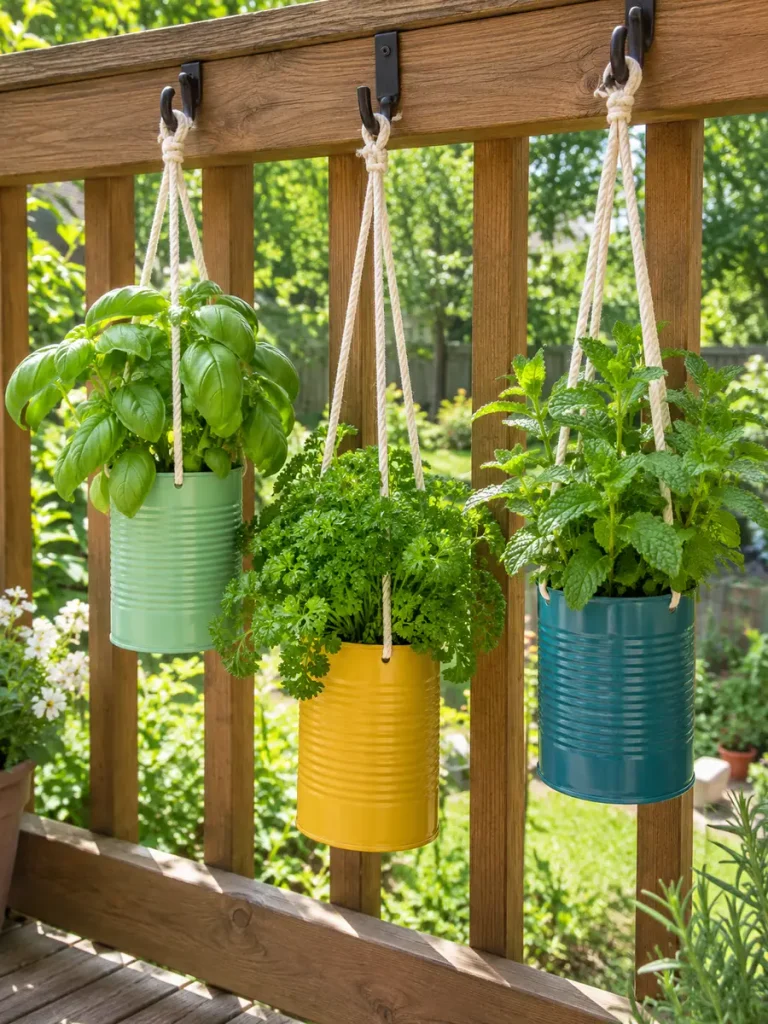
Three herb cans suspended together create a small vertical garden without taking up table space, making the idea particularly useful on balconies and compact patios.
Things You’ll Need
- 3 matching cans
- Exterior paint
- Strong cord
- Secure hooks
- Potting mix
- Basil, parsley, mint, or other herbs
Making Process
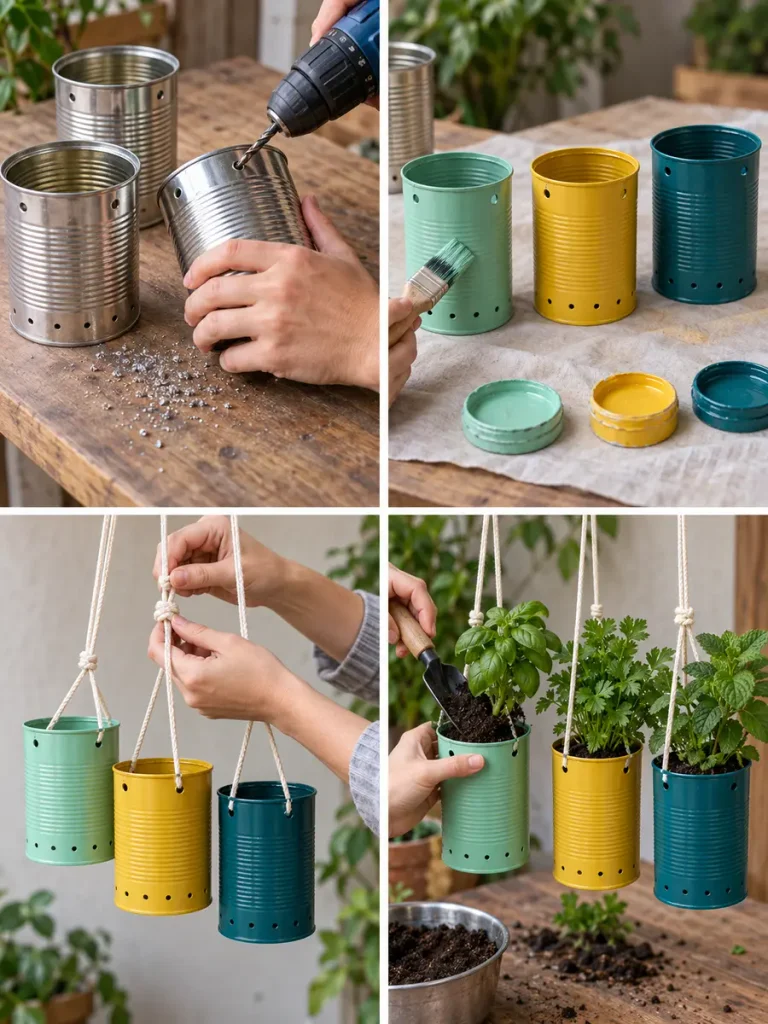
- Clean and dry three cans.
- Drill drainage holes and balanced hanging holes.
- Paint the cans in coordinating colors.
- Allow the paint to dry.
- Thread strong cord through the upper holes.
- Tie secure knots and check that each can hangs level.
- Fill with potting mix.
- Plant basil, parsley, and mint or other herbs.
- Hang from sturdy hooks at staggered heights.
15. Tin Can Flower Chandelier
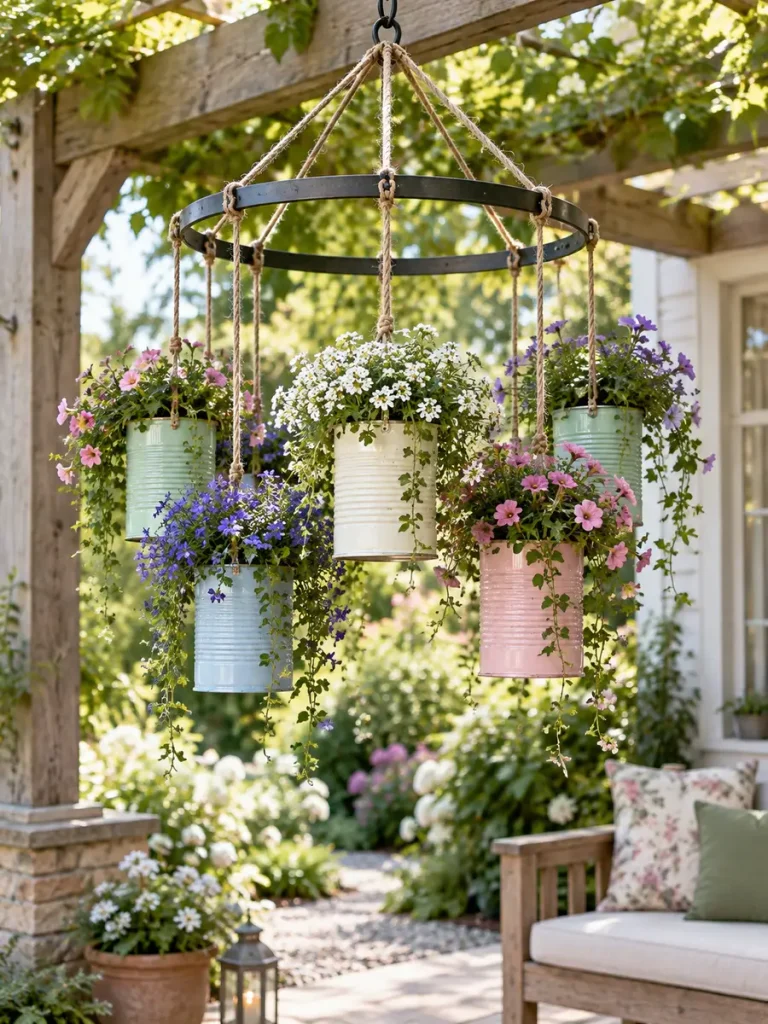
A cluster of small flower-filled cans can become a dramatic hanging garden feature. The central ring is what turns ordinary hanging planters into a true flower chandelier.
Things You’ll Need
- 4-7 lightweight tin cans
- Coordinating paint
- Strong cord
- Durable circular hanging ring
- Heavy-duty pergola hook
- Potting mix
- Trailing flowers
Making Process
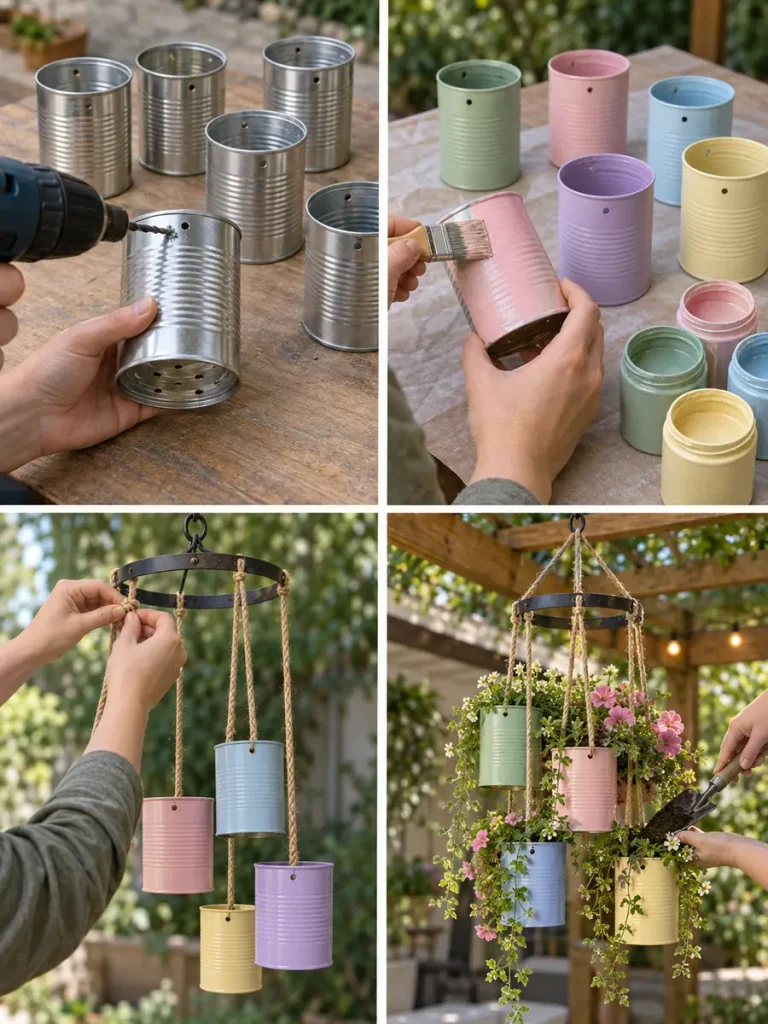
- Clean 4–7 lightweight cans.
- Drill drainage holes and hanging holes.
- Paint the cans in a coordinated palette.
- Cut separate lengths of strong cord.
- Attach the cord securely to each can.
- Tie the other ends around a sturdy central ring.
- Adjust the cords so the cans hang at different heights.
- Fill with potting mix.
- Plant lobelia, alyssum, or calibrachoa.
- Hang the ring from a heavy-duty pergola or ceiling hook and check balance.
16. Tin Can Vertical Wall Garden
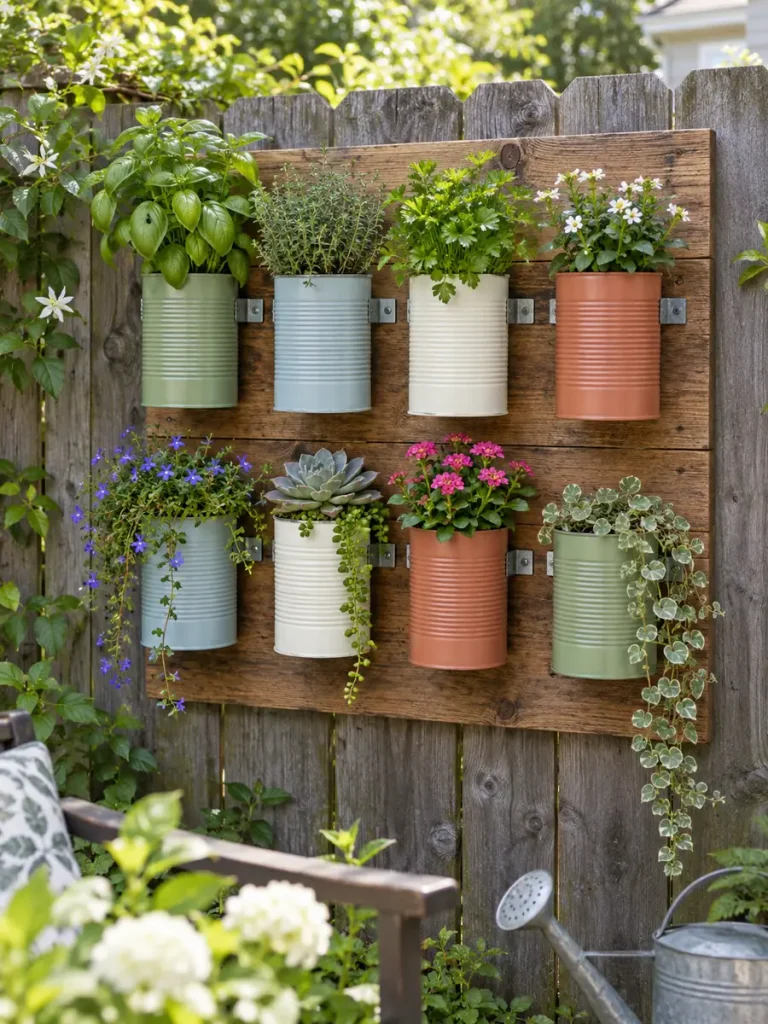
A blank fence panel or outdoor wall can become a compact vertical garden using a strong wooden backing board and rows of tin can planters.
Things You’ll Need
- Weather-treated wooden board
- Several tin cans
- Exterior paint
- Metal can holders or brackets
- Wall-mounting hardware
- Potting mix
- Herbs, flowers, or succulents
Making Process
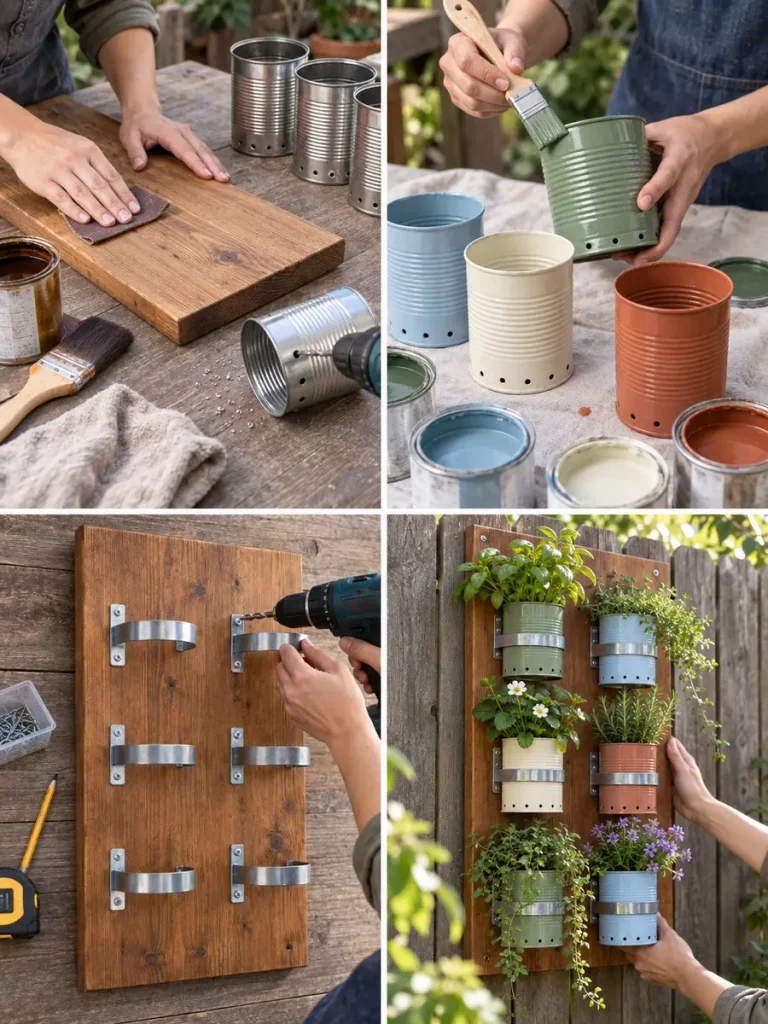
- Sand and weather-treat a strong wooden backing board.
- Clean the cans and drill drainage holes.
- Paint the cans in coordinating colors.
- Lay the cans on the board to plan spacing.
- Mark the bracket positions.
- Screw metal can holders securely to the board.
- Mount the board firmly to a fence or wall.
- Fill the cans with potting mix.
- Plant herbs, flowers, or succulents.
- Place each planted can into its holder.
17. Daisy-Face Tin Can Flower Pots
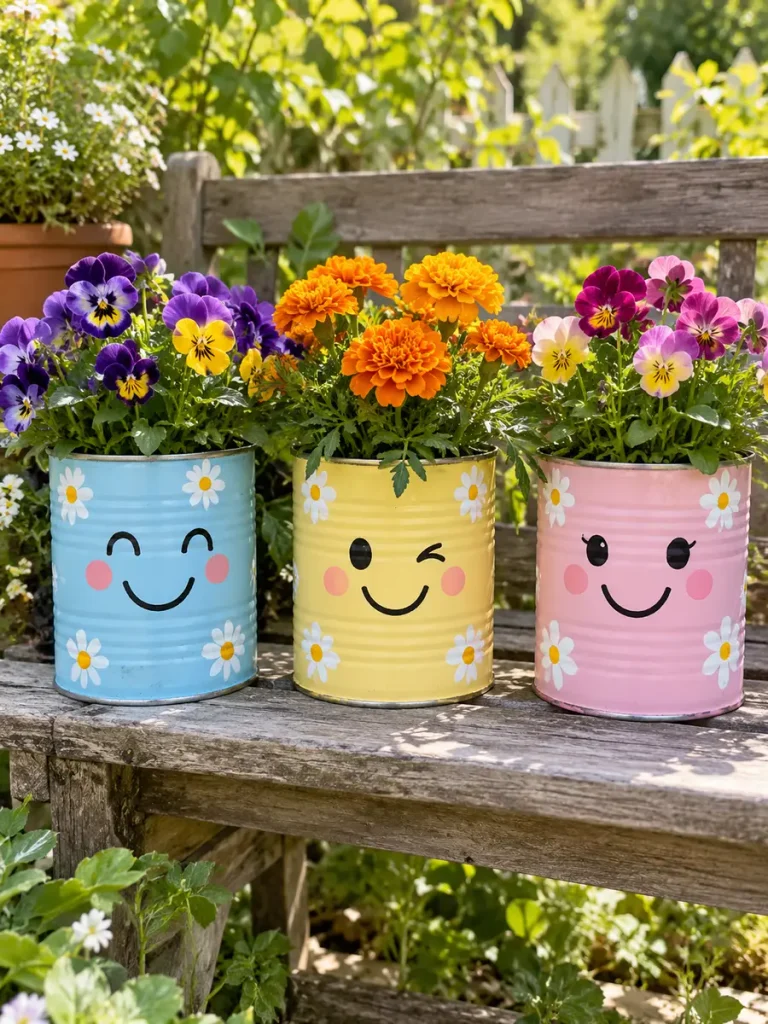
Combine smiling character faces with simple daisy decorations for one of the sweetest projects in the collection. These cheerful pots are perfect for a playful patio or family garden.
Things You’ll Need
- Medium tin cans
- Pastel paints
- Black paint pen or fine brush
- White and yellow paint
- Potting mix
- Colorful flowers
Making Process
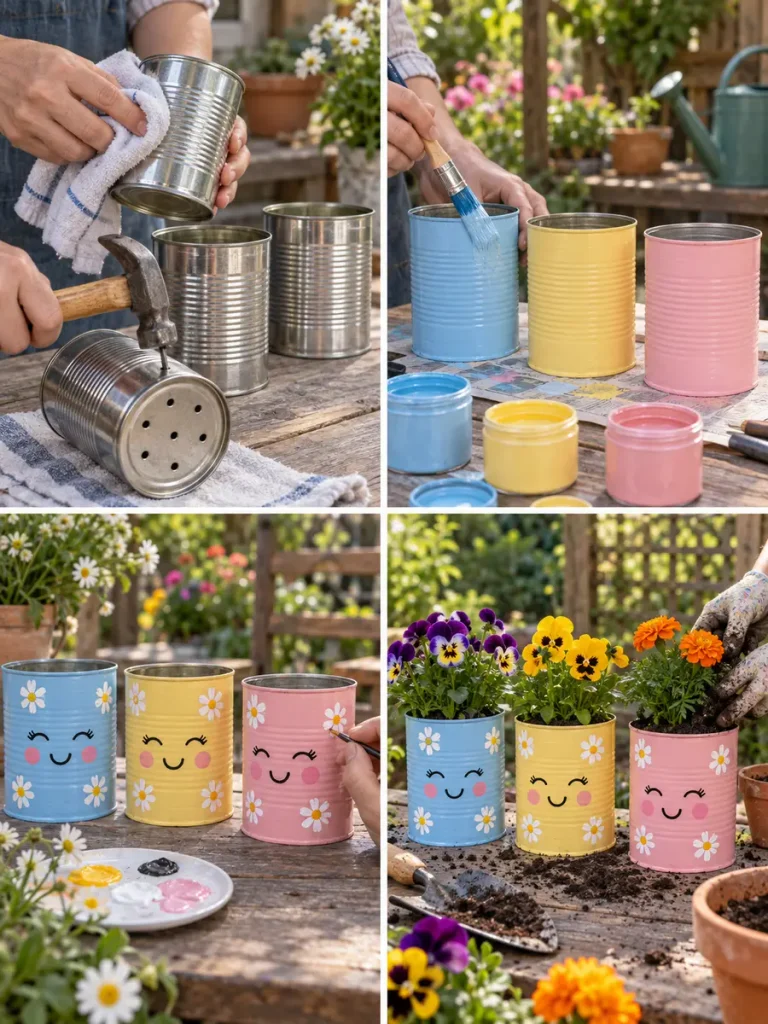
- Clean the cans and drill drainage holes.
- Paint each can in a pastel color.
- Let the base coat dry.
- Paint simple eyes and a curved smile.
- Add rosy cheeks.
- Paint small white daisies around the sides.
- Add yellow centers to the daisies.
- Let the details dry.
- Fill with potting mix.
- Plant pansies, marigolds, or other compact flowers.
18. Tin Can Strawberry Planters
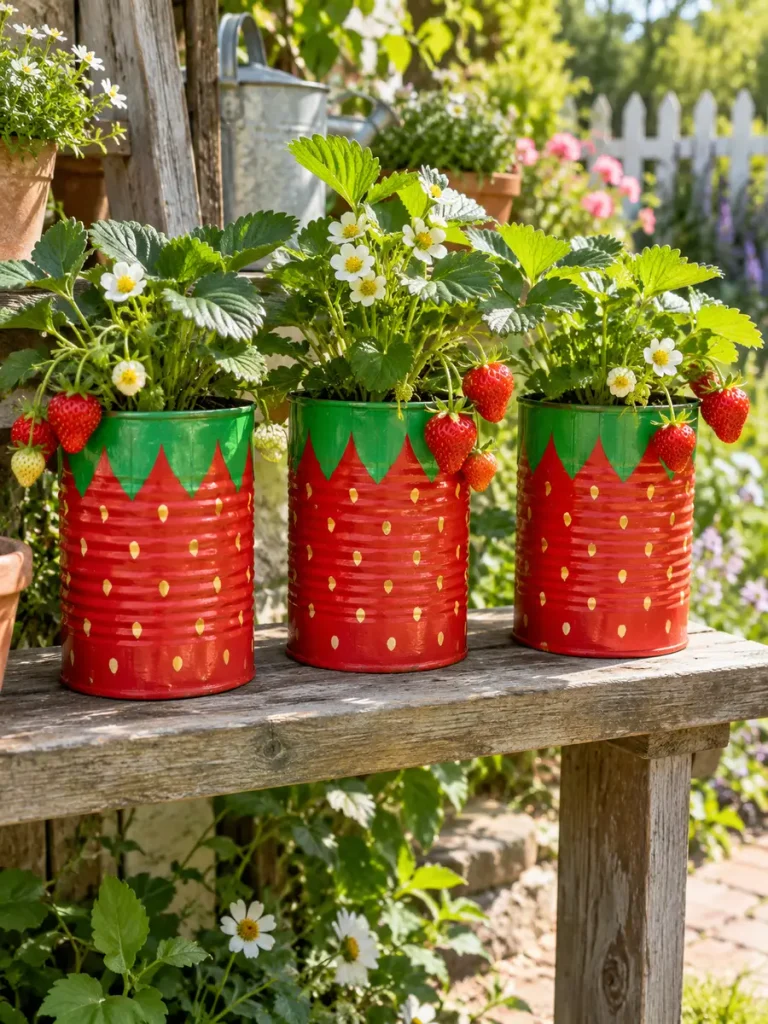
Why put strawberries in plain containers when the containers themselves can look like strawberries? Red paint and tiny seed dots create the effect quickly.
Things You’ll Need
- Medium tin cans
- Red, green, yellow, and white paint
- Potting mix
- Compact strawberry plants
Making Process
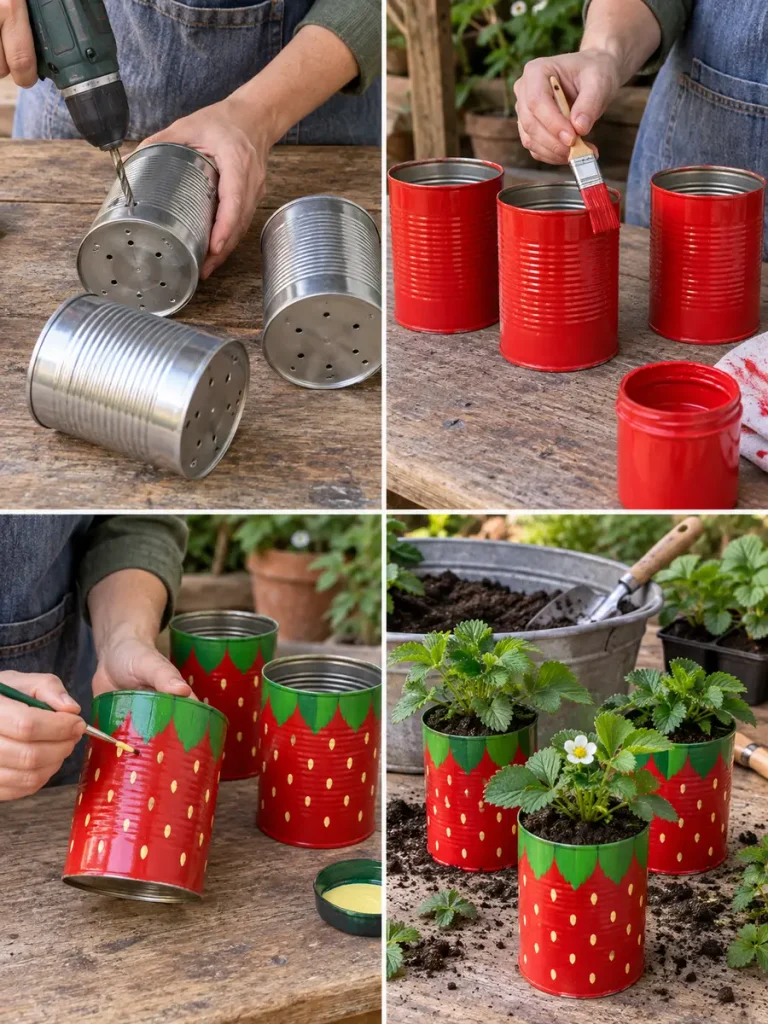
- Clean the cans and add drainage holes.
- Paint the entire can strawberry red.
- Let the red paint dry.
- Add small pale yellow or white seed-shaped dots.
- Paint pointed green leaves around the upper rim.
- Allow the design to dry.
- Apply a protective outdoor finish if desired.
- Fill with quality potting mix.
- Plant a compact strawberry plant.
- Water lightly and place in suitable bright light.
19. Sunflower Tin Can Planters
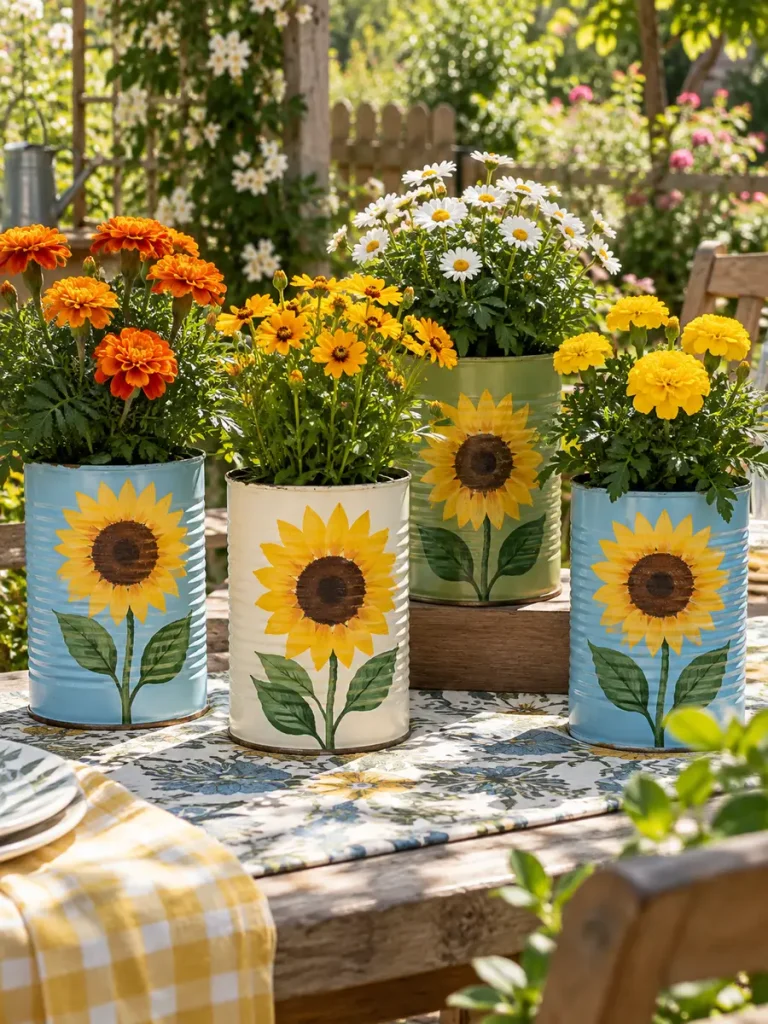
Large painted sunflowers bring a sunny feel to a fence, patio, or garden table even before the real plants begin to bloom.
Things You’ll Need
- Tin cans
- Sky blue, cream, or sage base paint
- Yellow, brown, and green paint
- Brushes
- Potting mix
- Compact flowers or herbs
Making Process
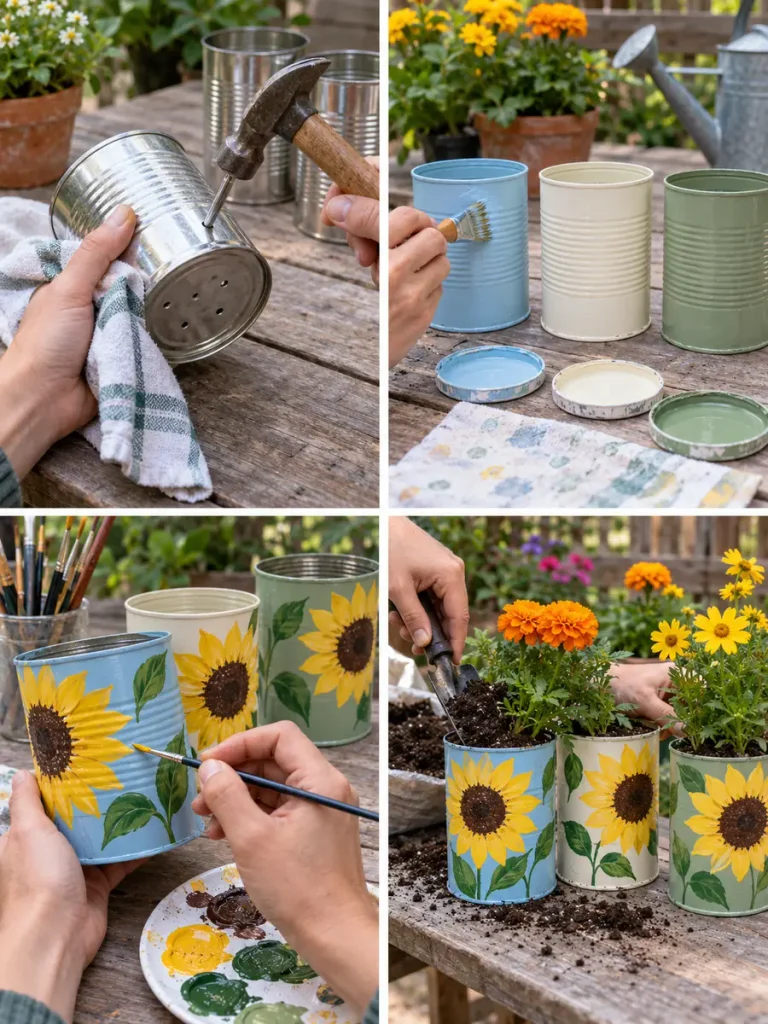
- Clean the cans and drill drainage holes.
- Paint each can with a sky-blue, cream, or sage base.
- Let the base coat dry.
- Paint a dark round sunflower center.
- Add yellow petals around it.
- Paint green stems and leaves.
- Allow the design to dry.
- Fill with potting mix.
- Plant marigolds, coreopsis, daisies, or herbs.
- Arrange on a garden table or shelf.
20. Tin Can Mini Succulent Garden
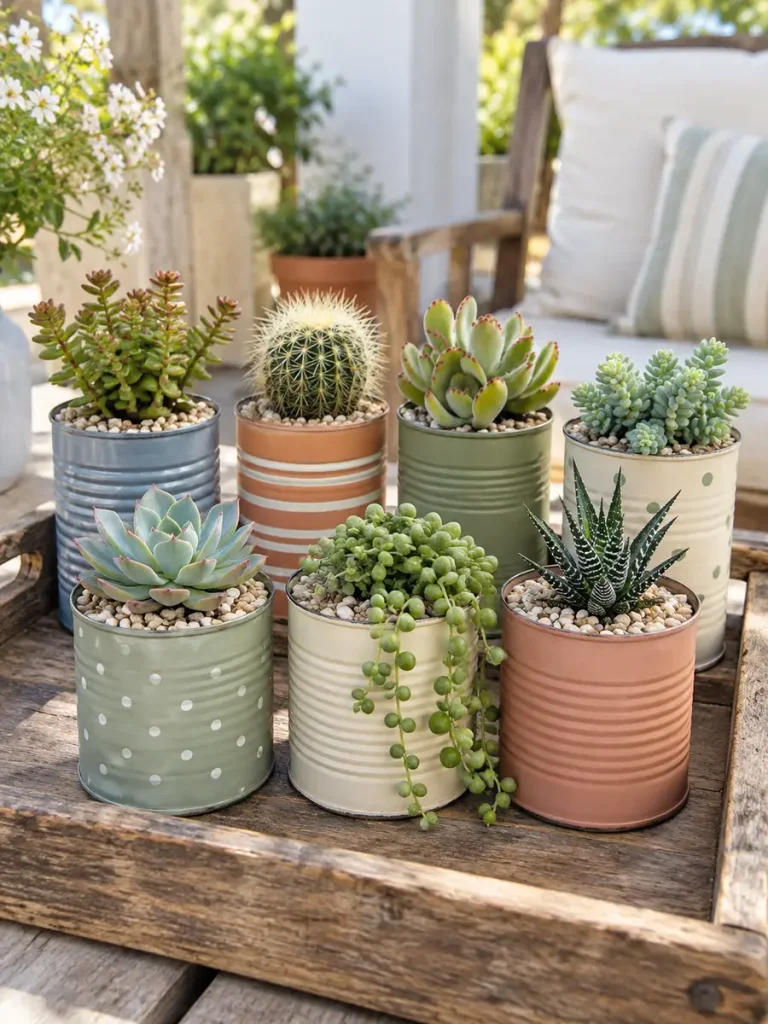
Small cans are ideal for displaying a collection of miniature succulents and cacti. This is also a good use for tins that are too small for most flowering plants.
Things You’ll Need
- 6-7 small tin cans
- Pastel or neutral paints
- Succulent potting mix
- Miniature succulents and cacti
- Decorative gravel
Making Process
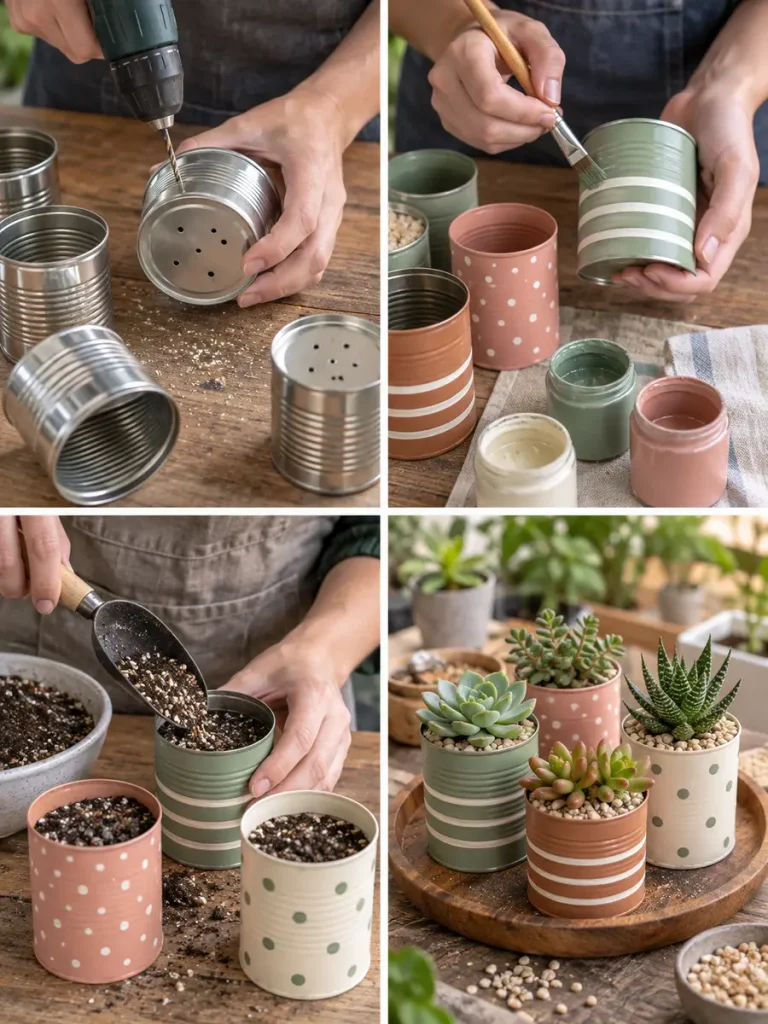
- Clean several small cans.
- Drill small drainage holes.
- Paint the cans in soft pastel or earthy colors.
- Add simple dots, stripes, or geometric accents.
- Let the paint dry.
- Fill each can with succulent mix.
- Plant a different succulent in every can.
- Add a thin layer of decorative gravel.
- Group the cans together on a wooden tray or sunny shelf.
21. Butterfly Tin Can Garden Stakes
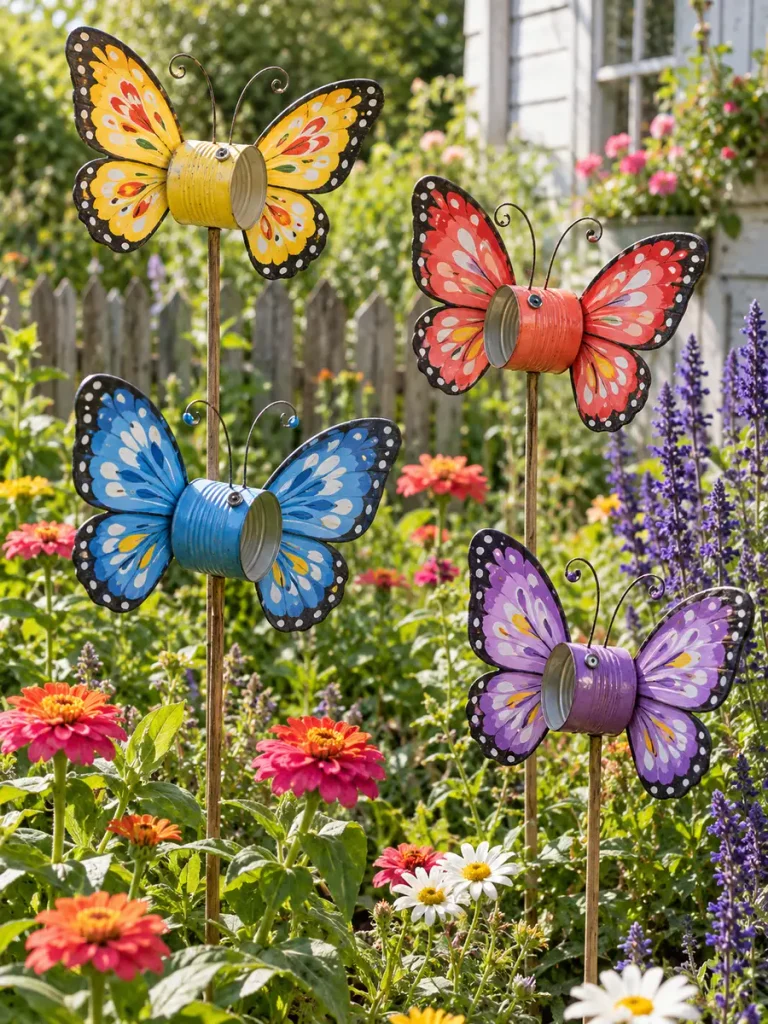
Butterfly garden stakes use the same basic horizontal-can idea as bee stakes but offer more room to play with wing colors and patterns. Keeping the design distinctly butterfly-like makes the finished decorations stand out among real flowers.
Things You’ll Need
- Small tin cans
- Colorful outdoor paint
- Lightweight wing material
- Thin wire
- Wooden stakes
- Outdoor adhesive or suitable fasteners
Making Process
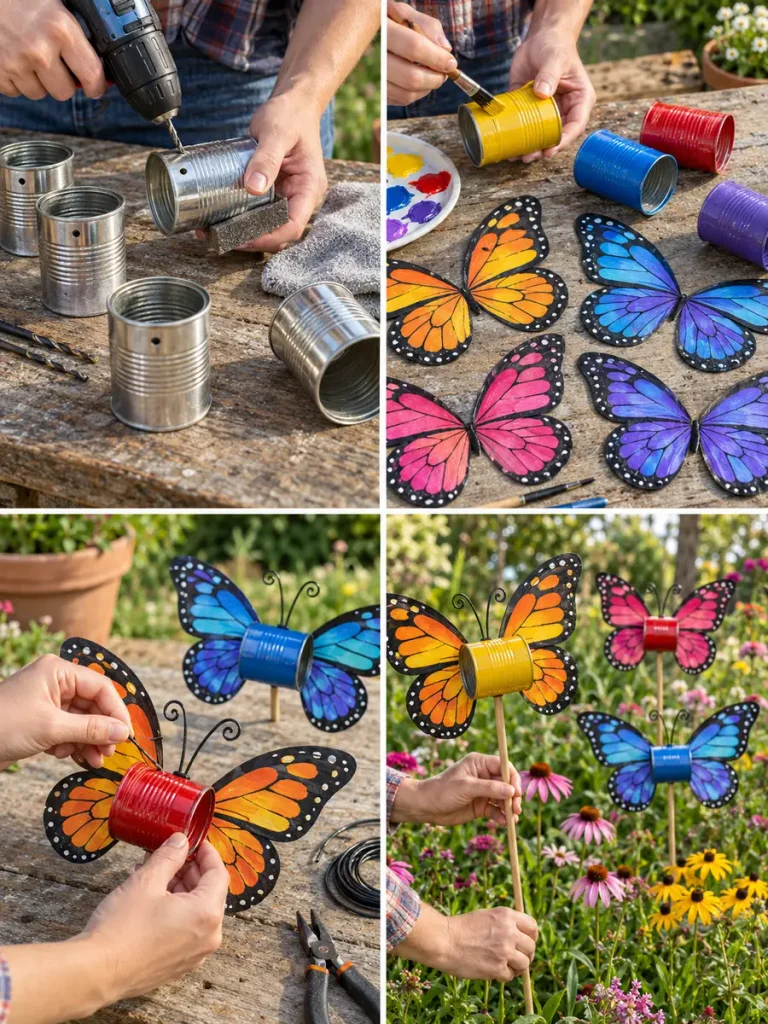
- Clean and lightly sand small cans.
- Paint each can a bright solid color.
- Let the paint dry.
- Cut matching pairs of butterfly wings.
- Paint colorful patterns on the wings.
- Add contrasting borders, dots, or spots.
- Attach the wings securely to each can.
- Bend thin wire into curved antennae and attach them.
- Secure each butterfly horizontally to a wooden stake.
- Push the stakes into a flower bed at different heights.
22. Tin Can Fence Flower Cascade
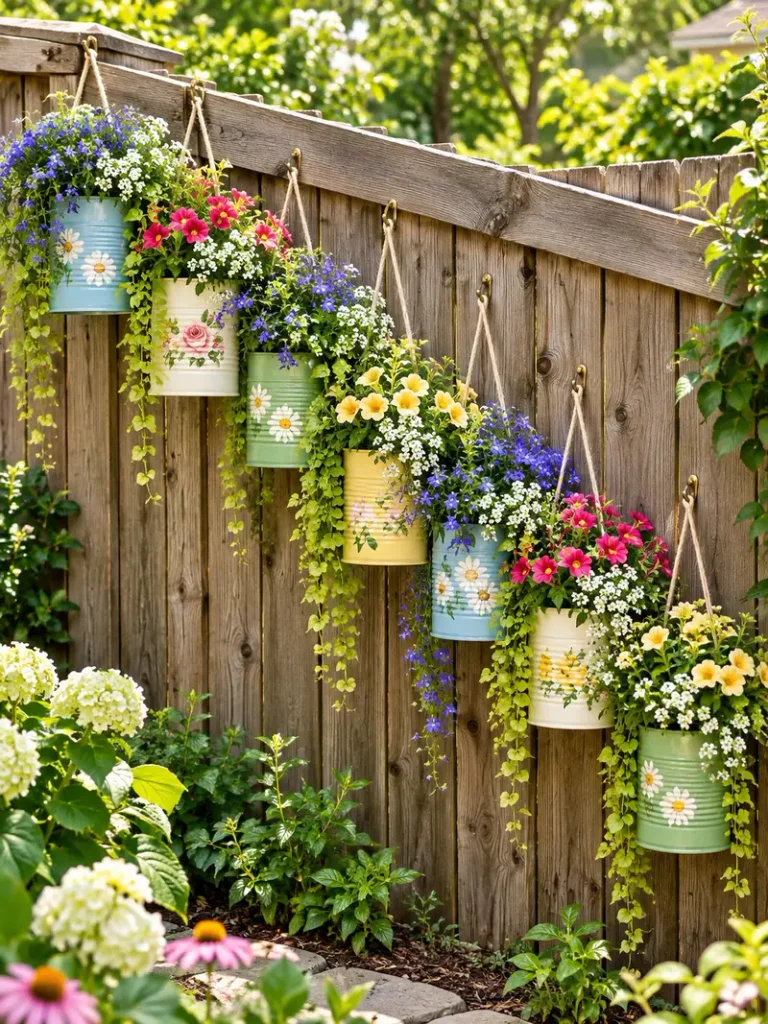
A flower cascade is one of the easiest ways to make a plain fence look fuller. Instead of arranging the cans in straight rows, position them gradually lower across the fence.
Things You’ll Need
- 5-7 tin cans
- Coordinating paints
- Strong hanging cord
- Secure fence hooks
- Potting mix
- Trailing flowers
Making Process
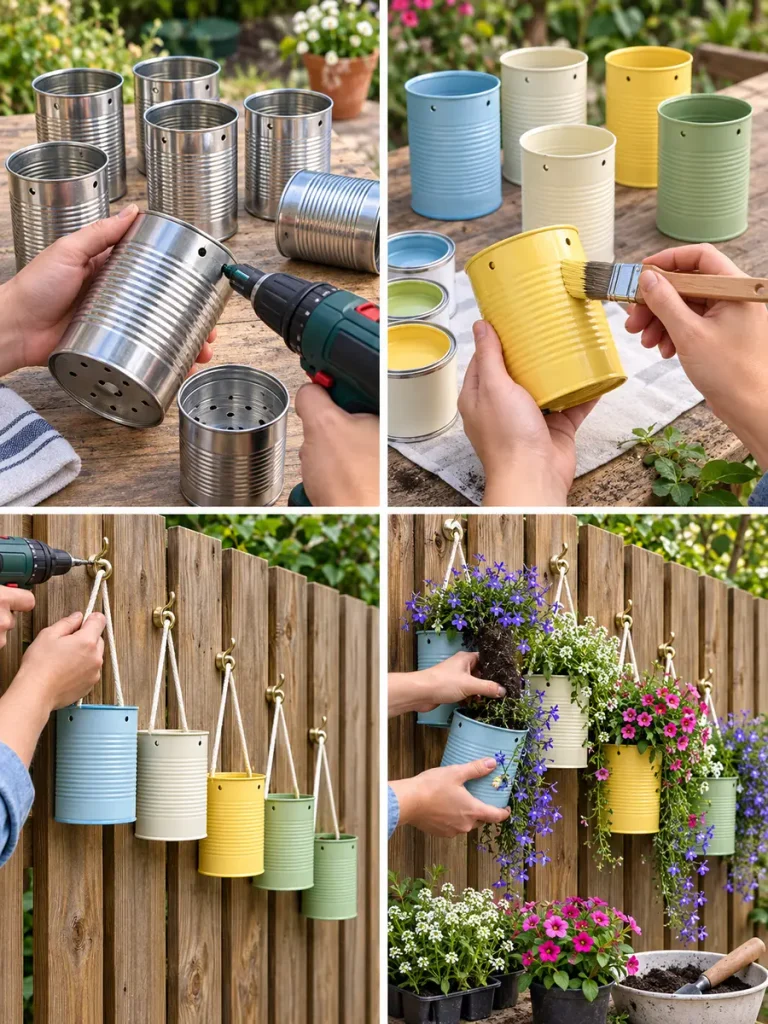
- Clean the cans and add drainage holes.
- Drill hanging holes near the upper rims.
- Paint all cans in a coordinated palette.
- Allow the paint to dry.
- Thread strong cord through each planter.
- Tie secure hanging loops.
- Install fence hooks at gradually changing heights.
- Fill the cans with potting mix.
- Plant lobelia, alyssum, creeping Jenny, or calibrachoa.
- Hang the planters from highest to lowest and adjust the spacing.
23. Mixed Tin Can Garden Display
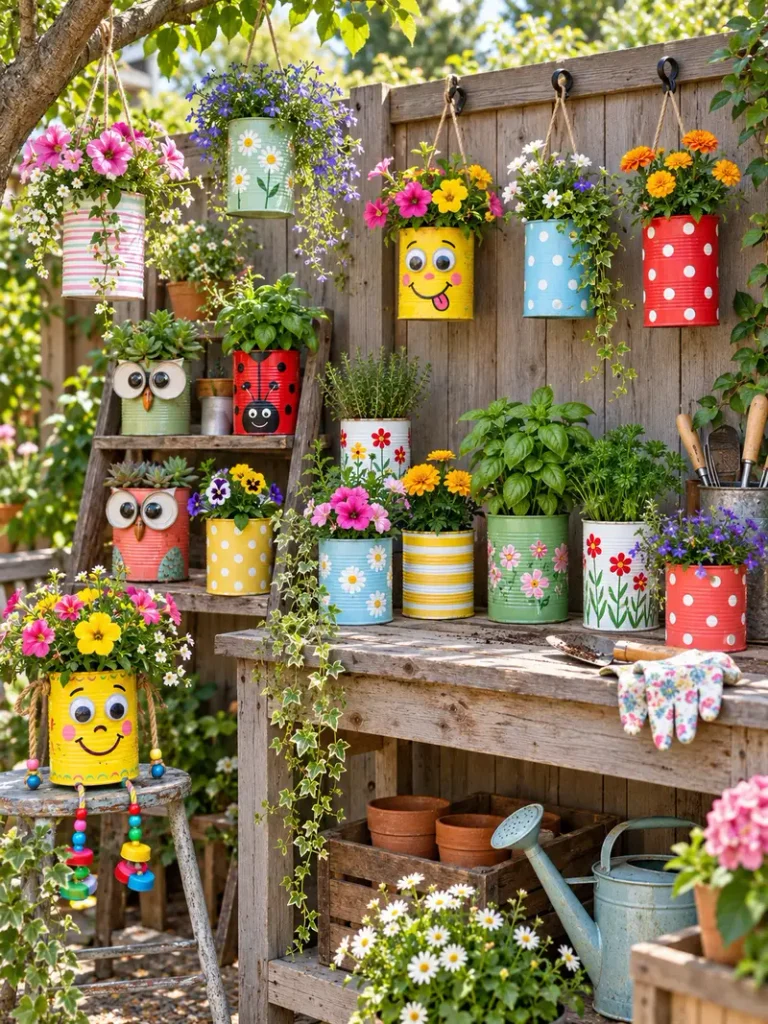
After trying several individual projects, bring the styles together in one larger recycled garden display. This final idea is perfect when you have collected cans in many shapes and sizes.
Things You’ll Need
- Assorted tin cans
- Exterior paints
- Brushes
- Rope and hanging cord
- Secure hooks
- Potting mix
- Flowers and herbs
Making Process
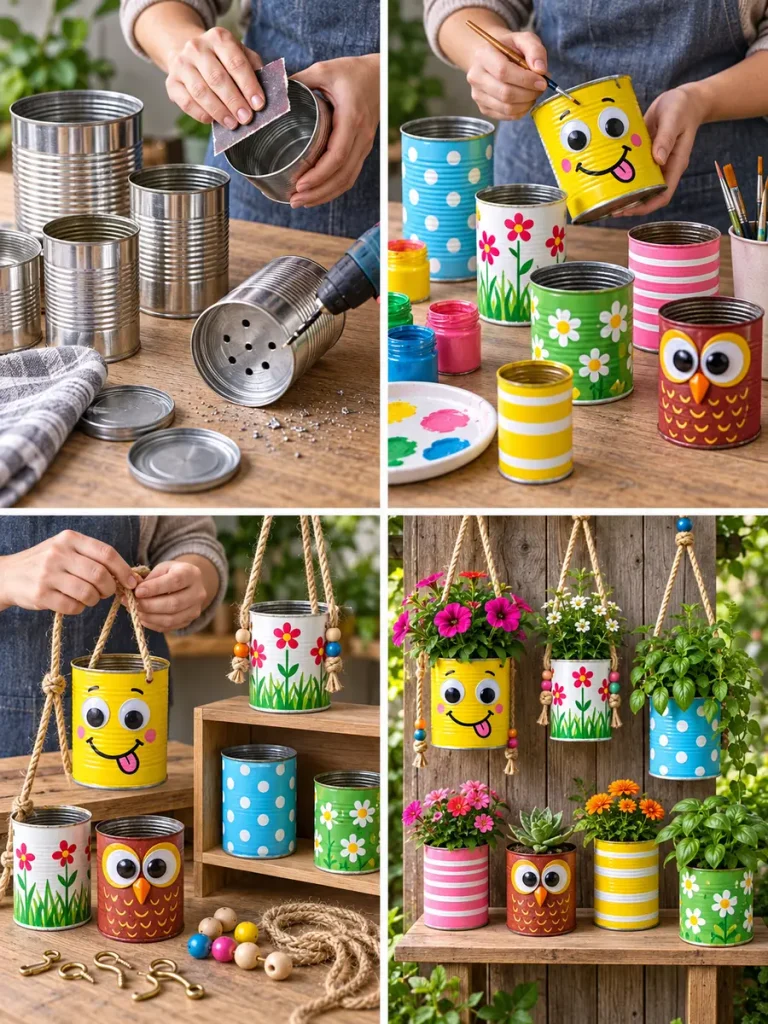
- Collect tin cans in several sizes.
- Clean and dry every can.
- Smooth rough edges and drill drainage holes.
- Choose a coordinated color palette.
- Paint some cans solid colors.
- Decorate others with stripes, dots, flowers, or faces.
- Add rope or hanging cord to selected cans.
- Prepare shelves, hooks, and fence spaces.
- Fill all planting cans with potting mix.
- Plant a mixture of flowers, herbs, and trailing greenery.
- Place some cans on shelves or tables.
- Hang others at different heights.
- Adjust the entire arrangement until it looks balanced.
Best Flowers for Tin Can Planters
Choosing plants that stay reasonably compact will make these DIY Tin Can Garden Ideas easier to maintain.
- Pansies and violas
- Alyssum
- Lobelia
- Marigolds
- Dianthus
- Calibrachoa
Best Herbs to Grow in Tin Cans
- Thyme
- Chives
- Parsley
- Oregano
- Basil
- Mint
How to Make Tin Can Planters Last Longer Outside
- Use paint and primer designed to adhere to metal.
- Apply a compatible outdoor protective coating after the decoration has dried.
- Keep drainage holes clear so water does not remain trapped inside.
- Avoid leaving cans in trays full of rainwater.
- Replace cans if rust becomes deep enough to weaken the metal.
Important Watering Tips
Small metal containers can dry faster than large ceramic or plastic pots, especially in summer sun. Check moisture by touching the soil rather than watering on a fixed schedule. Shade, temperature, rainfall, plant type, and container size all affect how quickly the mix dries. Good drainage remains important even when the soil dries quickly.
Prevent Tin Can Planters From Becoming Too Hot
Metal exposed to intense sunshine can warm quickly. During very hot weather, use lighter paint colors where practical, move small containers away from harsh afternoon sun, and watch plants for heat stress. Another useful option is to keep the plant in its original draining nursery pot and place that pot inside the decorated tin can as a removable cover.
Where to Display DIY Tin Can Garden Ideas
- Wooden fences
- Balcony walls
- Garden shelves
- Patio tables
- Porch railings
- Pergolas
- Garden sheds
- Vertical planter boards
- Sunny windowsills
- Raised garden beds
- Outdoor potting benches
How to Make a Tin Can Garden Look More Stylish
Limit the main palette to three to five related colors so different can designs still feel connected. Repeat one simple motif, such as white dots or tiny daisies, across several containers. Mix upright herbs, rounded flowers, and trailing plants, and vary the can sizes and heights. Odd-numbered groupings of three, five, or seven containers often feel relaxed and balanced.
Frequently Asked Questions About DIY Tin Can Garden Ideas
Can you really grow plants in tin cans?
Yes. Many compact flowers, herbs, seedlings, and succulents can grow in tin cans for at least part of their life cycle. The important factors are drainage, appropriate soil, enough root space, and suitable light. Larger plants may eventually need to be moved into bigger containers.
Do tin can planters need drainage holes?
If you are planting directly into the tin, usually yes. Drainage holes allow excess water to escape and reduce the chance of saturated soil. If the tin is only being used as a decorative outer cover around a nursery pot, the inner pot can provide the drainage instead.
How many drainage holes should I make?
Several small holes spread across the base are generally better than relying on one central opening. The exact number depends on the size of the can, but the goal is to let excess water leave freely.
How can I stop tin cans from rusting?
Cleaning the metal, using a compatible primer and outdoor paint, applying a protective clear coating, and avoiding standing water can slow deterioration. Recycled metal planters will still weather over time, especially outdoors.
What flowers are best for tin cans?
Compact pansies, violas, alyssum, lobelia, marigolds, dianthus, and similar smaller flowering plants are good options. Always check the mature size of the specific variety and transplant it if the root system outgrows the can.
What herbs grow best in tin cans?
Thyme, chives, parsley, oregano, basil, cilantro, and young mint plants can work well. Larger or vigorous herbs may need transplanting as they mature.
Can I hang tin can planters from a fence?
Yes, provided you use sturdy hanging points and suitable hooks. Wet soil is much heavier than dry soil, so the support should be strong enough for a fully watered planter.
Are tin can planters good for succulents?
They can be, provided the cans have excellent drainage and are filled with a fast-draining succulent or cactus mix. Avoid overwatering and give each plant the amount of light it requires.
Final Thoughts
You do not need expensive pots to add character to a garden. A few cleaned food cans can become bright flower planters, practical herb containers, colorful hanging baskets, funny garden characters, or decorative bees and butterflies. The most enjoyable part of these DIY Tin Can Garden Ideas is how easy they are to personalize. Start with one or two simple projects, then save additional cans as you use them. Before long, you can build an entire recycled garden display filled with flowers, herbs, succulents, and handmade personality.