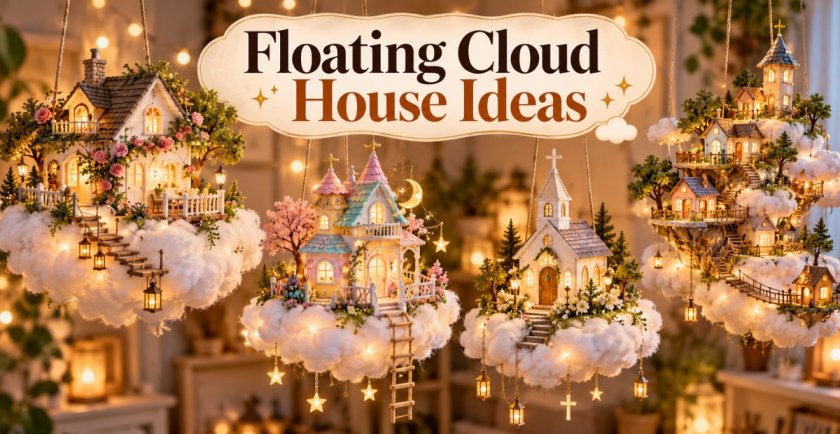
Imagine looking across your room and seeing a tiny glowing cottage floating on a fluffy white cloud. Its little windows shine with warm light, miniature trees surround the front door, and a delicate ladder hangs down as though someone could climb straight into the sky.
It sounds like something from a fairy tale, but you can create the effect using cardboard, craft wood, cotton batting, miniature decorations, and a little patience.
That’s what makes floating cloud house ideas so much fun. They turn everyday craft materials into miniature worlds that seem to defy gravity. Some resemble cozy cabins above the clouds, while others look like enchanted castles, tiny bakeries, woodland cottages, or entire villages suspended in the air.
You don’t need professional model-making skills to try them, either. A simple cardboard house on a cotton-covered platform can look surprisingly beautiful once you add a few architectural details and carefully positioned lights.
The following 23 designs offer something for different crafting abilities and decorating styles. You’ll find soft pastel houses, rustic wooden cabins, whimsical fantasy buildings, and more elaborate miniature scenes.
Each idea includes a materials list and practical instructions to help you recreate the design rather than simply admire it.
Whether you’re making a special handmade gift, decorating a fantasy-themed room, or looking for an unusual weekend craft, these little houses are a lovely place to start.
Before You Start: How to Build a Floating Cloud House
Most floating cloud houses have three basic parts: a miniature building, a lightweight cloud-shaped platform, and a secure hanging system.
Once you understand how these parts work together, you can experiment with almost any house style.
Basic Supplies
You’ll use different materials for different projects, but these are worth keeping nearby:
- Foam board, chipboard, or sturdy cardboard for building structures
- Lightweight craft wood, wooden sticks, and small dowels
- Polyester fiberfill or cotton batting for fluffy cloud effects
- White craft felt for covering visible platform edges
- Acrylic paints, brushes, craft glue, and scissors
- Clear acetate for miniature windows
- Miniature artificial plants, trees, flowers, and beads
- Battery-operated, low-heat LED fairy lights
- Clear monofilament or strong decorative cord
- Appropriate hanging hardware rated for the intended load
A craft knife, cutting mat, small ruler, and hot-glue gun can also be useful. Adults should handle sharp cutting tools and hot glue.
How to Make a Strong, Lightweight Cloud Base
The fluffy cloud is the decorative covering, not the part that supports the house.
For a typical miniature cottage, cut an oval or irregular cloud shape from rigid foam board. An 8–12-inch platform is a reasonable starting size, depending on the house.
Attach the house to this solid platform using suitable craft adhesive. For larger buildings, use additional lightweight internal supports.
Next, glue small tufts of polyester fiberfill around the platform’s exposed edges and underside. Build up the layers gradually until the rigid base is hidden.
Leave the central area reasonably flat so the house sits securely.
If the design hangs from the ceiling, connect its suspension cords to reinforced structural points rather than relying on loose cotton fibers or decorative trim. Use properly rated overhead mounting hardware, distribute the load appropriately, and test the completed assembly before displaying it.
A Quick Word About Lights and Hanging Safety
Use only suitable low-heat, battery-operated LED products according to their instructions. Keep battery packs accessible, and don’t bury electrical components inside cotton batting or other flammable craft materials.
Never attach these decorations to light fixtures, fans, sprinklers, or smoke detectors. Avoid placing hanging crafts above cribs, beds, seating, or walkways where falling parts could cause injury. Keep small decorative pieces and hanging cords away from children and pets.
Now, let’s create some magical little worlds.
1. Glowing Storybook Cottage on a Soft Cotton Cloud
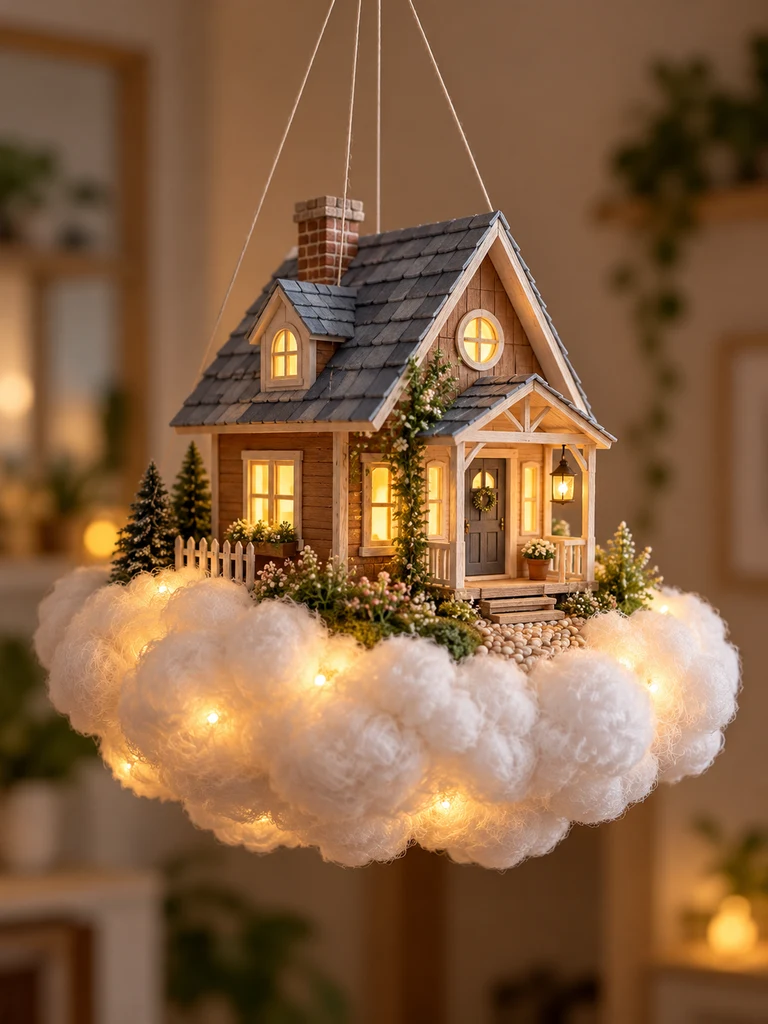
There’s something irresistible about a tiny cottage with glowing windows.
For this first project, picture a warm brown cottage with a steep roof, a miniature front porch, and a few little shrubs outside. The entire house rests on a billowy white cloud, giving it the appearance of a home drifting gently through the sky.
It’s a wonderful starting project because the building uses simple shapes, but the finished result can be surprisingly detailed.
Materials You’ll Need
- Sturdy cardboard or foam board
- Thin balsa wood strips
- Brown, cream, and muted blue acrylic paint
- Clear acetate for windows
- Polyester fiberfill
- Lightweight rigid foam-board platform
- Miniature artificial shrubs
- Small decorative pebbles or lightweight painted foam stones
- Battery-operated LED lights
- Strong hanging cord and suitable mounting hardware
How to Make It
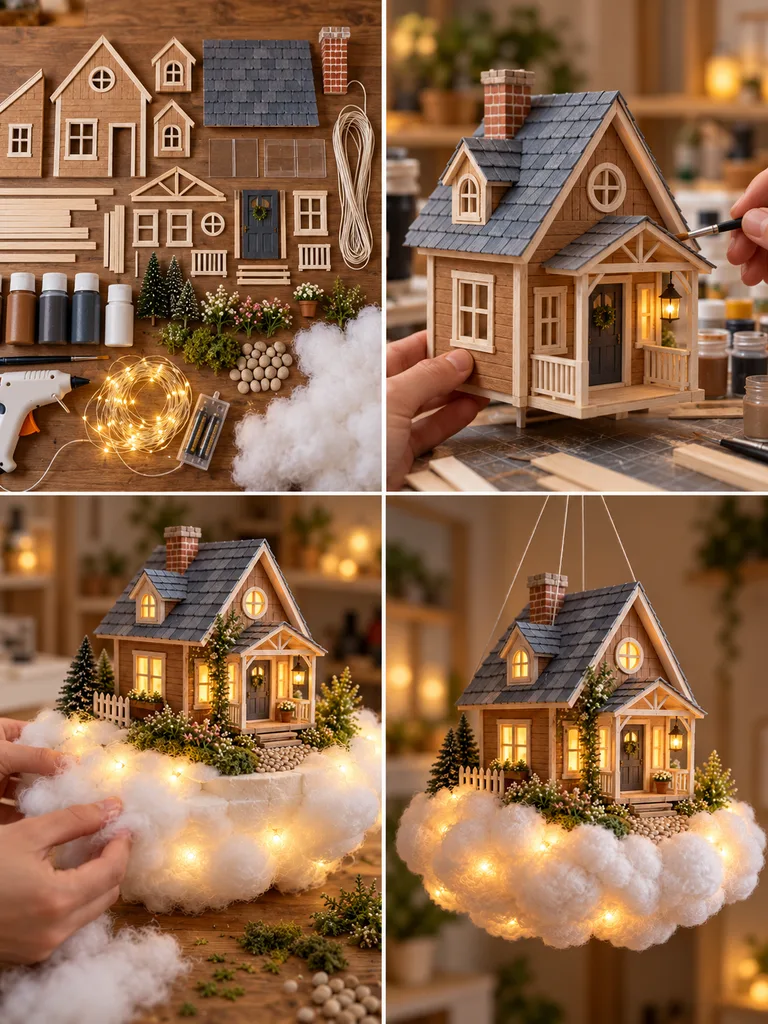
- Create the cottage walls. Cut four cardboard walls for a house approximately 5 inches wide and 6 inches tall. Make a rectangular doorway and several small window openings before assembling the structure.
- Build the roof and porch. Glue the walls into a hollow box, then add two sloped roof panels. Use thin balsa strips around the roof edges and windows to imitate real wooden trim. Add a tiny porch using lightweight cardboard posts and a narrow platform.
- Paint the house. Use a warm brown for the walls, dusty blue for the roof, and cream for the window frames. A slightly uneven painted finish makes the cottage look handmade and lived-in.
- Add the glowing windows. Glue clear acetate behind the windows. Position a suitable battery LED inside the hollow building, keeping its switch accessible through the removable roof or underside.
- Create the floating cloud. Cut an irregular oval from rigid foam board, attach the cottage, and cover the exposed platform edges with overlapping tufts of polyester fiberfill.
- Finish the miniature garden. Add shrubs near the porch, a tiny path made from lightweight imitation stones, and a miniature lantern beside the door. Attach reinforced suspension cords to the platform and test the balance.
Styling Tip: Keep the surrounding decorations small so the cottage remains the focal point. Warm yellow lighting works especially well with the brown walls and blue roof.
2. Pastel Dream House With Hanging Moon and Stars
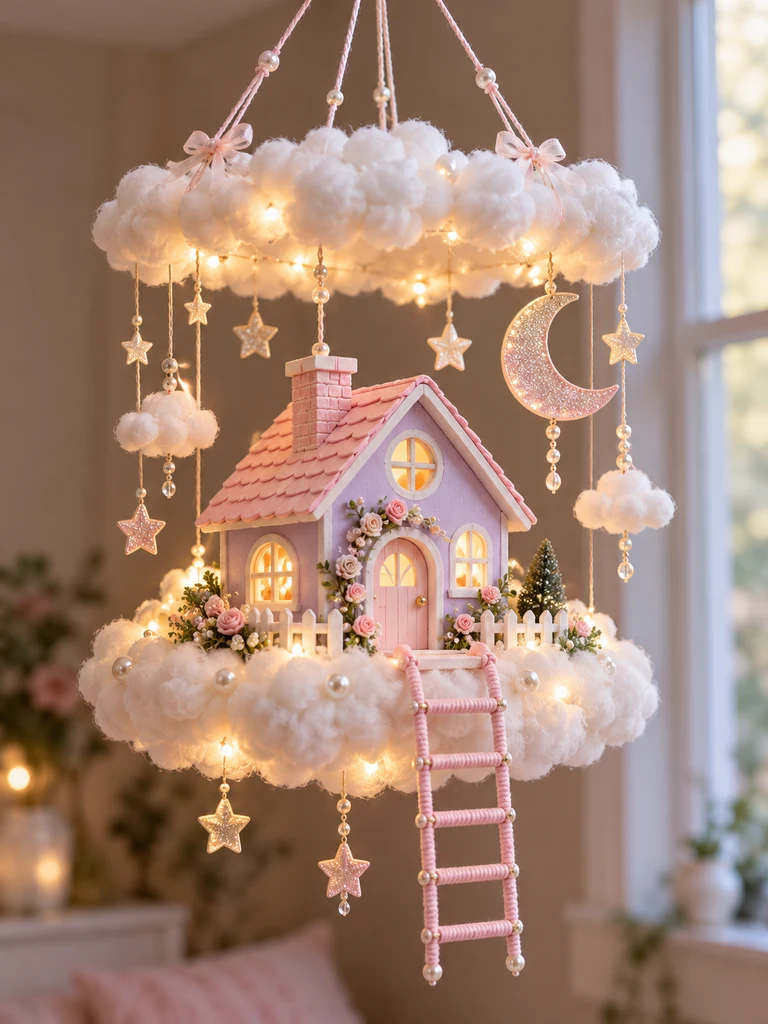
If you love soft pinks, pale lavender, and dreamy bedroom decorations, this little house has plenty of charm.
The design features a pastel cottage sitting on a circular cloud platform, with a crescent moon, dangling stars, and a miniature pink ladder.
Unlike the rustic storybook cottage, this version looks deliberately playful, with rounded windows and candy-colored architectural details.
Materials You’ll Need
- Lightweight foam board
- Pastel pink and lavender cardstock
- Pale pink and white acrylic paints
- White polyester fiberfill
- Small circular foam-board platform
- Glitter-effect cardstock
- Wooden dowels or paper straws
- Pink embroidery thread
- Small pearl beads
- Battery LED fairy lights
How to Make It
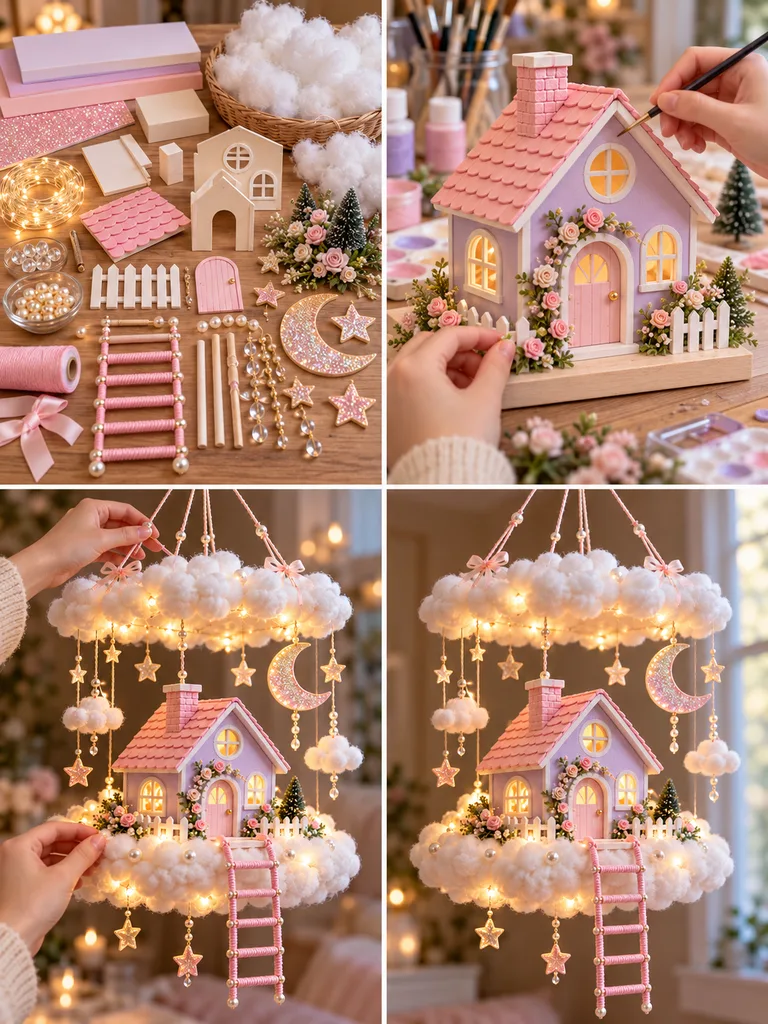
- Cut the house structure. Create a small rectangular building with a triangular roof, approximately 4 inches wide. Cut a rounded doorway and circular window openings.
- Apply the pastel colors. Paint the walls soft lavender and the roof blush pink. Add white trim around the windows and a few tiny painted dots for a whimsical appearance.
- Build the cloud platform. Cut a rigid circular base about 9 inches across. Cover its sides and underside with fluffy white fiberfill, leaving the center clear for the house.
- Make the hanging decorations. Cut a crescent moon and several stars from glitter-effect cardstock. Attach them to pink thread at different lengths beneath the cloud’s rim.
- Craft the miniature ladder. Cut two narrow pieces of lightweight wooden dowel or use sturdy paper straws for the side rails. Glue short matching rungs between them and paint the ladder pink.
- Assemble the display. Secure the cottage to the cloud platform, add the ladder so it hangs below one edge, and position the moon and stars around the open spaces. Add a small warm LED inside the house.
Styling Tip: A pale cream or lavender wall makes the pastel house stand out without competing with its delicate colors. Keep the finished mobile safely away from beds and cribs.
3. Mini Floating Victorian Townhouse Cloud
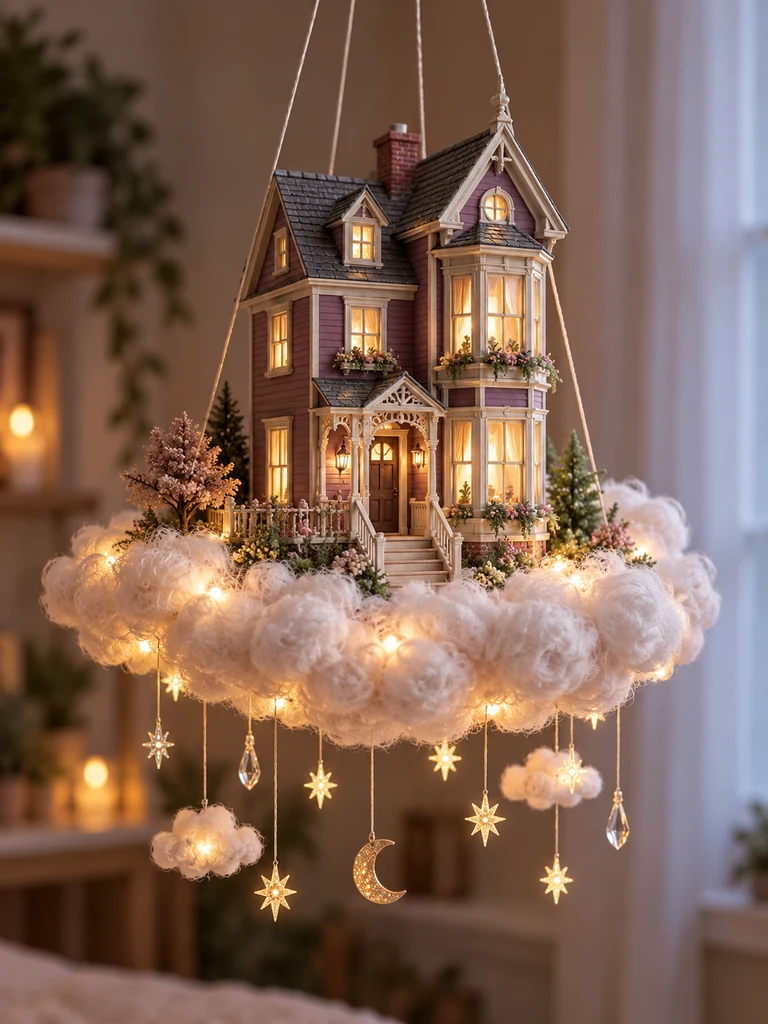
Victorian architecture is full of details that look wonderful in miniature.
Tall windows, decorative roof trim, tiny chimneys, and narrow porches can transform an ordinary cardboard house into something that resembles a building from an illustrated storybook.
For this idea, the house sits on an elongated cloud with softly curled edges.
Materials You’ll Need
- Thick chipboard
- Thin wooden craft strips
- Textured scrapbook paper
- Acrylic paints in charcoal, cream, and muted plum
- Clear acetate
- Polyester batting
- Oval foam-board base
- Small wooden beads
- Micro LED lights
How to Make It
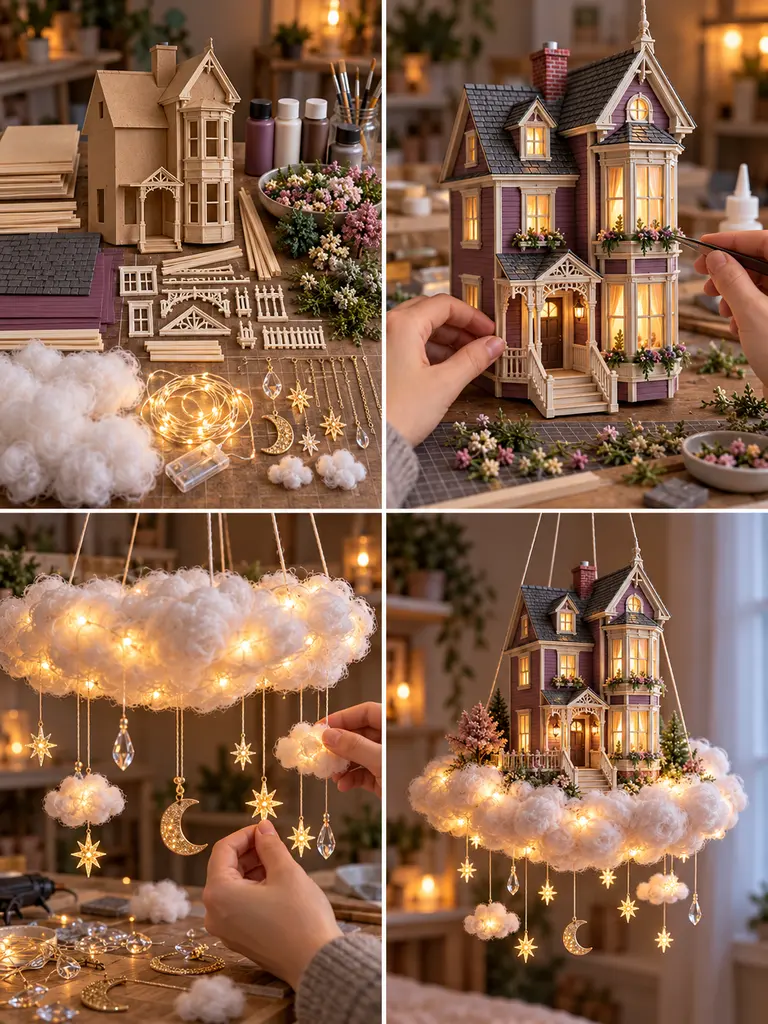
- Draw the townhouse façade. Sketch a narrow two-story house approximately 5 inches wide and 8 inches tall. Include a tall roof peak, upper windows, a lower entrance, and space for a tiny bay window.
- Cut and assemble the walls. Use chipboard for the main structure. Form the bay window with three small angled panels instead of attaching a flat window to the front.
- Add Victorian details. Use narrow wood strips for window frames, decorative roof trim, porch pillars, and door molding. Small wooden beads can imitate ornamental details near the roofline.
- Create a shingled roof. Cut tiny overlapping rectangles from textured paper and glue them onto the sloped roof. Paint the walls muted plum, the roof charcoal, and the trim warm cream.
- Build the elongated cloud. Cut a long oval foam-board platform and cover it with batting. Use slightly tighter cotton curls at the ends to create a billowing cloud silhouette.
- Install lighting and finish. Attach the townhouse securely, add warm LEDs behind the windows, and create miniature entrance steps from stacked lightweight cardboard.
Styling Tip: Avoid making every Victorian detail perfectly symmetrical. Slight variations in trim and window sizes give the miniature more character.
4. Woodland Mushroom Cottage Cloud
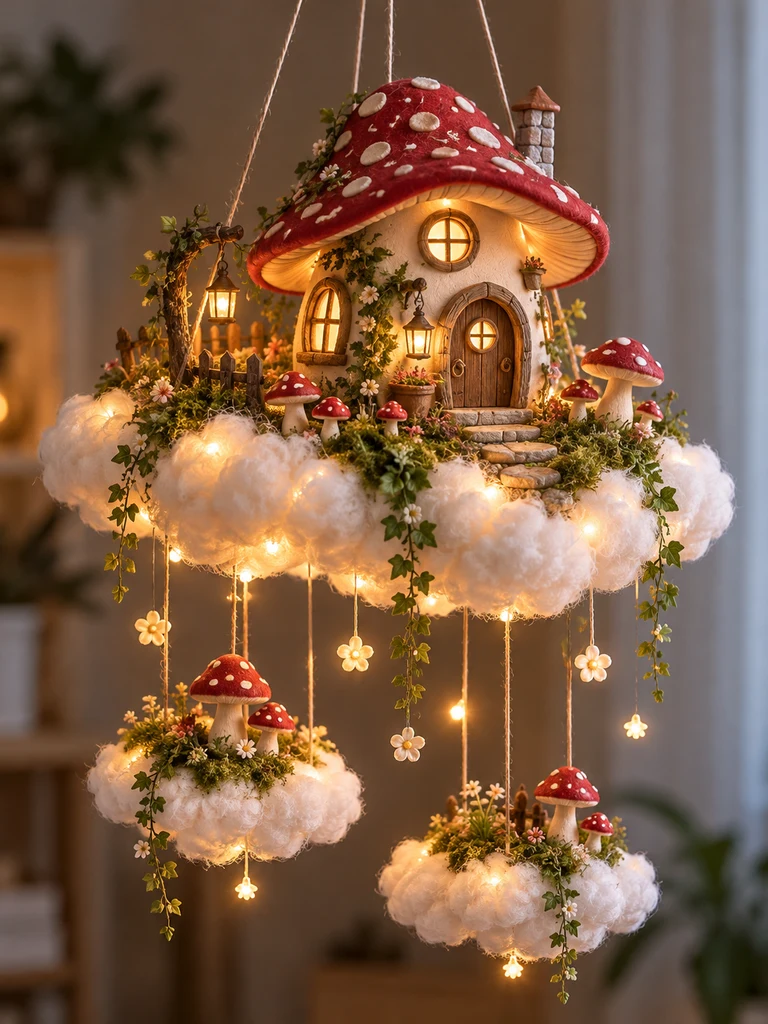
What if a woodland mushroom grew into a tiny house and somehow floated into the sky?
This project combines a rounded cottage with a large mushroom-cap roof. Tiny red toadstools, green moss, and little stones decorate the cloud around it.
The design feels especially magical because the house doesn’t follow ordinary rectangular architecture.
Materials You’ll Need
- Cardboard tube or curved cardstock
- Lightweight foam for the roof
- Small amounts of air-dry clay
- Red, cream, and brown acrylic paint
- Green craft moss
- White polyester fiberfill
- Foam-board platform
- Small felt scraps
- Lightweight imitation stones
- Battery LED light
How to Make It
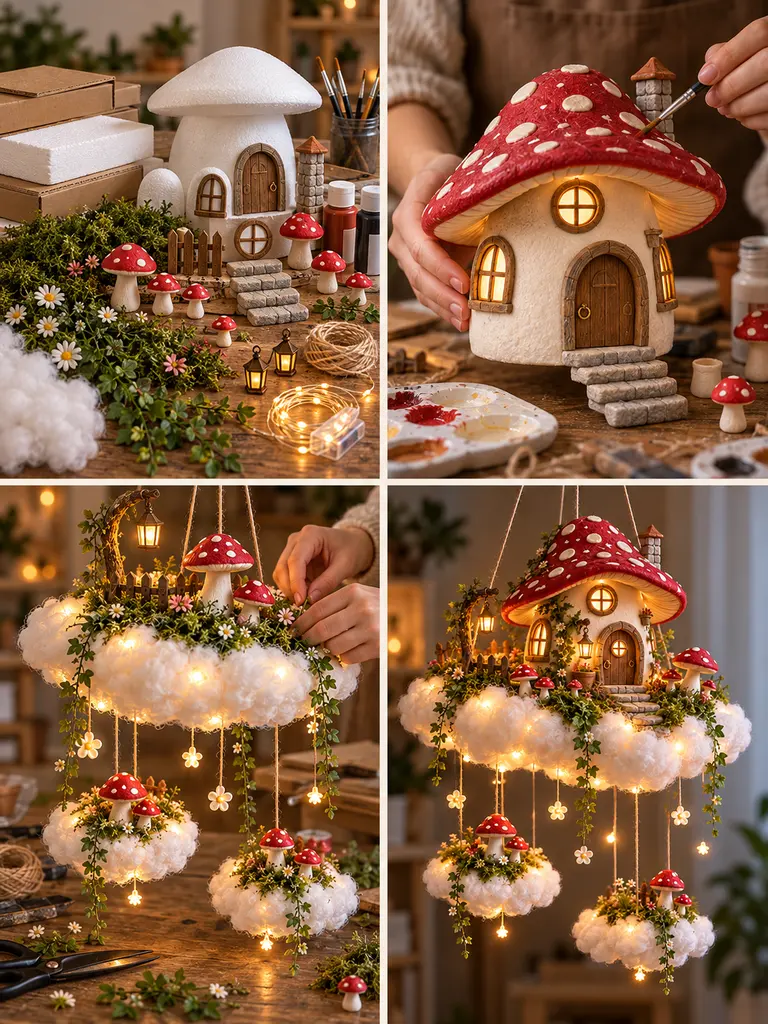
- Make the rounded house body. Use a short cardboard tube or curve cardstock into a cylinder approximately 4 inches wide. Cut a rounded doorway and two oval windows.
- Create the mushroom roof. Cut a broad mushroom-cap shape from lightweight foam. Smooth its edges with a craft knife, handled by an adult, and make sure the roof extends beyond the walls.
- Paint the mushroom cottage. Paint the roof deep red and add uneven cream-colored spots. Use warm beige or light brown for the walls.
- Add organic details. Create a small curved door frame and a few window ledges using thin pieces of air-dry clay. Let them dry completely before attaching them.
- Prepare the woodland cloud. Cover a rigid irregular foam-board platform with fluffy batting. Leave a few small spaces on top for moss patches and miniature mushrooms.
- Complete the woodland scene. Secure the house to the platform, add tiny felt mushrooms, arrange faux moss around the doorway, and place miniature stones along a short path.
Styling Tip: Mix different mushroom sizes. Three little toadstools clustered near the door look more natural than identical mushrooms placed evenly around the house.
5. Scandinavian Snow Cabin on a Winter Cloud
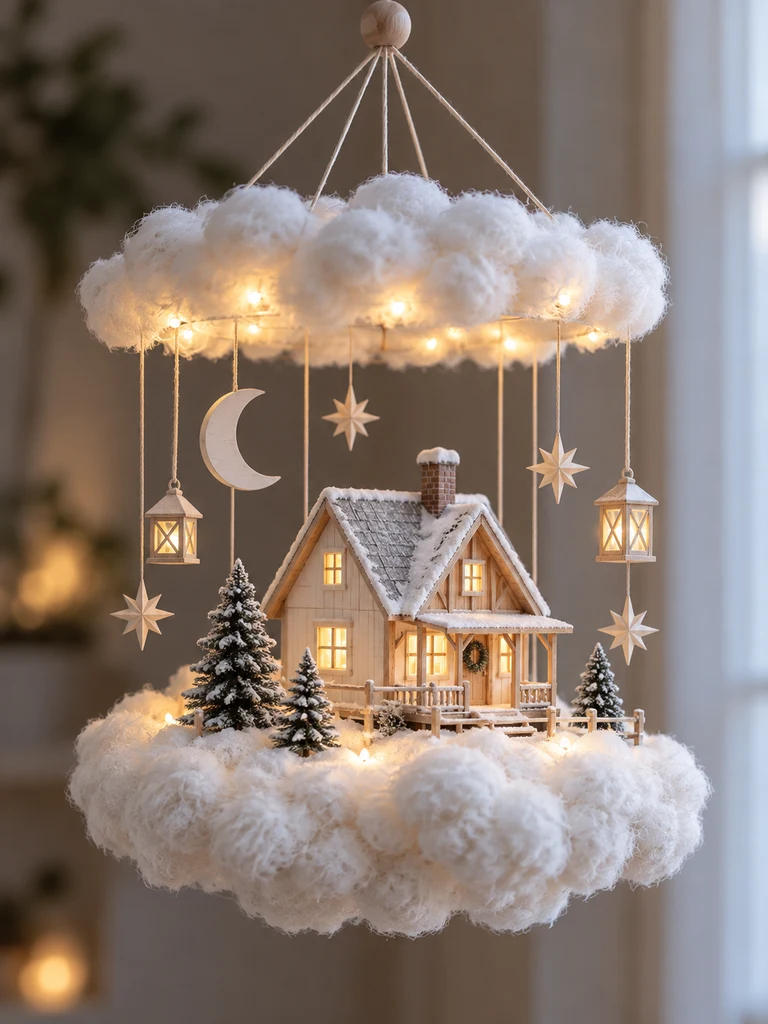
This floating house takes inspiration from simple Nordic cabins, with a steep roof, clean lines, pale wood, and soft winter colors.
Instead of elaborate decorations, its beauty comes from a few carefully chosen details: tiny evergreen trees, warm windows, and a thick layer of fluffy snow-like cloud.
Materials You’ll Need
- Thin balsa wood sheets
- White and gray acrylic paint
- Kraft paper
- Lightweight miniature pine trees
- Polyester batting
- White felt
- Rigid foam-board platform
- Small wooden sticks
- Battery-operated warm-white LEDs
How to Make It
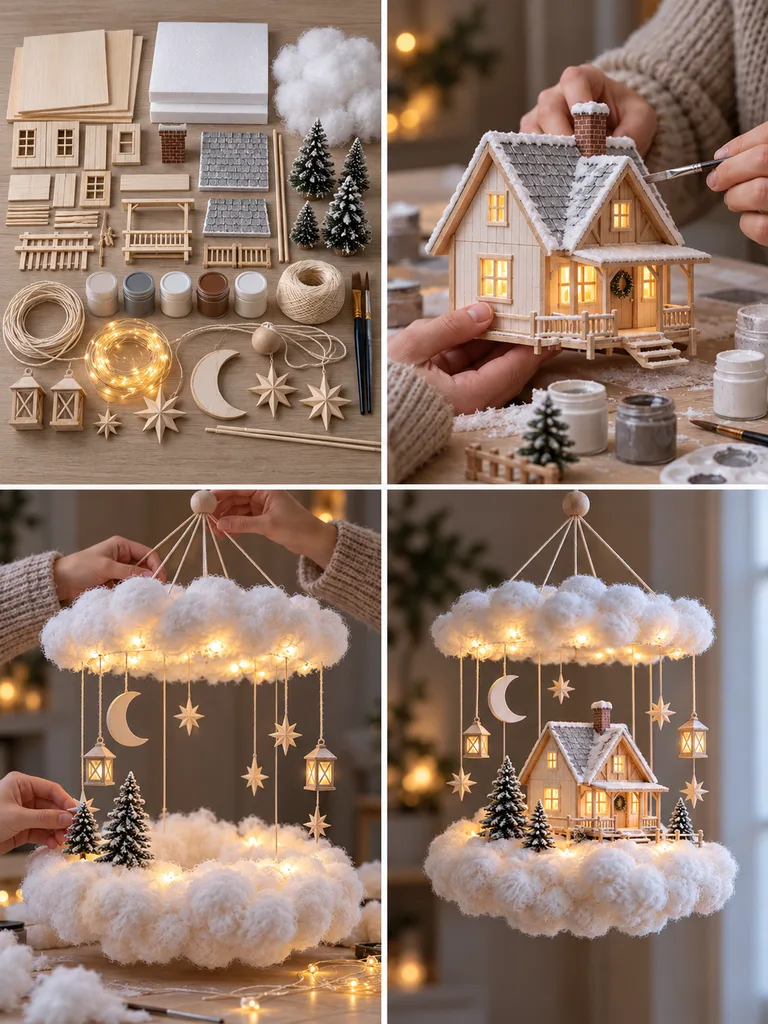
- Cut the cabin pieces. Make two rectangular sidewalls, a front and back wall with steep triangular peaks, and two roof panels.
- Assemble the wooden structure. Glue the walls together and add the pitched roof. Reinforce the inside corners with narrow wooden strips.
- Finish the exterior. Paint the walls warm white or leave some pale wood visible. Give the roof a muted gray finish and add thin kraft-paper strips to imitate roof seams.
- Prepare the snowy cloud. Cut a rigid base slightly wider than the cabin. Cover the top with white felt and add fluffy batting around the edges and underside to resemble soft snowdrifts.
- Add winter greenery. Place two or three lightweight miniature pine trees near the cabin, with a tiny path leading to the door.
- Light the windows. Position a warm battery LED inside the house and attach the cabin securely to the cloud platform.
Styling Tip: Stick to white, gray, natural wood, and evergreen. The restrained palette is what makes this design feel peaceful.
6. Floating Treehouse Cloud Platform
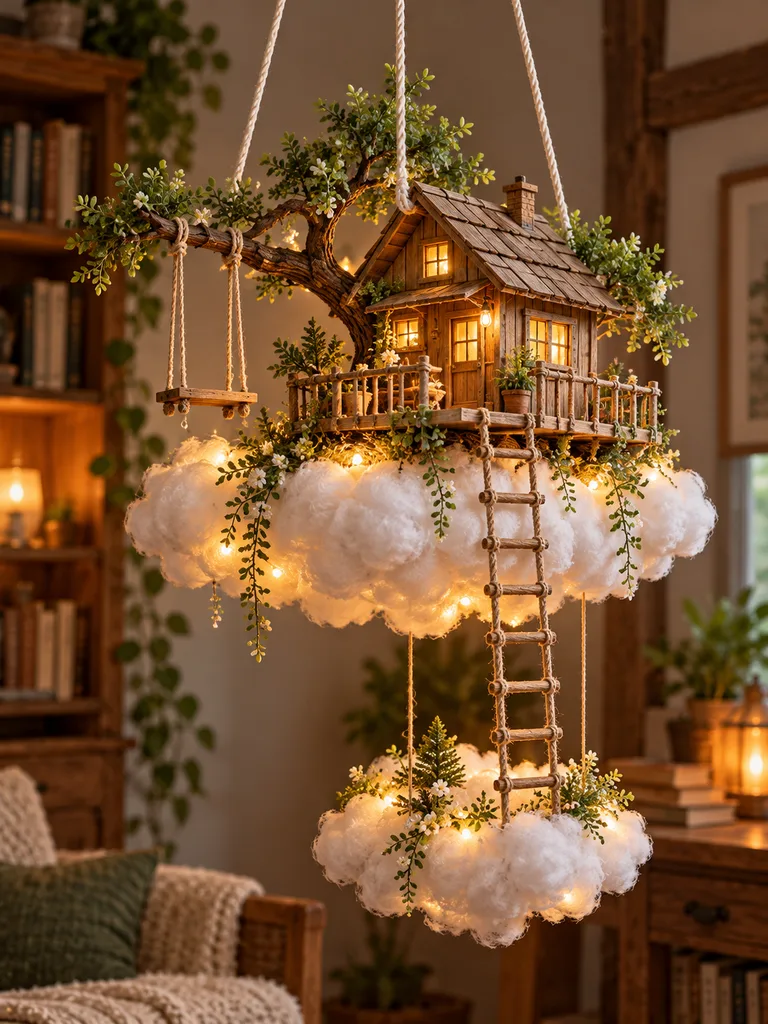
A treehouse floating on a cloud is a playful twist on two childhood dreams: having your own secret treehouse and living high in the sky.
This design uses craft sticks to create a rustic wooden hut raised slightly above a broad cloud platform. A tiny rope ladder and swing complete the scene.
Materials You’ll Need
- Wooden craft sticks
- Lightweight foam board
- Jute twine
- Small artificial branches
- Cotton batting
- Wooden dowels
- Brown acrylic paint
- Lightweight rigid cloud platform
- Craft glue
How to Make It
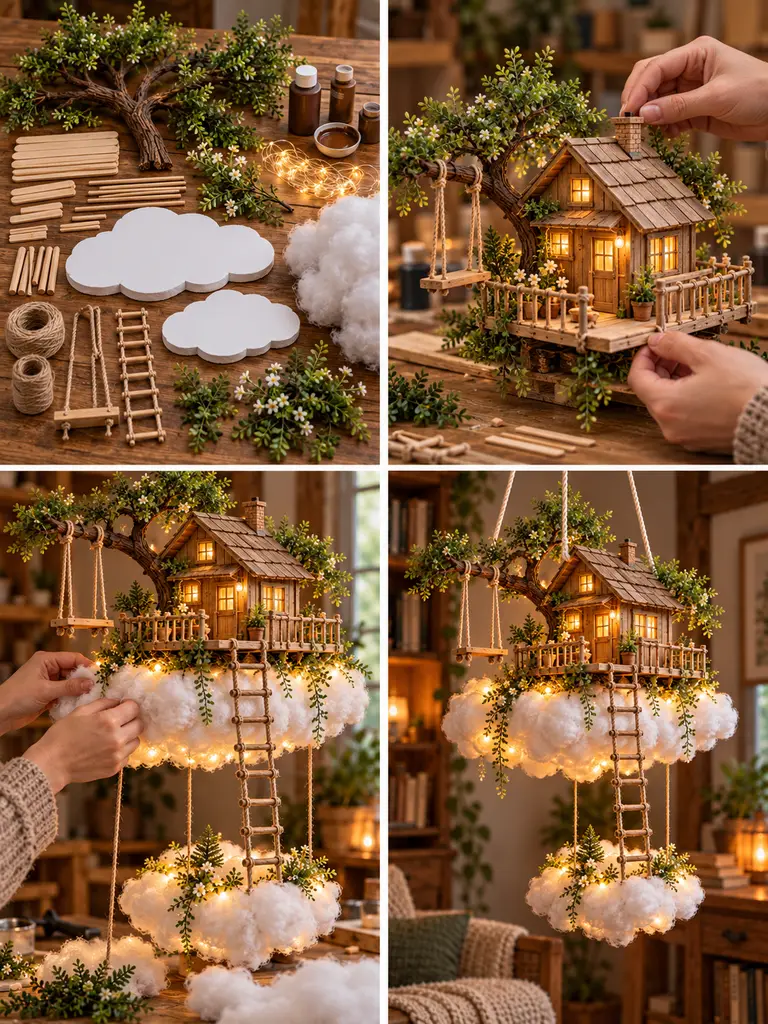
- Build the hut walls. Trim craft sticks to equal lengths and glue them onto thin foam-board wall panels. Leave a small opening for the door and windows.
- Create the raised foundation. Attach the hut to four short wooden dowel supports fixed securely to a reinforced platform. Keep the elevation modest so the assembly stays stable.
- Add a sloped roof. Layer craft sticks over lightweight cardboard roof panels to give the treehouse a rustic, weathered appearance.
- Make railings and a ladder. Use narrow wooden sticks for porch railings. Tie short dowel rungs between two pieces of twine to create a miniature rope ladder.
- Shape the cloud base. Cover the platform’s perimeter with irregular tufts of cotton batting. Add one smaller cloud shape beneath the main platform for extra visual depth.
- Finish the scene. Attach lightweight faux branches beside the hut, hang a miniature swing from a reinforced support, and let the ladder descend toward the edge of the cloud.
Styling Tip: Use slightly different brown paint tones on the wooden sticks to imitate weathered timber.
7. Tiny Sky Bakery on a Whipped Cloud
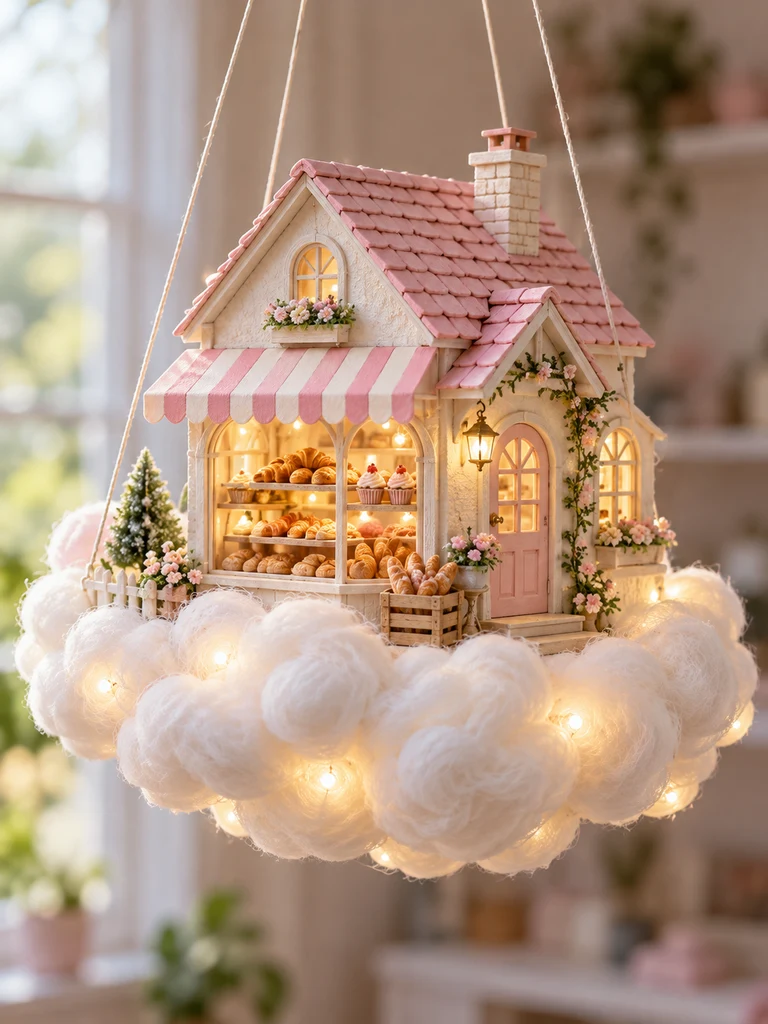
A tiny bakery floating on a fluffy cloud feels like something from a story about a village where every morning smells like fresh pastries.
The house is designed as a miniature shop with a striped awning, a little display window, and colorful pretend baked goods.
The cloud beneath it has rounded, swirled edges inspired by whipped cream.
Materials You’ll Need
- Sturdy cardboard
- Pink and cream patterned paper
- Thin wooden sticks
- Lightweight polymer-clay-style craft miniatures
- Cotton batting
- Foam-board cloud platform
- Acrylic paint
- Clear acetate
- Battery LED lights
How to Make It
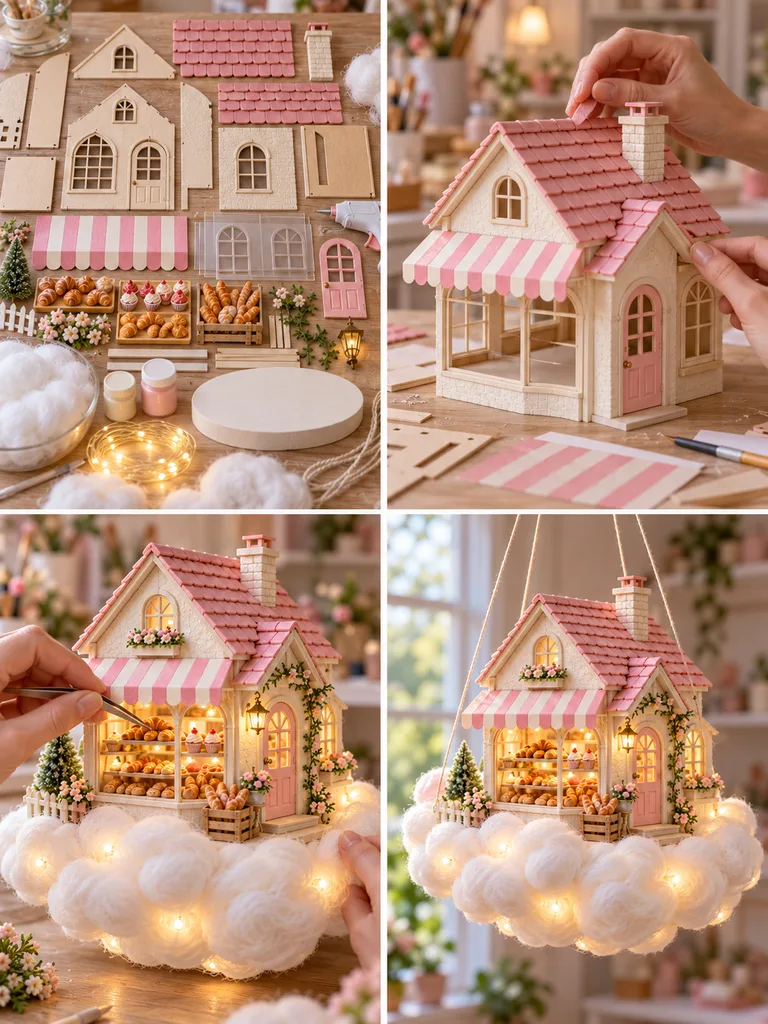
- Construct the storefront. Build a small rectangular shop with a flat front façade, sloping roof, doorway, and one large display window.
- Add the bakery awning. Cut a strip of striped paper and fold a narrow front edge to imitate a fabric canopy. Attach it above the display window with lightweight craft-stick supports.
- Paint the building. Choose warm cream walls, blush-pink trim, and a muted rose-colored roof.
- Create the pastry display. Make miniature croissants, buns, and cupcakes from lightweight modeling materials. Use them sparingly so the window display doesn’t become crowded.
- Build the whipped cloud. Cover the rigid platform with small rounded tufts of batting, arranging them in overlapping circular clusters.
- Assemble the bakery. Fix the shop to the cloud, add tiny pastry crates beside the entrance, and position a warm LED behind the display window.
Styling Tip: A striped awning instantly establishes the bakery look, so keep the other decorations relatively simple.
8. Lantern-Roof Japanese-Inspired Tea House Cloud
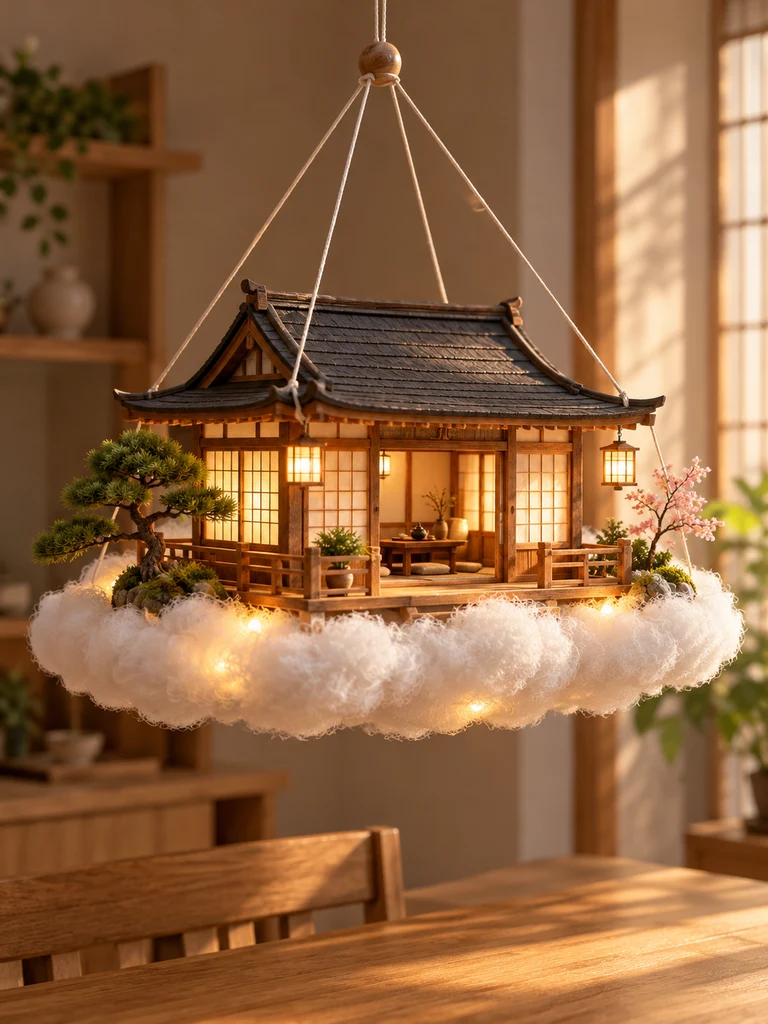
This floating miniature takes inspiration from the calm proportions of traditional Japanese tea-house architecture.
The design uses slim wooden framing, broad roof overhangs, paper-look windows, and a little bonsai-inspired tree.
Rather than a puffy cloud filled with ornaments, the house rests on a low, softly shaped cloud platform.
Materials You’ll Need
- Thin balsa wood
- Lightweight cardstock
- Translucent paper
- Small wooden dowels
- Warm brown and charcoal acrylic paint
- Polyester batting
- Rigid foam-board base
- Miniature artificial tree
- Small battery-operated LED lanterns
How to Make It
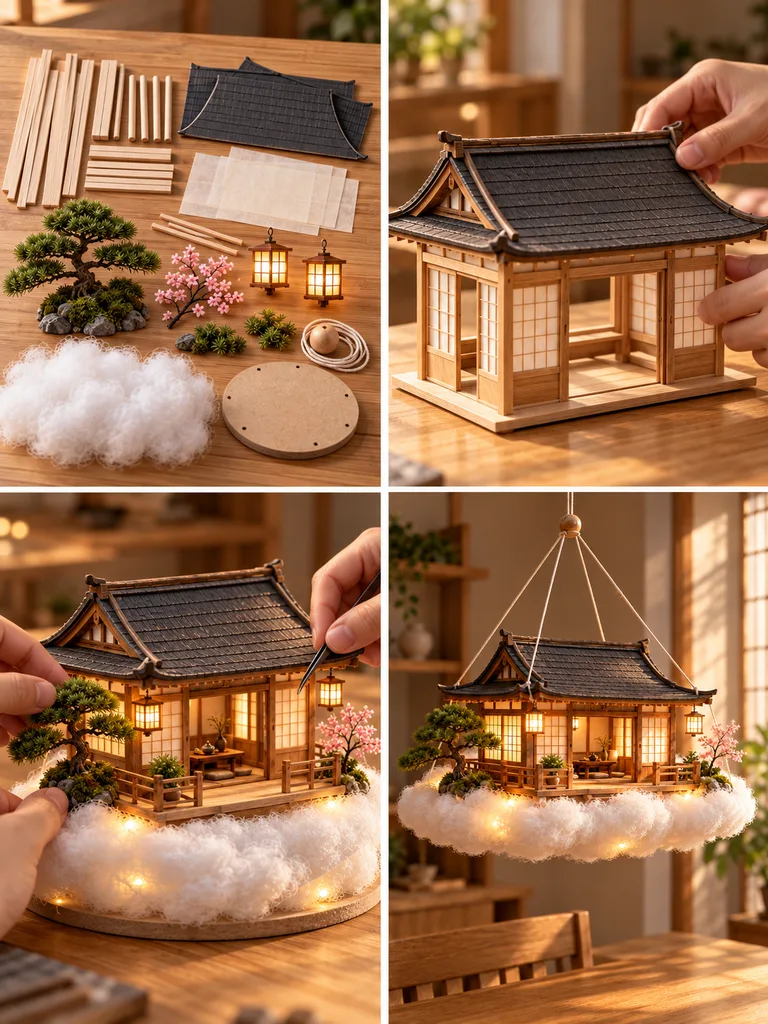
- Build a rectangular wooden frame. Use thin balsa strips to create a modest single-story house. Add evenly spaced vertical supports along the front.
- Create the roof. Cut two large roof panels from lightweight cardstock and gently curve their outer corners upward. Reinforce the underside with narrow wooden strips.
- Make paper-style windows. Glue translucent paper behind the window openings. Add a neat grid of thin wooden strips to imitate framed panels.
- Paint the structure. Use warm brown for the wooden framework and charcoal gray for the roof. Keep the palette restrained.
- Prepare the cloud platform. Cut a broad, shallow oval from rigid foam board. Cover its exposed edges with smoothly arranged batting rather than oversized individual puffs.
- Add the finishing details. Secure the tea house to the platform, place a small bonsai-style tree beside the entrance, and add miniature battery LED lanterns near the steps.
Styling Tip: Leave open space around the miniature tree and entrance. A simple composition suits this architectural style better than a crowded display.
9. Celestial Observatory House on a Night Cloud
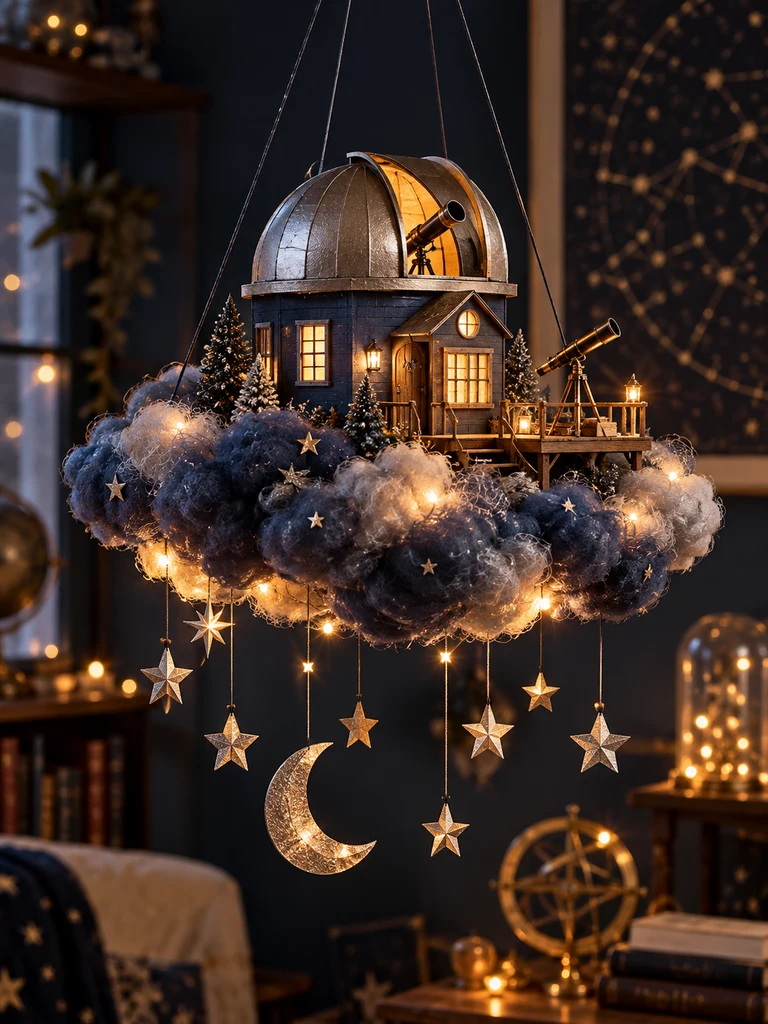
Not every floating cloud has to be white.
For this design, imagine a midnight-blue cloud carrying a miniature observatory. A small telescope points toward dangling stars, while warm light glows from a domed roof.
It’s a lovely project for anyone who enjoys astronomy, moon-and-star decorations, or celestial-themed rooms.
Materials You’ll Need
- Lightweight cardboard
- Small foam hemisphere
- Metallic silver cardstock
- Midnight-blue and charcoal paint
- Clear acetate
- Polyester batting
- Dark fabric or felt
- Paper straws
- Miniature star charms
- Battery LED lights
How to Make It
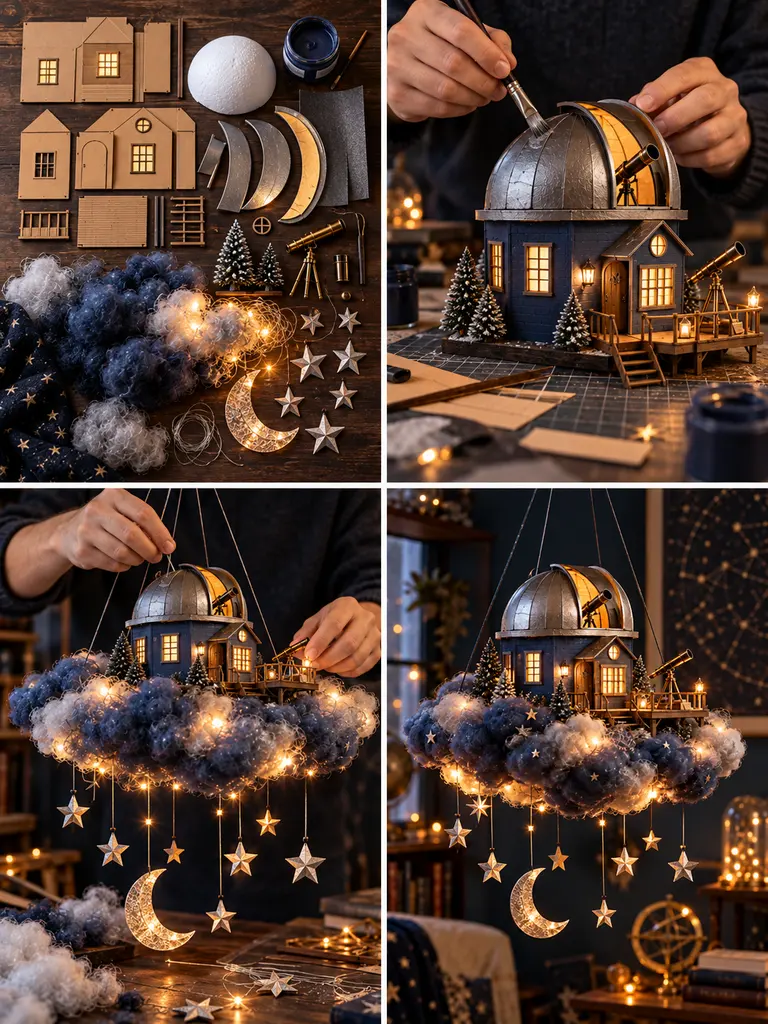
- Construct the observatory house. Build a small rectangular cottage with a flat upper platform for the dome.
- Make the observatory dome. Use a lightweight foam hemisphere for the rounded roof. Cut a narrow opening to suggest an observation hatch.
- Paint and decorate. Paint the house midnight blue and the dome charcoal. Add silver paper trim and a few tiny star-shaped details.
- Craft a telescope. Roll cardstock or use a paper straw for the telescope barrel. Attach it to a small triangular stand and position it near the observatory entrance.
- Create the night cloud. Cut a rigid platform and cover the edge with polyester batting that has been lightly wrapped or accented with dark-blue fabric. Leave selected fibers white to create moonlit highlights.
- Assemble the celestial scene. Fix the observatory to the cloud, attach several lightweight stars on short threads, and add soft LED lighting inside the house.
Styling Tip: Use deep blue, charcoal, silver, and just a hint of warm gold. The contrast between the dark cloud and bright stars creates the magical effect.
10. Floating Lighthouse Cottage Cloud
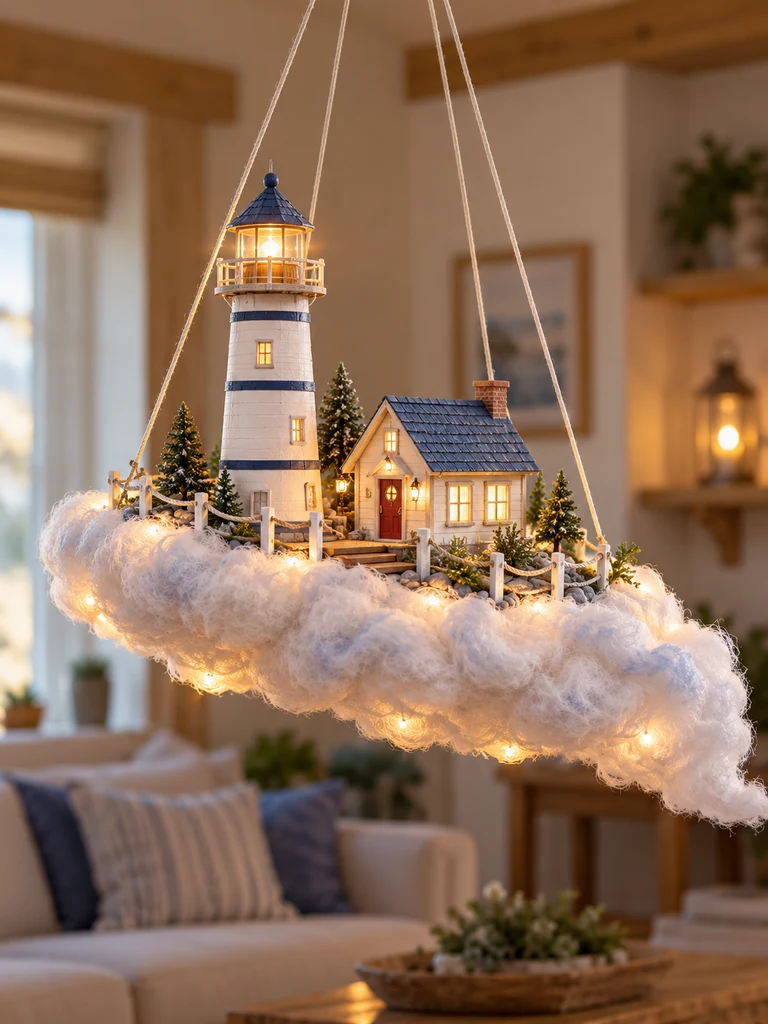
A lighthouse usually stands beside the ocean, but this unusual design places it above the clouds.
The miniature combines a small cottage with a slender lighthouse tower. A windswept cloud beneath the buildings suggests that the entire structure is drifting through the sky.
Materials You’ll Need
- Lightweight cardboard tube
- Foam board
- Thin wooden strips
- White, navy, and gray acrylic paint
- Clear acetate
- Polyester batting
- Rigid oval platform
- Jute twine
- Small battery-operated LED
How to Make It
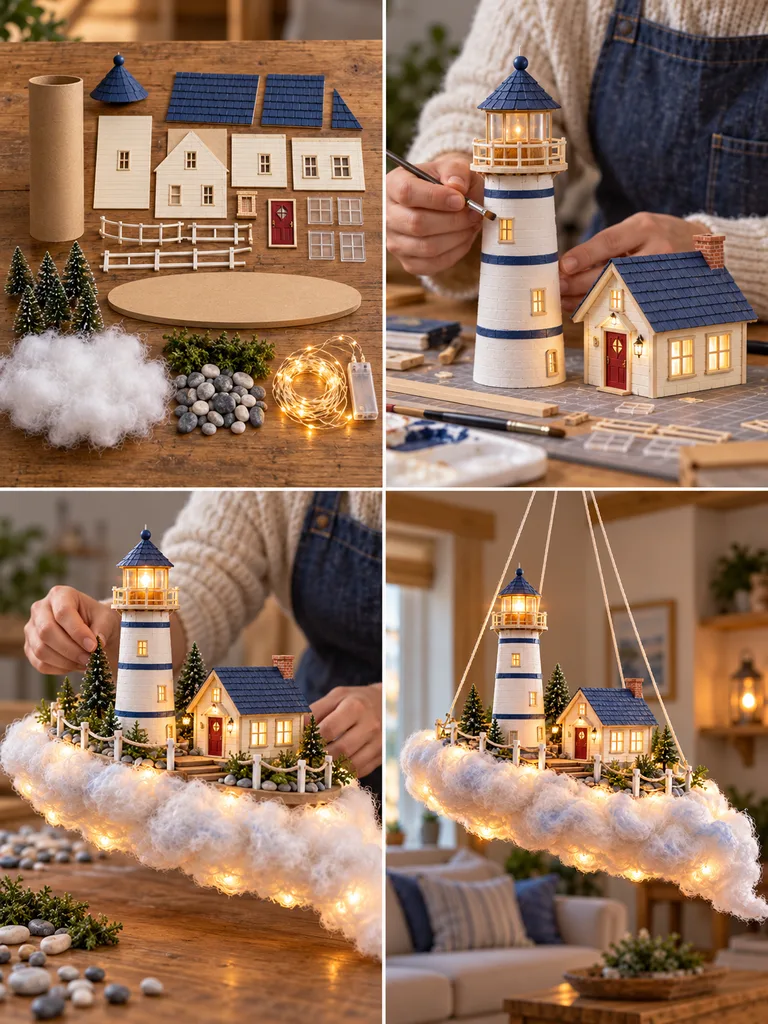
- Build the lighthouse tower. Use a narrow cardboard tube approximately 7 inches tall. Cover it with thin cardstock and cut a small opening near the top.
- Create the lighthouse cap. Make a shallow cone-shaped roof with cardstock. Add a lightweight circular railing below the lantern section using narrow craft strips.
- Build the attached cottage. Make a small rectangular house with a pitched roof and connect it visually to the lighthouse with a short walkway.
- Paint the buildings. Use warm white for the tower, navy for the roofs, and pale gray for the cottage walls. Add fine horizontal lines to imitate wood siding.
- Make the windswept cloud. Cut an elongated irregular base, making one end narrower than the other. Layer batting in sweeping curves along the underside.
- Finish with lighting. Install a battery LED in the lighthouse’s top section and attach the buildings to the platform. Add a short jute rope detail and tiny steps leading to the cottage.
Styling Tip: Keep the lighthouse taller than the adjoining house. That difference in height makes the architecture immediately recognizable.
11. Rose Garden Cottage on a Romantic Cloud
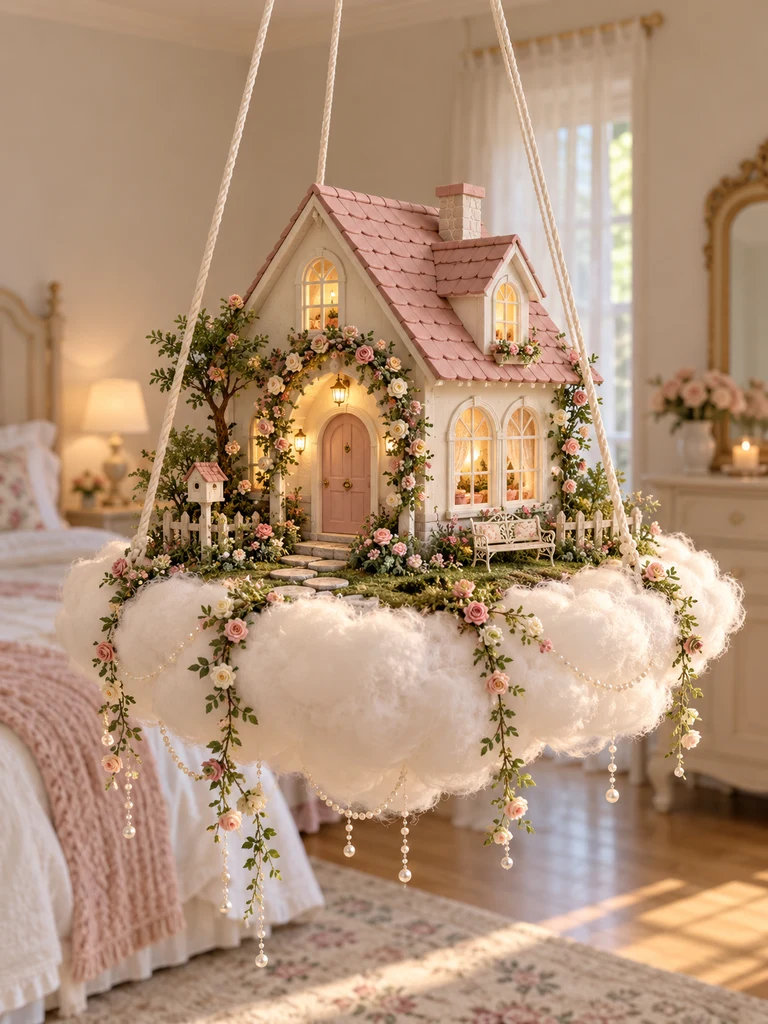
This is one of the softer, more decorative floating cloud house ideas.
Picture a cream-colored cottage with arched windows, delicate rose vines climbing around the doorway, and a fluffy cloud edged with tiny pink blossoms.
It’s especially pretty when the finished house is surrounded by gentle natural light.
Materials You’ll Need
- Foam board
- Cream and blush acrylic paint
- Thin cardstock
- Miniature faux roses
- Green floral wire
- Cotton batting
- Pearl beads
- Rigid cloud platform
- Battery LED lights
How to Make It
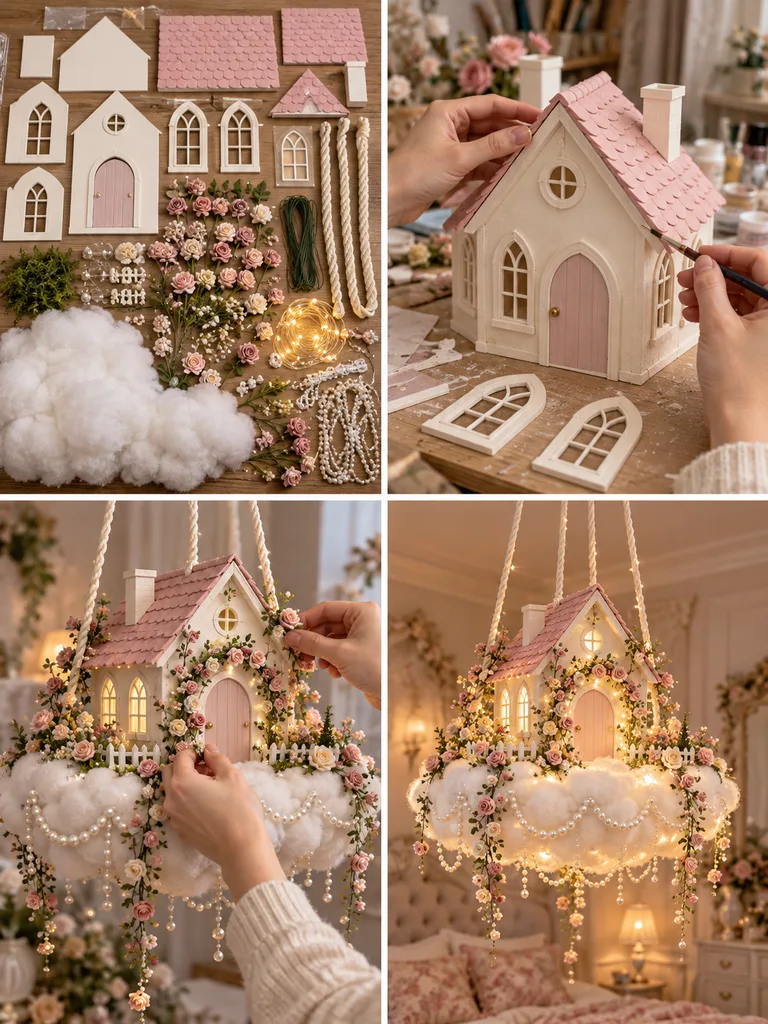
- Build the cottage. Cut four walls with a pitched roof, arched front door, and several tall arched windows.
- Paint the exterior. Use soft cream for the walls and muted blush pink for the roof. Add narrow white window trim.
- Create the rose arch. Bend lightweight floral wire into an arch above the doorway. Attach tiny faux roses and small green leaves using craft glue.
- Build the cloud. Cover the edge and underside of a rigid oval platform with white batting, creating a soft rounded silhouette.
- Add floral accents. Place a few miniature roses around the cloud’s upper edge. Attach selected pearl beads beneath the platform on short reinforced threads.
- Finish the cottage. Secure it to the platform, add a tiny garden path, and position a warm LED behind the windows.
Styling Tip: Stick to two or three rose shades. Blush pink, dusty rose, and cream create a softer look than a mixture of many bright colors.
12. Mini Greenhouse Sky House
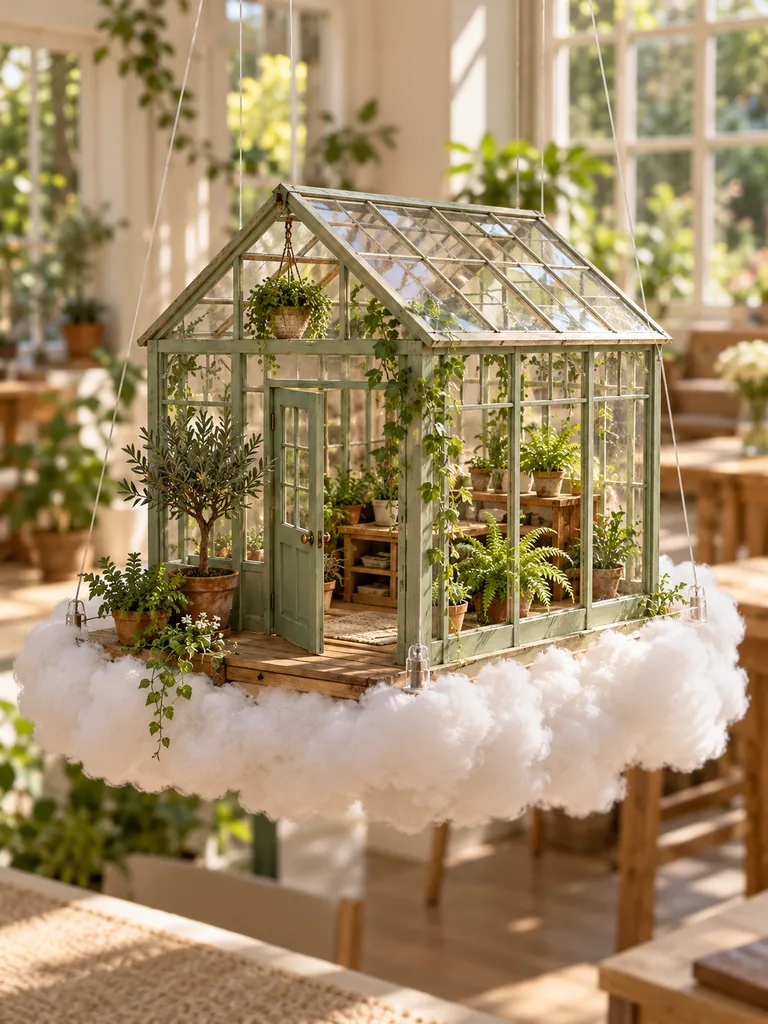
A miniature greenhouse floating above the clouds is an especially charming idea for plant lovers.
Unlike the other houses, its walls are largely transparent. The little structure appears to contain its own tiny garden filled with potted plants, shelves, and hanging greenery.
Materials You’ll Need
- Thin balsa wood strips
- Clear acetate sheets
- Lightweight cardboard
- Pale green acrylic paint
- Miniature faux plants
- Small paper pots
- Polyester batting
- Rigid foam-board platform
- Fine craft wire
How to Make It
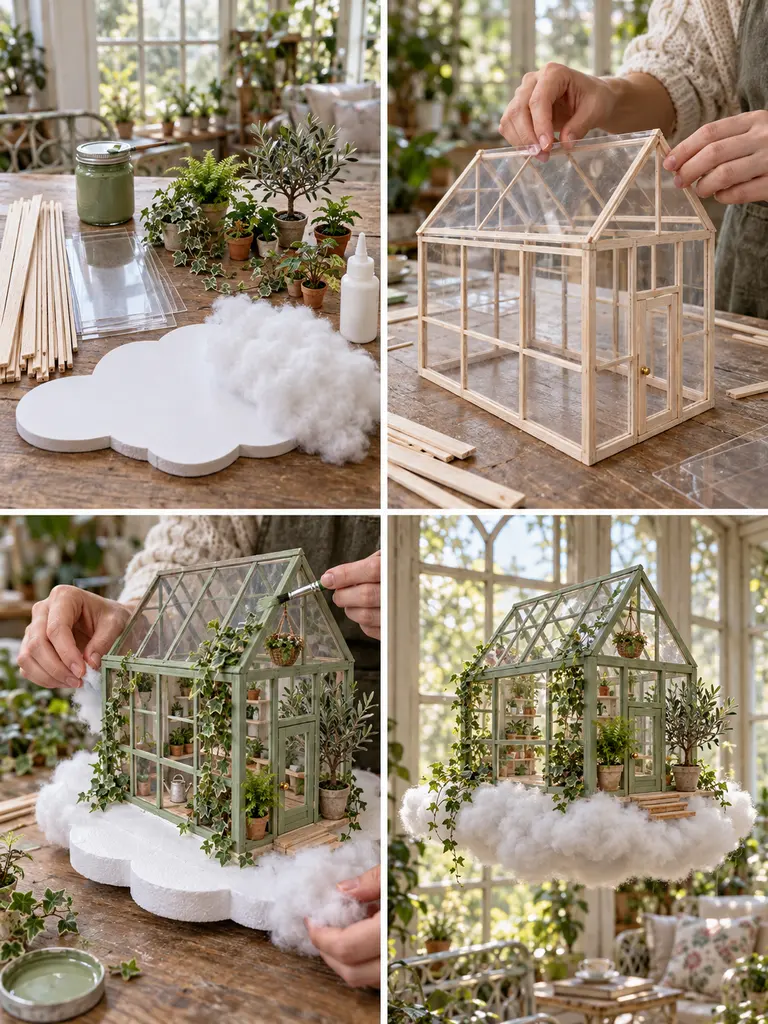
- Create the greenhouse frame. Build a rectangular base using lightweight balsa strips, approximately 5 inches long and 4 inches wide.
- Add vertical supports. Glue thin wooden strips upright at the corners and along the walls. Attach a pitched roof frame above them.
- Install transparent panels. Cut clear acetate to fit between the supports. Glue the panels carefully so the transparent surfaces remain clean.
- Paint the frame. Use a soft sage or pale eucalyptus-green finish. Leave the glazing transparent so the miniature interior remains visible.
- Make the cloud platform. Cut a wide oval rigid base and add soft white batting around the sides and underside.
- Fill the greenhouse. Add miniature shelves, small paper plant pots, hanging faux vines, and a tiny trellis. Secure the greenhouse to the cloud, ensuring its lightweight details are firmly attached.
Styling Tip: Vary the plants’ heights and leaf shapes. Two tiny trailing plants, a small upright tree, and a few compact potted plants create a convincing greenhouse interior.
13. Rustic Farmhouse Cloud Homestead
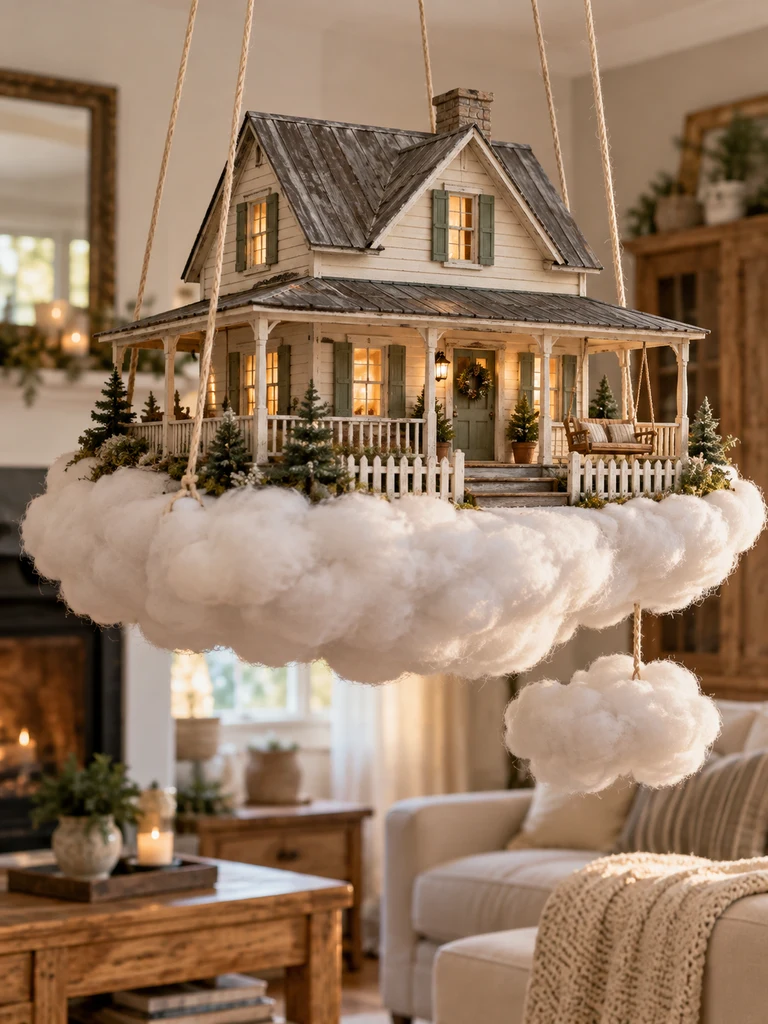
If you love farmhouse decorating, this little floating homestead offers plenty of room for miniature details.
The house features a traditional pitched roof, a wraparound porch, a tiny fence, and a little porch swing.
A broad cloud platform gives the farmhouse enough space to feel like a complete miniature property.
Materials You’ll Need
- Wooden craft sticks
- Sturdy chipboard
- Thin cotton twine
- Cream and sage acrylic paint
- Lightweight faux greenery
- Cotton batting
- Large rigid foam-board base
- Small wooden dowels
- Battery LED lights
How to Make It
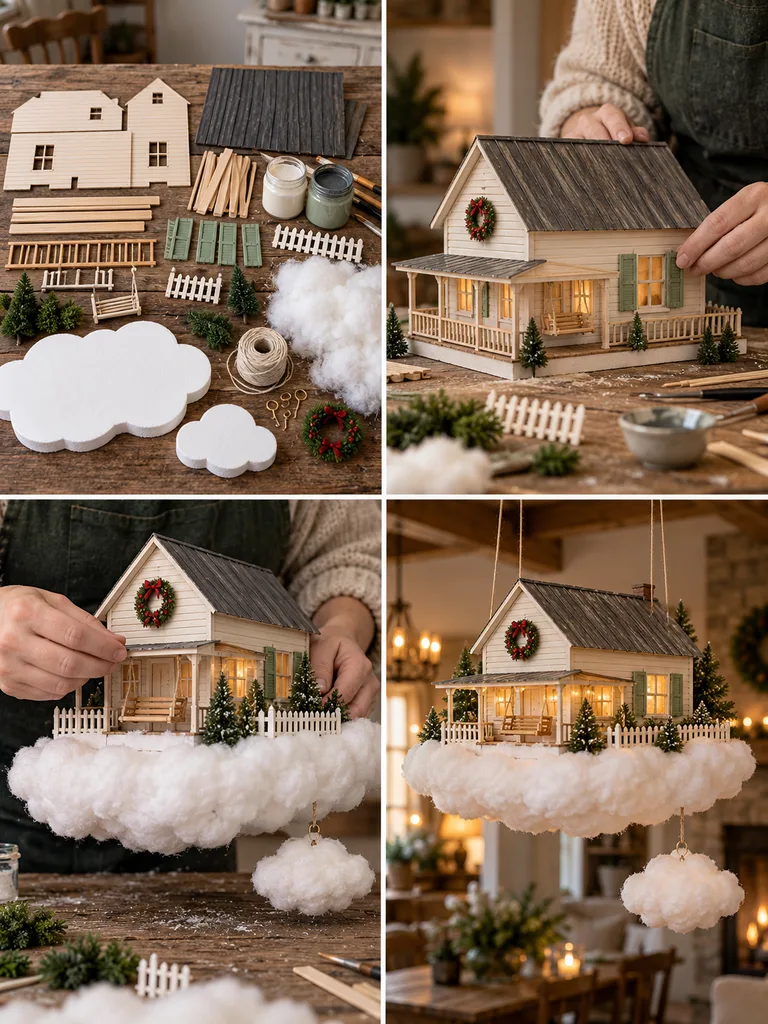
- Build the main farmhouse. Cut rectangular chipboard walls and cover the exterior with horizontally arranged craft sticks to imitate wooden siding.
- Add the roof. Construct a steep pitched roof and paint it muted charcoal or weathered gray.
- Create the porch. Add a narrow platform around the front and one side of the house. Use thin wooden dowels for the porch posts and railings.
- Make a miniature swing. Cut a small craft-stick seat and suspend it with cotton twine from a reinforced porch beam.
- Prepare the wide cloud. Cover the sides and underside of a broad rigid foam-board base with fiberfill. Add a small secondary cloud shape below one corner.
- Arrange the homestead. Attach the farmhouse securely, build a short fence segment, add a miniature wreath beside the door, and place a few plants near the porch.
Styling Tip: Weather the wood lightly with dry-brushed gray paint. It makes the farmhouse look more realistic than perfectly painted craft sticks.
14. Floating Castle Turret House
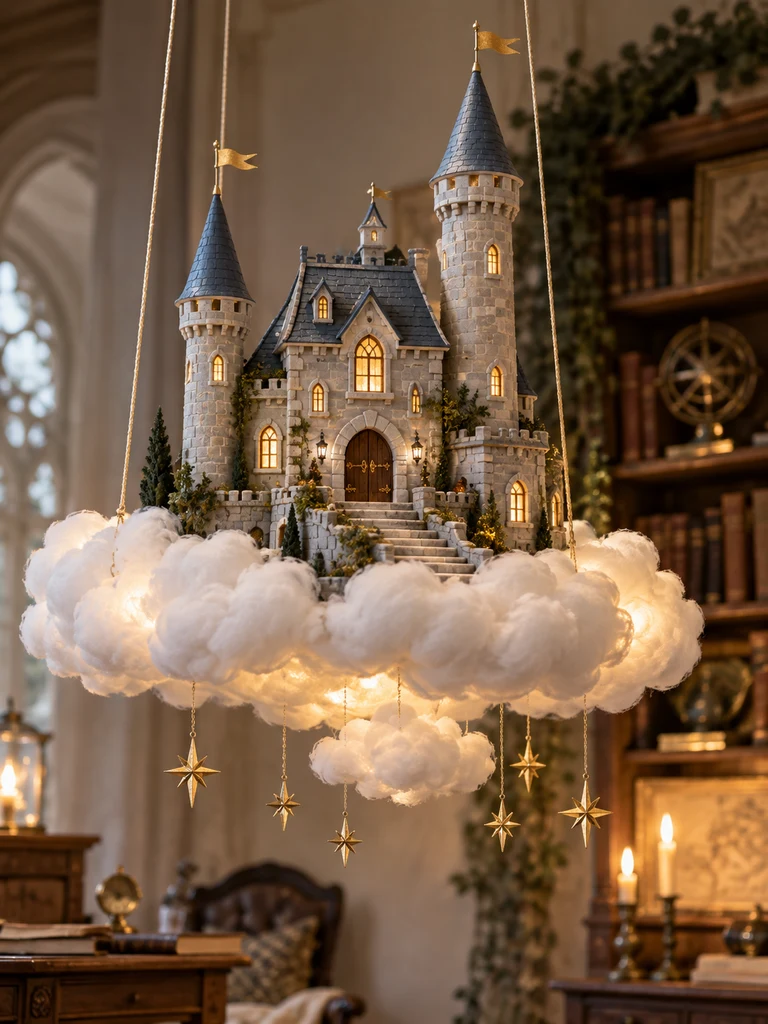
For a dramatic fantasy project, try building a miniature castle that seems to hover above a great cloud.
This version uses two towers, a central doorway, tiny flags, and a layered cloud platform that gives the castle a majestic appearance.
Although it looks detailed, most of the structure can be made from ordinary cardboard tubes and foam board.
Materials You’ll Need
- Lightweight cardboard tubes
- Foam board
- Textured cardstock
- Gray, cream, and muted gold paint
- Small paper flags
- Polyester batting
- Reinforced rigid base
- Thin wooden dowels
- Battery LED lights
How to Make It
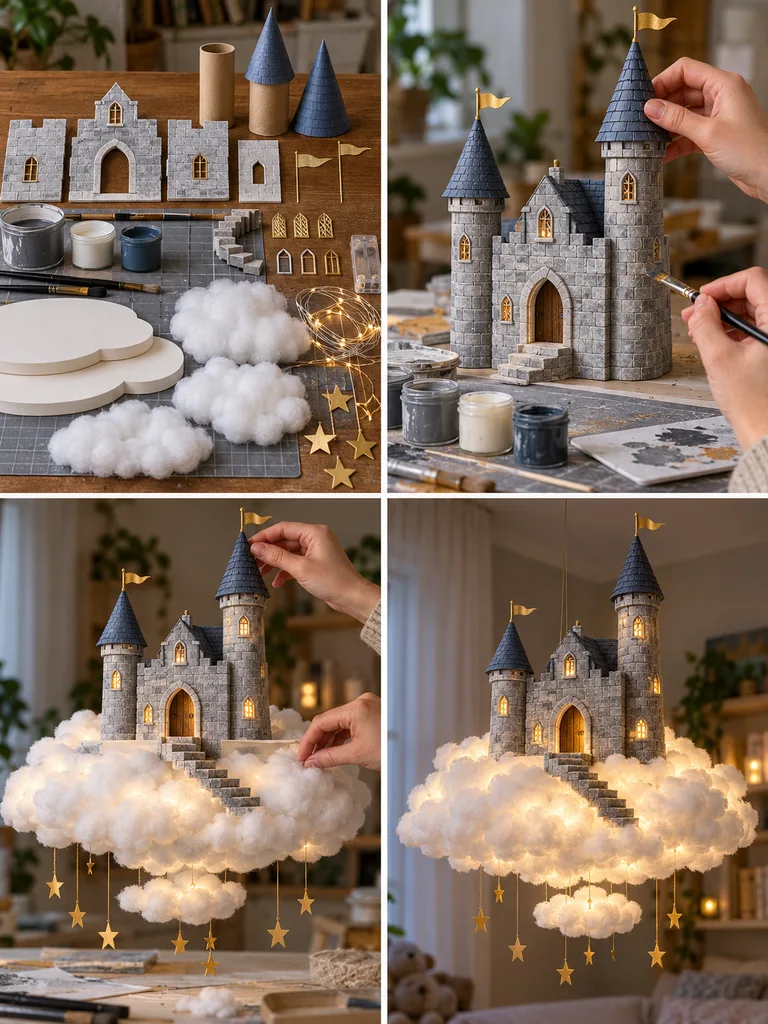
- Build the castle’s central structure. Cut foam-board walls for a rectangular building with a large arched doorway.
- Create the towers. Cut two cardboard tubes to different heights. Attach them on either side of the central house, reinforcing the connections.
- Add turret roofs. Roll lightweight cardstock into cones and glue one to the top of each tower.
- Paint the stone finish. Apply a gray base coat and lightly sponge cream paint over the surface. Draw subtle stone-block lines rather than deeply carving the walls.
- Build the elevated cloud. Cut a rigid platform large enough to support the whole castle. Add a second smaller layer beneath the center, then cover the exposed edges with overlapping cotton batting.
- Finish the details. Add miniature stairs, narrow paper flags on thin dowels, small gold window frames, and gentle internal lighting.
Styling Tip: Keep the castle’s tallest tower slightly off-center. The irregular skyline makes the floating structure feel more storybook-like.
15. Cozy Mountain Chalet Cloud
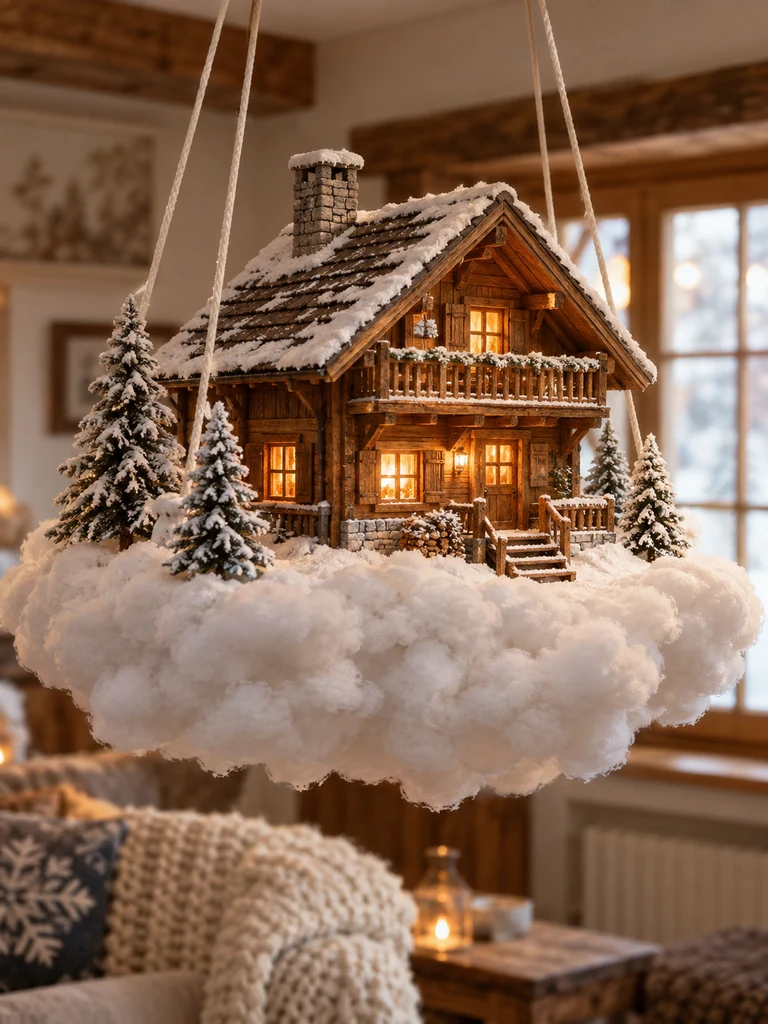
This design brings the warmth of an Alpine winter cabin into a miniature floating decoration.
The chalet has a steep roof, a wooden balcony, snowy eaves, and a few tiny fir trees.
Its fluffy cloud resembles a little winter landscape hovering in the air.
Materials You’ll Need
- Thin balsa wood
- Wooden craft sticks
- Brown and cream acrylic paint
- Faux snow material
- Polyester batting
- Miniature fir trees
- Rigid foam-board platform
- Small wooden dowels
- Warm battery LED lights
How to Make It
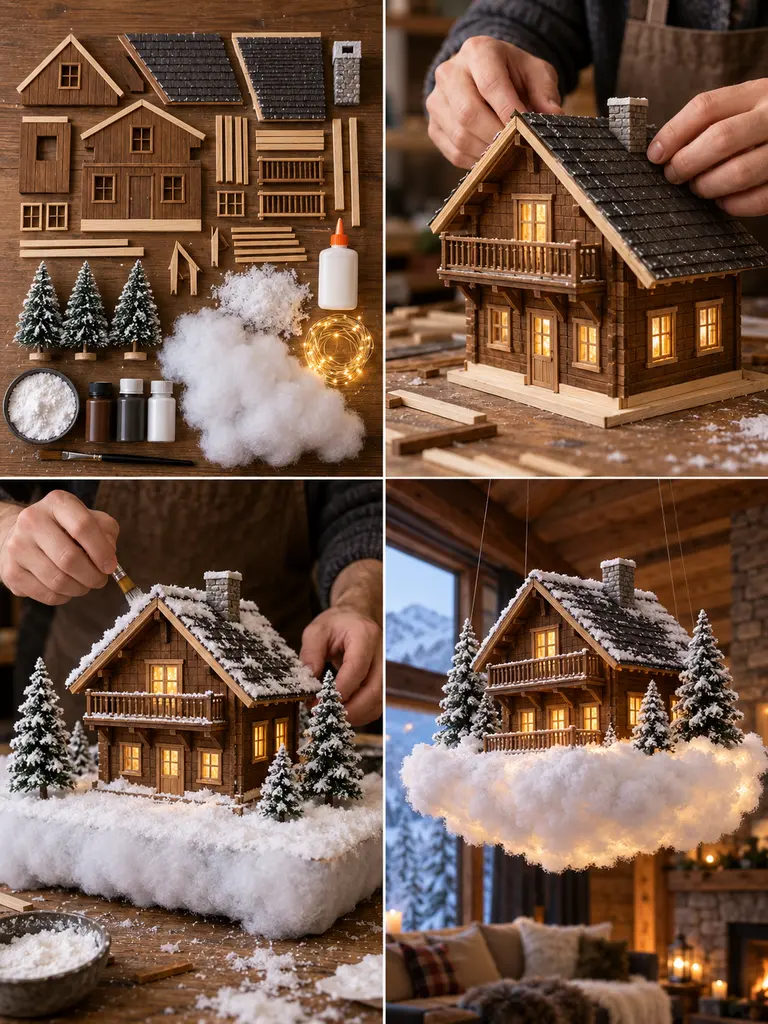
- Construct the chalet walls. Build a small rectangular house with one upper-level balcony opening.
- Add a steep roof. Cut broad roof panels that overhang the walls. Attach craft-stick strips across the roof for a layered wooden appearance.
- Build the balcony. Make a narrow balcony platform from balsa wood and add a miniature railing using thin dowels.
- Paint the structure. Use medium brown for the walls, dark brown for the roof, and cream for the window trim.
- Create snowy cloud drifts. Cover a rigid platform with white felt, then add batting around the edges. Use a small amount of suitable faux snow on the roof and around the base.
- Complete the winter landscape. Attach two or three fir trees, create a tiny path, and position warm LEDs inside the chalet.
Styling Tip: A warm window glow against white snow makes the scene feel inviting, even without many decorations.
16. Rainbow Cloud House Mobile
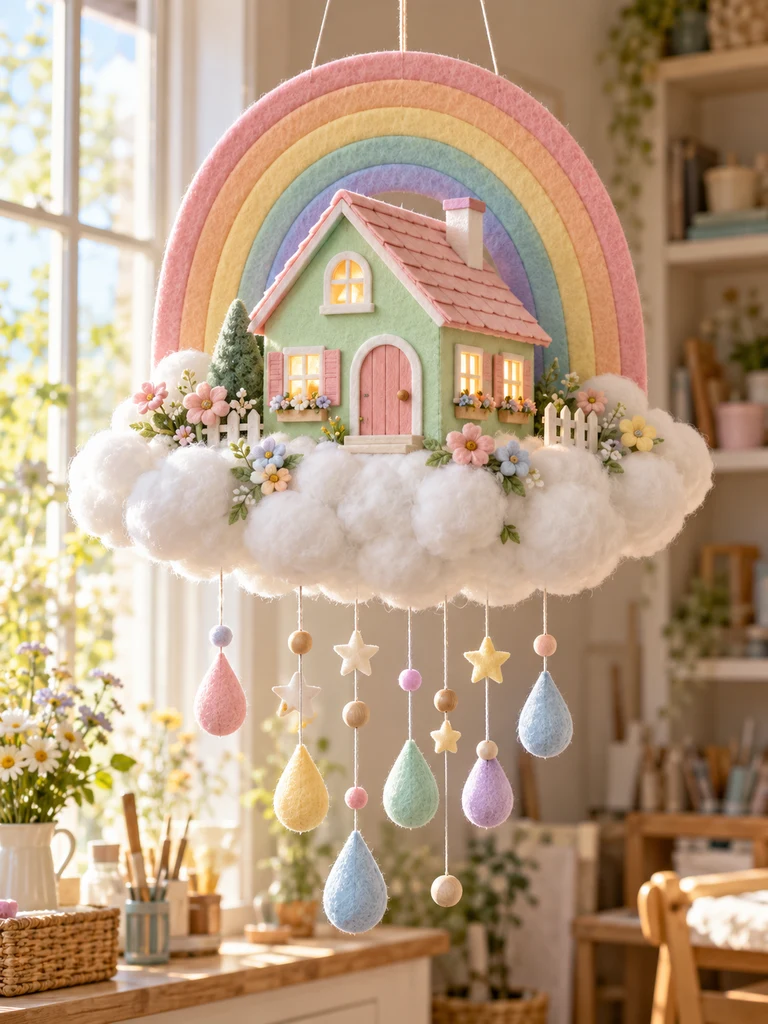
This cheerful design swaps rustic and vintage details for bright pastels and playful shapes.
A small cottage sits beneath a handmade rainbow arch, with tiny raindrops and stars hanging from the cloud.
The design is especially fun because every part can be made from simple craft materials.
Materials You’ll Need
- Lightweight cardboard
- Pastel felt or cardstock
- Acrylic paint
- Cotton batting
- Rigid foam-board cloud base
- Embroidery thread
- Wooden beads
- Glue
- Battery LED light
How to Make It
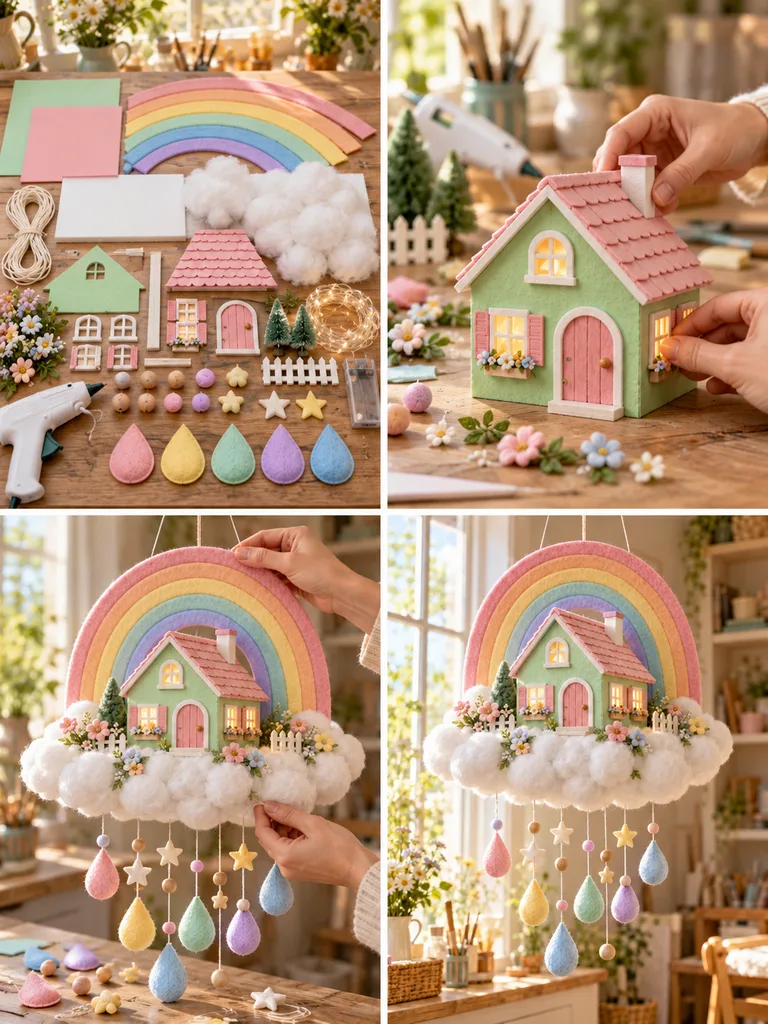
- Build a simple cottage. Cut four cardboard walls and a triangular roof. Keep the architecture uncomplicated, with one doorway and two front windows.
- Paint the house. Use pale yellow, blush pink, or mint green for the walls. Paint the shutters in a contrasting pastel shade.
- Make the rainbow. Cut several curved bands from lightweight felt or cardstock. Layer the bands into a rainbow and attach them to a thin concealed cardboard support.
- Shape the cloud. Create a rigid oval platform and wrap its edges with fluffy white batting.
- Attach the rainbow. Fix the rainbow’s hidden support securely behind the cottage so it rises above the roof without needing to balance on loose fiberfill.
- Add hanging decorations. Cut small pastel raindrops and stars, attach them to short threads, and suspend them beneath the cloud.
Styling Tip: Use four or five pastel rainbow colors rather than very bright primary colors for a softer, more cohesive appearance.
17. Vintage Blue Roof Cottage on a Pearl Cloud
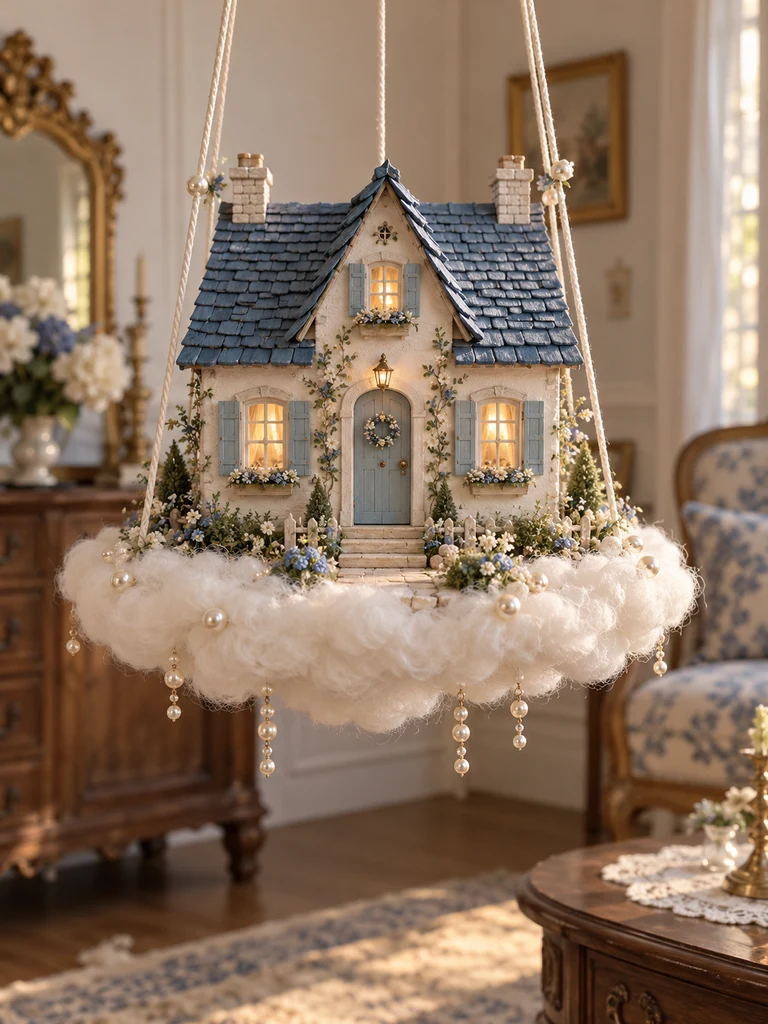
A deep-blue roof can make a miniature cottage feel especially elegant.
This design combines cream walls, carefully layered blue paper shingles, delicate shutters, and a white cloud with subtle pearl-like details.
The finished house has a vintage quality without needing elaborate architecture.
Materials You’ll Need
- Sturdy cardboard
- Textured blue scrapbook paper
- Cream acrylic paint
- Thin wooden strips
- Small pearl beads
- Cotton batting
- Rigid foam-board base
- Clear acetate
- Battery LED lights
How to Make It
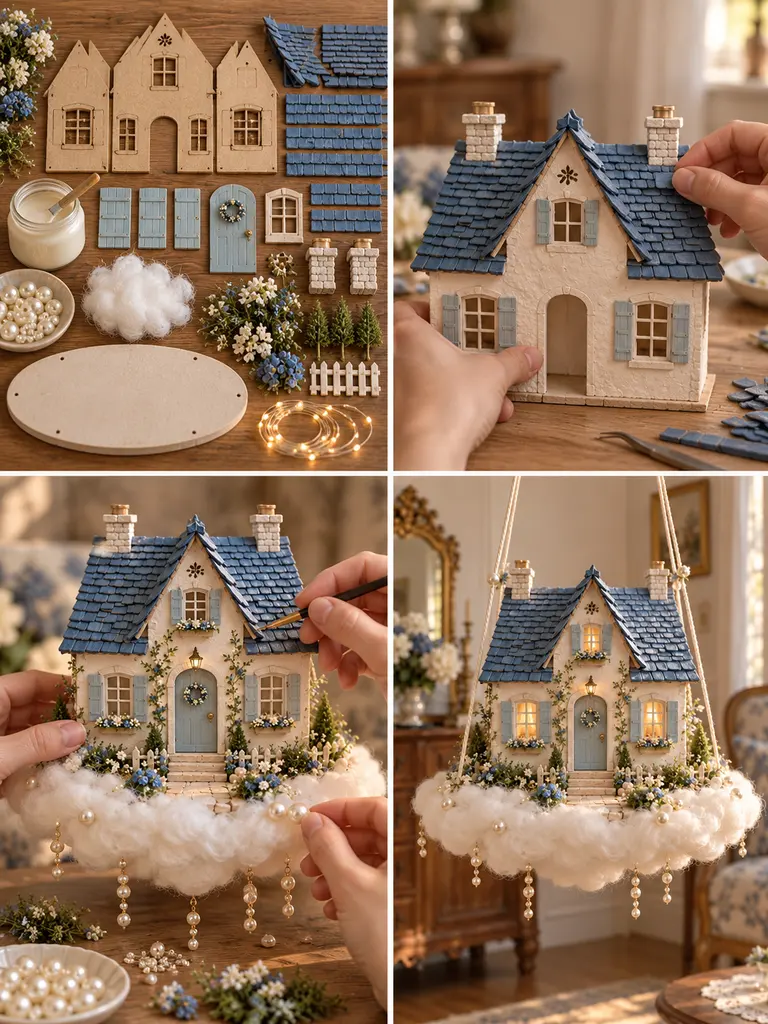
- Build a symmetrical cottage. Make a rectangular house with a centered front door and two matching front windows.
- Create the roof. Cut two sloped roof panels and cover them with rows of small overlapping blue paper shingles.
- Paint the walls and trim. Use warm ivory on the exterior and pale blue for the window shutters.
- Add vintage details. Create narrow window frames, tiny flower boxes, and a simple front step using wooden strips.
- Make the pearl cloud. Cover a rigid cloud-shaped base with white batting. Attach a few lightweight pearl beads around selected edges, avoiding excessive weight.
- Complete the display. Secure the house, add a tiny garden arrangement, and position warm LEDs behind the windows.
Styling Tip: Choose one dominant blue shade for the roof and use lighter blue only for small accents. Too many blue tones can make the cottage appear busy.
18. Boho Macramé Floating Cloud House
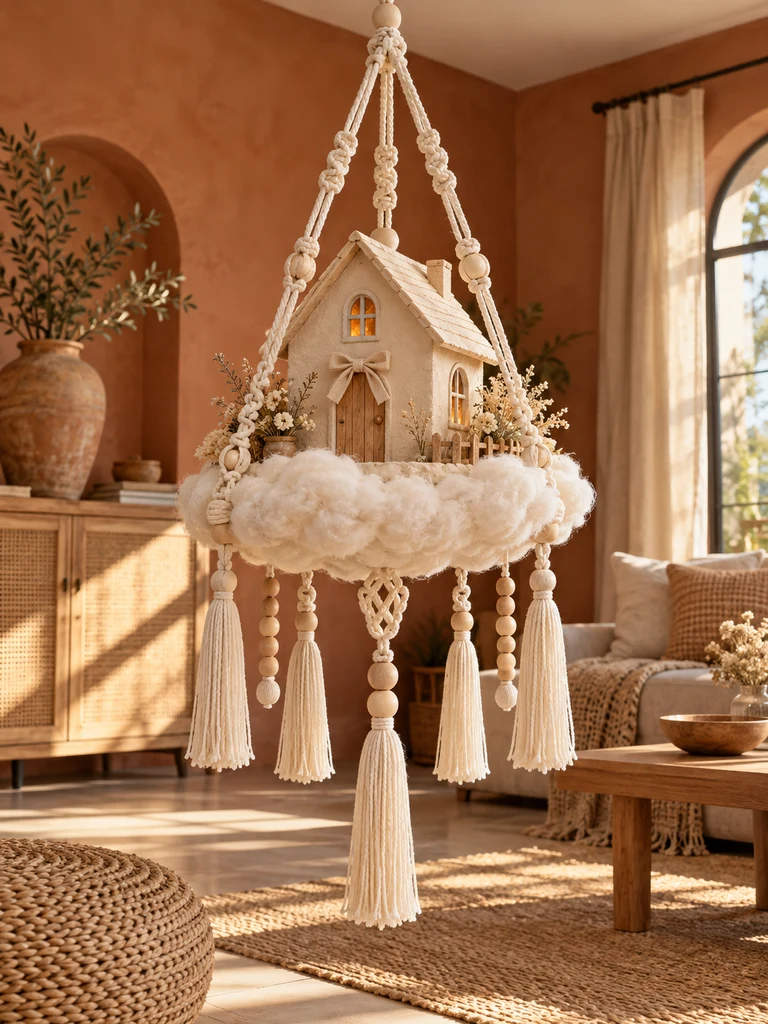
This project has a very different personality from the colorful fairy houses.
Think natural cotton cord, wooden beads, creamy cloud layers, soft tassels, and a tiny neutral-colored house.
The overall look is relaxed and textured, making it well suited to bohemian-style interiors.
Materials You’ll Need
- Lightweight cardboard
- Cream and beige acrylic paints
- Cotton macramé cord
- Natural wooden beads
- Polyester batting
- Rigid circular foam-board platform
- Linen ribbon
- Scissors
- Craft glue
How to Make It
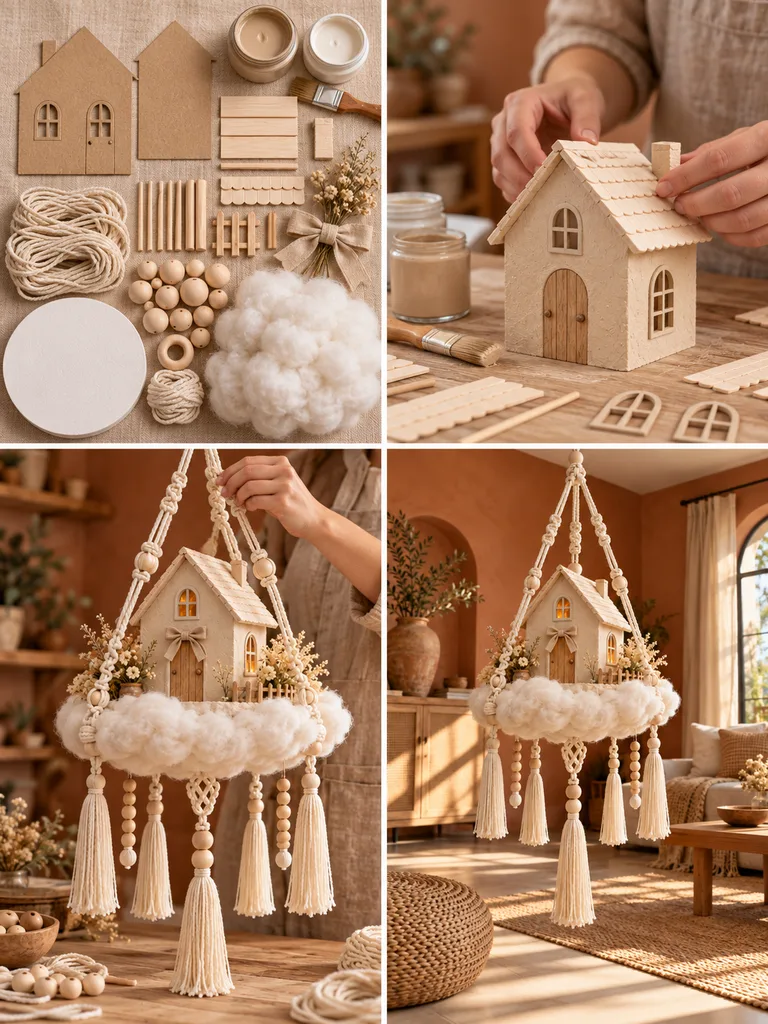
- Build the miniature house. Create a simple rectangular cottage with a pitched roof and arched front windows.
- Paint the exterior. Choose sandy beige walls, an ivory roof, and soft cream trim.
- Prepare the cloud base. Cut a circular rigid platform and cover the edges and underside with batting.
- Make decorative macramé tassels. Cut several lengths of cotton cord, fold them into bundles, and tie narrow wrapping knots around the top. Trim the ends evenly.
- Add wooden beads. Thread small wooden beads onto selected decorative cords and attach them beneath the cloud’s reinforced base.
- Create the hanging system. Attach structural suspension cords to properly reinforced points on the platform. Use decorative macramé knots around these cords without relying on loose tassels to support the house.
- Assemble the display. Secure the neutral cottage to the cloud and add a small linen ribbon or delicate wooden detail near the doorway.
Styling Tip: Use cream, tan, and natural wood as the main colors. The different textures provide enough visual interest without bright paint.
19. Floating Schoolhouse Cloud
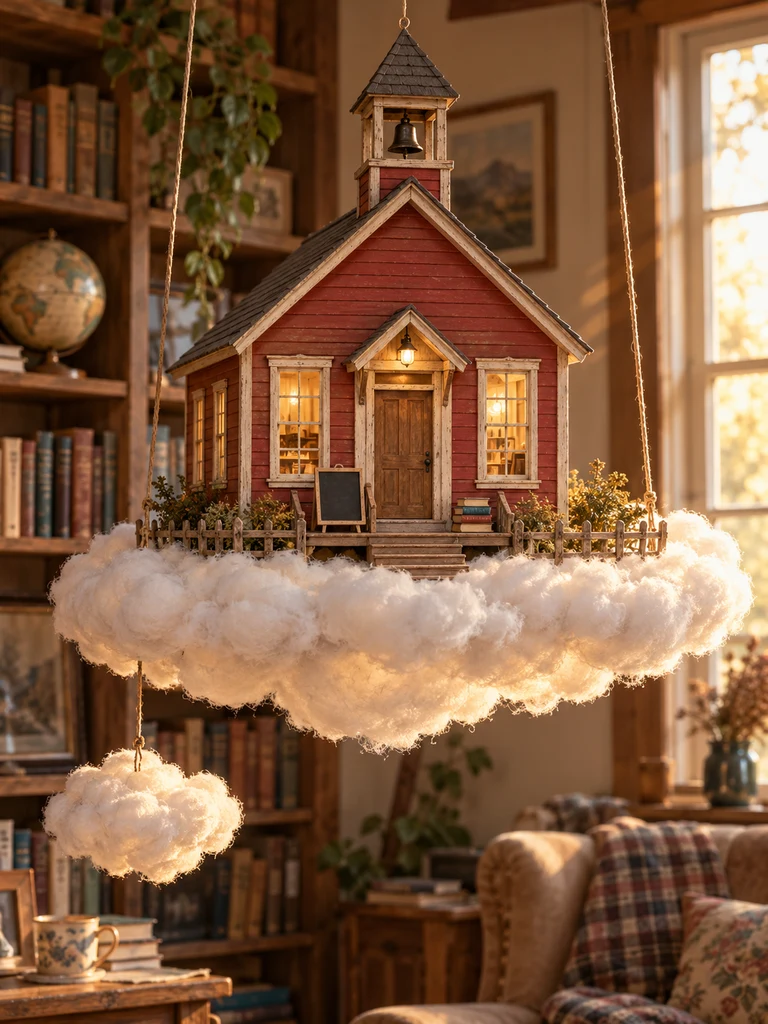
A tiny old-fashioned schoolhouse floating above the clouds creates a nostalgic storybook scene.
This design has a traditional red exterior, cream trim, a little bell tower, and miniature school-themed details outside.
Materials You’ll Need
- Chipboard
- Lightweight craft wood
- Red and cream acrylic paint
- Small metal-look bead
- Cotton batting
- Foam-board platform
- Thin cardstock
- Miniature paper books
- Battery LED lights
How to Make It
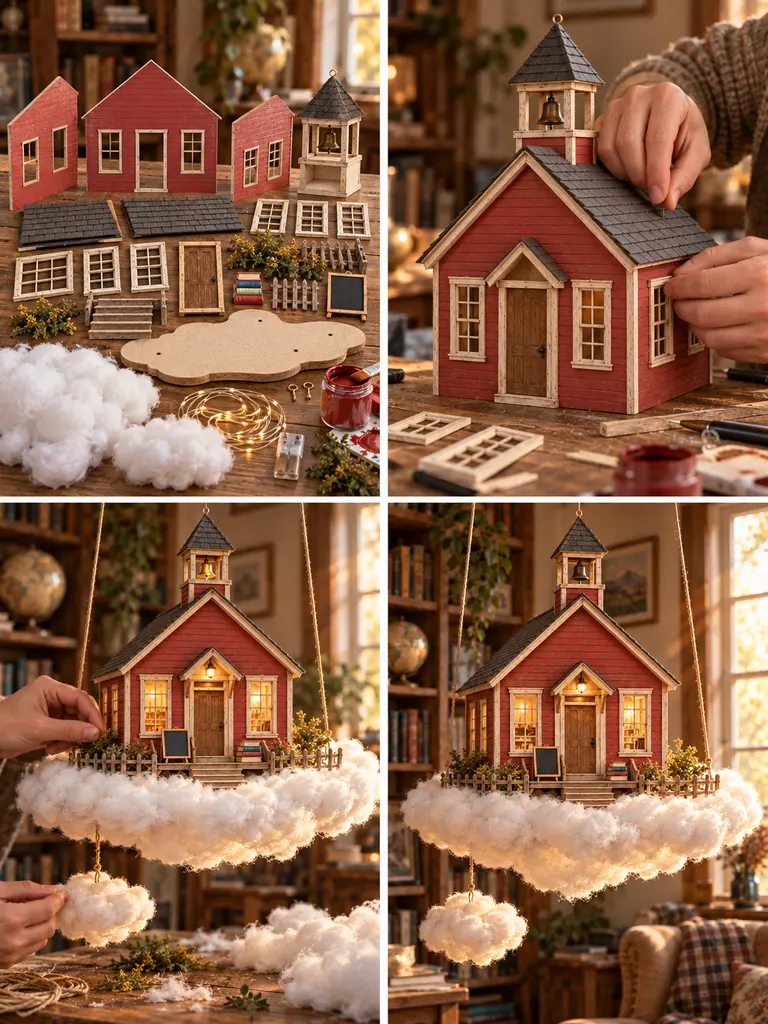
- Cut the schoolhouse walls. Make a rectangular building with a steep pitched roof and a central front entrance.
- Add the bell tower. Construct a small square tower from chipboard. Attach it securely above the roof ridge and leave an opening for a miniature bell.
- Paint the exterior. Use classic muted red walls, cream window frames, and a charcoal-gray roof.
- Create schoolhouse details. Add a tiny doorway step, decorative shutters, and a small blackboard-like panel beside the entrance.
- Prepare the cloud. Cut a broad rigid base and add fluffy batting around the perimeter, with a smaller cloud puff positioned beneath one corner.
- Finish the scene. Secure the schoolhouse, add a miniature stack of paper books near the steps, and place a small LED inside the building.
Styling Tip: A simple symmetrical façade makes the bell tower stand out. Keep the tiny school accessories minimal so they don’t overpower the building.
20. Sky Library House With a Tiny Ladder
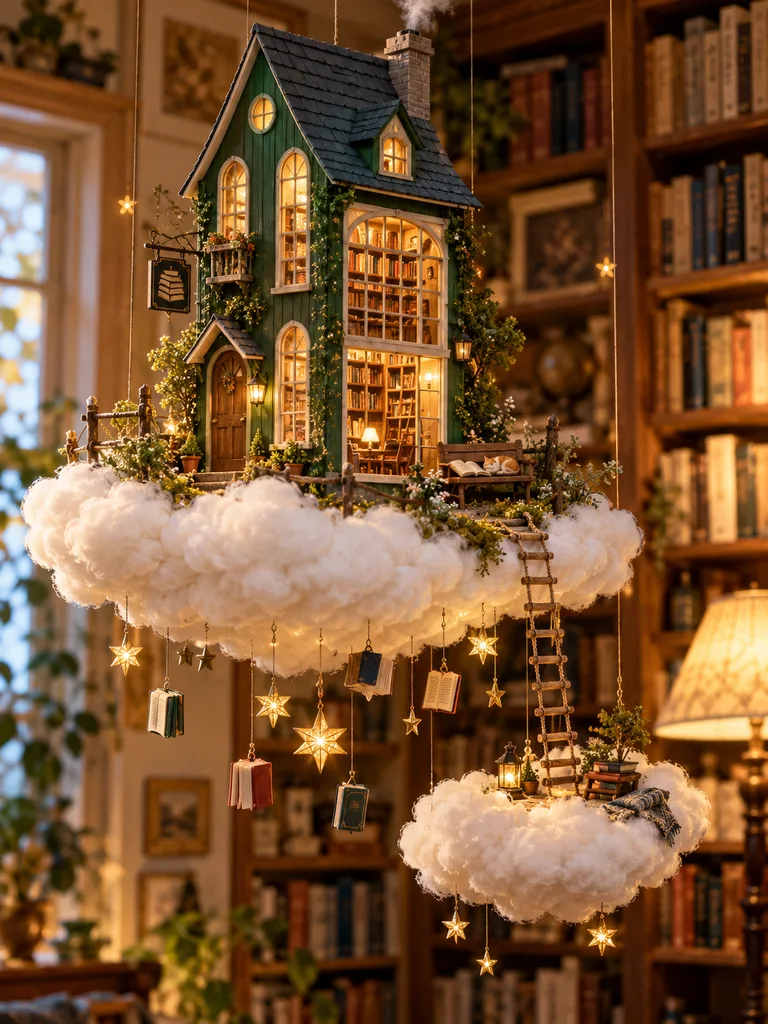
For book lovers, this may be one of the most charming floating cloud house ideas.
The miniature library has tall windows, a steep roof, tiny books, and a delicate ladder descending from one cloud level toward another.
The warm light inside suggests a cozy reading room hidden high above the world.
Materials You’ll Need
- Sturdy cardboard
- Kraft paper
- Thin balsa wood strips
- Miniature paper book covers
- Cotton batting
- Two rigid foam-board platforms
- Small wooden dowels
- Warm battery LED lights
- Strong suspension cord
How to Make It
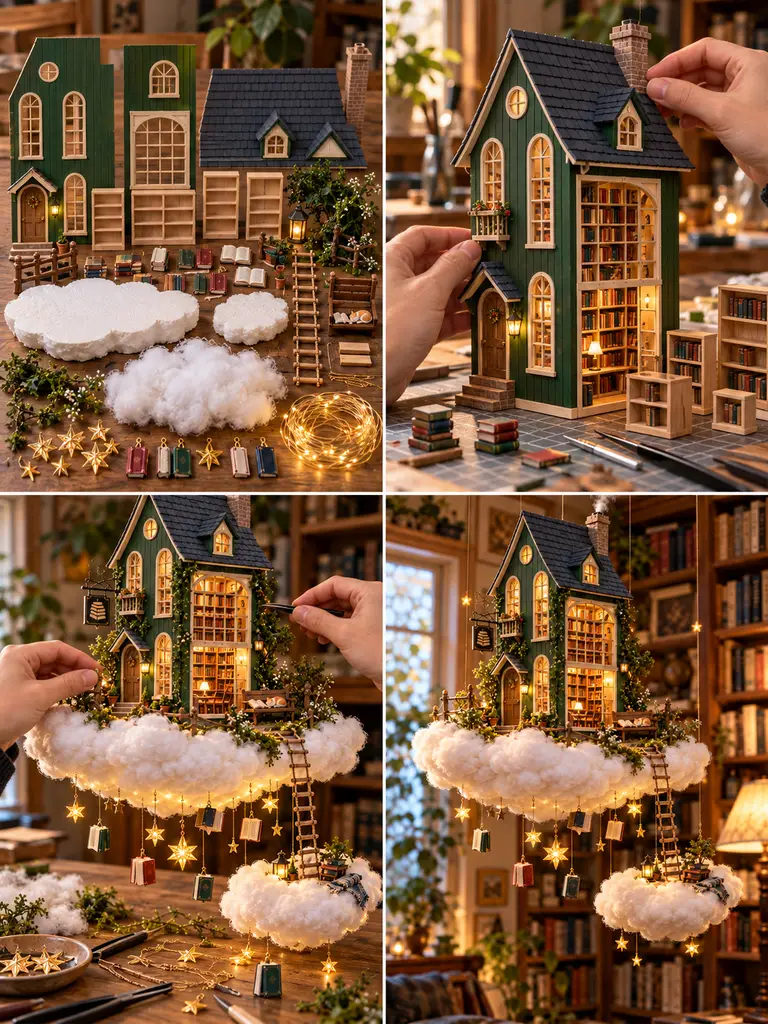
- Build the library cottage. Make a tall, narrow house with a steep roof and several elongated windows.
- Create a miniature book collection. Fold tiny rectangles of paper into book shapes. Cover them with colored paper and arrange them on narrow balsa wood shelves visible through the front window.
- Paint the exterior. Use deep forest green, warm brown, or muted navy with cream window trim.
- Make the two-tier cloud. Cut one larger rigid platform for the house and a smaller secondary platform. Cover their edges with batting.
- Create the connecting ladder. Use two narrow wooden dowels as rails and glue small evenly spaced rungs between them.
- Assemble the floating design. Secure the library to the main cloud platform. Suspend the smaller cloud independently or from a reinforced support structure, checking the complete arrangement for balance.
- Add the finishing touches. Position the ladder between the two cloud levels, add a few paper stars, and install warm LEDs inside the library.
Styling Tip: A tiny reading lamp silhouette in one window adds a wonderful touch, even if it doesn’t actually light up.
21. Floating Gingerbread-Inspired Candy House Cloud
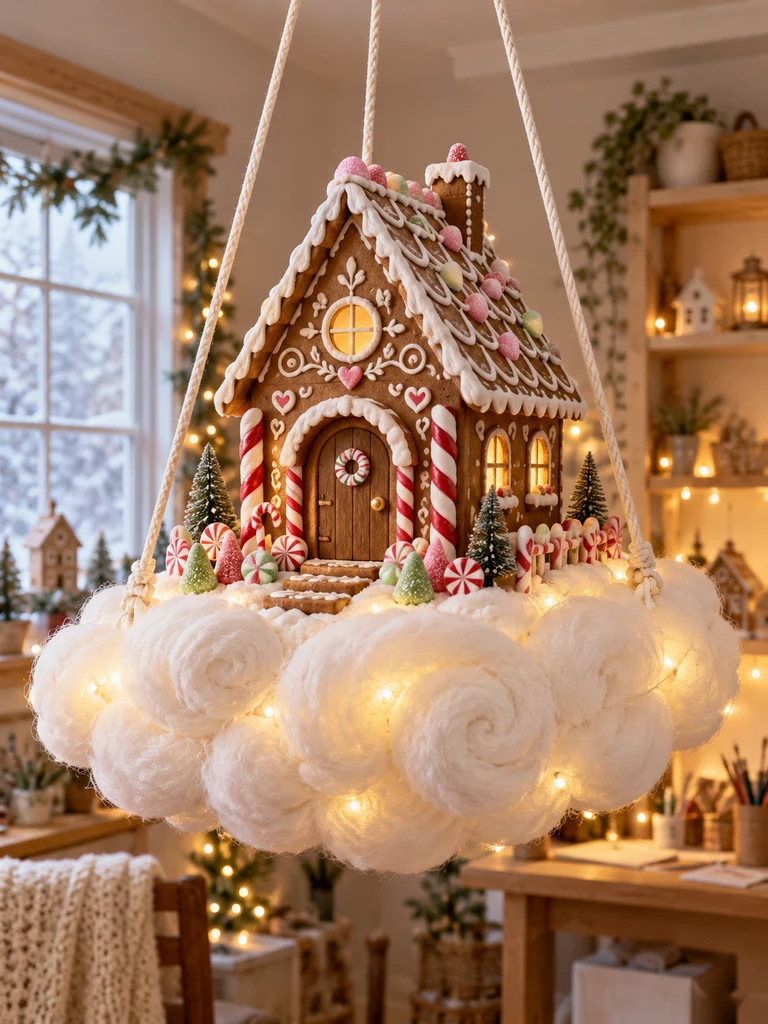
This playful house looks like a giant Christmas treat resting on a soft cloud.
Its brown walls are decorated with white icing-style patterns, while candy-cane columns, peppermint details, and colorful gumdrop shapes surround the entrance.
Everything is made from non-edible craft materials, so the finished decoration can be reused.
Materials You’ll Need
- Brown cardstock
- Lightweight cardboard
- White paint pen
- Pastel craft foam
- Small decorative faux candy pieces
- Cotton batting
- Rigid foam-board platform
- Red and white paper straws
- Battery-operated LED lights
How to Make It
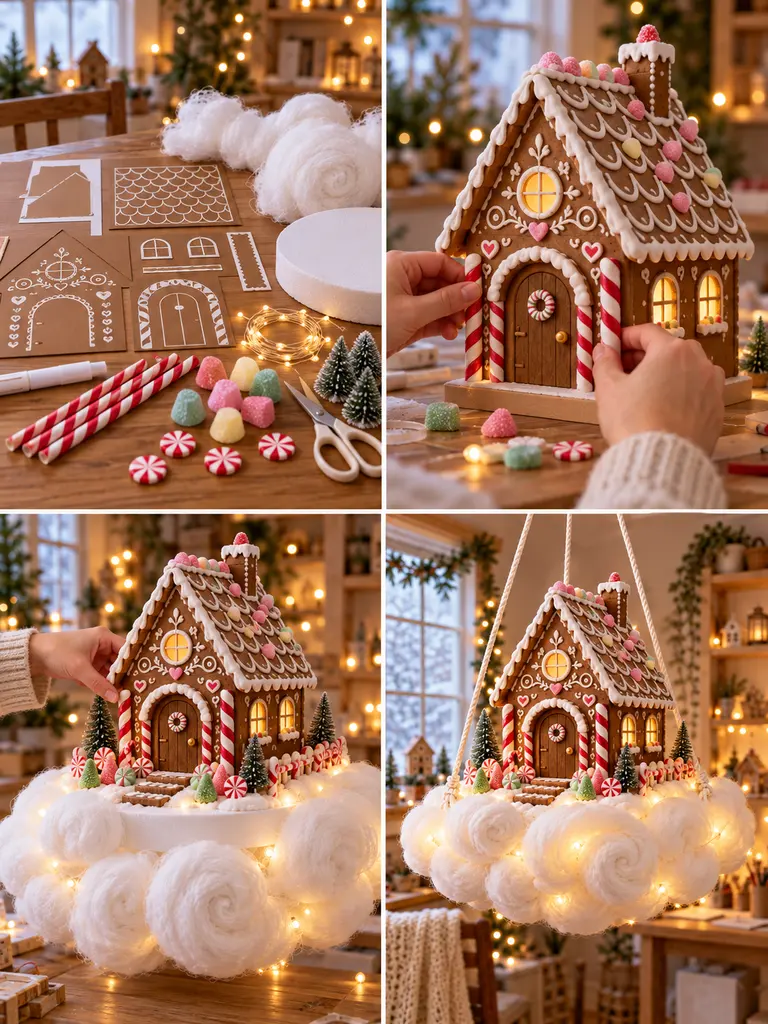
- Construct the gingerbread cottage. Make a small house with a steep roof, wide doorway, and two windows.
- Decorate the roof. Draw wavy white icing patterns along the roof edges using a paint pen. Add scalloped paper trim for an extra layered effect.
- Make the candy details. Cut tiny peppermint swirls, gumdrop shapes, and decorative candies from colored craft foam.
- Add candy-cane columns. Use red-and-white patterned paper straws or decorated lightweight dowels beside the entrance.
- Build the dessert-like cloud. Cover a rigid base with rounded cotton tufts, arranging them in thick layers that resemble whipped frosting.
- Assemble the scene. Secure the house, add faux candy pieces around the doorway, and place a soft LED behind the windows.
Styling Tip: Use warm brown, white, peppermint red, and a few pastel candy colors. Keep the cloud almost entirely white so the house remains the visual center.
22. Tiny Chapel House on a Heavenly Cloud
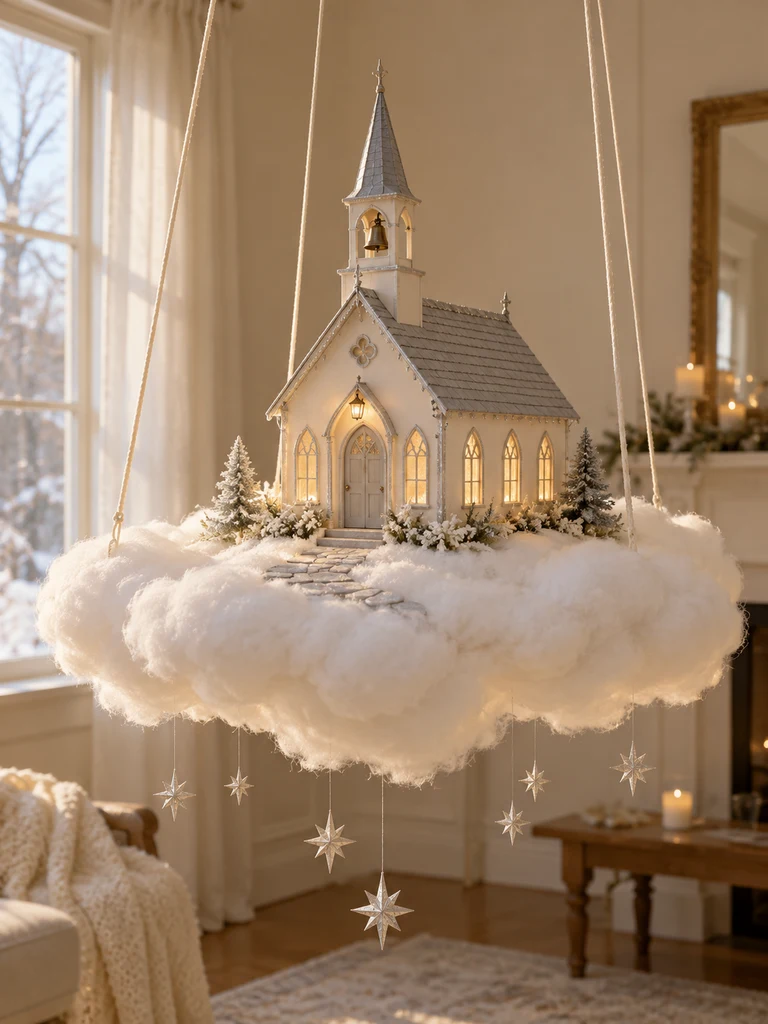
This peaceful design features a miniature chapel-inspired house with a narrow steeple, arched windows, and soft glowing light.
Its cloud base has long, drifting edges that create a gentle, floating appearance.
Silver stars and a tiny bell add delicate finishing details.
Materials You’ll Need
- White cardstock
- Lightweight foam board
- Silver metallic paper
- Thin wooden dowels
- Clear acetate
- Polyester batting
- Rigid cloud-shaped base
- Small lightweight decorative bell
- Battery LED lights
How to Make It
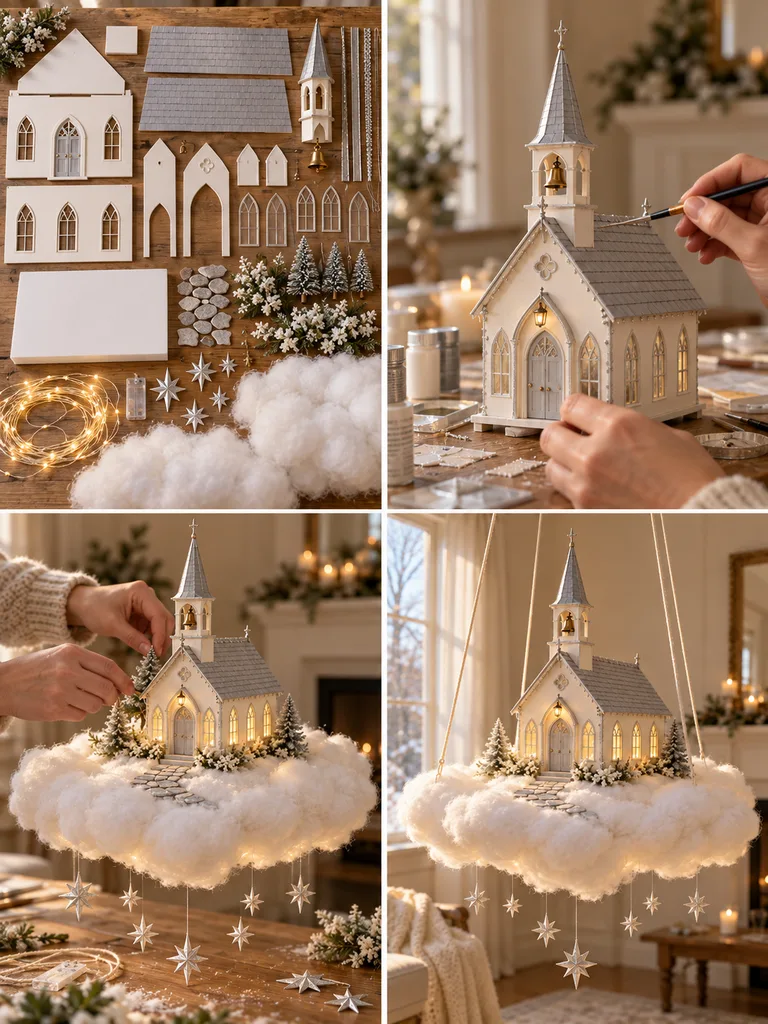
- Build the chapel structure. Cut a long rectangular building with a pitched roof. Make an arched doorway and two tall side windows.
- Create the steeple. Build a narrow square tower from foam board and attach a pointed cardstock roof.
- Paint the building. Use warm white for the walls, light gray for the roof, and silver accents around selected architectural details.
- Add the windows. Attach clear acetate behind the arched openings. Use thin silver paper strips for the window framing.
- Create the cloud platform. Cut a rigid oval with slightly irregular edges. Cover its sides and underside with long overlapping pieces of batting to imitate drifting cloud layers.
- Finish the miniature scene. Secure the building, attach a tiny lightweight bell near the steeple, add several silver paper stars, and position a warm LED inside the chapel.
Styling Tip: Keep the decorations understated. The arched windows and soft glow already create a lovely focal point.
23. Multi-Level Floating Village Cloud Cluster
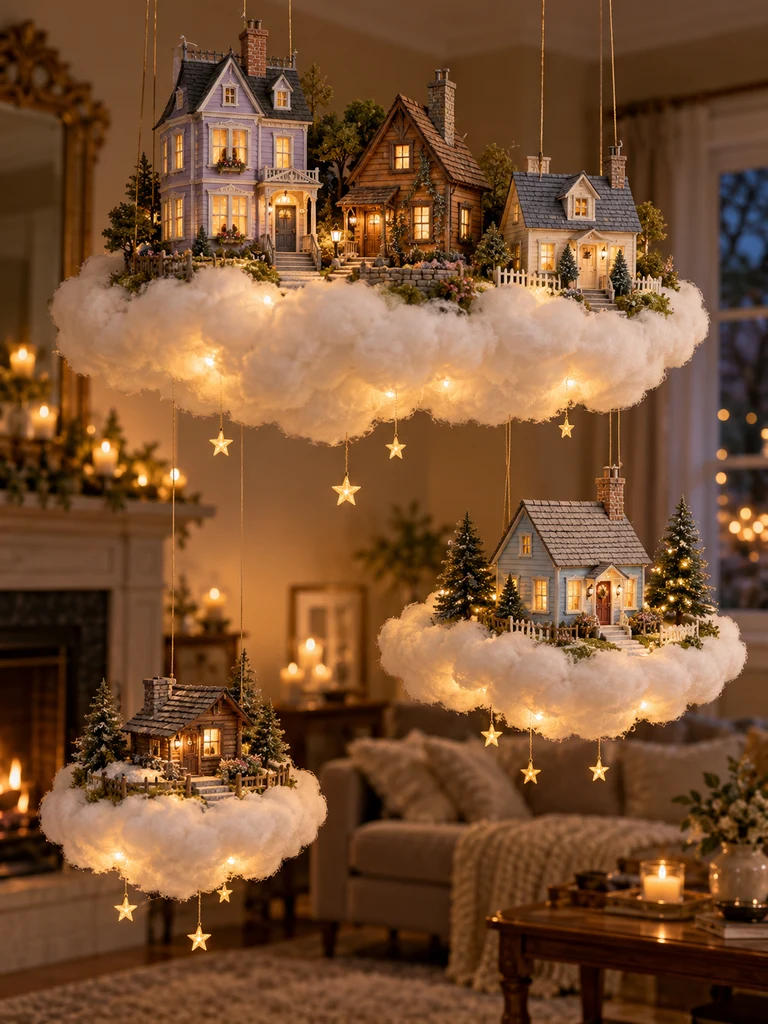
For the final project, imagine several tiny houses occupying their own cloud islands, connected visually by miniature lights and hanging stars.
It’s a larger statement piece, but you can build it using the same basic techniques as the smaller projects.
The biggest difference is planning the structure before adding the decorative details.
Materials You’ll Need
- Sturdy lightweight cardboard
- Balsa wood strips
- Three rigid foam-board platforms
- Polyester fiberfill
- Acrylic paints in coordinating colors
- Miniature artificial pine trees
- Warm battery-operated LED lights
- Clear acetate
- Strong hanging cord
- Appropriate overhead mounting hardware
How to Make It
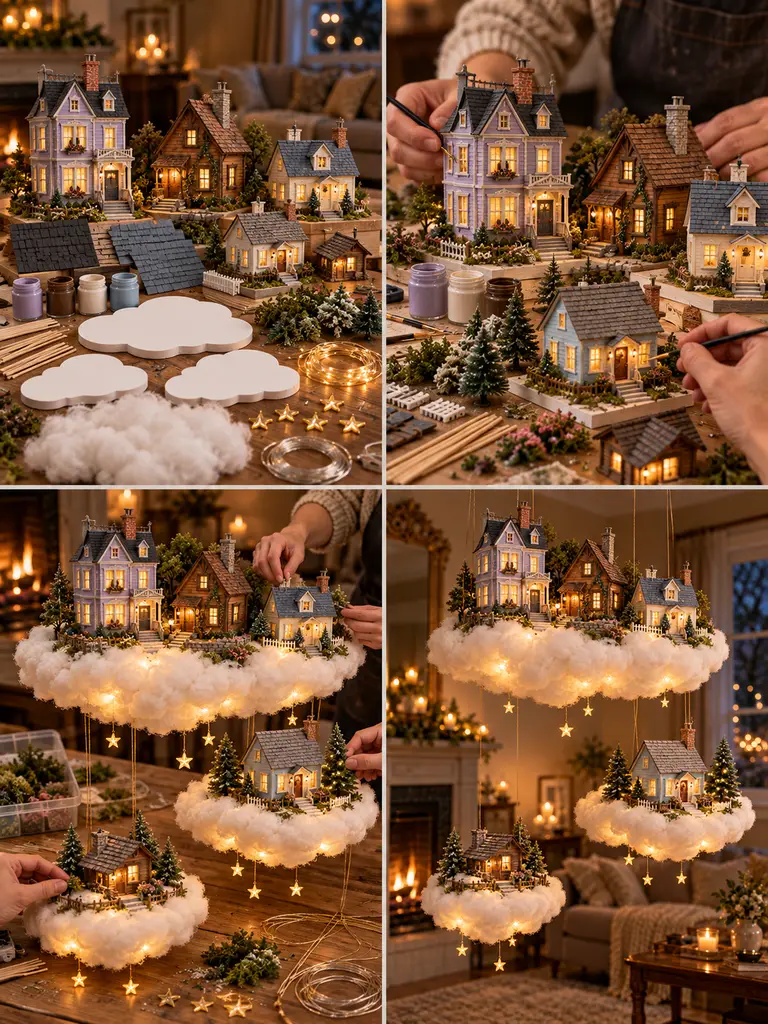
- Plan the village layout. Sketch three cloud islands of different sizes. Decide which houses will sit on each island before cutting the platforms.
- Build the miniature houses. Create several small buildings with varied architecture, such as a narrow townhouse, a pitched-roof cottage, and a compact farmhouse. Keep them lightweight and hollow.
- Paint the buildings. Choose a coordinated palette such as dusty blue, warm brown, cream, and muted lavender. Give each house a different roofline and window arrangement.
- Prepare the three cloud platforms. Cut three rigid foam-board shapes, with the largest supporting the main village. Cover the exposed sides and undersides with fiberfill.
- Attach the village structures. Secure the houses to their platforms. Add miniature trees, tiny walkways, and selected architectural details.
- Install the lights. Position suitable low-heat battery LEDs inside the houses, with battery compartments accessible for maintenance.
- Arrange the floating levels. Use separately rated support points or an engineered, appropriately supported hanging frame for the three platforms. Do not rely on cotton batting, decorative string, or the lower houses to carry upper levels. Test each platform’s stability before completing the display.
- Finish the composition. Add a few lightweight dangling stars and miniature cloud accents, keeping enough open space between the islands to appreciate each building.
Styling Tip: Make one cloud island noticeably larger than the others. It creates a natural focal point and makes the overall composition feel intentional.
How to Make Your Floating Cloud Houses Look More Realistic
Once you’ve built your first miniature floating house, you’ll probably notice that the smallest details make the biggest difference.
A simple cardboard cottage can look quite convincing when its windows have depth, the roof has realistic texture, and the cloud beneath it appears soft rather than perfectly round.
Here are a few things worth remembering.
Use More Than One Texture
Try combining smooth painted walls with textured roofing, wooden trim, fluffy cotton, and small foliage details.
For example, a farmhouse made entirely from flat cardboard may look plain. Adding overlapping craft-stick siding and a textured roof instantly makes it feel more like a miniature building.
Keep the Windows Small and Detailed
Windows help establish the scale of a miniature house.
Use thin strips of cardstock or balsa wood to create frames. Clear acetate can imitate glass, while translucent paper can diffuse the light from inside.
A few carefully finished windows usually look better than dozens of openings with no trim.
Build Clouds in Irregular Layers
Real clouds rarely resemble perfectly round cotton balls.
To create a more believable appearance, use fiberfill in different-sized tufts. Layer larger sections around the main base and use smaller pieces to fill gaps.
Leave a few soft, uneven edges rather than trimming everything into a smooth shape.
Use Warm Lighting Sparingly
You don’t need dozens of lights inside every house.
Sometimes one gently illuminated window creates more atmosphere than filling the entire building with bright LEDs.
Choose suitable low-heat, battery-operated lights and keep all electrical components accessible and away from loose fiberfill, heat sources, and moisture.
Think About the Viewing Angle
Most suspended miniature houses are viewed from slightly below.
That means roof details, cloud edges, hanging accessories, and the underside of the platform may be more noticeable than tiny ground-level details.
Before permanently attaching decorative pieces, hold the assembled craft at its planned display height and check how it looks from across the room.
Where to Display Floating Cloud House Decorations
These miniature houses can work in many spaces, depending on the design.
Living room: A floating Victorian townhouse, woodland cottage, or multi-level village makes an unusual decorative focal point.
Home office: A celestial observatory, sky library, or miniature greenhouse adds personality to a creative workspace.
Bedroom reading corner: A pastel dream house, rose garden cottage, or boho macramé cloud can create a softer atmosphere.
Craft room: A miniature bakery, rainbow cloud house, or floating farmhouse is a fun way to showcase handmade skills.
Seasonal display: A snowy chalet, gingerbread cottage, or Scandinavian winter cabin works beautifully as part of Christmas or winter decorating.
Gift display: Smaller cloud houses can be presented in protective boxes as handmade gifts rather than suspended permanently.
For hanging installations, choose a location away from fans, heating fixtures, doors, and frequently occupied areas. Avoid placing them above beds or anywhere small parts could fall onto people.
Frequently Asked Questions About Floating Cloud House Ideas
What is a floating cloud house craft?
A floating cloud house craft is a miniature decorative building placed on a cloud-shaped base, often covered in polyester fiberfill or cotton batting.
Some are suspended from the ceiling using an appropriately rated hanging system. Others are displayed on a shelf with a concealed support, making them appear to float.
The houses can resemble cottages, castles, cabins, shops, or entire miniature villages.
What is the best material for making fluffy clouds?
Polyester fiberfill is a useful option because it’s lightweight, easy to shape, and available at many craft stores.
Cotton batting can also work well for soft layered edges.
Whichever material you choose, attach it to a solid structural base instead of using the fluffy material itself to support the house.
Can I make a floating cloud house using only cardboard?
Yes. Cardboard can be used for the house, roof, doors, window frames, and structural platform if it’s sufficiently rigid and reinforced for the intended display.
You can then use fiberfill for the cloud appearance and decorative paper for additional details.
For a suspended model, evaluate the complete weight and use suitable load-rated structural materials and hardware.
How do I make the windows glow?
Cut small window openings and attach clear acetate or translucent paper behind them.
Place an appropriately rated, low-heat battery LED inside the hollow house, keeping its battery compartment accessible.
Avoid candles, incandescent bulbs, improvised electrical wiring, or any lighting that could overheat paper, cardboard, or fiberfill.
How can I hang a cloud house without it tilting?
Balance begins with the structural platform.
Use a suitable rigid base, distribute the building’s weight evenly, and attach structural suspension cords to reinforced points. Three or more well-positioned support points can help keep a lightweight platform level when installed correctly.
Test the hanging balance in a safe location before mounting the finished decoration overhead. Always use mounting hardware appropriate for the surface and total load.
Which floating cloud house is easiest for a beginner?
The glowing storybook cottage, pastel dream house, and Scandinavian snow cabin are relatively approachable projects.
Their house structures use basic rectangular walls and pitched roofs. You can also simplify their decorative details until you’re comfortable working with smaller pieces.
Can floating cloud houses be made without lights?
Absolutely.
A well-painted miniature cottage with textured roofing, fluffy cloud edges, and a few tiny trees can look beautiful in daylight.
If you prefer not to include electrical components, focus on contrasting materials, carefully painted windows, and creative cloud silhouettes.
How long does it take to make a floating cloud house?
It depends on the complexity of the design and how much detail you add.
A basic cardboard cottage and cloud platform might be completed during a weekend crafting session, while a multi-house village can require multiple sessions.
Remember to allow sufficient drying and curing time for paint, glue, and modeling materials. Rushing these stages can weaken the structure or spoil the finish.
Are floating cloud houses suitable for children’s rooms?
They can be decorative additions when securely installed in appropriate locations, but they aren’t toys.
Keep all hanging cords, small objects, detachable details, and battery compartments inaccessible to children. Do not hang them above cribs, beds, or play areas where falling parts could cause injury.
For younger children’s rooms, a securely enclosed, non-hanging display placed out of reach may be a more suitable choice.
Final Thoughts on Floating Cloud House Ideas
There’s something wonderfully imaginative about making a tiny house that appears to float in the sky.
A few pieces of cardboard can become a charming Victorian townhouse. Wooden craft sticks can turn into a snowy mountain chalet. Cotton batting becomes a billowy cloud, and a carefully positioned light makes a miniature window look as though someone is home.
That’s the real appeal of these 23 floating cloud house ideas. They give you an opportunity to build an entire little world from materials that might otherwise seem ordinary.
You don’t have to attempt the most complicated design first.
Start with a simple cottage, experiment with the cloud shape, and see how the materials work together. Once you’re comfortable with the basics, try a mushroom house, a sky greenhouse, or a more elaborate multi-level village.
Give yourself permission to adjust the colors, architectural details, and decorations along the way. One person’s floating cottage might have a blue roof and tiny roses, while another’s has weathered wooden walls and miniature evergreen trees.
Those personal touches are what make handmade projects special.
Choose the design that sparks your imagination, gather your supplies, and enjoy creating a little home among the clouds.