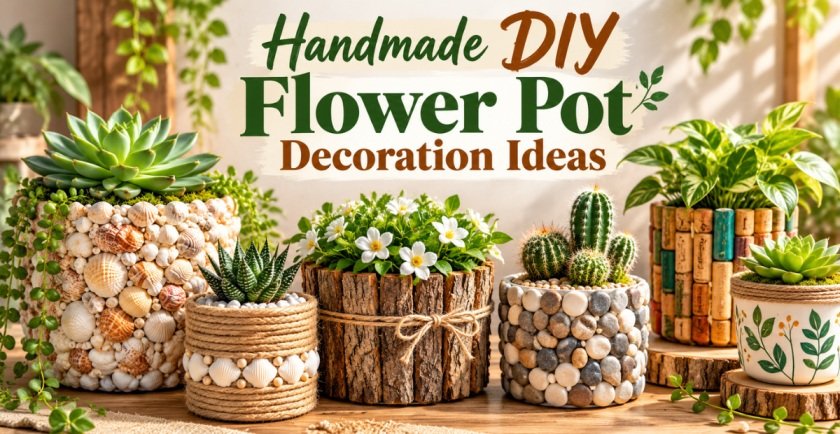
A plain flower pot is easy to overlook. We buy one because a plant needs somewhere to live, place it on a windowsill or patio, and often forget that the container can be part of the decor too. With a few simple materials, even an inexpensive terracotta pot or basic nursery cover can become something much more personal.
The most useful DIY flower pot decoration ideas are not just pretty; they also respect how the planter needs to function. Drainage should stay open, moisture-sensitive materials need protection, and heavy decorations should be paired with a sturdy base. Thinking about those details before you start makes the finished project easier to live with and helps it last longer.
The 23 projects below move from shells, pebbles and rope to wood, fabric, bamboo, clay relief and recycled bottle caps. Each idea includes a material list and a practical making method, so you can follow the design closely or simply borrow the technique and adapt it to materials you already have.
For projects that use cork, fabric, rope, moss or untreated wood, a removable nursery pot is often the easiest solution. You can lift the plant out to water it, let excess moisture drain away, and return it to the decorative container once the outside is dry.
1. Seashell Mosaic Succulent Pot
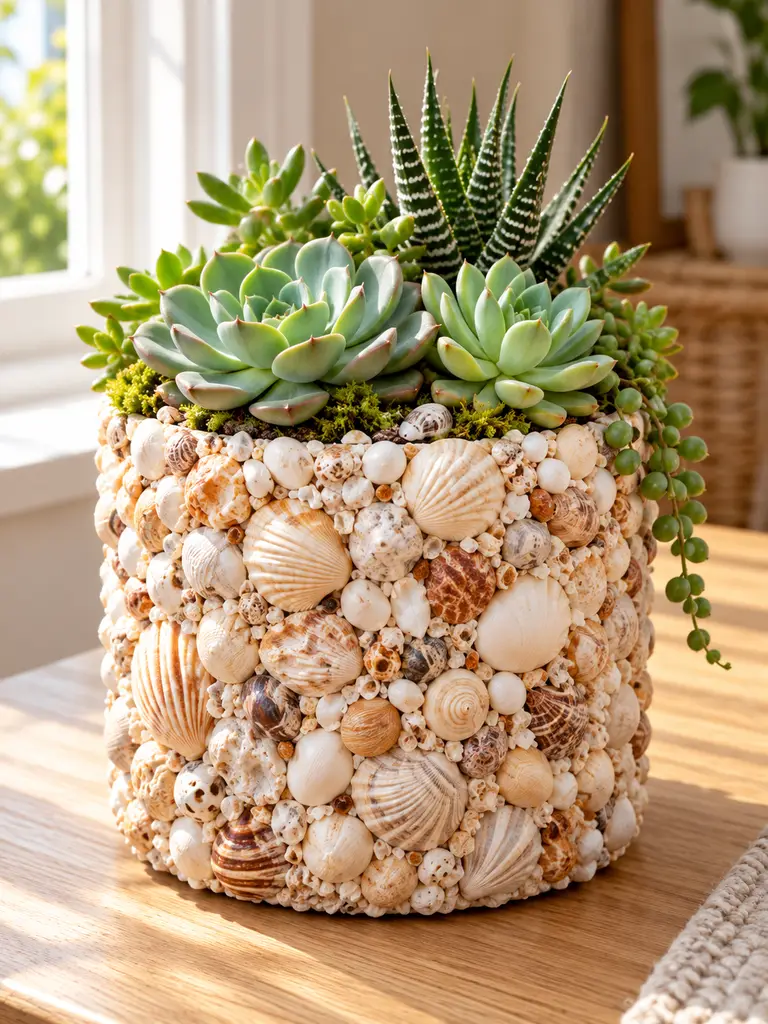
A shell-covered planter is a lovely way to use a small collection of beach finds without turning the room into themed coastal decor. The trick is to vary the shell sizes and directions so the surface feels collected and organic rather than arranged in stiff rows.
Succulents work especially well here because their clean, sculptural leaves contrast with the busy shell texture. Keep the planting simple and let the handmade surface do most of the decorative work.
Materials Needed
- Plain terracotta or ceramic pot
- Small and medium natural seashells
- Tiny shell fragments for filling gaps
- Strong adhesive suitable for ceramic and shells
- Small craft stick or applicator
- Clear protective sealer appropriate for the materials
- Succulent potting mix and compact succulents
How to Make It
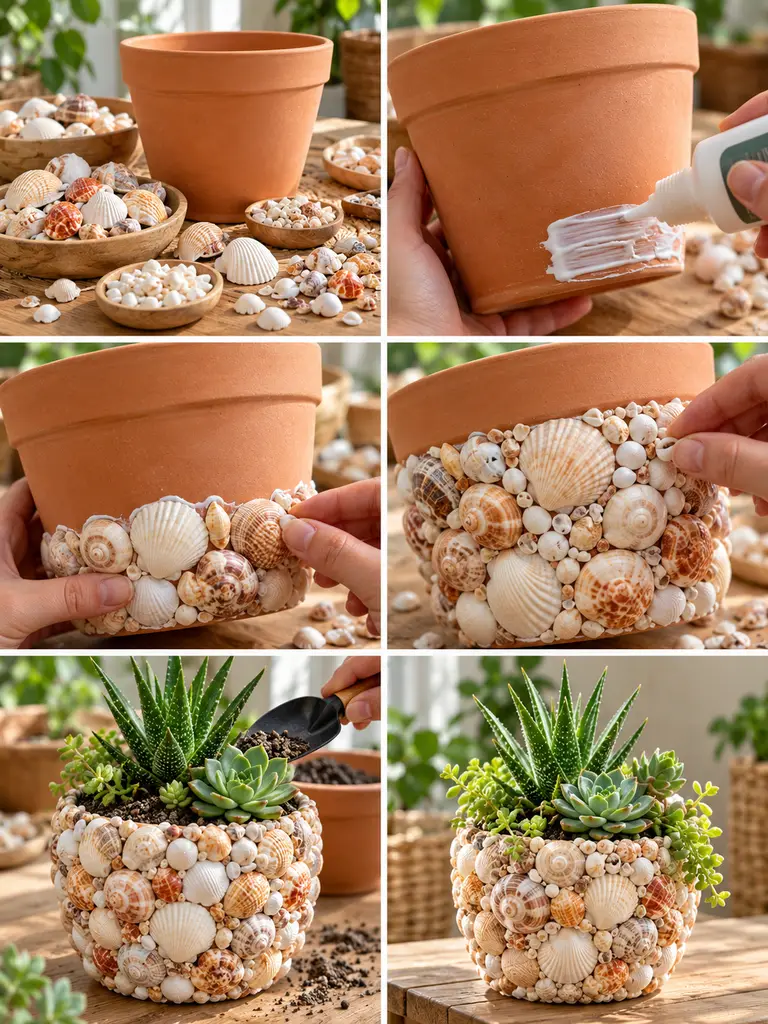
- Wash the pot and shells, then let everything dry completely before gluing.
- Sort shells roughly by size so larger pieces can establish the pattern and smaller pieces can fill the awkward spaces.
- Begin near the lower edge and attach the larger shells first, turning them in different directions for a natural mosaic look.
- Add smaller shells and fragments between the larger pieces until very little of the base pot shows.
- Keep the drainage hole and the inside planting area free from adhesive and decoration.
- Allow the adhesive to cure fully, then apply a suitable clear sealer if the planter will be exposed to occasional moisture.
- Fill with well-draining succulent mix and add one larger succulent or a balanced cluster of smaller plants.
2. River Pebble Rustic Flower Pot
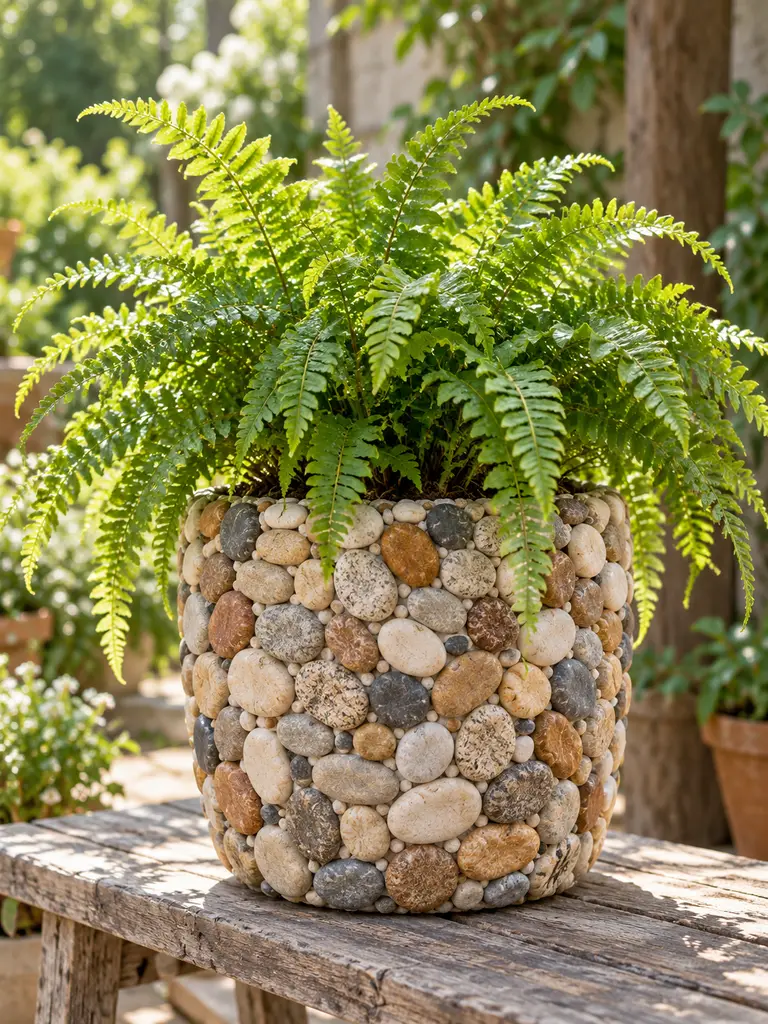
Smooth river pebbles give an inexpensive planter the weight and character of a much more substantial stone container. A mixture of warm gray, beige, cream, taupe and brown stones keeps the surface interesting while still feeling calm and natural.
Choose a sturdy base pot for this project because even small pebbles add noticeable weight. Flatter stones are easier to bond securely and create a neater finish than very rounded pieces.
Materials Needed
- Sturdy terracotta, cement or ceramic planter
- Small flat river pebbles
- Exterior-grade adhesive
- Protective gloves
- Grout, optional
- Damp sponge and small brush
- Stone-compatible sealer, optional, plus potting soil and plant
How to Make It
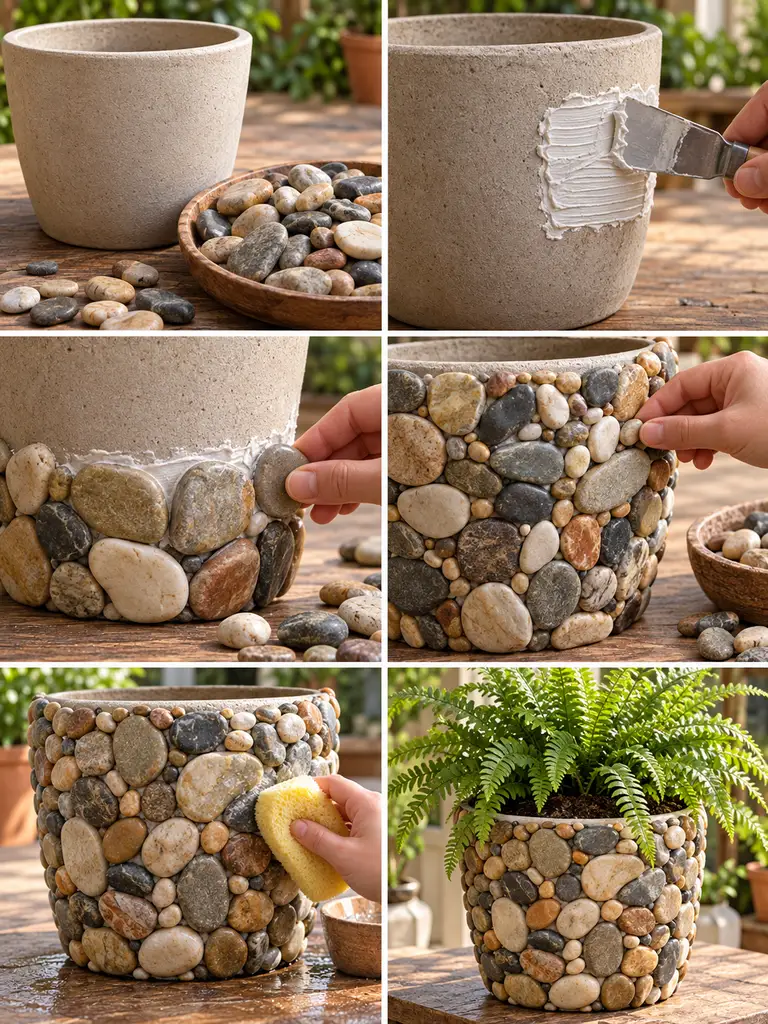
- Wash the pebbles thoroughly and allow them to dry before starting.
- Lay out a selection and identify the flatter sides that will sit most securely against the pot.
- Work in small sections, applying only as much adhesive as you can cover before it begins to set.
- Press larger stones in first, then use smaller stones to close obvious gaps.
- Step back every few rows to make sure the colors and stone sizes remain balanced around the planter.
- If you want a masonry-style finish, add grout after the adhesive cures and wipe the pebble faces clean with a damp sponge.
- Let the finished surface cure completely before filling the planter and adding a fern, grass or another leafy plant.
3. Jute Rope Wrapped Planter
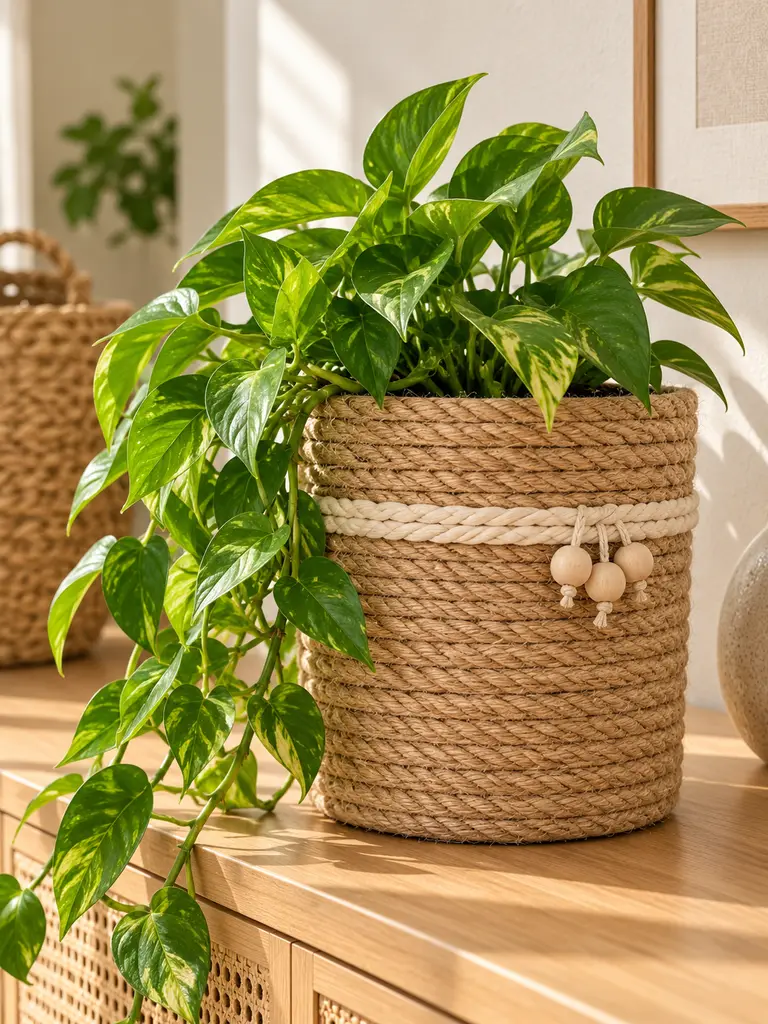
A jute-wrapped pot is simple, inexpensive and surprisingly polished when the rope rows are tight and even. The natural fiber adds warmth without competing with the plant, which makes this an easy fit for farmhouse, bohemian and relaxed neutral interiors.
For the longest-lasting result, treat the decorated container as an outer pot and keep the plant in a removable nursery pot. That way the rope does not stay wet every time you water.
Materials Needed
- Plain cylindrical planter
- Natural jute or sisal rope
- Strong craft adhesive
- Scissors
- Cream cotton cord, optional
- A few unfinished wooden beads, optional
- Removable nursery pot and plant
How to Make It
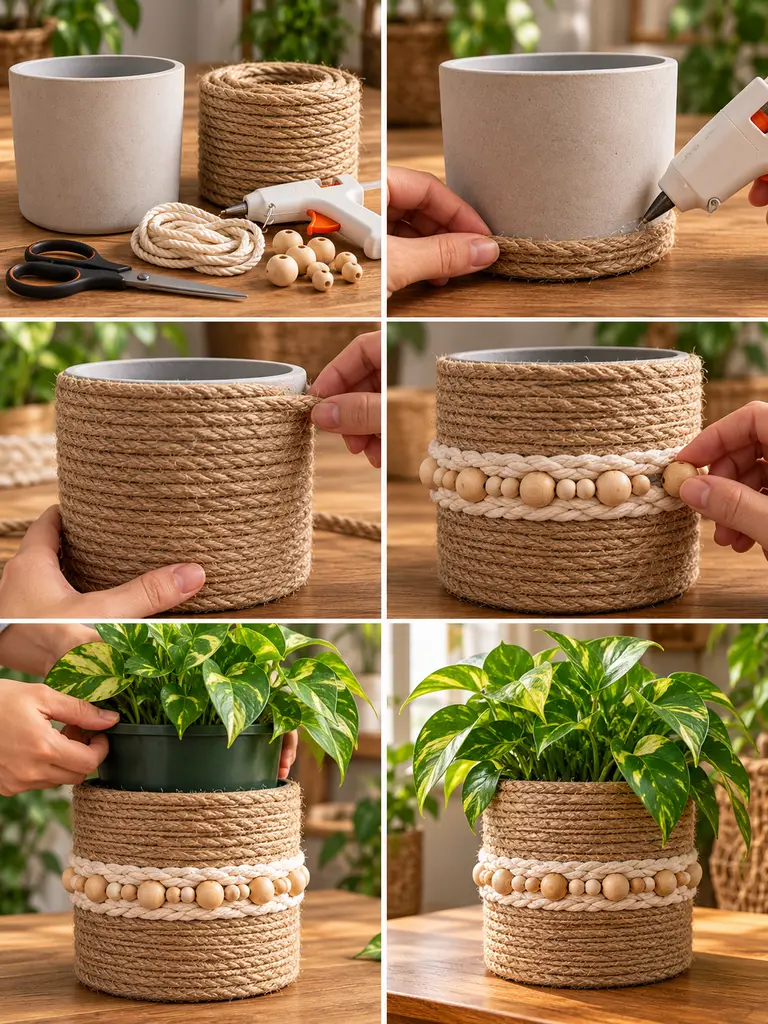
- Clean and dry the planter so the adhesive can grip the surface properly.
- Secure the rope end near the bottom edge with a small amount of adhesive.
- Wrap slowly, applying adhesive in short sections and pressing each new row firmly against the previous one.
- Continue upward until the pot is covered, checking often for gaps or loose sections.
- Add a slim contrasting cotton-cord band or a few wooden beads if you want a little extra detail.
- Trim the rope neatly and hide the final end at the back of the planter.
- Place the plant inside in its nursery pot so watering remains easy and the rope stays cleaner.
4. Broken Ceramic Mosaic Flower Pot
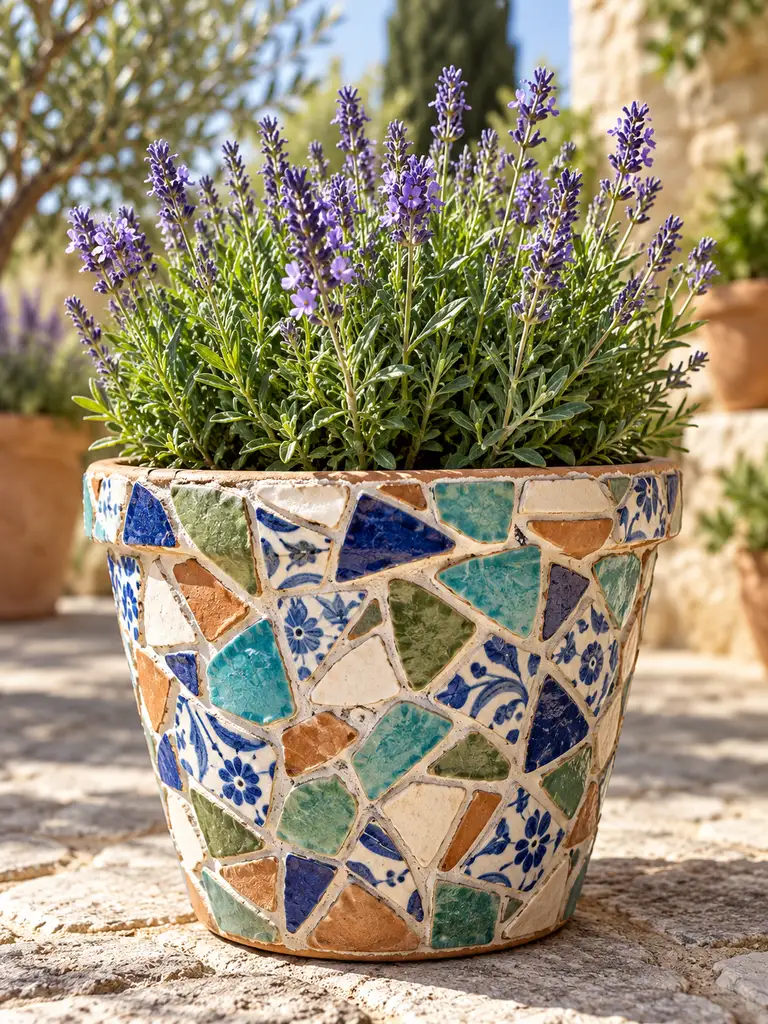
Broken ceramic and leftover tile pieces can turn a plain pot into a colorful mosaic that feels far more personal than a store-bought patterned planter. Keeping the palette limited to a few related colors makes the finished piece look intentional instead of chaotic.
Because cut ceramic edges can be sharp, this is one project where careful preparation matters. Eye protection and tile nippers make it much easier to create manageable pieces before you begin arranging the design.
Materials Needed
- Terracotta or ceramic planter
- Broken ceramic or tile pieces
- Tile nippers
- Eye protection and gloves
- Mosaic adhesive
- Grout and small spreader
- Damp sponge, grout sealer and planting supplies
How to Make It
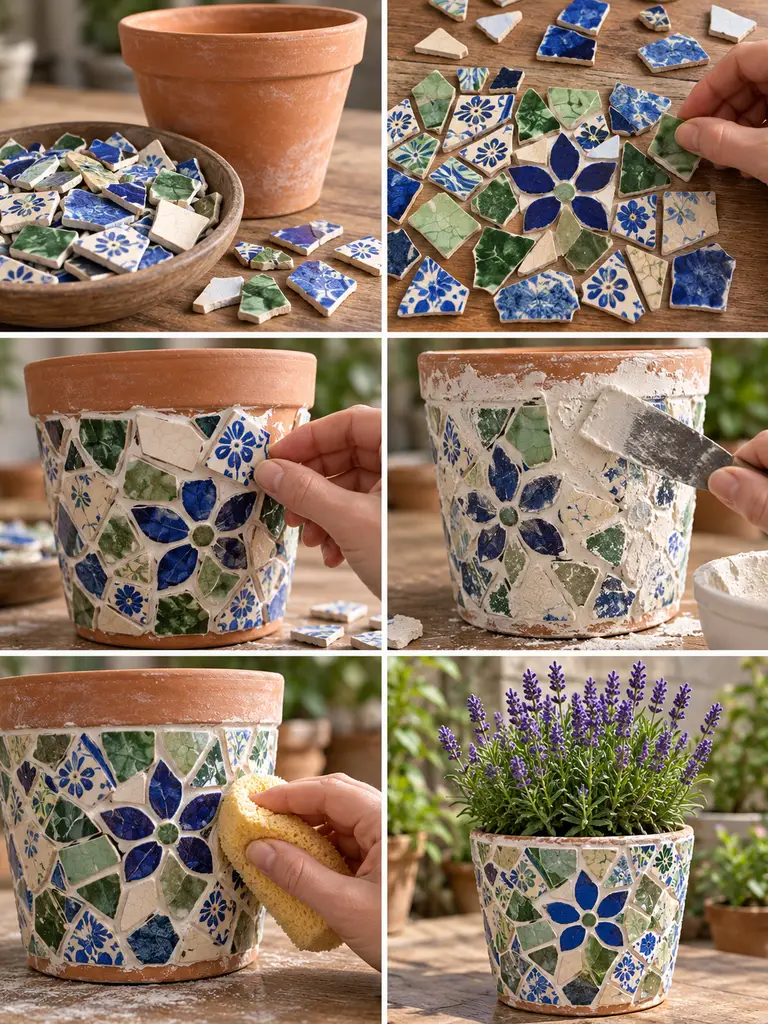
- Wearing eye protection, trim larger pieces into safe, manageable fragments.
- Arrange a rough pattern on the table before committing anything to the pot.
- Glue each piece individually, leaving narrow, reasonably consistent gaps for grout.
- Work gradually around the pot so the color distribution stays balanced.
- After the adhesive cures, press grout into the spaces between the ceramic fragments.
- Wipe the ceramic faces clean with a damp sponge before the grout fully hardens, then seal if required.
- Allow the pot to cure completely before adding soil and a plant such as lavender or compact flowering greenery.
5. Tree Bark Woodland Planter
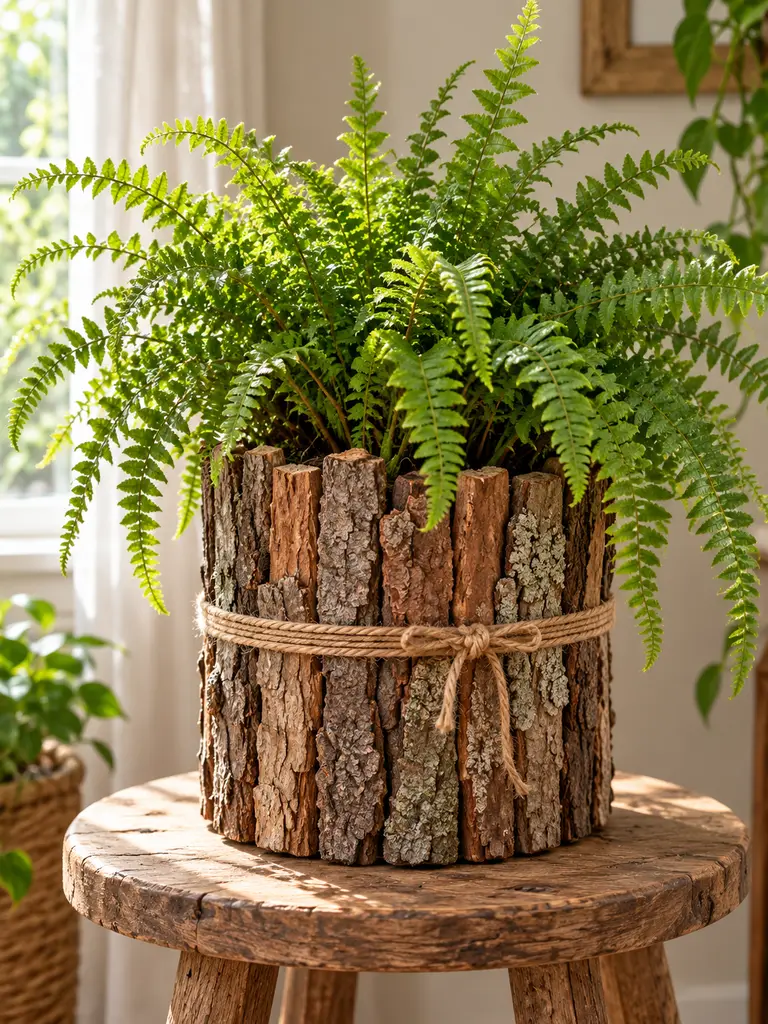
Pieces of naturally fallen bark can make a basic container look like a small section of woodland trunk. The irregular cracks, rough edges and changing brown tones are the reason this design works, so there is no need to force every piece into perfect uniformity.
Ferns, ivy and other soft green plants suit the woodland character particularly well. A simple jute tie can also help visually pull the bark pieces together without hiding the texture.
Materials Needed
- Plain cylindrical planter
- Dry naturally fallen bark
- Pruning shears or sturdy scissors
- Strong adhesive
- Natural jute twine
- Matte protective finish, optional
- Removable nursery pot and fern or other foliage plant
How to Make It
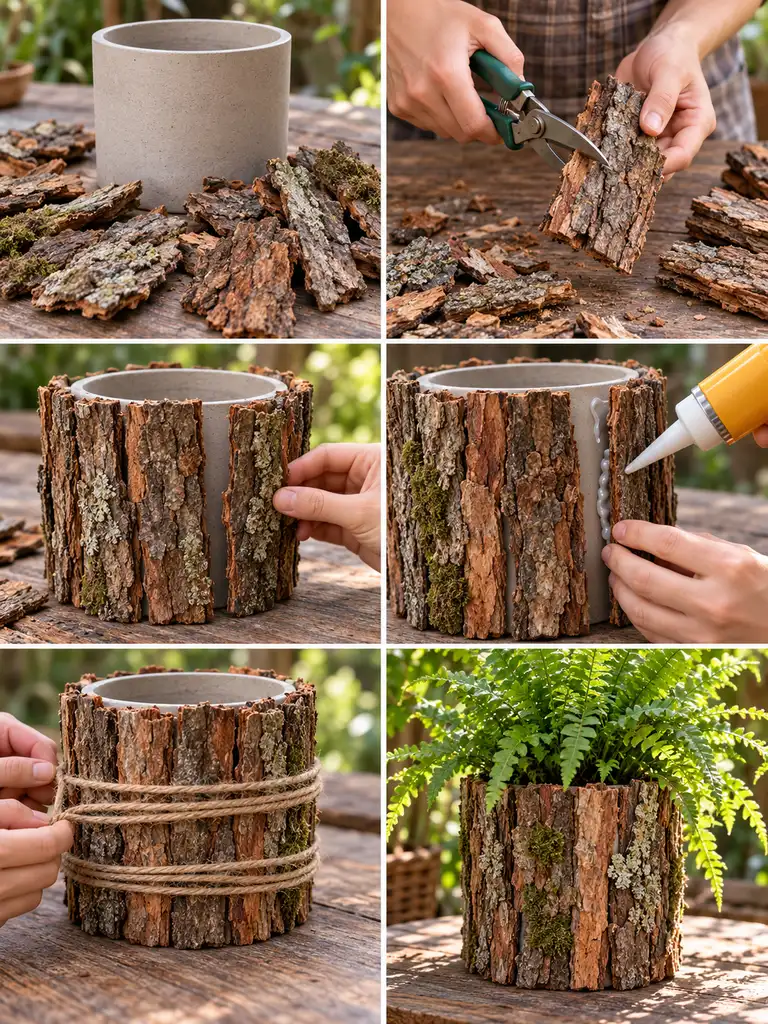
- Use only loose bark that has already fallen naturally, and let it dry fully before crafting.
- Trim the bark into sections close to the height of the planter.
- Test-fit the pieces around the container so the widths and irregular edges balance each other.
- Glue each bark section vertically, using smaller fragments to disguise larger gaps.
- Wrap jute twine around the planter while the adhesive cures if extra support is useful.
- Leave the twine as a decorative detail or remove it once the bark is secure.
- Slip a nursery pot with a fern or ivy into the finished woodland-style cover.
6. Wooden Slice Mosaic Pot
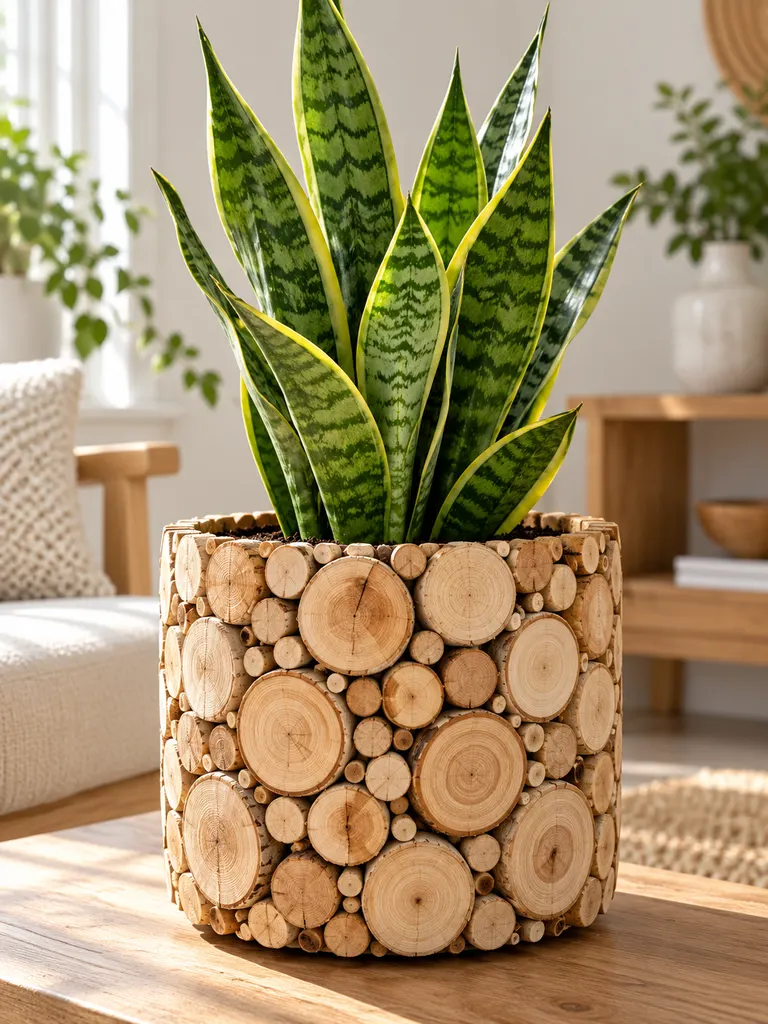
Small cross-sections of dry branches create a warm mosaic that shows off natural growth rings and subtle differences in wood color. Using several diameters is important because the smaller rounds can fill the spaces between larger slices and make the surface feel complete.
This design works best when the wood is thoroughly seasoned before you begin. Fresh branch slices can shrink or split as they dry, which may loosen the finished arrangement.
Materials Needed
- Plain sturdy planter
- Dry branch slices in mixed diameters
- Fine sandpaper
- Strong adhesive
- Small wood pieces for narrow gaps
- Clear matte wood sealer
- Nursery pot and upright snake plant
How to Make It
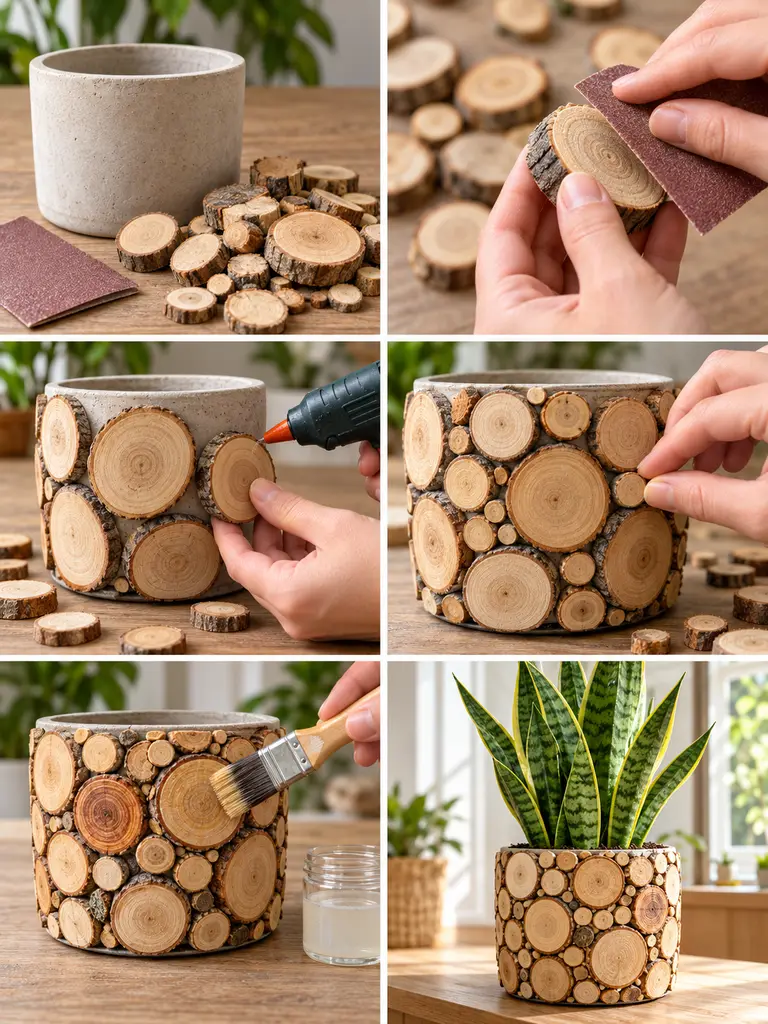
- Check that the branch slices are dry, then sand any rough or splintered edges.
- Lay a handful of slices against the planter to judge spacing before gluing.
- Attach the larger wood rounds first to establish the main mosaic.
- Fill the spaces between them with smaller rounds and tiny wood pieces.
- Keep the rim fairly simple so the natural pattern does not become visually heavy.
- Brush on a suitable matte protective finish once the adhesive has cured.
- Add a snake plant or another upright green plant after the surface is completely dry.
7. Coastal Rope and Shell Planter
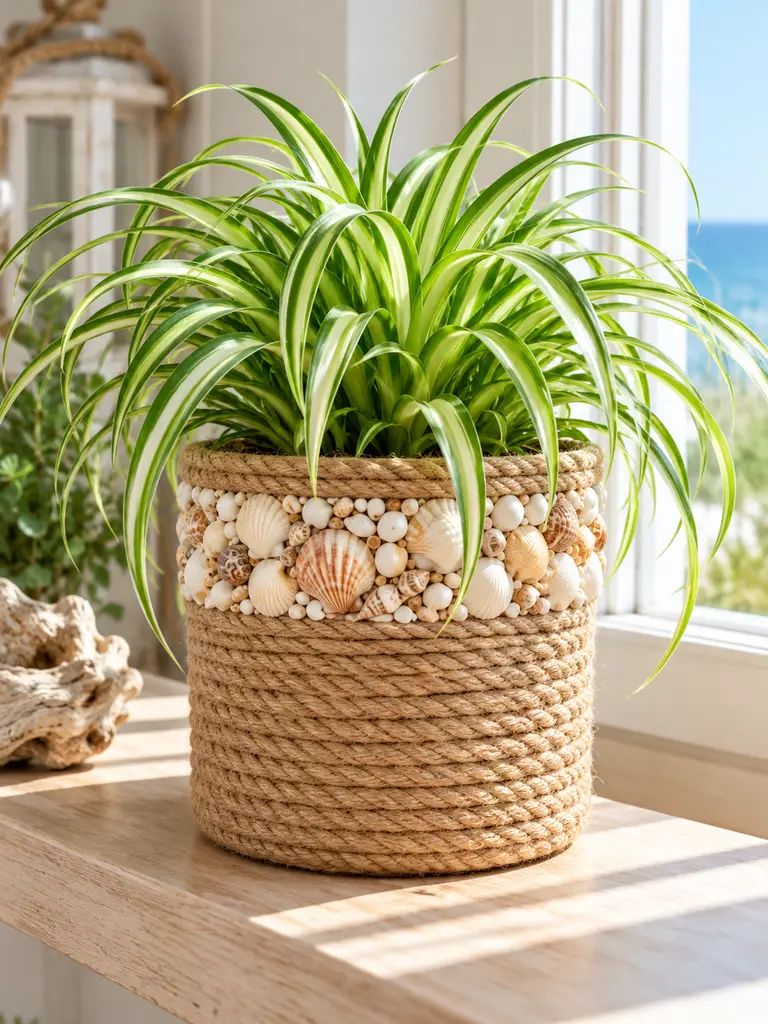
Combining rope and shells creates a softer coastal look than covering the entire pot with shells. The rope brings warmth and structure, while one restrained shell band gives the planter a beach-inspired detail without making it feel overly themed.
A spider plant is a natural partner for this design because its arching leaves echo the relaxed shape of the shells and rope while keeping the overall look light.
Materials Needed
- Plain cylindrical planter
- Natural jute rope
- Small cream, ivory and pale peach seashells
- Strong adhesive
- Scissors
- Narrow rope for rim trim
- Removable nursery pot and spider plant
How to Make It
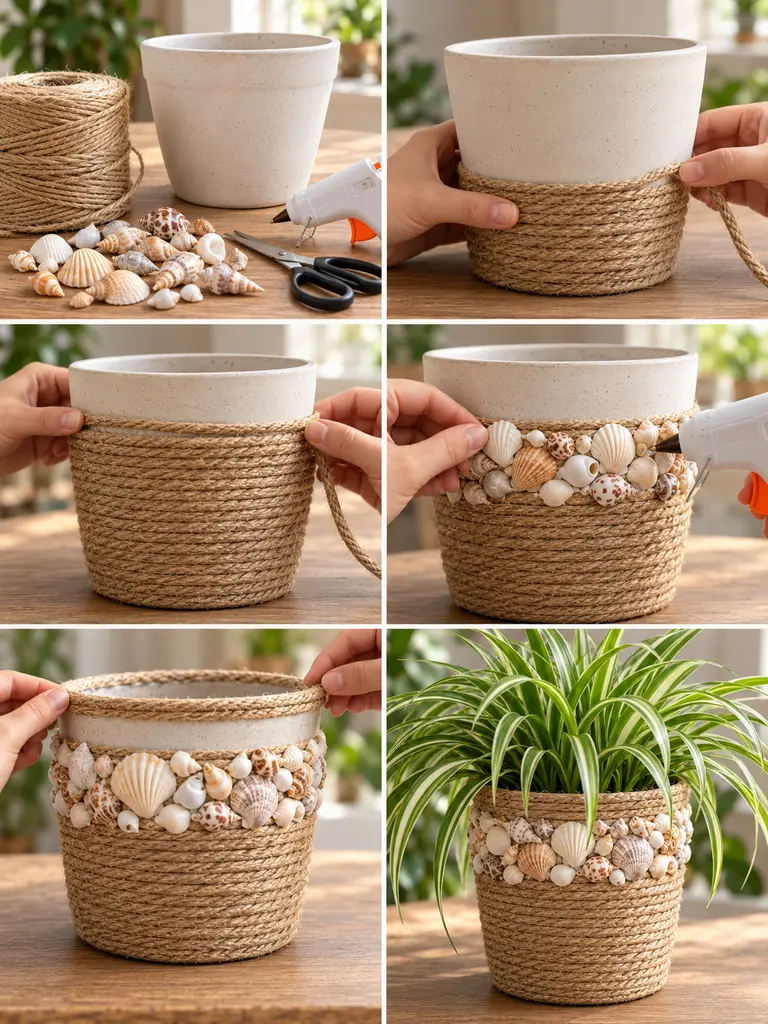
- Clean the planter and begin wrapping the lower section tightly with jute rope.
- Continue until the rope reaches roughly two-thirds of the pot height.
- Leave a clear band above the rope for the shell decoration.
- Attach the larger shells first, then use smaller shells to fill the spaces between them.
- Finish the upper rim with a narrow rope border to visually frame the shell band.
- Let all adhesive cure fully before handling or watering near the decorated surface.
- Insert a nursery pot containing a healthy spider plant.
8. Pressed Flower Botanical Pot
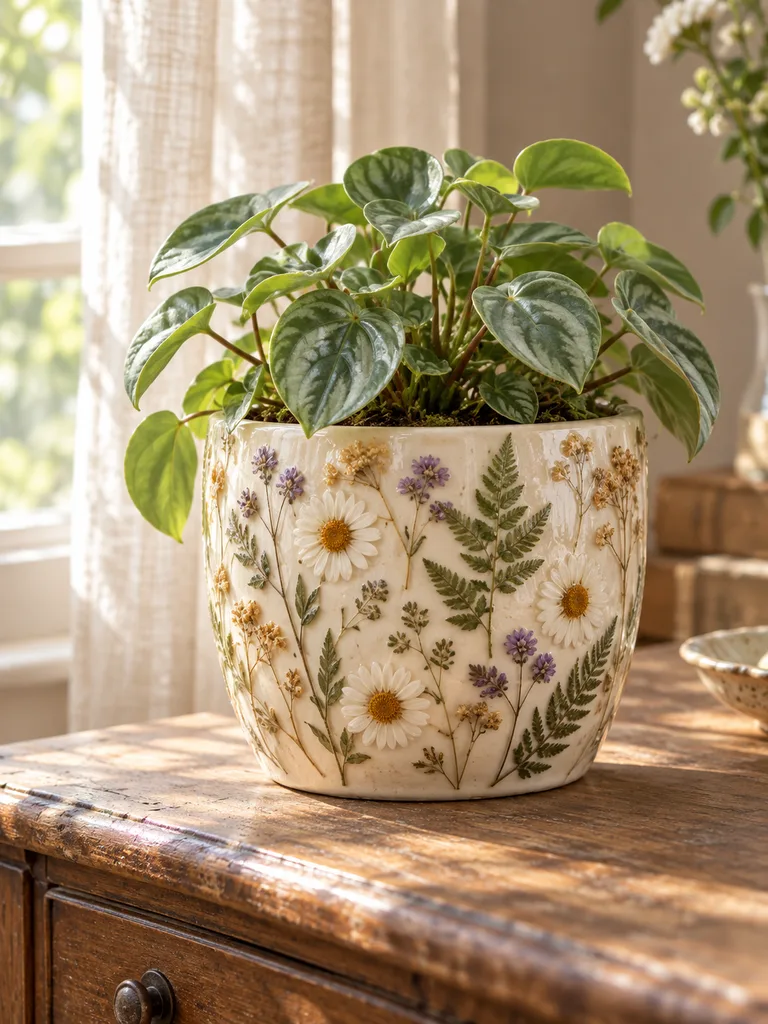
Pressed flowers give a plain planter a delicate, collected quality that looks especially pretty in bedrooms, reading corners and other protected indoor spaces. Small daisies, lavender-toned blossoms, fern leaves and tiny dried stems are easier to place on a curved pot than large rigid flowers.
Leave some empty space between botanical clusters. A little breathing room makes each pressed element visible and keeps the finished planter from looking like printed wrapping paper.
Materials Needed
- Smooth ivory or pale ceramic pot
- Fully dried pressed flowers
- Pressed leaves and fern fronds
- Decoupage medium
- Soft flat brush
- Tweezers
- Clear protective topcoat and compact houseplant
How to Make It
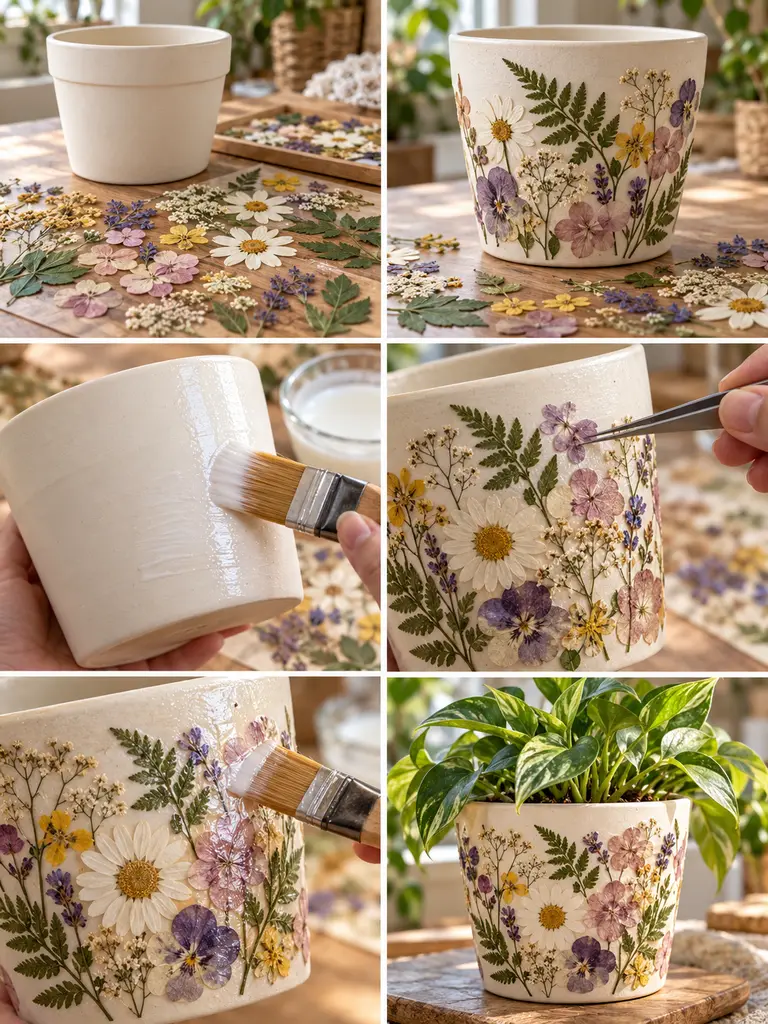
- Arrange the pressed flowers on a table first until you find a balanced composition.
- Brush a thin layer of decoupage medium over one small section of the pot.
- Use tweezers to place the most delicate flowers and leaves without tearing them.
- Continue around the planter, keeping intentional gaps between some botanical groups.
- Gently smooth lifted edges rather than pressing hard on fragile petals.
- After the first layer dries, add thin protective coats of decoupage medium or a compatible clear topcoat.
- Let the finish cure fully before adding the plant.
9. Hand-Painted Folk Art Flower Pot
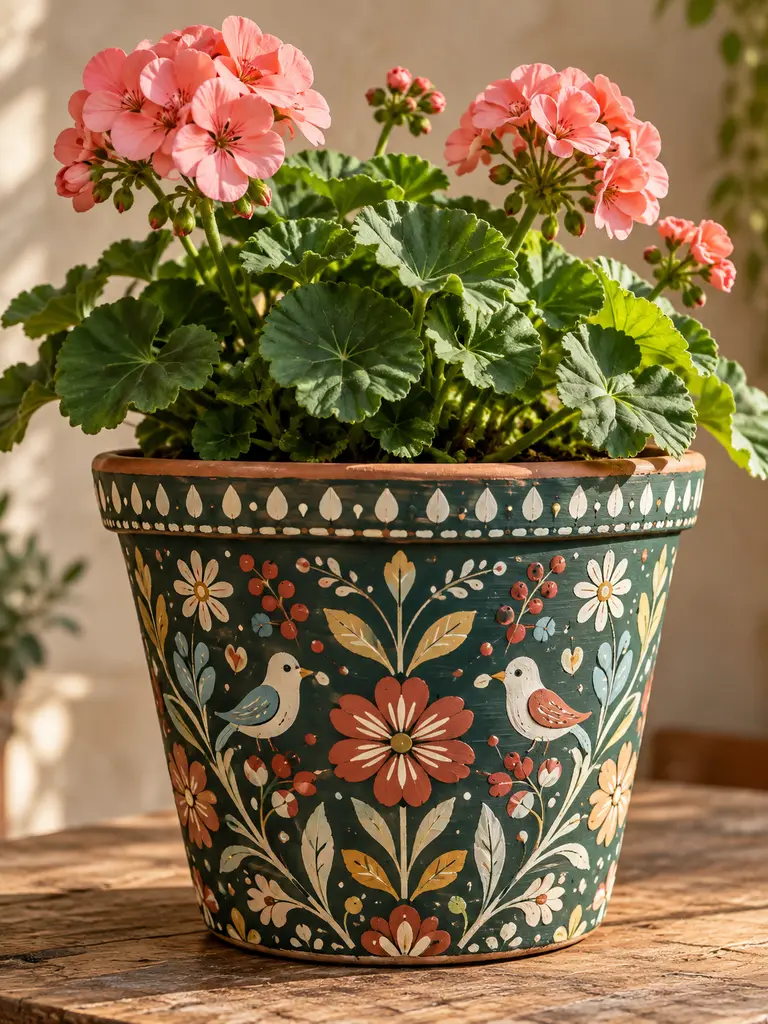
Painting the pot by hand is one of the easiest ways to make a truly one-of-a-kind planter. A deep green or muted teal background gives cream flowers, dusty pink petals, berries and tiny stylized birds enough contrast to stand out without looking too bright.
Do not worry about making every leaf identical. Slight changes in brush pressure and shape are part of what gives folk-inspired decoration its handmade charm.
Materials Needed
- Terracotta flower pot
- Primer or suitable base coat
- Deep green or muted teal paint
- Cream, ochre, dusty pink, terracotta red and pale blue paints
- Fine and medium paintbrushes
- Pencil
- Clear protective sealer and plant
How to Make It
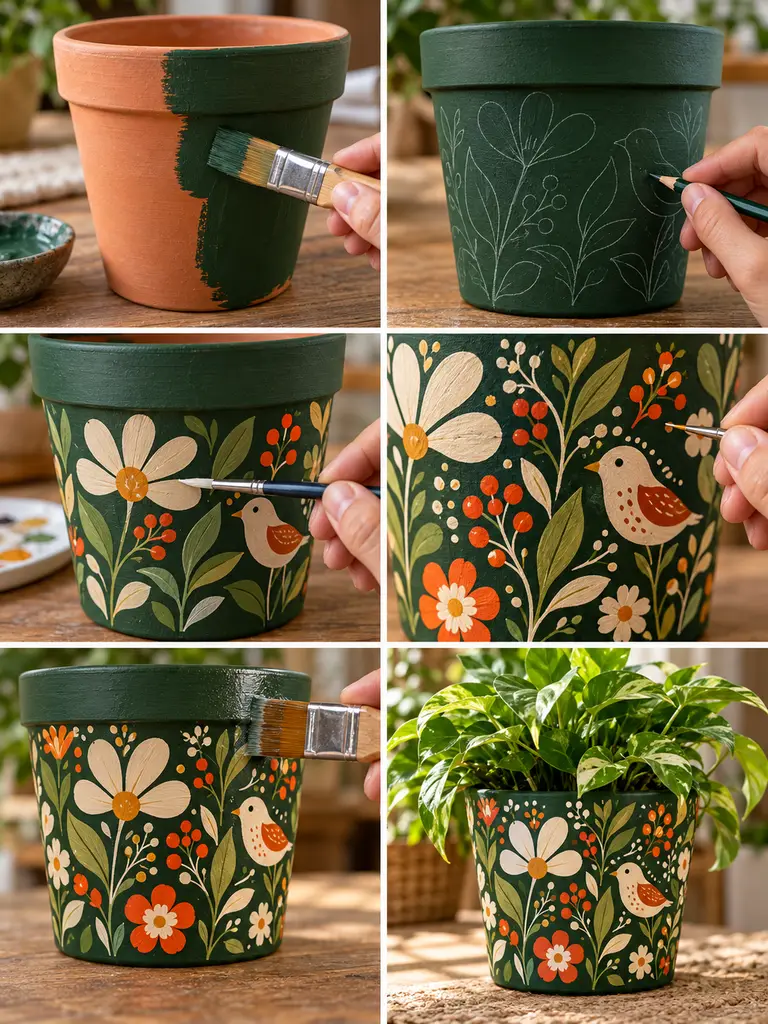
- Clean and dry the pot, then apply primer or a suitable base coat.
- Paint the background in a deep muted green and allow it to dry.
- Lightly sketch the main flowers, leaves and bird shapes with pencil.
- Paint the larger flowers and leaves first so they establish the composition.
- Add berries, dots, stems, tiny birds and border details with a finer brush.
- Let the artwork dry thoroughly, then apply a protective finish suitable for the pot location.
- Add greenery or a flowering plant that does not completely hide the painted surface.
10. Cork Mosaic Planter
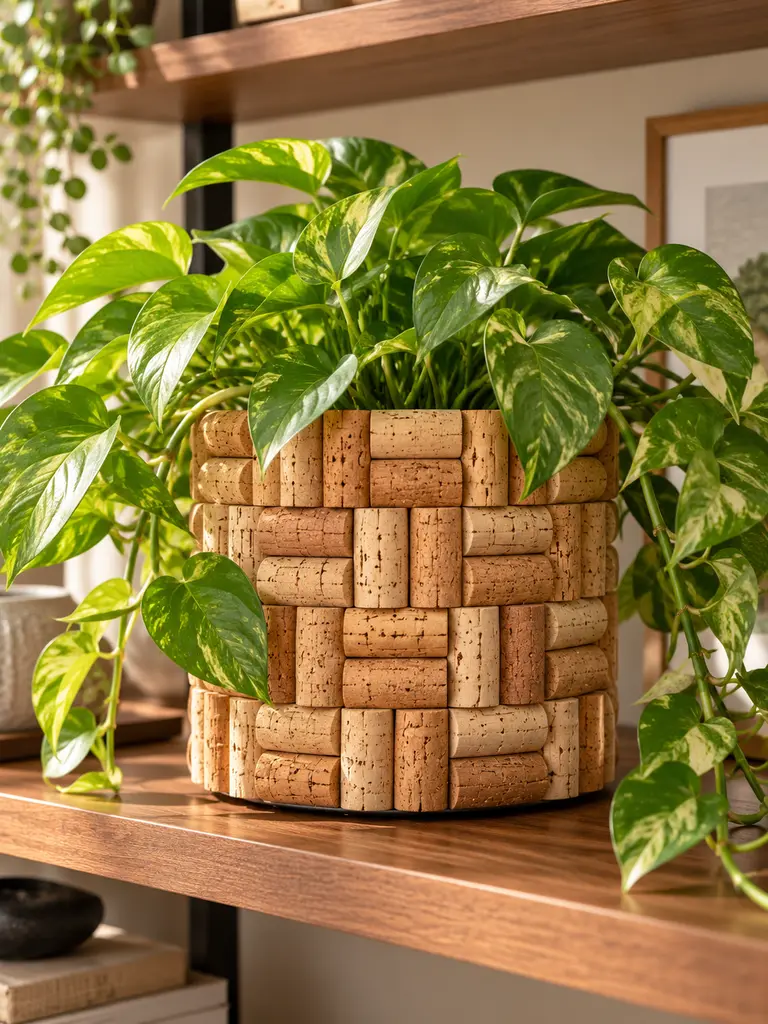
Natural cork is lightweight, warm in color and full of texture, making it a useful alternative to heavier pebble or tile mosaics. Cutting corks lengthwise provides a flatter bonding surface and lets you create alternating horizontal and vertical sections around the pot.
Since cork can absorb moisture, it is best used as a decorative outer layer with a removable nursery pot inside.
Materials Needed
- Plain planter
- Clean natural corks
- Craft knife
- Cutting mat
- Strong adhesive
- Ruler
- Removable nursery pot and trailing pothos or philodendron
How to Make It
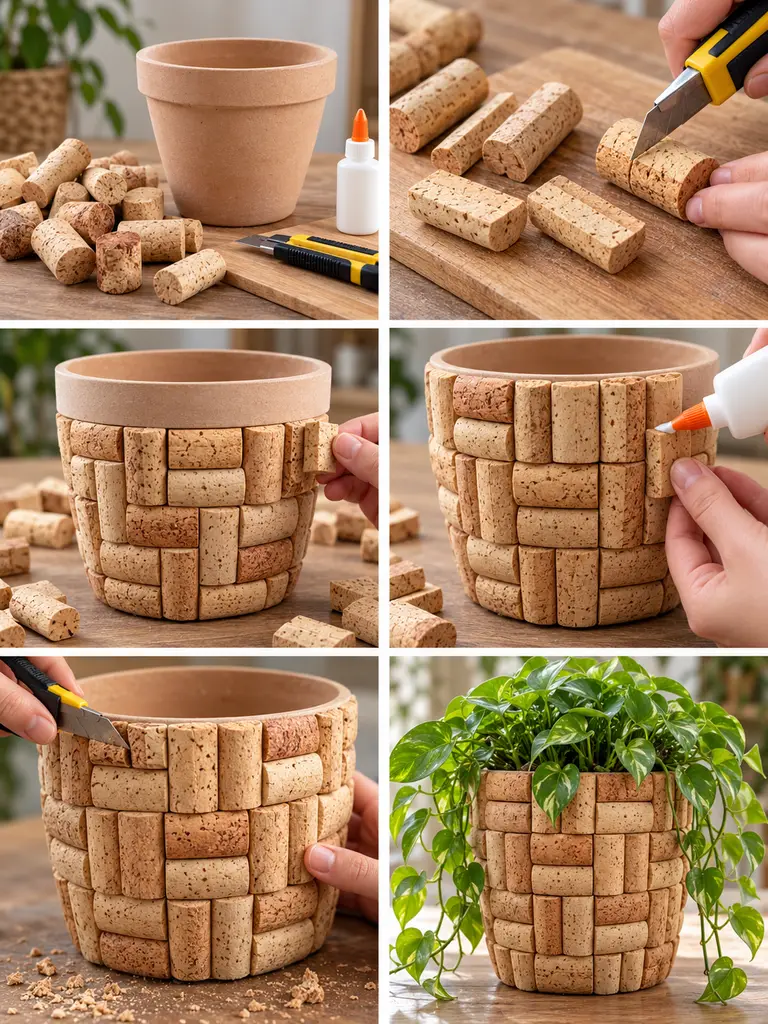
- Cut the corks lengthwise on a stable cutting surface so they sit flatter against the planter.
- Experiment with horizontal and vertical arrangements before gluing.
- Start near the center and attach the first cork pieces securely.
- Continue the alternating pattern around the curved surface, trimming pieces where needed.
- Check the rim and base for awkward gaps and fill them with smaller cork sections.
- Allow the adhesive to cure completely before inserting the plant.
- Use a nursery pot inside so watering does not repeatedly soak the cork exterior.
11. Driftwood Stick Flower Pot
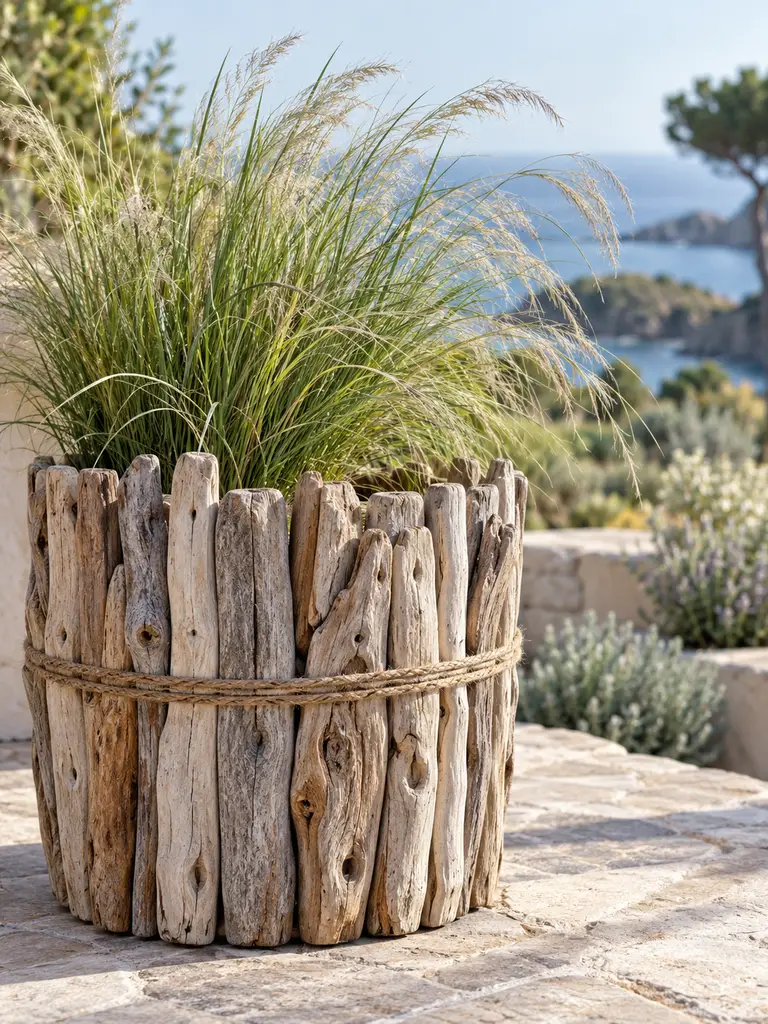
Weathered driftwood brings soft gray, bleached beige and silver-brown tones to a planter without any paint. Vertical sticks also create a strong handmade structure that works well with coastal, rustic and relaxed outdoor styling.
A few height differences along the rim make the finished piece feel natural. If every stick is exactly identical, the result can lose some of the character that makes driftwood attractive.
Materials Needed
- Plain cylindrical planter
- Clean dry driftwood sticks
- Small saw or pruning tool
- Sandpaper
- Strong adhesive
- Natural jute cord
- Nursery pot and ornamental grass
How to Make It
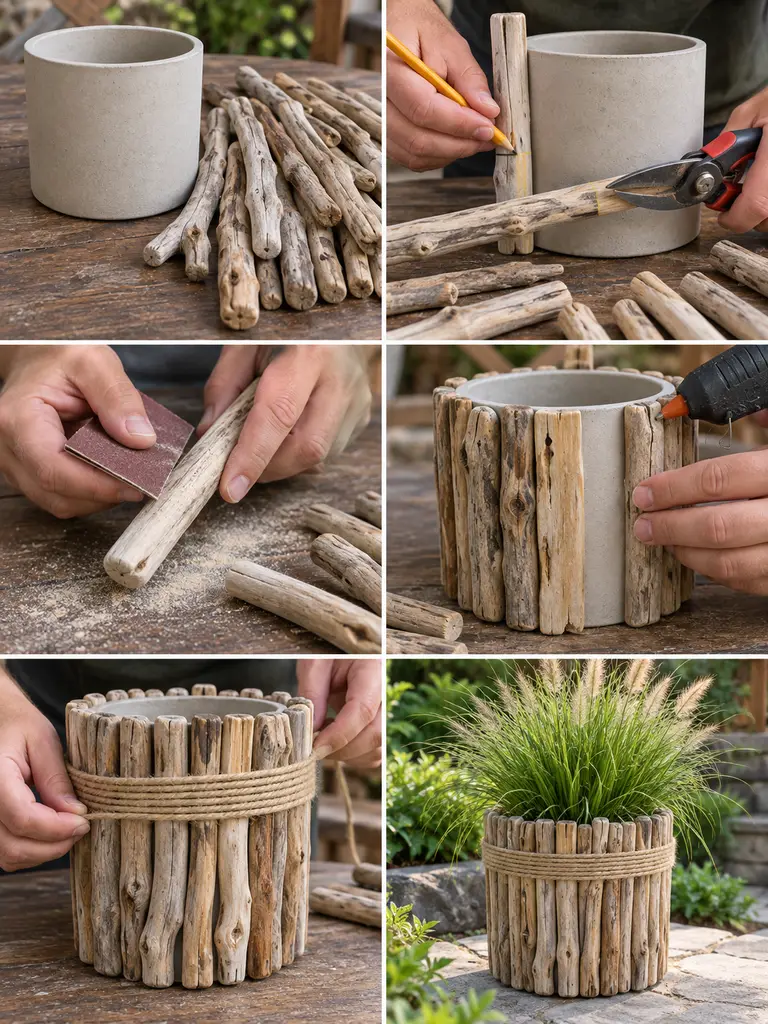
- Clean the driftwood and allow it to dry thoroughly.
- Measure pieces against the planter and trim them to similar but not perfectly identical heights.
- Sand rough cut ends and any sharp splinters.
- Glue the sticks vertically around the outer surface, keeping them close enough to conceal most of the base pot.
- Wrap jute cord twice around the center to add subtle structure and extra visual cohesion.
- Let the adhesive cure completely before moving the planter.
- Insert an ornamental grass or another plant with soft arching foliage.
12. Glass Gem Mosaic Planter
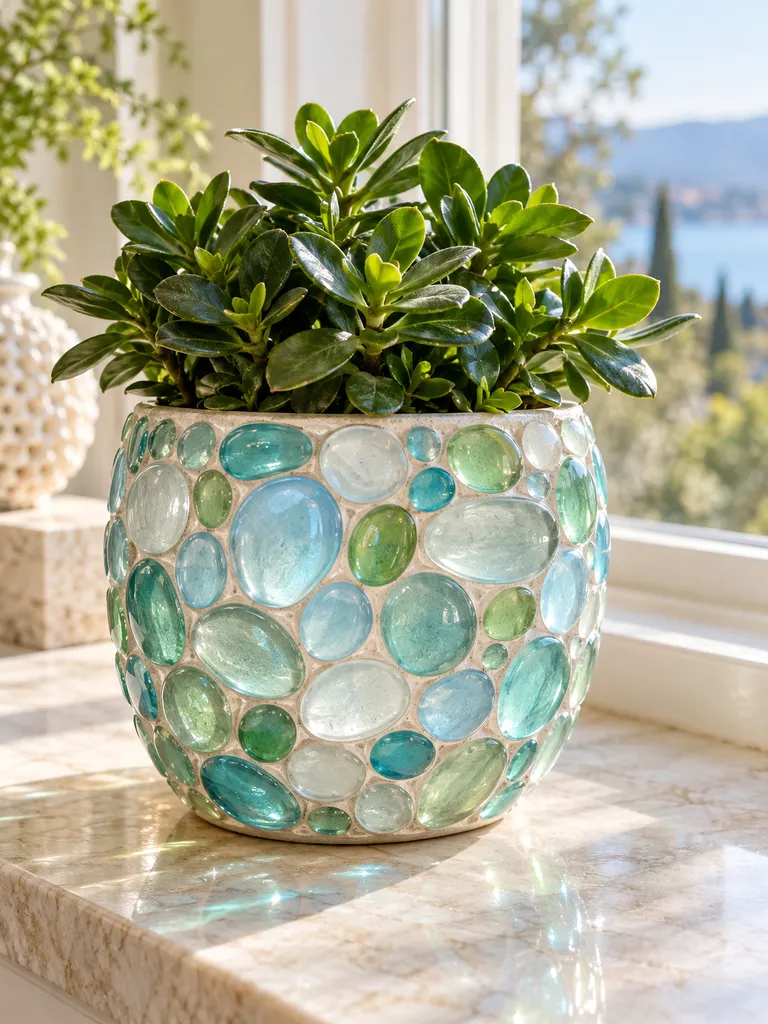
Flat-backed glass gems create a brighter, more luminous finish than stone or ceramic mosaics. Sea-glass shades such as aqua, pale blue, frosted white and soft green work especially well because they catch window light without feeling overly flashy.
Keeping the grout lines narrow helps the gems remain the main feature. Place the finished pot near a bright window so natural light can reflect through the translucent colors.
Materials Needed
- Smooth ceramic planter
- Flat-backed glass gems in aqua, blue, white and green
- Clear strong adhesive
- Pale grout, optional
- Small grout spreader
- Damp sponge
- Compatible clear finish and compact green plant
How to Make It
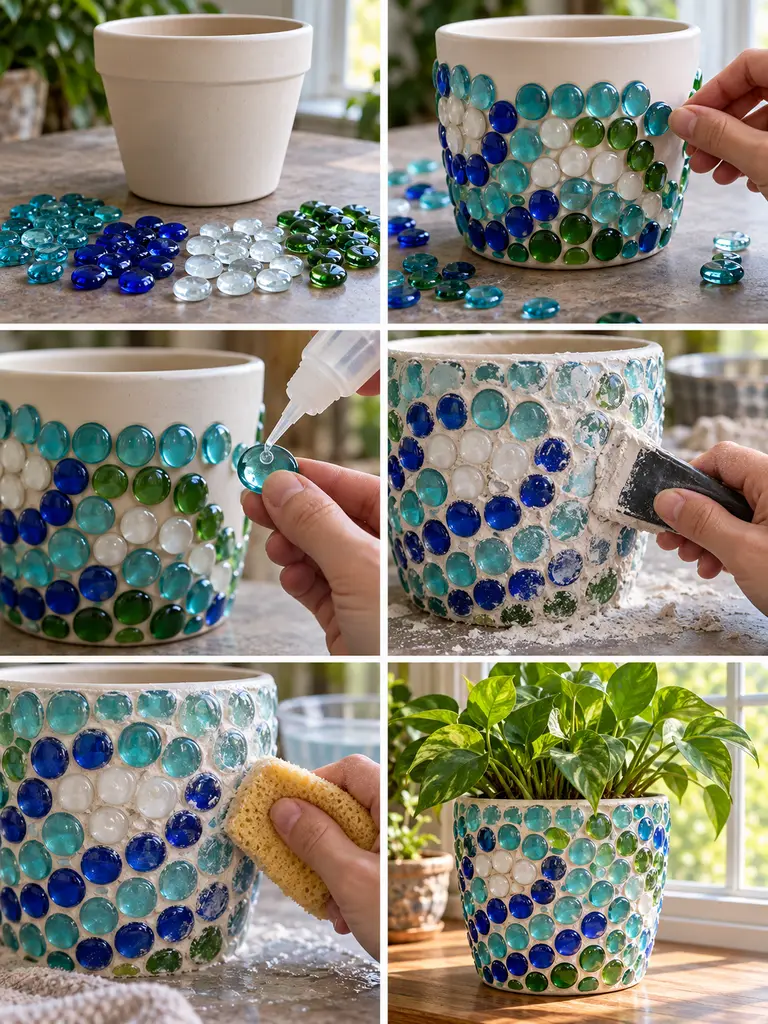
- Sort the gems by color and decide whether you want a loose pattern or a gentle gradient.
- Arrange a few pieces against the pot before using adhesive.
- Attach the gems one at a time, keeping small, fairly consistent spaces between them.
- Allow the adhesive to cure before applying grout.
- Press pale grout between the gems and wipe the glass faces clean with a damp sponge.
- Seal the finished surface if the grout or setting requires it.
- Add a compact succulent or small fern and place the planter where it can catch natural light.
13. Twine Macramé Wrapped Pot
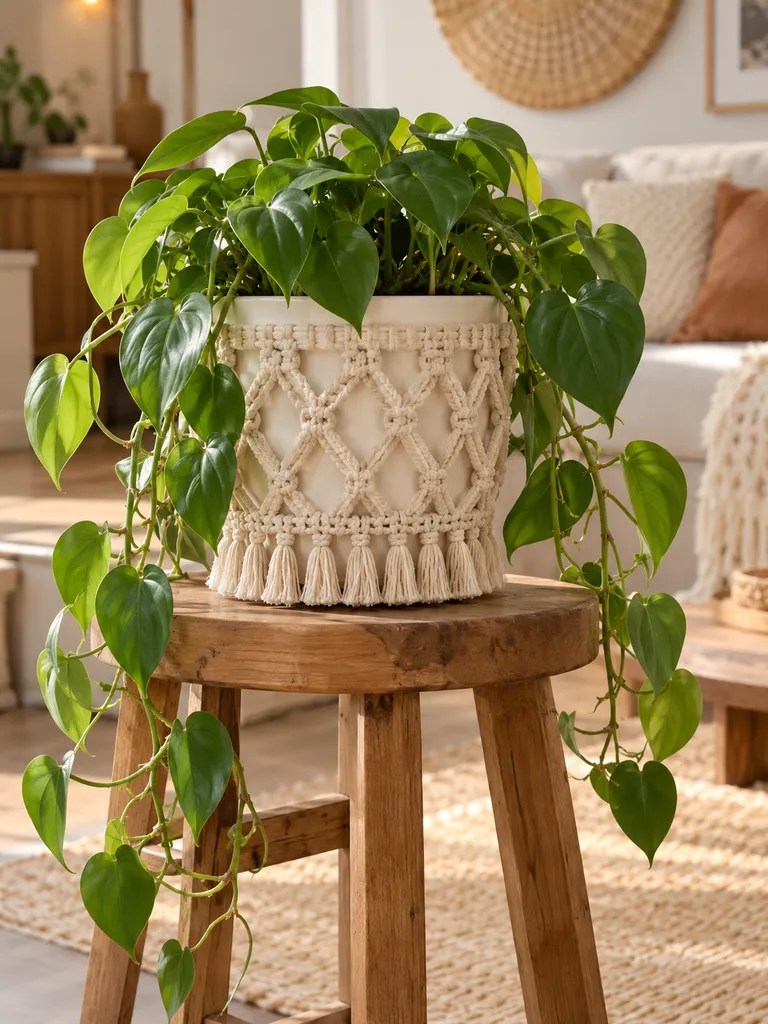
A macramé sleeve adds softness and texture without permanently changing the pot underneath. Simple square knots and open diamond sections are enough to make the planter feel handcrafted without requiring an elaborate hanging design.
Keeping the sleeve removable also makes the project practical. You can slide it off for cleaning or when you want to change the plant later.
Materials Needed
- Warm-white ceramic planter
- Natural cream cotton macramé cord
- Measuring tape
- Scissors
- Temporary support or clips
- Optional comb for fringe
- Nursery pot and trailing heartleaf philodendron
How to Make It
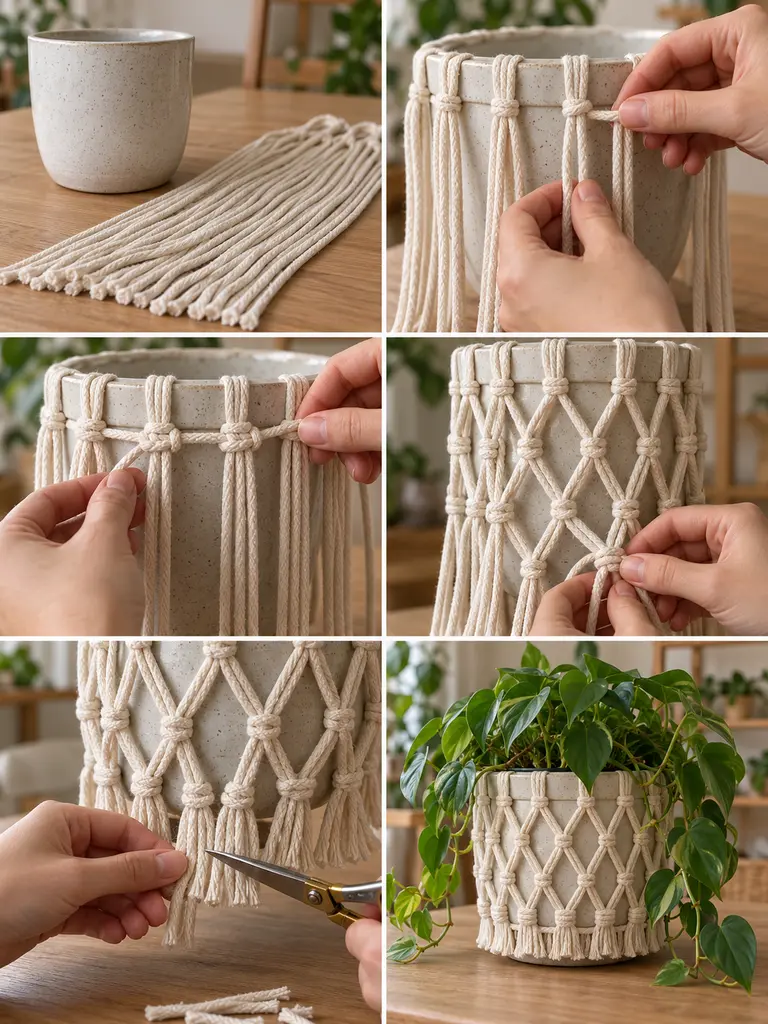
- Measure the planter height and cut the cords with generous extra length for knotting.
- Anchor the cords around the top of the pot at evenly spaced intervals.
- Tie the first row of square knots, keeping the tension as consistent as possible.
- Continue downward with offset knots to form open diamond shapes.
- Stop above the base and finish with a neat final knot row.
- Trim the cord ends into a short tidy fringe.
- Slip a nursery pot with trailing philodendron into the finished sleeve.
14. Seashell Rim Terracotta Pot
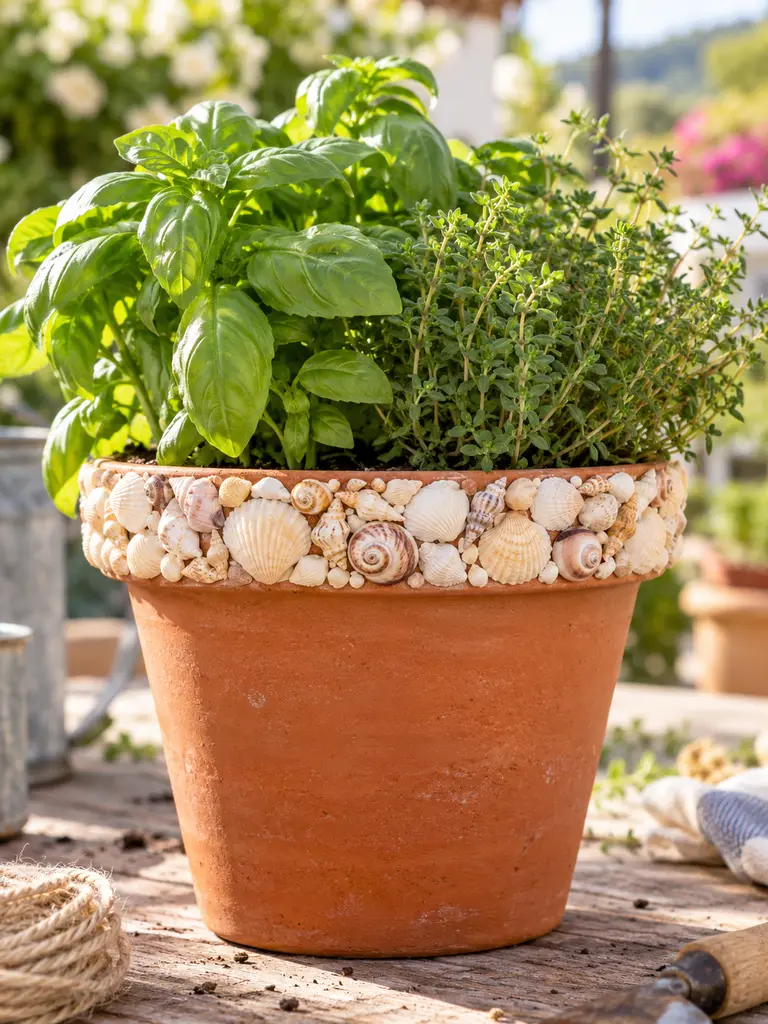
Decorating only the rim is a good option when you want a coastal accent but still like the warm color and texture of traditional terracotta. It also makes a small shell collection go much further than a full-coverage design.
Choose shells that are small enough to sit securely on the rim and keep the body of the pot completely bare. The contrast between textured shells and simple terracotta is what makes this version feel clean.
Materials Needed
- Wide-rim terracotta pot
- Small natural seashells
- Tiny shell fragments
- Strong waterproof adhesive
- Small applicator
- Suitable clear sealer, optional
- Potting mix and fresh herbs
How to Make It
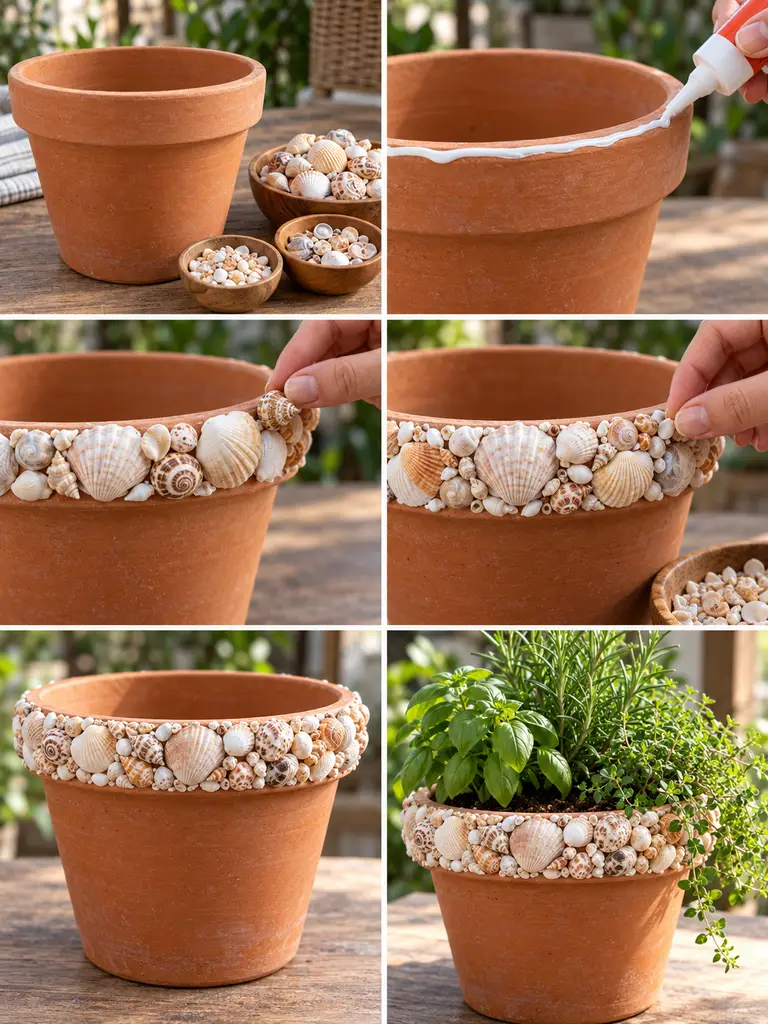
- Clean the terracotta rim and let the pot dry completely.
- Sort the shells by size so you can build a balanced border.
- Apply adhesive around a short section of the upper rim only.
- Position the larger miniature shells first, keeping their shapes varied.
- Fill small spaces with tiny shells and fragments while leaving the lower pot undecorated.
- Allow the shell border to cure fully and seal it if the chosen materials require protection.
- Plant basil, thyme or another compact herb combination.
15. Painted Geometric Terracotta Pot
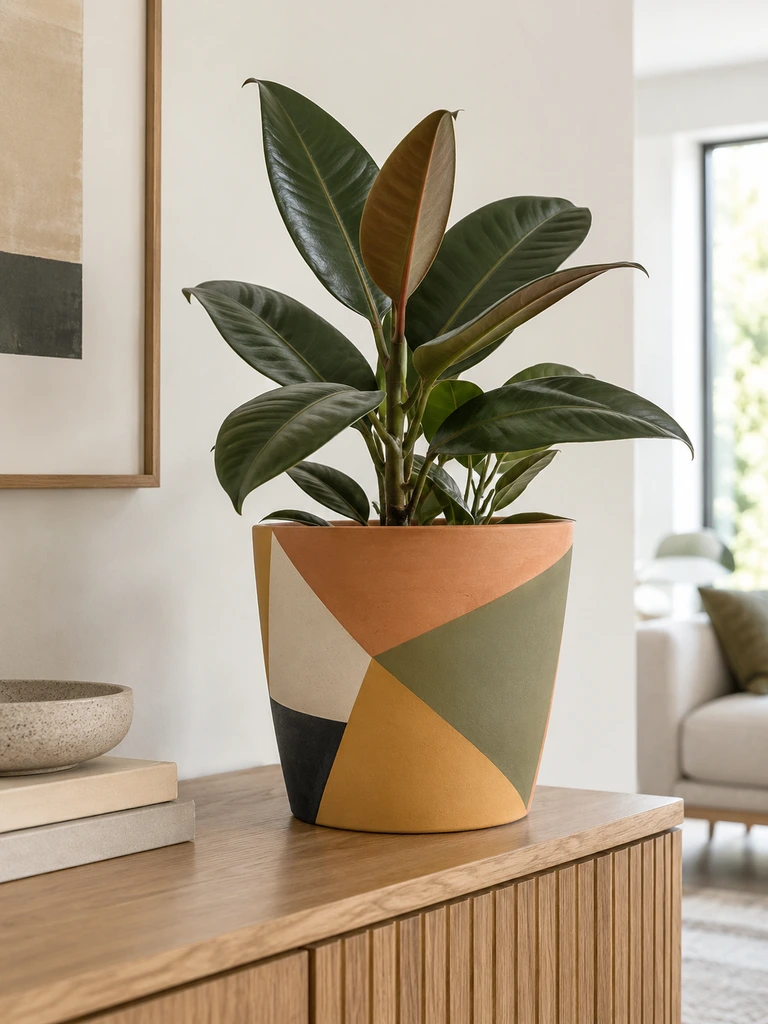
Geometric color blocking gives terracotta a clean contemporary update without requiring detailed painting skills. Broad angled sections are easier to tape neatly than dozens of tiny shapes and they allow the natural clay color to remain part of the design.
Muted olive, cream, dusty mustard and charcoal work especially well together because the palette feels modern while still sitting comfortably beside natural wood and green foliage.
Materials Needed
- Terracotta planter
- Primer
- Painter’s tape
- Muted olive paint
- Cream, dusty mustard and charcoal paint
- Paintbrushes
- Clear protective finish and upright foliage plant
How to Make It
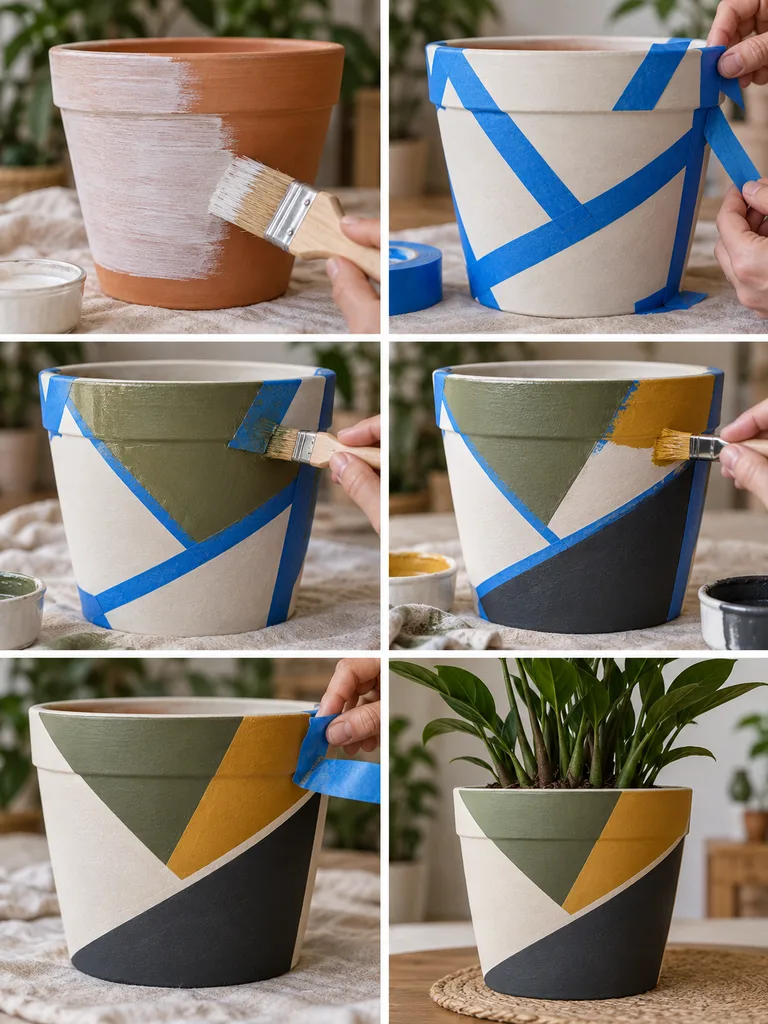
- Clean the pot and apply a light primer or base coat as appropriate.
- Once dry, use painter’s tape to divide the surface into broad diagonal and triangular sections.
- Paint the olive and cream areas first, keeping each color within its taped boundary.
- Add mustard and a smaller charcoal section for contrast.
- Remove the tape carefully to reveal the clean geometric edges.
- Touch up any small imperfections and apply a protective finish once the paint is fully dry.
- Add a rubber plant or another upright green plant after the finish has cured.
16. Natural Moss-Covered Planter
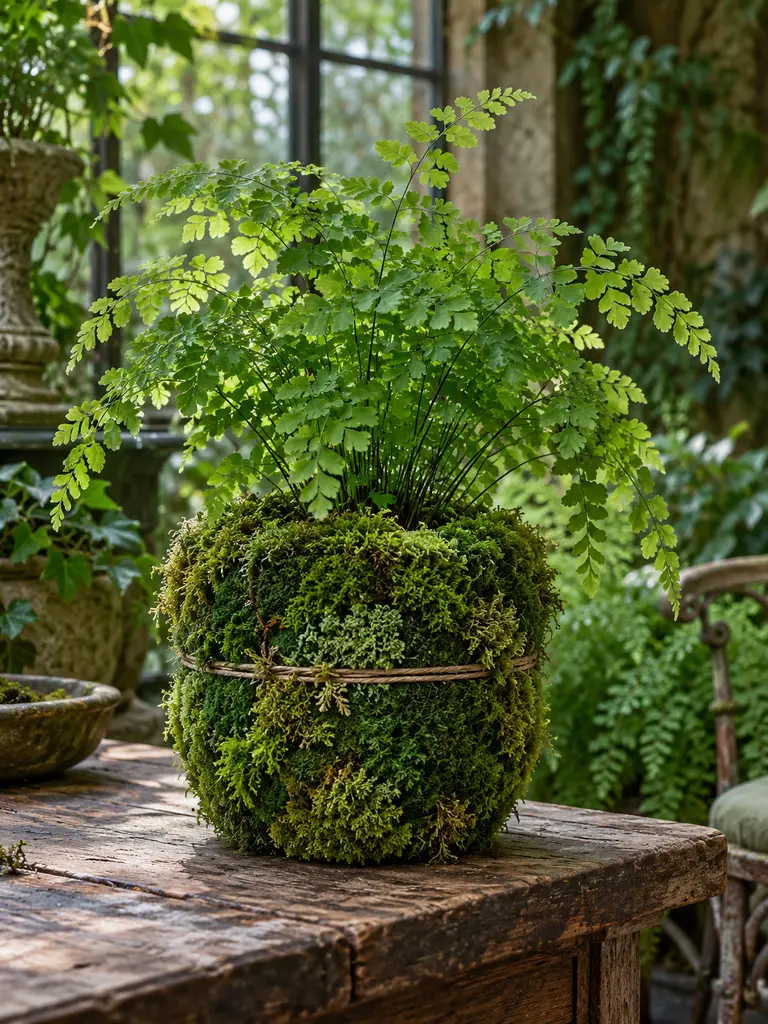
A preserved-moss finish gives a plain planter the soft, overgrown character of a shaded woodland garden. Using several green tones rather than one flat color makes the surface look more natural and dimensional.
Because preserved moss is decorative rather than a living exterior planting, this project is much easier to maintain than trying to establish live moss all around a household pot. An inner nursery pot also keeps regular watering away from the moss covering.
Materials Needed
- Plain planter
- Preserved craft moss in mixed green tones
- Strong craft adhesive
- Scissors
- Natural twine, optional
- Removable nursery pot
- Shade-loving fern or delicate foliage plant
How to Make It
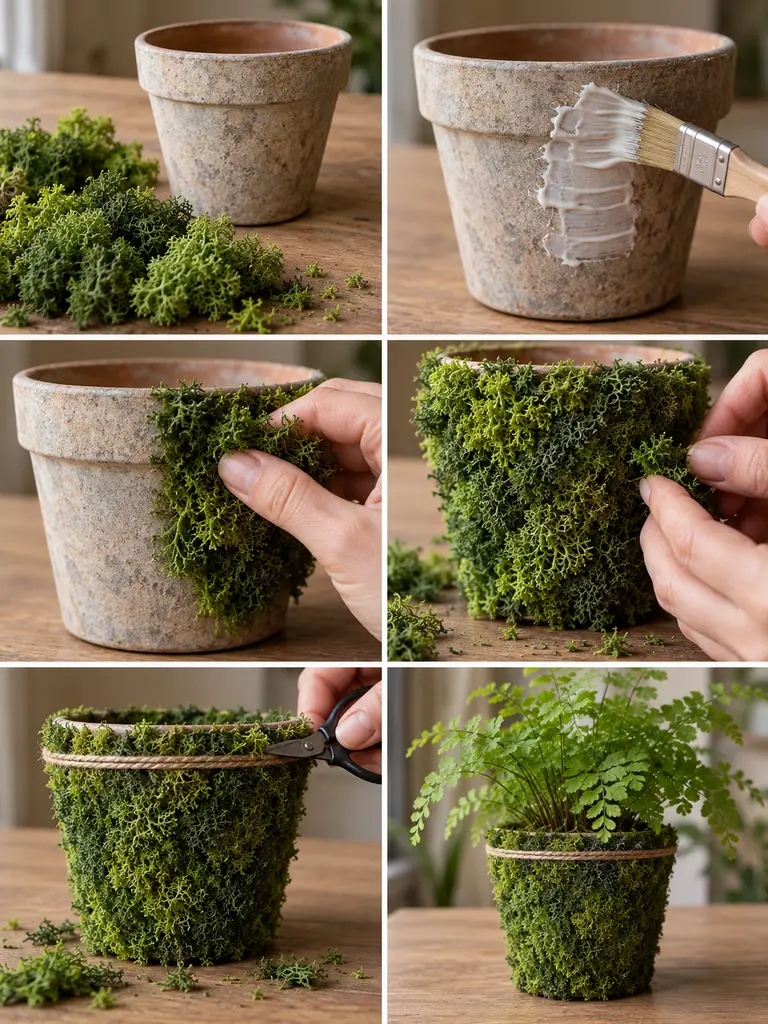
- Pull the preserved moss into manageable pieces before applying adhesive.
- Coat only a small section of the pot at a time so the adhesive does not skin over before the moss is placed.
- Press the moss firmly against the surface, mixing slightly different textures and shades.
- Fill thin spots with smaller pieces until the base container is mostly hidden.
- Trim loose moss around the rim and base and add a subtle twine detail if desired.
- Let the adhesive cure completely and brush away any loose fragments.
- Place a fern or other shade-loving plant inside in a removable nursery pot.
17. Wooden Bead Decorated Flower Pot
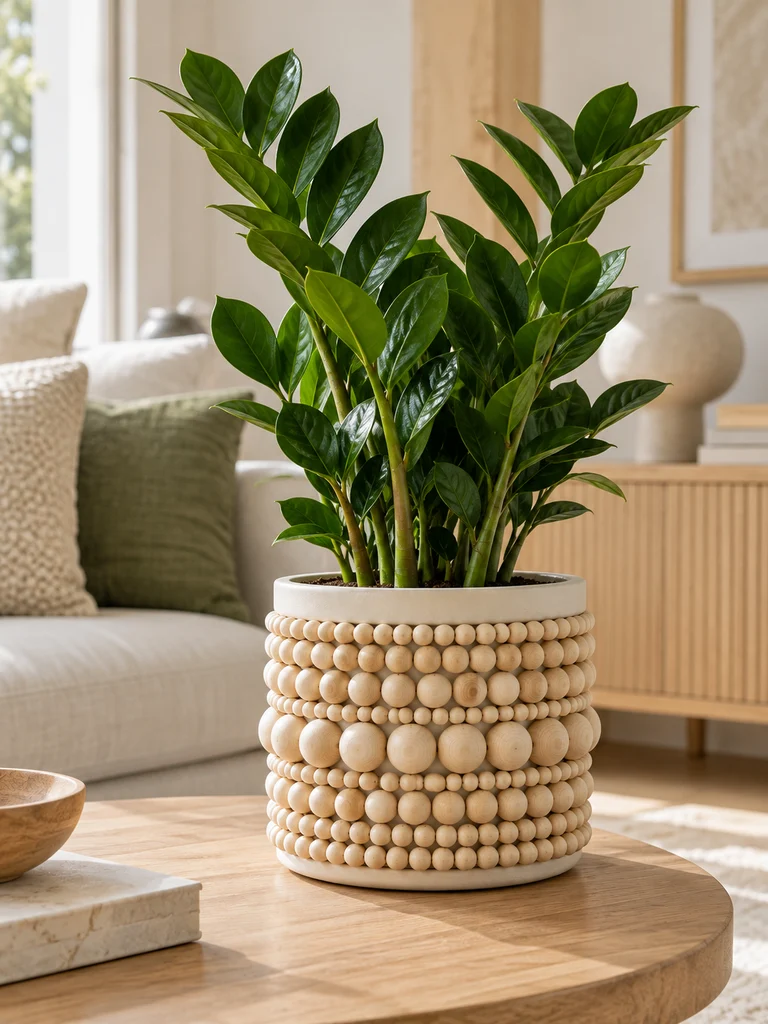
Unfinished wooden beads can turn a smooth pot into something surprisingly sculptural. Rows of small and medium beads create rhythm and depth while keeping the color palette soft enough for Scandinavian and organic-modern interiors.
The easiest way to keep the design looking intentional is to mark faint guidelines before gluing. Those lines help the rows stay level even when the bead sizes vary.
Materials Needed
- Smooth off-white planter
- Unfinished wooden beads in two or three sizes
- Strong adhesive
- Pencil
- Ruler or flexible measuring tape
- Matte clear finish, optional
- ZZ plant or another upright green plant
How to Make It
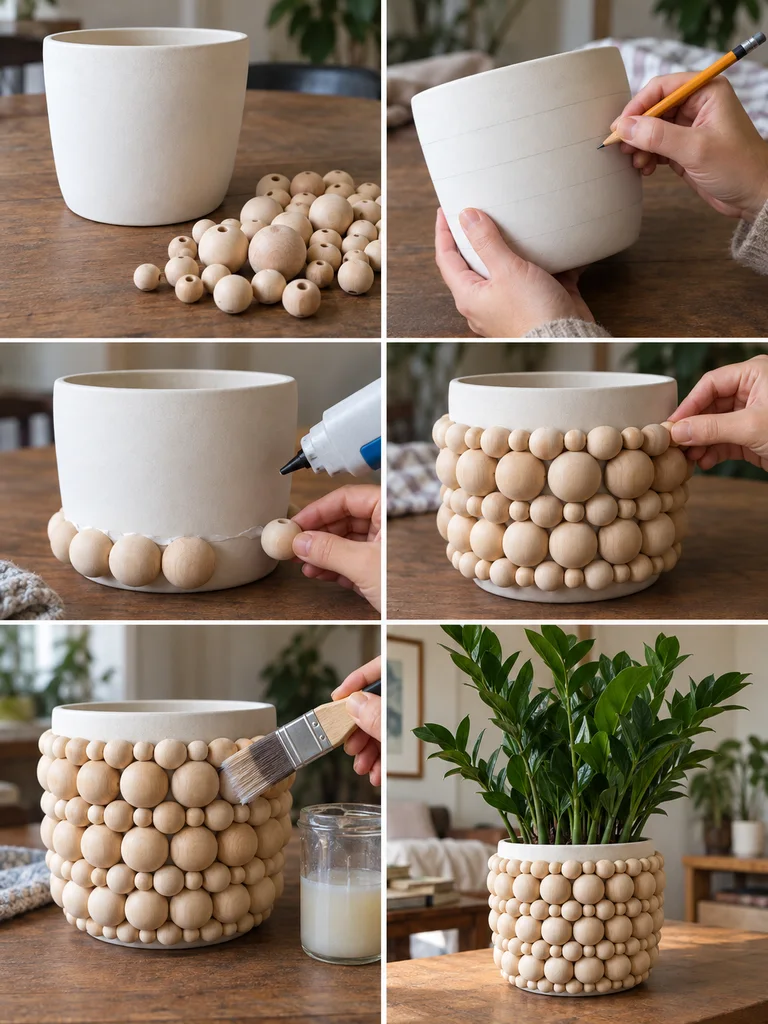
- Clean the planter and lightly mark horizontal guide lines around the surface.
- Lay out several bead sizes on the table to decide how the rows will repeat.
- Glue the first row carefully, using the guideline to keep it level.
- Continue upward, alternating large and small beads to create a balanced pattern.
- Fill obvious gaps with smaller beads while keeping the upper rim relatively simple.
- Apply a matte protective finish if the unfinished wood needs extra protection in the chosen location.
- Add a ZZ plant or another strong green plant once the adhesive is fully cured.
18. Fabric Scrap Patchwork Planter
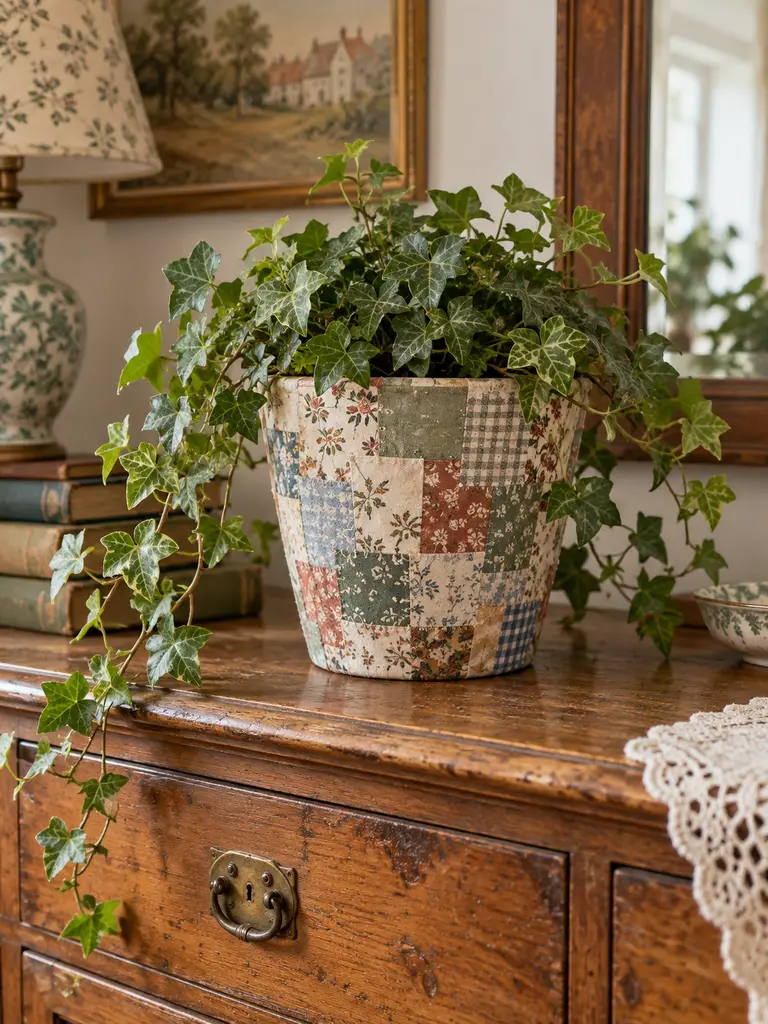
Small fabric scraps that are too pretty to throw away can become a soft patchwork finish for an old pot. The design looks more collected and less chaotic when the fabrics share a muted palette, such as sage, dusty blue, cream, terracotta and faded floral prints.
This is best treated as an indoor or protected-porch project. Fabric and decoupage finishes generally last longer when they are not exposed to repeated rain or standing water.
Materials Needed
- Smooth flower pot
- Cotton fabric scraps in a coordinated palette
- Fabric scissors
- Decoupage medium
- Flat brush
- Clear protective decoupage coat
- Removable nursery pot and trailing ivy
How to Make It
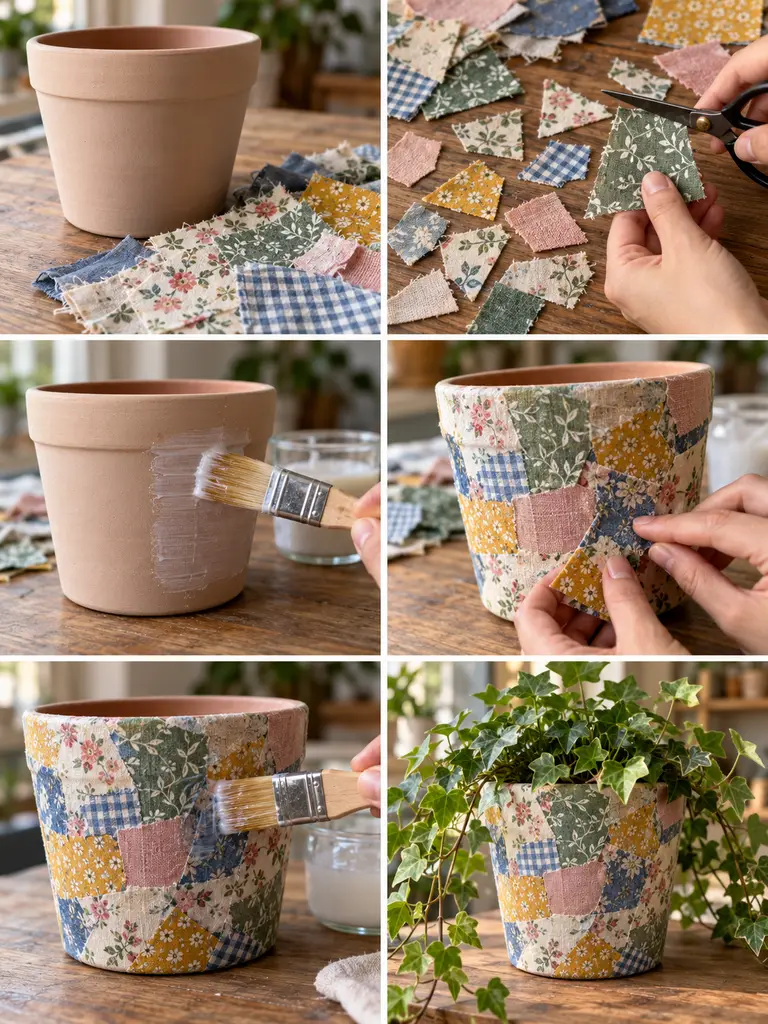
- Cut the fabric into small rectangles and irregular shapes with enough variety to avoid a rigid grid.
- Arrange the pieces by color so you can spread darker and lighter fabrics evenly around the pot.
- Brush decoupage medium onto a small section of the planter.
- Press fabric pieces into place with slight overlaps, smoothing bubbles and wrinkles as you go.
- Continue until the surface is covered, then brush a protective decoupage layer over the entire patchwork.
- Let the finished cover dry and cure thoroughly before using it.
- Place trailing ivy or another houseplant inside in a removable nursery pot.
19. Crushed Stone Textured Pot
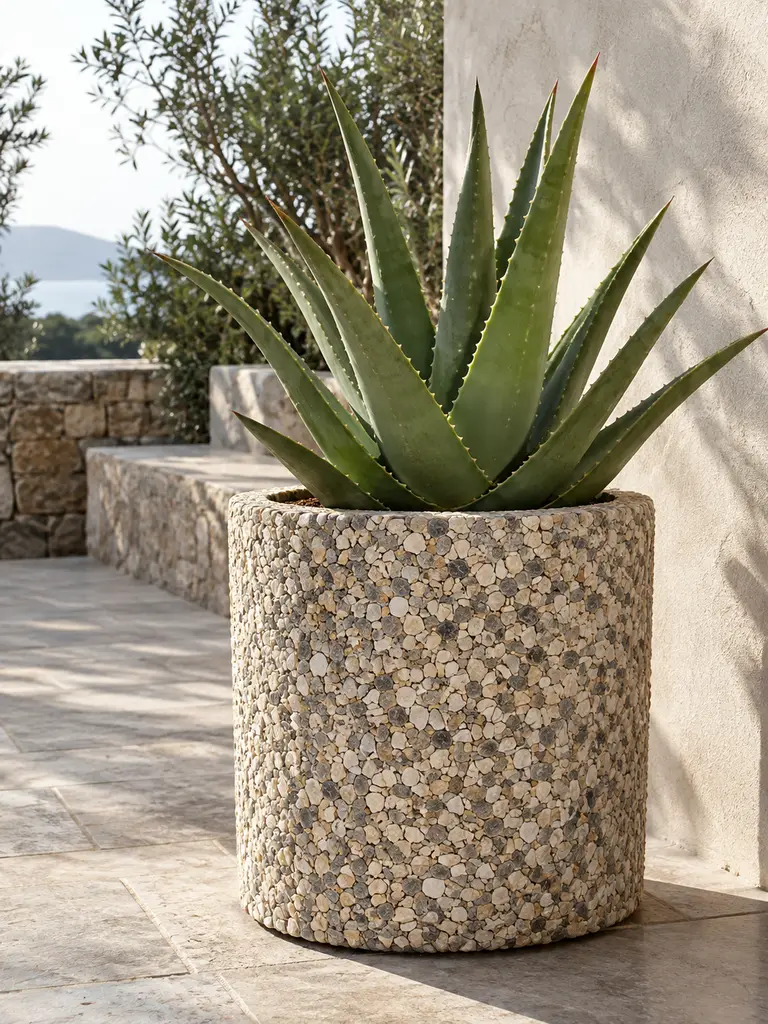
Fine decorative gravel can give a lightweight planter the rough, mineral look of exposed aggregate. A controlled mix of warm gray, pale taupe and sandy beige keeps the finish sophisticated and helps it blend naturally with stone patios and neutral walls.
Using smaller gravel is important here. Large stones can look bulky on a cylindrical pot and add much more weight than necessary.
Materials Needed
- Sturdy plain planter
- Fine decorative gravel or crushed stone
- Exterior bonding adhesive
- Shallow tray
- Protective gloves
- Brush and matte compatible sealer
- Aloe or another architectural plant
How to Make It
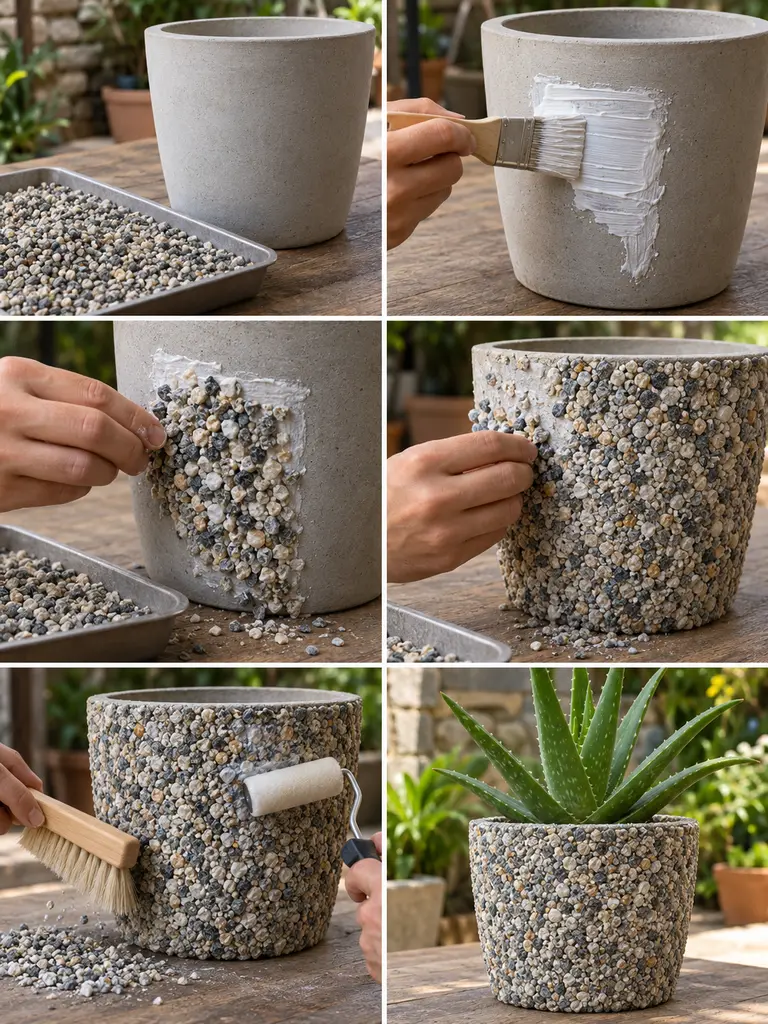
- Pour the gravel into a shallow tray and remove any unusually large or sharp pieces.
- Apply bonding adhesive to one manageable section of the planter.
- Press or sprinkle the crushed stone into the wet adhesive until the base is well covered.
- Continue around the container, filling thin areas with additional stone.
- After curing, brush away loose particles and inspect the surface for weak patches.
- Apply a suitable matte protective sealer if needed for the materials and location.
- Add an aloe or another structural plant once the finish is fully dry.
20. Clay Relief Botanical Planter
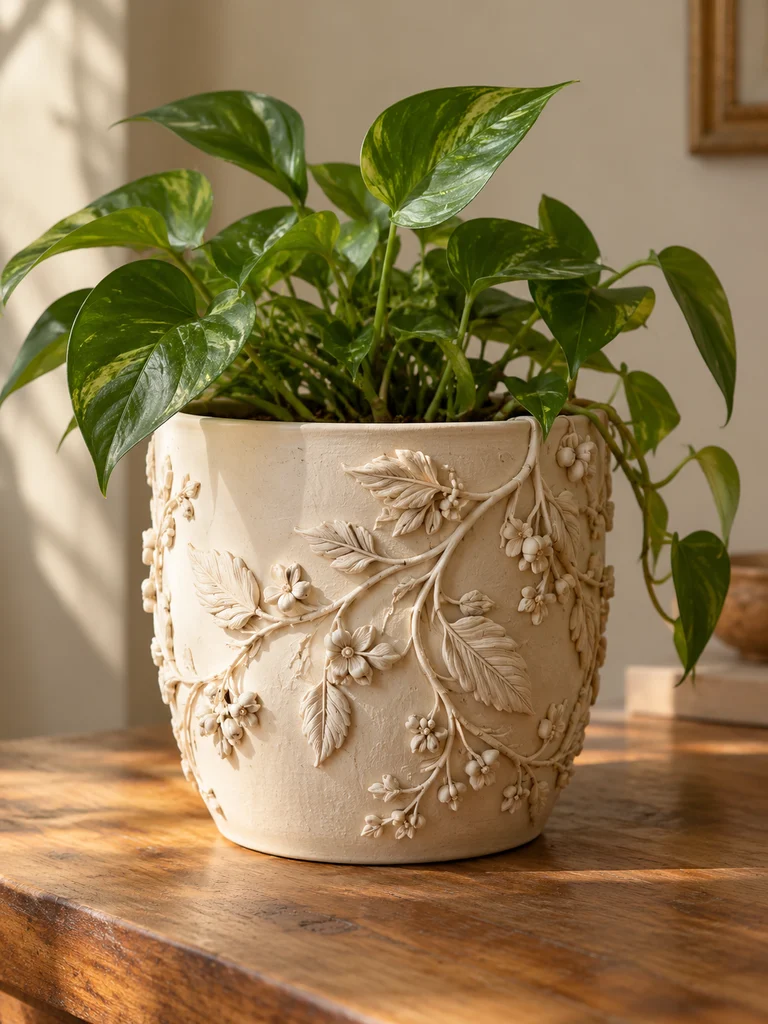
Raised clay leaves, stems and small flowers can make a plain planter look like handmade pottery. Painting the relief and the pot in one warm ivory or soft sage tone keeps the design refined and allows the shadows around the sculpted details to provide most of the decoration.
Keep the clay elements relatively thin. Delicate relief is easier to attach securely, adds less weight, and looks more believable on a curved planter than very thick ornaments.
Materials Needed
- Smooth planter
- Air-dry craft clay
- Small rolling tool
- Craft knife and sculpting tools
- Suitable adhesive
- Primer and paint
- Protective finish and simple leafy houseplant
How to Make It
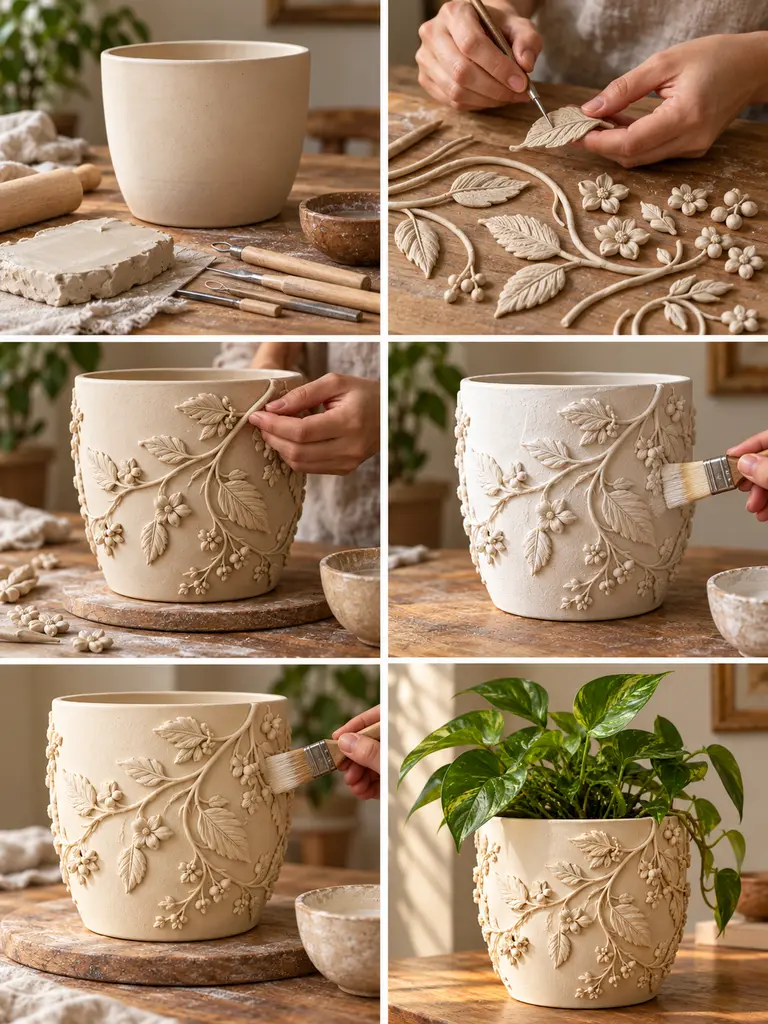
- Roll small amounts of clay and shape thin leaves, curling stems, berries and simple flowers.
- Use sculpting tools to add veins and subtle surface detail while the clay is workable.
- Arrange the botanical pieces on the planter before fixing them permanently.
- Attach each relief element securely and allow the clay to dry according to the product instructions.
- Prime the entire planter so the original surface and clay additions take paint evenly.
- Paint the pot and relief in one unified warm ivory or soft sage color, then add a protective finish once dry.
- After curing, add a simple green plant that does not hide the sculpted design.
21. Upcycled Bottle Cap Mosaic Pot
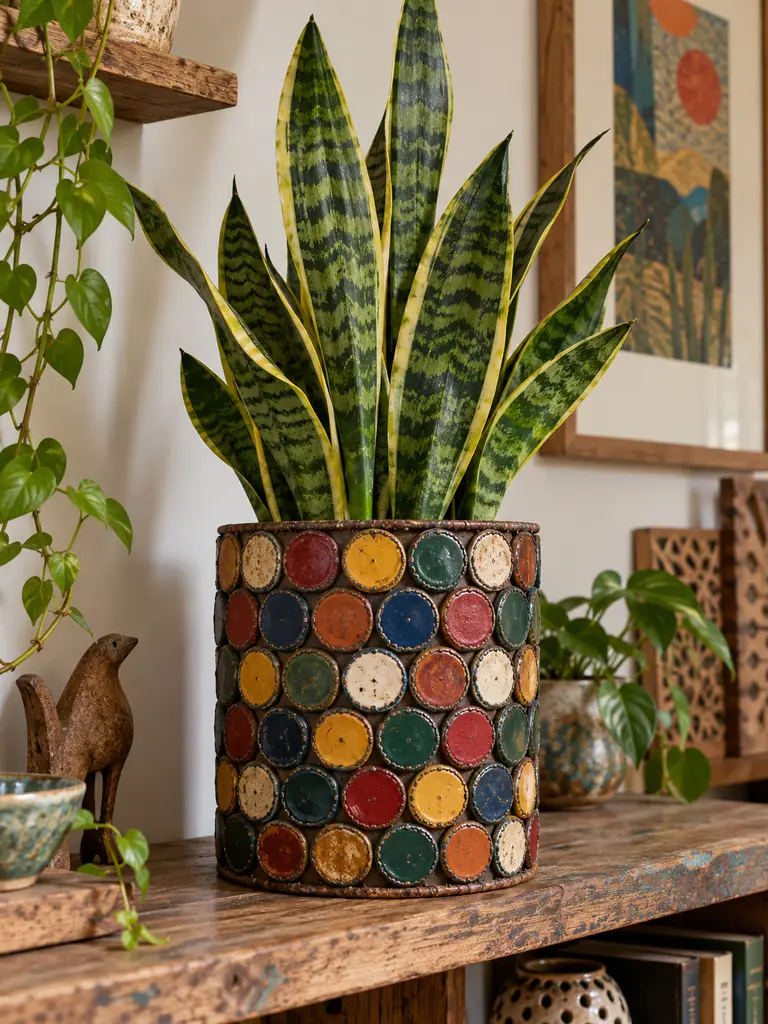
Bottle caps can create an unexpectedly graphic planter when they are cleaned, flattened where necessary and arranged deliberately. Painting over logos and using a restrained vintage-inspired palette keeps the project focused on color and repetition rather than branding.
A tall snake plant balances the busy cap surface because its upright leaves create a simple silhouette above the mosaic.
Materials Needed
- Sturdy cylindrical planter
- Clean unbranded or painted metal bottle caps
- Pliers for checking and flattening rough edges
- Strong adhesive
- Protective gloves
- Paint in muted red, mustard, green, navy, cream and rust, optional
- Tall snake plant
How to Make It
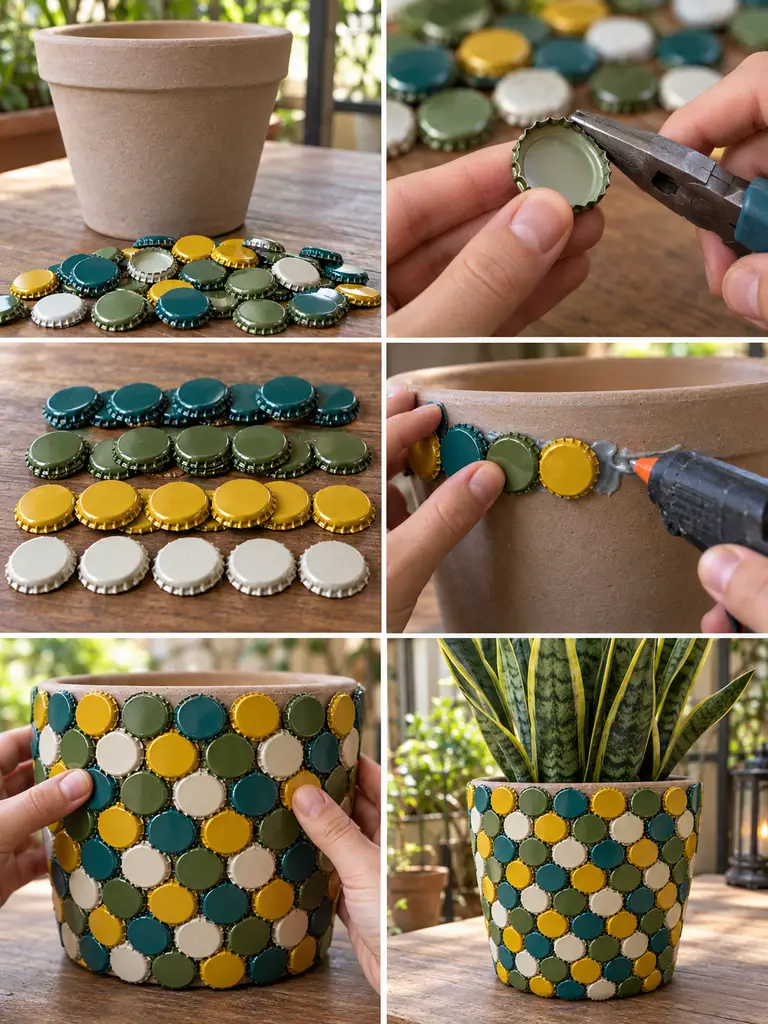
- Wash and dry the caps, then inspect every edge and discard anything sharp or damaged.
- Flatten rough edges carefully where needed so each cap can sit safely against the pot.
- Sort the caps by color and plan a repeating pattern on the table.
- Glue the first rows around the planter, keeping the spacing consistent.
- Continue until the surface is covered, checking that no logos or readable branding remains visible.
- Let the adhesive cure completely and test a few caps gently to confirm they are secure.
- Add a tall snake plant once the planter is ready to use.
22. Bamboo Stick Wrapped Planter
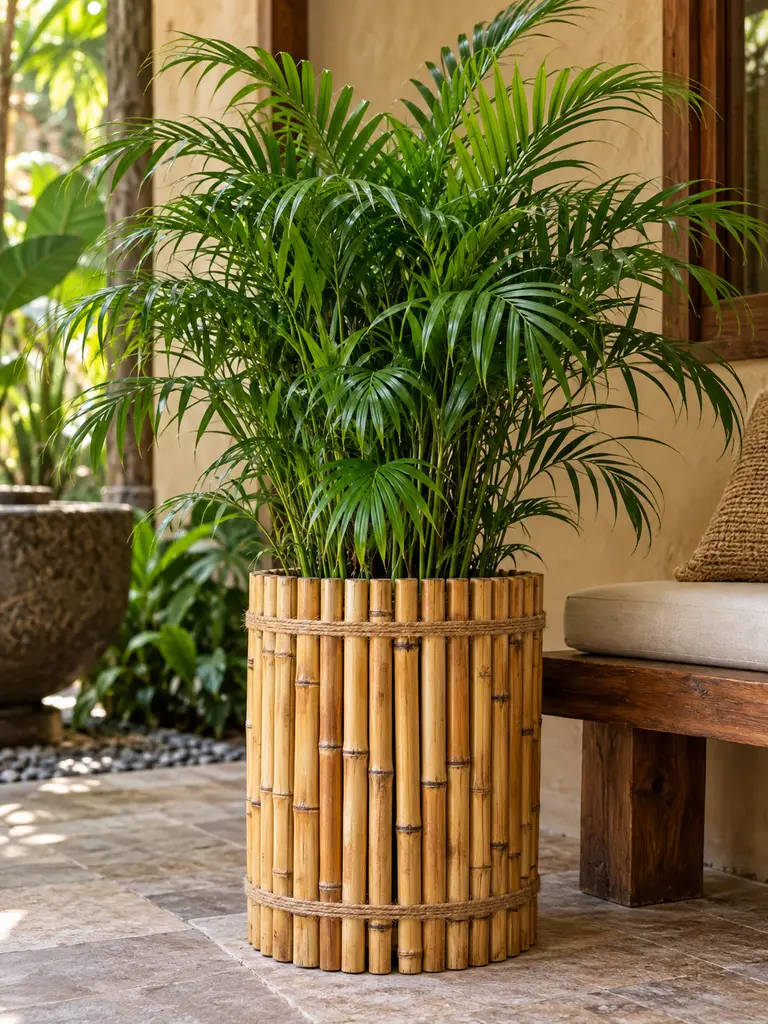
Slim bamboo sections create a clean vertical texture that feels especially appropriate with tropical foliage. Natural nodes and subtle changes in golden-tan color keep the surface from looking too uniform even when the pieces are cut to nearly the same height.
Two narrow jute bands help visually frame the bamboo and make the planter feel finished without covering the material.
Materials Needed
- Plain cylindrical pot
- Thin bamboo canes
- Fine-tooth saw
- Sandpaper
- Strong adhesive
- Natural jute cord
- Parlor palm or fern in a nursery pot
How to Make It
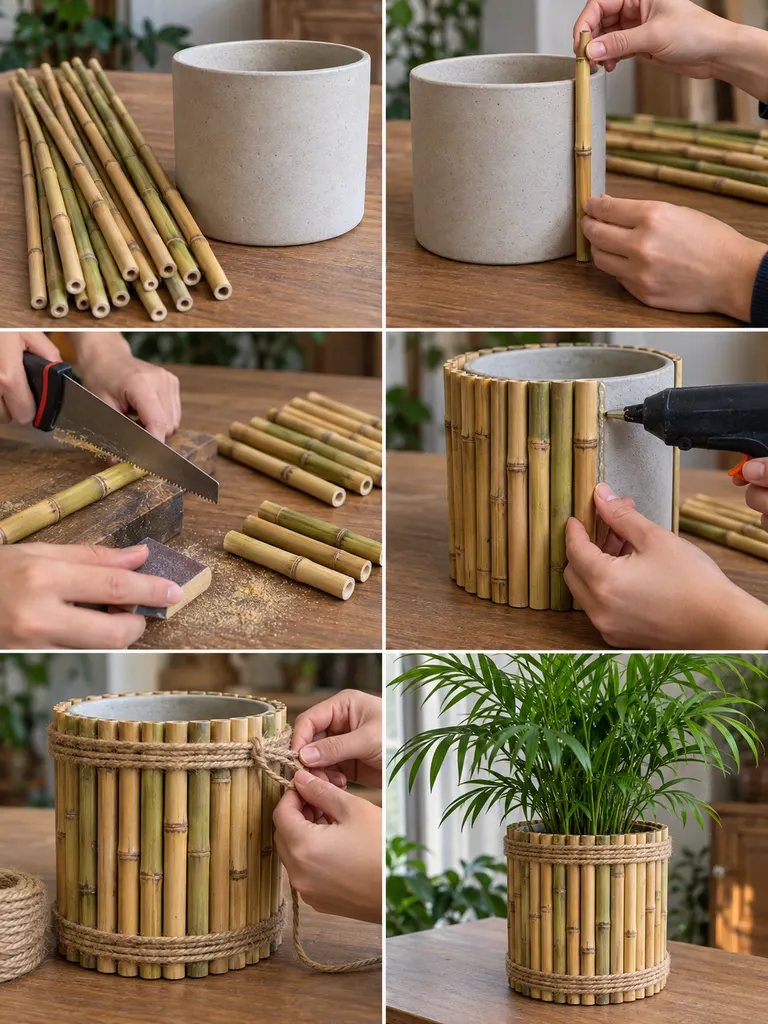
- Measure the height of the planter and mark the bamboo pieces before cutting.
- Cut the canes carefully with a fine-tooth saw and sand every rough end smooth.
- Lay several pieces beside the pot to check the spacing and natural color variation.
- Glue the bamboo vertically side by side around the outer surface.
- Tie neat jute bands near the upper and lower sections once the adhesive has cured.
- Check that no bamboo piece interferes with drainage or makes the pot unstable.
- Insert a lush parlor palm or fern to complete the tropical look.
23. Mixed Natural Materials Statement Planter
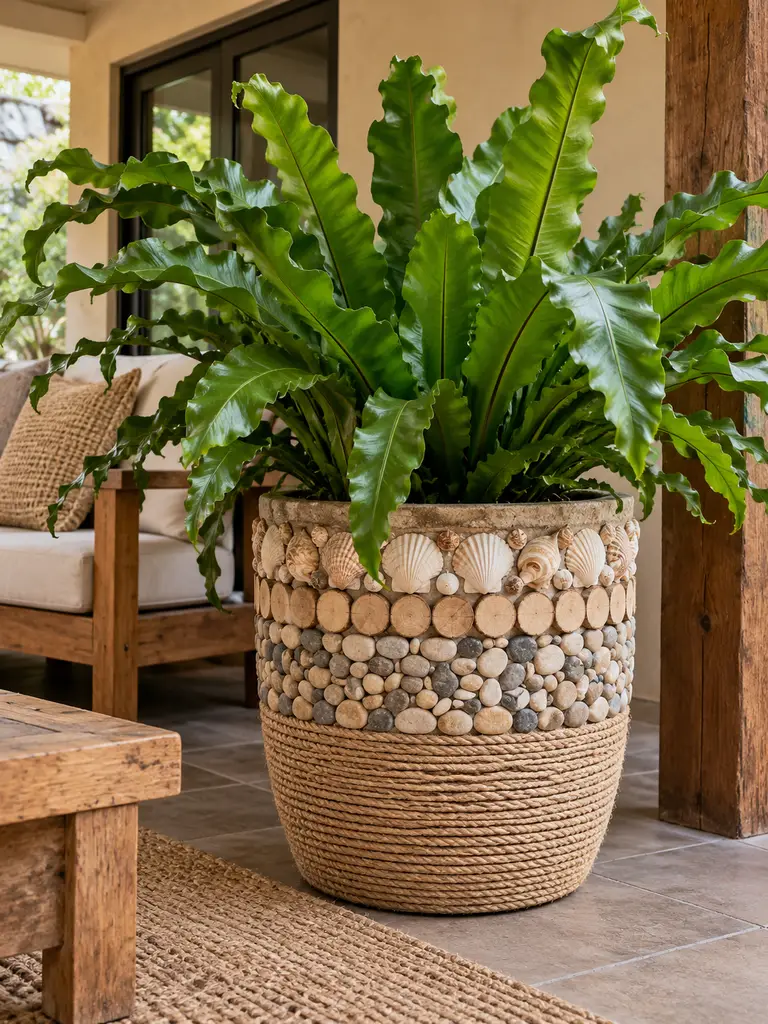
A larger planter can handle several textures at once, but the materials need a clear structure. Separating rope, pebbles, wood rounds and shells into distinct horizontal bands keeps the design readable and prevents the surface from feeling random.
Because the planter itself is already visually rich, a single dramatic green plant works better than adding lots of colorful flowers on top.
Materials Needed
- Large sturdy planter
- Natural jute rope
- Small warm-gray and beige river pebbles
- Small pale wood rounds
- Cream and sandy seashells
- Strong adhesives appropriate for each material
- Bird’s nest fern or another large leafy plant
How to Make It
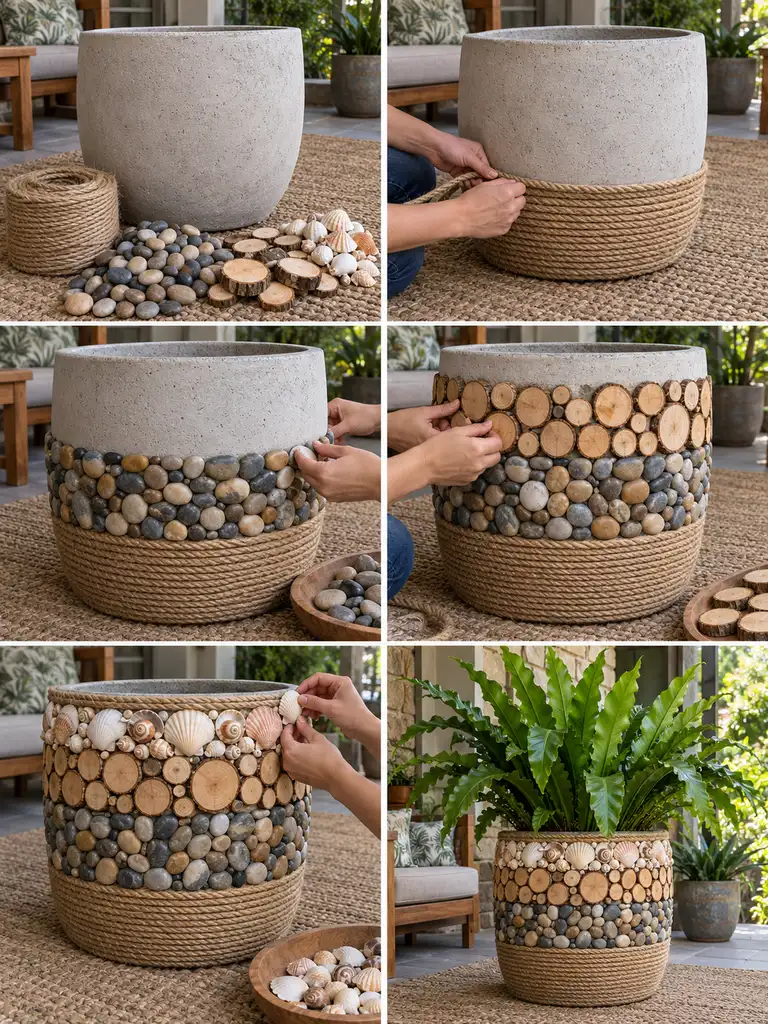
- Lay out the rope, pebbles, wood rounds and shells before starting so the band proportions can be planned.
- Wrap the lowest section tightly with jute rope and secure the ends cleanly.
- Build the next horizontal band with closely fitted river pebbles.
- Attach a narrower band of wood rounds above the stone section, filling gaps with smaller slices.
- Finish near the top with a restrained shell border and clean up any visible adhesive around the edges.
- Allow every material layer to cure completely before moving the planter.
- Insert a large bird’s nest fern or similarly lush statement plant.
Practical Tips for Successful DIY Flower Pot Projects
Surface preparation matters more than it seems. Dust, grease, old flaking paint and trapped moisture can weaken adhesives, so wash reusable pots and let porous materials such as terracotta dry fully before decorating.
Keep drainage holes completely open. Glue, grout, fabric and decorative stones should stay away from the drainage opening so excess water can escape normally. If a design is difficult to waterproof, use it as a decorative cachepot with a separate nursery pot inside.
Match the adhesive to both surfaces. Stone, glass, ceramic, wood, rope, plastic and fabric do not all bond equally well with the same product. For an outdoor project, choose an adhesive that is also rated for moisture and exterior conditions.
Give every layer enough curing time. Paint, grout, sealer, clay and glue may feel dry on the surface before they are fully hardened. Waiting the recommended time helps stop pieces shifting or lifting once the planter is filled and watered.
How to Make Handmade Flower Pots Look More Finished
A little planning is usually what separates an intentionally handmade planter from one that looks rushed. Before gluing anything, spread the materials out and sort them by size, color or texture. Shells can be grouped by shape, pebbles by tone, fabric by pattern and wood pieces by diameter. This makes it much easier to distribute visual weight evenly around the pot.
Pay particular attention to the upper rim and base. Those edges are where loose rope ends, excess glue, ragged fabric or uneven grout are easiest to notice. Clean the edges before the adhesive fully hardens, trim fibers neatly and remove any loose material before the final sealer goes on.
Finally, let the plant complement the planter instead of competing with it. A highly detailed mosaic often looks best with simple green foliage, while a restrained rope or terracotta design can handle a fuller or more colorful planting.
Frequently Asked Questions
What can I use to decorate an old flower pot?
Seashells, river stones, rope, ceramic fragments, wood slices, cork, fabric, bamboo, glass gems, wooden beads, pressed flowers, paint, clay and cleaned bottle caps can all work. The best choice depends on whether the pot will be indoors or outdoors and how much moisture the material can tolerate.
Can I decorate plastic flower pots?
Yes. Clean the plastic thoroughly and choose an adhesive or paint that specifically lists plastic as a compatible surface. Very thin flexible pots are not ideal for heavy pebble or tile mosaics because flexing can loosen the decoration.
What glue is best for decorating flower pots?
There is no single best adhesive for every project. Stone, glass, ceramic, wood, fabric, rope and plastic all have different requirements. Check the product label for both materials you are joining and choose an exterior-rated option when the pot will be exposed to outdoor moisture.
Should I seal a decorated flower pot?
Often, but not always. Painted terracotta, wood, grout and some porous craft finishes can benefit from a compatible protective coating. Fabric, cork and rope projects are usually easier to maintain as protected indoor cachepots rather than trying to make them completely weatherproof.
Can these decorated pots stay outdoors?
Pebble mosaics, ceramic mosaics, suitably painted terracotta and some stone finishes can work outdoors when every adhesive, grout and sealer used is exterior-rated. Fabric, preserved moss, cork, untreated wood and natural rope normally last longer under cover.
How do I stop watering from damaging the decoration?
Use a removable nursery pot inside the decorative planter. Lift it out for watering, let excess water drain completely, and return it to the outer container. This is especially helpful for rope, fabric, cork, wood and moss finishes.
Final Thoughts
The nicest thing about handmade planters is that no two have to look exactly alike. Natural shells vary, wood grain changes from slice to slice, fabric scraps never repeat in quite the same way, and hand-painted brush marks give every pot its own character.
Use these DIY flower pot decoration ideas as starting points rather than strict templates. You might borrow the rope treatment from one project and pair it with the shell border from another, or use the clay-relief technique in a color that better suits your room. Choosing materials you already have is often what makes the finished planter feel most original.
Take time with the small details, protect the materials appropriately, and keep the needs of the plant in mind. A simple pot can become a decorative object in its own right while still remaining practical enough to use every day.
