
A wall clock can be far more than a practical way to check the time. With a simple quartz movement and a thoughtfully chosen face, it can become handmade wall art that adds texture, color and personality to a room. These DIY Clock Ideas explore materials that are easy to recognize and enjoyable to work with, including wood, clay, cane, fabric, cork, resin, pebbles and reclaimed pieces.
The projects are intentionally varied rather than minor versions of the same design. Some lean rustic or coastal, others are modern, colorful or bohemian, and several make use of leftover materials that might otherwise be discarded. Each idea includes a clear materials list and a practical making method, so the article works as a useful project guide rather than a gallery of inspiration alone.
1. Pressed Flower Resin Clock
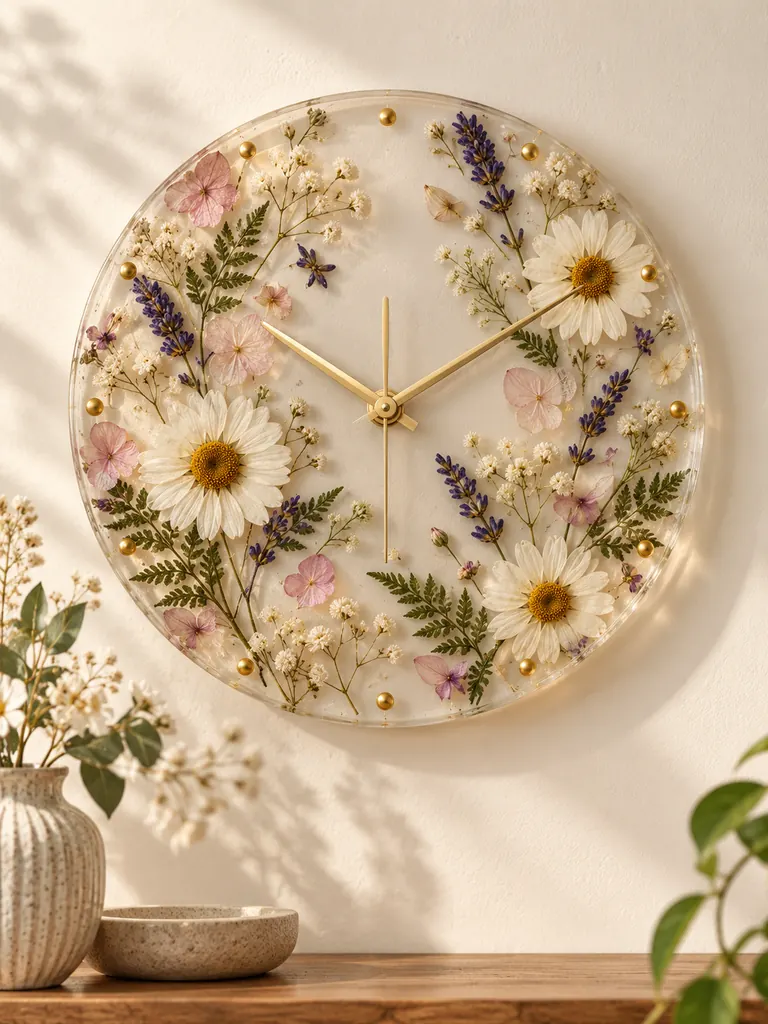
A transparent resin clock turns pressed botanicals into functional wall art. Leaving open areas of clear resin keeps the flowers from feeling crowded and lets light pass through the finished piece.
Materials Needed
- Round silicone resin mold
- Clear epoxy resin and hardener
- Fully dried pressed flowers and fern leaves
- Quartz clock movement with slim hands
- Mixing cups, tweezers, drill and fine sandpaper
How to Make It
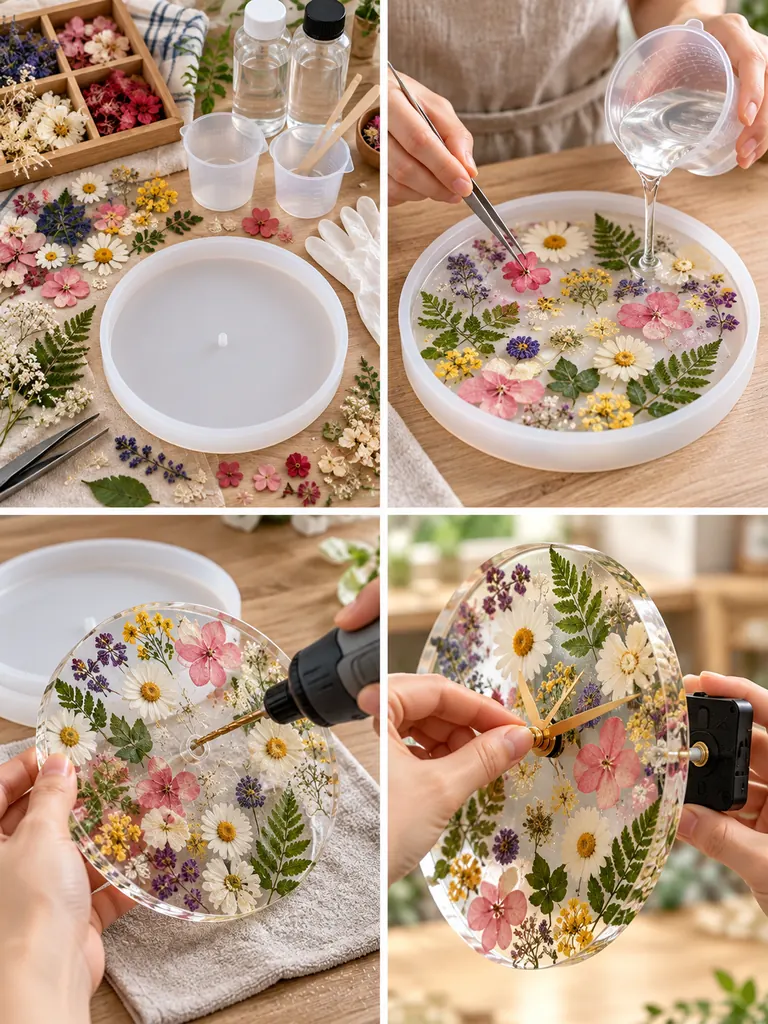
- Arrange the dried flowers in the mold, keeping the center and hand path fairly open.
- Mix the resin exactly to the manufacturer’s ratio and pour a thin first layer.
- Add or reposition botanicals with tweezers, then complete the pour and allow a full cure.
- Remove the disc, mark the exact center and drill a clean shaft opening.
- Install the movement from the back, add the hands, insert a battery and check clearance.
2. Painted Terrazzo Clay Clock
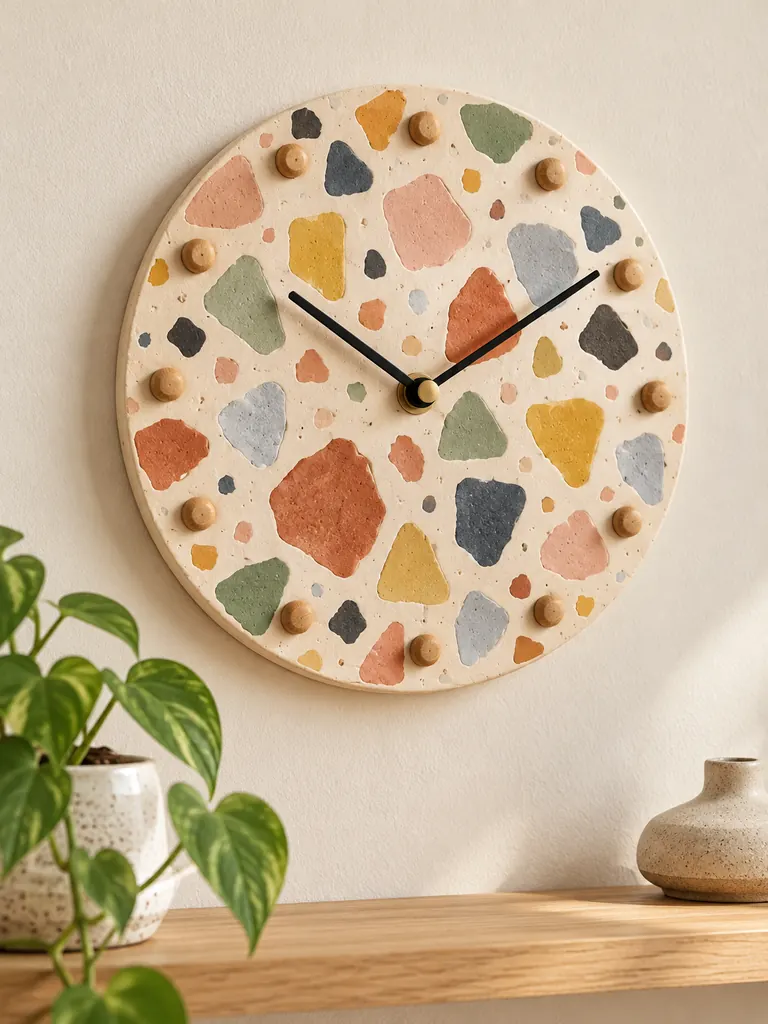
Terrazzo-style clay is a simple way to give a handmade clock a modern designer look. Small irregular color chips create visual interest while a calm cream base keeps the face easy to read.
Materials Needed
- Air-dry clay plus small colored clay pieces
- Rolling pin and round cutting template
- Craft knife and skewer
- Fine sandpaper and matte sealer
- Quartz movement, wooden markers and black hands
How to Make It
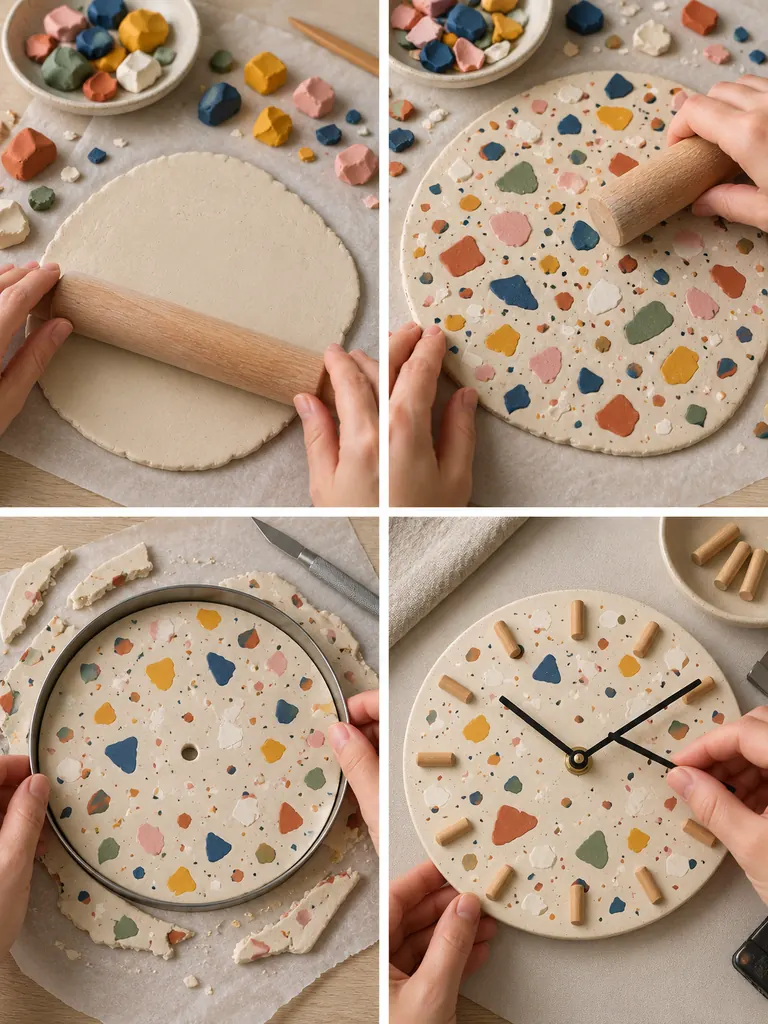
- Roll the base clay into an even slab thick enough to stay rigid after drying.
- Scatter small colored fragments across the surface and roll lightly to embed them.
- Cut a clean circle and form the center hole while the clay is still soft.
- Dry flat, sand the perimeter and seal the surface once completely cured.
- Attach the wooden markers, fit the clock movement and confirm the hands rotate freely.
3. Woven Cane and Wood Clock
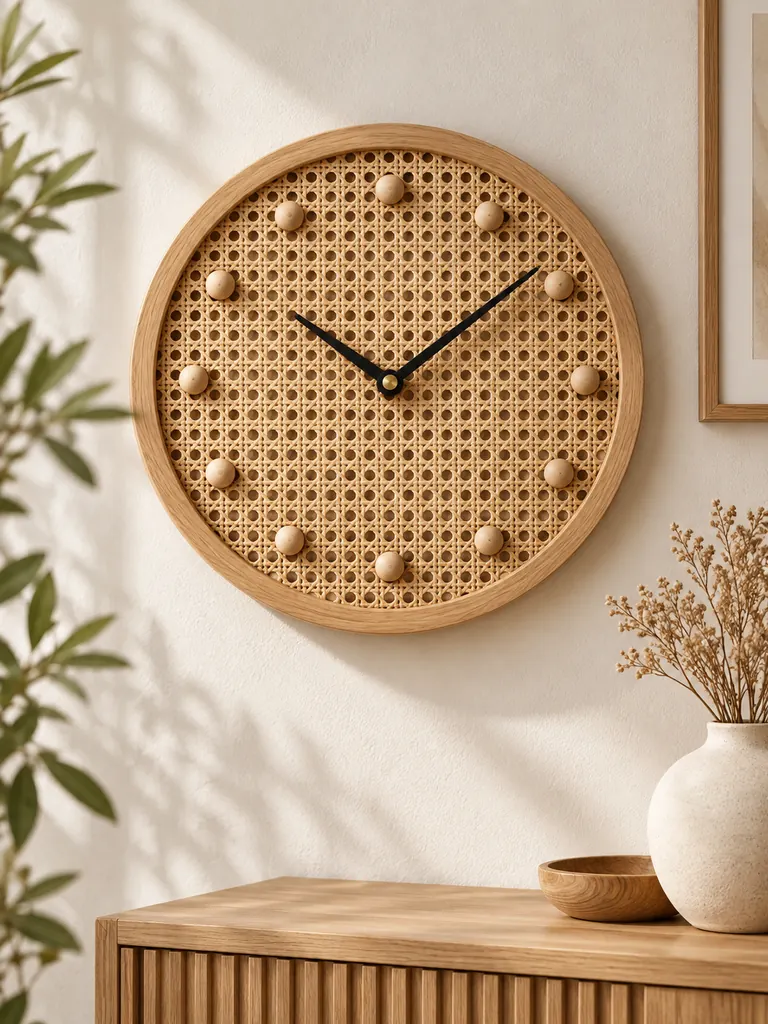
Cane webbing gives a clock a light, tactile quality that works especially well in Scandinavian and boho rooms. A natural wood ring and simple bead markers keep the design warm rather than busy.
Materials Needed
- Round wooden frame or ring
- Natural cane webbing
- Small wooden beads or pegs
- Strong craft glue and scissors
- Clock mechanism with black hands
How to Make It
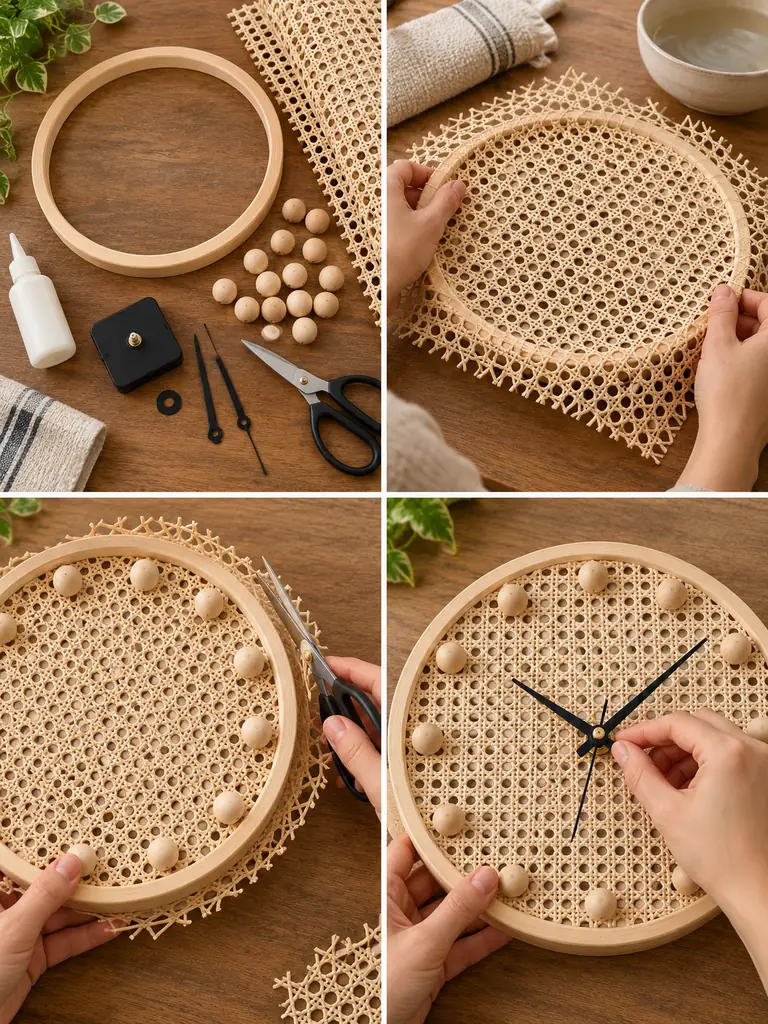
- Cut cane slightly larger than the opening so there is enough material to secure at the back.
- Lightly dampen stiff cane, stretch it evenly and glue it to the rear of the frame.
- Trim excess material and mark twelve evenly spaced hour positions.
- Glue the wooden markers in place and carefully open the center for the clock shaft.
- Install the movement and hands, then make sure the woven surface does not rub the mechanism.
4. Moon Phase Wooden Wall Clock
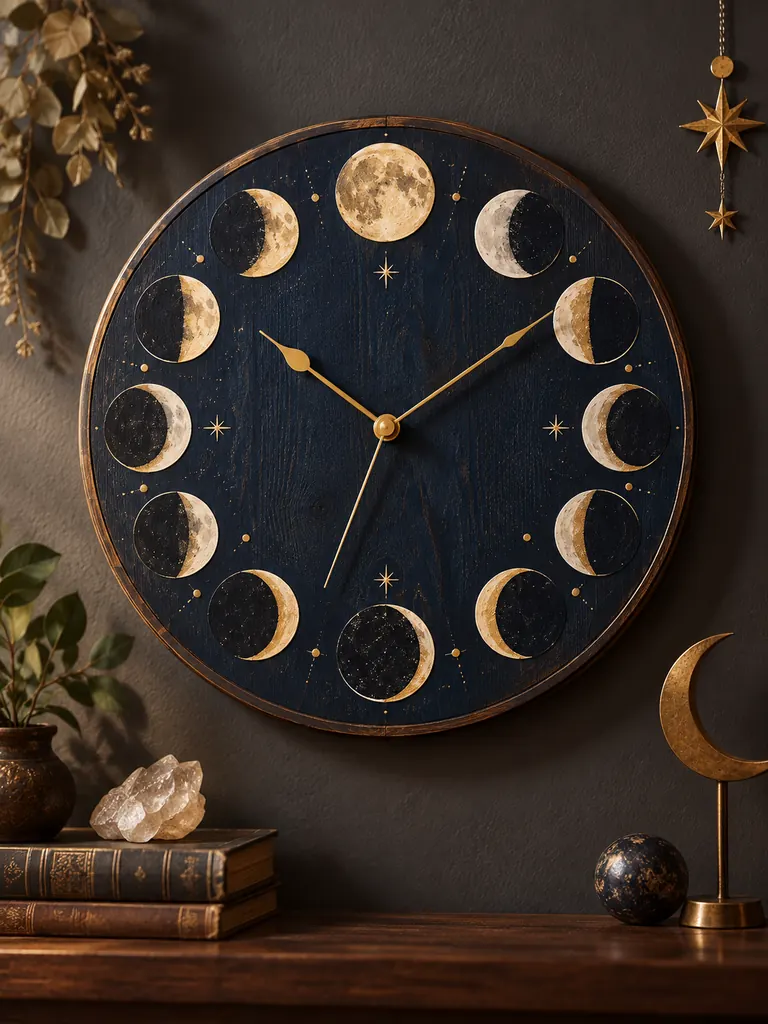
This celestial clock uses painted moon phases as decoration instead of conventional numbers. The deep background gives the pale moons enough contrast while the uncluttered center keeps the time readable.
Materials Needed
- Round plywood board
- Sandpaper and dark navy paint or stain
- Cream, white and muted gold acrylic paint
- Fine brushes and clear sealer
- Clock movement with antique-gold hands
How to Make It
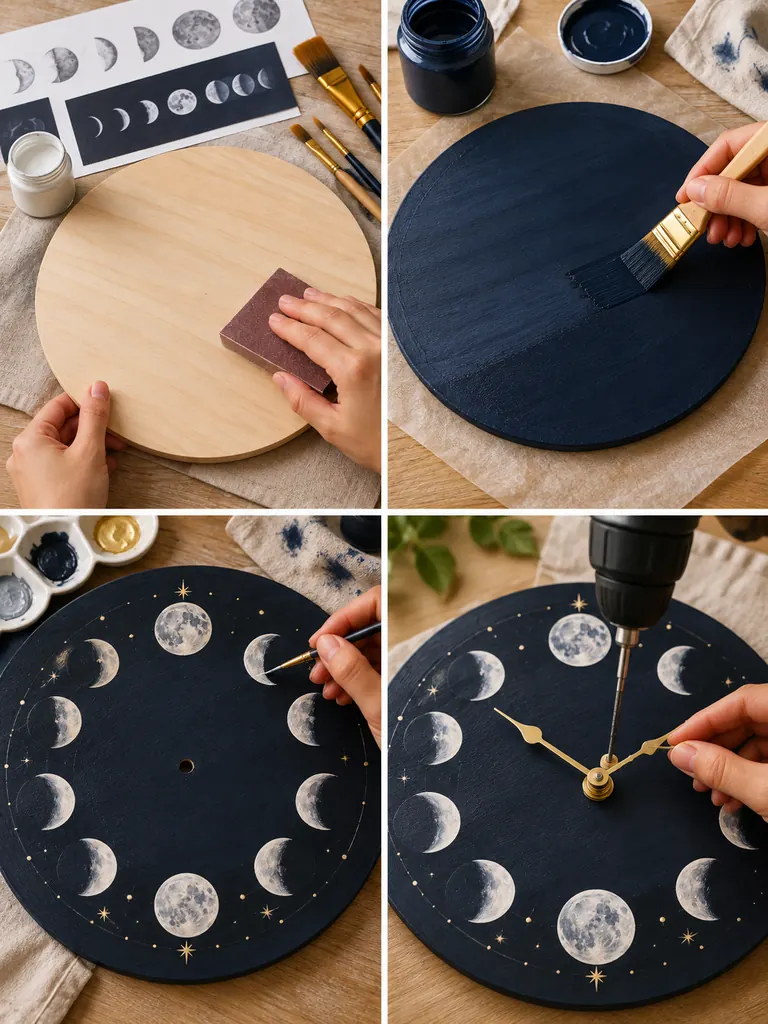
- Sand the wooden disc smooth and apply the dark background color in thin even coats.
- Mark twelve positions lightly and sketch a sequence of crescents, halves and full moons.
- Paint the lunar details with a fine brush, keeping the center comparatively quiet.
- Seal the artwork after it has dried and prepare the center opening for the shaft.
- Secure the movement from behind, attach the hands and test a complete rotation.
5. Colorful Wooden Bead Clock
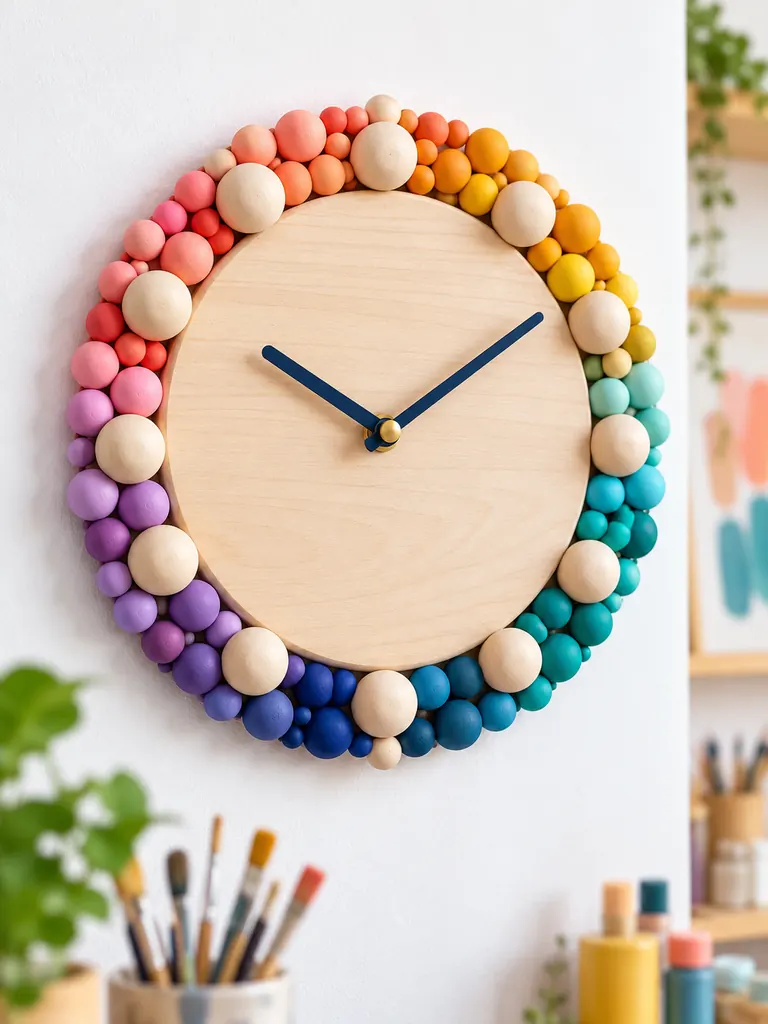
Painted wooden beads create a playful border without sacrificing a clean clock face. A controlled rainbow gradient and twelve larger natural beads make the design colorful but still organized.
Materials Needed
- Round pale-wood clock base
- Wooden beads in several sizes
- Acrylic paints and brushes
- Strong adhesive
- Clock mechanism with navy or dark hands
How to Make It
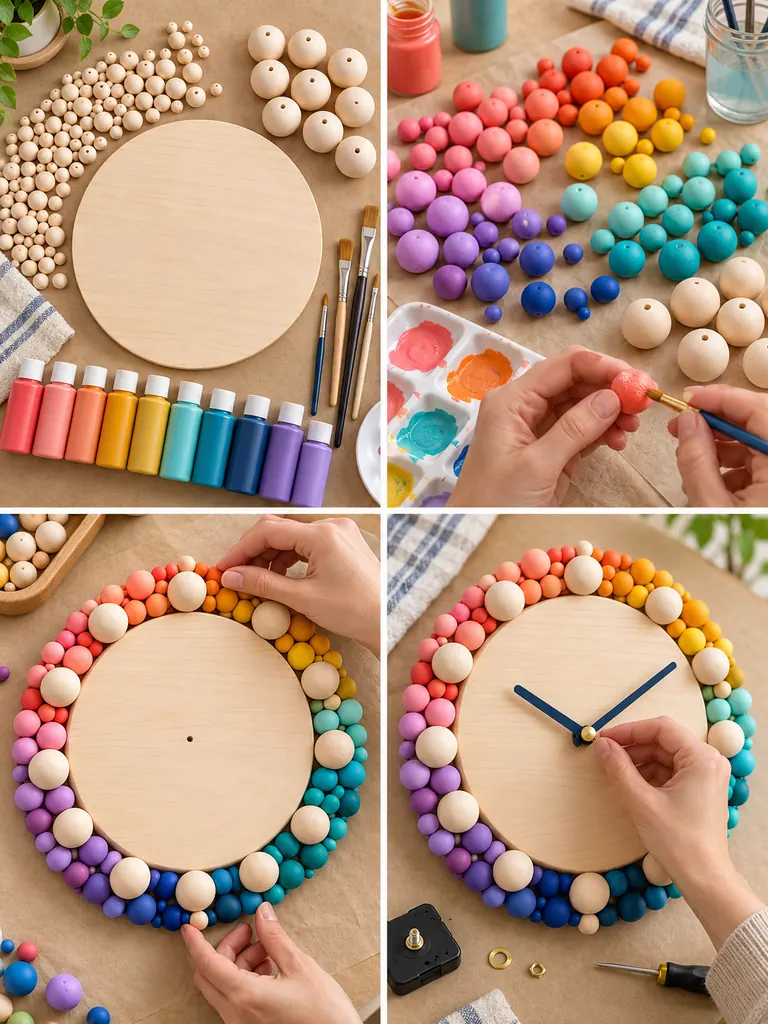
- Separate twelve larger beads for hour markers and leave them natural.
- Paint the smaller beads in coordinated rainbow colors and let them dry fully.
- Arrange the colored beads around the perimeter, placing the twelve natural markers evenly.
- Glue the arrangement securely and keep the center of the clock unobstructed.
- Fit the movement and dark hands, then check that all beadwork sits outside the hand path.
6. Handmade Mosaic Tile Clock
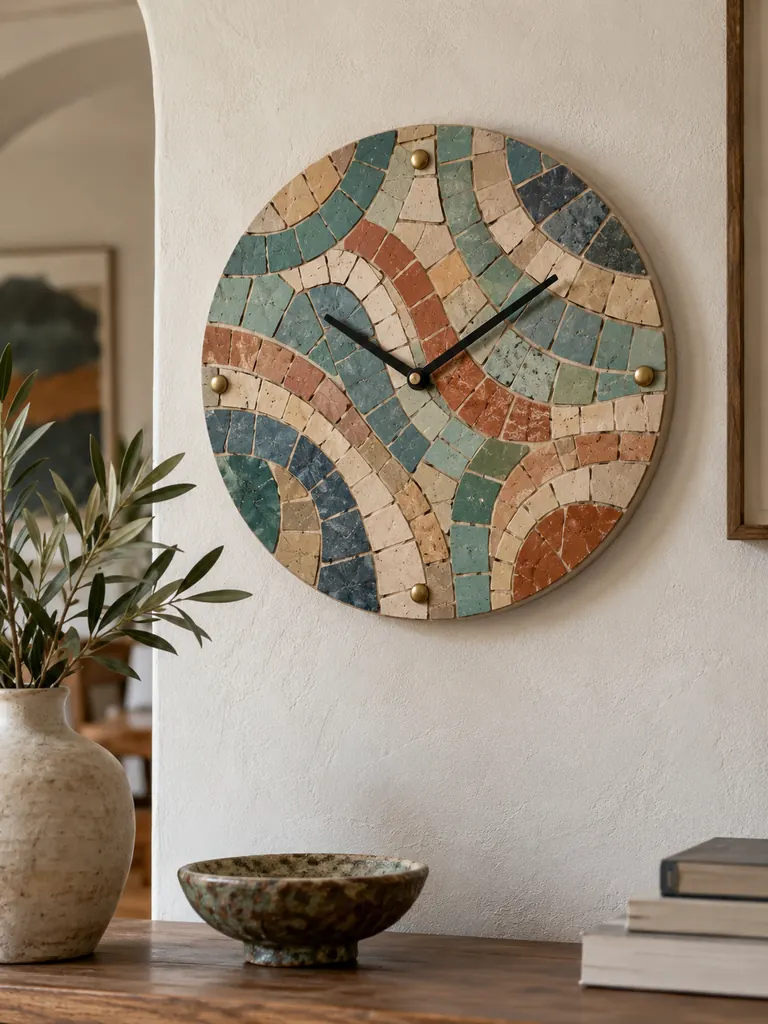
A mosaic clock feels like a small piece of handmade wall art. Flowing curved bands keep this version organic and contemporary, while restrained colors make the ceramic texture the main feature.
Materials Needed
- Round wooden backing board
- Small ceramic mosaic pieces
- Tile adhesive and warm-gray grout
- Grout spreader and sponge
- Clock movement, black hands and four brass dots
How to Make It
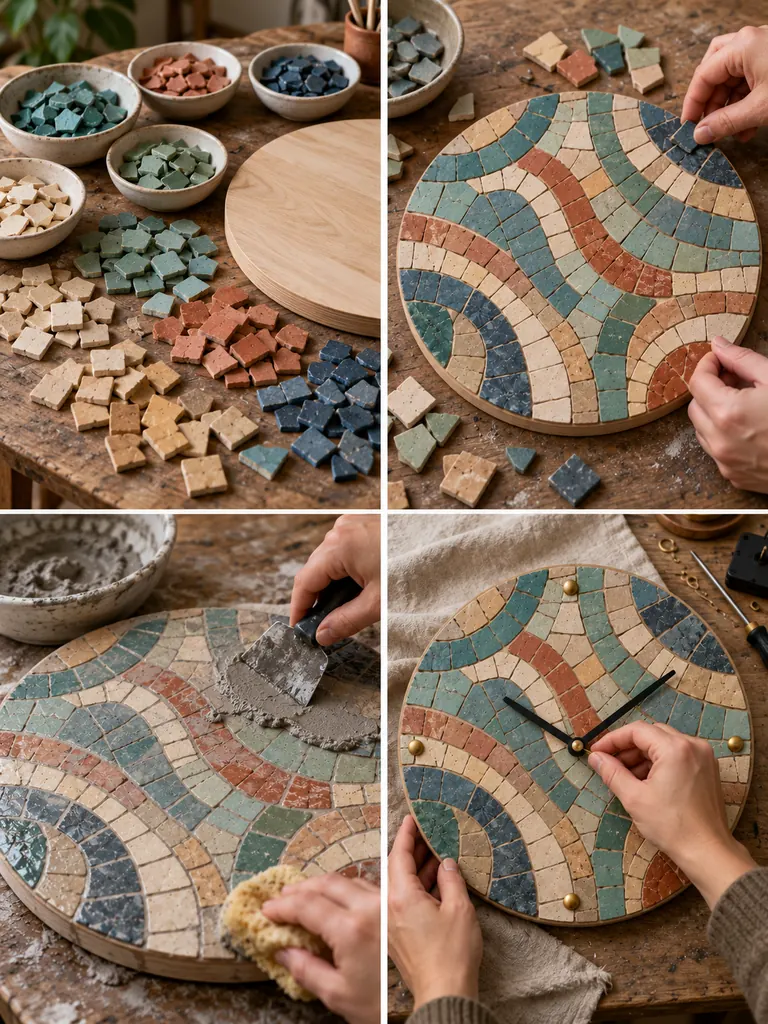
- Sort tiles by color and dry-arrange broad curved bands across the board.
- Glue each piece while preserving narrow, fairly consistent spaces for grout.
- When the adhesive is cured, spread grout across the surface and work it into the joints.
- Wipe the tile faces clean with a damp sponge and allow the grout to cure completely.
- Add brass markers at 12, 3, 6 and 9, then install the movement and black hands.
7. Macramé Fringe Clock
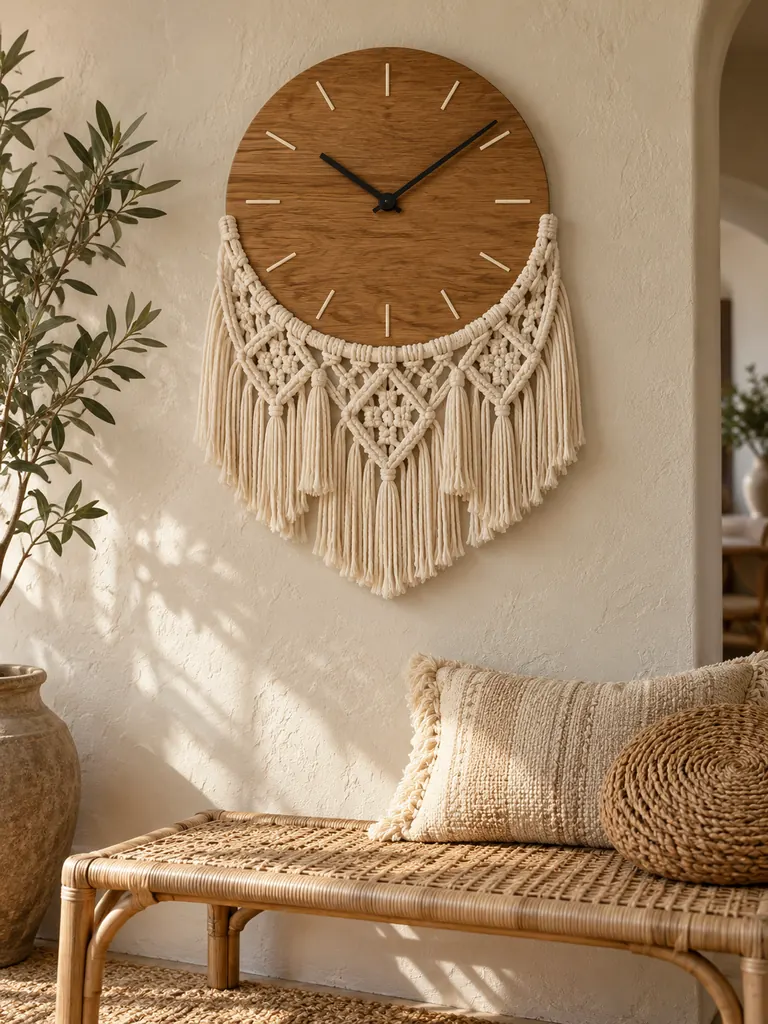
Combining wood with macramé turns a clock into a functional textile wall hanging. The wooden face remains simple while the lower fringe adds softness, movement and a clear handmade character.
Materials Needed
- Round wooden clock base
- Natural cotton macramé cord
- Drill, scissors and measuring tape
- Wood comb
- Clock mechanism and matte-black hands
How to Make It
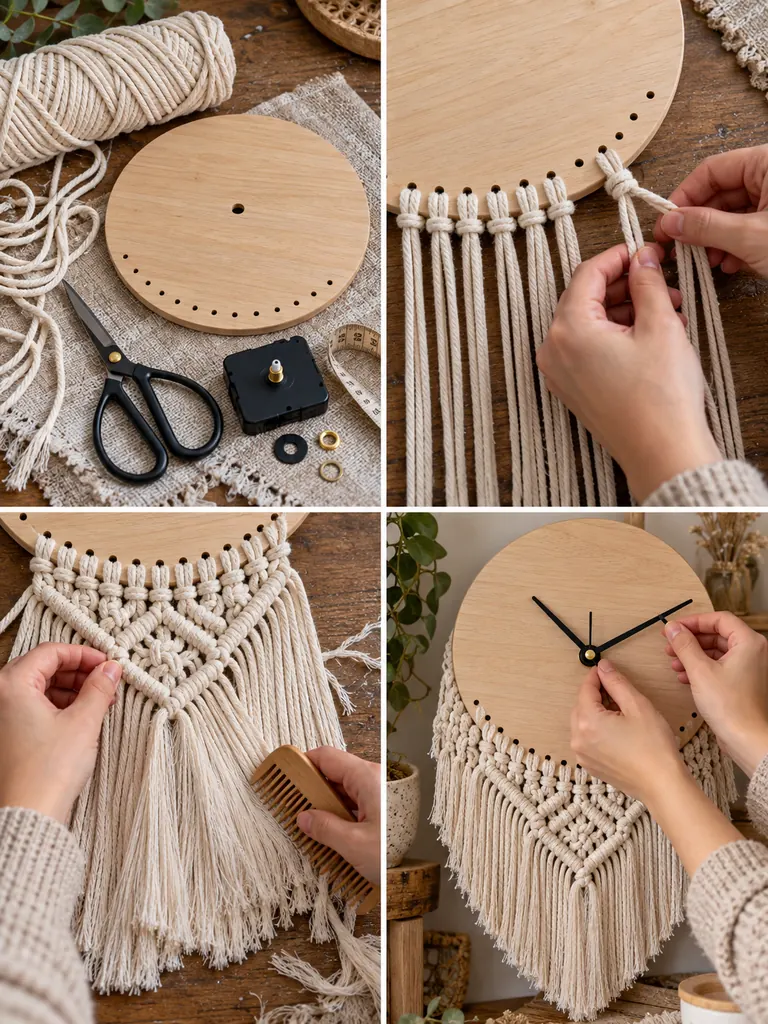
- Mark a row of evenly spaced holes along the lower edge of the wooden disc.
- Cut equal cord lengths and attach them through the holes with lark’s head knots.
- Build a balanced diamond-knot pattern, then comb and trim the fringe neatly.
- Add minimal hour lines to the wooden face while keeping the design uncluttered.
- Install the clock movement and hands, checking that no cord can reach the rotating hands.
8. Vintage Book Page Decoupage Clock
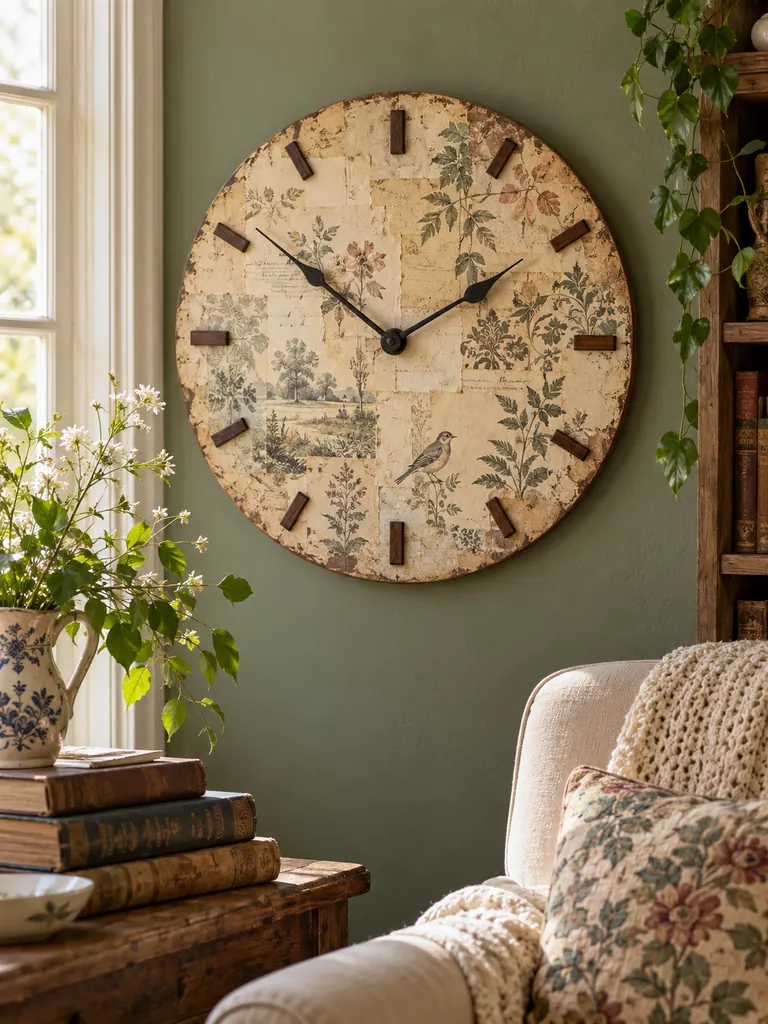
Layered vintage-style paper can give a plain wood circle the warmth of an old keepsake. Using decorative, illegible fragments avoids visual clutter and lets botanical motifs provide the character.
Materials Needed
- Round wooden base
- Vintage-style decorative paper scraps
- Decoupage medium and flat brush
- Fine sandpaper and matte sealer
- Dark wood markers, clock movement and black hands
How to Make It
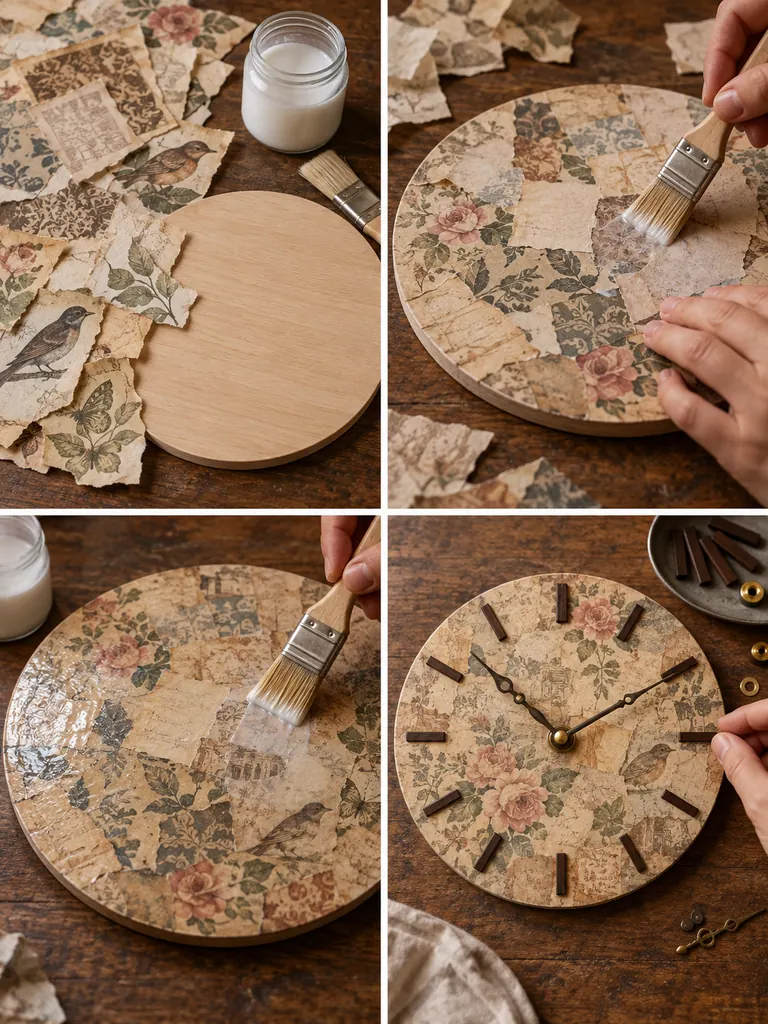
- Tear paper into varied shapes so the finished layers do not look too uniform.
- Brush decoupage medium onto the wood and overlap the fragments across the entire face.
- Smooth bubbles gently, then apply a thin protective coat over the paper.
- Once dry, lightly distress selected edges and attach twelve small dark wooden markers.
- Open the center if needed, install the mechanism and finish with antique-style dark hands.
9. Driftwood Sunburst Clock
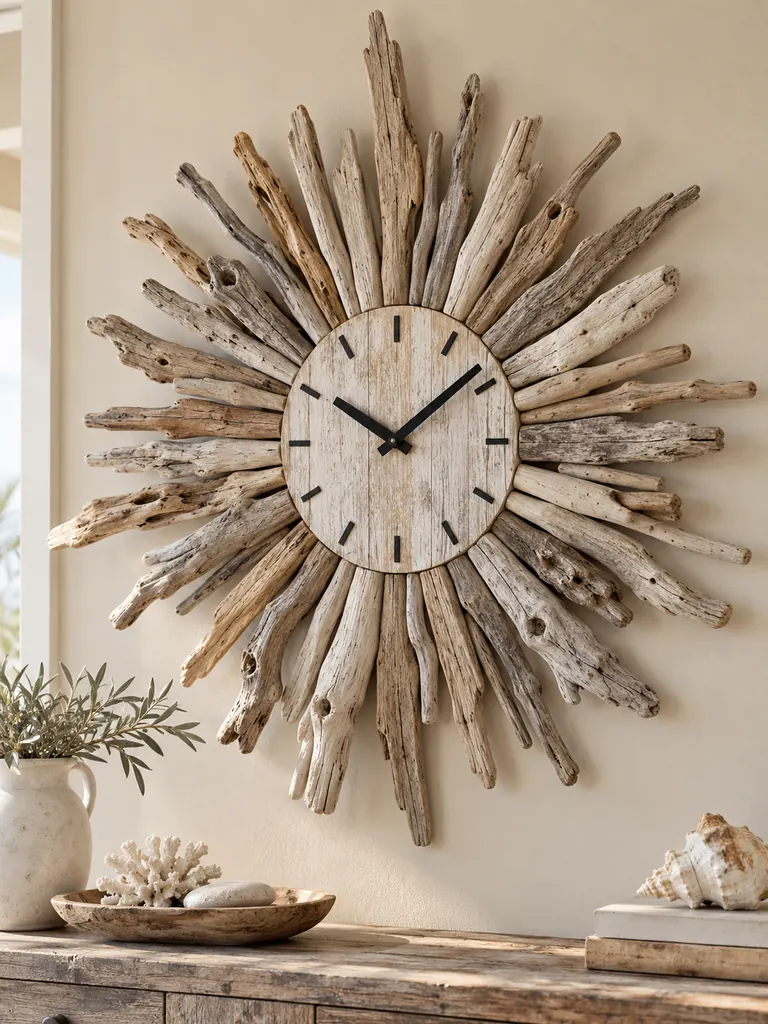
Weathered driftwood naturally produces a one-of-a-kind sunburst because no two pieces share exactly the same shape. Alternating lengths adds rhythm while the pale center keeps the clock readable.
Materials Needed
- Small round plywood center
- Clean, fully dried driftwood pieces
- Strong construction adhesive
- Sandpaper and measuring tape
- Clock mechanism and bold black hands
How to Make It
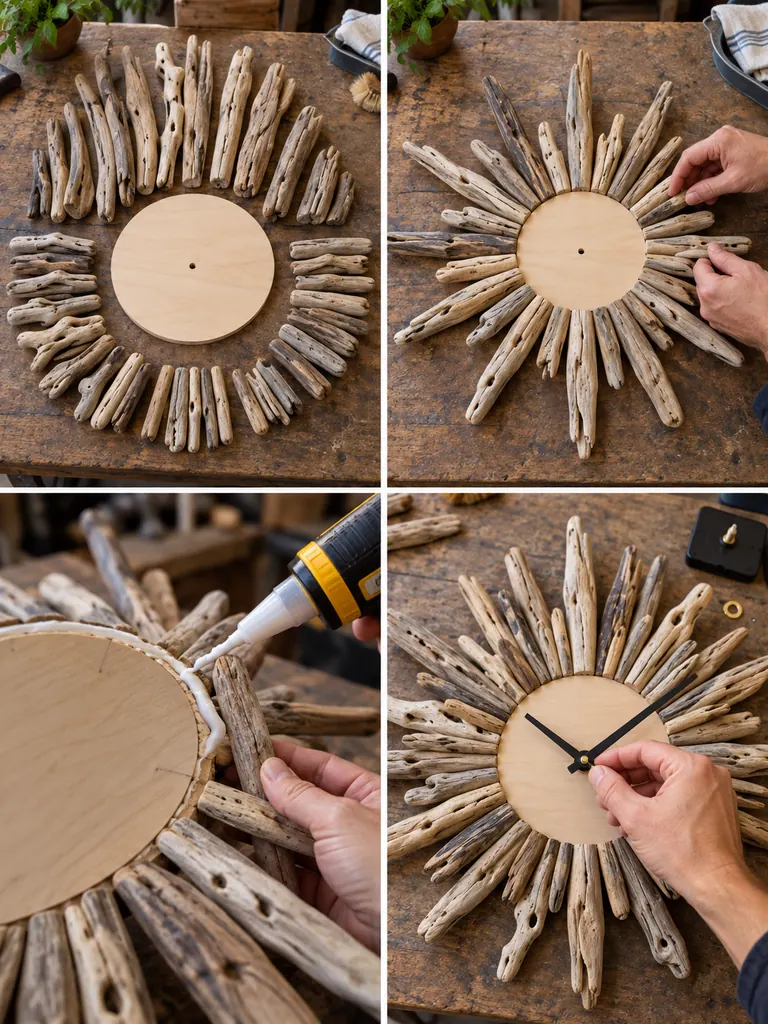
- Sort the driftwood by length and thickness before beginning the layout.
- Arrange long pieces at balanced intervals, then fill the spaces with shorter pieces.
- Glue each branch securely to the backing and allow the adhesive to cure undisturbed.
- Add simple dark hour marks to the central wooden disc.
- Fit the movement and bold hands, then attach wall hardware rated for the finished weight.
10. Embroidery Hoop Fabric Clock
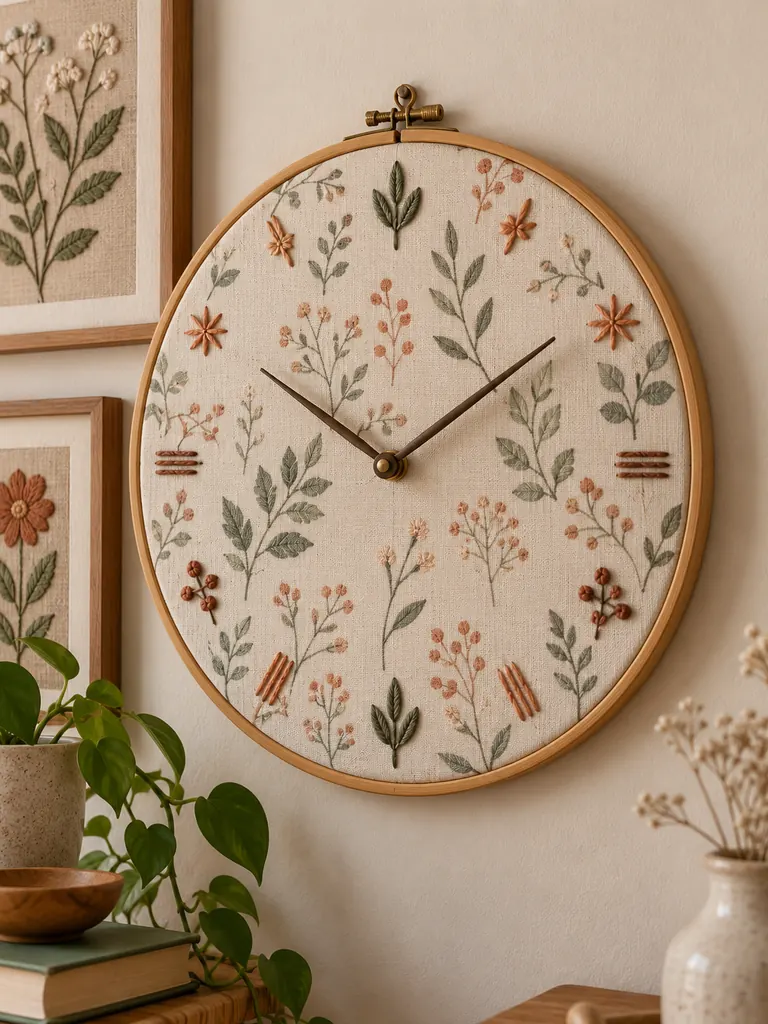
An embroidery hoop makes a lightweight clock frame while fabric introduces pattern and softness. Hand-stitched hour symbols make the project feel more personal than printed numbers.
Materials Needed
- Large bamboo embroidery hoop
- Cream linen or other medium-weight fabric
- Embroidery floss, needle and fabric pencil
- Thin backing or stabilizer
- Clock movement with bronze hands
How to Make It
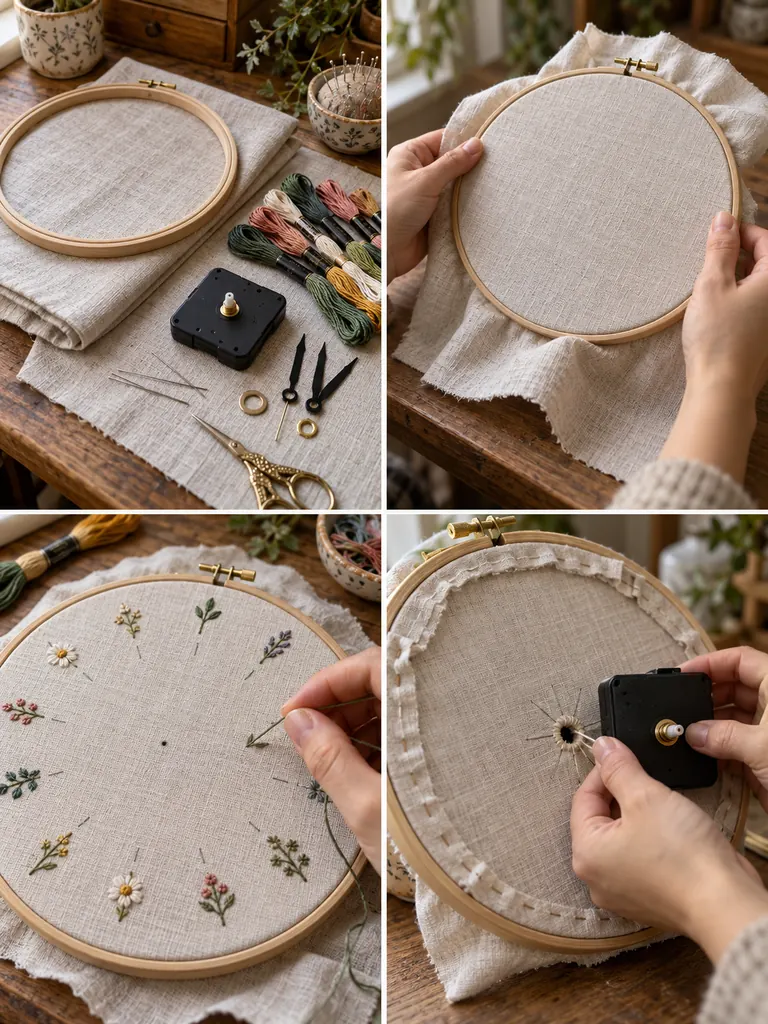
- Stretch the fabric tightly in the hoop and tighten the screw so the surface stays flat.
- Mark twelve evenly spaced positions with a removable fabric pencil.
- Embroider small leaves, stars or stitched lines at each hour position.
- Reinforce the center from behind and make a neat opening for the movement shaft.
- Install the mechanism, trim excess fabric at the back and attach the hands.
11. Geometric Wooden Dowel Clock
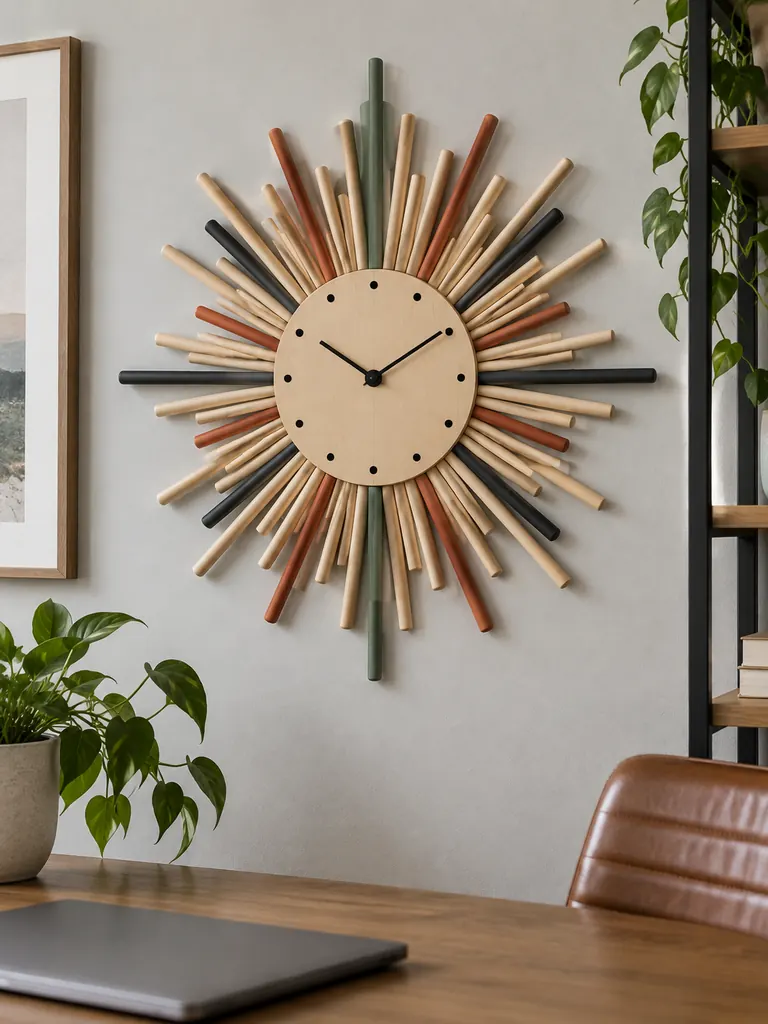
Wooden dowels can turn a small clock face into a bold modern sunburst. Using three lengths and only a few painted accents creates a strong geometric pattern without making the piece feel overly decorative.
Materials Needed
- Round plywood clock center
- Thin wooden dowels
- Small saw, ruler and sandpaper
- Muted sage, charcoal and terracotta paint
- Wood glue and clock mechanism
How to Make It
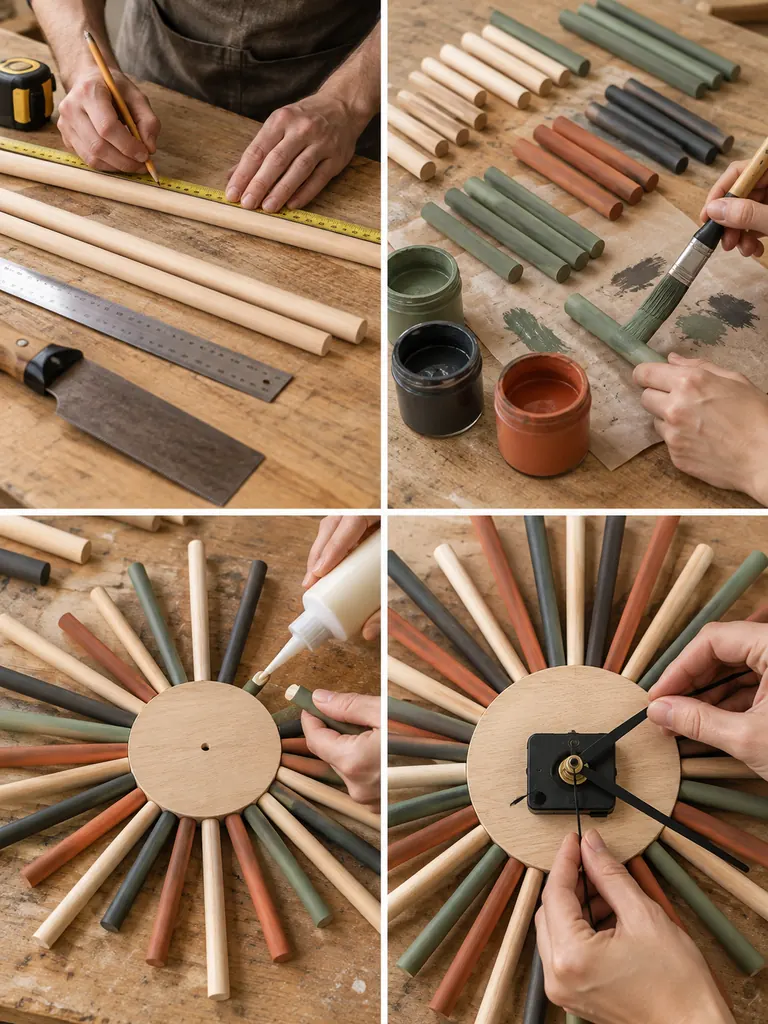
- Measure and cut the dowels into three planned lengths, then sand every cut end.
- Paint a limited number of dowels and leave most pieces natural.
- Arrange the dowels radially around the center, alternating lengths for a consistent rhythm.
- Glue the pieces securely and let the assembly dry flat.
- Add tiny hour dots, install the movement and finish with slim black hands.
12. Seashell Coastal Clock
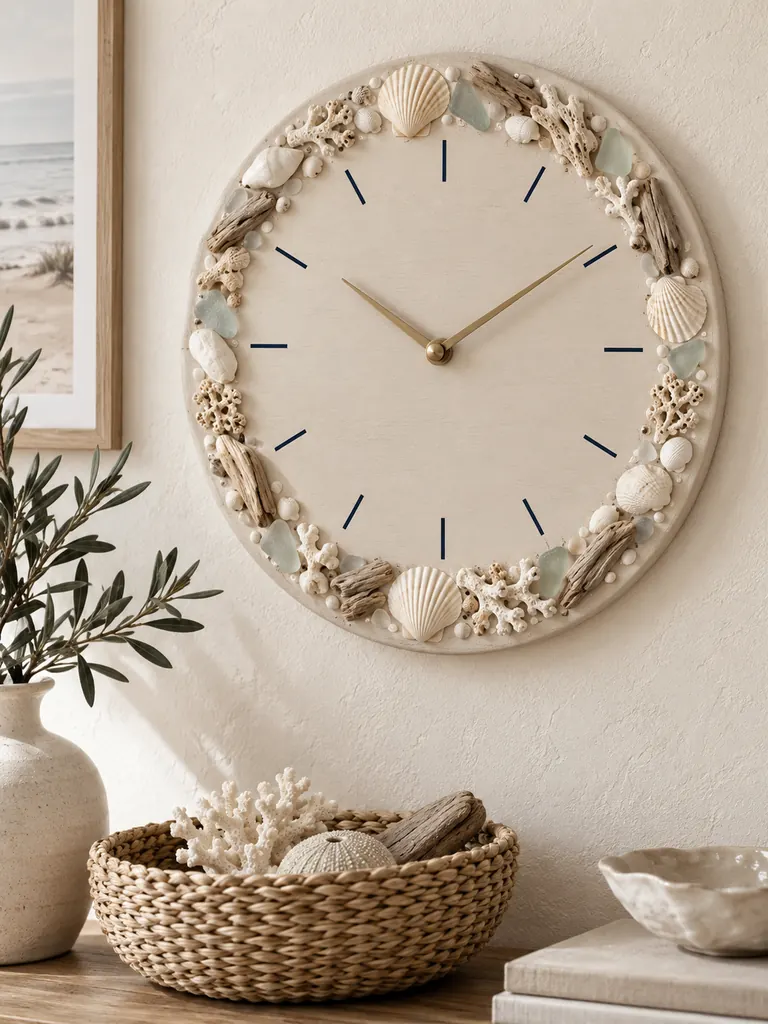
A coastal clock looks more sophisticated when shells are used as a restrained border rather than covering the entire face. Sea glass and tiny driftwood pieces introduce natural variation while the center stays calm.
Materials Needed
- Round wooden clock base
- Small clean shells and scallop fragments
- Pale sea glass and small driftwood pieces
- Warm sand paint and strong adhesive
- Clock movement, navy markers and brass hands
How to Make It
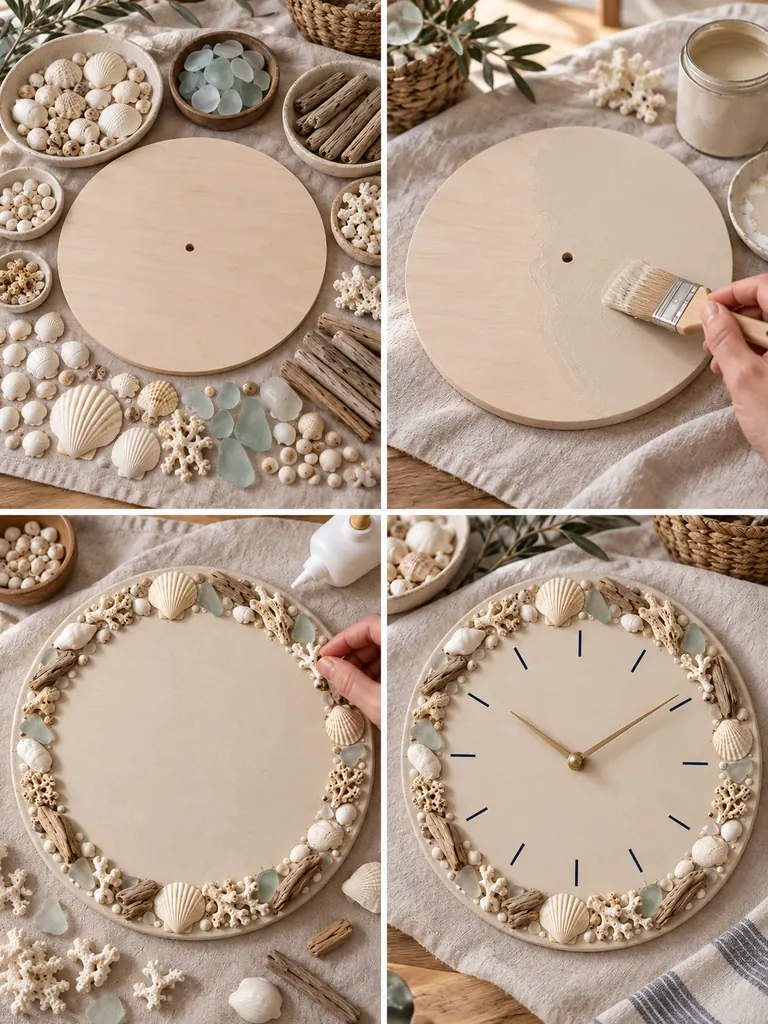
- Paint the wooden base a warm sandy cream and allow the finish to dry.
- Arrange shells, sea glass and driftwood loosely around the perimeter before gluing.
- Secure the pieces while preserving plenty of clear space inside the border.
- Add simple navy hour lines once the decorative edge is fully set.
- Install the movement and brushed-brass hands, then check that the border does not obstruct them.
13. Leather Strap Hanging Clock
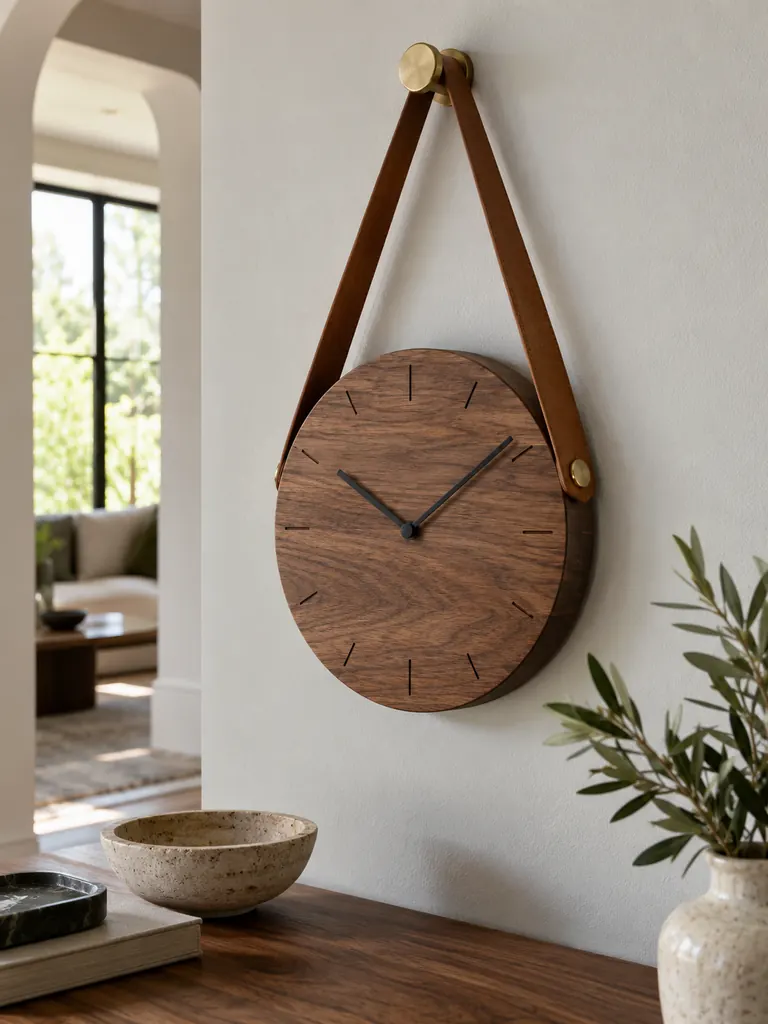
A wide leather strap gives a plain wooden clock an architectural hanging detail. The key is to treat the strap as structural hardware, not just decoration, so the rivets and wall peg must be secure.
Materials Needed
- Thick round wooden board
- Caramel recycled or faux-leather strap
- Brass rivets or Chicago screws
- Walnut stain and sandpaper
- Clock mechanism, black hands and drill
How to Make It
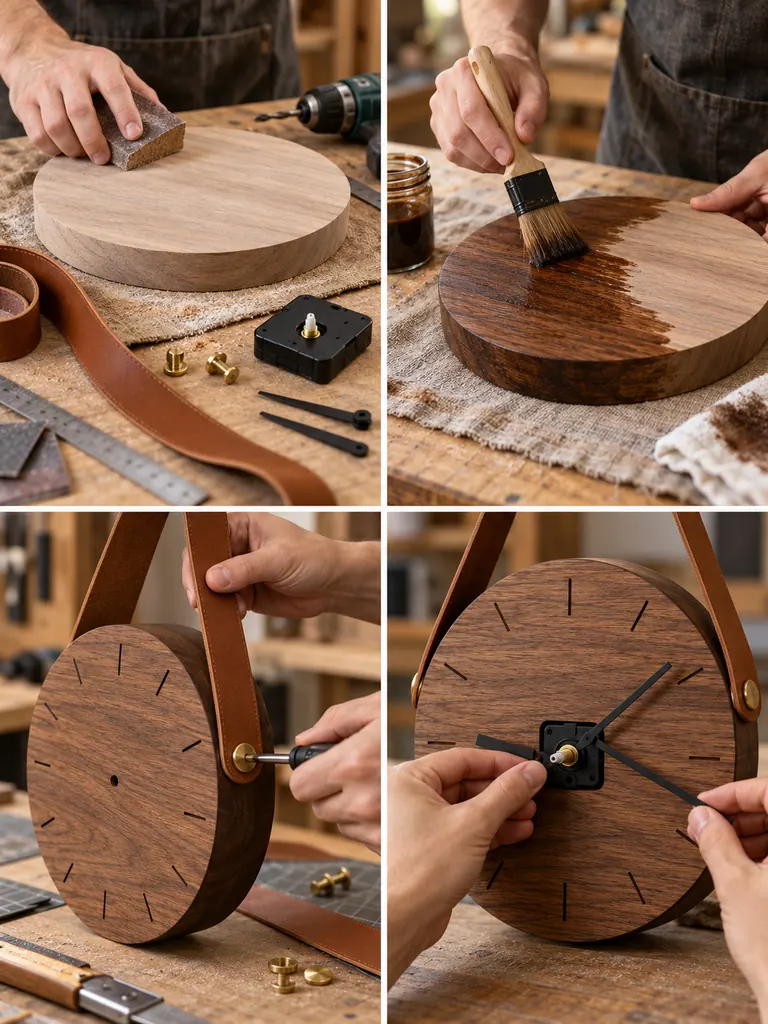
- Sand the wood thoroughly and apply the walnut stain evenly on the face and edge.
- Measure the strap so it forms a balanced loop above the clock.
- Fix both strap ends to the sides with strong brass hardware rather than glue alone.
- Prepare the center hole to match the movement shaft and add subtle hour lines.
- Install the movement from the back, attach the hands and hang the strap from a secure wall peg.
14. Painted Botanical Wood Slice Clock
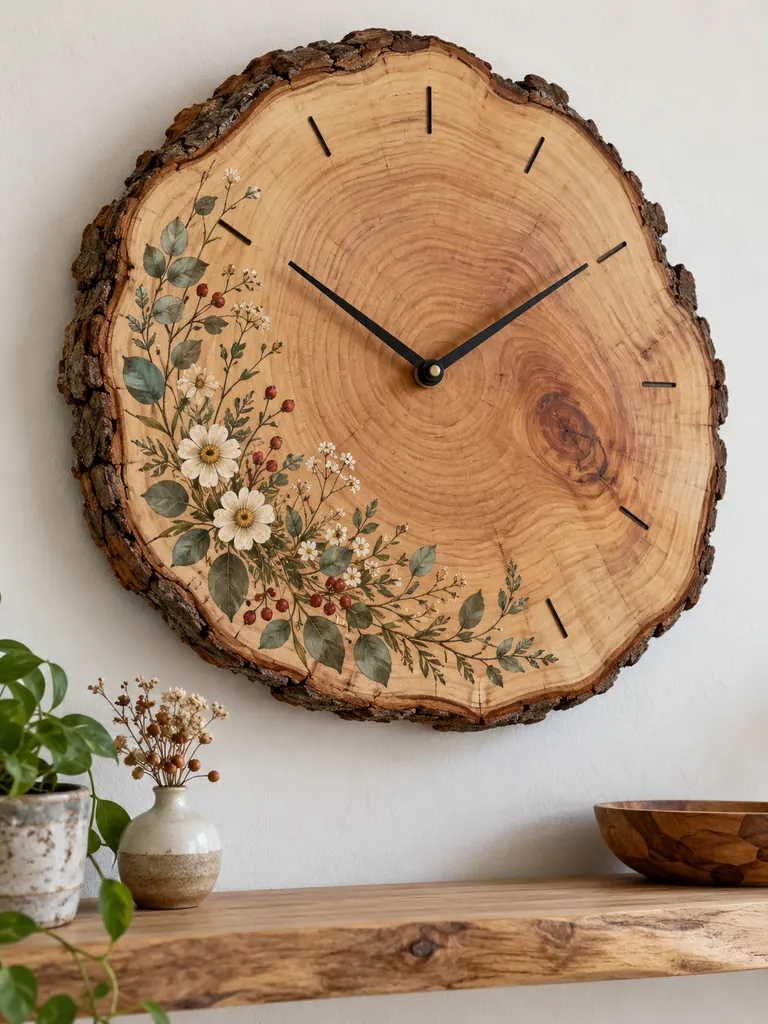
A natural wood slice already has rich texture, so it needs only a restrained painted accent. A botanical sweep along one side lets the bark edge and growth rings remain visible.
Materials Needed
- Dry wood slice with bark edge
- Fine sandpaper
- Acrylic paints and detail brushes
- Clear wood sealer
- Clock mechanism and matte-black hands
How to Make It
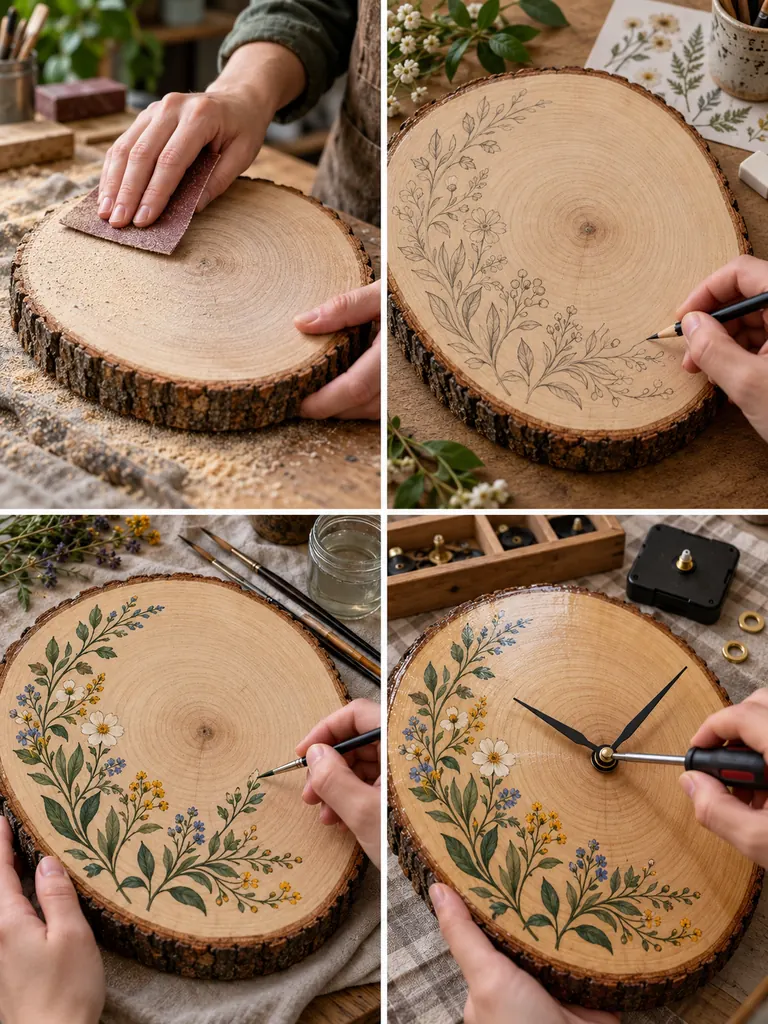
- Make sure the slice is fully dry, then sand the front smooth without removing the bark.
- Sketch a loose arrangement of leaves, stems and small flowers along one side.
- Paint larger shapes first and add fine stems, berries and highlights after they dry.
- Seal the artwork and carefully drill the center without splitting the wood.
- Fit the mechanism, add subtle hour ticks and attach contrasting black hands.
15. Recycled Cork Mosaic Clock
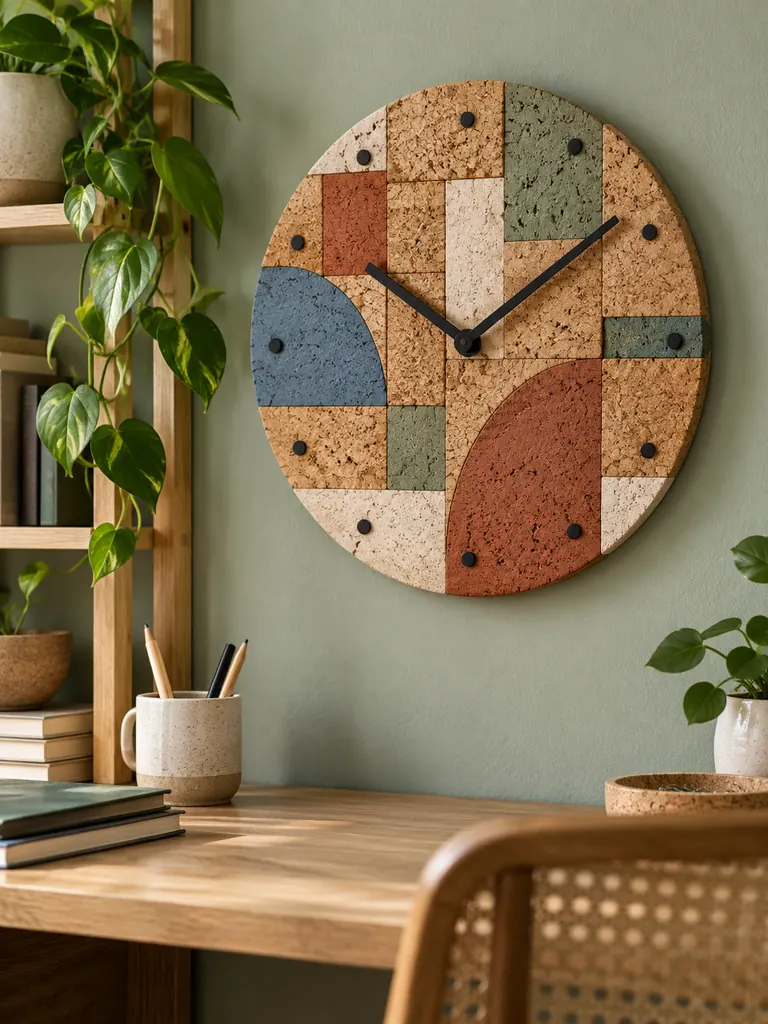
Cork is light, easy to cut and naturally warm, which makes it ideal for a wall clock. Mixing raw pieces with muted painted sections creates texture while keeping the finished piece practical to hang.
Materials Needed
- Cork sheets or clean cork pieces
- Thin plywood backing
- Craft knife, cutting mat and ruler
- Muted acrylic paints and strong glue
- Clock movement and matte-black hands
How to Make It
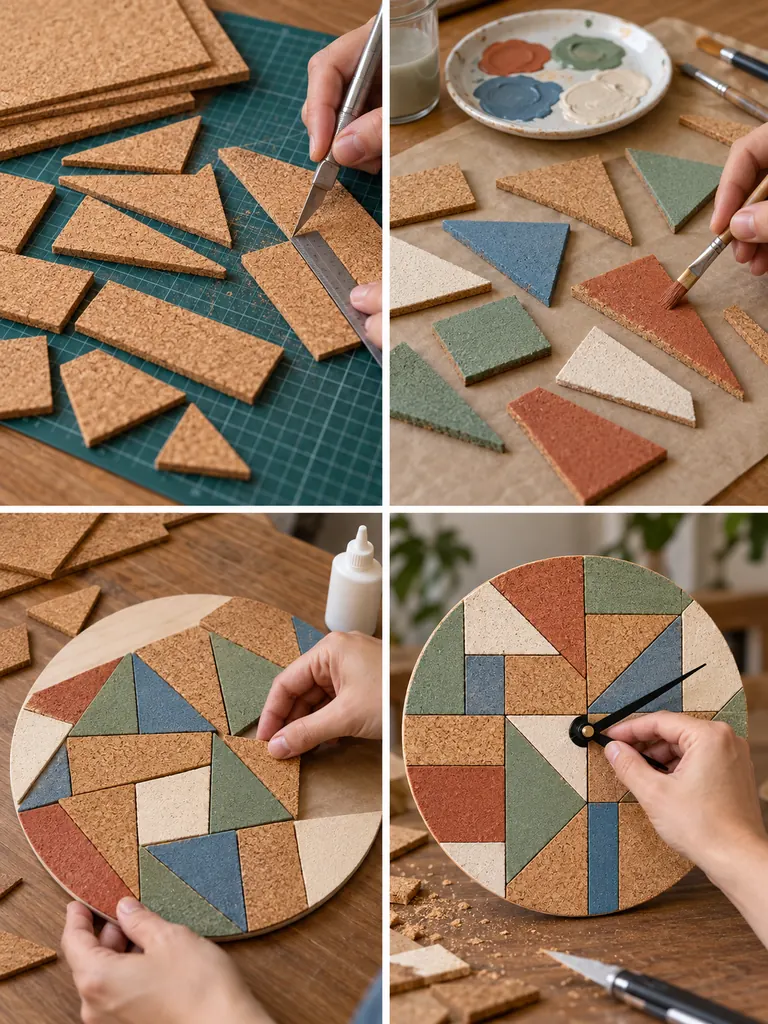
- Cut cork into triangles, rectangles and other simple geometric shapes.
- Paint selected pieces in terracotta, sage, dusty blue and cream while leaving others natural.
- Arrange the shapes over the backing until the pattern feels balanced, then glue them down.
- Trim the outer edge cleanly and mark the hour positions with small charcoal dots.
- Open the center, install the movement and attach lightweight black hands.
16. Clay Botanical Relief Clock
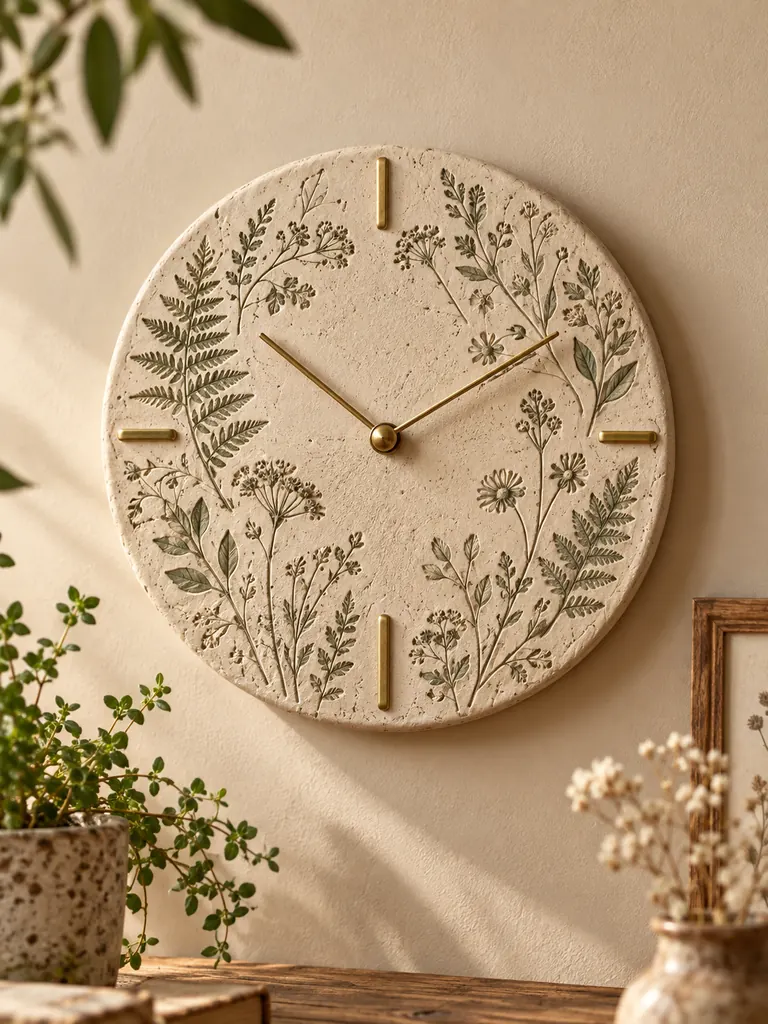
Pressed leaves and flowers give air-dry clay detailed botanical texture without complicated sculpting. A thin sage-gray wash should settle mainly into the impressions so the overall clock remains warm ivory.
Materials Needed
- Air-dry clay
- Rolling pin and round template
- Fresh fern leaves, herbs and small flowers
- Sage-gray wash and clear matte sealer
- Clock movement with four brass markers and brass hands
How to Make It
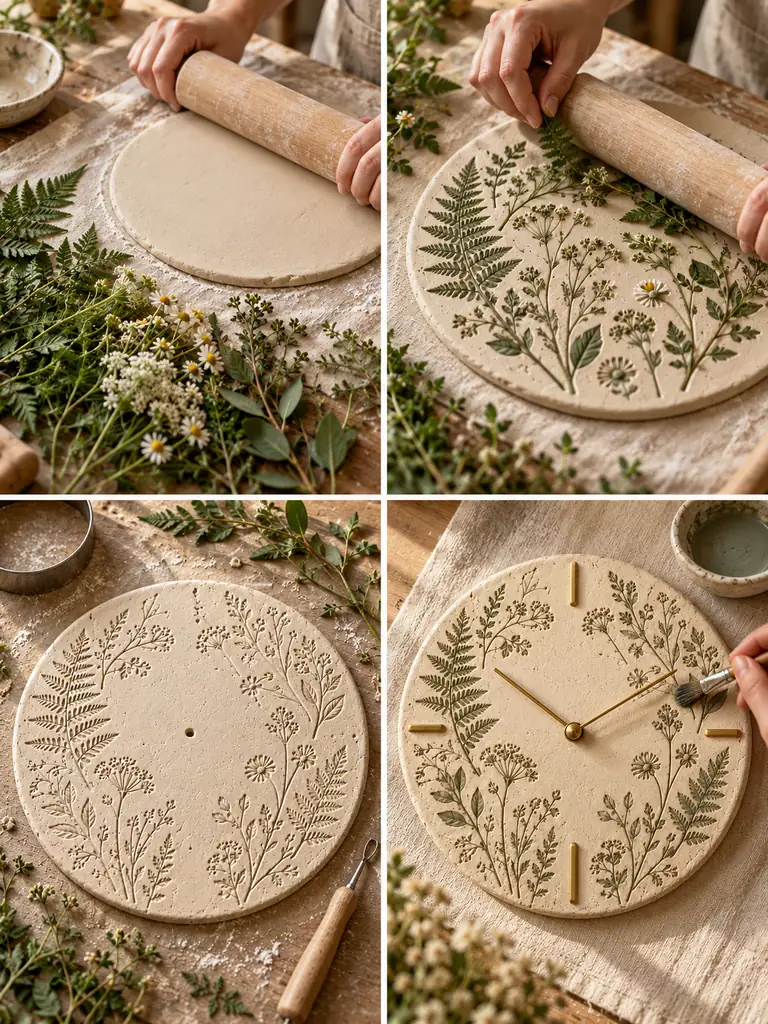
- Roll the clay into an even slab and cut a clean circular face.
- Arrange fresh botanicals on the surface and roll gently so their shapes press into the clay.
- Lift the plants away, refine the edges and make the center hole before drying.
- After a full cure, brush on a very thin sage-gray wash and wipe the raised surface clean.
- Add brass markers at 12, 3, 6 and 9, then install the movement and matching hands.
17. Recycled Denim Patchwork Clock
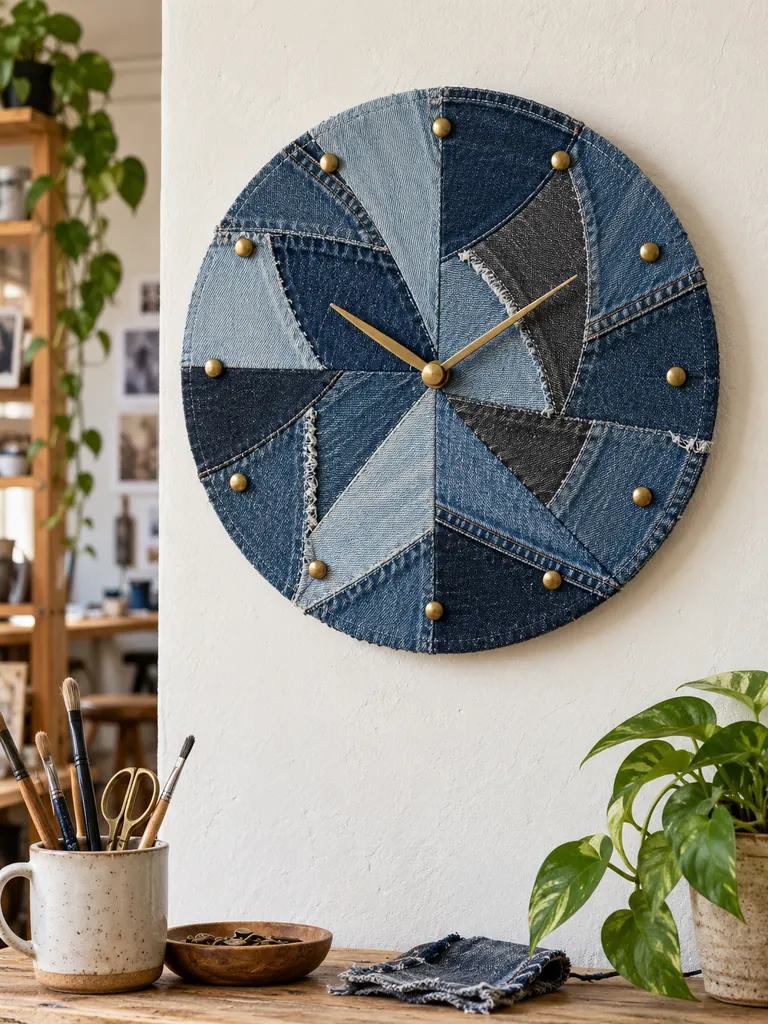
Old jeans can become a surprisingly polished clock when different washes are arranged intentionally. A radial layout keeps the patchwork organized, and small brass studs stand out clearly against the denim.
Materials Needed
- Old denim in several blue washes
- Round plywood backing
- Fabric scissors and fabric glue
- Twelve antique-brass studs
- Clock mechanism and brass hands
How to Make It
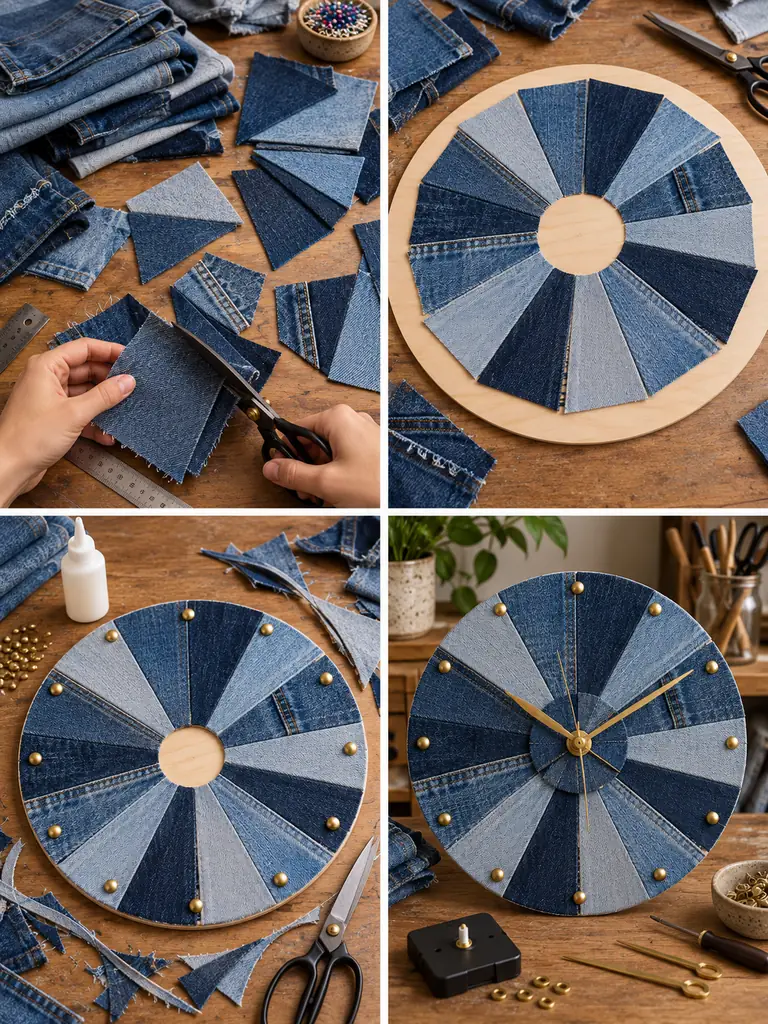
- Cut the denim into neat wedges and curved pieces, saving seams for a few accent sections.
- Lay the pieces radially on the plywood and alternate light and dark washes.
- Glue the fabric flat, smoothing wrinkles and controlling frayed edges.
- Trim the perimeter and place twelve brass studs at the hour positions.
- Open the reinforced center, fit the movement and attach the brass hands.
18. Minimalist Concrete Clock With Brass Details
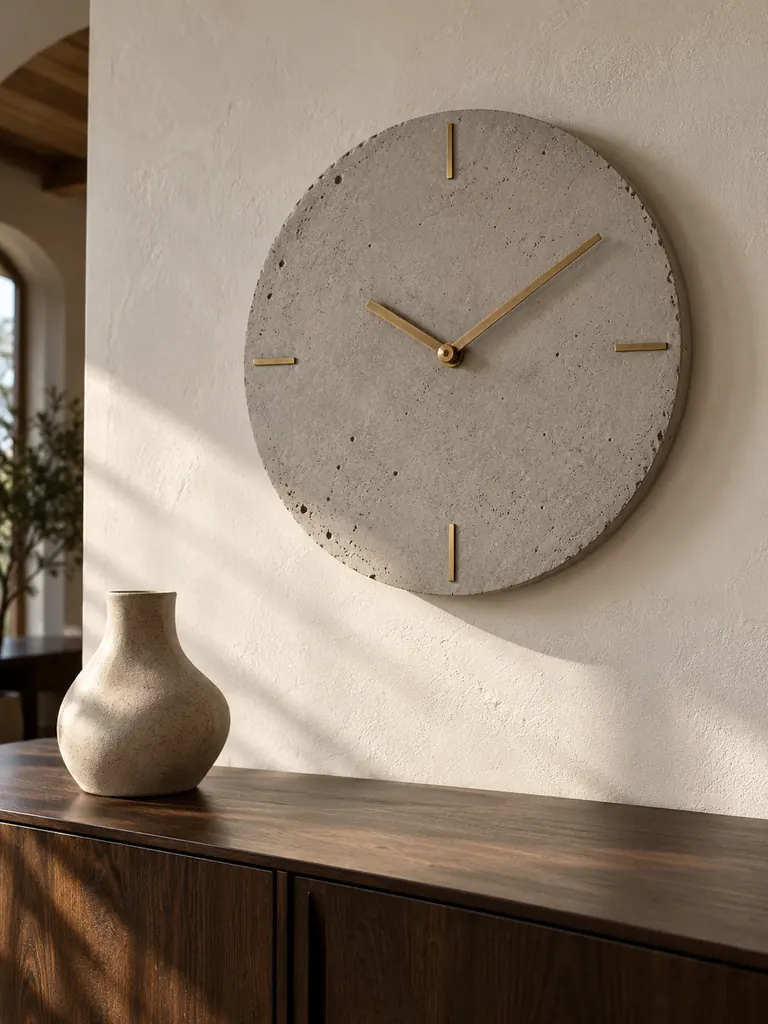
Concrete makes a simple clock feel architectural, especially when the face stays thin and the markings are restrained. Small natural air bubbles and slightly imperfect edges reinforce the handmade character.
Materials Needed
- Fine craft concrete or cement mix
- Shallow round silicone mold
- Water, mixing bowl and gloves
- Small tube for the center opening
- Long-shaft clock movement with four brass markers and brass hands
How to Make It
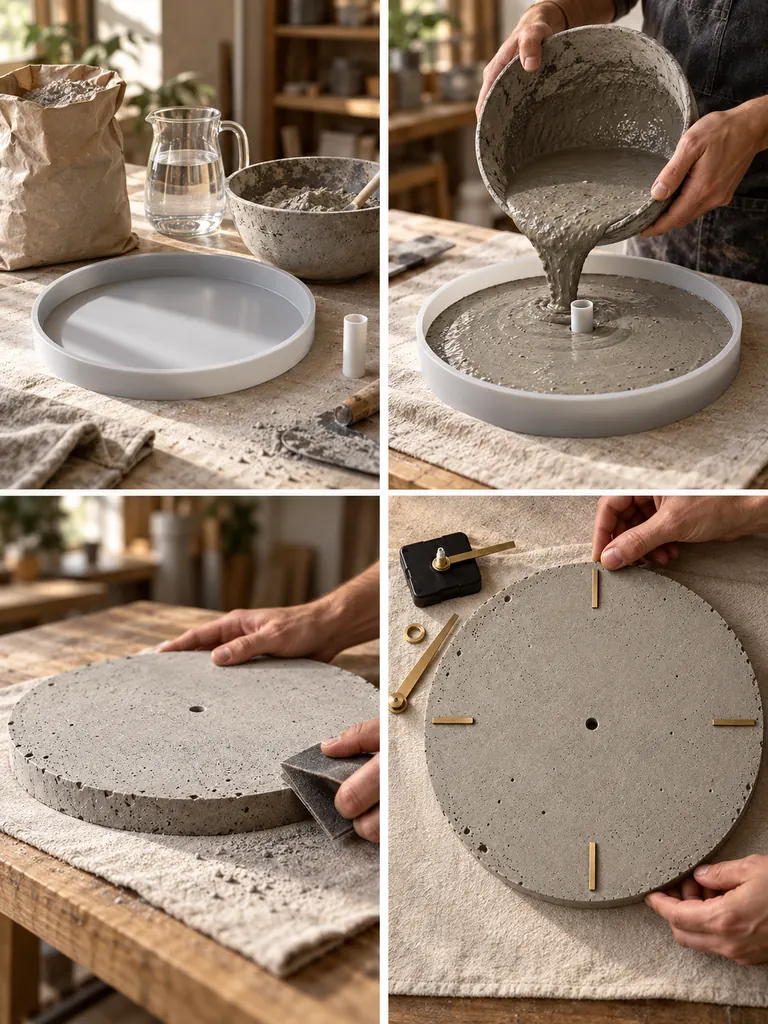
- Mix the concrete to the recommended consistency and pour it into the shallow mold.
- Insert a small tube at the exact center so the shaft opening remains clear.
- Tap the mold gently to release larger trapped bubbles, then let the concrete cure fully.
- Remove the disc and sand rough edges without polishing away all natural texture.
- Attach brass markers only at 12, 3, 6 and 9, then install the long-shaft movement and hands.
19. Painted Rainbow Arch Clock
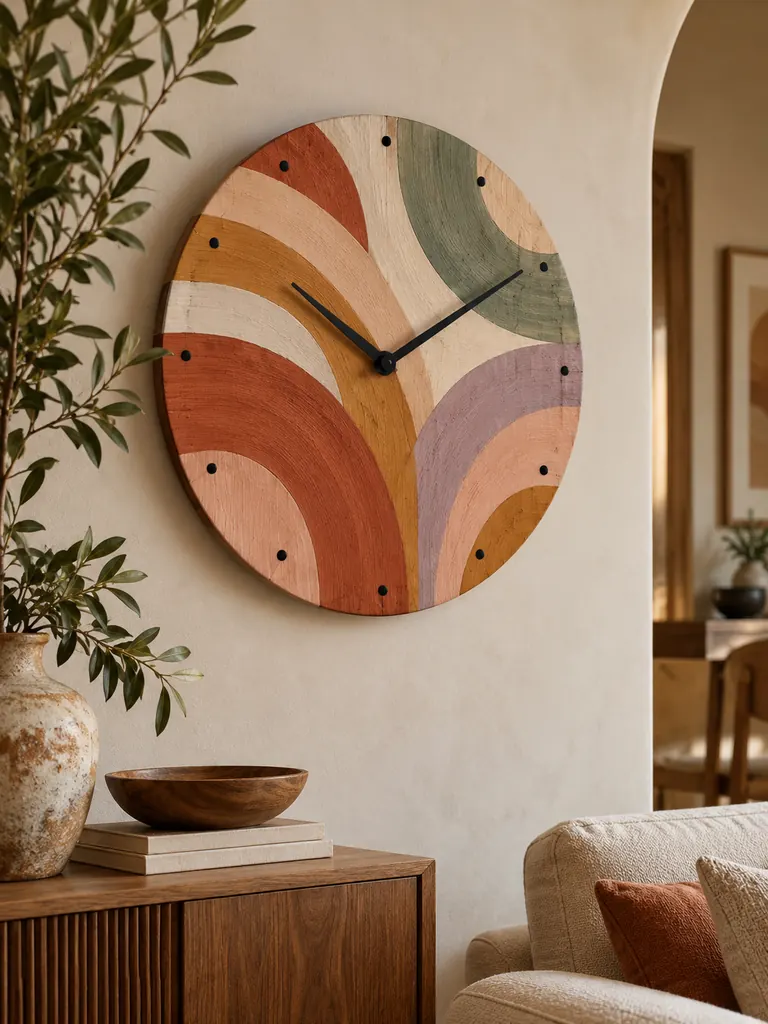
Overlapping arches can turn a plain wooden clock into abstract wall art. Muted earthy colors keep the pattern sophisticated, while tiny black hour dots make the clock practical without competing with the painted design.
Materials Needed
- Round wooden board
- Pencil, compass and ruler
- Muted acrylic paints and brushes
- Clear matte sealer
- Clock movement, tiny black hour dots and black hands
How to Make It
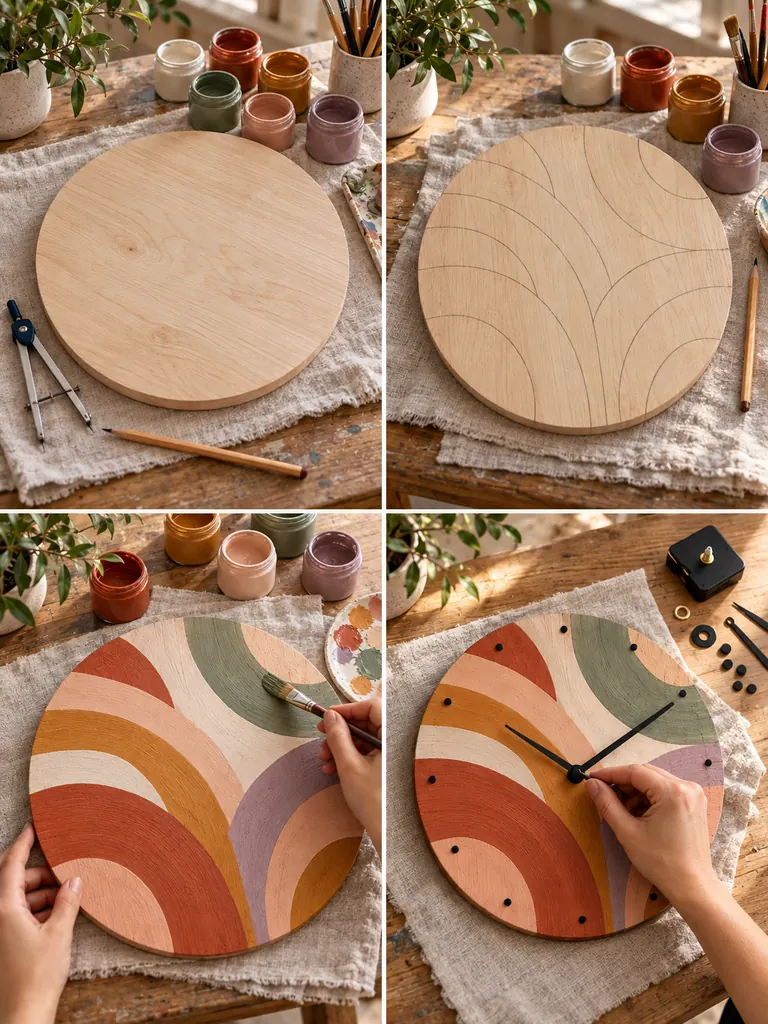
- Sand the board and lightly establish the center and hour positions.
- Sketch overlapping asymmetrical arches with a compass and freehand curves.
- Paint the sections in terracotta, mustard, blush, lavender, sage and cream, letting adjacent areas dry.
- Seal the surface and add twelve small black hour dots around the perimeter.
- Prepare the center, install the movement and finish with bold but slender black hands.
20. Rattan Sun Clock
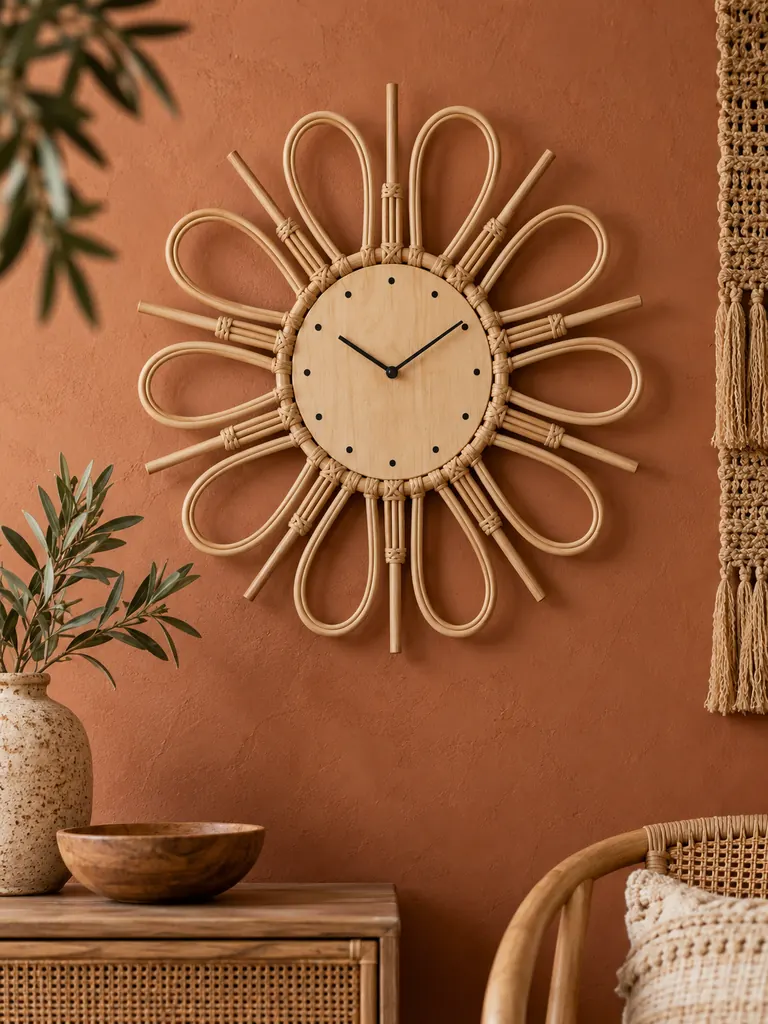
Rattan creates an airy sunburst because the loops leave visible negative space around the center. Alternating loops with straight spokes gives the design more structure than a simple ring of identical rays.
Materials Needed
- Small round pale-wood clock center
- Natural rattan or craft reed
- Warm water, shears and strong adhesive
- Small clamps
- Clock movement and slim black hands
How to Make It
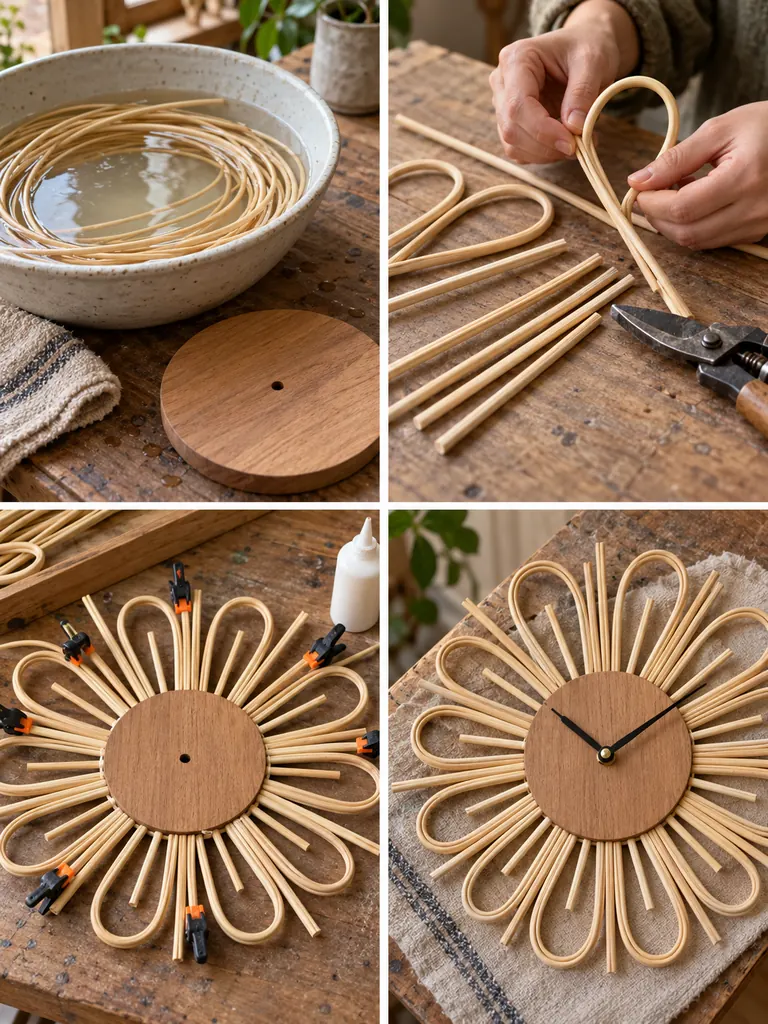
- Soak the rattan briefly until it bends without cracking.
- Form several graceful loops and cut additional straight spokes to coordinated lengths.
- Arrange looped and straight pieces alternately around the wood center.
- Glue and clamp each section until the rattan dries in its final shape.
- Add small charcoal hour markers, install the movement and attach slim black hands.
21. Hand-Painted Folk Art Clock
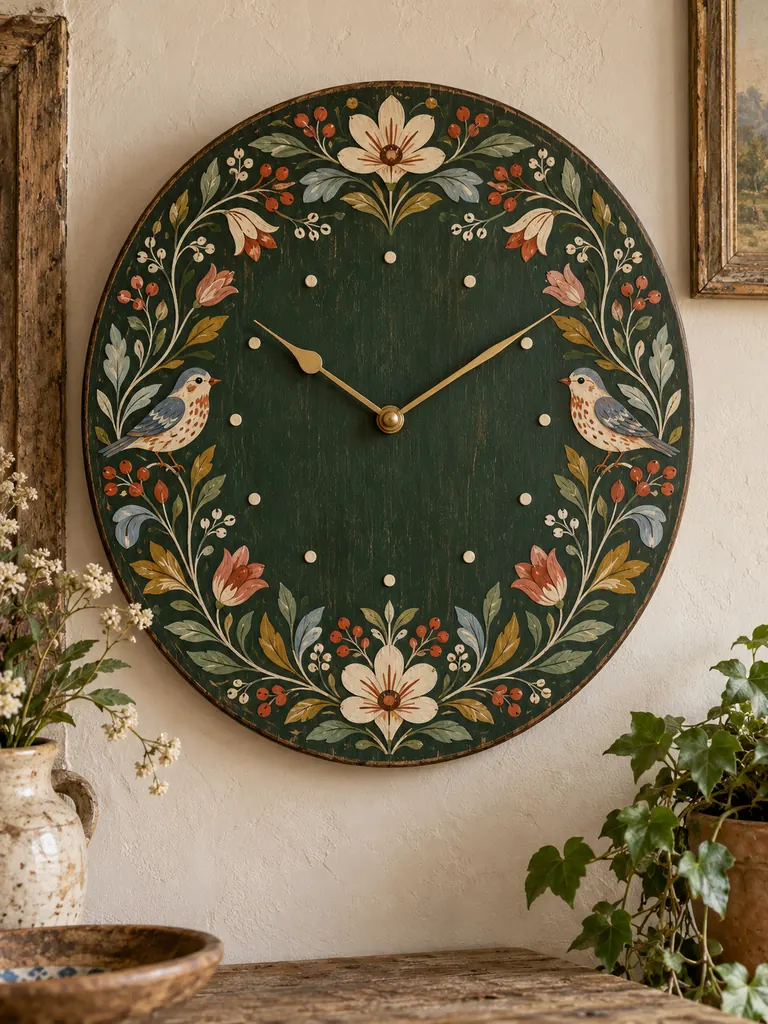
A folk-art clock rewards careful brushwork and a balanced composition. Keeping the center calmer while concentrating flowers, berries and birds around the border preserves readability and lets the painted edge become the focal point.
Materials Needed
- Round wooden clock panel
- Deep forest-green base paint
- Cream, rust, ochre, dusty pink and pale blue paints
- Fine detail brushes and clear sealer
- Clock movement and elegant brass hands
How to Make It
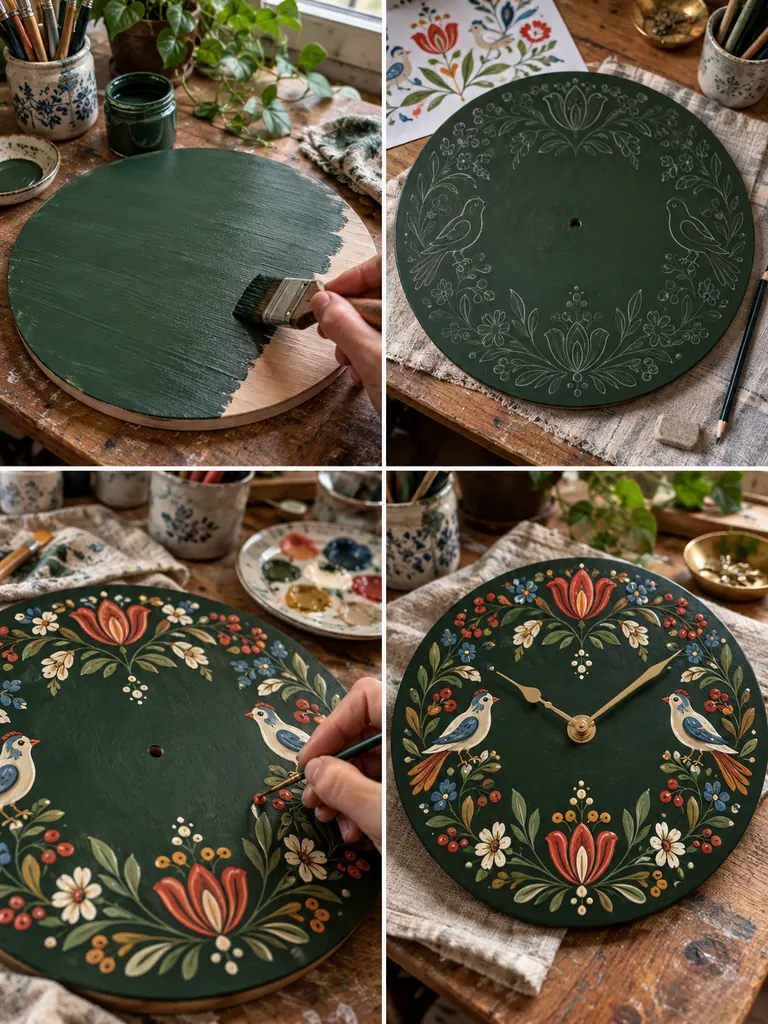
- Paint the panel deep green and allow the surface to dry thoroughly.
- Sketch a symmetrical border of flowers, leaves, berries and small decorative birds.
- Build the motifs in layers, starting with larger flowers and finishing with fine stems and dots.
- Add small cream hour marks and seal the finished painting.
- Prepare the center opening, install the movement and attach the brass hands.
22. Scrap Wood Patchwork Clock
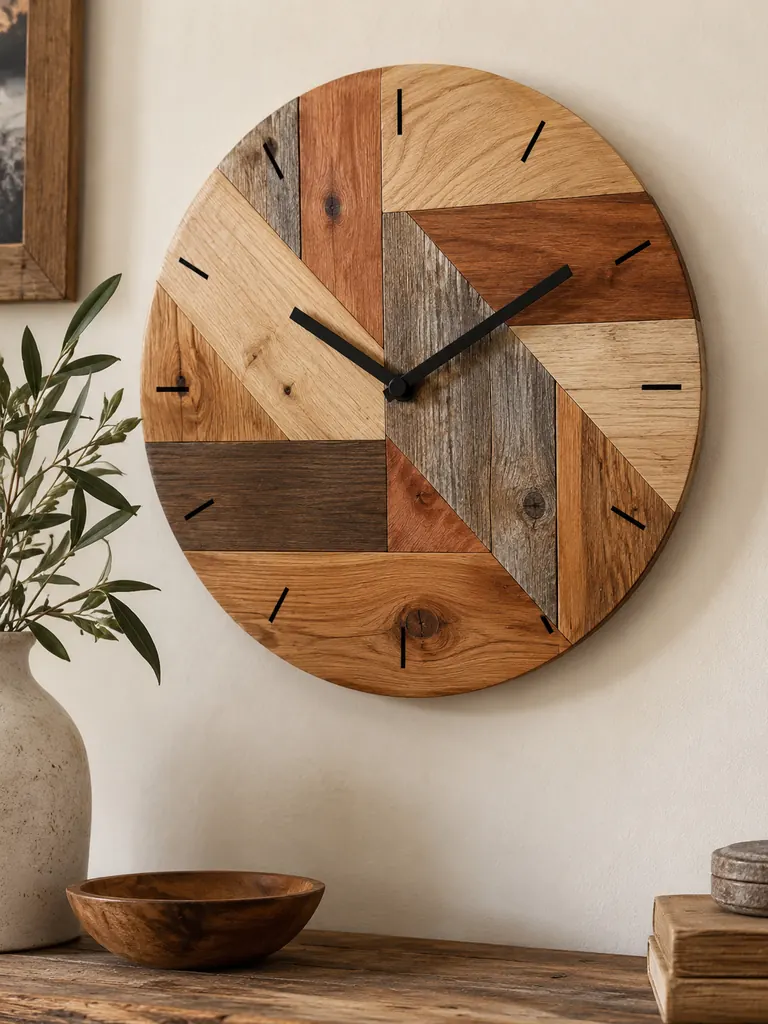
Small offcuts can become a substantial clock when they are arranged as a deliberate patchwork. Changing grain direction and wood tone creates the pattern naturally, so the surface needs little additional decoration.
Materials Needed
- Assorted reclaimed wood scraps
- Thin plywood backing
- Wood glue and saw
- Sander or fine sandpaper
- Natural finish, clock movement and black hands
How to Make It
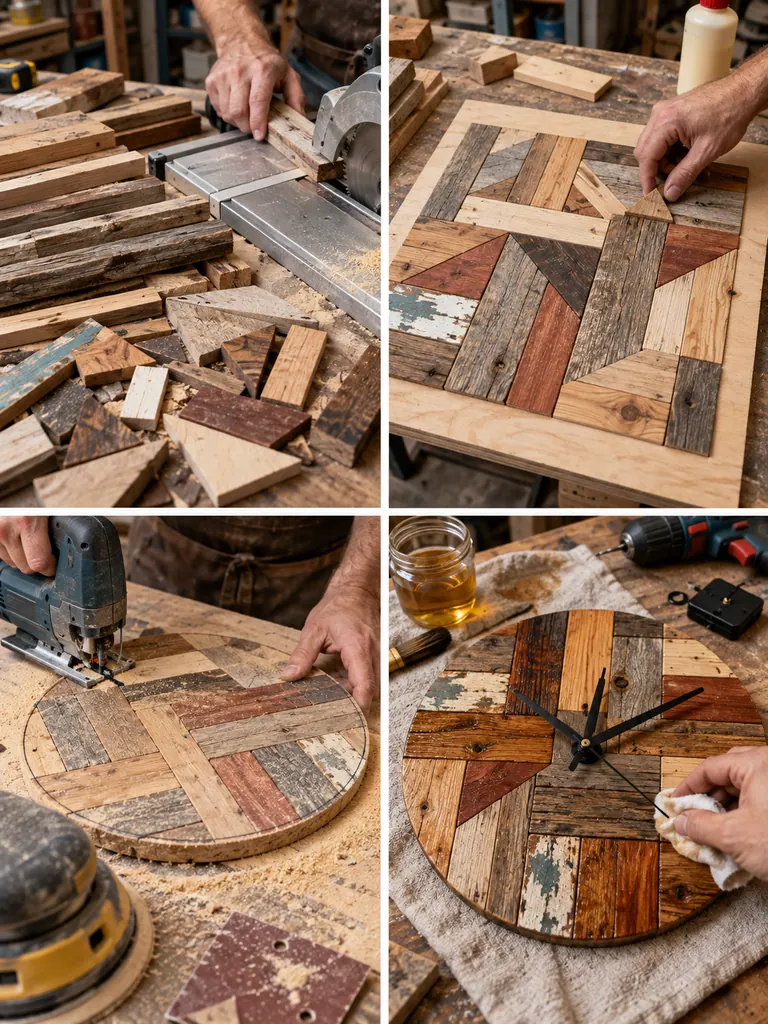
- Cut the scraps into strips and geometric pieces while preserving varied tones and grain.
- Arrange them tightly across the plywood backing and glue each piece in place.
- Trace a large circle over the cured panel and cut out the clock shape.
- Sand the face and edge smooth, then apply a clear natural finish.
- Drill the center, add small black hour lines and install the movement with bold black hands.
23. Pebble and Slate Garden-Inspired Clock
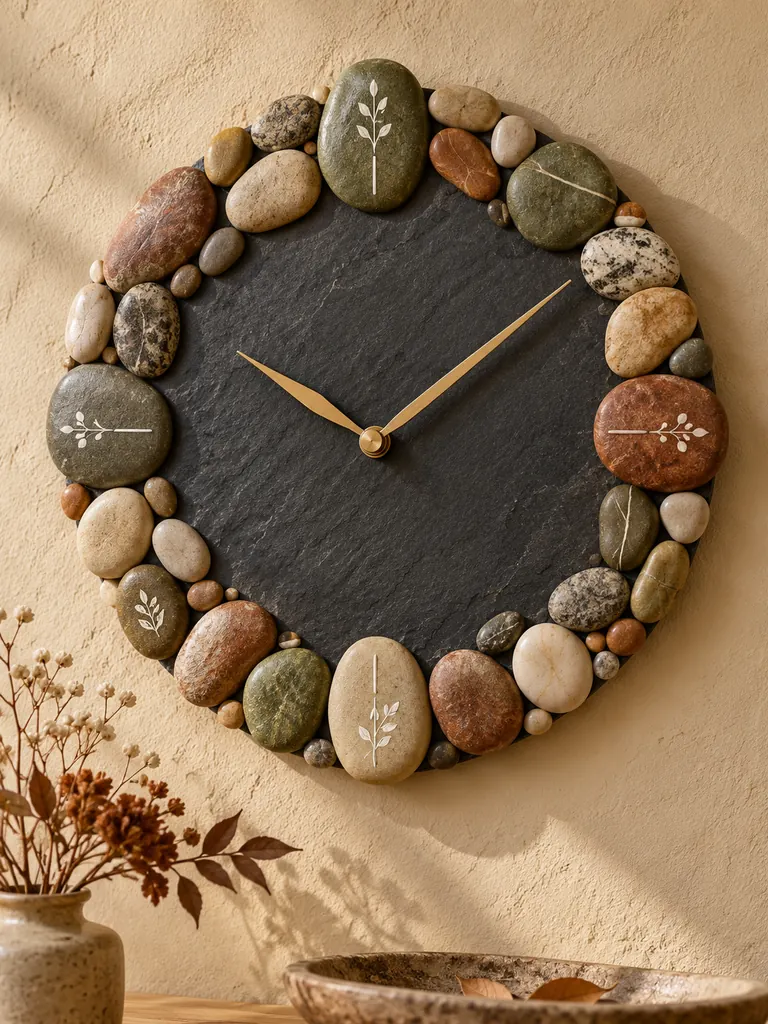
Smooth river stones and a dark slate-style center create an organic clock with a garden-inspired feel. Four larger feature stones provide orientation while smaller pebbles form a deliberately irregular border.
Materials Needed
- Round slate or slate-style base
- Smooth river pebbles in mixed natural colors
- Strong stone adhesive
- White paint and fine detail brush
- Clock movement, brushed-gold hands and sturdy hanging hardware
How to Make It
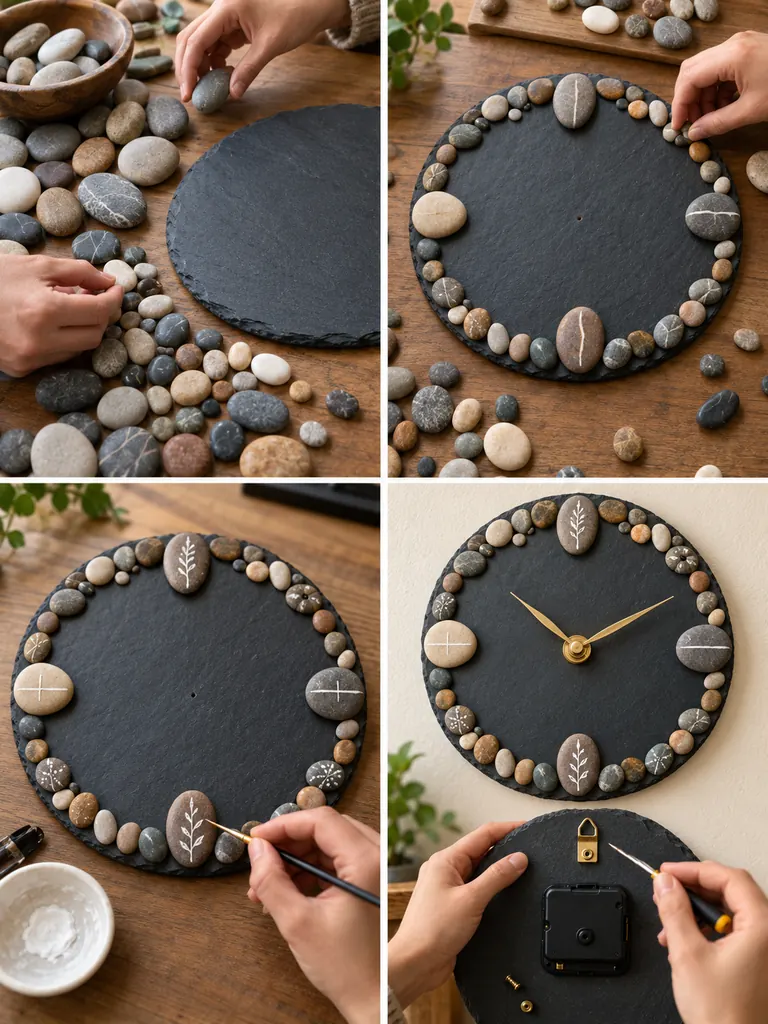
- Sort the stones by size and color, reserving four larger pebbles for the main hour points.
- Dry-arrange the border first so the overall weight and spacing feel balanced.
- Glue the stones securely and allow the adhesive to cure without moving the clock.
- Paint minimal white markers and a few simple botanical line details on selected feature stones.
- Install the gold movement and hands, then attach hanging hardware strong enough for the finished weight.
Tips for Making a DIY Wall Clock Look Professional
Accuracy matters most at the center. If the movement shaft is even slightly off-center, the hands can look awkward against the hour positions. Measure the diameter in more than one direction, mark the midpoint carefully and drill only after checking it twice. For round faces, a paper clock template is a simple way to position markers evenly.
Keep contrast in mind when choosing hands. Dark hands can disappear against walnut, charcoal paint or deep blue backgrounds, while brass hands can get lost against warm tan surfaces. Set the loose hands on the finished face before assembly and view them from several feet away. If they are hard to read, change the finish rather than adding unnecessary decoration.
Raised embellishments also need planning. Beads, shells, stones, mosaic tiles and thick painted details should stay outside the path of the hands. The hour and minute hands must remain parallel, and neither should scrape the clock face. After assembly, rotate the hands manually through a full twelve-hour cycle before inserting the battery.
Choosing the Right Clock Mechanism
Most handmade wall clocks use an inexpensive battery-powered quartz movement, but the important detail is shaft length. Measure the total thickness at the exact center of the face, including any backing layers. The threaded portion of the shaft must extend far enough through the front to accept the washer and nut while still leaving room for the hands.
Hand length matters too. A large clock needs hands long enough to read from across the room, but very heavy or oversized hands can strain a small movement. Silent-sweep mechanisms are especially useful in bedrooms, offices and reading spaces because they remove the repetitive ticking sound. Whatever style you choose, test the movement for several hours before hanging the finished clock.
How to Hang Handmade Clocks Safely
Match the wall fixing to the weight of the project. Light embroidery-hoop, cane and cork clocks may work with a simple picture hook, while concrete, pebble, mosaic and thick reclaimed-wood clocks can require a screw and wall anchor. If a visible leather strap, rope or textile element is part of the hanging design, make sure it is mechanically secured and not held only with craft glue.
Check the back of the clock before hanging it. The movement should sit flat, wires or cords should be clear of the battery compartment, and no decorative component should push the clock away from the wall unevenly. For a heavy piece, adding a separate D-ring or keyhole plate to the structural backing is safer than depending on the movement case.
Frequently Asked Questions About DIY Clock Ideas
What is the easiest material for a beginner DIY clock?
A pre-cut plywood circle is one of the easiest starting points because it is rigid, lightweight and simple to drill. It can be painted, decoupaged, covered with fabric or decorated with lightweight materials without needing advanced woodworking tools.
Can I make a clock without using numbers?
Yes. Dots, short lines, beads, stitched symbols, wood pegs or only four main markers can all work. The important thing is that the hour positions are evenly spaced and the hands have enough contrast to be read quickly.
How do I find the exact center of a round clock face?
Measure the diameter in several directions and mark the halfway point of each line. The intersection is the center. For greater accuracy, use a compass or a printable circle template and verify the mark from at least two directions before drilling.
How can I keep a handmade clock from becoming too heavy?
Use thin plywood, cork, fabric, cane or air-dry clay, and reserve heavier materials for a border or a few accents. When using stones, tiles or thick wood, choose a strong backing and plan the wall hardware at the same time as the design.
Final Thoughts
The most memorable DIY Clock Ideas are not necessarily the most complicated. A successful handmade clock combines a reliable movement, readable hands and a material treatment that suits the room. Pressed flowers can make resin feel delicate, reclaimed wood can add warmth, and simple cane or fabric can create texture without adding much weight.
Use these 23 projects as starting points rather than strict templates. Change the colors, scale, markers or decorative details to fit your own space, and take time with the measurements and finishing. Those small practical decisions are what turn an ordinary craft project into a wall clock that feels personal, useful and worth displaying.
