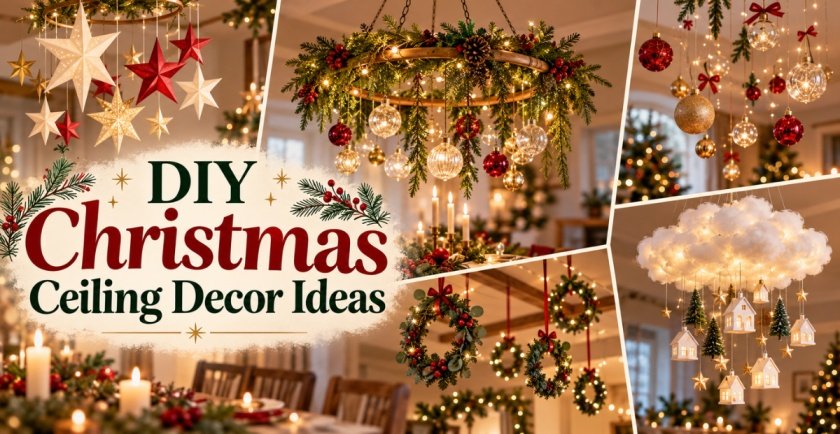
When December rolls around, most of us start decorating the Christmas tree, hanging wreaths on doors, and finding the perfect spot for stockings. But there’s one area of the house that rarely gets much attention: the ceiling.
A few handmade decorations overhead can completely change the atmosphere of a room. Imagine sitting beneath a constellation of golden paper stars, gathering around a dining table decorated with a suspended evergreen wreath, or walking into a room filled with floating Christmas ornaments.
The best part? You don’t need an expensive collection of decorations to make it happen.
These 23 DIY Christmas ceiling decor ideas use everything from cardstock and leftover ribbon to yarn, fabric scraps, pinecones, and simple wooden hoops. Some are small enough to make in an afternoon, while others create dramatic overhead displays that become the centerpiece of your holiday decorating.
I’ve included practical instructions for each project, along with suggestions for choosing colors, arranging the decorations, and making them work in different rooms.
Whether you love traditional red-and-green Christmas decorations, cozy farmhouse details, or a more modern holiday look, there’s something here worth making.
Before You Start: A Few Supplies and Hanging Tips
You don’t need to buy everything on this list. Many projects use supplies you may already have in a craft drawer or leftover Christmas decoration box.
Useful materials to keep nearby:
- Colored cardstock, tissue paper, and decorative paper
- Scissors, a ruler, pencils, and craft glue
- Cotton twine, ribbon, and transparent monofilament
- Embroidery hoops, lightweight dowels, and wooden beads
- Felt, yarn, fabric scraps, and faux greenery
- Battery-operated LED fairy lights
- Suitable ceiling hooks or mounting hardware
One important thing to plan before crafting is how everything will hang.
Choose mounting hardware specifically rated for your ceiling surface and the decoration’s total weight. Follow the manufacturer’s instructions, and don’t assume ordinary tape or a wall hook will safely hold something overhead. Keep decorations away from ceiling fans, lights, heating vents, smoke detectors, and sprinkler heads.
Lightweight materials are especially helpful for suspended decorations. Anything with small parts or hanging strings should also remain out of children’s and pets’ reach.
With those basics covered, let’s get into the fun part.
Paper and Lightweight Christmas Ceiling Decorations
Paper is one of the easiest materials to work with because it’s inexpensive, available in almost every color, and light enough for many overhead displays.
These first five projects are particularly good for anyone who enjoys simple cutting, folding, and assembling.
1. Floating 3D Christmas Star Constellation
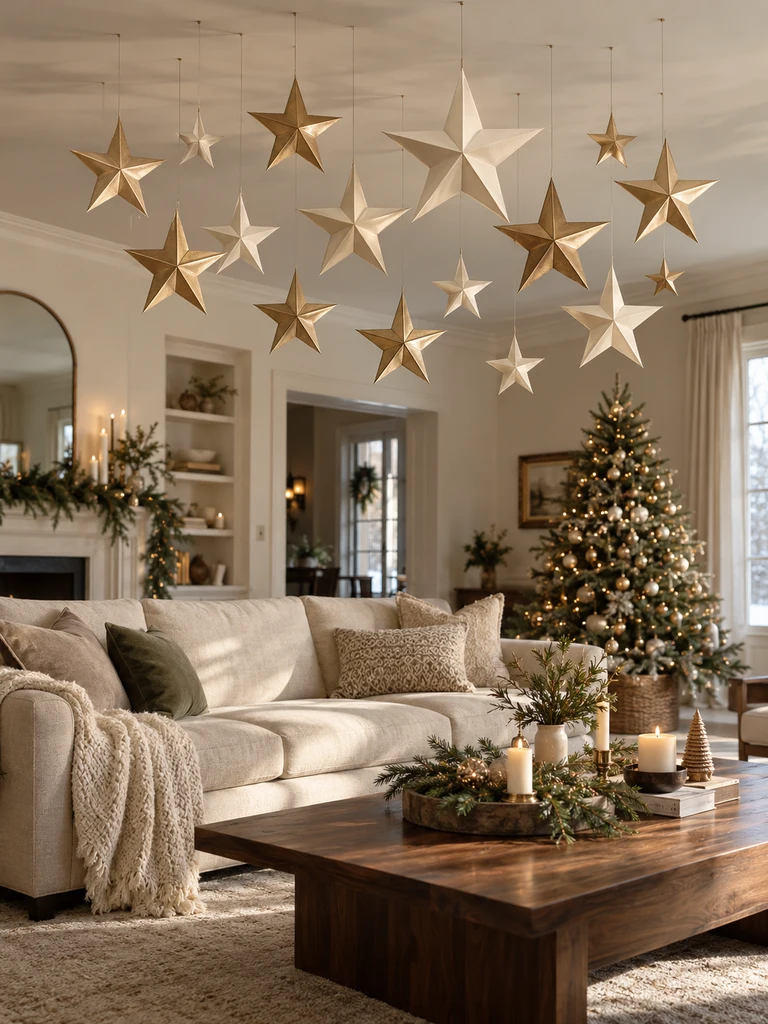
There’s something beautiful about a room filled with stars, especially when they aren’t all the same size or hanging in perfectly straight rows.
This project uses folded cardstock stars to create a delicate constellation overhead. The different sizes give the arrangement depth, while metallic paper catches the surrounding light without needing a single bulb attached.
Materials you’ll need:
- Ivory, champagne, and gold cardstock
- Star templates in three sizes
- Scissors, ruler, and bone folder
- Paper glue
- Transparent hanging thread
- Suitable ceiling mounting hardware
How to make it:
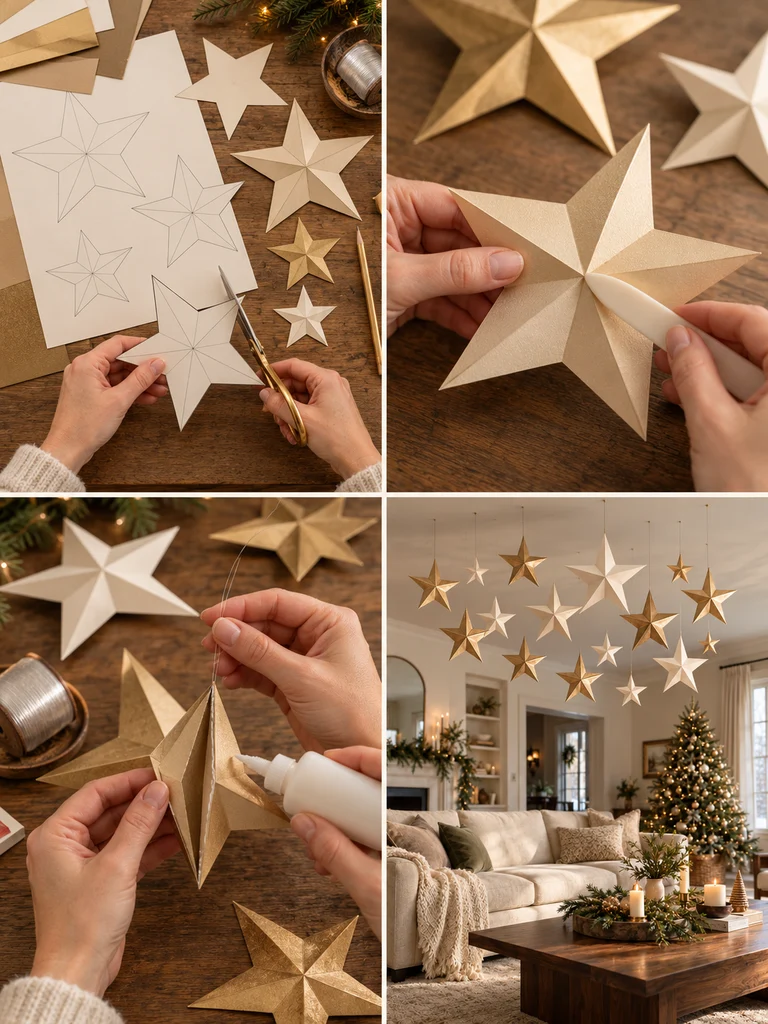
- Draw or print star templates measuring approximately 4, 6, and 8 inches across. Cut several stars from each cardstock color.
- For each dimensional star, use a matching front and back piece. Score the lines from the center toward the points, then fold alternating ridges and valleys to create a raised shape.
- Glue the matching pieces together around the edges, leaving a little room for the folds to hold their shape.
- Make roughly 12–18 stars, combining different sizes and colors.
- Attach transparent thread to the top point of each star and hang them at varied heights from suitable ceiling mounting points.
Styling idea: Keep the largest stars toward the center and smaller ones around the edges. This creates the impression of a natural constellation rather than a flat collection of ornaments.
2. Oversized Honeycomb Ornament Cloud
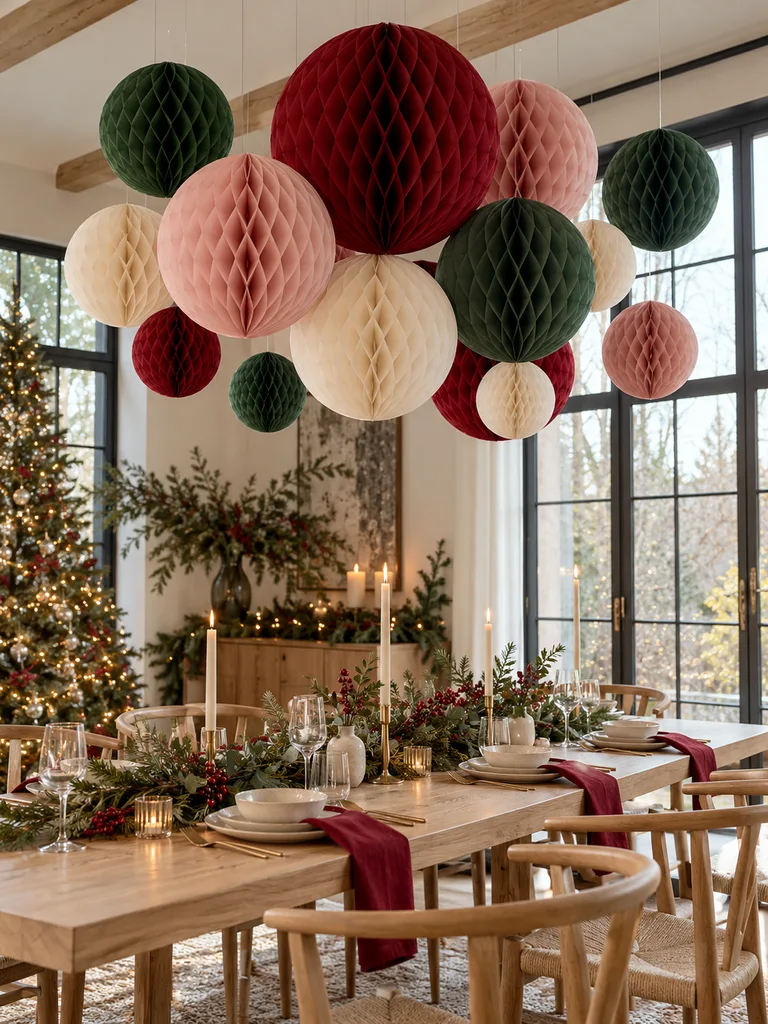
If you love Christmas decorations with a playful, colorful personality, honeycomb ornaments are a wonderful option.
Rather than hanging ordinary baubles, you can create oversized paper spheres that resemble giant Christmas ornaments. Their folded texture adds dimension, and the whole display looks especially good above a holiday dessert table.
Materials you’ll need:
- Tissue paper in four complementary colors
- Cardstock for circular templates
- Glue stick or paper-safe adhesive
- Scissors
- Ribbon or thin cord
- Lightweight ceiling mounting hardware
How to make it:
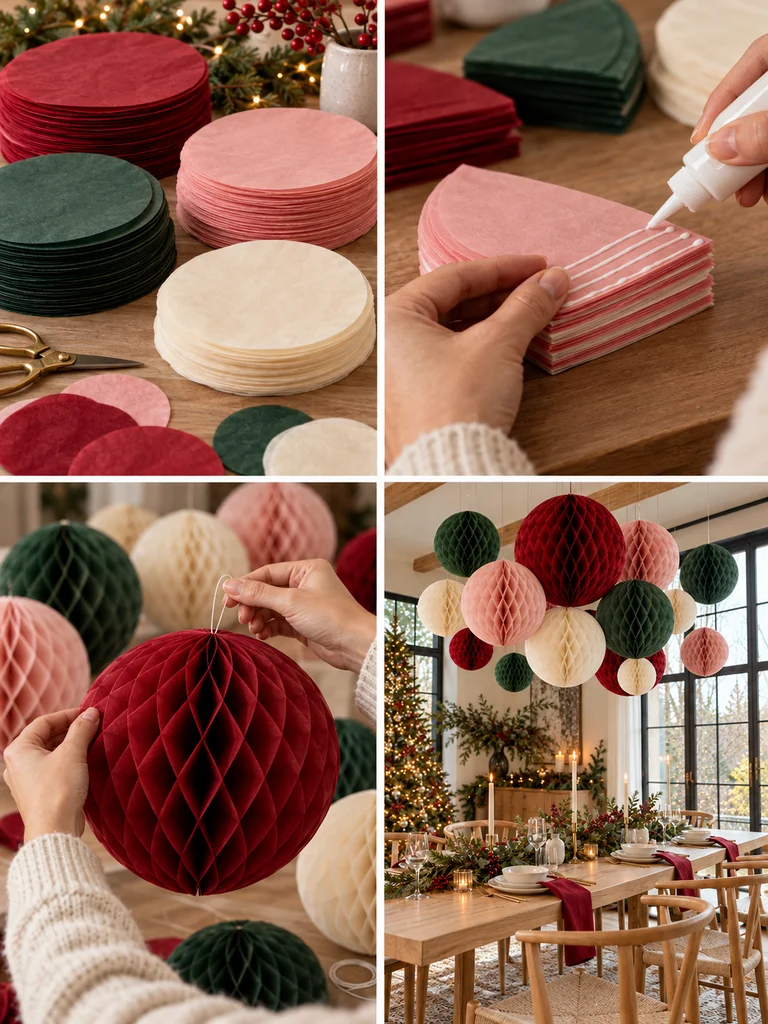
- Cut stacks of tissue paper into matching circles. Use around 25–40 tissue layers for each full honeycomb ball, depending on paper thickness and desired fullness.
- Fold a sample circle in half to mark guide positions. Apply narrow glue lines to alternating positions between successive sheets.
- Continue stacking and gluing until you have a complete layered stack.
- Attach sturdy cardstock semicircles to the outside, then carefully open the honeycomb structure into a sphere.
- Secure the ends, add a hanging loop, and repeat with other sizes and colors.
- Suspend the ornaments in a loose cloud formation, placing the largest spheres near the center.
Styling idea: Use matte colors instead of glitter on every ornament. Honeycomb paper already has plenty of visual texture, so a restrained palette usually creates a more polished result.
3. Hanging Origami Christmas Tree Forest
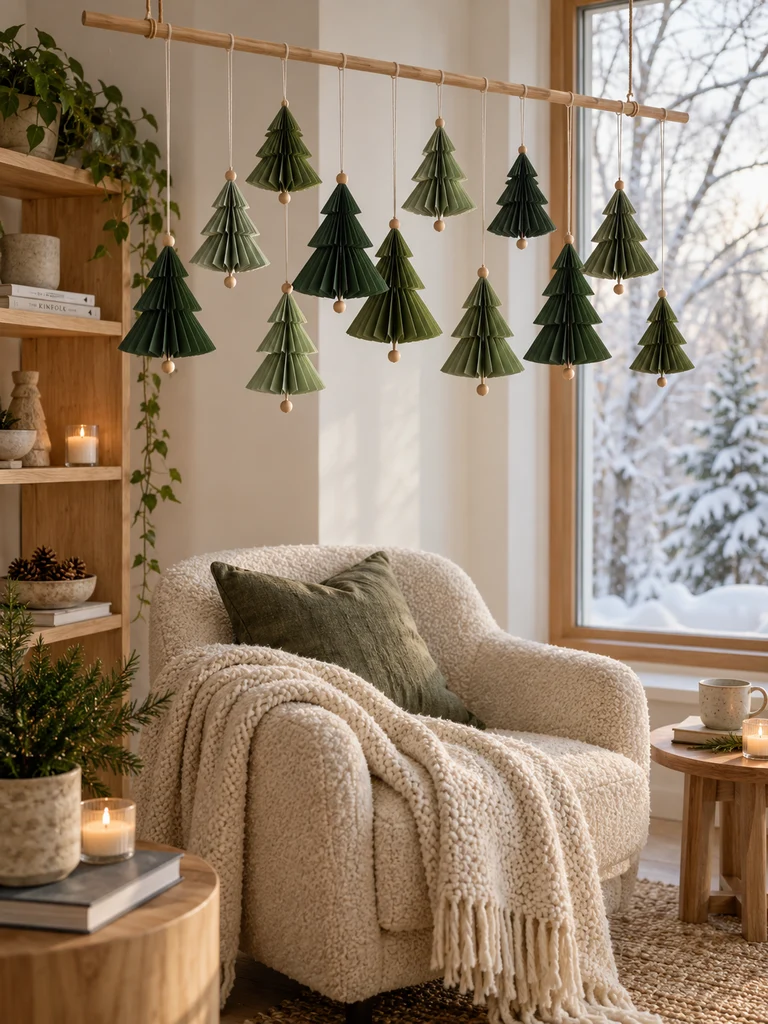
Not every Christmas ceiling decoration needs to sparkle.
A small forest of folded paper trees can look wonderfully calm and understated, particularly in a room with natural wood furniture, neutral walls, and soft lighting.
The secret is making several trees that share the same general shape but vary slightly in height.
Materials you’ll need:
- Green origami paper or lightweight cardstock
- Wooden dowel
- Cotton cord
- Wooden beads
- Scissors
- Craft glue
How to make it:
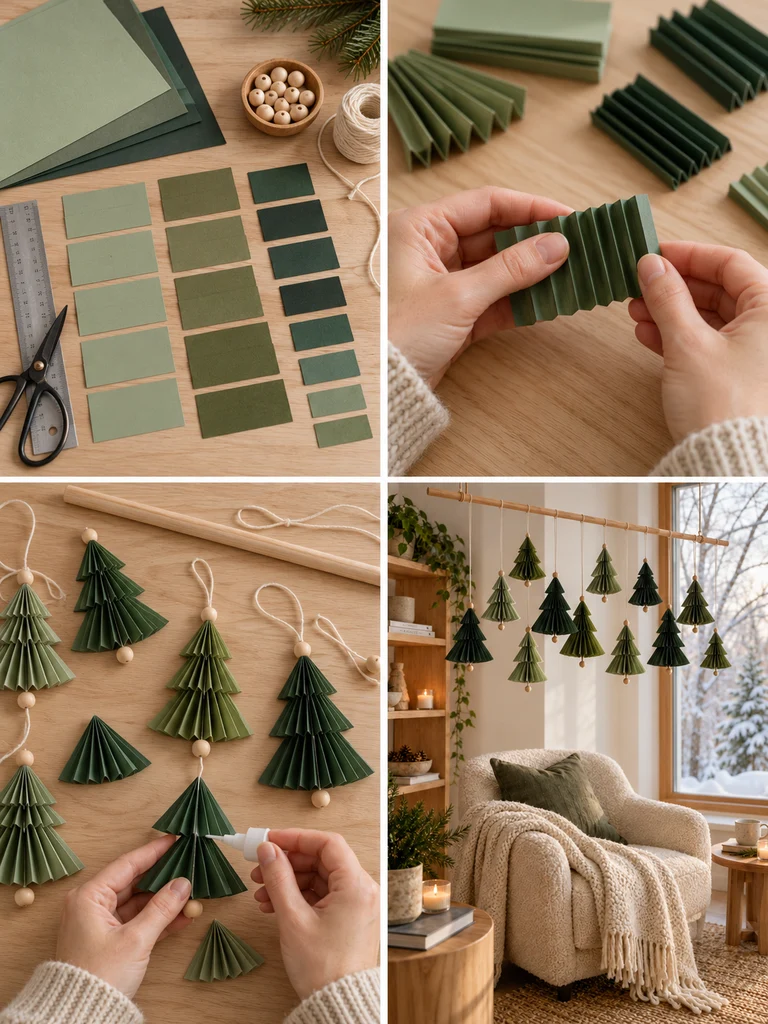
- Cut paper into rectangles of different sizes. Accordion-fold each rectangle into even pleats.
- Fold the pleated shape in half and secure the inner edges to create a triangular fan resembling a Christmas tree.
- Make additional folded sections if you want fuller, layered trees.
- Attach a small bead or narrow paper trunk at the bottom of each tree.
- Fasten hanging thread through the upper fold and prepare 10–15 trees.
- Tie the threads to a lightweight wooden dowel, alternating the trees’ heights and green shades.
Styling idea: Leave a little open space between the trees. The empty space helps their individual silhouettes stand out and makes the display feel light rather than crowded.
4. Miniature Gingerbread Village Ceiling Mobile
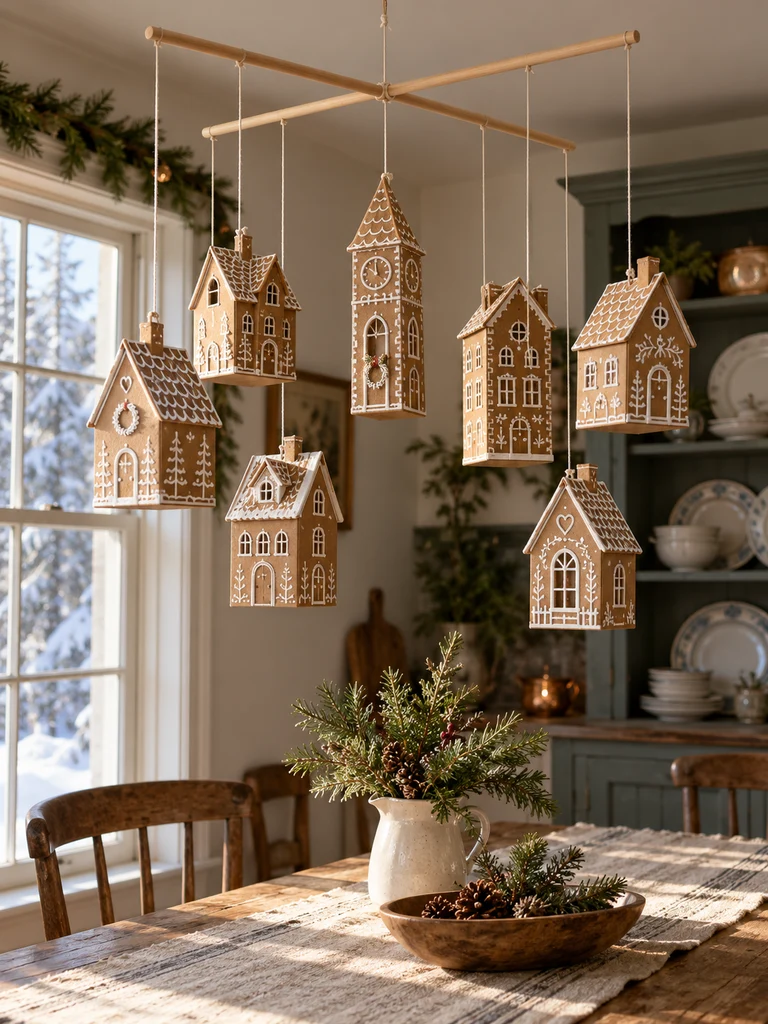
Gingerbread houses are usually displayed on tables, but miniature versions can look equally charming suspended overhead.
For this version, the houses are made from cardstock rather than real gingerbread. That keeps them lightweight, reusable, and much easier to hang.
Each house can have its own personality, from tiny cottage windows to striped rooftops and decorative doorways.
Materials you’ll need:
- Brown kraft cardstock
- White paint pens
- Ruler and scissors
- Craft glue
- Miniature paper house templates
- Cotton twine
- Two lightweight wooden dowels
How to make it:
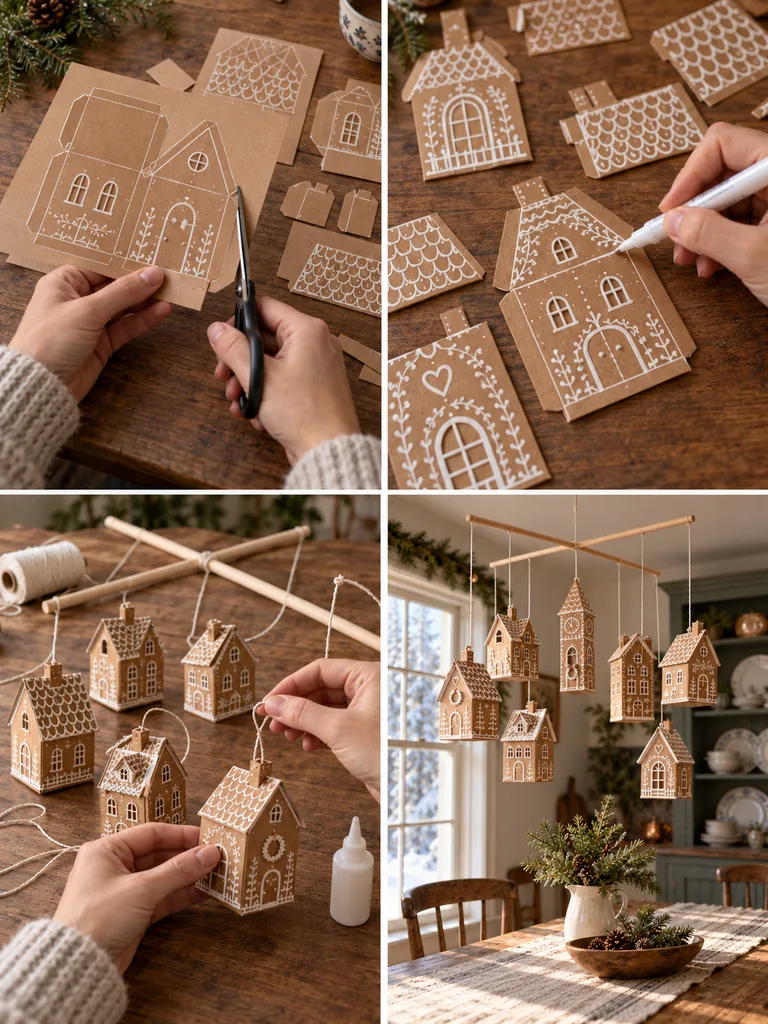
- Draw small house templates with four walls, a roof, and narrow glue tabs. Keep the finished houses approximately 3–5 inches tall.
- Cut the templates and score the fold lines before assembling anything.
- Use a white paint pen to draw icing-style roof tiles, windows, door frames, and decorative dots.
- Fold and glue the houses together, keeping their interiors empty.
- Attach a hanging loop through a reinforced point near each roof peak.
- Cross the wooden dowels to create a mobile frame, then suspend the houses at different heights.
Styling idea: Mix simple cottages with a few taller houses. A small white paper church or clock tower could become the focal point without requiring a complicated structure.
5. Giant Peppermint Candy Ceiling Swirls
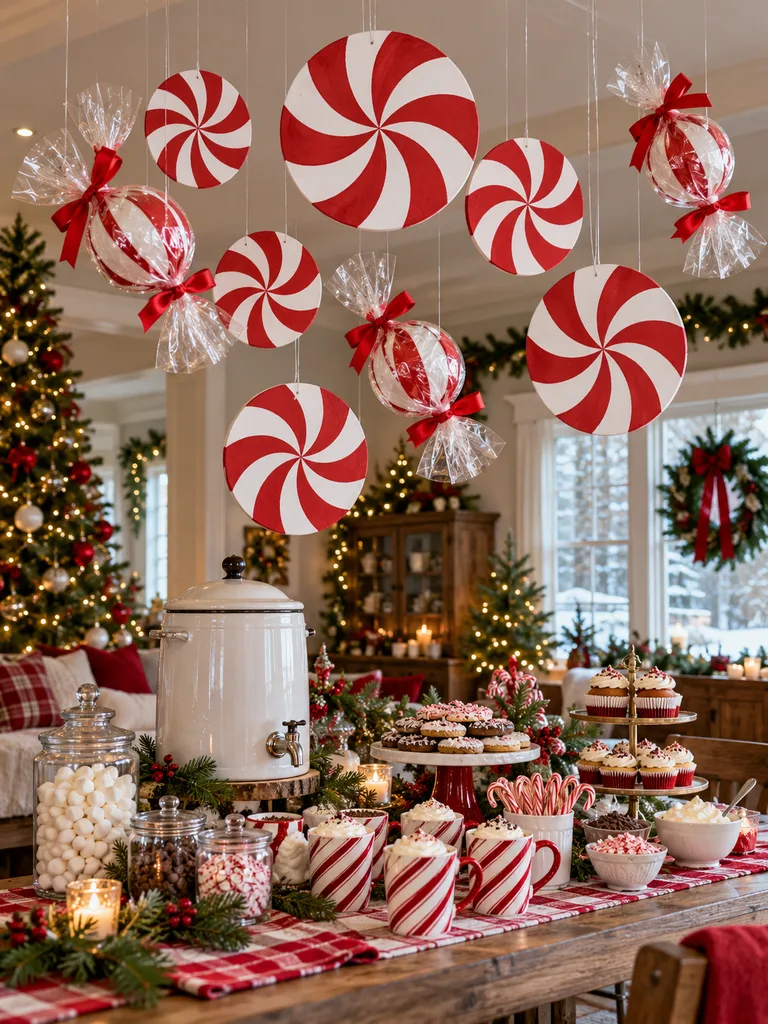
This project is perfect for anyone who loves cheerful, candy-inspired Christmas decorating.
Oversized peppermint shapes bring instant color to an otherwise ordinary ceiling. They look particularly fun above a hot chocolate bar, dessert display, or Christmas party table.
Materials you’ll need:
- Lightweight foam board
- Red and white craft paint
- Circular templates
- Craft knife and cutting mat
- Clear cellophane
- Red satin ribbon
- Hanging cord
How to make it:
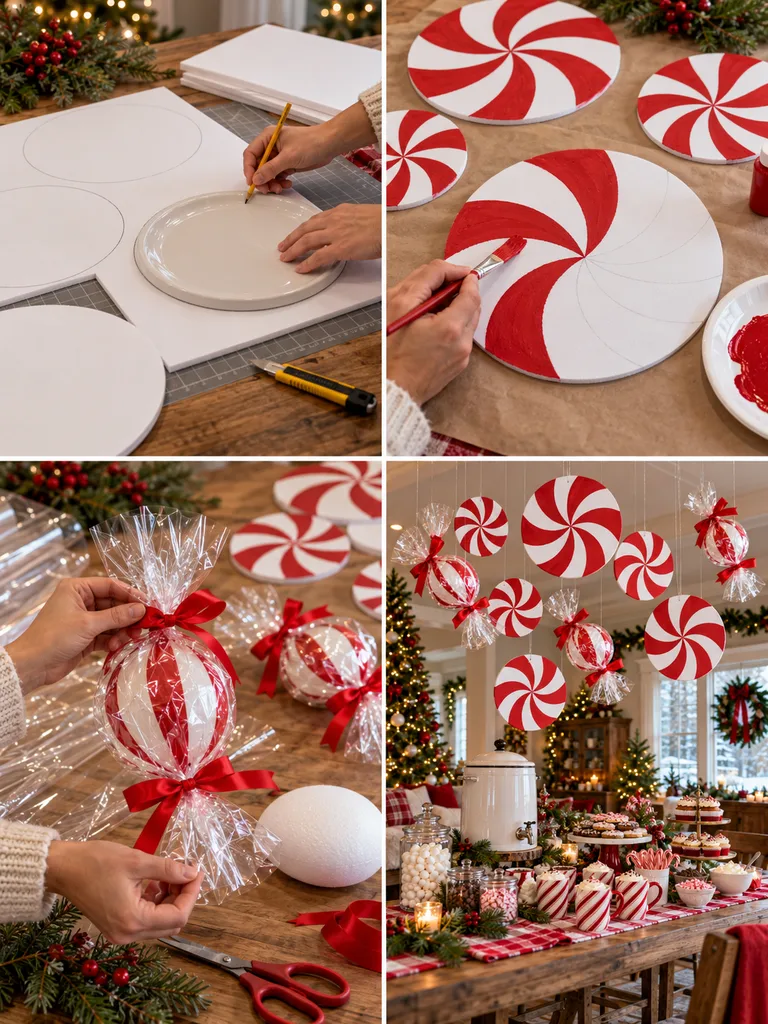
- Trace circles approximately 8–12 inches wide onto foam board and carefully cut them out. Adults should handle the craft knife.
- Paint the discs white and allow them to dry completely.
- Draw curved peppermint stripes radiating from each center, then paint alternating sections bright red.
- For variety, make a few lightweight wrapped candies using small foam spheres enclosed in clear cellophane.
- Tie red ribbon around the ends of the cellophane and attach secure hanging loops.
- Arrange the peppermint discs and wrapped candies overhead, with a few hanging lower than the rest.
Styling idea: Pair this display with a red-and-white table runner and a few matching paper decorations. You don’t need to cover the entire room in candy-themed pieces to create the effect.
Nature-Inspired and Rustic Christmas Ceiling Designs
Natural textures bring warmth to Christmas decorating. Pine, wood, dried citrus, linen, and muted greenery work beautifully together, especially in farmhouse and cottage-style interiors.
The next five projects focus on those earthy, handcrafted details.
6. Rustic Evergreen Hoop Chandelier
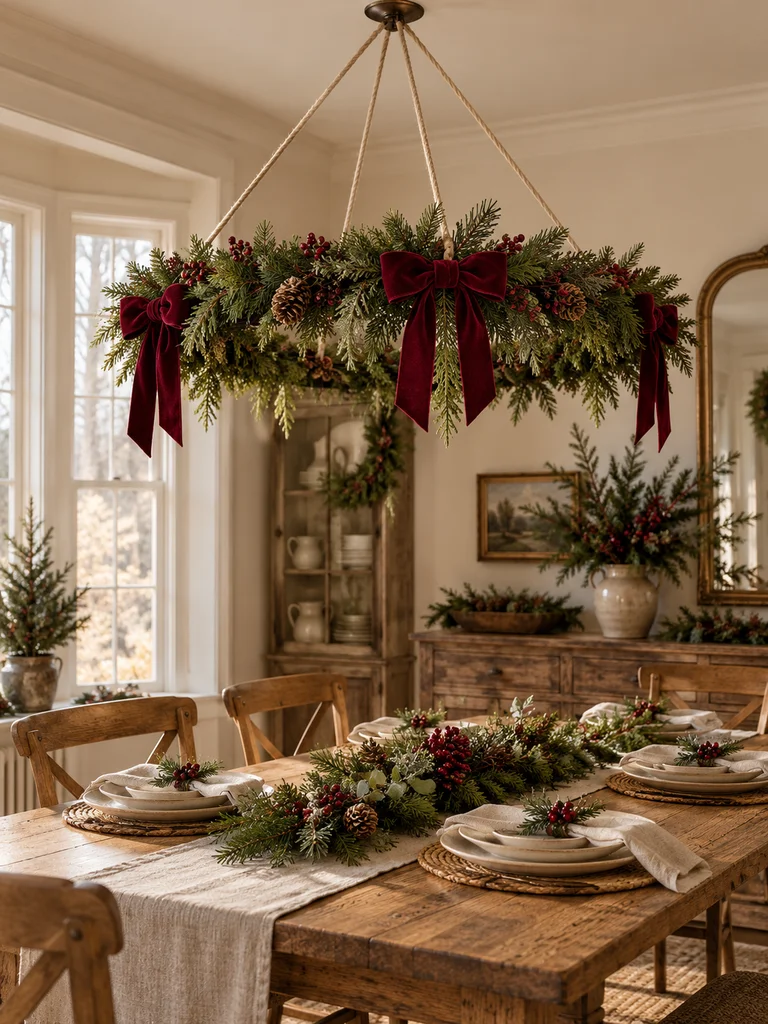
A Christmas wreath doesn’t have to hang vertically on a door.
Turn a lightweight hoop into an overhead chandelier, and you have an entirely different decoration. It brings greenery closer to the dining table without using valuable tabletop space.
Materials you’ll need:
- Lightweight embroidery hoop, approximately 12–16 inches
- Artificial pine and cedar sprigs
- Miniature lightweight pinecones
- Faux berry stems
- Floral wire
- Burgundy velvet ribbon
- Three or four equal-length hanging cords
How to make it:
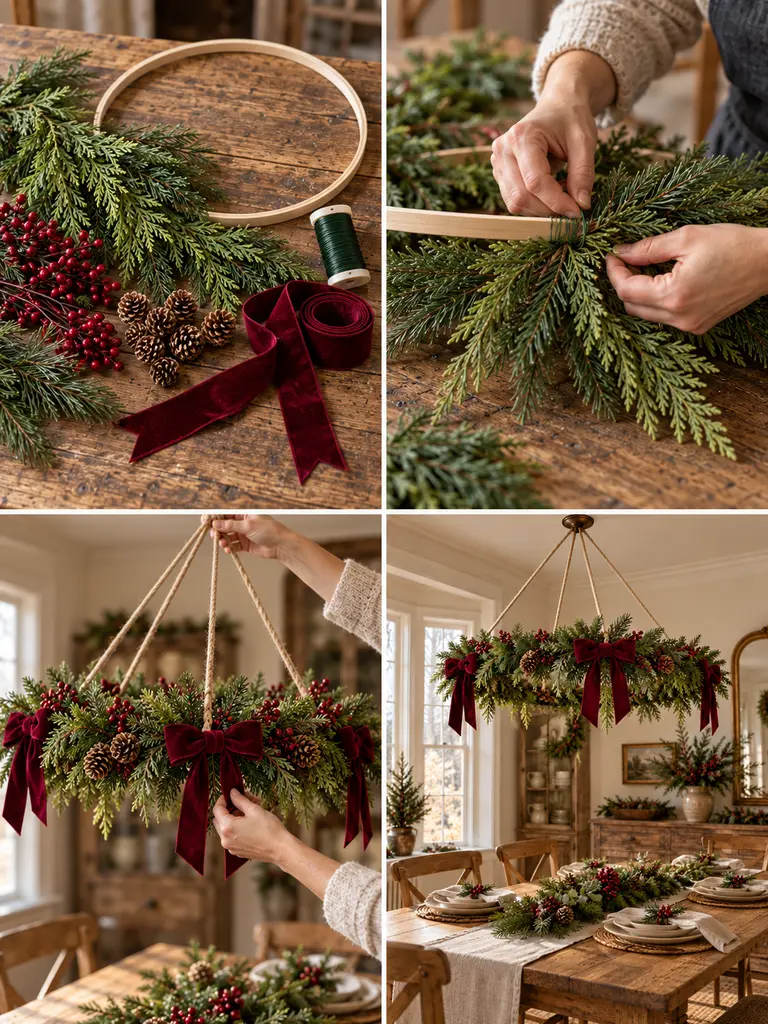
- Wrap artificial greenery around the hoop, securing the stems with floral wire. Aim for a full appearance without adding unnecessary weight.
- Distribute small pinecones and berry clusters around the circle.
- Make three or four burgundy velvet bows and attach them at evenly spaced points.
- Tie equal-length support cords to the hoop so it hangs horizontally.
- Gather the cords above the center, test the balance, and attach the chandelier to properly rated overhead mounting hardware.
Styling idea: A few long ribbon tails hanging from the hoop create a lovely sense of movement. Keep the chandelier completely separate from the room’s light fixture rather than fastening it to the fixture.
7. Dried Orange and Cinnamon Ceiling Garland
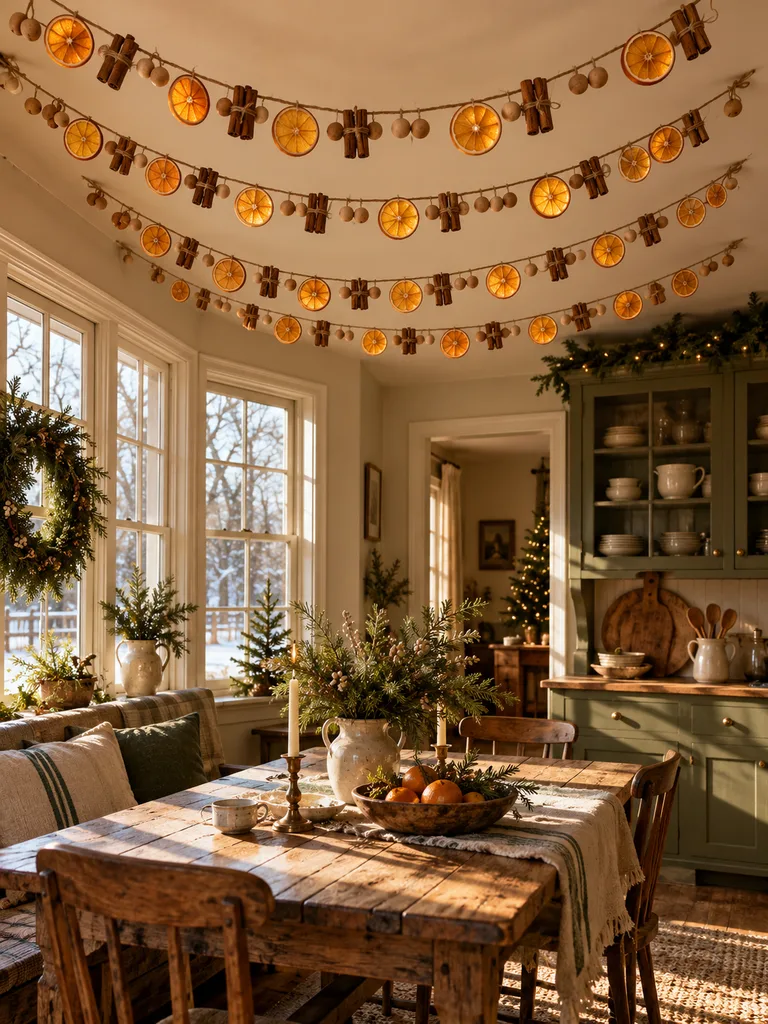
Sometimes the simplest decorations are the ones that make a room feel most inviting.
Dried orange slices have a rich amber color that looks particularly beautiful against greenery and natural wood. Combine them with cinnamon sticks and wooden beads for an old-fashioned Christmas display.
Materials you’ll need:
- Completely dried orange slices
- Cinnamon sticks
- Natural wooden beads
- Jute twine
- Large embroidery needle or suitable threading tool
- Lightweight mounting hardware
How to make it:
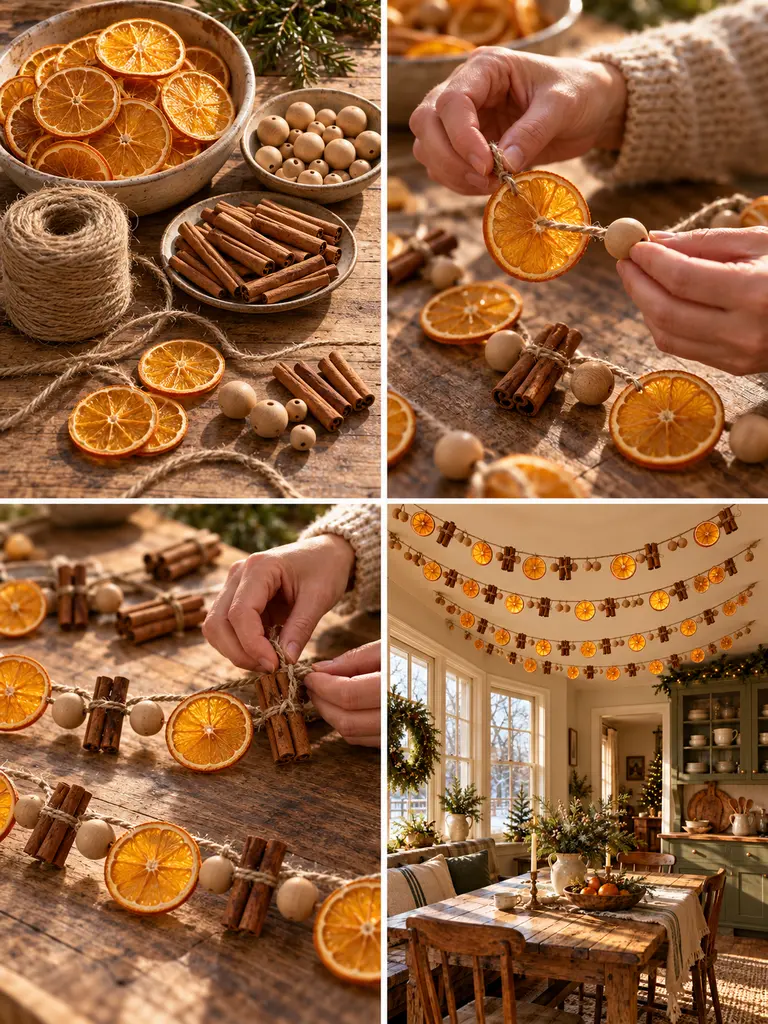
- Buy fully dried orange slices or prepare your own using a food dehydrator according to its instructions. Make sure every slice is dry before hanging.
- Cut several lengths of jute twine to fit the planned overhead arrangement.
- Thread twine through dried orange slices, alternating them with wooden beads.
- Tie cinnamon sticks together in small bundles and attach them between selected orange slices.
- Repeat until you have several decorated strands.
- Secure the garlands across the ceiling with a slight, graceful curve rather than pulling them completely straight.
Styling idea: This combination works especially well in a kitchen or breakfast nook with neutral colors. Avoid placing the garlands near steam, heat, or high humidity, which can damage the dried fruit.
8. Enchanted Woodland Branch Installation
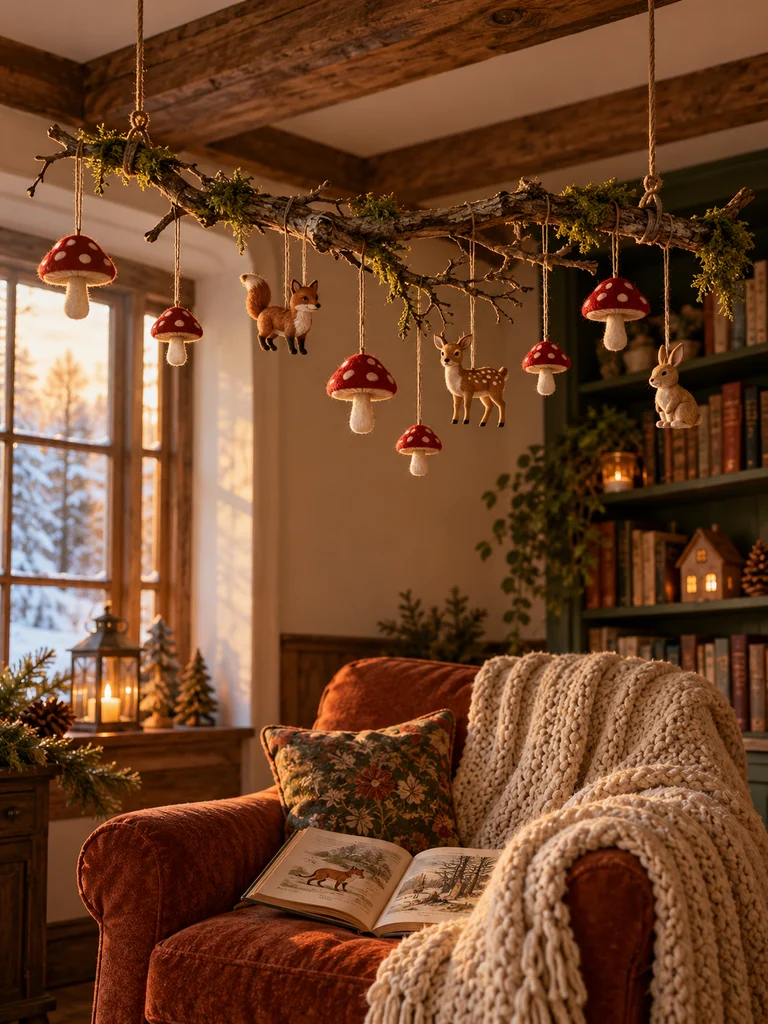
This one is a little different from traditional Christmas decorations.
Instead of ornaments and glitter, imagine a miniature forest suspended above a cozy corner of your home. Tiny mushrooms, woodland animals, and touches of greenery give it a storybook appearance.
Materials you’ll need:
- Lightweight artificial branch
- Red, white, and brown felt
- Small wooden animal ornaments
- Faux moss
- Embroidery thread
- Craft glue
- Secure hanging cords
How to make it:
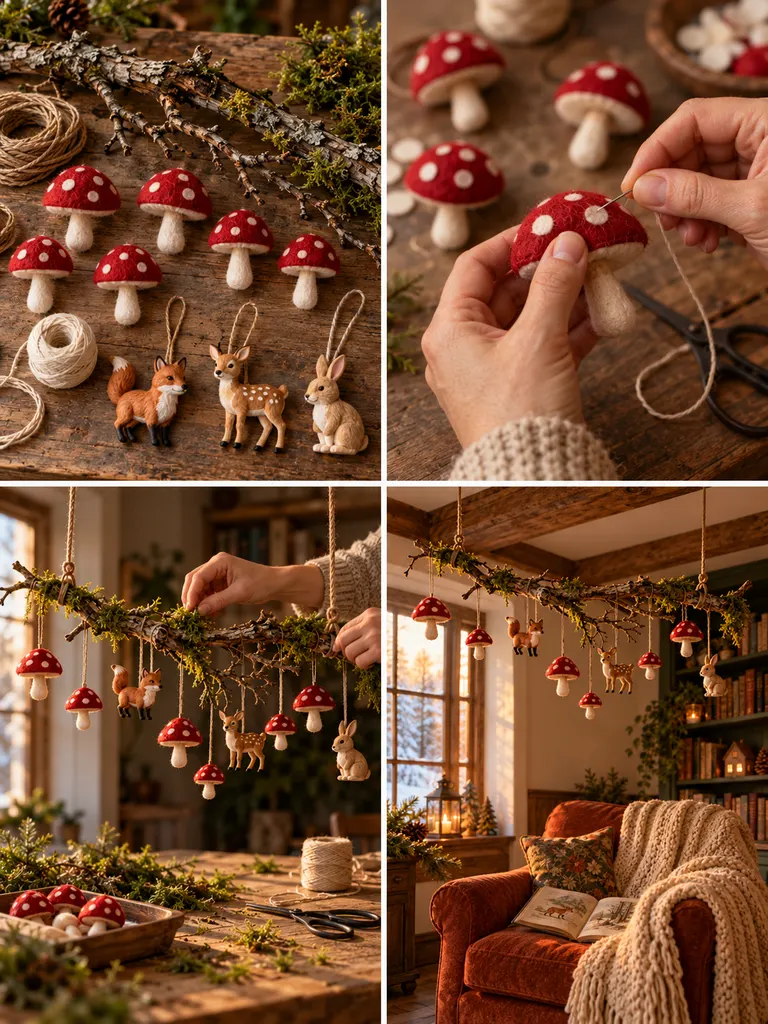
- Select a lightweight artificial branch with several smaller offshoots. Avoid heavy natural branches that would require substantial structural mounting.
- Cut mushroom caps and stems from felt. Stitch or glue the pieces into small three-dimensional mushroom ornaments.
- Add white felt dots to the red mushroom caps for a woodland toadstool appearance.
- Attach small pieces of faux moss along selected parts of the branch.
- Hang miniature animals and mushrooms from the smaller offshoots using short pieces of thread.
- Suspend the branch securely from multiple support points, adjusting the cords until it hangs level.
Styling idea: Keep the woodland animals small. A few carefully placed foxes, deer, or rabbits will have more charm than covering every inch of the branch.
9. Scandinavian Straw Himmeli Ceiling Mobiles
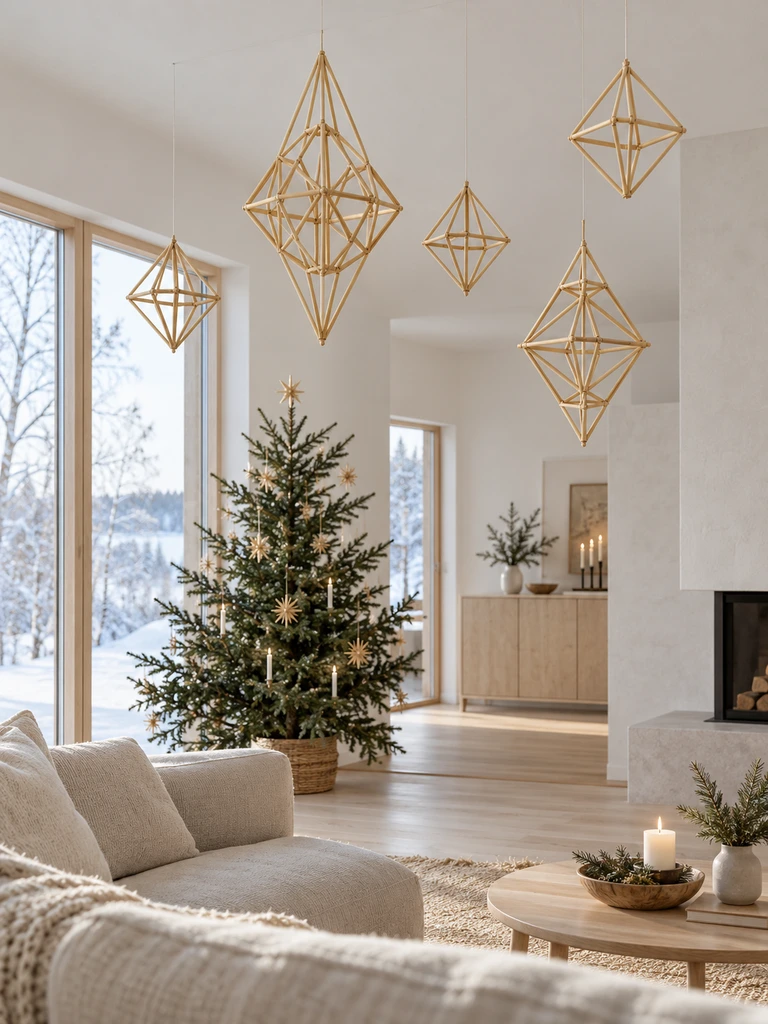
If your Christmas decorating style leans modern and minimal, this is a lovely alternative to conventional ornaments.
Himmeli decorations are geometric mobiles traditionally associated with Finnish craft. Their clean lines look beautiful in natural straw or lightweight paper tubes.
Materials you’ll need:
- Natural straw or lightweight paper straws
- Cotton thread
- Needle suitable for threading straws
- Ruler
- Scissors
- Optional wooden beads
How to make it:
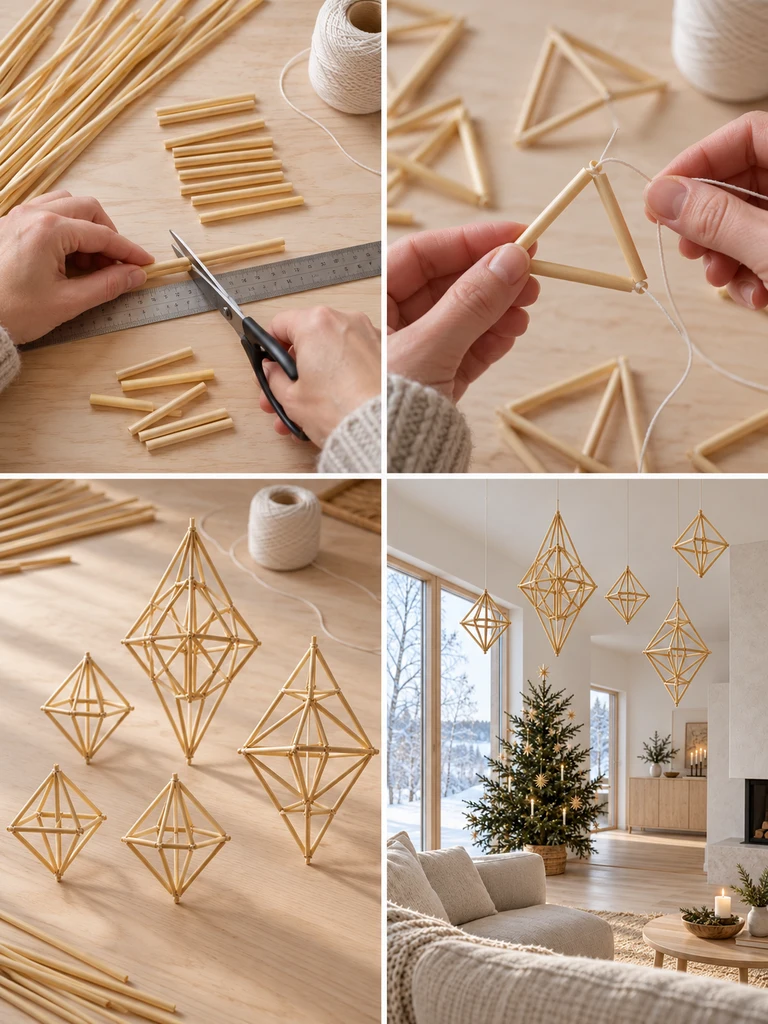
- Cut 12 straw segments to equal lengths for a simple octahedron-shaped mobile.
- Thread the first three segments into a triangle and secure the thread.
- Add more segments to create the connected triangular faces, following a basic octahedron pattern.
- Tighten the connections gently so the finished structure holds its geometric shape.
- Repeat using shorter and longer straw segments to create mobiles in different sizes.
- Attach a hanging thread to the upper point and arrange the pieces at staggered heights.
Styling idea: Three to five carefully spaced mobiles can be enough. Pair them with soft greenery or natural linen decorations for a quiet, Nordic-inspired Christmas look.
10. Mini Christmas Wreath Ceiling Gallery
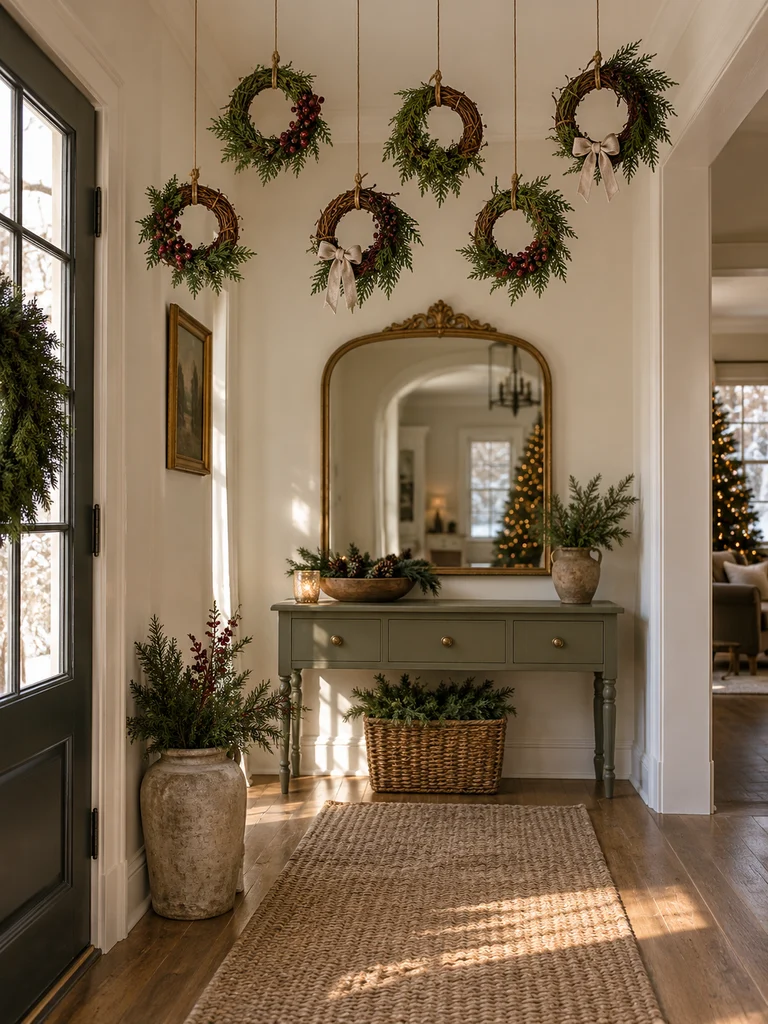
One large wreath can make a statement, but a collection of miniature wreaths creates an entirely different effect.
This project works particularly well in an entryway because guests notice the decoration as soon as they walk inside.
Materials you’ll need:
- Small lightweight wreath bases, approximately 4–6 inches wide
- Artificial cedar and pine sprigs
- Faux berries
- Narrow linen ribbon
- Floral wire
- Cotton hanging cord
How to make it:
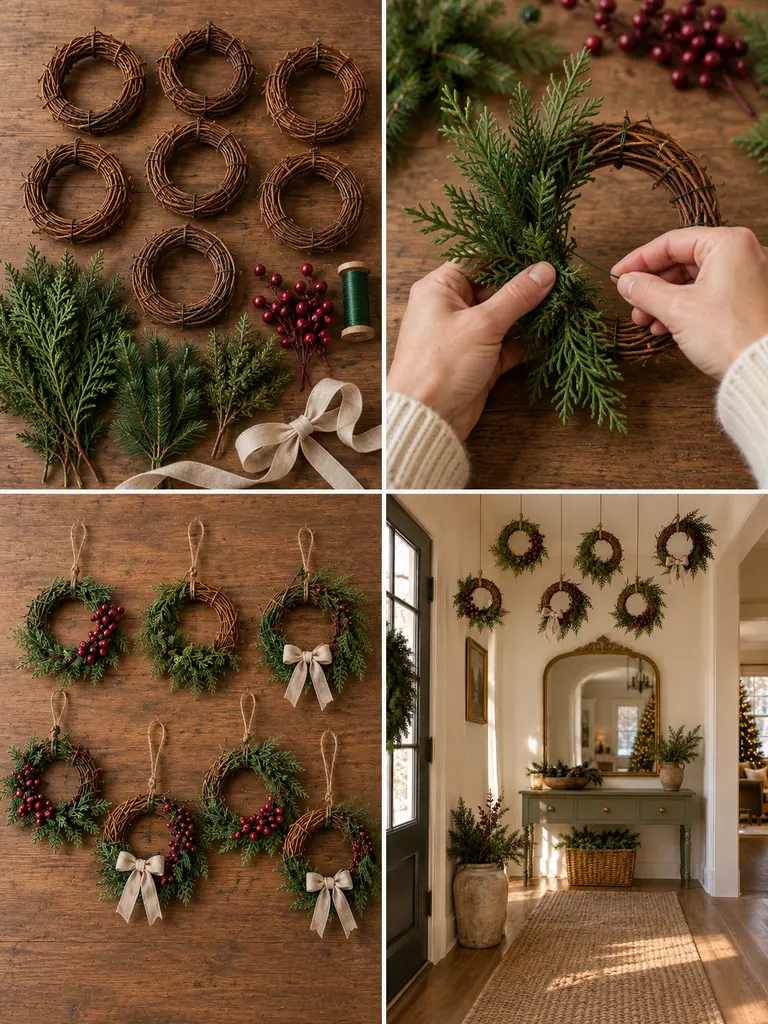
- Lay out the wreath bases and decide how many you want to use. Five to seven is a manageable starting point.
- Attach short pieces of faux cedar and pine around each base.
- Give each wreath a slightly different arrangement: berries on one, a bow on another, or extra greenery on a third.
- Tie a small linen ribbon bow near the bottom or side of selected wreaths.
- Attach secure hanging loops and suspend the wreaths in an organized overhead arrangement.
Styling idea: Keep the hanging lengths consistent for a formal gallery or alternate two heights for a more relaxed look. Either approach works best when the wreaths share a common color palette.
Cozy Fabric, Yarn, and Ribbon Christmas Decorations
Fabric decorations soften a room in a way that shiny ornaments sometimes can’t.
Velvet, felt, plaid, macramé, and fluffy yarn all bring a handmade quality to Christmas decorating. They’re particularly appealing in bedrooms, family rooms, and cozy holiday spaces.
11. Cascading Burgundy Velvet Bow Canopy
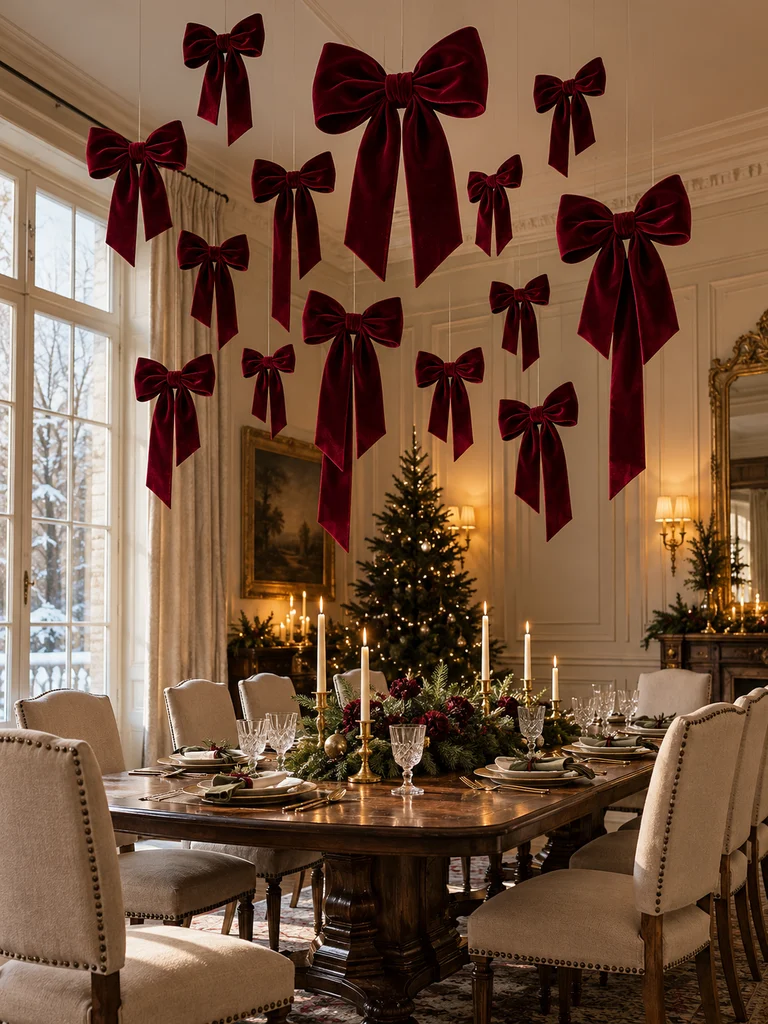
Bows have become a favorite detail in festive decorating, and they’re especially striking when used in unexpected places.
Instead of tying them onto a Christmas tree, make a collection of large velvet bows and suspend them overhead.
Materials you’ll need:
- Wide burgundy velvet ribbon
- Narrow matching ribbon
- Scissors
- Needle and matching thread
- Lightweight hanging line
- Optional small hoop for the central arrangement
How to make it:
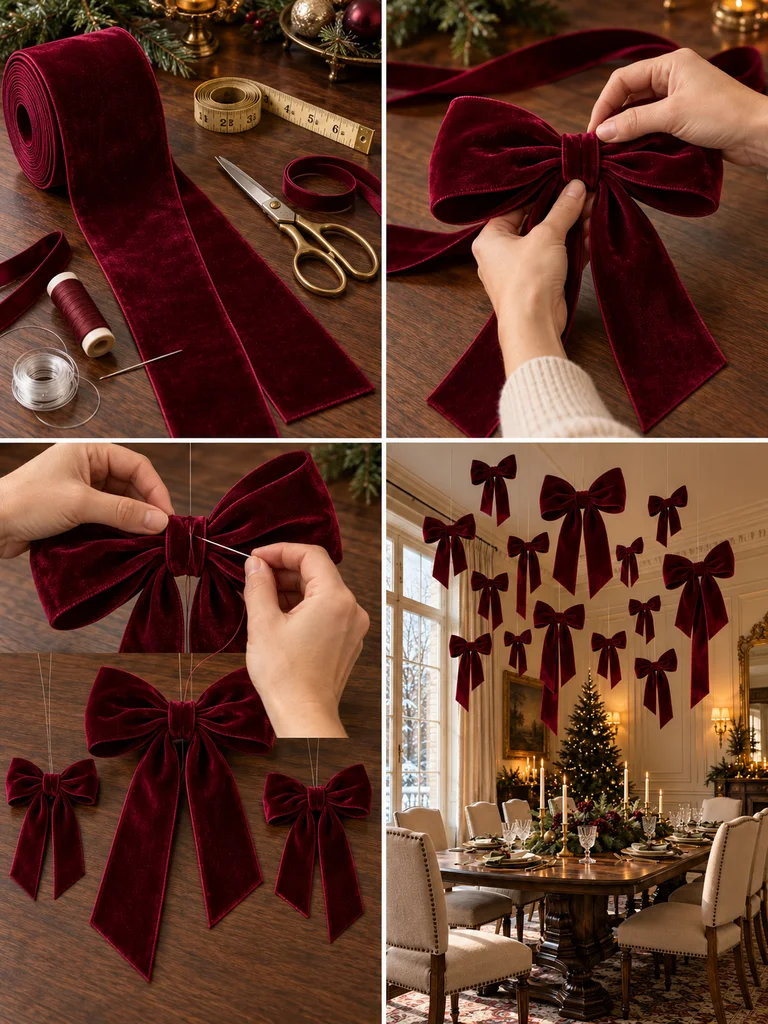
- Cut several lengths of wide velvet ribbon, allowing enough material for full loops and trailing ends.
- Fold each length into a bow shape, keeping the loops balanced.
- Pinch and stitch the center, then cover the stitches with a narrow strip of matching ribbon.
- Make bows in three sizes for a more natural arrangement.
- Attach transparent hanging lines to reinforced points at the bow centers.
- Suspend the bows individually or from a small concealed support hoop, varying their heights.
Styling idea: Deep burgundy looks especially elegant alongside cream, brass, and dark green. Let some ribbon tails hang longer than others, but keep every piece well above head height.
12. Fluffy Yarn Snowball Ceiling Clouds
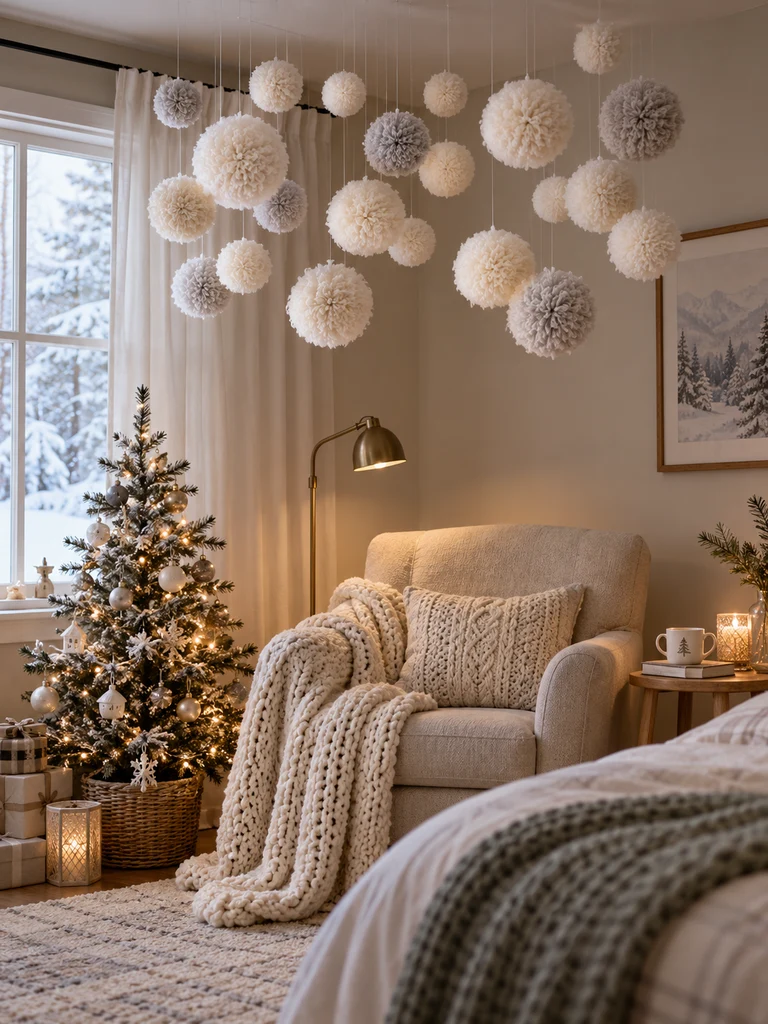
You can create the appearance of soft falling snow without paper confetti, glitter, or anything messy.
Fluffy yarn pom-poms are lightweight, reusable, and easy to make while watching a Christmas movie.
Materials you’ll need:
- White, ivory, and cream yarn
- Pom-pom maker or cardboard templates
- Sharp scissors
- Transparent thread
- Lightweight mesh support or suitable mounting points
How to make it:
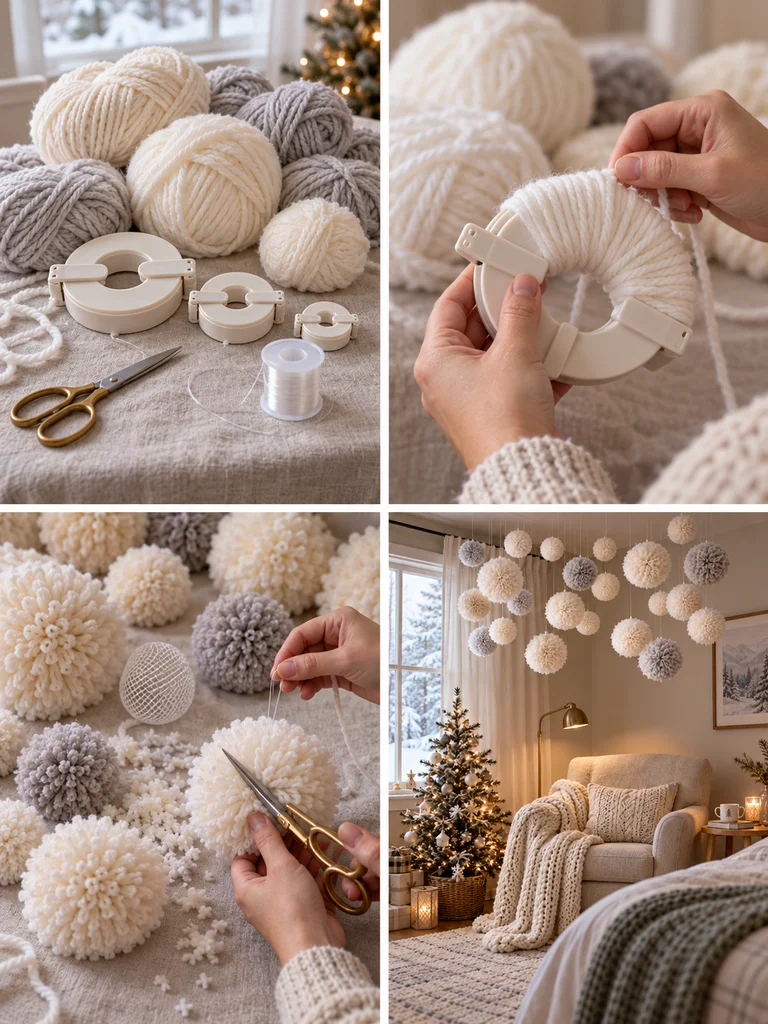
- Wind yarn around a pom-pom maker or cardboard template until you have a thick bundle.
- Tie the center tightly, cut the loops, and fluff the yarn into a rounded ball.
- Trim uneven strands to create a soft snowball shape.
- Make approximately 20–30 pom-poms in different sizes.
- Tie transparent thread securely around the center of each pom-pom.
- Attach the pom-poms to a lightweight mesh support at varied lengths, creating several cloud-like clusters.
Styling idea: Add a few very pale silver pom-poms for a subtle shimmer. Too many metallic accents may take away from the soft, snowy appearance.
13. Cozy Plaid Fabric Ceiling Bunting
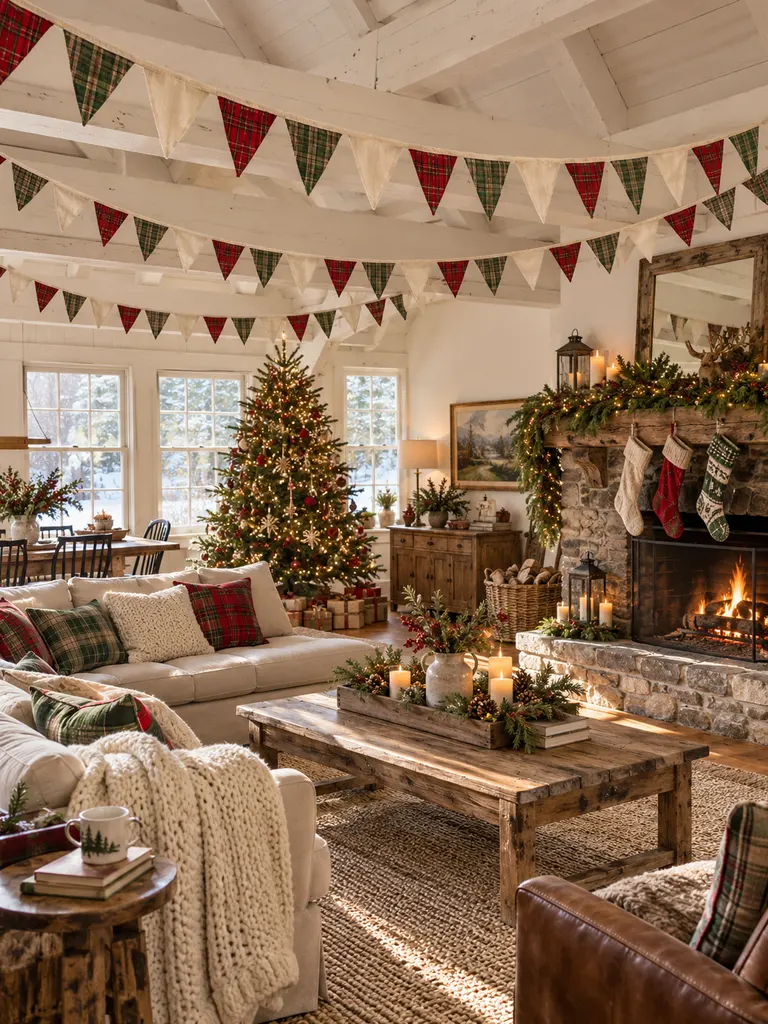
Plaid fabric has an unmistakably cozy Christmas character.
If you’ve got leftover fabric from holiday sewing projects, old wrapping materials, or unused plaid scraps, this is an excellent way to repurpose them.
Materials you’ll need:
- Red and green plaid fabric
- Cream cotton fabric
- Bias tape or sturdy cotton ribbon
- Fabric scissors
- Fabric glue or sewing supplies
- Suitable mounting hardware
How to make it:
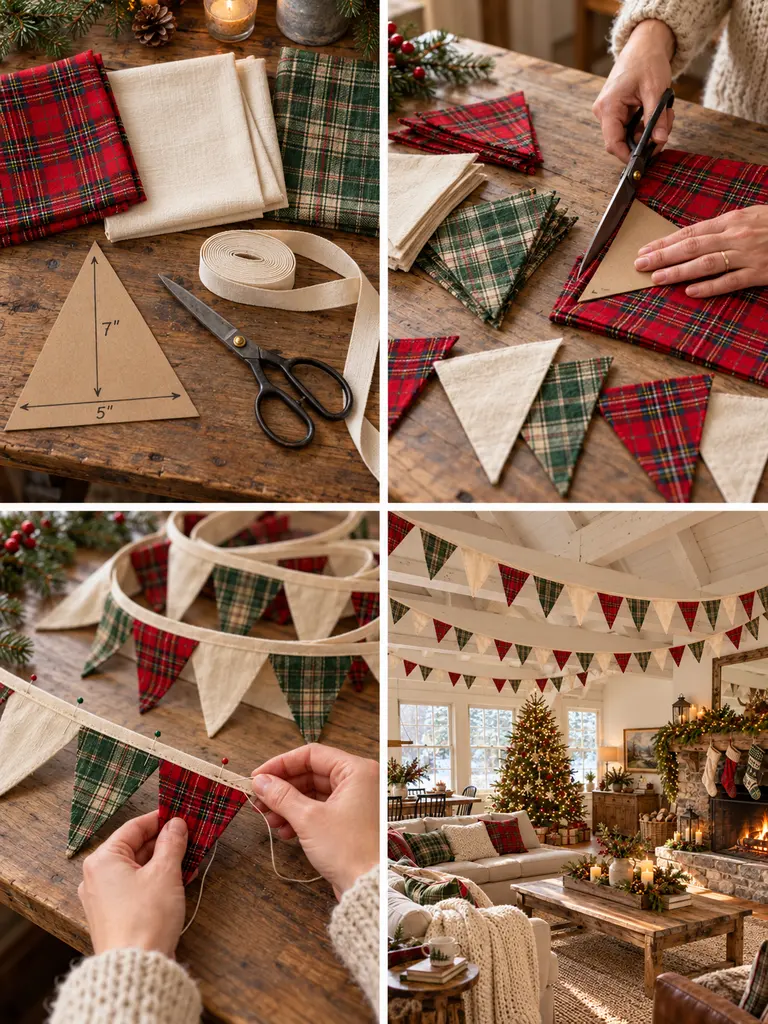
- Make a triangular bunting template approximately 5 inches wide and 7 inches tall.
- Cut enough fabric triangles to cover your desired garland lengths.
- Arrange the triangles in a repeating pattern, alternating plaid and plain cream fabric.
- Fold the top edge of each triangle over the bias tape, then stitch or glue it securely in place.
- Repeat to create multiple garlands.
- Hang the bunting in broad, gentle curves across the room.
Styling idea: Plaid ceiling bunting works beautifully with knitted cushions, rustic wooden furniture, and a traditional Christmas tree. A little imperfection in the fabric adds to its handmade charm.
14. Handmade Felt Christmas Angel Mobile
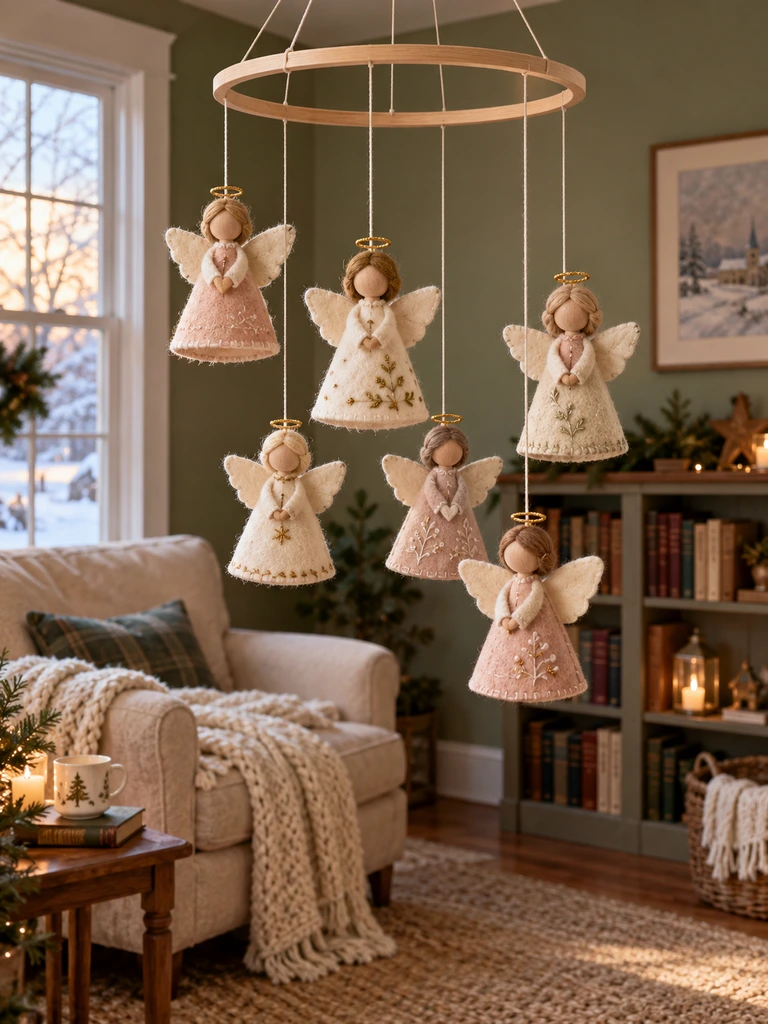
These little felt angels are sweet enough to keep and reuse every Christmas.
Their soft fabric bodies, tiny wings, and simple halos give them a gentle appearance without needing complicated sewing skills.
Materials you’ll need:
- Ivory, cream, and blush felt
- Small wooden beads for heads
- Gold cord or thin gold pipe cleaners
- Cotton stuffing
- Embroidery thread
- Lightweight mobile hoop
- Craft glue
How to make it:
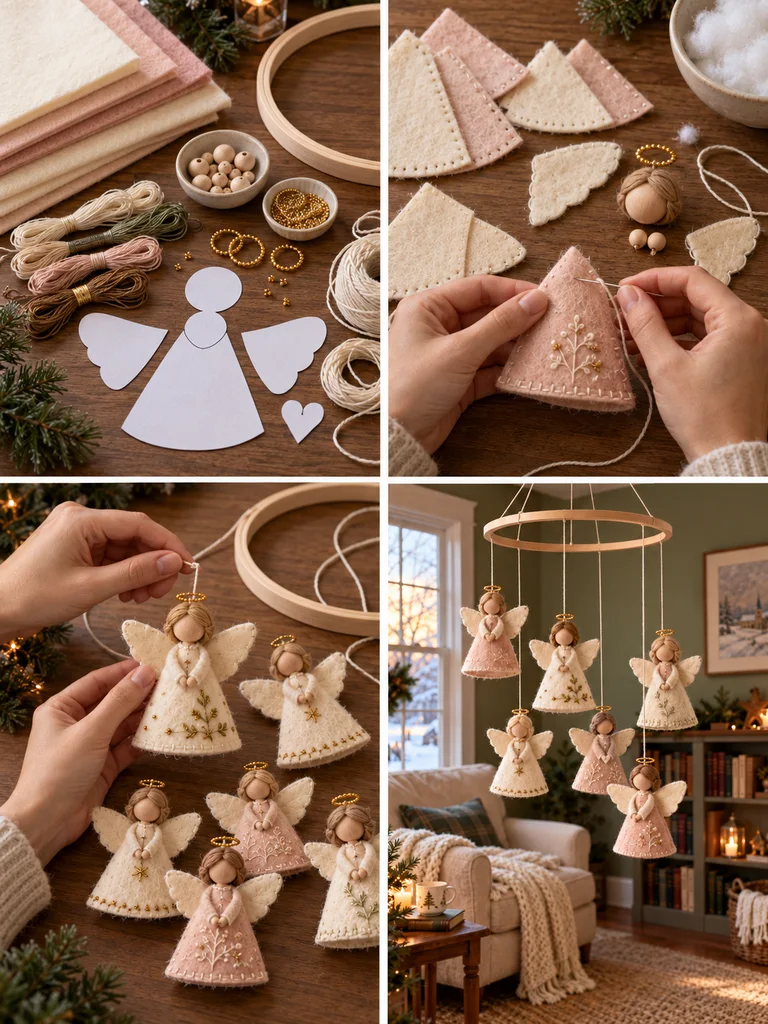
- Cut matching felt shapes for each angel’s body and wings.
- Stitch the body edges together, leaving a small opening for a little cotton stuffing.
- Close the opening and attach the wings to the back.
- Secure a wooden bead at the top for the head.
- Shape a small gold halo and attach it behind or above the head.
- Make several angels and suspend them from a lightweight circular mobile frame.
Styling idea: Use a slightly different dress shape or halo style for each angel. Avoid giving every figure the exact same appearance; that small variety makes the handmade collection more interesting.
15. Boho Macramé Christmas Tree Pendants

Macramé doesn’t have to be limited to wall hangings and plant holders.
A few small, knotted Christmas tree pendants can become a distinctive ceiling decoration, particularly in homes that use neutral colors and natural textures.
Materials you’ll need:
- 3 mm cotton macramé cord
- Small wooden rings
- Wooden beads
- Sage-green yarn
- Scissors
- Measuring tape
How to make it:
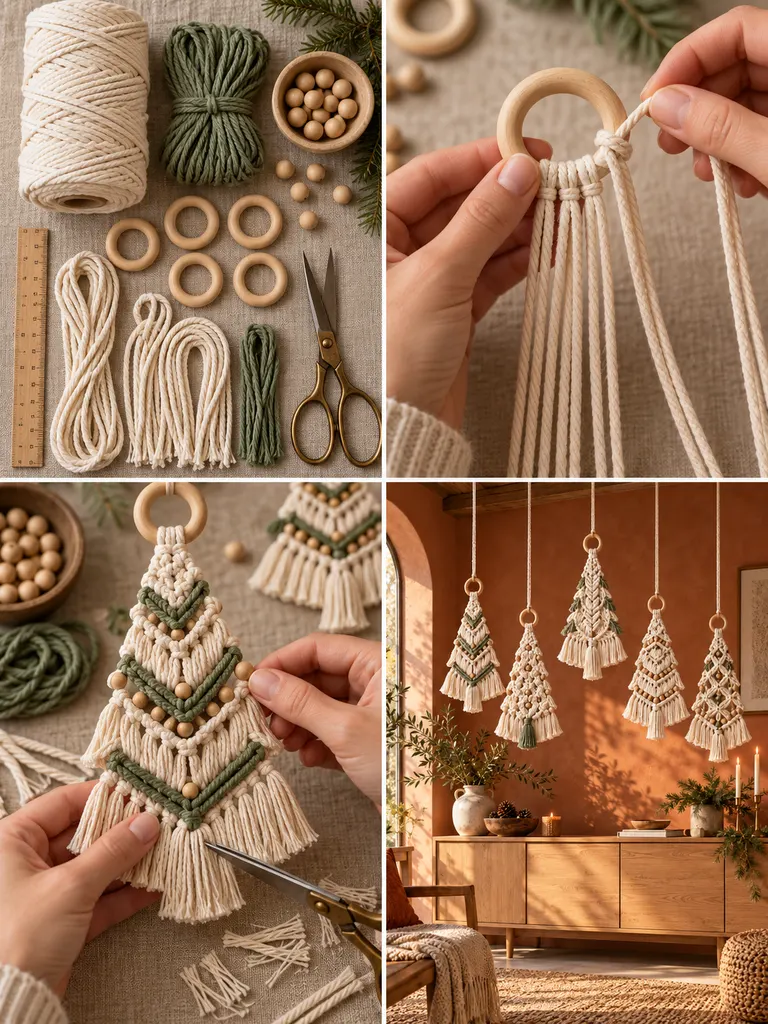
- Cut multiple lengths of macramé cord, approximately 30–36 inches each, depending on the finished tree size.
- Fold the cords in half and attach them to a wooden ring using lark’s head knots.
- Work rows of square knots, gradually narrowing the knot pattern toward the upper section or widening it toward the base, depending on your preferred tree orientation.
- Add occasional wooden beads or short pieces of green yarn between selected knots.
- Trim the loose ends into a neat triangular tree silhouette and leave a small tassel at the bottom.
- Create several pendants, then hang them at different heights.
Styling idea: Hang three or five pendants together instead of scattering them around the entire room. Their detailed knotwork is easier to appreciate in a smaller, focused grouping.
Whimsical and Statement Christmas Ceiling Displays
Sometimes a Christmas ceiling decoration should be the first thing people notice.
These next five ideas are designed to make a stronger visual impression. They’re especially fun for holiday parties, family gatherings, and rooms where you want something a little unexpected.
16. Floating Christmas Bauble Waterfall
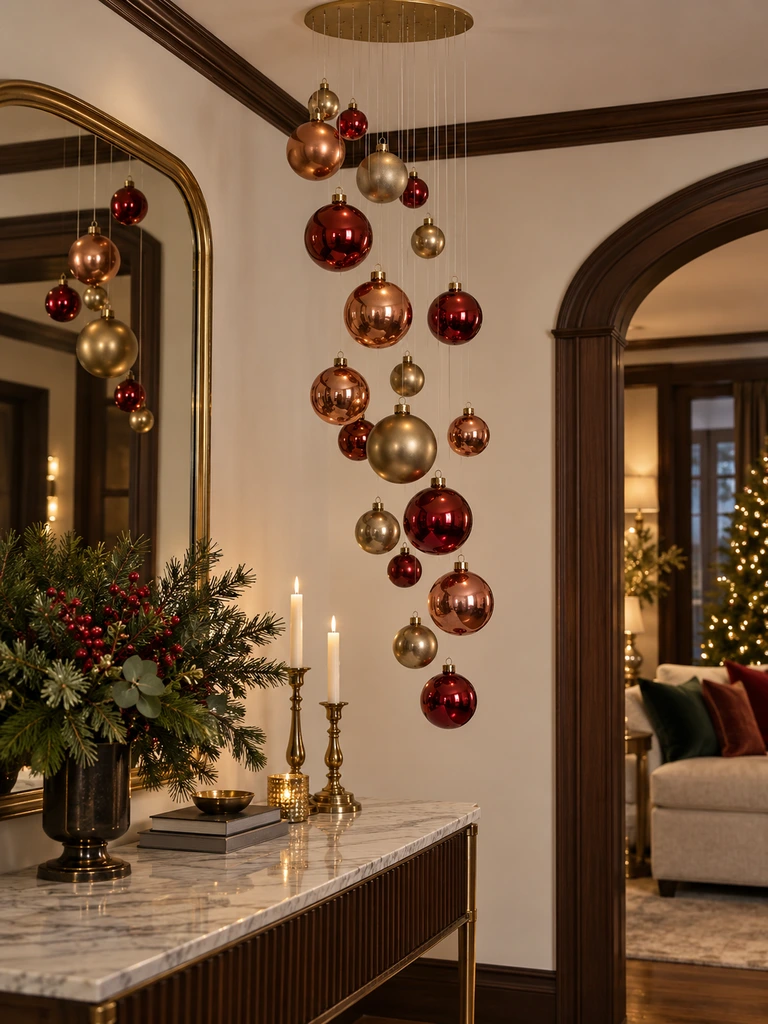
Imagine dozens of Christmas ornaments appearing to float in midair.
That’s the appeal of this decoration. Transparent hanging line makes the ornaments seem almost weightless, while the variation in lengths creates the illusion of a cascading waterfall.
Materials you’ll need:
- Lightweight shatterproof Christmas baubles
- Transparent monofilament
- Measuring tape
- Scissors
- Secure ceiling mounting hardware
- Optional lightweight support frame
How to make it:
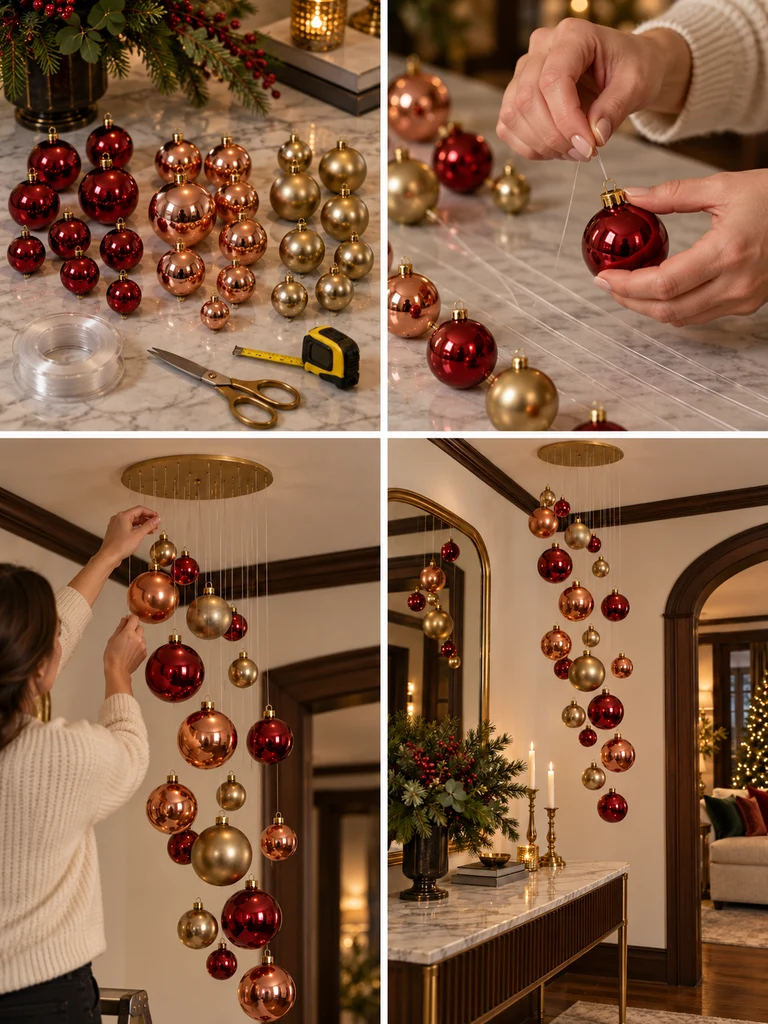
- Choose around 20–30 lightweight baubles in three coordinating colors and several sizes.
- Plan the arrangement on paper, marking the intended hanging position and length for each ornament.
- Cut transparent lines in different lengths, leaving extra material for secure knots.
- Tie each line firmly to its bauble’s hanging loop, checking that the ornament cap is secure.
- Attach the lines to suitable overhead mounting points or a properly suspended lightweight frame.
- Arrange the ornaments in a descending formation, adjusting their spacing until the overall silhouette resembles a waterfall.
Styling idea: Put more gold ornaments toward the center and use cranberry and copper around the edges. The colors create depth without requiring an extremely large number of baubles.
17. Santa’s Flying Sleigh Silhouette Mobile
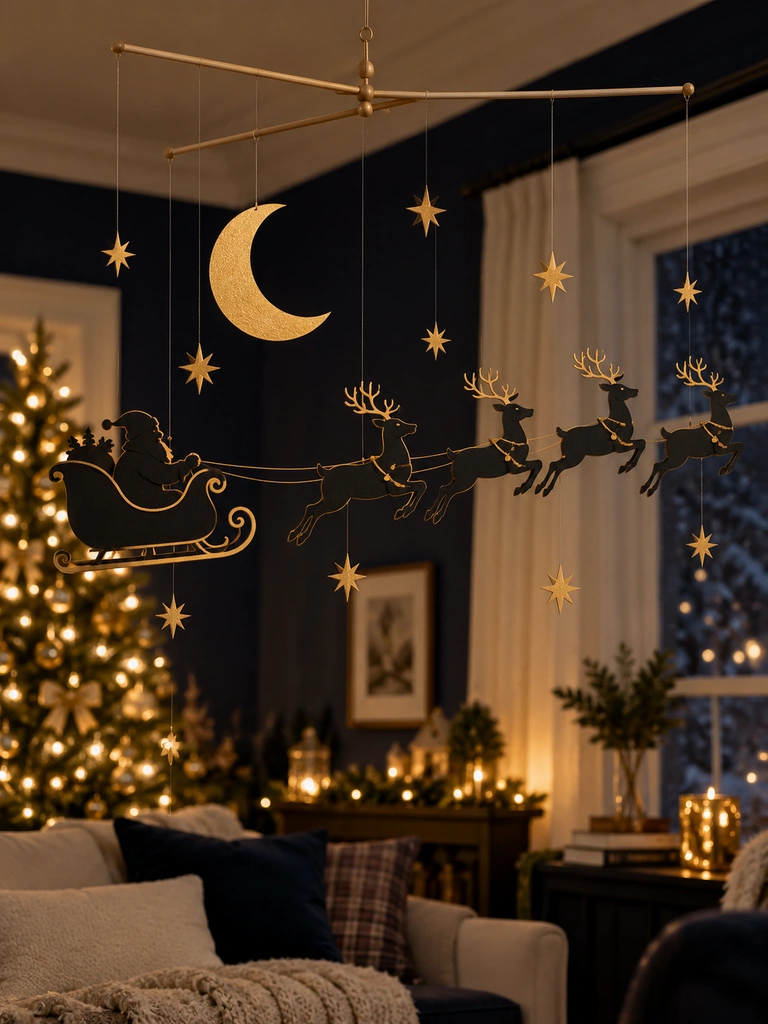
This decoration tells a story.
Instead of simply hanging Christmas shapes, you’ll create a little scene of Santa and his reindeer traveling across the night sky.
The finished effect is especially charming near a Christmas tree or window.
Materials you’ll need:
- Black and metallic-gold cardstock
- Reindeer and sleigh templates
- Moon and star templates
- Scissors
- Thin transparent thread
- Lightweight wooden dowels
- Craft glue
How to make it:
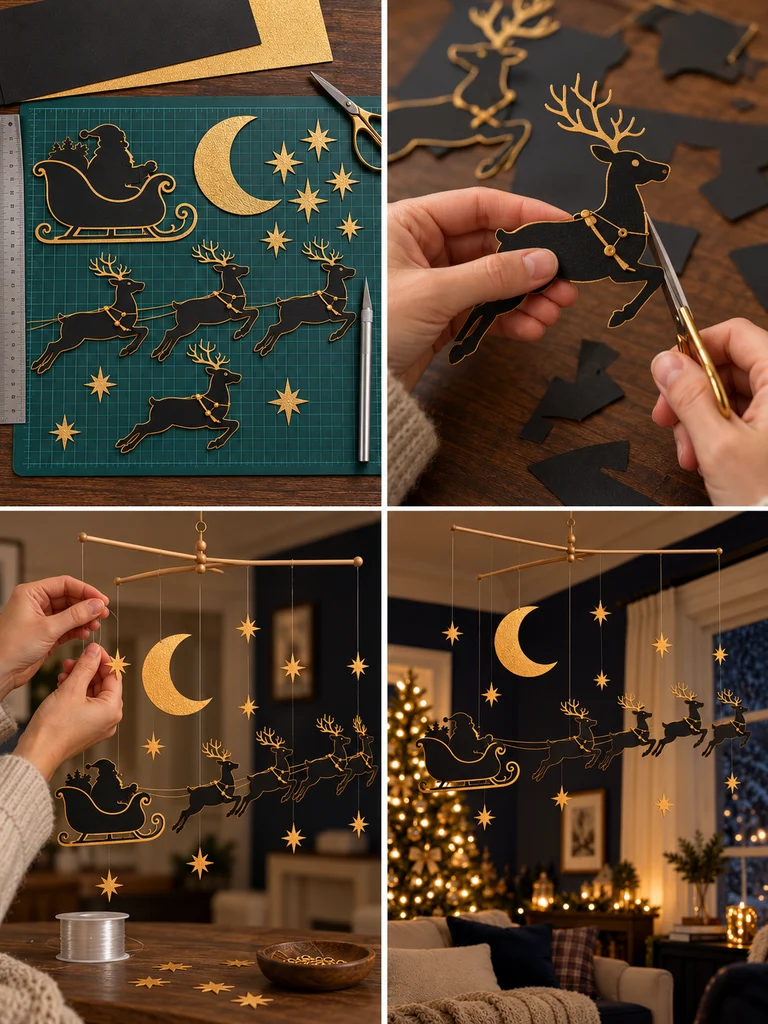
- Draw or print silhouette templates for a sleigh, several reindeer, a crescent moon, and stars.
- Cut the designs from cardstock, keeping delicate details thick enough to avoid tearing.
- Reinforce the upper hanging points with a second small layer of cardstock.
- Arrange the sleigh and reindeer in a flying formation before attaching any threads.
- Tie the silhouettes to a lightweight mobile frame at carefully chosen positions, balancing the pieces as you go.
- Hang the moon and stars at separate heights to create a layered night-sky appearance.
Styling idea: Use mostly black silhouettes with just a few gold stars. This contrast helps the reindeer and sleigh stand out against a light-colored ceiling.
18. Frozen Icicle Ceiling Wonderland
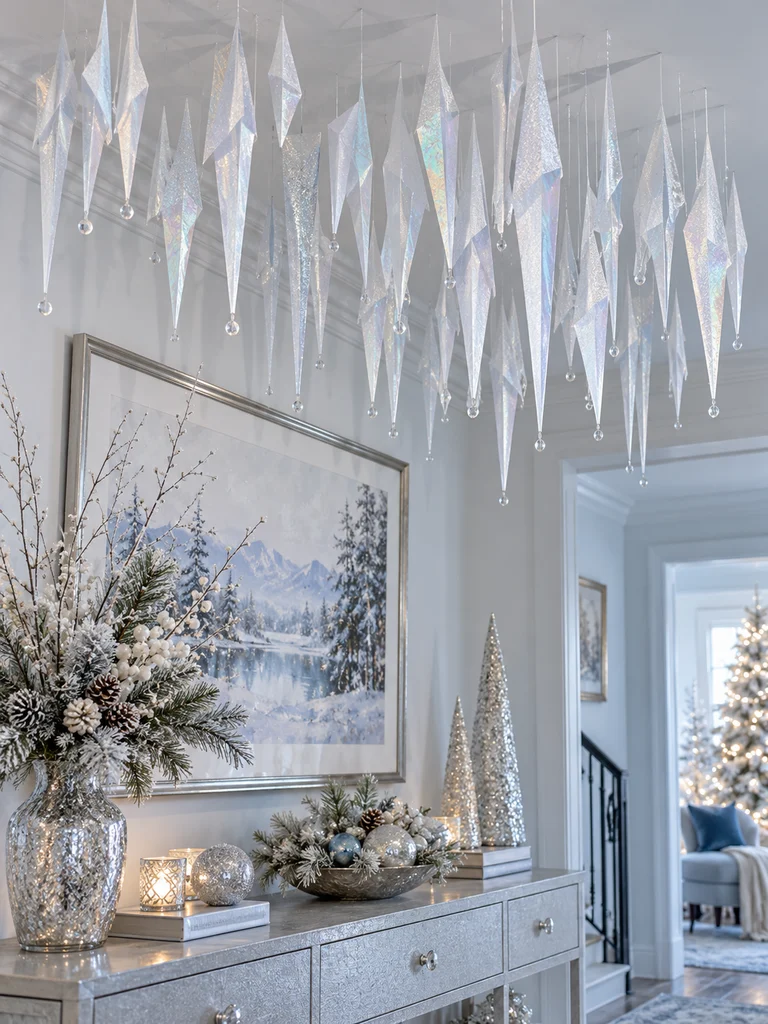
You don’t need real ice, glass ornaments, or heavy decorations to create a frosty winter atmosphere.
Thin vellum and iridescent paper can mimic the appearance of icicles beautifully, especially when several layers catch the light.
Materials you’ll need:
- Frosted vellum sheets
- Iridescent or pearl-finish paper
- Silver thread
- Lightweight clear beads
- Scissors
- Ruler
- Suitable overhead mounting hardware
How to make it:
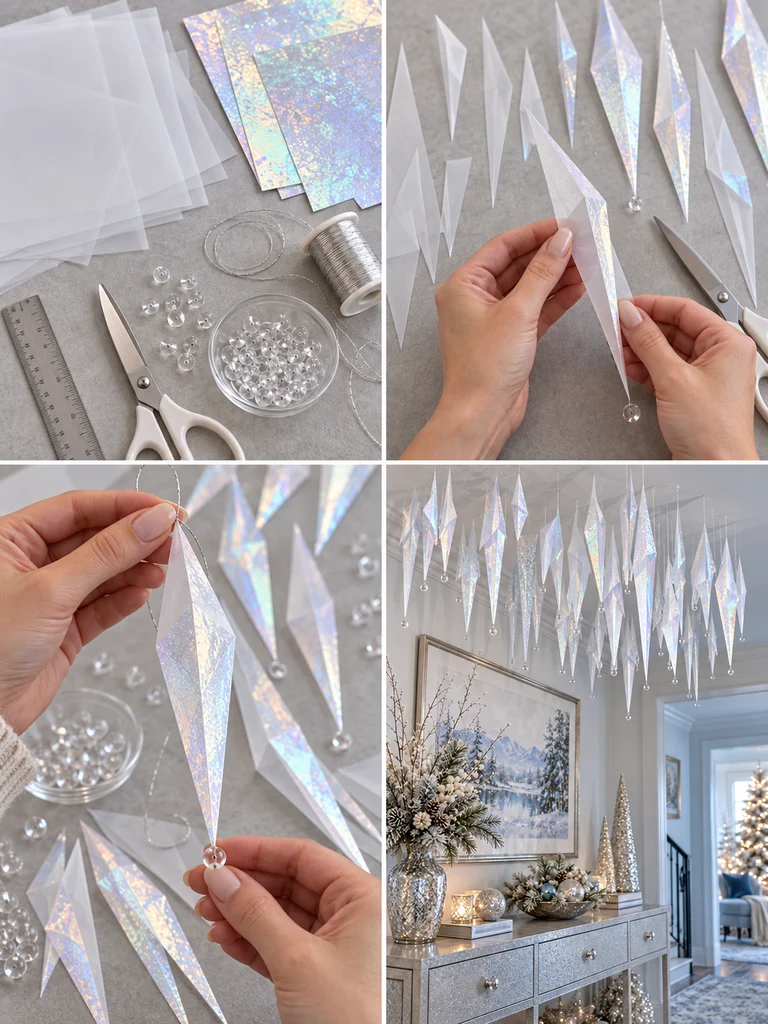
- Cut long, narrow triangular shapes from vellum, varying the lengths between approximately 6 and 14 inches.
- Layer selected triangles with smaller strips of iridescent paper for added shine.
- Carefully curl or fold a few strips to create different icicle shapes.
- Attach silver thread to the wide top end of each piece.
- Add a lightweight clear bead to the bottom of selected icicles for a frozen-droplet effect.
- Suspend the icicles in uneven groups, leaving gaps so each shape remains visible.
Styling idea: Keep the color palette almost entirely white, silver, and translucent. A few pale-blue accents are enough to reinforce the icy theme without making the display too colorful.
19. Suspended Mini Christmas Gift Box Display
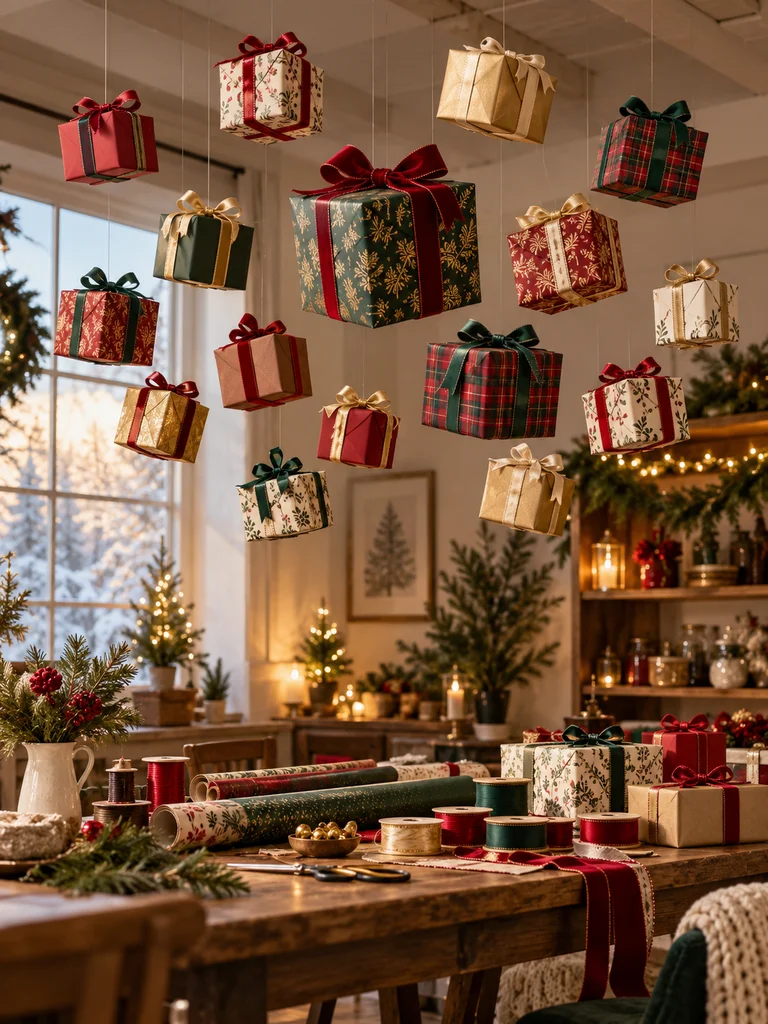
Christmas presents don’t have to stay under the tree.
A collection of small, lightweight gift boxes hanging from the ceiling adds a playful, unexpected detail to a holiday room.
And because the boxes are empty, you can create a substantial-looking display without adding much weight.
Materials you’ll need:
- Lightweight cardstock gift boxes
- Red, green, and gold wrapping paper
- Grosgrain ribbon
- Double-sided tape
- Scissors
- Transparent hanging line
- Appropriate mounting hardware
How to make it:
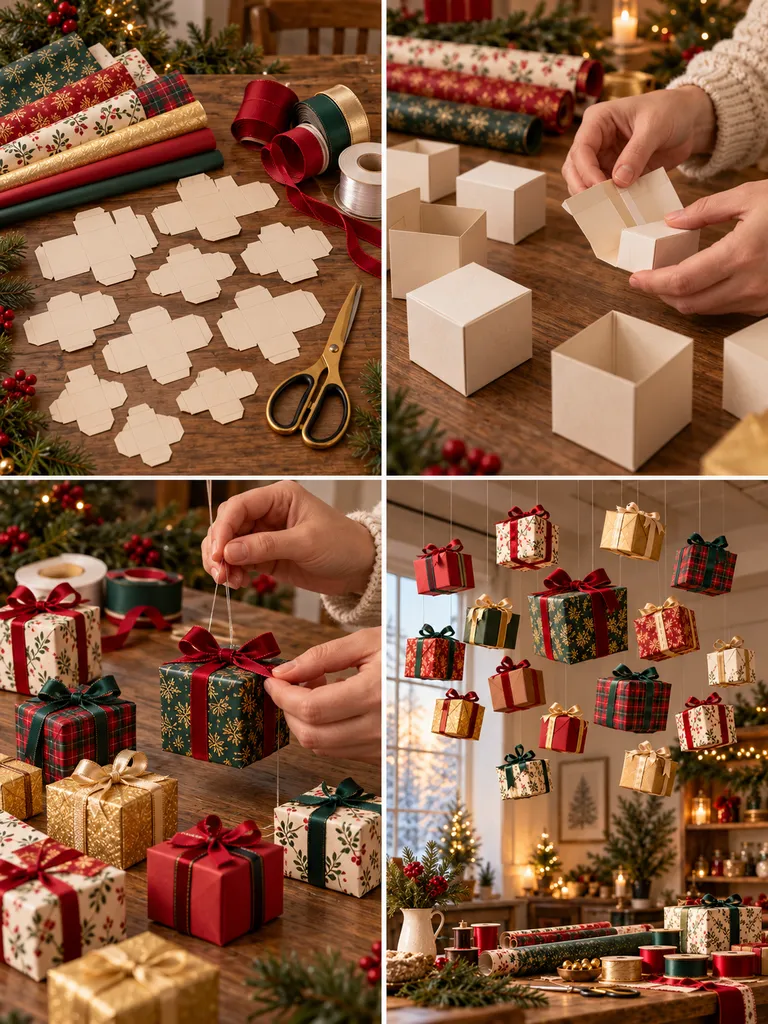
- Assemble miniature empty cardstock gift boxes in several sizes, keeping them roughly 3–6 inches wide.
- Wrap each box neatly in your chosen Christmas paper.
- Add ribbon around each box and finish with a simple bow.
- Reinforce the upper hanging point so the decoration is supported by the box structure rather than the bow alone.
- Attach transparent hanging lines.
- Suspend the boxes in a balanced cluster, alternating their colors, sizes, and heights.
Styling idea: Use gift wrap patterns that coordinate with the actual wrapped presents below. This makes the ceiling arrangement feel connected to the rest of the room.
20. Christmas Hot Air Balloon Ornament Fleet
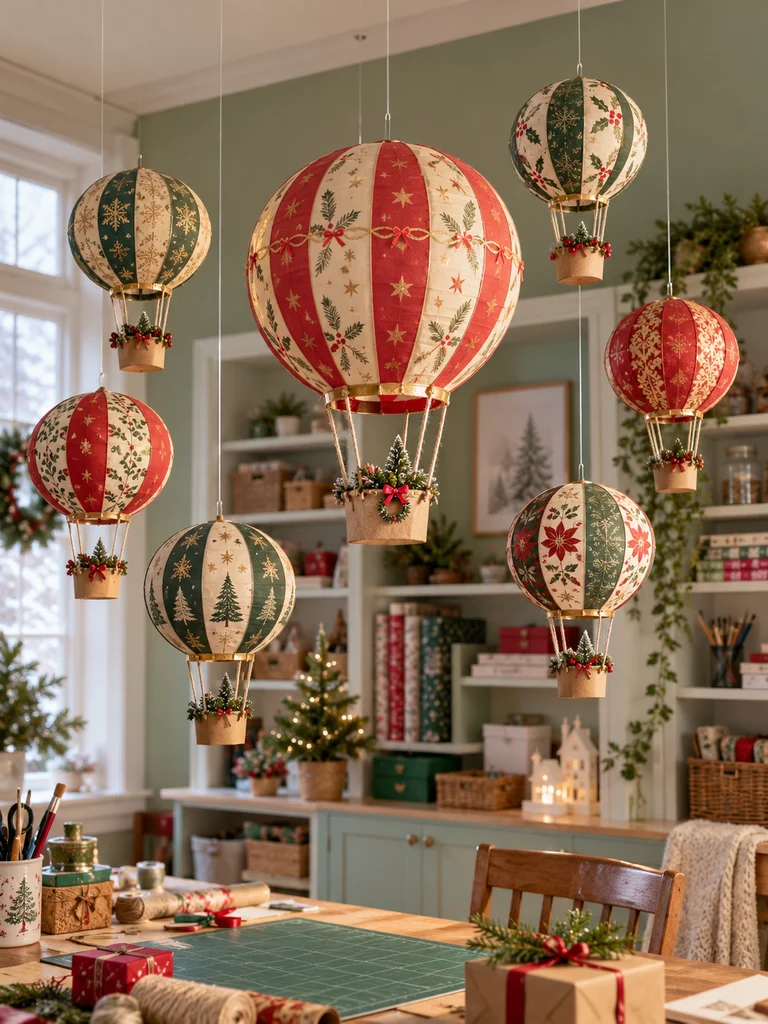
These miniature hot air balloons make a lovely alternative to conventional Christmas ornaments.
The little baskets and rounded balloon tops create a whimsical scene, almost as though Christmas gifts are being delivered through the air.
Materials you’ll need:
- Lightweight small paper lantern forms
- Patterned scrapbook paper
- Cardstock for miniature baskets
- Cotton string
- Scissors
- Craft glue
- Narrow ribbon
How to make it:
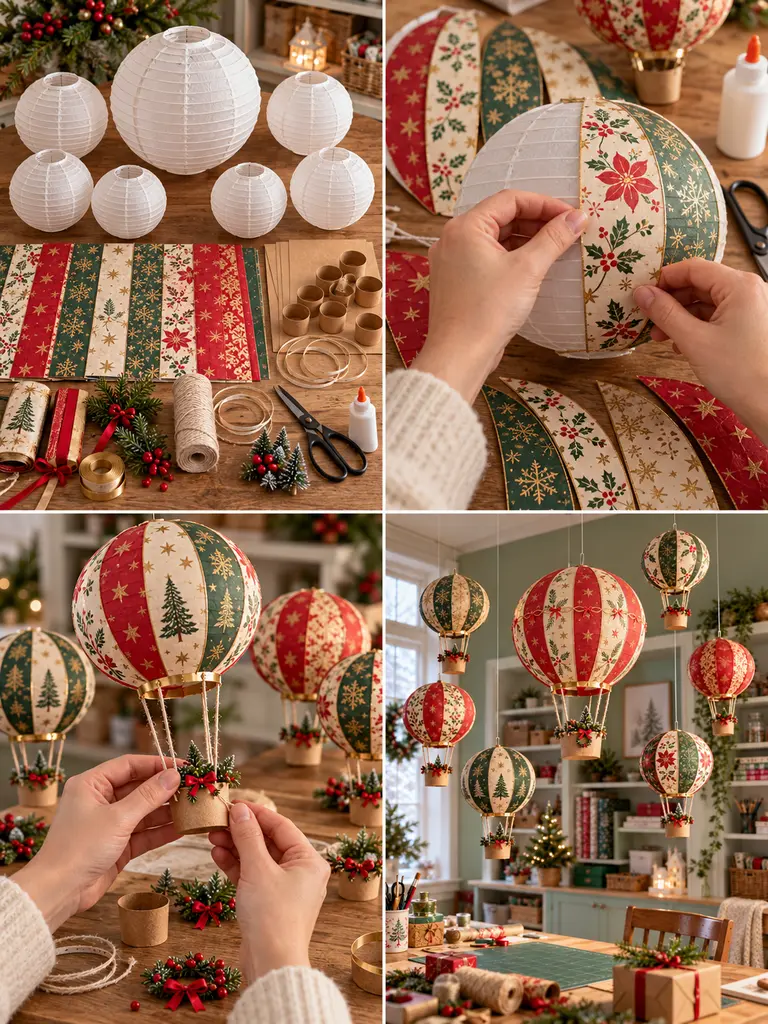
- Prepare several small paper lantern forms, approximately 4–6 inches wide.
- Add lightweight patterned paper panels or decorative strips to create stripes and other festive details.
- Cut cardstock templates for tiny open-top baskets, then fold and glue them into shape.
- Attach four short, equal-length strings from each basket to reinforced points near the bottom of its balloon form.
- Add a decorative ribbon bow or small paper flag.
- Attach a separate secure hanging line to the top of each balloon and suspend the group at different heights.
Styling idea: Make one balloon slightly larger than the others and give it a distinctive red-and-cream striped pattern. It will naturally become the centerpiece of the collection.
Interactive and Illuminated Christmas Ceiling Decorations
The final three projects add something extra: an activity, a soft glow, or a colorful illuminated feature.
They’re ideal when you want decorations that do more than simply fill an empty space.
21. Hanging Advent Calendar Envelope Canopy
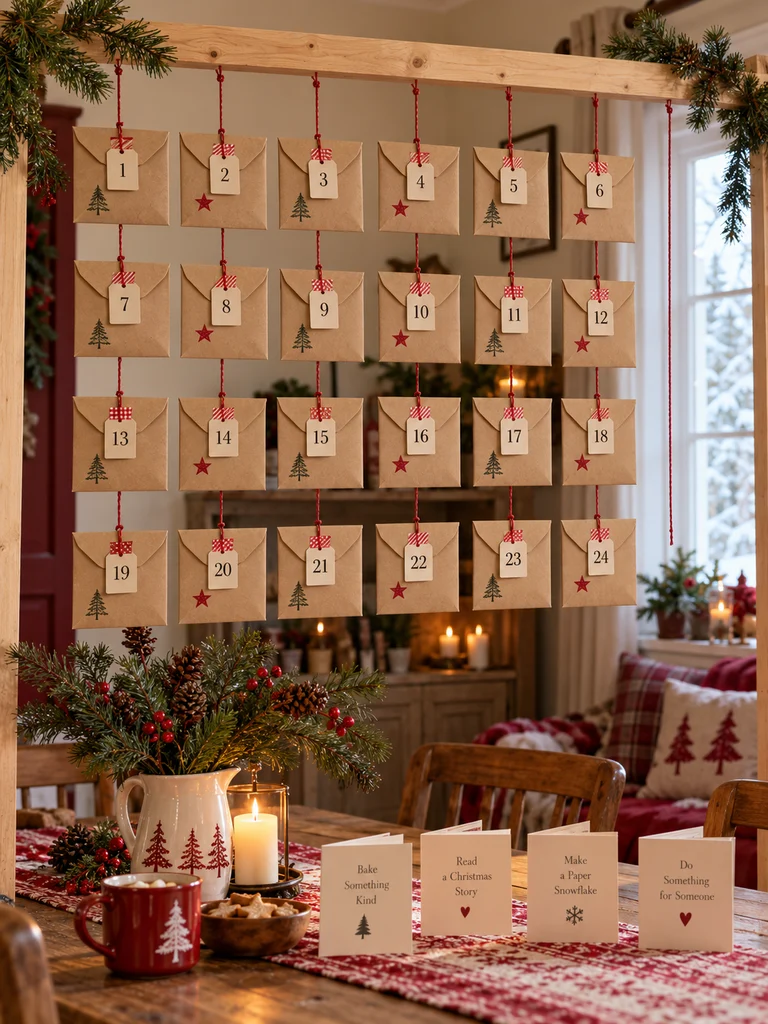
An Advent calendar can be more than a box sitting on a shelf.
This version turns 24 small envelopes into a suspended Christmas decoration. Each envelope can hold a tiny note, seasonal activity, or family tradition for the day.
Materials you’ll need:
- 24 small kraft-paper envelopes
- Number stickers or wooden number tags
- Red cotton twine
- Christmas-themed washi tape
- Small paper notes
- Lightweight hanging cord
- Secure mounting hardware
How to make it:
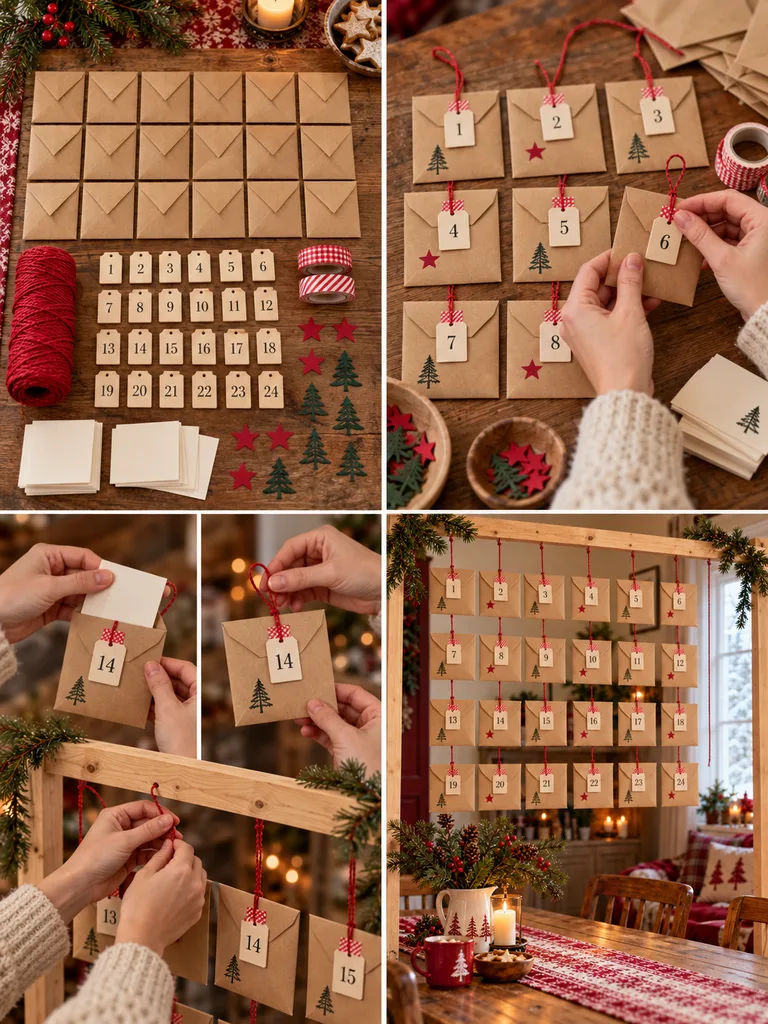
- Number the envelopes from 1 to 24.
- Decorate each envelope with a small piece of washi tape, a paper star, or a simple stamped Christmas design.
- Write 24 notes featuring holiday activities, kind gestures, or favorite Christmas traditions.
- Place one note inside each envelope and seal it lightly.
- Secure a hanging loop to each envelope without damaging the contents.
- Arrange the envelopes in rows or a gradual descending pattern over a dedicated activity area.
Styling idea: Plan the display at a safe, reachable height over a dedicated area rather than directly above a frequently used walkway. The envelopes should be easy to remove without pulling on the whole installation.
22. Twinkling Christmas Night Sky Canopy
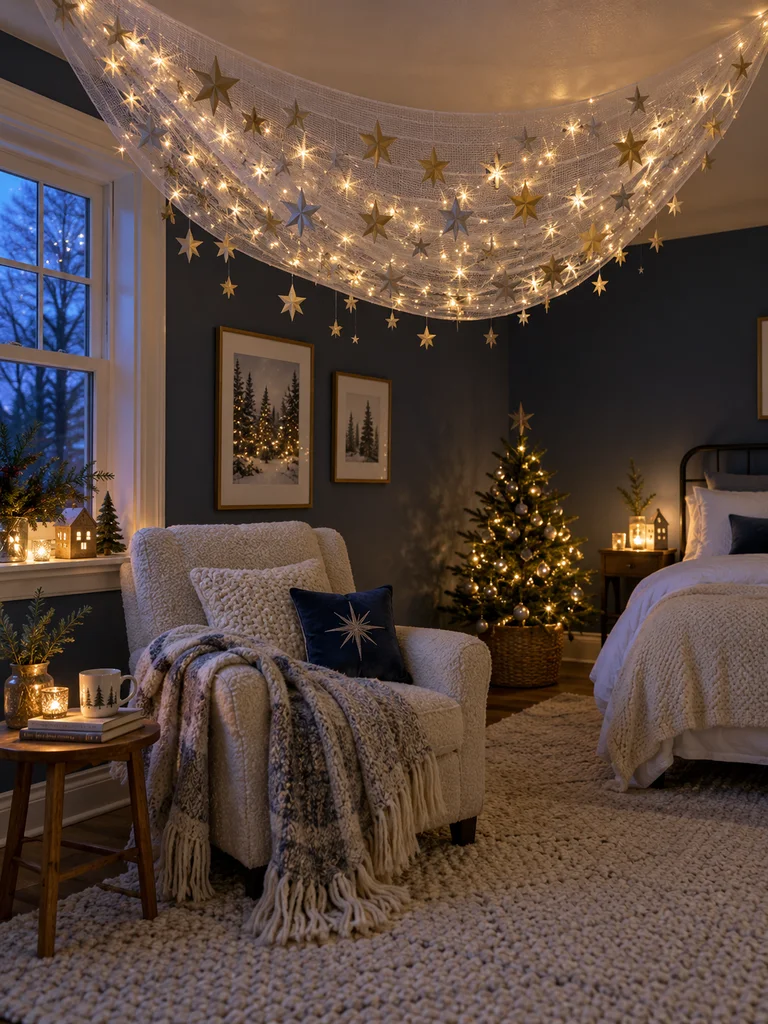
Soft lighting can make even a simple Christmas bedroom feel special.
This project creates a starry ceiling effect using lightweight mesh, tiny paper stars, and battery-operated LED lights.
It’s less about brightness and more about creating a gentle glow.
Materials you’ll need:
- Battery-operated, low-heat LED fairy lights
- Lightweight mesh suitable for decorative use
- Silver and champagne cardstock
- Small star-shaped templates
- Cotton thread
- Scissors
- Suitable ceiling mounting hardware
How to make it:
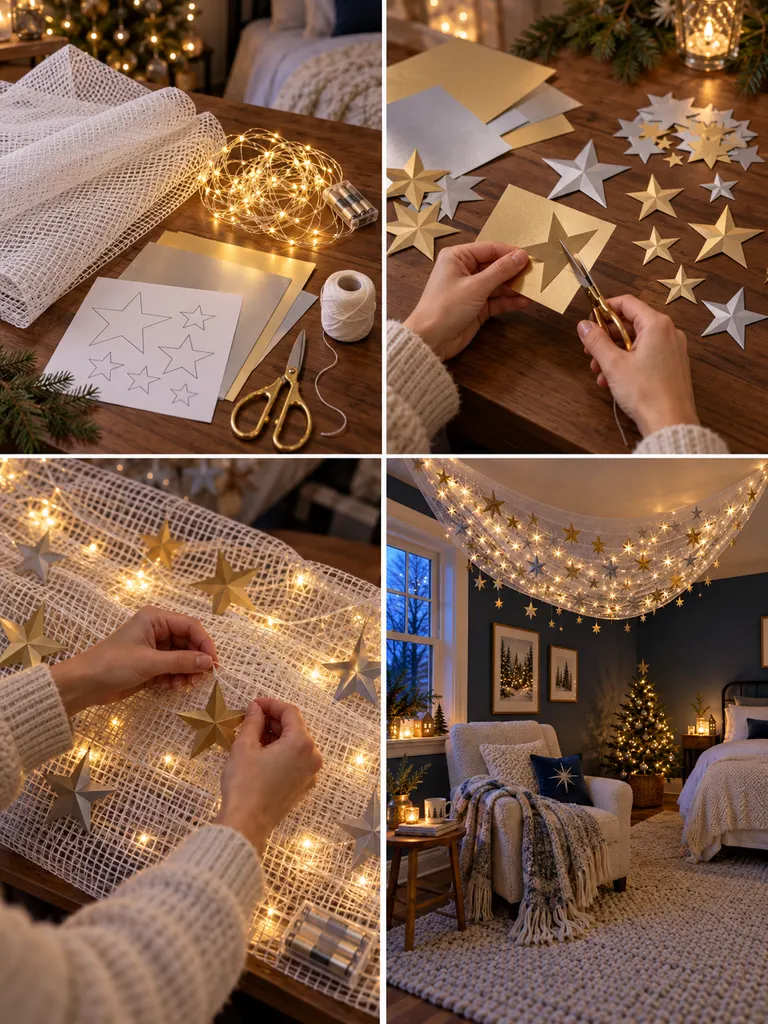
- Measure the ceiling area you want to decorate and cut the mesh to size, allowing for a gentle draped shape.
- Prepare several dozen small paper stars in two or three sizes.
- Tie the stars to selected points on the mesh using short threads.
- Arrange the LED light strands across the mesh following the lighting manufacturer’s instructions.
- Keep the battery compartment accessible for switching off the lights and changing batteries.
- Secure the mesh using suitable mounting points, checking that the installation remains well clear of electrical fixtures and other hazards.
Styling idea: Choose warm-white lighting rather than extremely bright multicolored lights for a calm bedroom atmosphere. Switch off the lights when unattended, and never use hot incandescent lights or candles with the mesh or paper decorations.
23. Glowing Faux Stained-Glass Christmas Lanterns
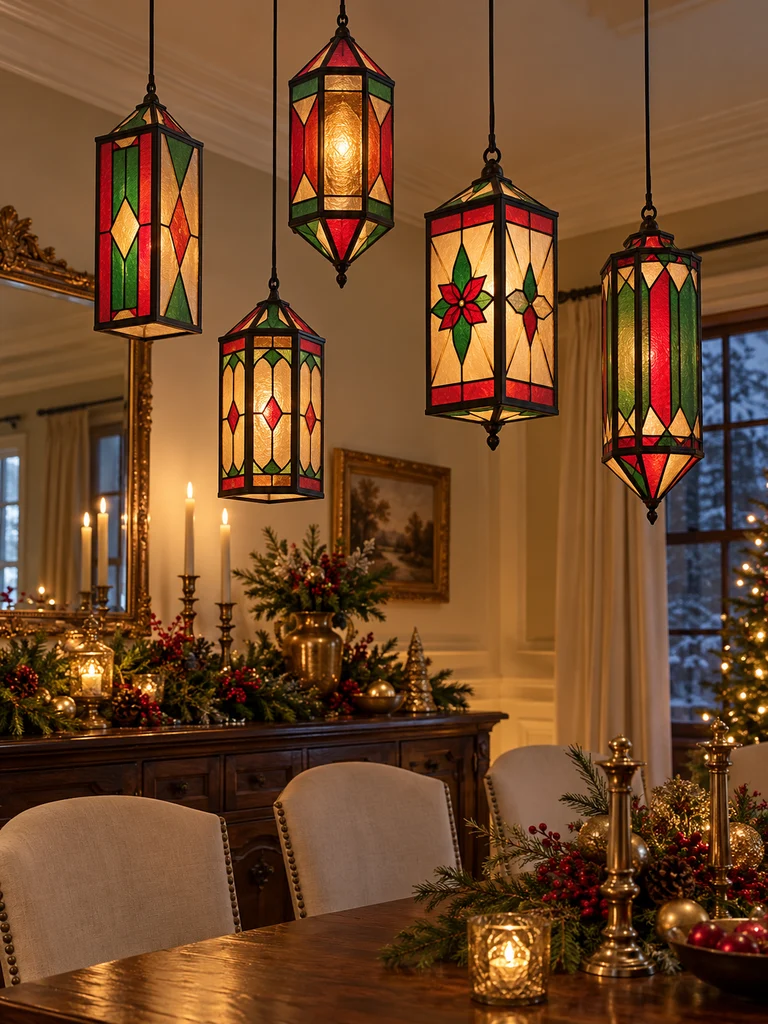
For the final idea, let’s finish with something that looks especially beautiful after sunset.
These handmade lanterns borrow their colorful appearance from stained-glass windows, but they’re created using lightweight translucent paper rather than glass.
The result is a collection of jewel-toned decorations that add color and a gentle glow to the ceiling.
Materials you’ll need:
- Small lightweight paper lantern frames
- Red, green, and amber translucent vellum
- Black cardstock strips
- Paper-safe craft glue
- Scissors
- Battery-operated LED lantern inserts
- Secure hanging cord
How to make it:
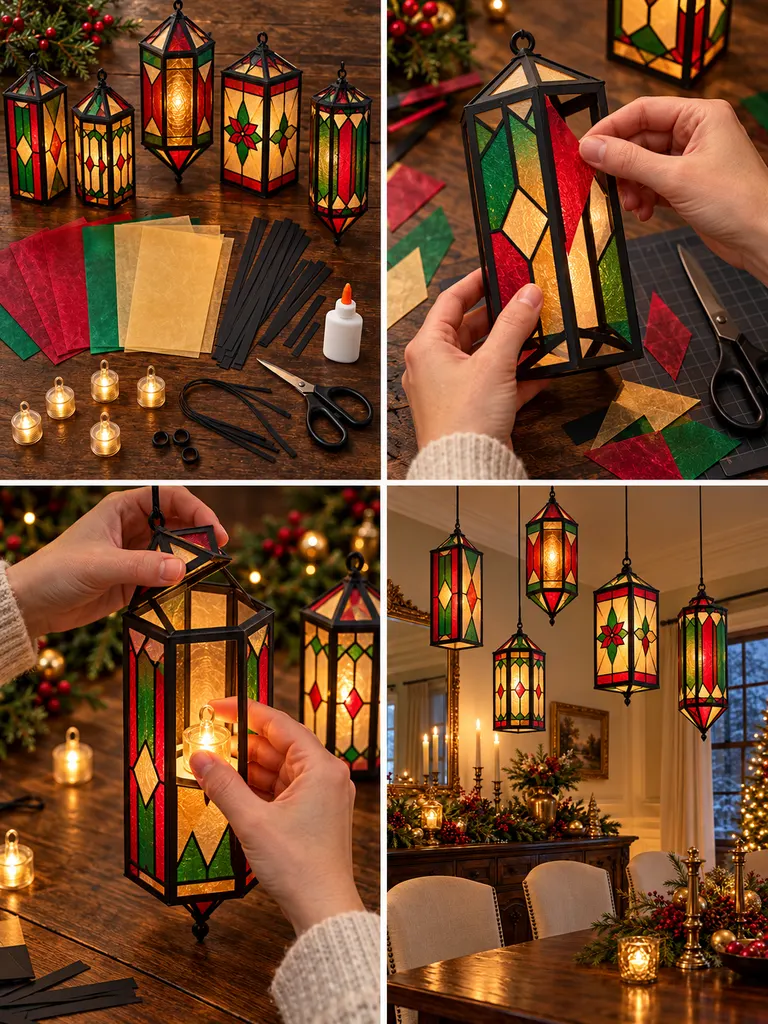
- Prepare several lightweight lantern frames in similar or complementary shapes.
- Cut translucent vellum into geometric pieces, such as diamonds, rectangles, or elongated triangles.
- Attach the colored pieces to the lantern surfaces, leaving narrow spaces between sections.
- Cover the joining edges with thin black cardstock strips to create a faux stained-glass pattern.
- Insert a suitable battery-operated LED light into each lantern according to its instructions.
- Attach secure hanging cords and suspend the lanterns at staggered heights, keeping their controls accessible.
Styling idea: Use several lanterns with the same geometric pattern but different dominant colors. Once illuminated, they’ll feel like a coordinated collection rather than unrelated decorations.
How to Hang DIY Christmas Ceiling Decorations Safely
Once your handmade decorations are finished, it’s tempting to start hanging them wherever there’s an empty patch of ceiling.
Before doing that, think about the weight, movement, and location of each piece.
A lightweight paper star and a large decorated hoop may require completely different mounting methods.
Choose the Right Ceiling Mounts
Use mounting hardware rated for the total suspended weight and appropriate for your ceiling material. Decorative adhesive hooks can have surface, installation, and load restrictions, so don’t assume a product designed for walls is suitable for overhead use.
For larger arrangements, distribute the weight across properly installed support points where appropriate.
Keep Decorations Clear of Fixtures
Never attach decorations to ceiling fans, smoke detectors, sprinkler heads, or light fixtures.
Make sure hanging ribbons, paper ornaments, and fabric don’t come near heat-producing lamps, electrical equipment, fireplaces, or heating vents.
Check the Hanging Height
A decoration may look beautiful while you’re standing across the room, but its hanging height still needs to be practical.
Avoid installations that interfere with walking paths, doors, or everyday activities. Keep cords, strings, and small components inaccessible to young children and pets.
Use LED Lighting Carefully
Battery-operated LED lights are generally more suitable for lightweight craft displays than heat-producing bulbs, but you still need to follow the product instructions.
Use lights approved for the way they’re installed, don’t overload the mounting structure, and keep battery compartments accessible.
Test Before Leaving Everything Up
After mounting a decoration, gently check that the support points are secure and the design hangs in balance.
Recheck installations periodically during the holiday season, especially if any pieces begin to tilt, loosen, or sag.
How to Choose the Best Christmas Ceiling Decoration for Your Room
With 23 different projects to choose from, it’s worth thinking about where each one will look best.
For living rooms: Floating stars, velvet bows, and mini wreath galleries create an elegant effect without taking up floor space.
For dining rooms: The evergreen hoop chandelier, ornament waterfall, and glowing lanterns can become striking overhead focal points.
For bedrooms: Origami trees, yarn snowballs, and softly illuminated star canopies bring a quieter, cozier atmosphere.
For kitchens and breakfast nooks: Dried orange garlands and plaid bunting complement wooden furniture and traditional Christmas decorating.
For holiday parties: Honeycomb ornament clouds, peppermint swirls, and floating gift boxes create colorful statement displays.
For small spaces: A single macramé grouping, a few himmeli ornaments, or one compact hanging mobile can make an impact without overwhelming the room.
You don’t need to use all 23 designs. In fact, choosing just one or two that work with your existing Christmas decorations will often create a more intentional result.
Frequently Asked Questions About DIY Christmas Ceiling Decor Ideas
What can I use to decorate my ceiling for Christmas?
You can use lightweight paper stars, hanging ornaments, miniature wreaths, fabric bunting, ribbon bows, origami trees, yarn pom-poms, and handmade ceiling mobiles. If you want something more dramatic, a properly supported greenery hoop or illuminated paper lantern arrangement can become a focal point.
Choose decorations based on the available space, ceiling surface, hanging hardware, and weight of the materials.
How can I decorate my ceiling for Christmas on a budget?
Start with paper, yarn, ribbon scraps, and leftover Christmas wrapping materials. Homemade cardstock stars, plaid fabric bunting, and origami trees can be inexpensive because their main materials are widely available.
You can also reuse shatterproof ornaments, artificial greenery, and decorative ribbons from previous holiday seasons.
Remember to include the cost of suitable mounting hardware in your budget.
How do I hang Christmas decorations from the ceiling without damaging it?
The safest suitable method depends on your ceiling material, finish, decoration weight, and the mounting product’s instructions.
Some removable products are designed for specific surfaces and loads, but many are not approved for overhead applications. Check the manufacturer’s instructions rather than relying on ordinary adhesive tape.
If you’re renting, prioritize lightweight decorations and use mounting methods permitted by your landlord or property manager.
Which Christmas ceiling decorations are easiest for beginners?
Accordion-folded paper trees, fabric bunting, yarn pom-poms, and simple paper star decorations are good starting points.
They don’t require advanced craft skills, and you can practice with inexpensive materials before creating a larger arrangement.
Can I make Christmas ceiling decorations without electricity?
Absolutely. Most of the ideas in this article don’t require any electrical components.
Paper constellations, hanging wreaths, straw mobiles, velvet bows, gingerbread house mobiles, and floating ornaments can all look beautiful without built-in lighting.
Natural daylight or existing room lighting is often enough to highlight their colors and shapes.
What colors look best for handmade Christmas ceiling decorations?
Traditional red, green, and gold work well for a familiar Christmas atmosphere.
For something softer, try ivory, champagne, and sage green. Burgundy and cream feel elegant, while natural straw, wood, and linen create a rustic or Scandinavian look.
For playful decorations, combine cranberry red, blush pink, peppermint white, and forest green.
A consistent palette across several decorations helps the room feel cohesive.
How many hanging decorations should I use in one room?
That depends on ceiling height, room size, and the style you’re trying to create.
A small room may look lovely with one carefully arranged mobile or a few suspended stars. Larger spaces can accommodate a fuller display, such as a paper ornament cloud or a multi-piece ceiling gallery.
Start with fewer decorations than you think you’ll need. You can always add more once you’ve seen how the arrangement works in the room.
Final Thoughts
Christmas decorating doesn’t have to stop at the tree, mantel, or front door.
The space above your head offers plenty of opportunities to add something handmade, unexpected, and memorable to your home.
A collection of folded paper stars can bring a quiet sense of wonder to a living room. A rustic greenery chandelier can make a holiday dinner feel special. Even something as simple as leftover plaid fabric or a handful of yarn pom-poms can become a beautiful Christmas ceiling decoration with a little creativity.
The most enjoyable part is choosing a project that fits your own style and giving it a personal touch.
You might keep everything simple with natural colors and handmade paper. Or perhaps you’d rather make a bold statement with floating gift boxes, glowing lanterns, or oversized peppermint decorations.
Whatever you choose, remember that the best handmade Christmas decorations don’t have to be perfect. They’re special because of the thought, creativity, and time that go into making them.
Pick your favorite of these 23 DIY Christmas ceiling decor ideas, gather a few supplies, and give that often-forgotten ceiling a little holiday attention this year.