 Skip to content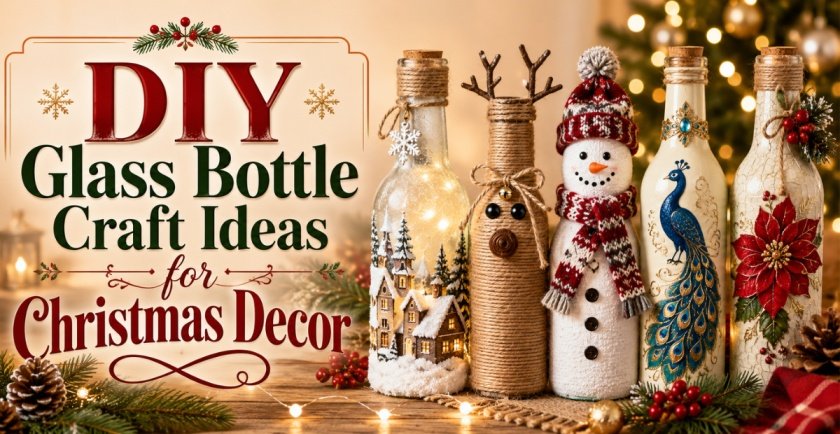
Empty glass bottles are one of those things that become surprisingly useful once Christmas crafting starts. A wine bottle with a graceful neck, a clear juice bottle, or a short glass container can turn into mantel decor, a glowing table accent, a handmade gift, or a centerpiece with just a few supplies you may already have.
That is why these DIY glass bottle craft ideas for Christmas decor are worth saving. You are not starting with an expensive craft blank. You are giving an old bottle a second life with paint, ribbon, twine, greenery, faux snow, miniature decorations, or battery-operated fairy lights.
I have kept the projects different from one another on purpose. Some are quick and forgiving. Others need a little more patience, especially the miniature scenes. There are playful bottles for kitchens and family rooms, calmer Scandinavian ideas, rustic farmhouse designs, and a few elegant options that work beautifully on a dining table or entry console.
The images are there to guide you, not to trap you into copying every berry and ribbon. Use the bottle shape you have. Swap colors to match your own Christmas decor. If you have plaid ribbon instead of velvet, use it. If your greenery is cedar instead of pine, even better. Handmade pieces look more interesting when they are not all identical.
Before You Start: Clean and Prepare the Bottles
A good finish starts before the paint comes out.
Soak bottles in warm, soapy water for 20 to 30 minutes. Peel away the labels, then remove stubborn adhesive with a suitable label remover or a little oil mixed with baking soda. Wash the glass again afterward so no greasy residue remains.
Once dry, wipe the outside with rubbing alcohol. After that, try not to handle the surface too much with bare fingers. Oils from your hands can make paint bead up or peel later.
If you are covering the whole bottle, a glass-compatible primer is useful. Apply thin coats rather than one thick coat. Let every layer dry properly before moving on.
A basic Christmas bottle craft box can include:
- Empty glass bottles
- Acrylic or glass paint
- Primer and clear sealer
- Fine and medium paintbrushes
- Sponge brush
- Painter’s tape
- Jute twine and cotton cord
- Velvet, plaid, satin, or burlap ribbon
- Faux pine, cedar, or eucalyptus
- Artificial red and white berries
- Mini pinecones
- Felt and faux fur
- Wooden beads and small bells
- Bottle-brush trees
- Faux snow
- Mini gift boxes and ornaments
- Air-dry clay or light craft foam
- Hot-glue gun and strong craft adhesive
- Battery-operated micro LED fairy lights
For any illuminated bottle, use battery-operated LEDs rather than a real candle. These projects often include fabric, glue, faux greenery, paint, or twine, so open flames are not a good fit.
1. Frosted Snowy Christmas Village Bottle
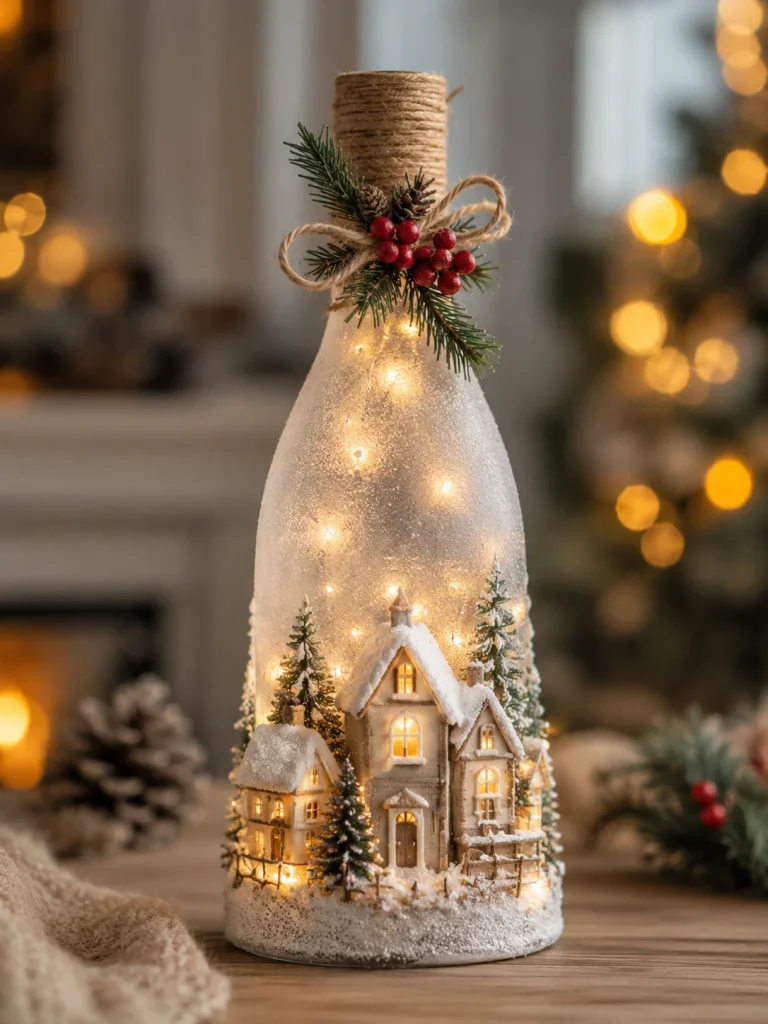
If I wanted one bottle to become the focal point of a Christmas mantel, this would be high on the list. The clear glass keeps the project light and airy, while the frosted finish makes the fairy lights glow like a winter evening.
Things You’ll Need
- Clear glass bottle
- Frosted glass spray or translucent white glass paint
- One or two miniature houses
- Small bottle-brush trees
- Faux snow
- Warm micro LED lights
- Jute twine
- Tiny pine sprig
- Red berries
- Strong craft glue
Making Process
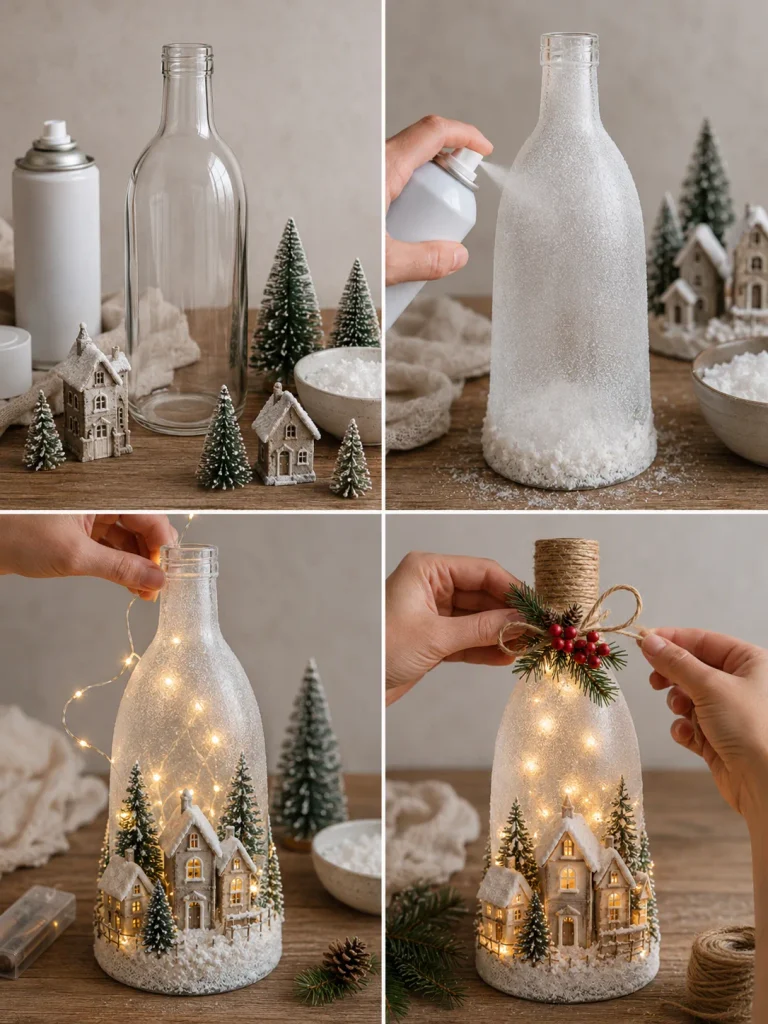
1. Clean the bottle thoroughly and let it dry. Apply a light frosted finish, but do not make the glass completely opaque. You still want light to pass through.
2. Decide where the village will sit. The lower third usually works best because the bottle stays balanced and the upper glass remains open.
3. Glue the largest miniature house first. Add smaller houses or trees around it, varying the heights rather than lining everything up.
4. Press faux snow around the base of the miniatures. Use just enough to hide glue points and create the look of a snowy ground.
5. Feed warm micro lights into the bottle. Keep the wire loose so the glow spreads rather than collecting in one bright clump.
6. Wrap the neck with twine and add a small pine sprig and a few berries.
The easy mistake here is overdecorating. Once the village and lights are in place, step away for a minute. If the scene already looks complete, leave it alone.
2. Rustic Twine Reindeer Bottle
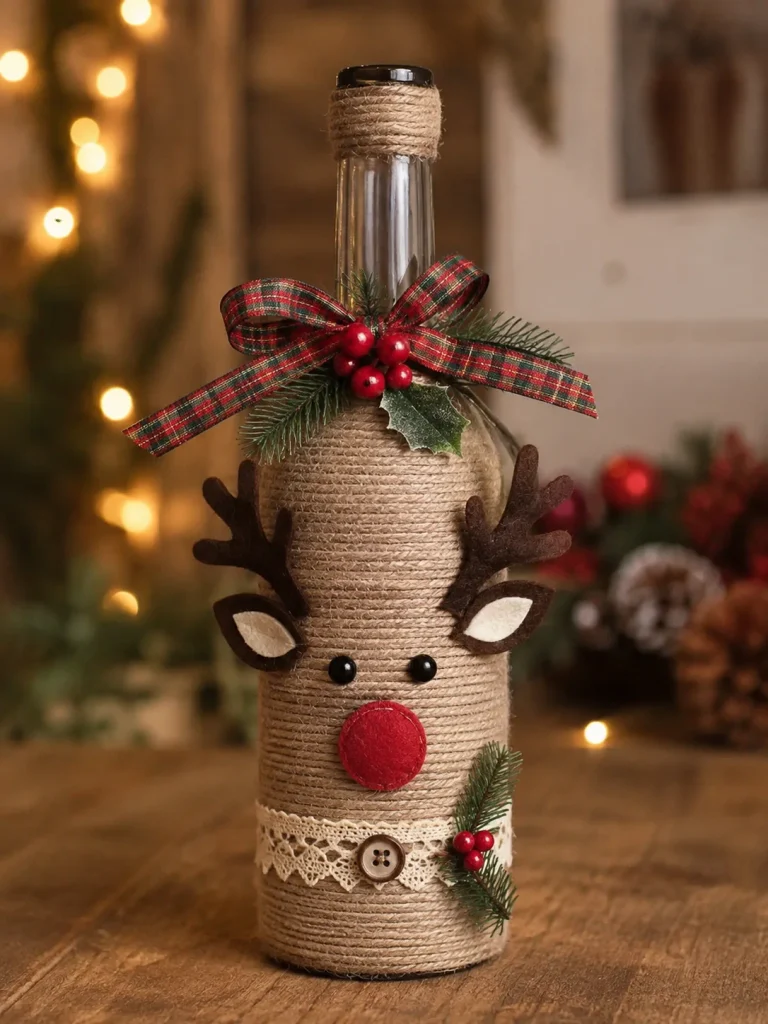
This one has a cozy farmhouse feel without needing complicated painting. The texture of twine does most of the work, and the reindeer face can be as simple or as detailed as you like.
Things You’ll Need
- Glass bottle
- Jute twine
- Brown and cream felt or craft foam
- Red felt ball or wooden bead for the nose
- Two small black beads for eyes
- Plaid ribbon
- Mini evergreen clipping
- Red berries
- Hot glue
- Scissors
Making Process
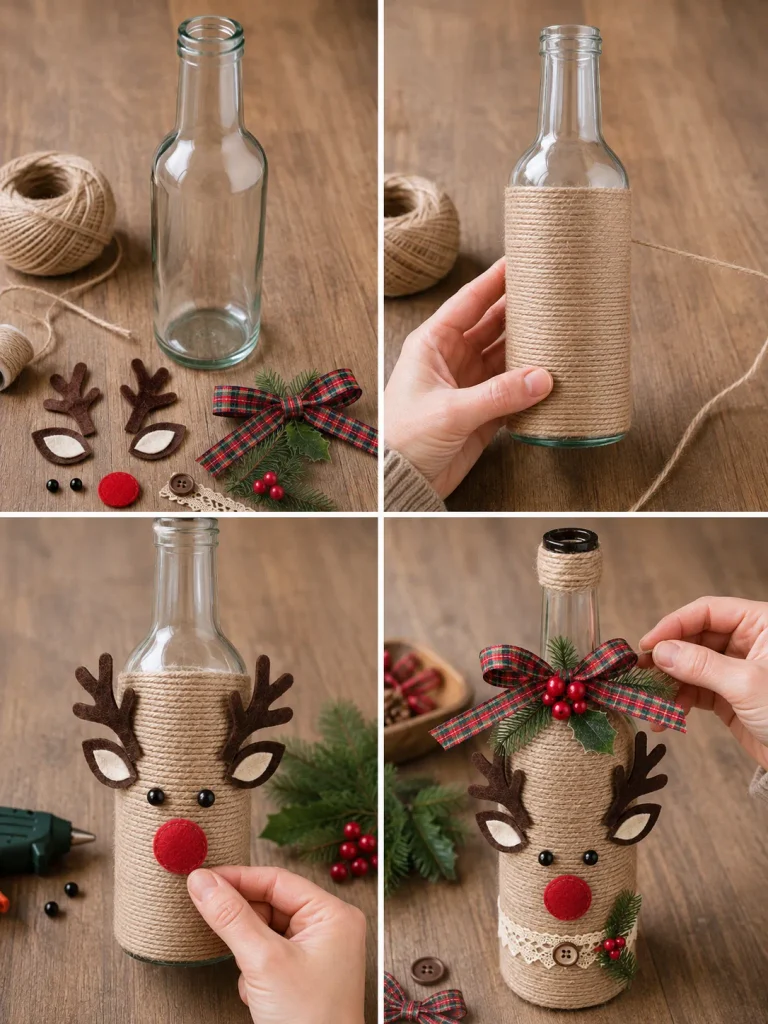
1. Start at the bottom and wrap the bottle tightly with twine. Add a small dot of glue every few turns instead of covering the whole bottle in glue. That keeps the finish cleaner.
2. Cut two antlers from dark brown felt or foam. Make the ears from brown pieces with smaller cream centers. Attach the antlers near the shoulder or neck, then add the ears slightly lower.
3. Glue on the eyes and red nose. Keep the face simple. A huge smile, eyebrows, glitter, and extra decorations can make the reindeer look crowded very quickly.
4. Finish the neck with a plaid ribbon bow. Tuck in one short pine sprig, a couple of berries, or a tiny bell.
5. If you want a softer look, wrap only the lower half of the bottle in twine and leave the upper glass visible. It is a nice variation when you are making several reindeer bottles together.
3. Christmas Fairy-Light Forest Bottle
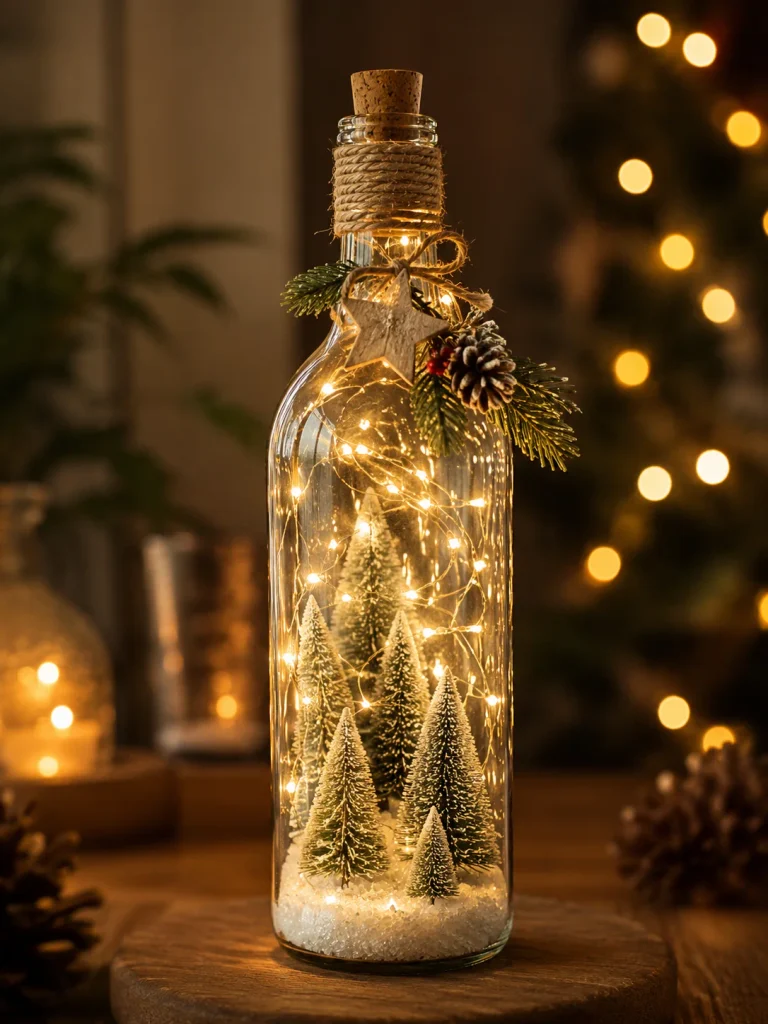
This is one of those projects that looks much harder than it really is. Most of the magic comes from miniature trees and a very thin wire light strand.
Things You’ll Need
- Clear wide-mouth bottle
- Faux snow
- Three to five miniature bottle-brush trees
- Warm micro LED lights
- Cork or bottle stopper
- Twine
- Small wooden star
- Mini pinecone
- Craft tweezers, if needed
Making Process
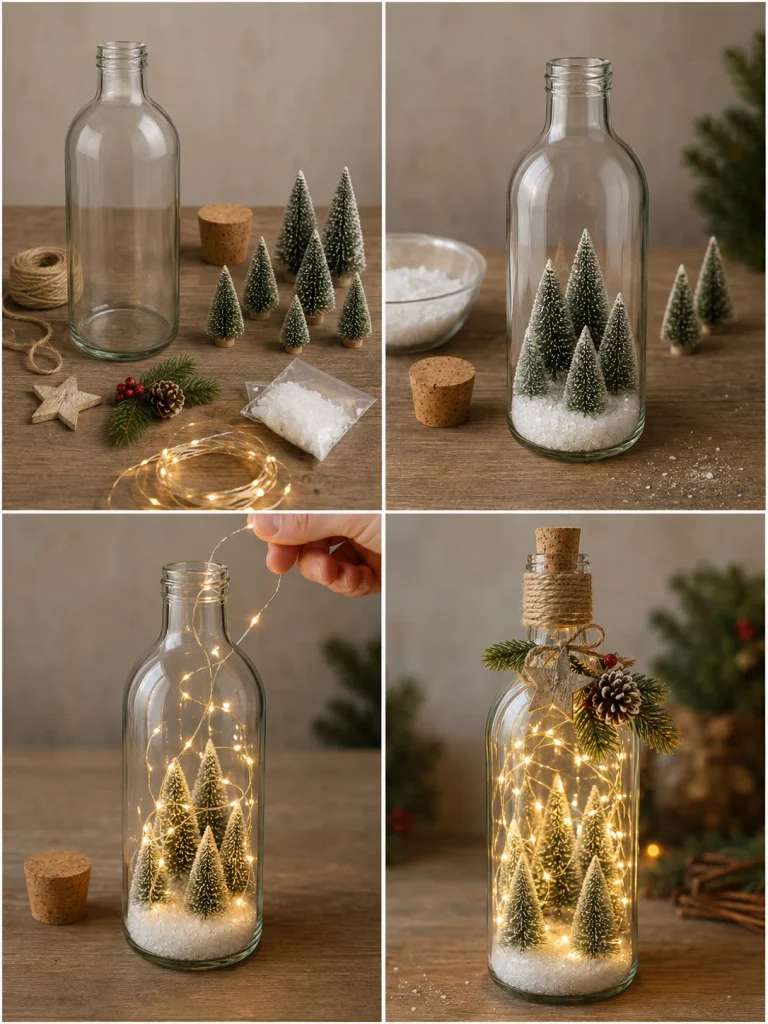
1. Pour a shallow layer of faux snow into the bottom of the bottle.
2. Place the tallest tree slightly toward the back. Add shorter trees toward the front and sides. Do not arrange them in a perfect line.
3. Use tweezers or a long craft tool to adjust the tree positions if the opening is narrow.
4. Feed the fairy lights into the bottle, letting the thin wire curve naturally around the trees.
5. Close the top with a cork if you have one. Wrap a few turns of twine around the neck.
6. Finish with one wooden star or mini pinecone rather than a large decoration.
The forest looks lovely in daylight, but the real payoff comes in the evening. Put it on a shelf or side table where the room light is a little lower and the tiny trees will glow beautifully.
4. Painted Snowman Bottle With a Knitted Scarf
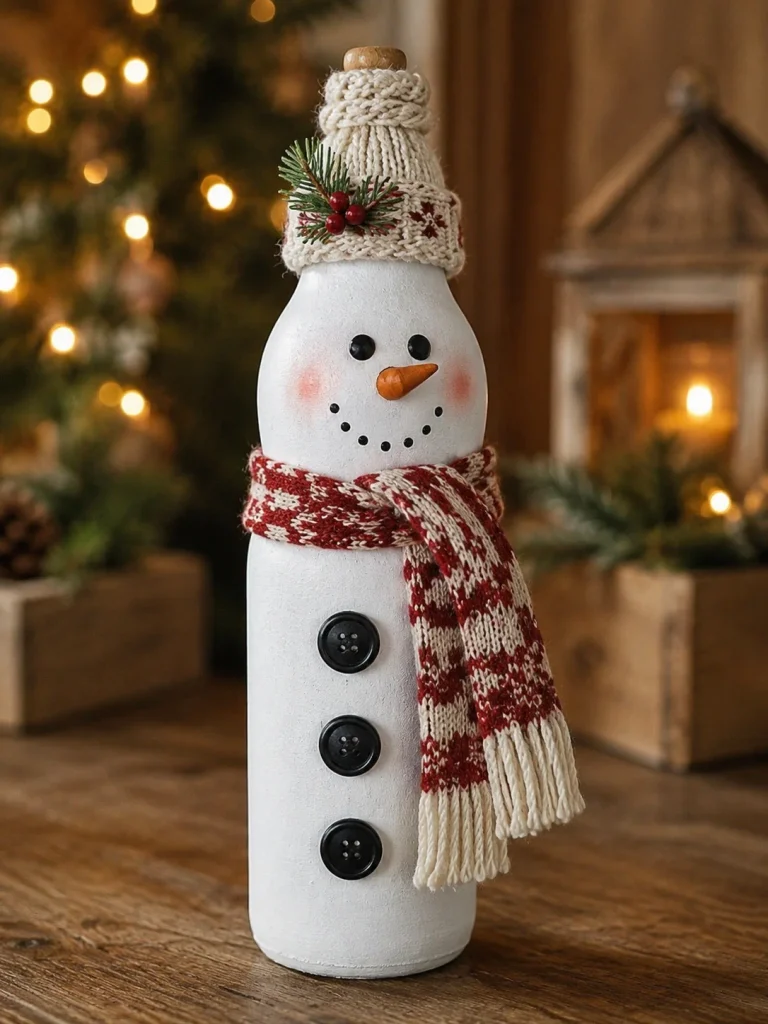
Rounded bottles are perfect for snowmen because the shape already gives you a head-and-body feel. This is also a good project for using scraps from an old sock or damaged knitwear.
Things You’ll Need
- Rounded glass bottle
- White acrylic or glass paint
- Orange paint or orange craft foam
- Black paint or small black beads
- Three buttons
- Knitted fabric scrap
- Red or green felt
- White pom-pom
- Hot glue
- Small brush
Making Process
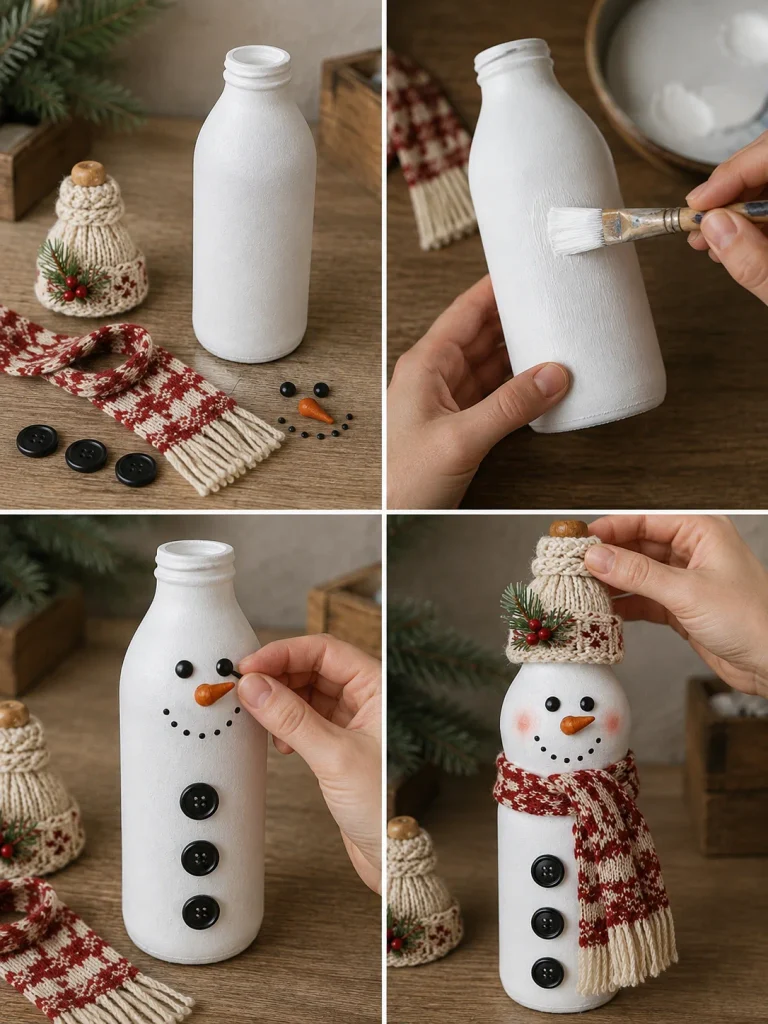
1. Paint the whole bottle matte white. Two thin coats usually give a smoother result than one heavy coat.
2. When the paint is dry, add the eyes, a tiny carrot-shaped nose, and a dotted smile. A faint touch of pink on the cheeks gives the snowman more personality without making it look overly cartoonish.
3. Glue three buttons down the front. Cut a narrow strip of knitted fabric for the scarf and wrap it naturally around the bottle shoulder. It does not need to sit perfectly straight.
4. Make a small winter hat from felt or knitted fabric and finish it with a pom-pom. Slip or glue the hat over the bottle opening.
5. One little pine sprig tucked into the hat is enough. The face and scarf should stay the focus.
5. Red Poinsettia Wrapped Christmas Bottle
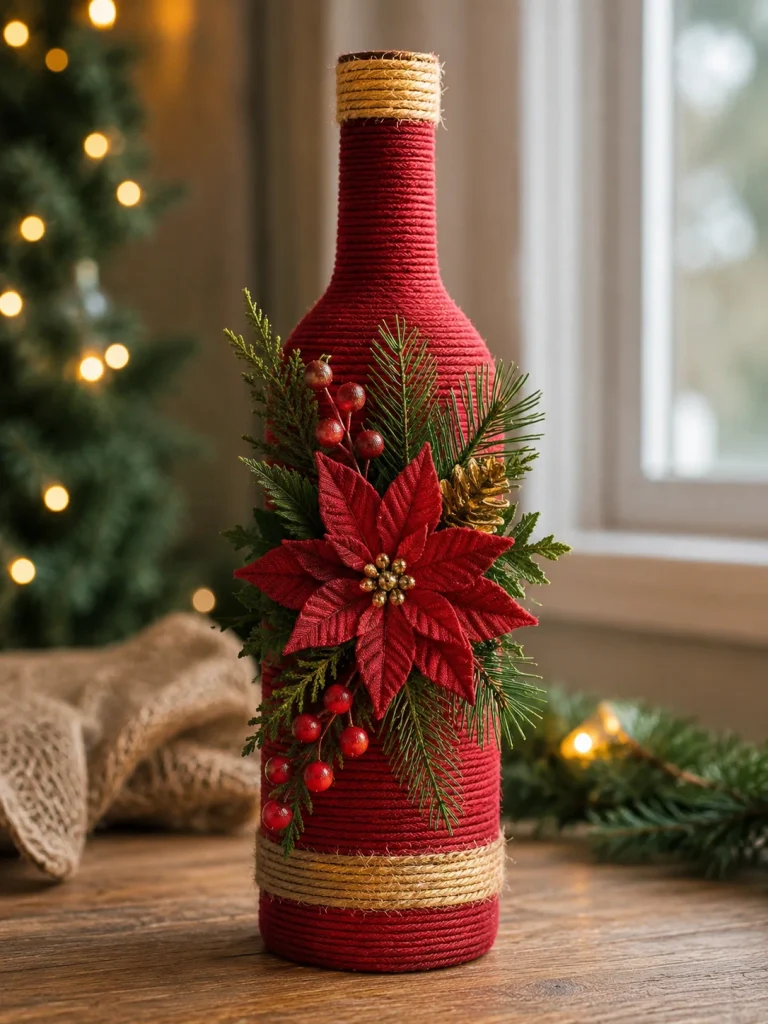
This is a nice break from character bottles. It feels richer and more grown-up, especially if your Christmas decor already includes deep red, dark green, and touches of gold.
Things You’ll Need
- Glass bottle
- Deep red cotton cord, yarn, or thin rope
- Jute twine
- Faux poinsettia
- Evergreen sprigs
- Red berries
- Small pinecone
- Gold beads or metallic accents
- Hot glue
Making Process
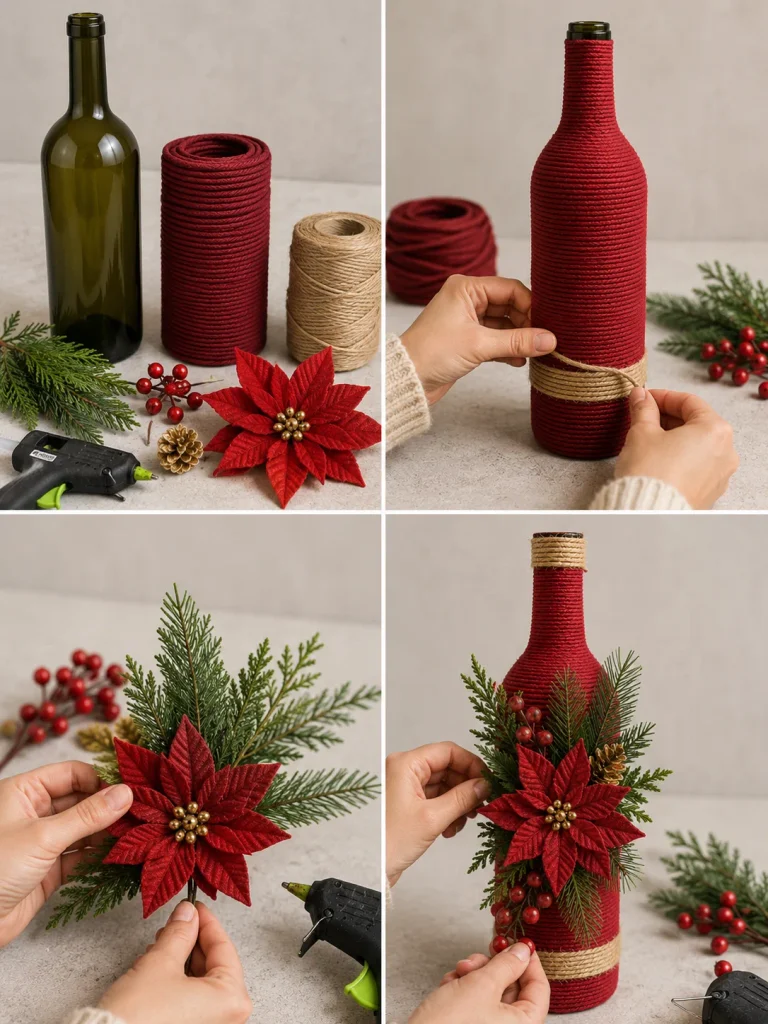
1. Begin wrapping the red cord at the bottom of the bottle. Keep every row close to the previous one so the glass does not show through. Add glue only at intervals and around the beginning and end points.
2. Wrap a narrow band of jute around the lower bottle or near the base. That natural texture keeps all the red from feeling flat.
3. Build the floral cluster separately before attaching it. Layer the poinsettia over pine, berries, and one small pinecone. If you use gold accents, keep them tiny.
4. Glue the finished cluster slightly off-center on the bottle. That small shift makes the arrangement feel less stiff.
5. This bottle works beautifully beside brass candleholders, wooden trays, or dark evergreen garlands.
6. North Pole Candy Cane Bottle
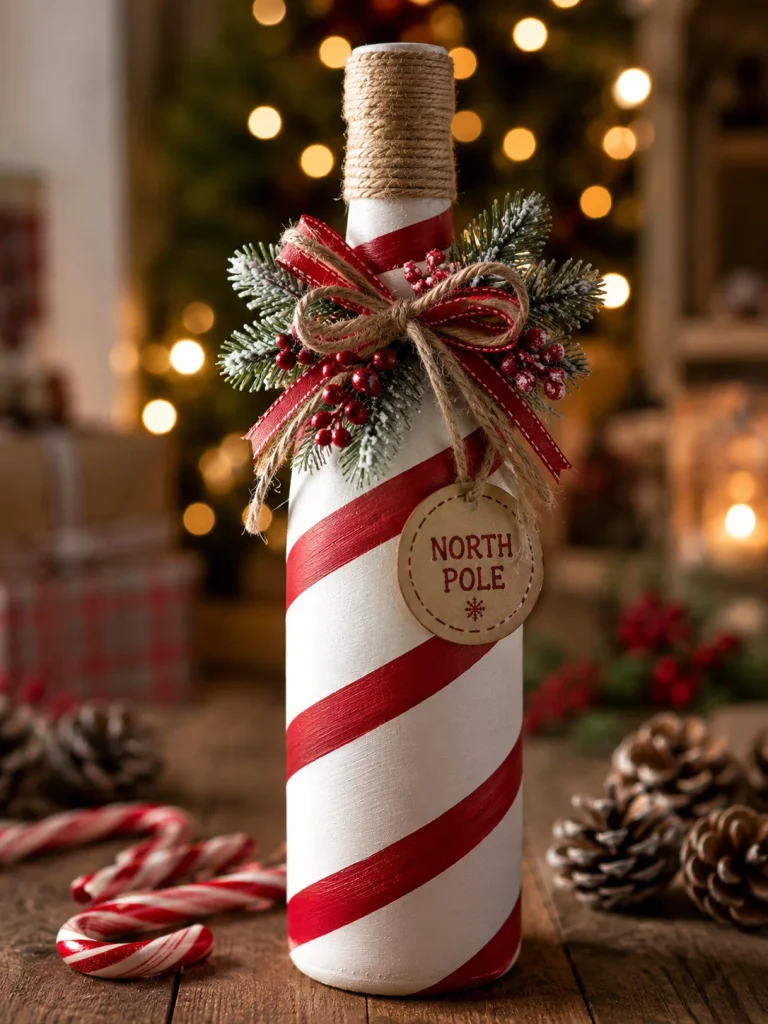
Red-and-white stripes bring instant Christmas energy. The trick is keeping the pattern clean and letting the candy-cane effect do most of the decorating.
Things You’ll Need
- Glass bottle
- White primer or white glass paint
- Red acrylic or glass paint
- Narrow painter’s tape
- Small sponge brush
- Frosted greenery
- Red ribbon
- Tiny bell or snowflake ornament
- Optional metallic gold paint
Making Process
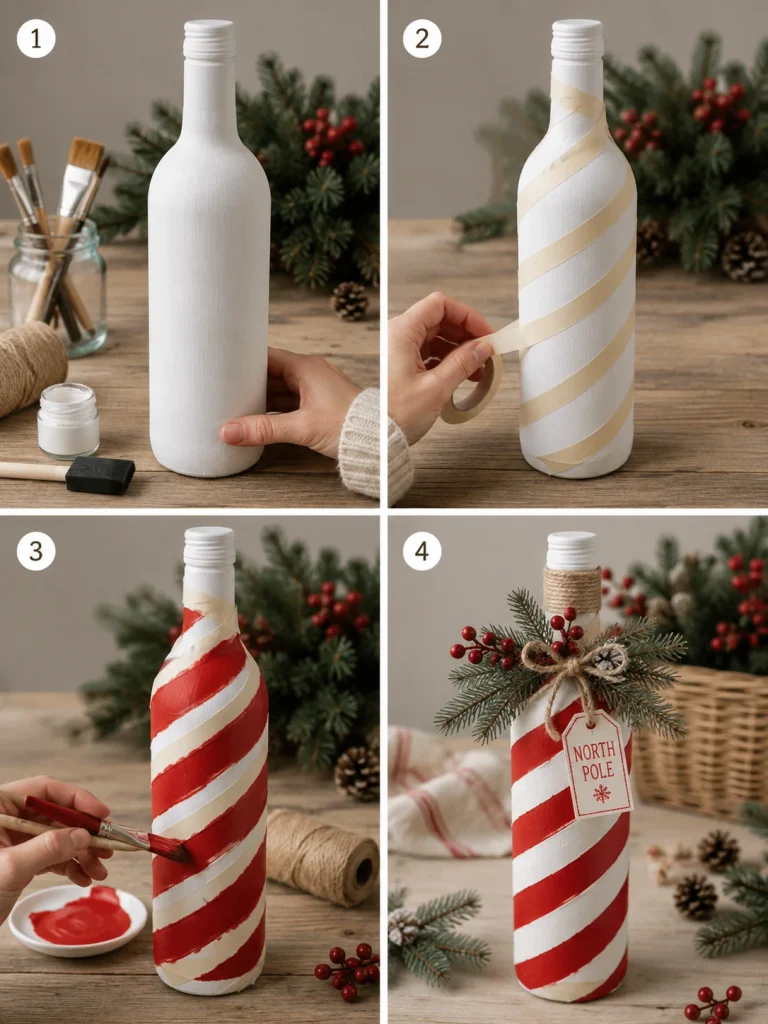
1. Paint the bottle white and allow it to dry completely.
2. Wrap narrow painter’s tape diagonally around the bottle, leaving even open spaces between the strips.
3. Paint the exposed sections red. A sponge brush helps reduce visible streaks.
4. Remove the tape carefully before the final red coat becomes rock-hard. This can help prevent the paint edge from tearing.
5. Add frosted greenery and a small red bow around the neck.
6. If you want a slightly dressier look, paint only the bottle rim or cap area with a soft metallic gold.
This bottle belongs naturally in a kitchen or hot-cocoa station. Put it near cookies, candy canes, or a gingerbread display and it immediately feels at home.
7. Woodland Christmas Cottage Bottle
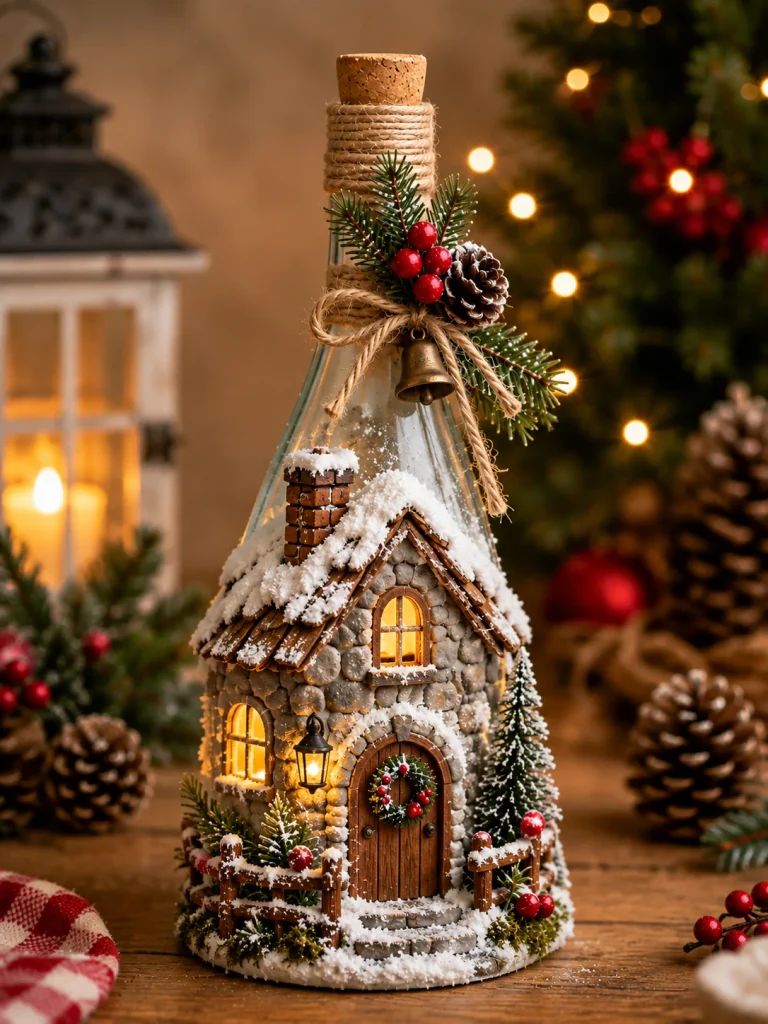
This one takes more time, but it is also the sort of project people stop to examine. The little cottage should feel attached to the bottle, not like a separate toy placed in front of it.
Things You’ll Need
- Wide glass bottle
- Air-dry clay, lightweight craft wood, or thick cardboard
- Brown, cream, and gray paint
- Mini evergreen trees
- Moss
- Tiny pinecones
- Small twigs
- Faux snow
- Red berries
- Warm LED light
- Craft glue or hot glue
Making Process
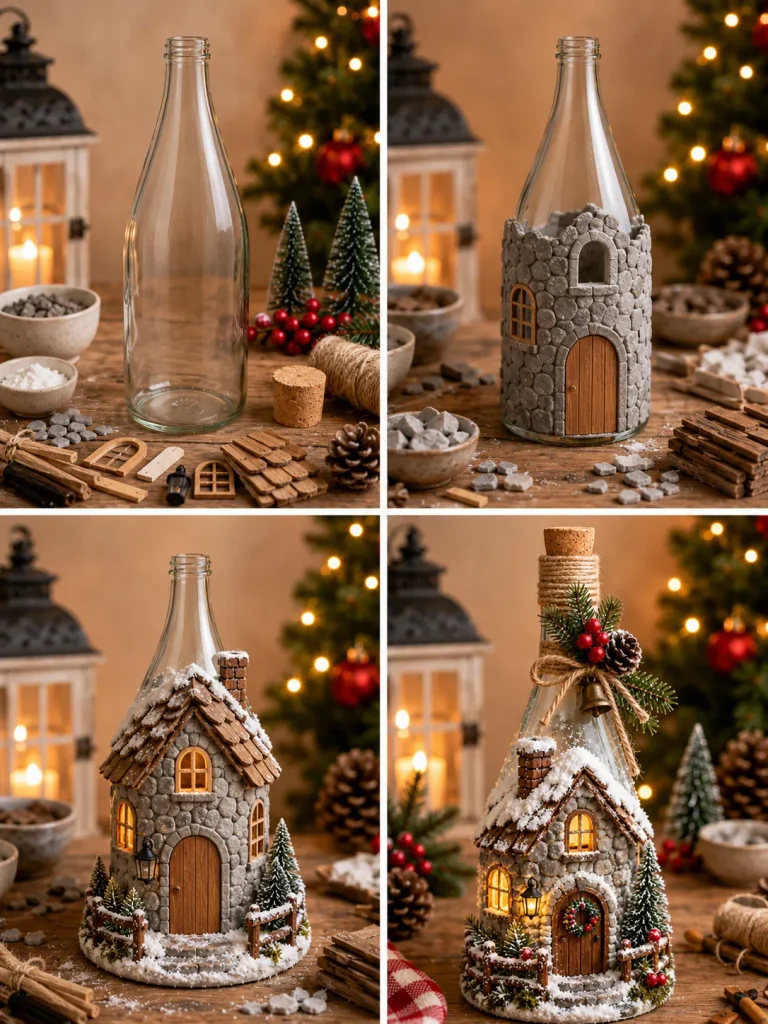
1. Sketch the cottage shape before gluing anything. Build a small front wall around the lower bottle with an arched door and one or two windows.
2. Create texture with clay lines, tiny craft sticks, or painted cardboard so the house reads as stone or timber. Let the structural pieces dry before adding mini decorations.
3. Add trees, moss, little logs, and a few berries around the base. Dust the roof and ground with faux snow.
4. If you want glowing windows, leave small openings and position a warm LED behind them. Test the light before you permanently close any section.
5. Keep the color palette wintery: brown, cream, white, forest green, and a few touches of berry red. Too many colors can make a tiny scene hard to read.
8. Elegant Christmas Peacock Bottle
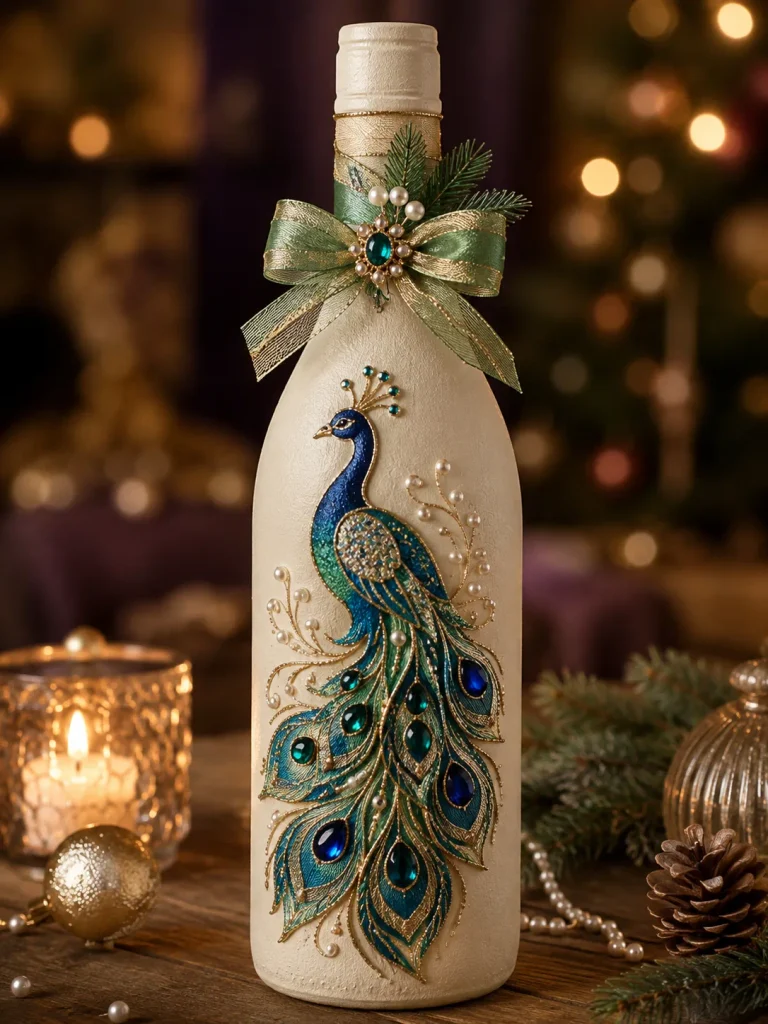
Not every Christmas bottle has to look rustic. This one works beautifully if you prefer jewel tones, gold details, and a slightly more formal holiday table.
Things You’ll Need
- Glass bottle
- Ivory or champagne base paint
- Sapphire blue paint
- Emerald or teal paint
- Metallic gold paint
- Fine detail brushes
- Pencil or removable sketch marker
- Small pearl beads or mirror accents
- Narrow velvet ribbon
- Strong craft glue
Making Process
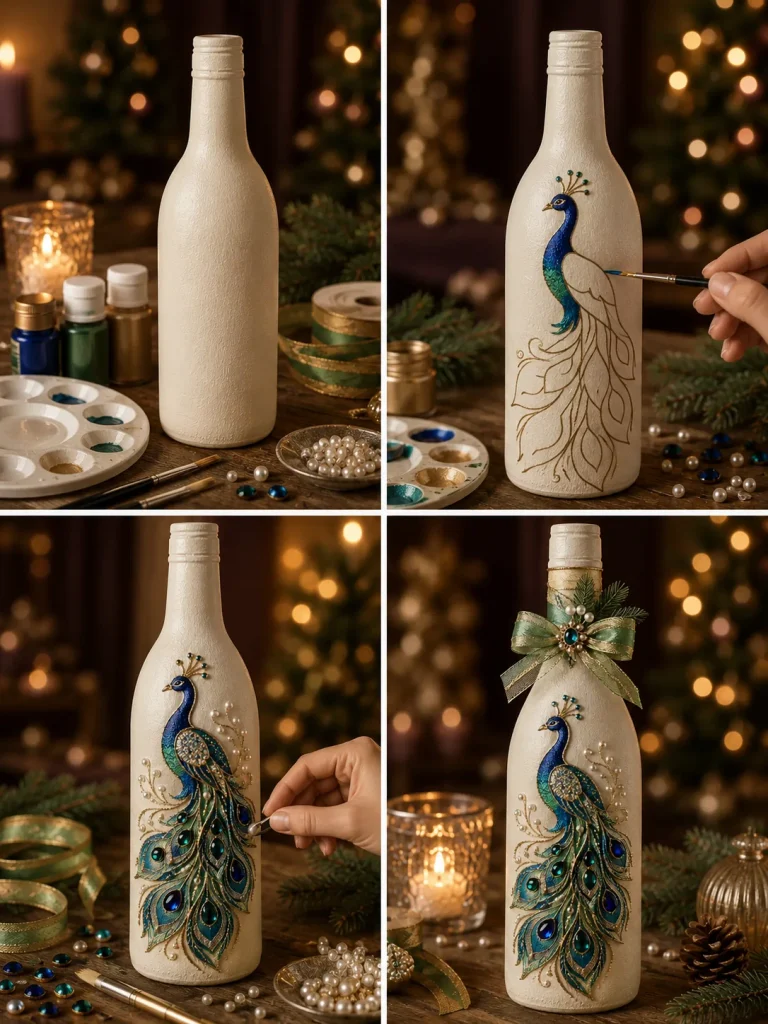
1. Paint the bottle ivory or pale champagne and let it cure. Lightly sketch the peacock body and tail before adding color.
2. Fill the body with deep sapphire blue. Build the tail with repeated teardrop shapes in emerald, teal, and gold. You do not need dozens of feathers; a simplified pattern often looks cleaner on glass.
3. Outline selected details with metallic gold. Add a few pearl beads or mirror accents to the tail, but leave plenty of painted surface visible.
4. Finish the neck with a narrow velvet ribbon. A tiny gold star or berry cluster can connect the design to Christmas without turning it into a themed character bottle.
5. Place it near gold ornaments, brass candleholders, or dark green foliage and the colors really stand out.
9. Gingerbread House Christmas Bottle
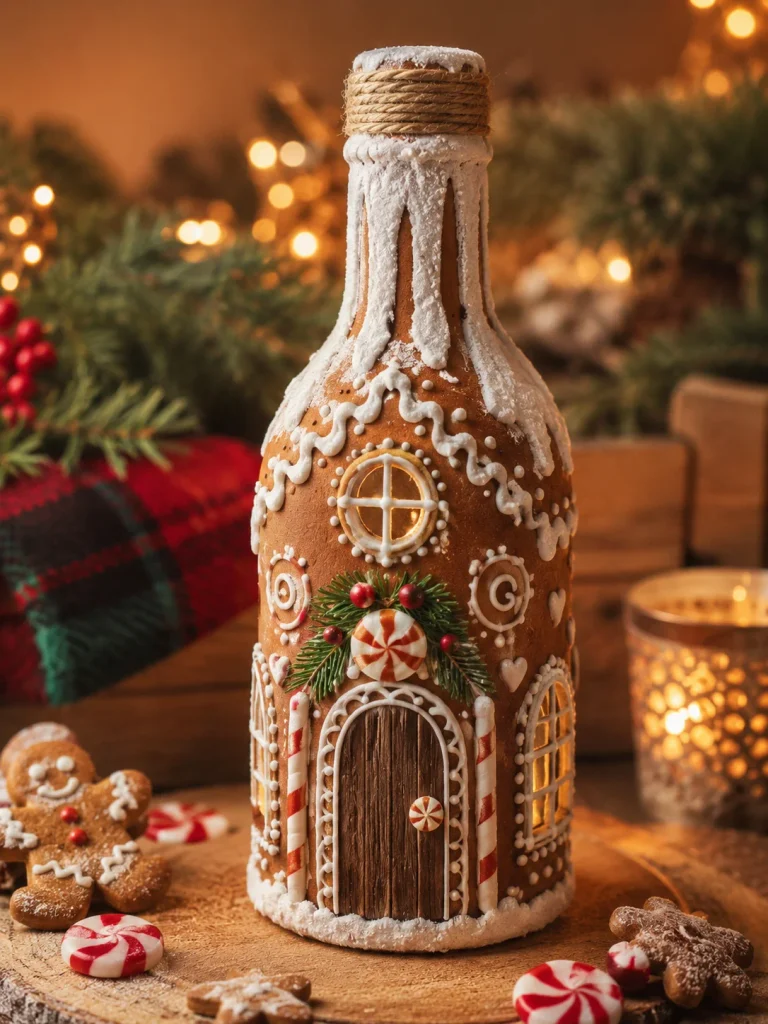
This bottle is playful, cozy, and especially fun for a kitchen Christmas display. The slightly imperfect icing lines are part of the charm, so do not stress about making every detail identical.
Things You’ll Need
- Glass bottle
- Warm brown paint
- White dimensional paint or puffy paint
- Red, green, and white craft clay or felt
- Small buttons or faux candy pieces
- White felt
- Fine brush
- Craft glue
Making Process
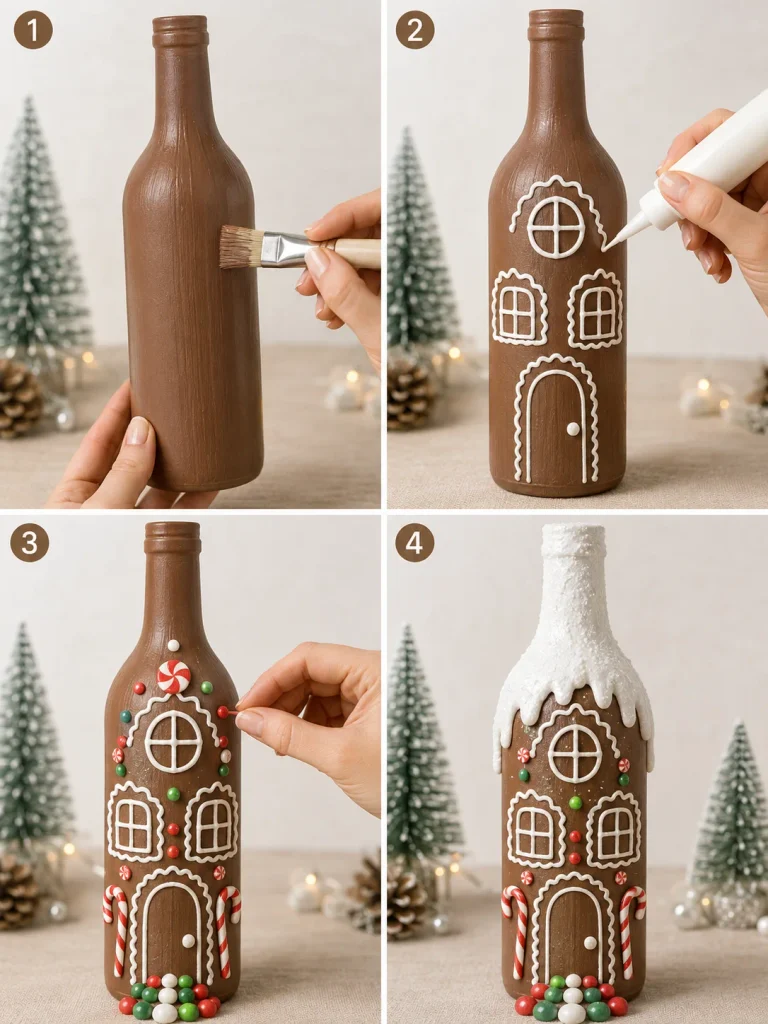
1. Paint the bottle a warm gingerbread brown. Once dry, use white dimensional paint to draw the door, windows, scalloped borders, roof lines, and icing dots.
2. Make small candy shapes from clay or felt. Peppermint circles, gumdrop shapes, and tiny red-and-white swirls work especially well.
3. If the bottle has broad shoulders, cut a strip of white felt to suggest a snow-covered roof. Attach it around the upper section.
4. Add the candy pieces sparingly. Leave some brown background visible so the bottle still reads as gingerbread rather than a pile of decorations.
5. A little wobble in the icing actually makes the bottle look more believable. Real gingerbread houses are never perfectly measured either.
10. Christmas Angel Bottle
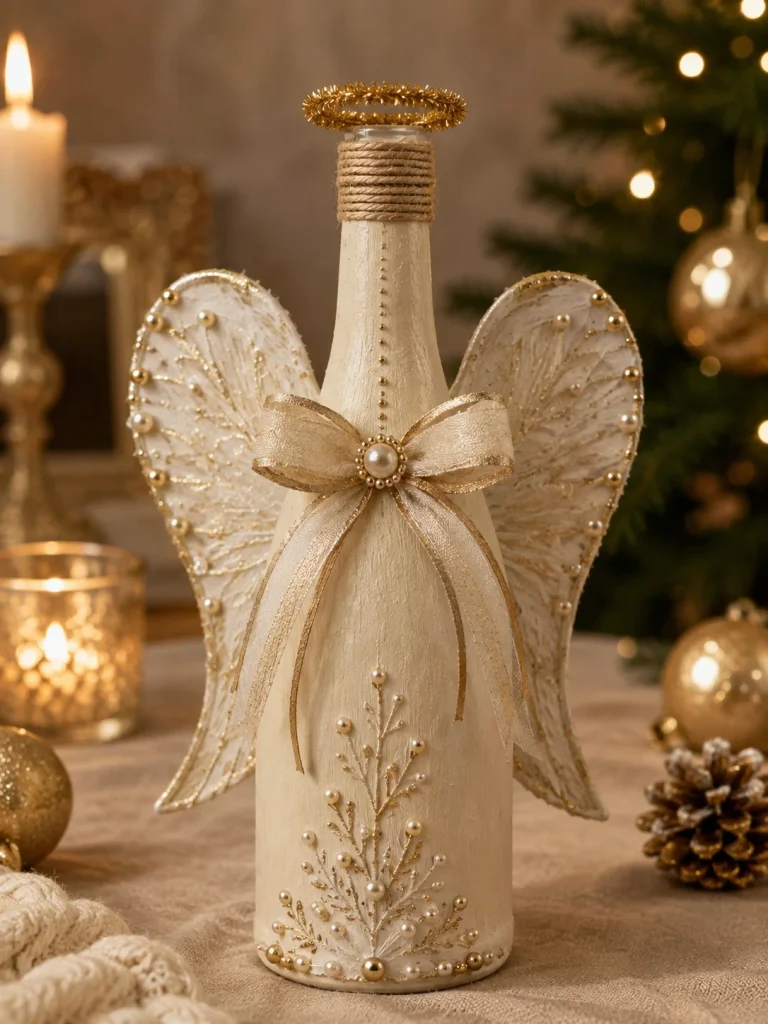
For a softer Christmas look, this angel bottle works beautifully with white, cream, gold, and pearl decorations. It can sit beside a nativity display or blend into a neutral holiday room.
Things You’ll Need
- Slender glass bottle
- Cream, white, or champagne paint
- Lightweight wings made from card, felt, wood, or feathers
- Gold craft wire
- Pearl beads
- Narrow gold ribbon
- Wooden ball or simple topper
- Strong glue
Making Process
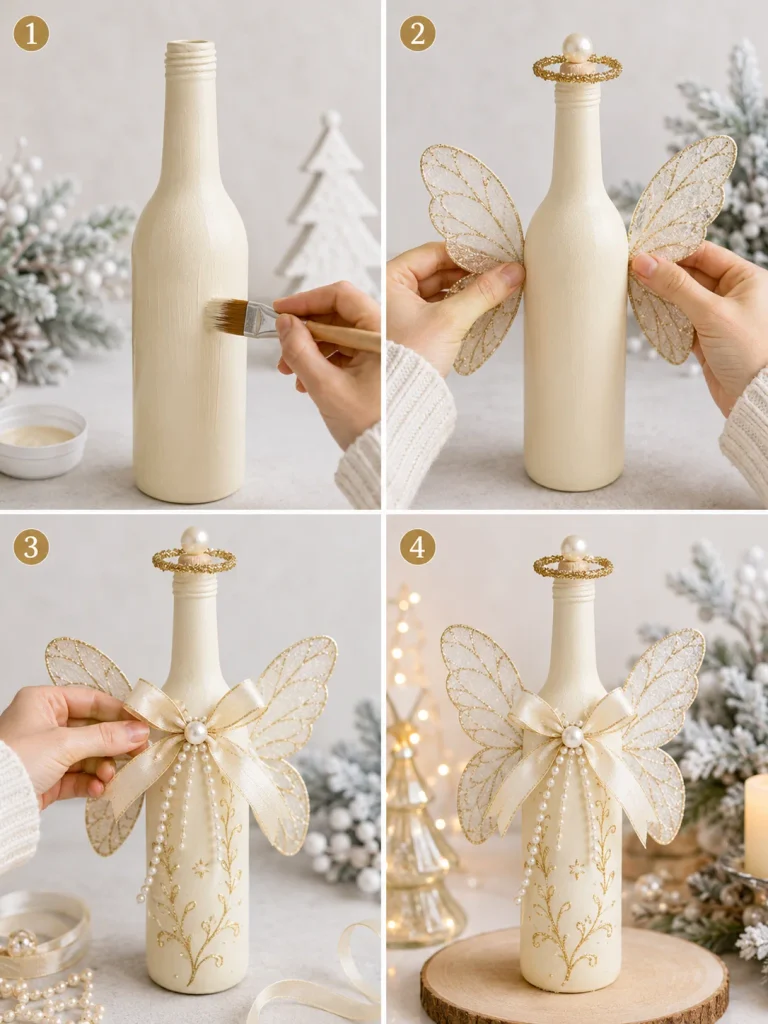
1. Paint the bottle and allow it to dry. Attach the wings to the back, making sure they are balanced and not so large that the bottle tips.
2. For the head, use a small wooden ball or a simple rounded topper. You can leave the face blank or add only tiny painted features.
3. Shape a halo from gold craft wire and secure it behind the head. Add a short line of pearl beads around the neckline.
4. Wrap the neck with a narrow gold ribbon and stop there. The angel looks better with a calm, uncluttered finish.
5. If you are making several, vary the wing material instead of changing the whole color scheme. One with felt wings and another with wooden wings will still look like a set.
More Ideas for the Holiday Season

45 Fancy Christmas Tree Decor Ideas for a Stunning Holiday Home
45 Modern Floral Christmas Tree Ideas for Chic and Stylish Holiday Decor
45 Unique Vintage Peacock Christmas Tree Ideas for a Grand Holiday Display
23 Creative DIY Wooden Christmas Gnomes for Festive Holiday Decorating

23 Easy DIY Christmas Village Houses Ideas for Festive Holiday Decor
24 Enchanting DIY Halloween Houses Ideas for Spooky Fall Decor
11. Santa Suit Bottle
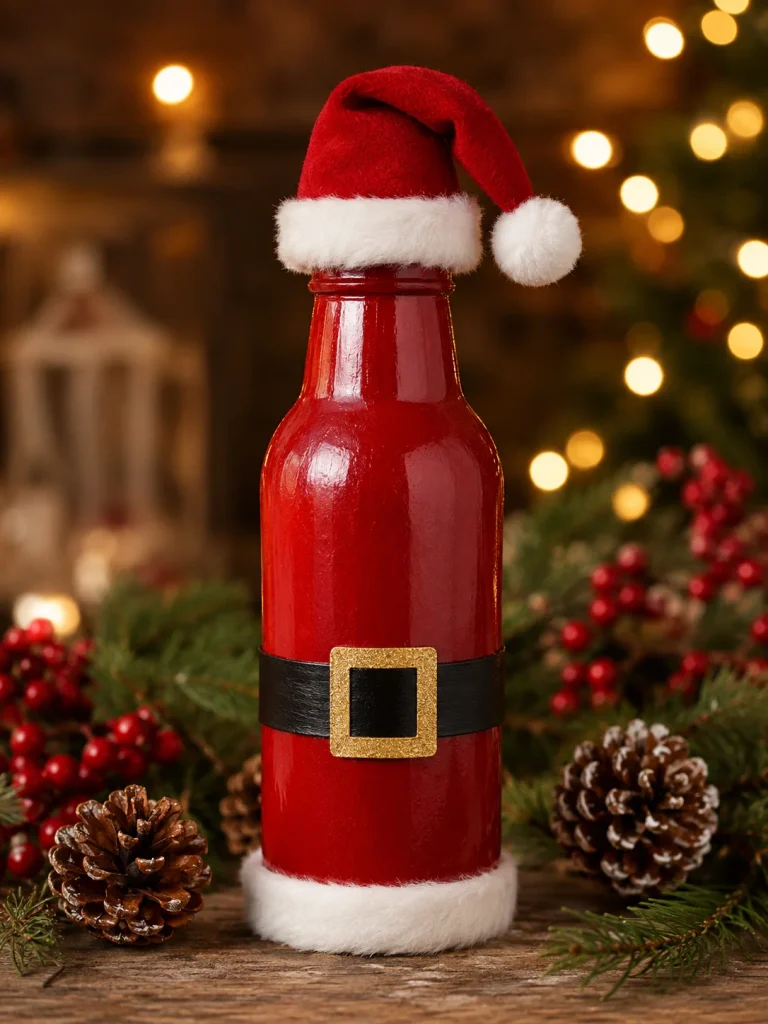
This is one of the easiest ideas in the article, and it still reads as Christmas from across the room. The clean red, black, white, and gold color blocks do the job quickly.
Things You’ll Need
- Glass bottle
- Rich red paint
- White faux fur or fluffy trim
- Black ribbon or black craft foam
- Gold buckle
- Three small black or gold buttons
- Red felt
- White pom-pom
- Hot glue
Making Process
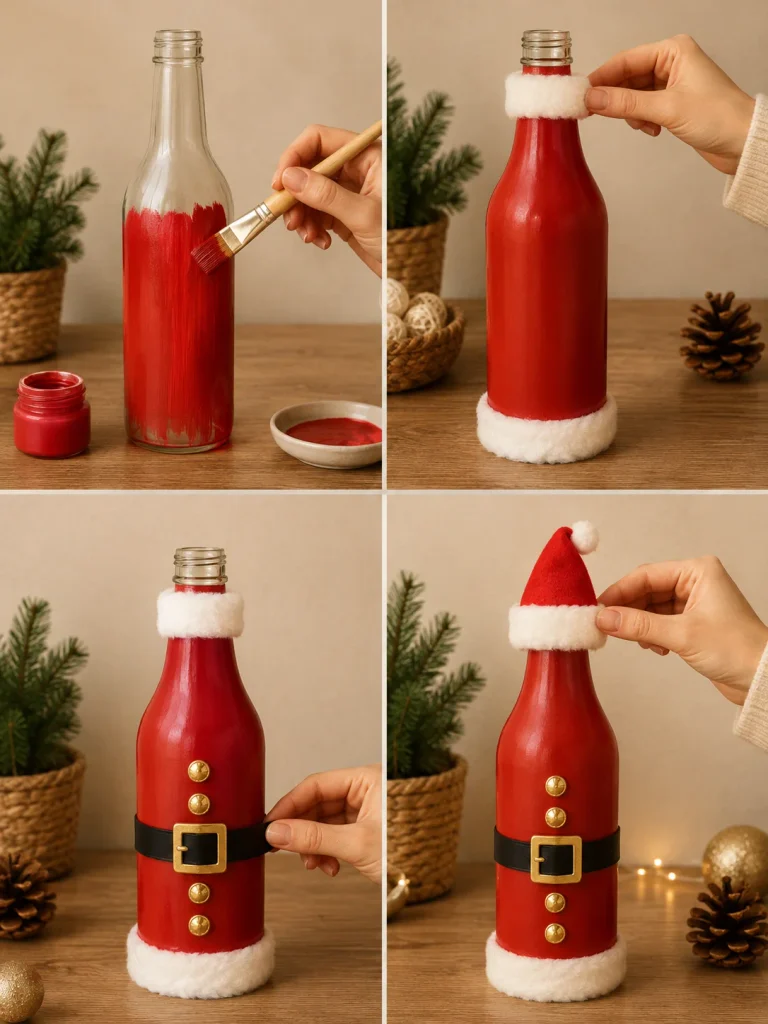
1. Paint the bottle red and let it dry fully. Add white faux-fur trim around the bottom and near the shoulder or neck.
2. Wrap a black ribbon around the middle for Santa’s belt. Glue a square gold buckle in the center.
3. Add three small buttons down the front. Make a simple felt Santa hat sized to fit over the bottle neck and finish it with white trim and a pom-pom.
The temptation is to add holly, glitter, snowflakes, bells, and lettering, but the suit works because it is simple. If you make a set, vary the bottle shapes rather than adding more decorations.
12. Christmas Nutcracker Bottle
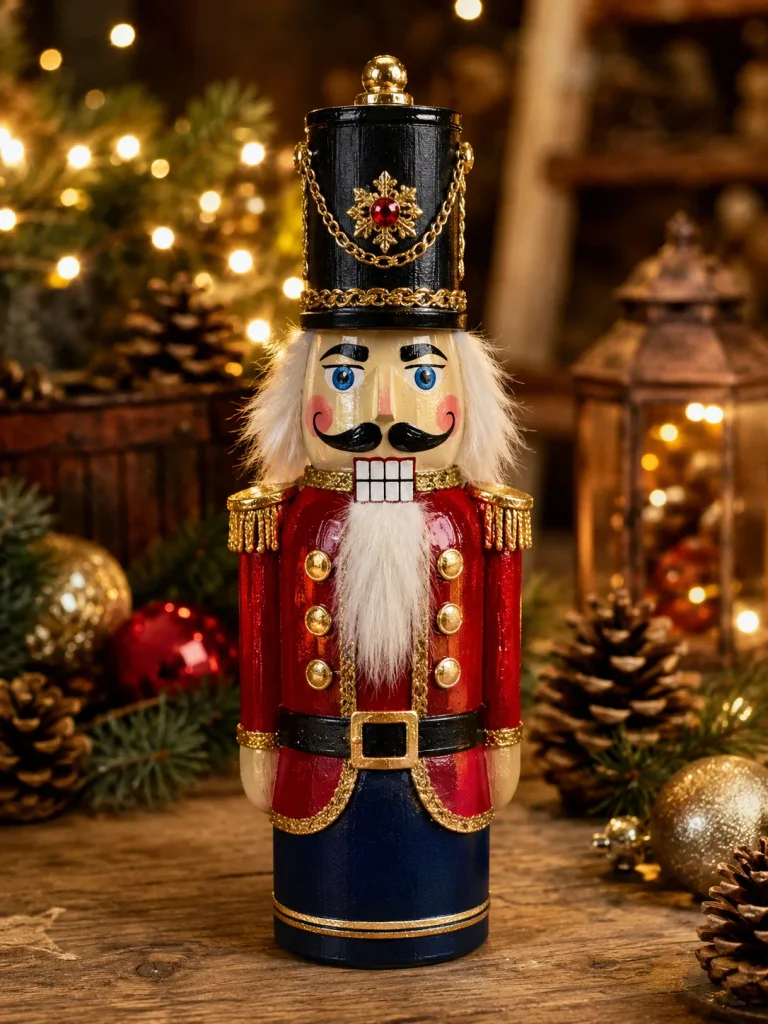
A tall, straight bottle already has the upright shape of a nutcracker soldier, so most of the work is painting the sections in the right order.
Things You’ll Need
- Tall straight-sided bottle
- Red, navy, black, cream, white, and gold paint
- Fine detail brushes
- Black ribbon or craft foam for the belt
- Gold buckle
- White faux fur or yarn for hair and beard
- Cardstock or felt for the hat
- Small gold embellishments
- Glue
Making Process
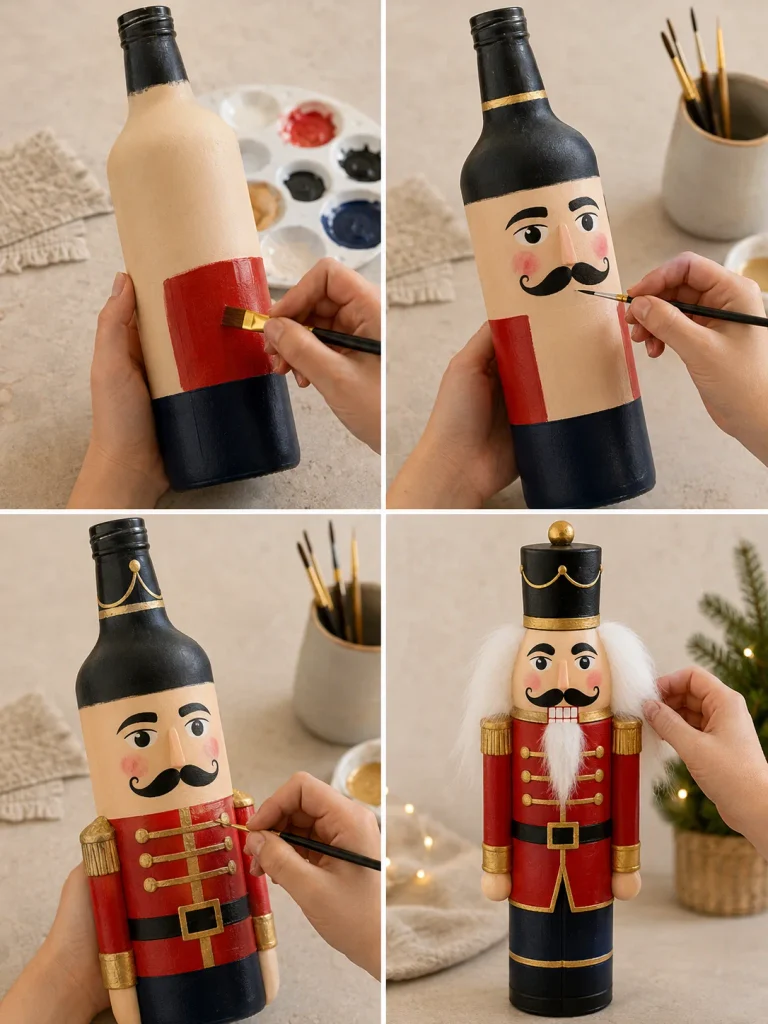
1. Block in the large colors first: skin tone for the face, red for the jacket, navy for the trousers, and black for the boots or hat.
2. Once those areas are dry, paint the eyes, eyebrows, rosy cheeks, curled moustache, and the rectangular nutcracker teeth.
3. Add the belt, buckle, gold jacket trim, buttons, and shoulder details. Small gold beads can work as buttons if painting circles is frustrating.
4. Attach white hair at the sides and a little beard below the mouth. Build a tall black hat from card or felt and slide or glue it over the neck.
5. A nutcracker can handle more detail than most bottle crafts, but keep the colors limited so the face does not get lost.
13. Snowy Pinecone Woodland Bottle
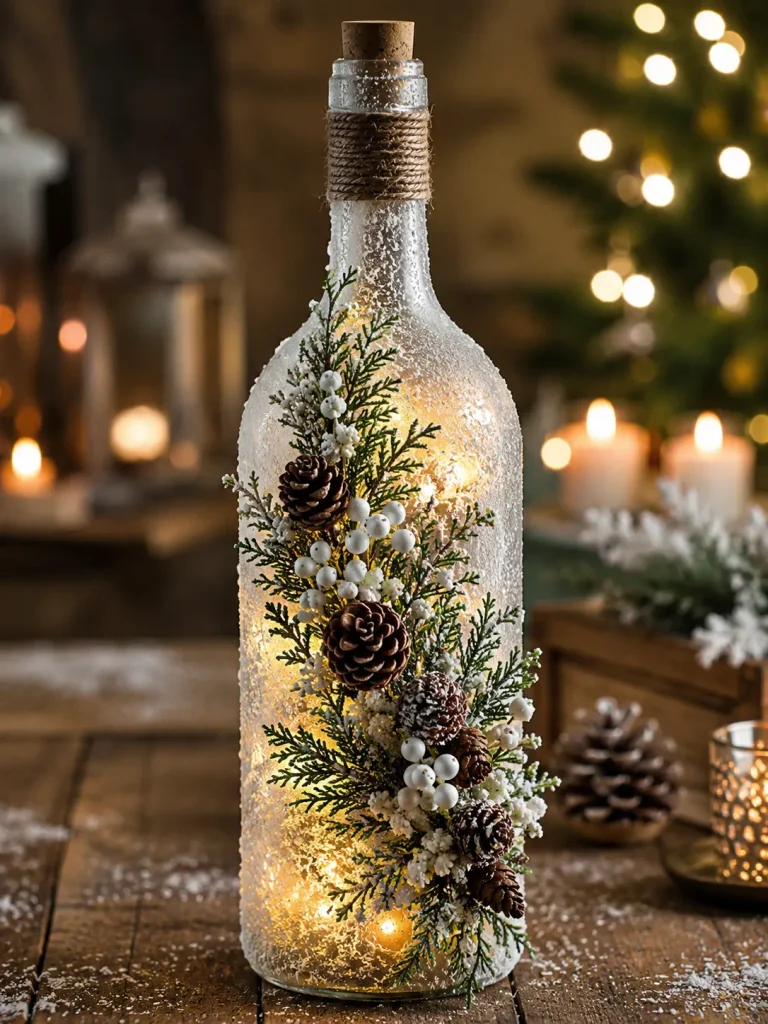
This one is a favorite if your Christmas decor leans natural. The bottle stays mostly simple while the greenery climbs diagonally across one side.
Things You’ll Need
- Clear glass bottle
- Frosted glass paint or spray
- Evergreen sprigs
- Mini pinecones
- White berries
- Faux snow
- Warm micro LED lights
- Twine
- Hot glue
Making Process
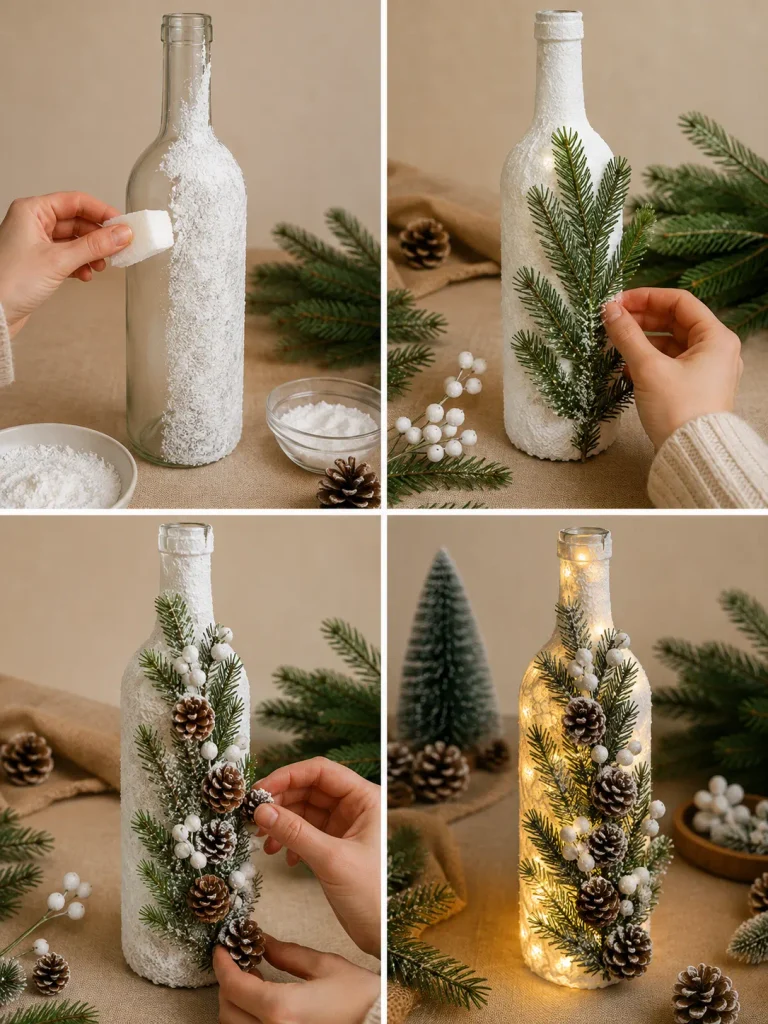
1. Give the bottle a light frosted finish. Do not cover every part equally; a little variation looks more natural once the lights are on.
2. Lay out your greenery on the table before gluing it. Build one diagonal line from the lower left toward the upper right, or reverse it if the bottle shape suits that better.
3. Glue evergreen pieces first, then tuck in pinecones and white berries. Dab faux snow onto selected areas rather than coating everything.
4. Insert the warm lights after the outside decorations are secure. Wrap the neck with twine and, if needed, add one tiny pinecone or wood charm.
5. Because the colors are mostly green, white, and brown, this bottle can stay out through January without looking overly Christmas-specific.
14. Christmas Tree Inside a Bottle
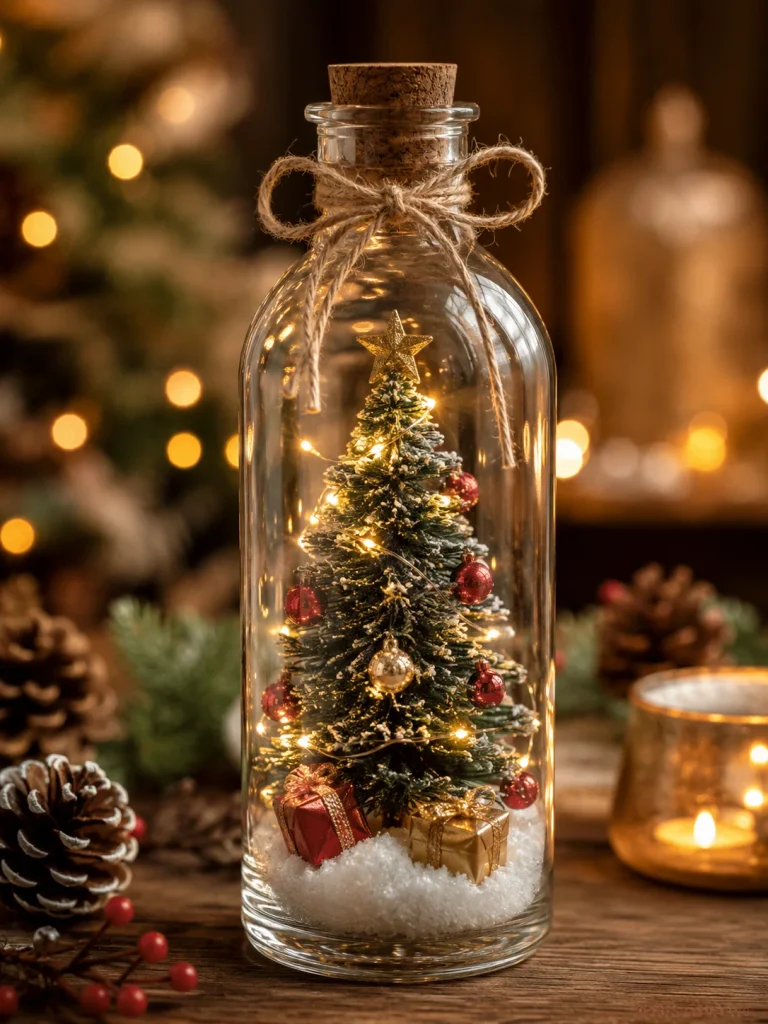
A wide-mouth bottle is worth saving for this project. The tree should be the star, so the outside decoration stays simple.
Things You’ll Need
- Clear wide-mouth bottle
- Faux snow
- Small bottle-brush Christmas tree
- Tiny beads or mini ornaments
- Mini star topper
- Warm micro lights
- Mini gift boxes
- Cork
- Velvet ribbon or twine
- Tweezers
Making Process
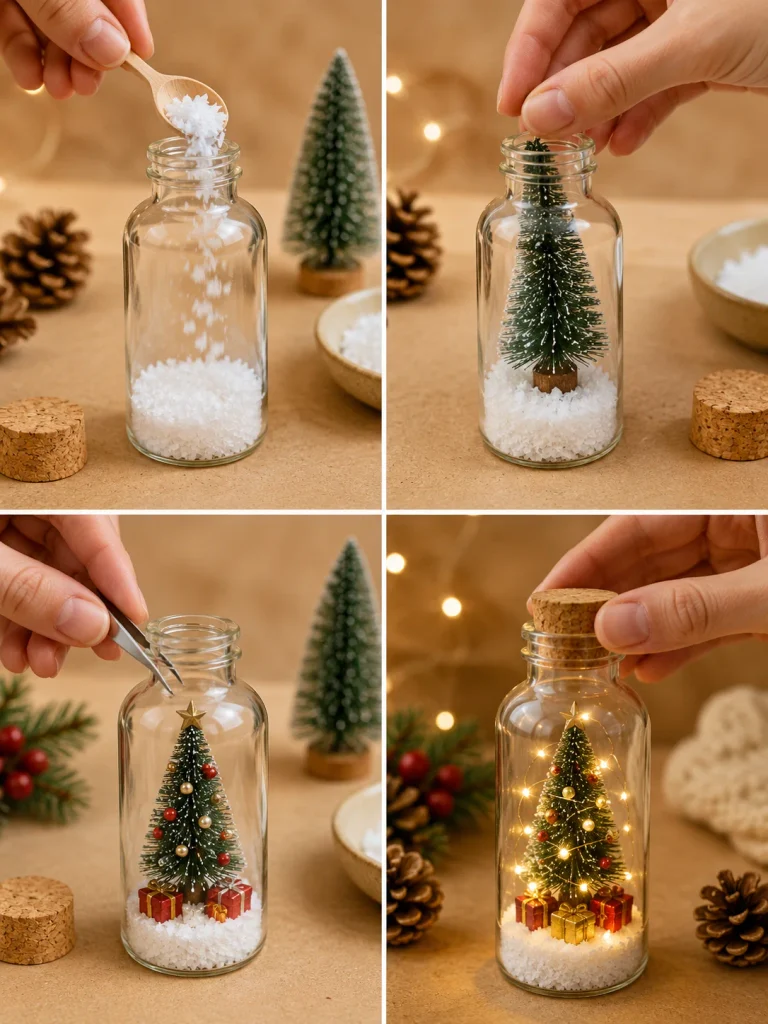
1. Pour faux snow into the bottle to create a soft base. Position the tree in the center and make sure it stands straight.
2. Decorate the tree with tiny beads, very small baubles, or miniature ornaments. Add a star topper if the bottle opening allows it.
3. Place two or three miniature gift boxes around the base. Use tweezers for fiddly pieces rather than shaking the bottle and hoping they land correctly.
4. Wind or feed the lights around the tree. Close the top with a cork and tie a simple ribbon at the neck.
Do not decorate the outside heavily. Clear glass is what makes the tiny scene feel special.
15. Scandinavian Christmas Bottle
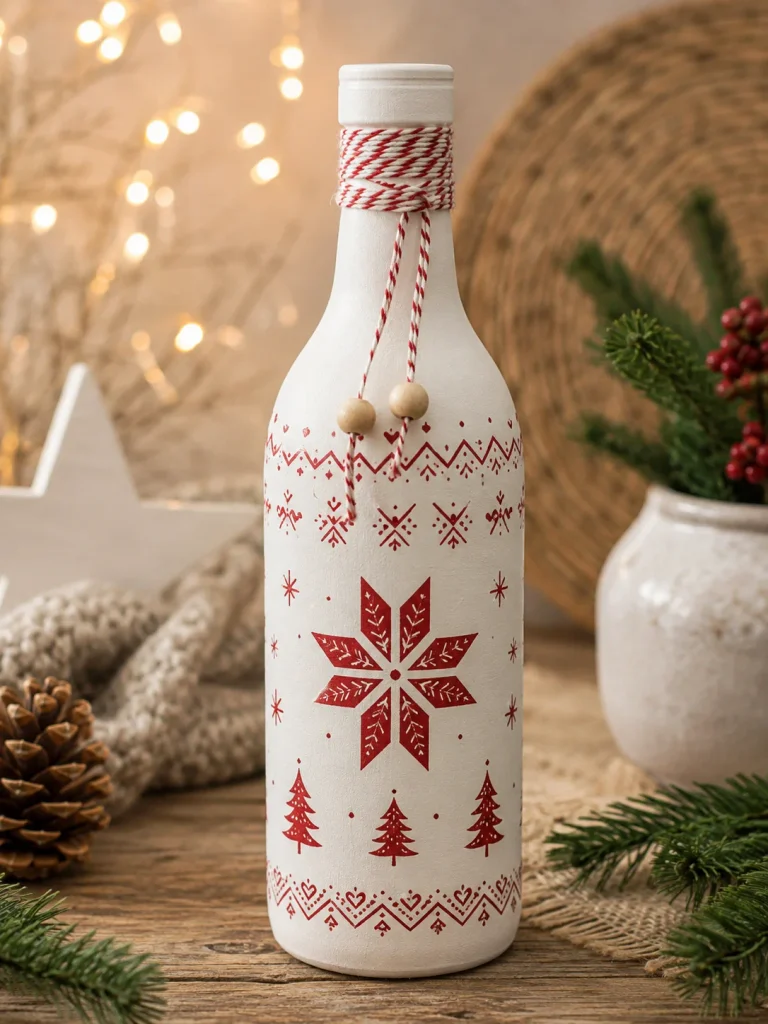
This idea is a nice reset after several detailed projects. The bottle relies on a cream background, red folk-style patterns, and plenty of empty space.
Things You’ll Need
- Glass bottle
- Matte cream paint
- Red acrylic paint
- Fine detail brush
- Pencil or removable marker
- Red-and-white baker’s twine
- Natural wooden beads
- Clear sealer
Making Process
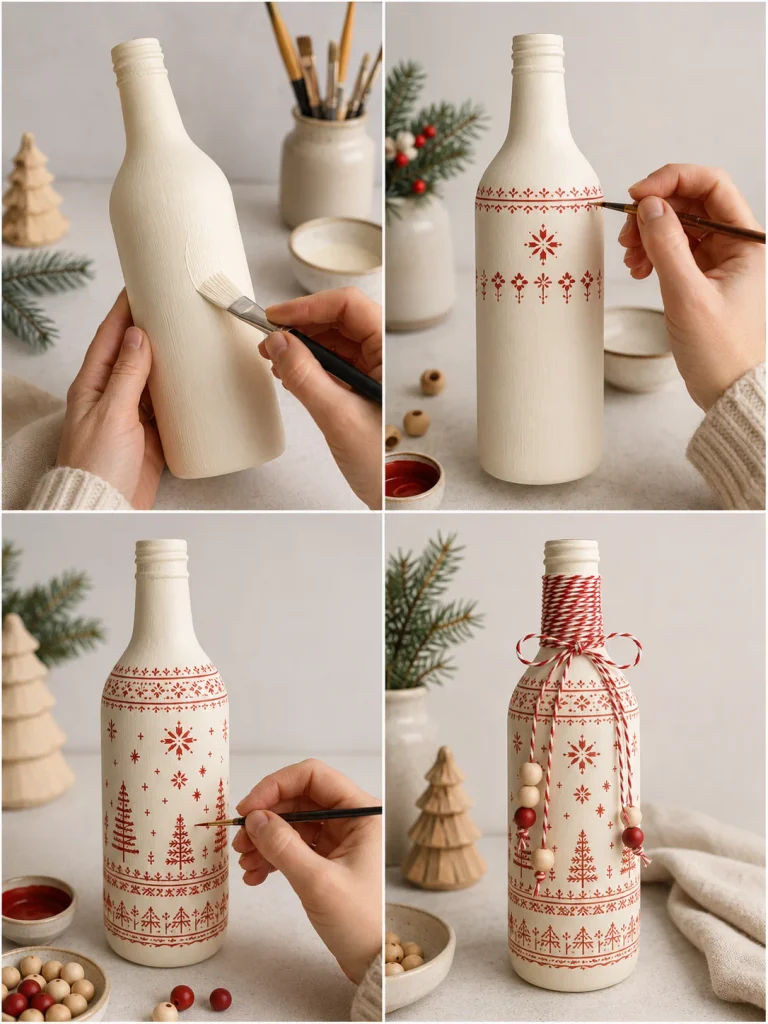
1. Paint the bottle matte cream and let the surface cure. Lightly sketch your main pattern bands if you are nervous about painting freehand.
2. Use a fine brush to add snowflakes, simple trees, stars, diamonds, dots, and geometric borders. Keep the pattern bands separated by open cream areas.
3. Wrap red-and-white twine around the neck. Thread one or two wooden beads onto the loose ends.
4. When the paint is fully dry, add a clear sealer if you plan to reuse the bottle for several years.
The biggest styling tip is to stop early. Scandinavian-inspired designs look best when there is room for the eye to rest.
16. Cozy Christmas Gnome Bottle
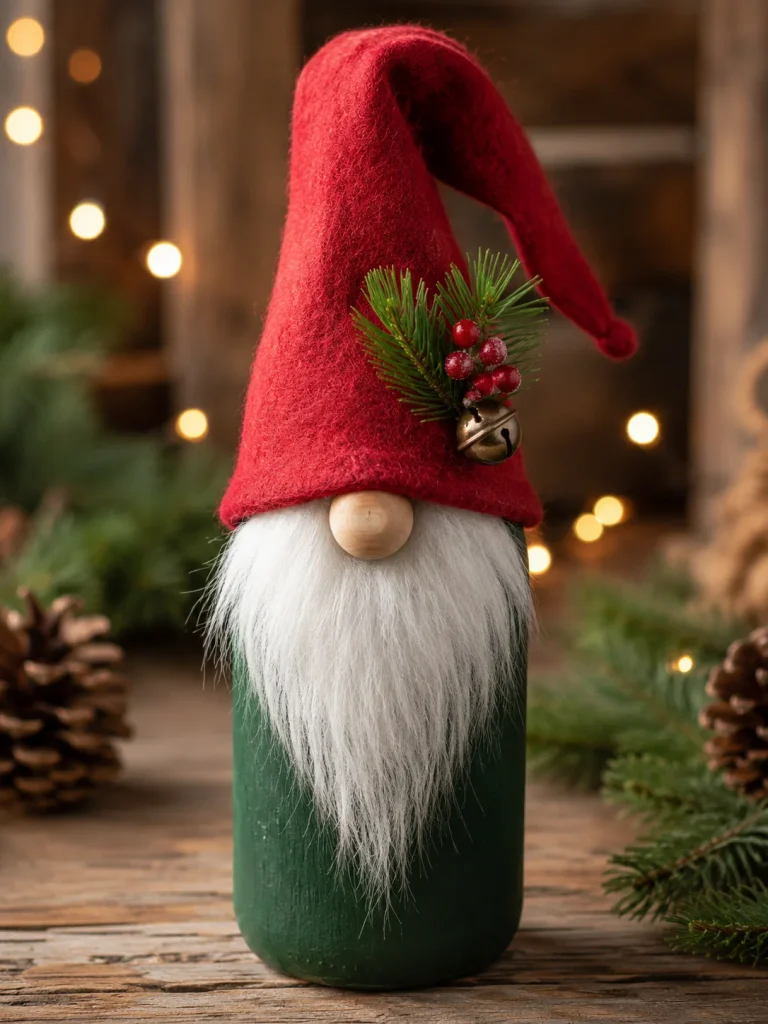
Gnome bottles are wonderfully forgiving because the face is mostly hidden. If you do not enjoy detailed painting, this is one of the easiest character ideas to try.
Things You’ll Need
- Glass bottle
- Forest green or muted red paint
- White faux fur
- Large wooden bead for the nose
- Red felt or knitted fabric
- Small bell
- Evergreen sprig
- Red berries
- Hot glue
- Scissors
Making Process
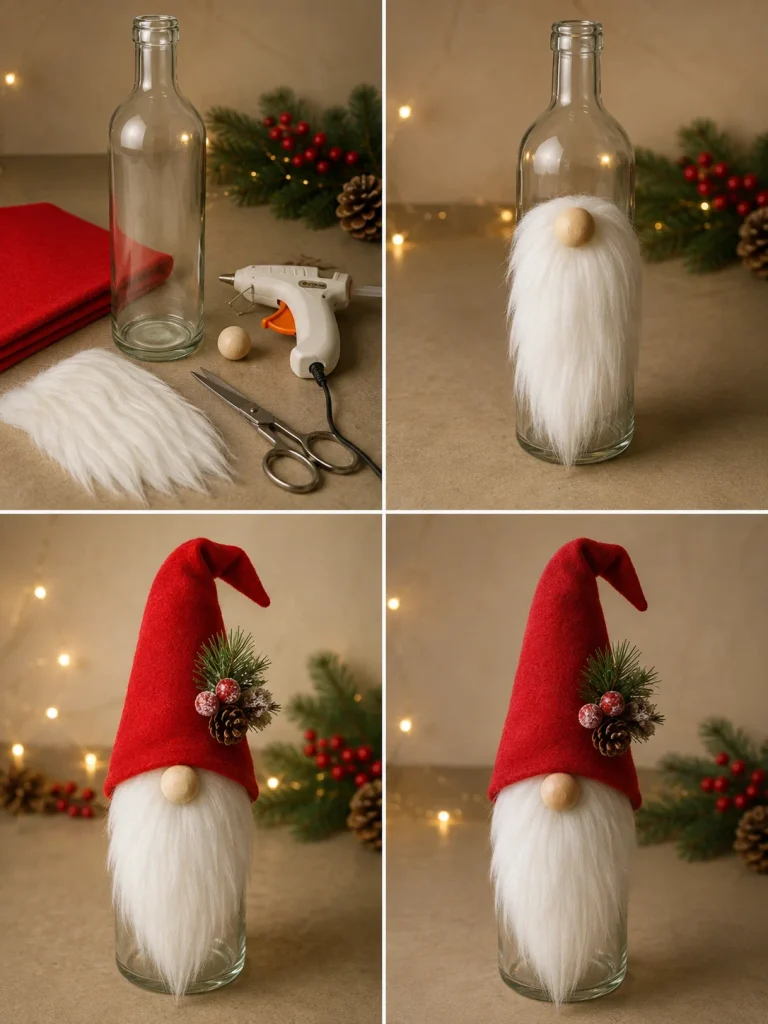
1. Paint the bottle or wrap the lower half in fabric. Cut a strip of faux fur wide enough to cover the upper front, keeping the fibers pointing downward.
2. Glue the beard in place. Add the wooden bead right above the beard line for the nose.
3. Make a tall cone-shaped hat from felt or knitted fabric. Pull it low over the bottle neck so the edge nearly touches the nose. The gnome does not need visible eyes.
4. Decorate the hat with one little bell, pine sprig, or berry cluster. Avoid covering the whole hat; the long red shape is part of the charm.
You can make a set in different body colors while keeping the same white beard and wooden nose.
17. Winter Cardinal Bird Bottle
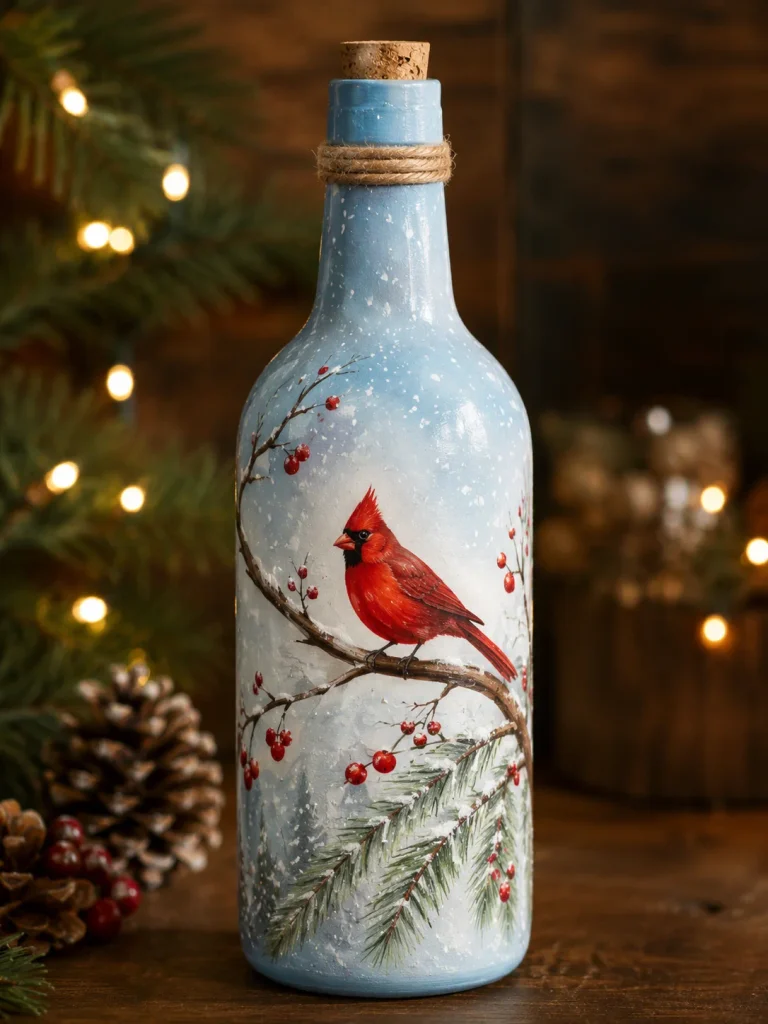
A bright red cardinal against pale blue snow gives you Christmas color without bows, Santa hats, or glitter. It also looks lovely in daylight, which is not true of every light-based bottle project.
Things You’ll Need
- Glass bottle
- Pale blue, white, brown, green, red, and black paint
- Fine and medium brushes
- Sponge
- Twine
- Cork
- Optional clear sealer
Making Process
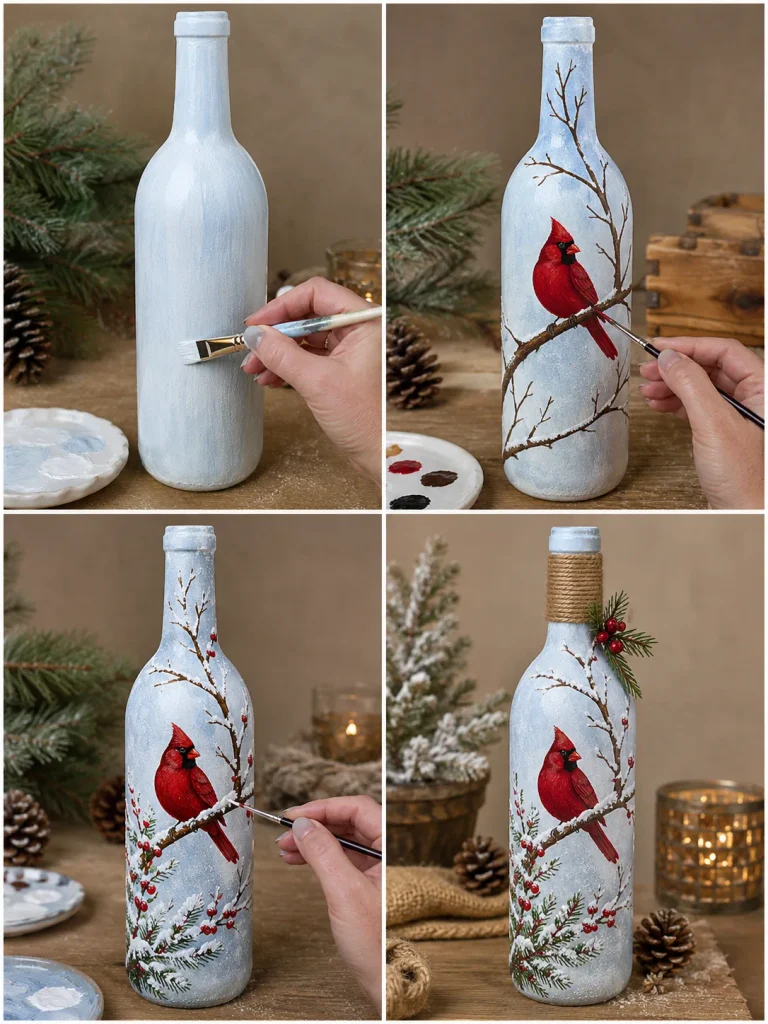
1. Blend pale blue and white over the bottle to create a soft winter background. A sponge can help soften the transition.
2. Paint a brown branch curving across the lower half. Add smaller bare twigs and a few evergreen tips.
3. Sketch the cardinal lightly, then paint the red body, black face marking, wing details, and beak. Keep the bird large enough to be seen from a distance.
4. Add red berries and small patches of snow along the branch. Flick or dot white paint across the background for falling snow.
5. Wrap the neck with twine and add a cork. The painted scene is detailed enough that it does not need extra ribbon.
18. Mini Christmas Fireplace Bottle
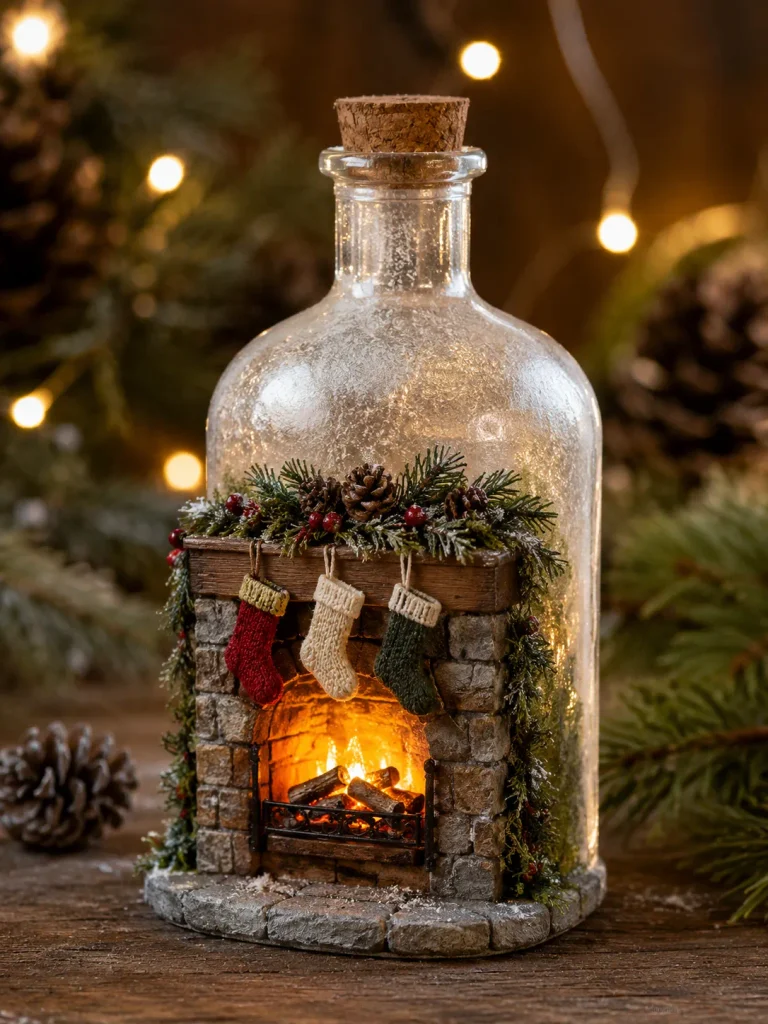
This project takes patience, but it is one of the ideas people are most likely to pick up and inspect. The tiny stockings and glowing fire make it feel like a miniature room built onto the bottle.
Things You’ll Need
- Wide glass bottle
- Air-dry clay, thick cardboard, or craft foam
- Craft sticks
- Gray, brown, cream, and red paint
- Mini logs or small twigs
- Warm LED light
- Mini stockings
- Evergreen sprigs
- Red berries
- Hot glue
Making Process
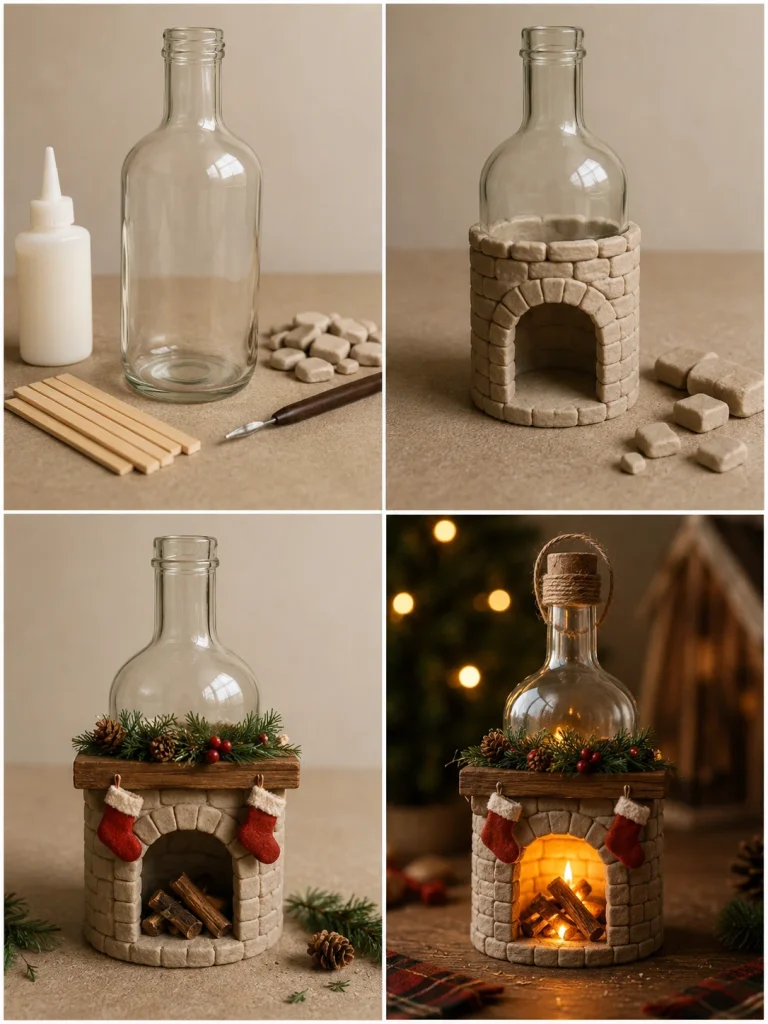
1. Build the fireplace surround around the lower front of the bottle. Shape an arched opening and make sure there is enough room for the light source behind the logs.
2. Add brick, stone, or plaster texture with clay pieces, paint, or craft foam. Let the structure dry before decorating.
3. Arrange tiny twigs inside the opening as logs. Hide a warm LED behind or beneath them so the fire glows without showing a large bulb.
4. Create a narrow mantel ledge. Add a thin strip of greenery, a few berries, and two or three miniature stockings.
5. Leave the upper part of the bottle clear or lightly frosted. That open glass keeps the finished piece from feeling too heavy.
19. Frosted Reindeer Silhouette Light Bottle
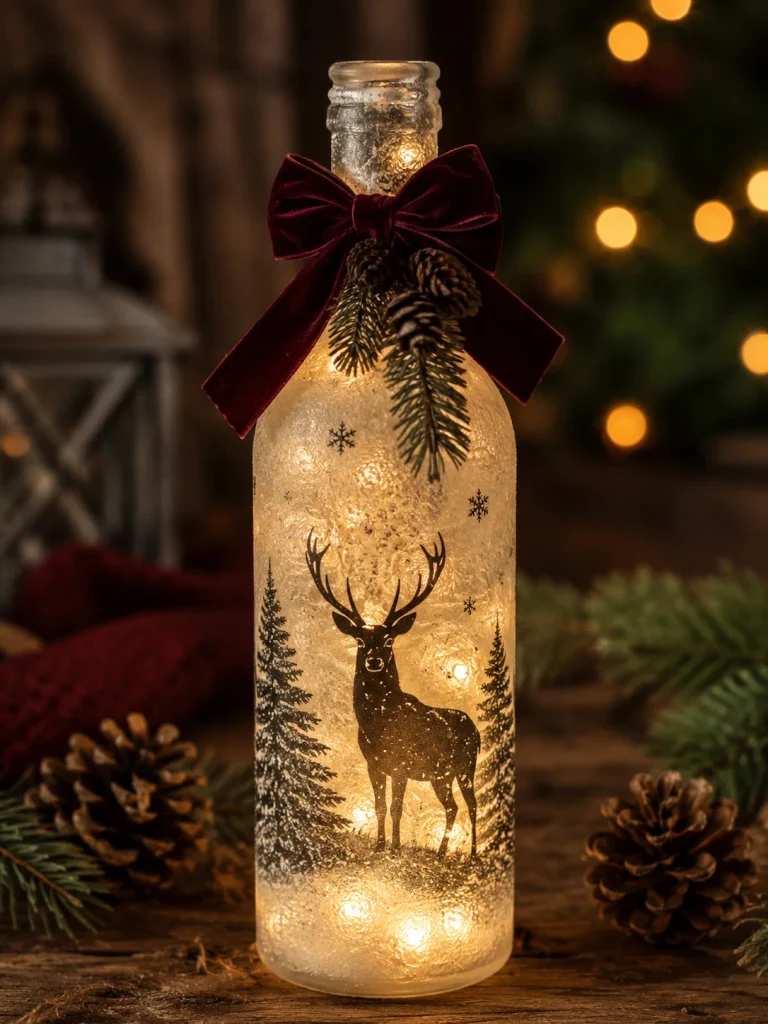
This is the more grown-up reindeer option. Instead of a face and red nose, the bottle uses a dark woodland silhouette against glowing frosted glass.
Things You’ll Need
- Clear bottle
- Frosted glass spray or translucent white paint
- Black glass paint or black silhouette cutouts
- Fine brush
- Warm micro LED lights
- Deep green, burgundy, or black ribbon
- Mini pine sprig
- Small pinecone
Making Process
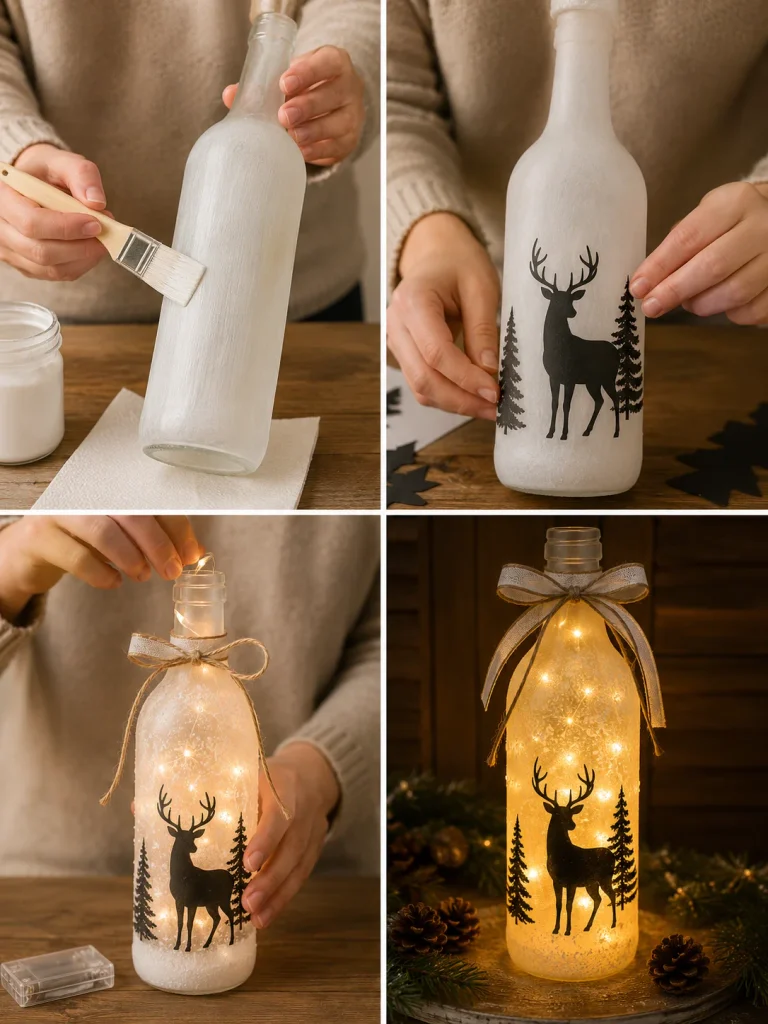
1. Apply a light frosted finish to the glass. You want an icy texture, not a solid white bottle.
2. Paint or attach a reindeer silhouette near the lower half. Add a few pine trees around it, keeping the shapes simple enough to stay readable when the lights are switched on.
3. Dot small snowflakes or snow specks across the upper section.
4. Feed warm micro lights into the bottle and spread the wire evenly. Tie a velvet or satin ribbon around the neck and add a tiny pine sprig if the top feels bare.
5. Turn the room lights down before judging the final look. This bottle is designed to be seen glowing.
20. Luxury Christmas Present Bottle
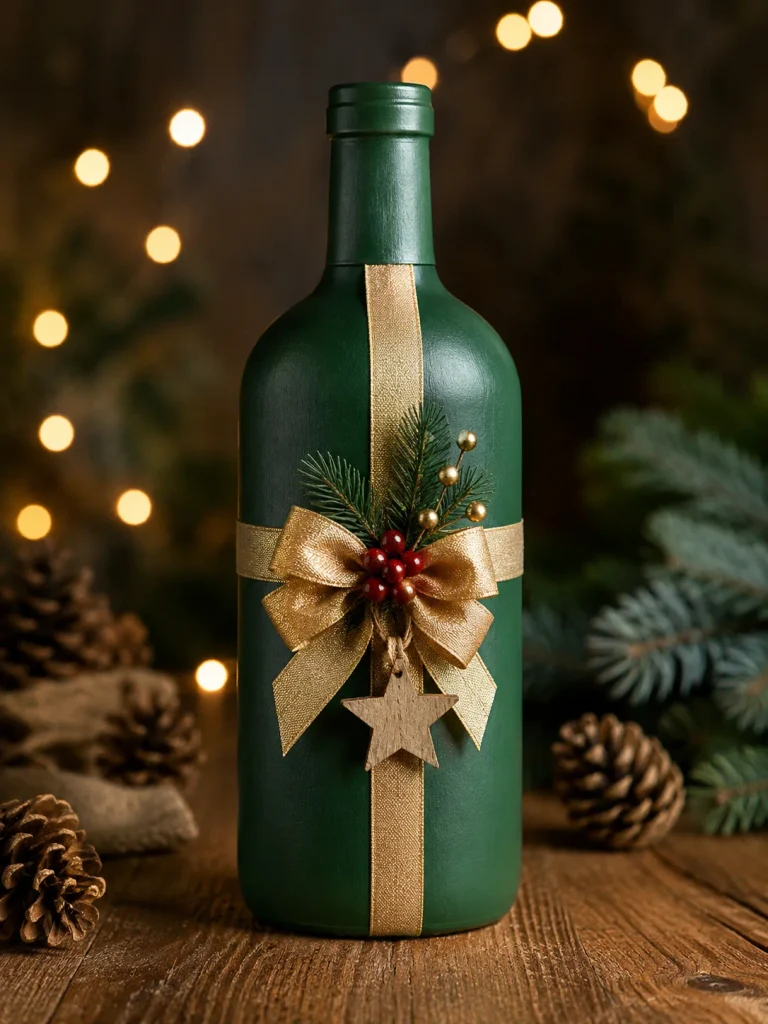
Think of the bottle as a wrapped gift rather than a painted ornament. It looks polished because the decoration is bold but controlled.
Things You’ll Need
- Glass bottle
- Forest green paint
- Wide champagne-gold ribbon
- Narrow gold ribbon
- Evergreen sprigs
- Red or gold berries
- Wooden star charm
- Hot glue
- Scissors
Making Process
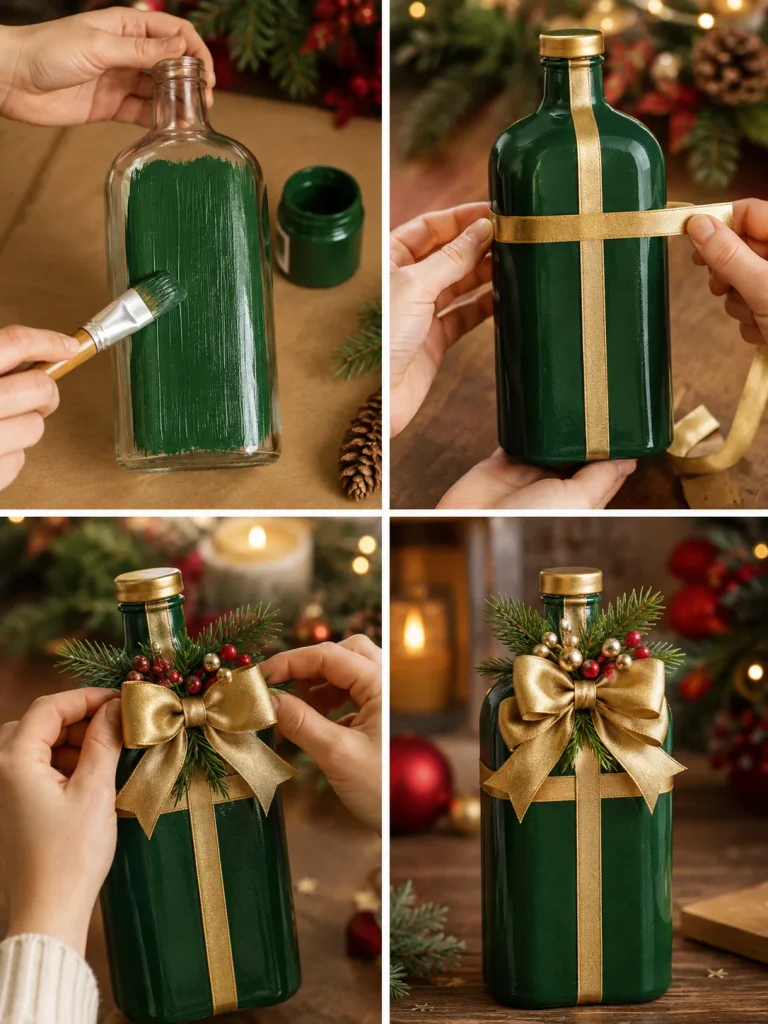
1. Paint the bottle a deep forest green and let it dry. Run one ribbon strip vertically from the neck toward the base.
2. Wrap a second strip around the middle so the two ribbons cross like a wrapped present. Glue the ends at the back rather than the front.
3. Make a structured bow from the same gold ribbon and attach it where the strips cross. Tuck short evergreen pieces and berries behind the bow.
4. Add one small wooden star or bell if you want a hanging accent. Avoid adding more after that. The green-and-gold blocks are what make the bottle feel neat and expensive.
A burgundy base with antique gold ribbon is a beautiful alternative if you prefer warmer colors.
Creative Ideas to Make at Home
23 Easy DIY Quilling Paper Art Ideas for Creative Home Decor
23 Creative DIY Wooden Christmas Gnomes for Festive Holiday Decorating
23 Easy DIY Christmas Village Houses Ideas for Festive Holiday Decor
45 DIY Seashell Wall Art Ideas for Beautiful Coastal Home Decor
24 Enchanting DIY Halloween Houses Ideas for Spooky Fall Decor
23 Handmade DIY Flower Pot Decoration Ideas You’ll Want to Recreate
21. Mini Christmas Wreath Bottle
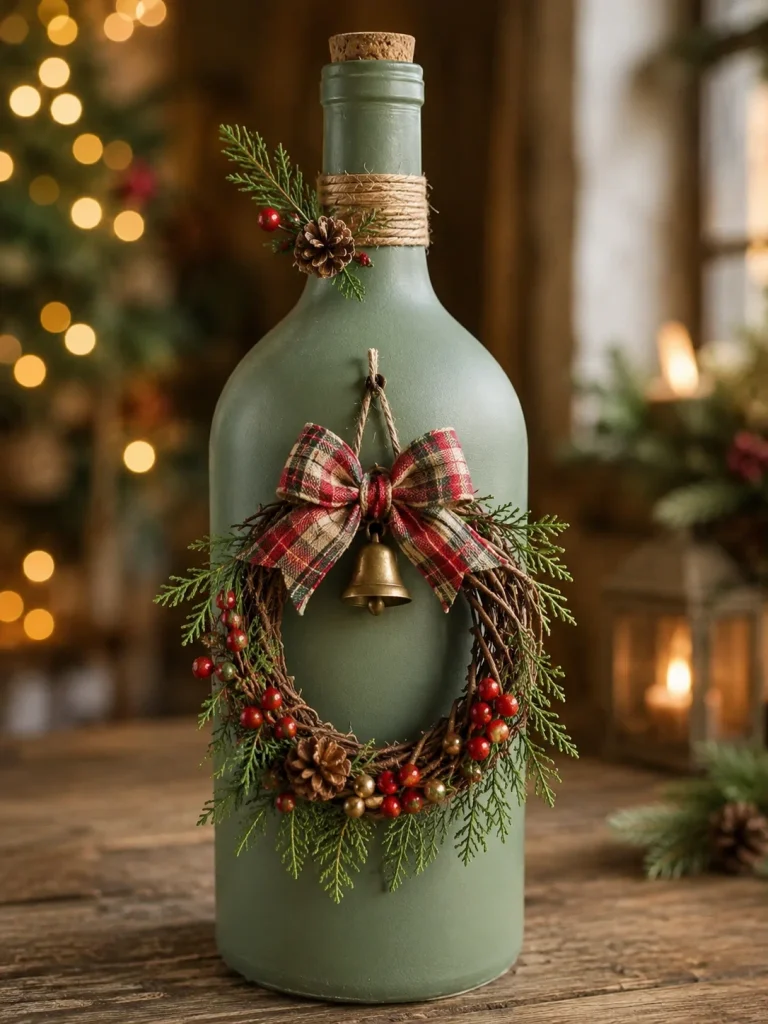
A tiny wreath can carry almost the entire design. This is a great project when you want something detailed but still tidy enough for a shelf or entry table.
Things You’ll Need
- Glass bottle
- Cream, sage, or muted green paint
- Thin grapevine ring or floral wire
- Mini evergreen sprigs
- Red berries
- Tiny pinecones
- Small gold bell
- Plaid or velvet ribbon
- Jute twine
- Hot glue
Making Process
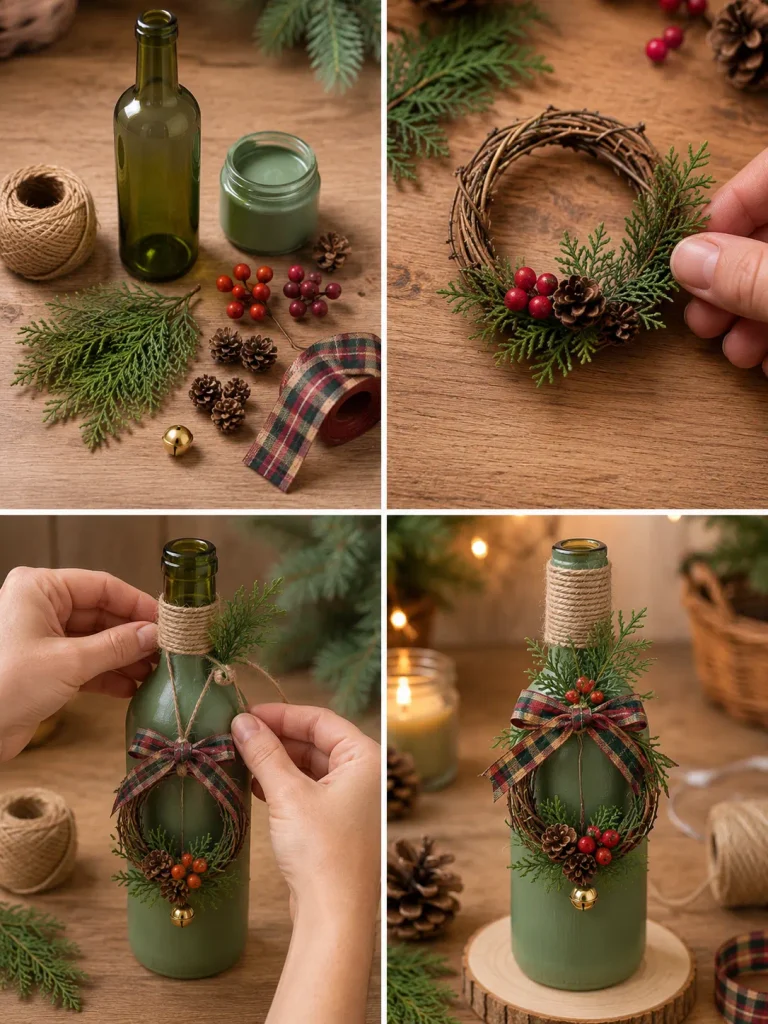
1. Paint the bottle and let it dry. If you want a rustic neck, wrap a few rows of jute around the top.
2. Form a small wreath from thin vine or floral wire. Test the size against the bottle before you start decorating it.
3. Attach evergreen pieces around the ring. Add berries and mini pinecones in small clusters rather than spacing every item evenly.
4. Tie a plaid or velvet bow at the top or bottom of the wreath. Hang a tiny bell in the center.
5. Glue the wreath to the bottle front. Repeat one detail at the neck—a ribbon, pine sprig, or berry cluster—so the top and bottom feel connected.
Changing the ribbon changes the whole mood. Plaid looks rustic, velvet feels traditional, and neutral linen gives it a farmhouse look.
22. Snow Globe Christmas Bottle
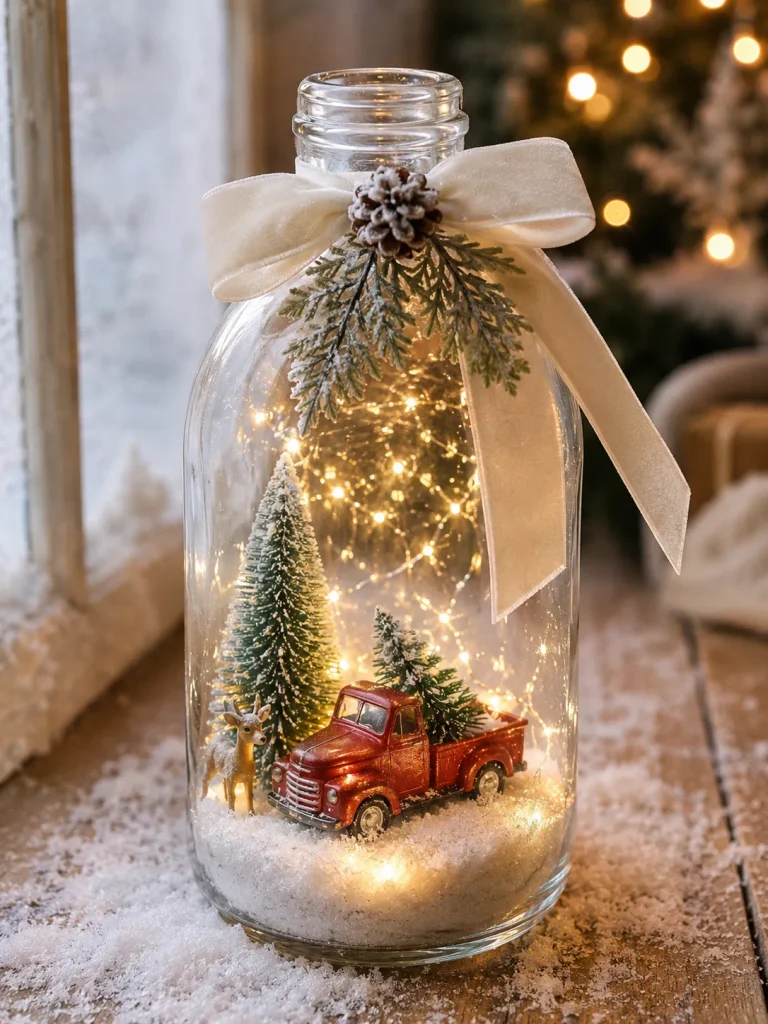
The bottle shape is taller than a classic snow globe, but the miniature winter-world idea works beautifully. Clear glass is important here because the fun is being able to look inside.
Things You’ll Need
- Clear wide-mouth bottle
- Faux snow
- Bottle-brush trees
- One small snowman, deer, red truck, or mini house
- Tiny gift boxes
- Warm micro LED lights
- White or cream ribbon
- Frosted pine sprig
- Cork
- Tweezers
Making Process
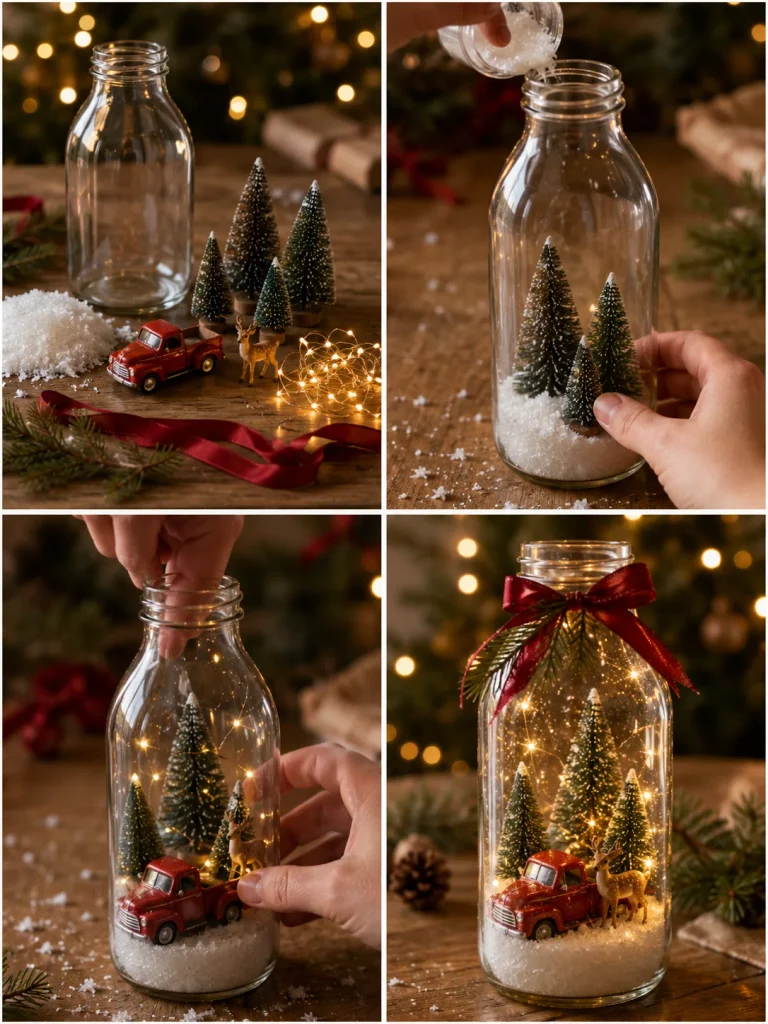
1. Add a layer of faux snow to the bottom. Keep it shallow enough that your miniatures do not disappear into it.
2. Place the largest tree first, then add one or two smaller trees. Position the central character or object slightly in front rather than dead center.
3. Add miniature gifts, a deer, or another small detail. Use tweezers if the bottle opening is narrow.
4. Feed the lights behind the miniatures so the bulbs glow around them rather than covering their faces.
5. Finish the neck with a cream ribbon, frosted greenery, and a cork. Leave most of the glass untouched.
Try a red truck instead of a snowman if you want a less cute and more rustic version. Both work well with snowy trees and warm lights.
23. Rustic Christmas Bottle Centerpiece Trio
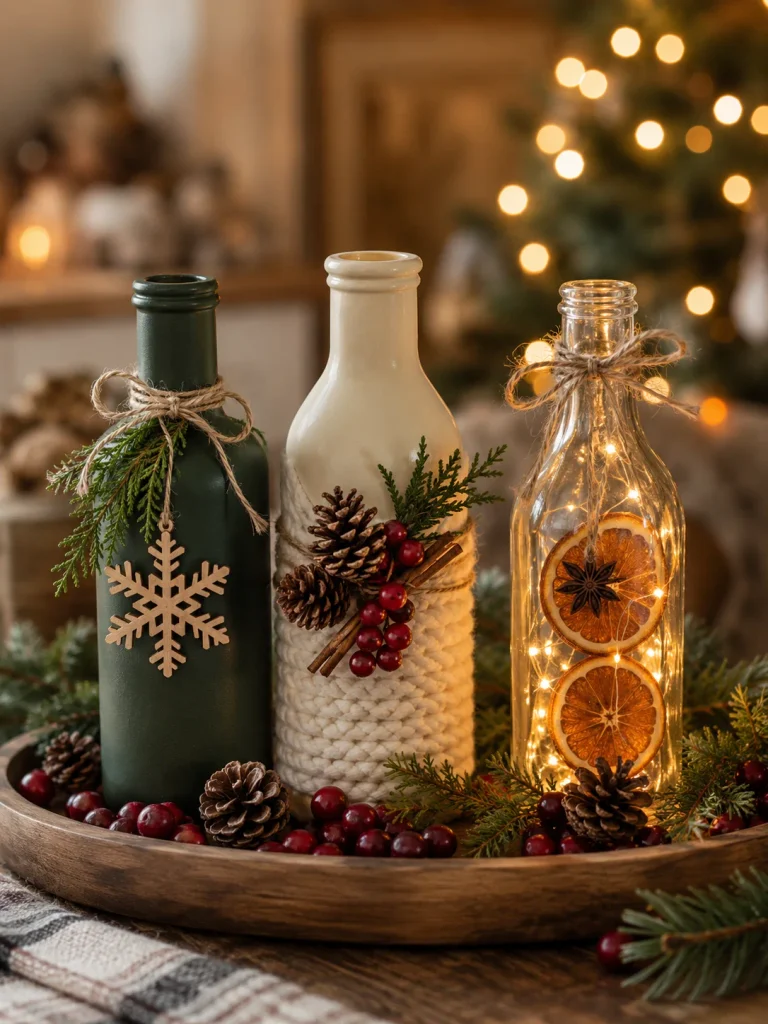
For the final idea, use three bottles that are different heights or shapes. Matching bottles can look a little formal; a mixed trio usually feels more relaxed and collected.
Things You’ll Need
- Three glass bottles
- Forest green paint
- Jute twine, chunky cotton cord, or yarn
- Warm micro LED lights
- Evergreen sprigs
- Red berries
- Pinecones
- Wooden stars or snowflakes
- Dried orange slices
- Cinnamon sticks
- Twine bows
- Shallow wooden tray
- Hot glue
Making Process
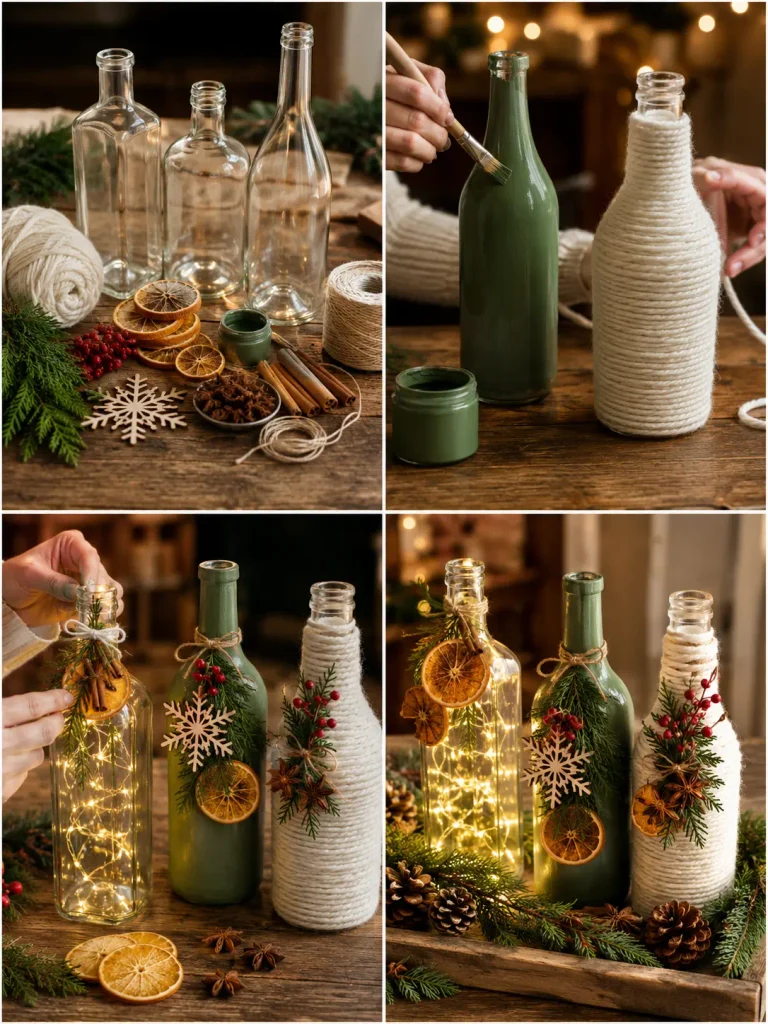
1. Choose a different finish for each bottle. Paint one deep green. Wrap another in twine or chunky neutral cord. Leave the third clear for fairy lights.
2. Decorate the green bottle with a simple evergreen sprig and wooden ornament. On the wrapped bottle, add berries, pinecones, or a cinnamon-stick bundle. Place warm fairy lights inside the clear bottle and tie twine around its neck.
3. Now repeat one or two materials across all three bottles. For example, use the same berries and wooden stars on each. Repetition is what makes mismatched bottles feel like a set.
4. Arrange the trio on a wooden tray. Fill the gaps with loose evergreen clippings, pinecones, and a few berries. Keep the tray low so the bottles remain the focus.
This centerpiece can work on a dining table, entry console, kitchen island, or sideboard. When Christmas is over, pack the bottles separately and they can come back next year.
Small Details That Make Homemade Bottle Crafts Look Better
The difference between a craft you proudly display and one that gets pushed to the back of a cupboard is usually not the cost of the supplies. It is the finishing.
Limit the color palette. Red, green, and natural brown works. So does white, silver, and pale green. Burgundy, forest green, and champagne gold feels richer. Once every ribbon, ornament, bead, and paint color gets added, the original idea can disappear.
Hide glue whenever possible. Hot glue is useful, but shiny blobs around felt, berries, and pinecones make a project look unfinished. Use smaller amounts and place the adhesive behind the decoration.
Mix textures instead of piling on more colors. Glass, velvet, pine, wood, jute, metal, and faux snow can make a simple three-color design feel layered.
And leave some empty space. This matters more than people think. A wreath looks better when you can actually see the bottle around it. A silhouette needs open frosted glass behind it. A miniature scene needs room to breathe.
How to Paint Glass Bottles So the Finish Lasts
Clean the bottle first, then wipe it with rubbing alcohol. For solid-color projects, use glass-compatible paint or a suitable primer under acrylic paint.
Build the color in thin layers. Thick paint takes longer to dry, shows brush marks, and is more likely to peel around the edges.
A sponge brush can create a smoother surface. A regular brush is useful when you actually want a handmade or slightly textured finish.
Let the paint cure before tying tight ribbon around the bottle or packing it away. If the piece will be reused for several Christmas seasons, add a compatible clear sealer once the paint is completely dry.
Where to Display DIY Glass Bottle Christmas Decor
Bottle crafts fit into places where large decorations can feel awkward. Try them on:
- A fireplace mantel
- Kitchen windowsill
- Dining-room sideboard
- Entry console
- Bar cart
- Open shelves
- Coffee-table tray
- Guest-room nightstand
- Christmas buffet
- Covered porch table
- Dining table centerpiece
Odd-number groupings usually look more relaxed. Three bottles with different heights are easier to style than four identical bottles in a straight row.
Frequently Asked Questions
What paint is best for Christmas glass bottle crafts?
Glass-specific acrylic paint is the simplest choice when you want reliable adhesion. Regular craft acrylic can also work if the bottle is cleaned, primed, and sealed properly. For glowing bottles, frosted or translucent finishes are better than thick opaque paint because light can still pass through.
How do I remove stubborn labels from glass bottles?
Soak the bottle in hot soapy water for 20 to 30 minutes. Peel the label away, then use a suitable adhesive remover or a small amount of oil and baking soda for sticky residue. Wash the bottle again afterward so the surface is grease-free before painting.
Can I put Christmas lights inside glass bottles?
Yes. Battery-operated micro LED lights are ideal. The wire is thin, the bulbs stay relatively cool, and cork-style bottle lights make the battery pack easy to hide at the top.
Can I use a real candle in a decorated bottle?
I would not. Most of these designs use ribbon, faux greenery, glue, felt, twine, paint, or artificial snow. Battery-operated LEDs give you the glow without putting those materials near an open flame.
Which bottles work best for these crafts?
Wine bottles are convenient, but juice, sparkling-water, oil, vinegar, and decorative beverage bottles can work just as well. Straight bottles are useful for Santa and nutcracker designs, while wide openings make miniature scenes much easier.
Can these Christmas bottle crafts be reused?
Yes. Wrap painted bottles in tissue paper so the surfaces do not rub together. Store dimensional crafts separately so the wreaths, miniatures, and greenery do not get crushed.
How do I make a homemade bottle craft look more polished?
Use fewer materials, keep painted edges clean, trim loose glue strings, repeat only two or three colors, and stop decorating before every inch is covered. More decoration is not always better.
What can I use instead of buying lots of miniatures?
Look through old ornaments, broken Christmas decorations, wreath picks, ribbon scraps, gift wrap, buttons, and leftover floral supplies. Tiny pieces can often be clipped from larger decorations. Clean, dry pinecones from outside are useful too.
A Few Bottles Are All You Need
The nicest thing about these DIY glass bottle craft ideas for Christmas is that the bottle shape often suggests the project. A rounded bottle starts looking like a snowman. A tall straight bottle makes sense as a nutcracker. Clear glass almost begs for fairy lights and a miniature winter scene.
Use the finished images as inspiration, then change what you need. Swap red velvet for plaid. Use dried orange instead of wooden stars. Leave out glitter if it is not your style. Add cedar instead of pine. Paint the bottle burgundy instead of green because that is what works in your room.
Handmade Christmas decor becomes more interesting when every piece is not trying to match a reference exactly. If you have been saving pretty bottles because they felt too useful to throw away, this is a very good excuse to finally pull them out and make something worth keeping.

