 Skip to content
Christmas crafting with a toddler is rarely tidy, and that is completely fine. The best projects are not the ones that look like they came from a craft store. They are the ones your child can actually take part in: pressing a painted hand onto paper, sticking down a giant star, making one hundred dots in the same corner, or proudly announcing that a lopsided green blob is a Christmas tree.
These Toddler Christmas Craft Ideas are built around exactly that kind of fun. The supplies are simple, the steps are short, and most of the tricky jobs can be handled by an adult before your child sits down. Each idea also includes a finished-craft image and a making-process image so readers can see both what they are aiming for and what the activity looks like while it is happening.
Use washable, non-toxic supplies and stay close while your toddler is crafting. Skip tiny embellishments for children who still put things in their mouths, and keep scissors, hot glue, baking trays, and other adult tools out of reach. A good toddler craft should feel like play. If attention disappears after five minutes, call it done and come back later.
Before You Start: Keep the Craft Box Simple
You do not need a cabinet full of expensive supplies for these projects. A small basket with washable paint, thick cardstock, construction paper, paper plates, child-safe glue, a few big brushes, sponge daubers, cotton, tissue paper, and recycled cardboard will cover almost everything below. The less you put on the table at once, the easier the activity usually goes.
It also helps to do the boring bits first. Cut the shapes, cover the table, pour a little paint into shallow dishes, and have a damp cloth nearby. Once a toddler sees paint, the waiting period is over.
1. Handprint Christmas Tree
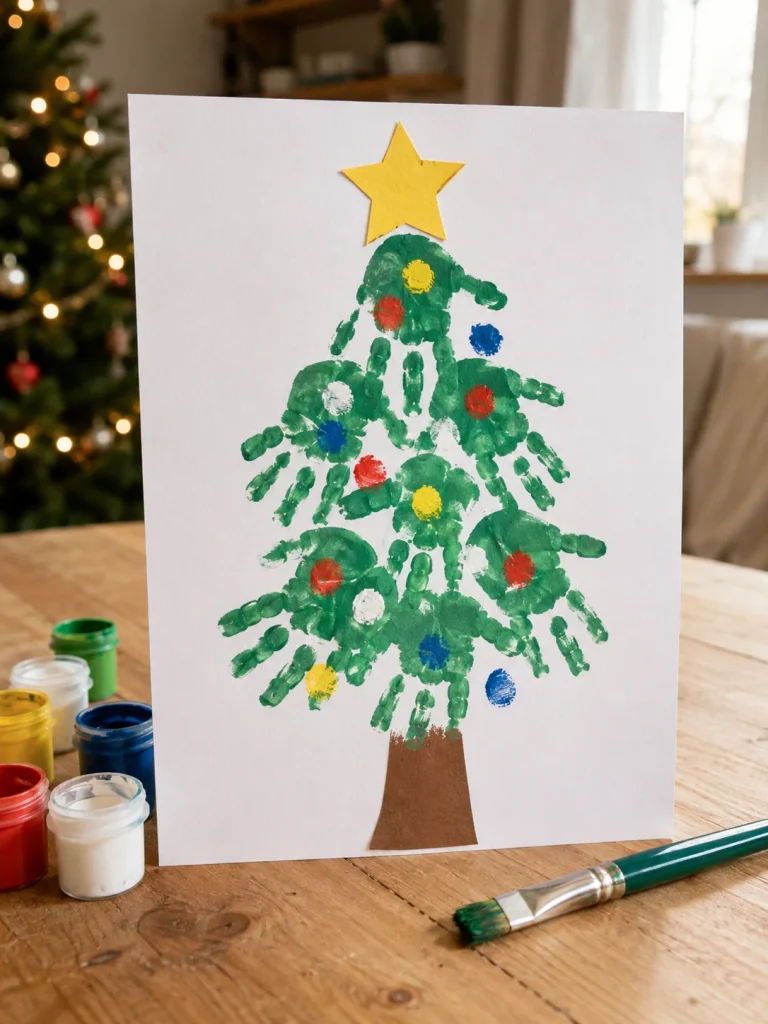
Handprint crafts are popular for a reason: they are easy for toddlers and surprisingly meaningful later. For this one, several green handprints become the branches of a Christmas tree. The prints do not need to line up perfectly. In fact, a slightly wonky tree has far more personality than a perfectly measured one.
Things You’ll Need
- Thick white cardstock
- Washable green paint
- Red, yellow, blue, and white washable paint
- Chunky paintbrush
- Brown and yellow construction paper
- Child-safe glue
- Damp cloth or baby wipes
How to Make It
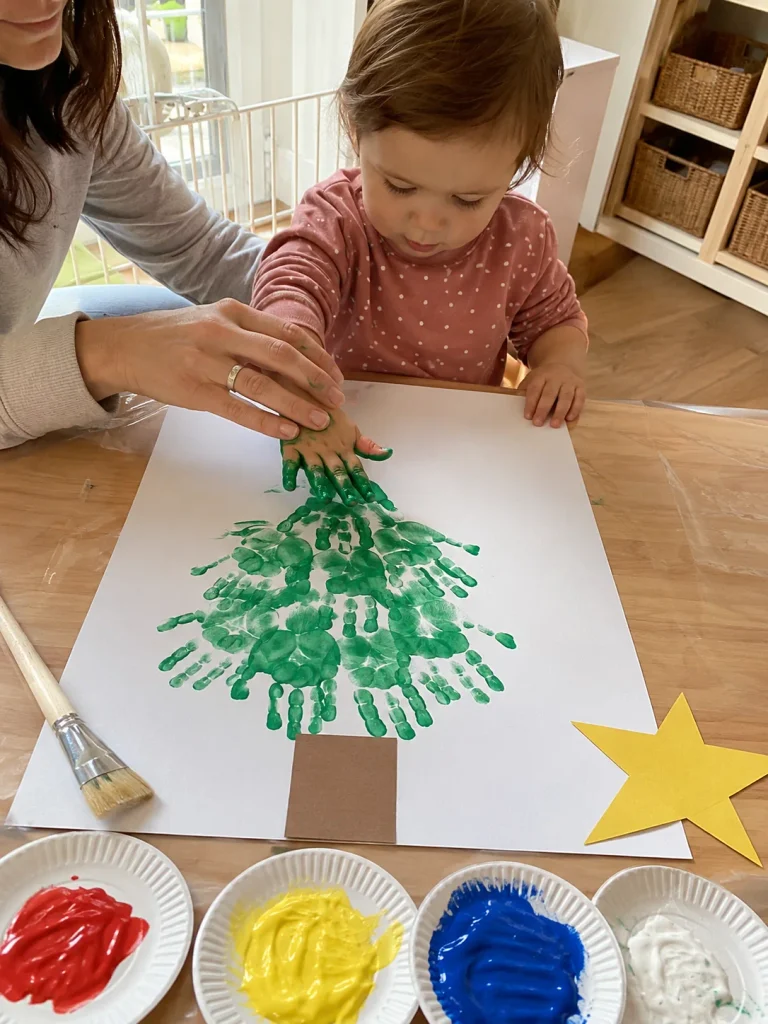
- Brush a thin layer of green paint onto your toddler’s palm.
- Press the first handprint near the bottom of the cardstock, then add more prints beside it to make a wide lower row.
- Continue upward with fewer prints in each row until the shape resembles a tree.
- Let the green paint dry, then invite your toddler to add colorful fingerprint ornaments.
- Glue on a simple brown paper trunk and a large yellow star.
Write your child’s name and the year on the back. This is one of those crafts that becomes more special every Christmas.
2. Fluffy Cotton Snowman
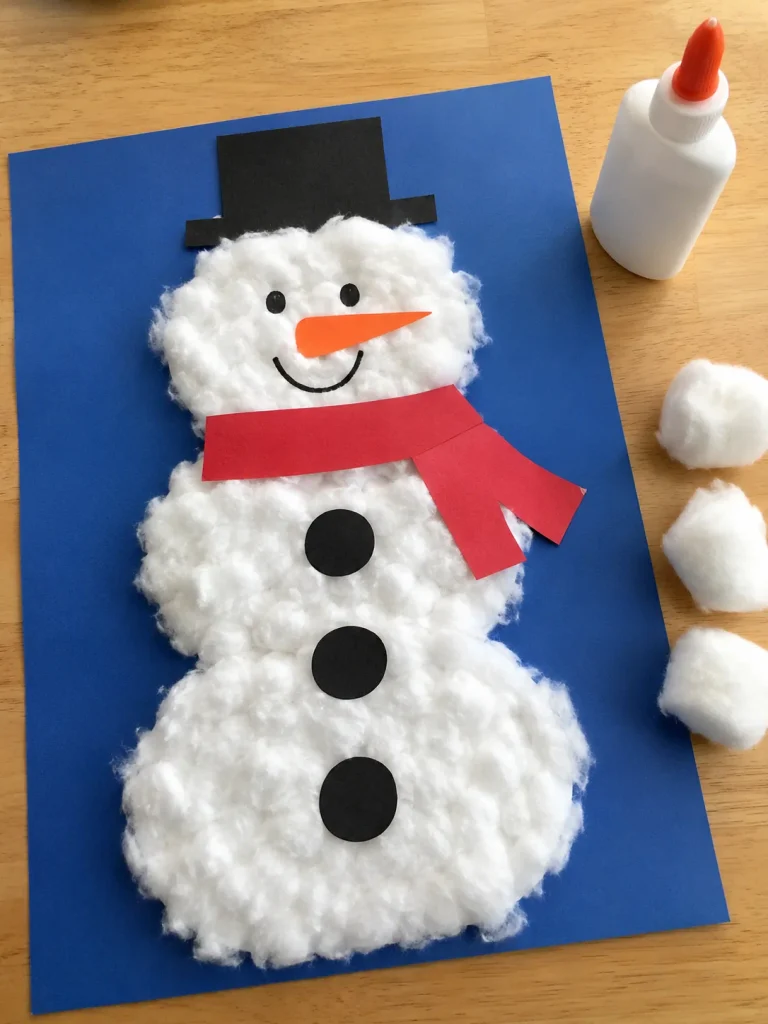
If your toddler enjoys soft textures more than messy paint, try this fluffy snowman. Big pieces of cotton are easy to grasp, easy to press down, and forgiving if they land outside the lines. You can prepare the face and accessories first so the actual craft time is mostly sticking and patting.
Things You’ll Need
- Blue cardstock
- Large pieces of cotton
- Child-safe school glue
- Orange, black, and red construction paper
- Washable black marker
- Scissors for adult use
How to Make It
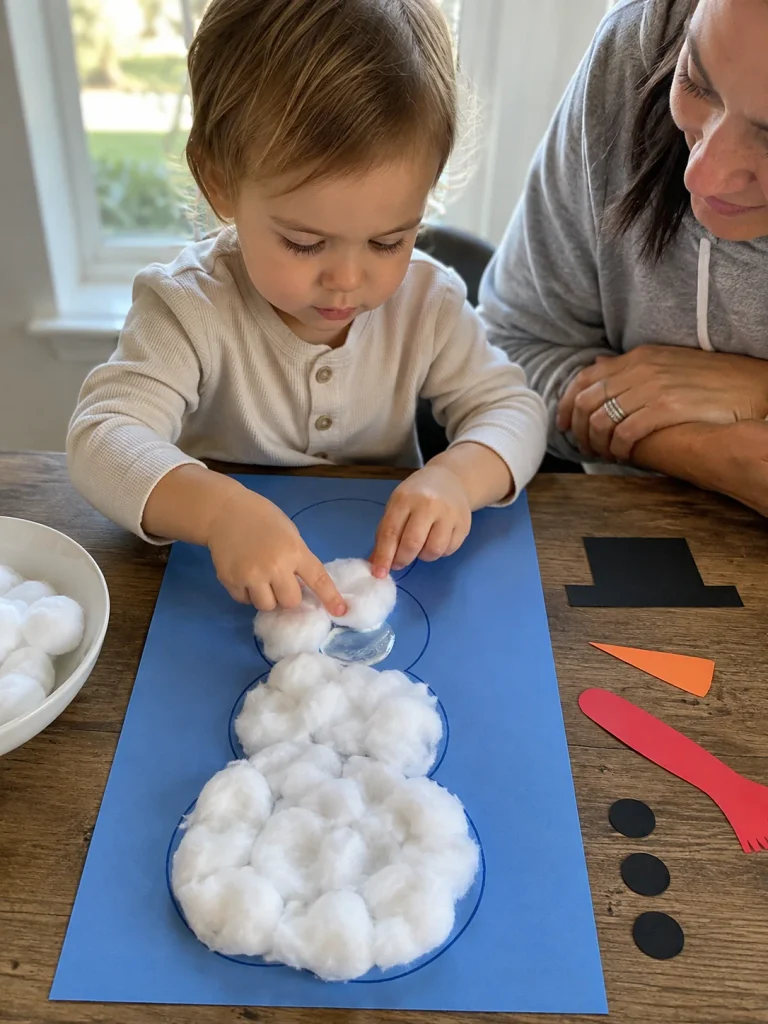
- Draw three large overlapping circles on the blue cardstock.
- Add glue inside the circles. For younger toddlers, spread the glue yourself rather than handing over the bottle.
- Let your child press large cotton pieces over the snowman’s body.
- Add an orange paper carrot nose, a black paper hat, and a wide paper scarf.
- Draw the eyes and smile, then add three oversized paper buttons.
Do not worry about exposed gaps or cotton hanging over the edge. That fluffy, uneven finish is what makes it look handmade.
3. Paper Plate Christmas Tree
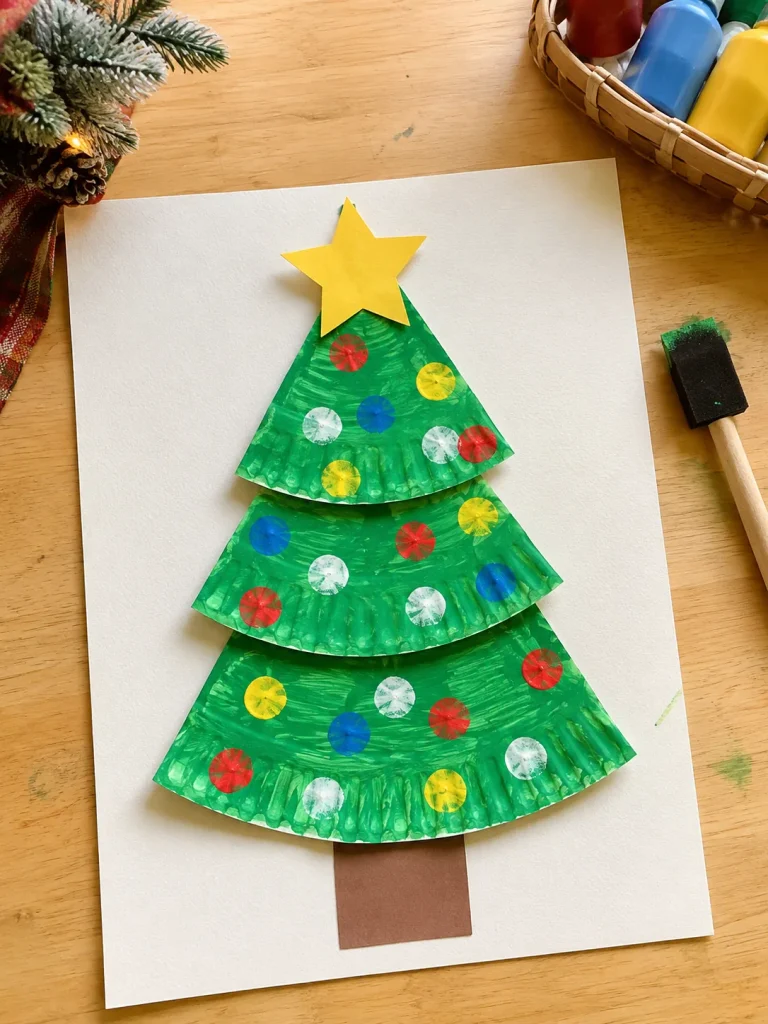
A plain paper plate can become a surprisingly cute Christmas tree with very little effort. The adult handles the cutting; the toddler gets the satisfying part: covering the pieces in green paint and adding decorations wherever they like.
Things You’ll Need
- One white paper plate
- Washable green paint
- Large sponge brush
- Red, yellow, blue, and white paint
- Brown and yellow cardstock
- Child-safe glue
- Scissors for adult use
How to Make It
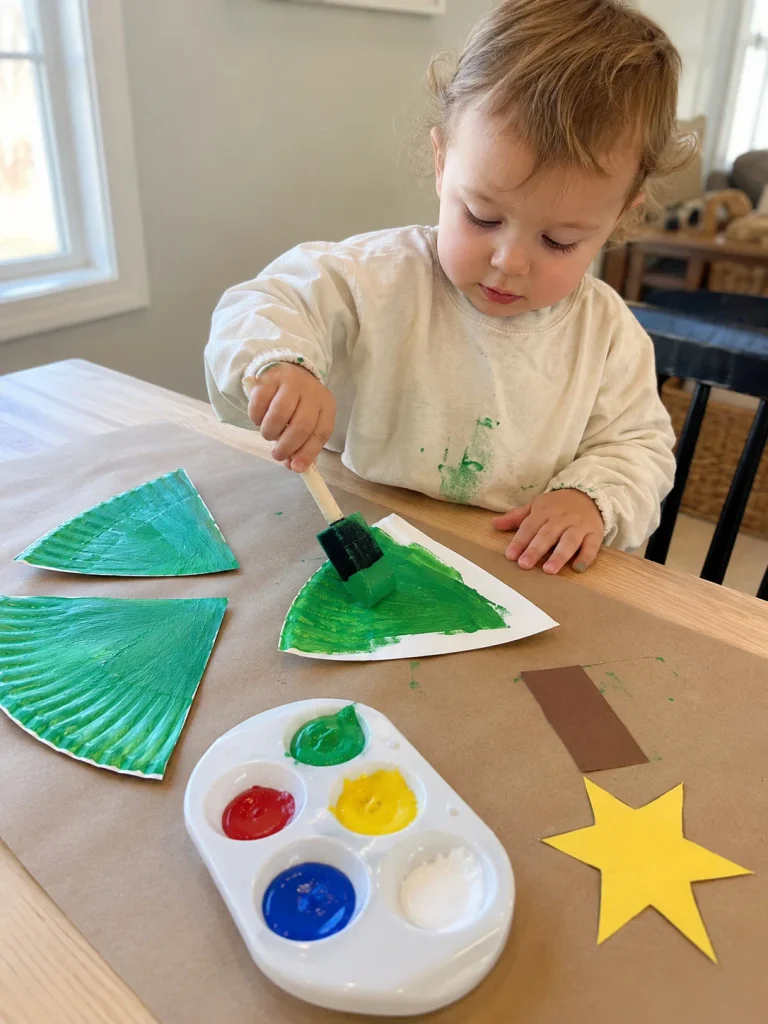
- Cut the paper plate into three triangular sections.
- Let your toddler paint all three pieces green using a broad sponge brush.
- Leave the pieces to dry before bringing out the ornament colors.
- Add fingerprint dots or sponge dots across the green sections.
- Stack the three sections from largest to smallest, then glue on a brown trunk and yellow star.
If you mount the finished tree onto white or kraft cardstock, it instantly looks ready for a wall display.
4. Fingerprint Christmas Lights
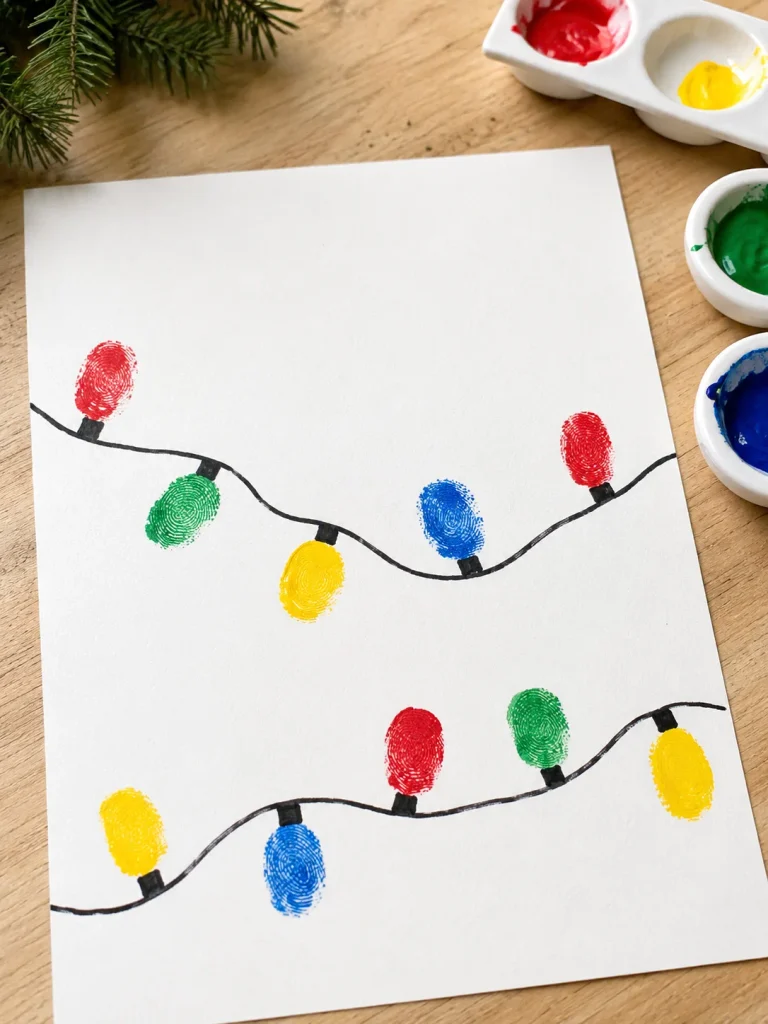
This is a good craft for a day when you want something festive but do not want to spend half an hour setting up. A wavy black line becomes a string of Christmas lights, and your toddler supplies the bulbs with colorful fingerprints.
Things You’ll Need
- White cardstock
- Black washable marker
- Red, yellow, green, and blue washable paint
- Small shallow paint dishes
- Damp cloth
How to Make It
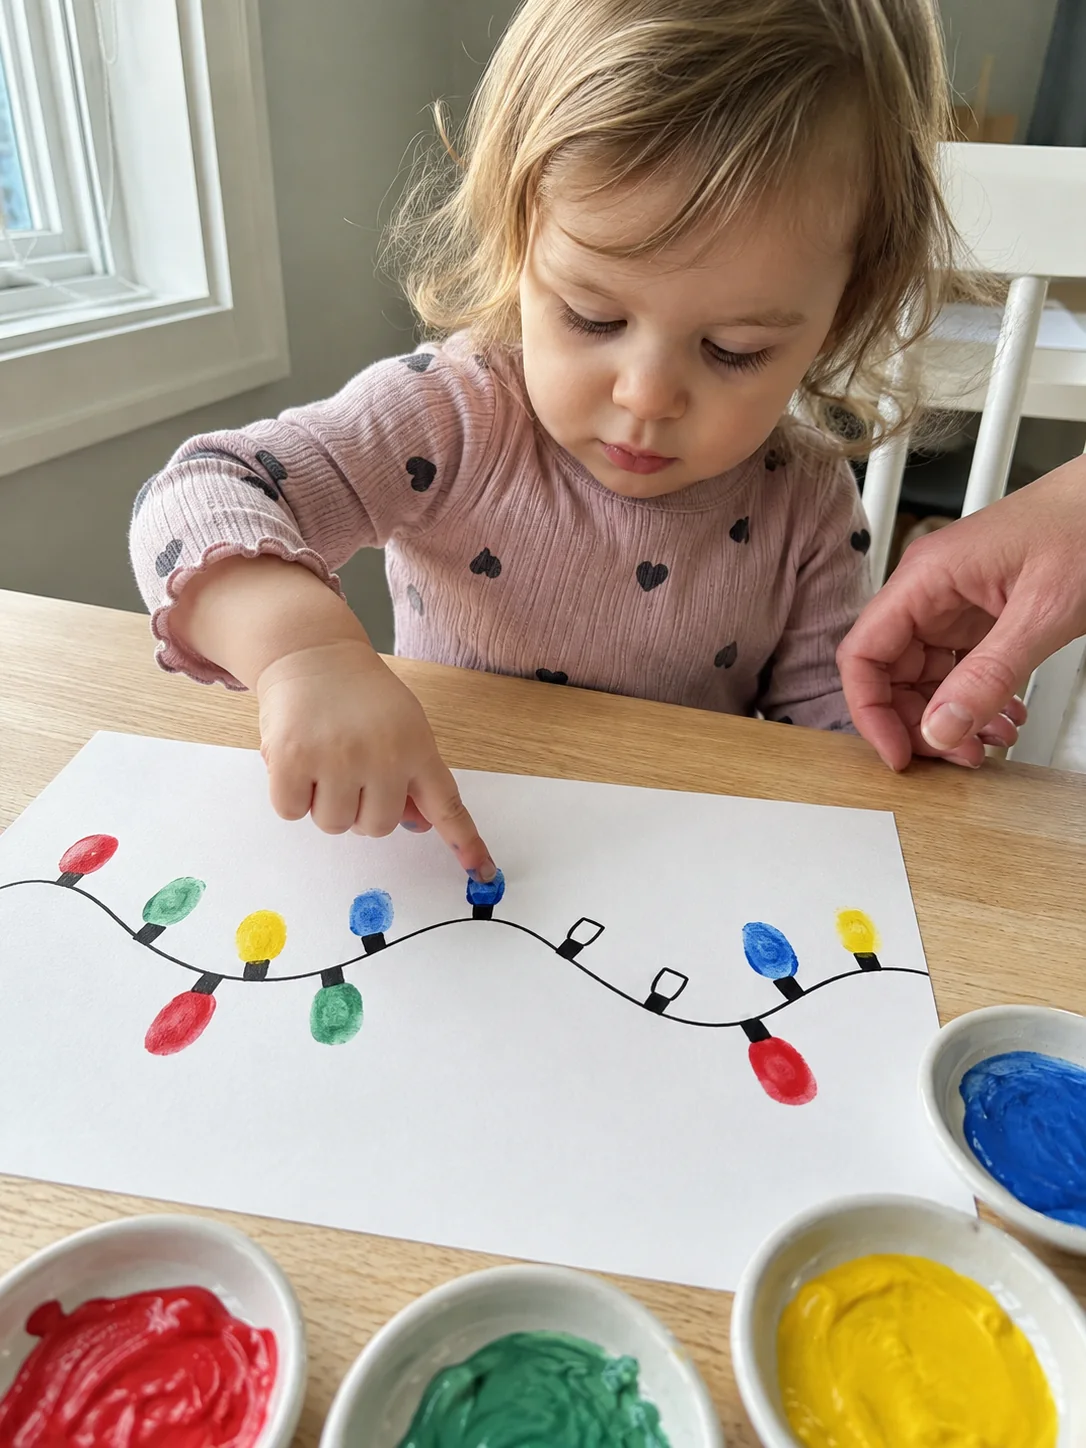
- Draw one or two loose wavy lines across the page.
- Add tiny black bulb bases along each line.
- Show your toddler how to dip one fingertip lightly into paint.
- Press a fingerprint beside each bulb base, changing colors as you go.
- Let the picture dry flat.
Fold the cardstock in half before you start and the same idea becomes an easy handmade Christmas card for grandparents.
5. Footprint Rudolph Keepsake
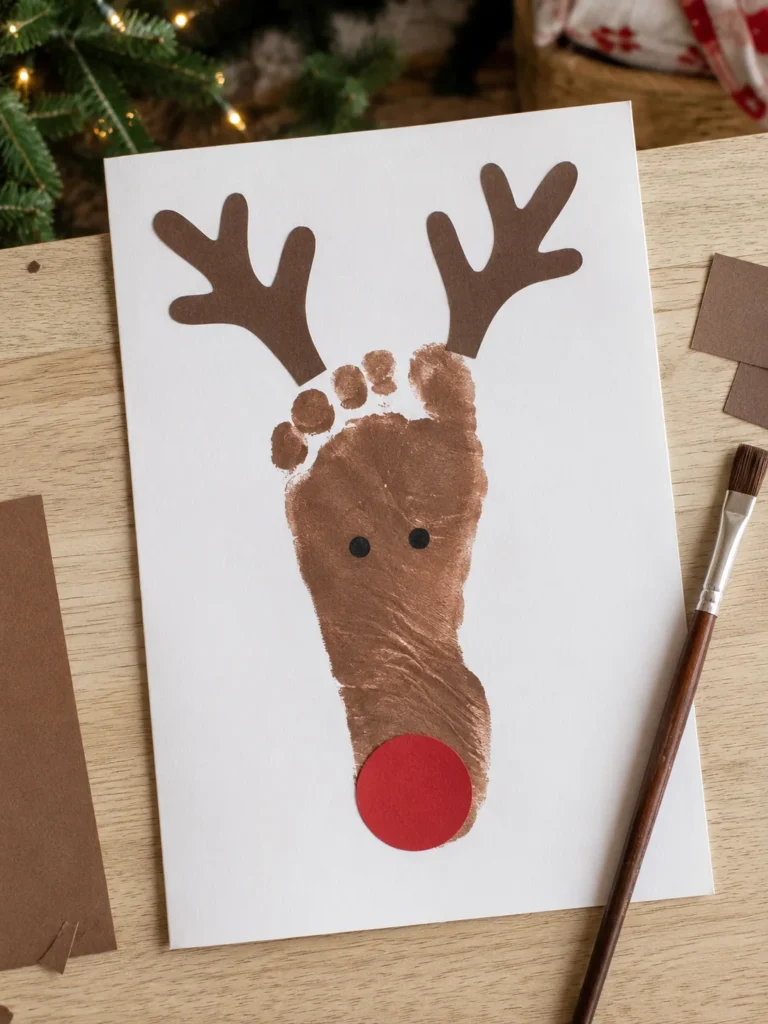
Footprint crafts involve a little more adult help, but they make wonderful keepsakes. The brown print becomes Rudolph’s face, then a few large paper pieces finish the look. Keep wipes beside you before you even open the paint. You will be glad you did.
Things You’ll Need
- Thick white cardstock
- Washable brown paint
- Soft paintbrush
- Brown and red construction paper
- Black washable marker
- Child-safe glue
- Damp cloth or wipes
How to Make It
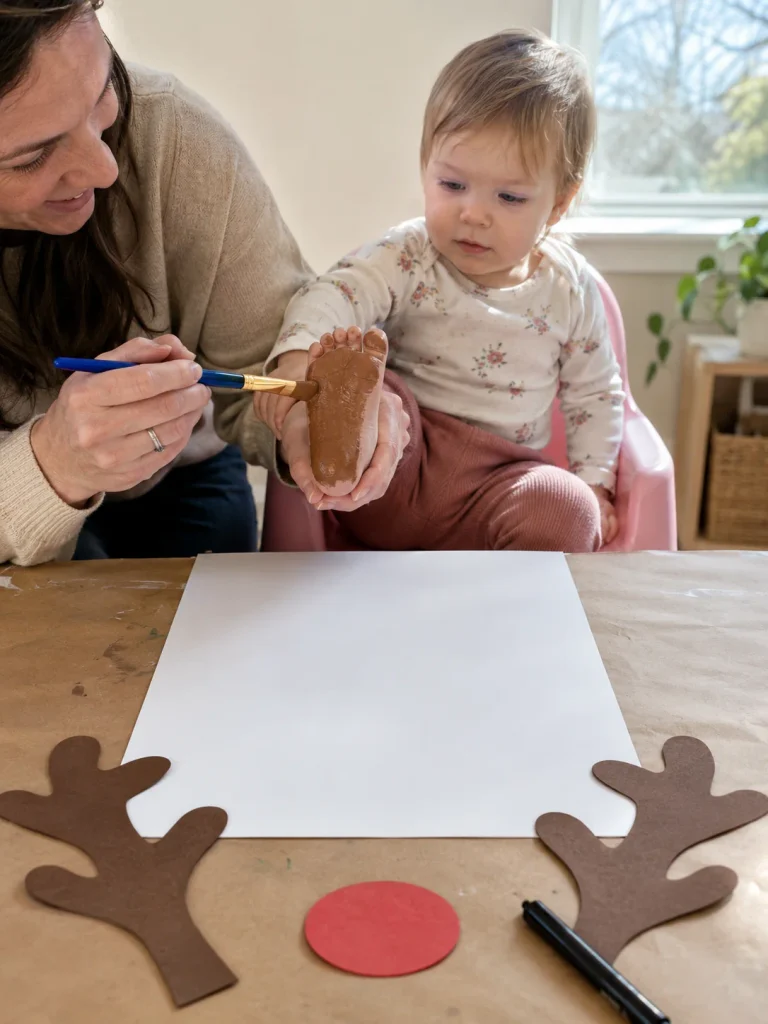
- Brush a thin, even layer of brown paint onto the bottom of your toddler’s foot.
- Press the foot onto cardstock and lift it straight up.
- Clean the foot immediately, then let the print dry.
- Cut two large antler shapes from brown paper and glue them near the top of the footprint.
- Draw the eyes and add one oversized red paper circle for Rudolph’s nose.
Keep the design simple. The footprint is the part you will want to remember years from now.
6. Sponge-Painted Christmas Tree
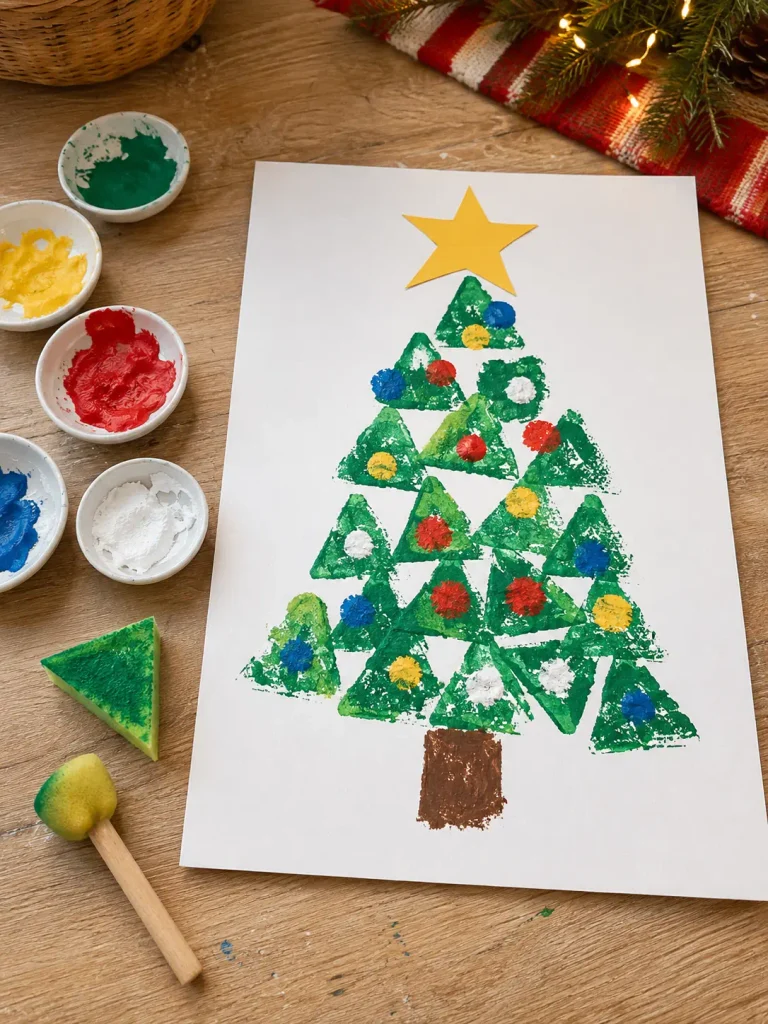
Stamping is one of the easiest painting motions for toddlers. A chunky triangle sponge is easy to grip, and repeated green stamps slowly build a Christmas tree without your child needing to stay inside a drawn outline.
Things You’ll Need
- White cardstock
- Large kitchen sponge
- Washable green paint
- Round sponge dauber
- Red, yellow, blue, and white paint
- Brown paint or cardstock
- Yellow paper star
How to Make It
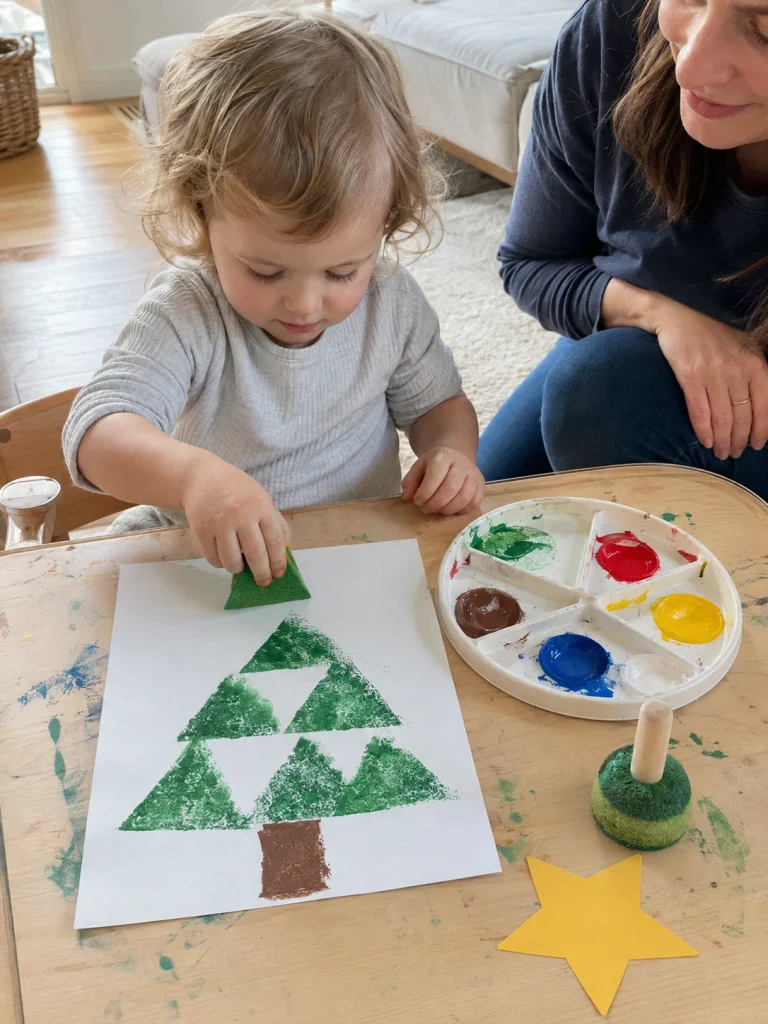
- Cut a clean sponge into a large triangle.
- Dip it lightly in green paint and show your toddler how to press it onto paper.
- Keep stamping until the triangles form a loose tree shape.
- After the green paint dries, use a round dauber to add colorful ornaments.
- Finish with a brown trunk and large yellow star.
If the picture starts looking more like a green forest than one tree, leave it. Toddler art does not need a correction round.
7. Torn Paper Christmas Wreath
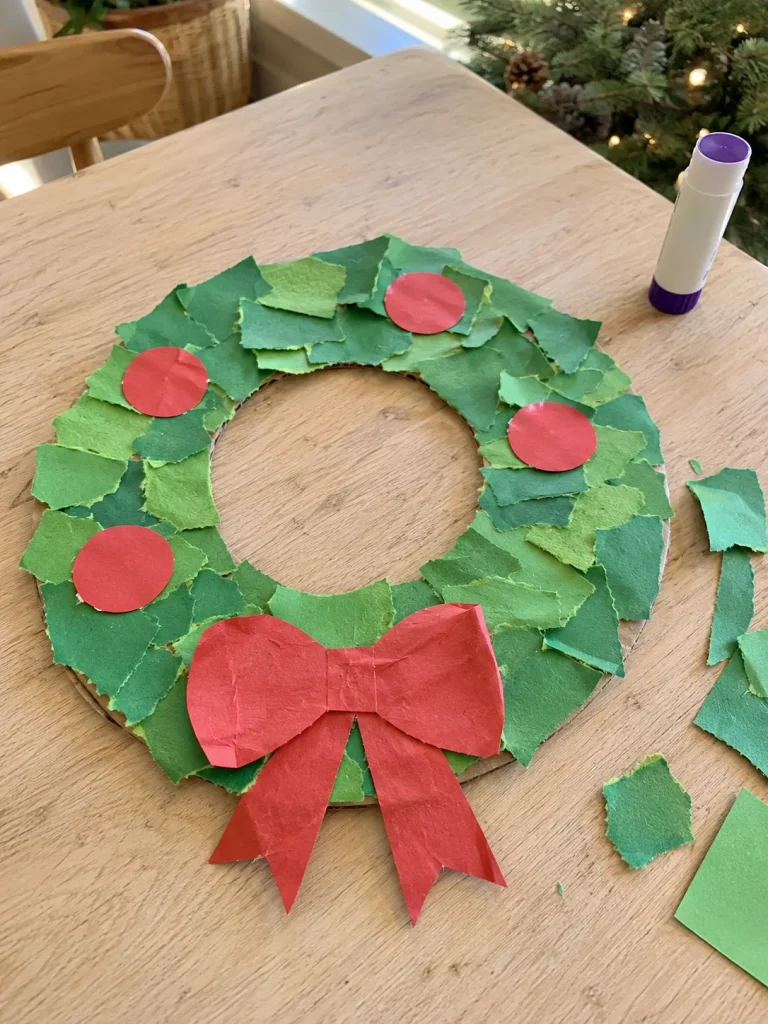
Tearing paper is an activity all by itself for many toddlers. Here it becomes useful. Irregular pieces of green construction paper give the wreath a layered, leafy texture without anyone needing to cut perfect shapes.
Things You’ll Need
- Cardboard
- Green construction paper in one or two shades
- Red construction paper
- Child-safe glue
- Scissors for adult use
How to Make It
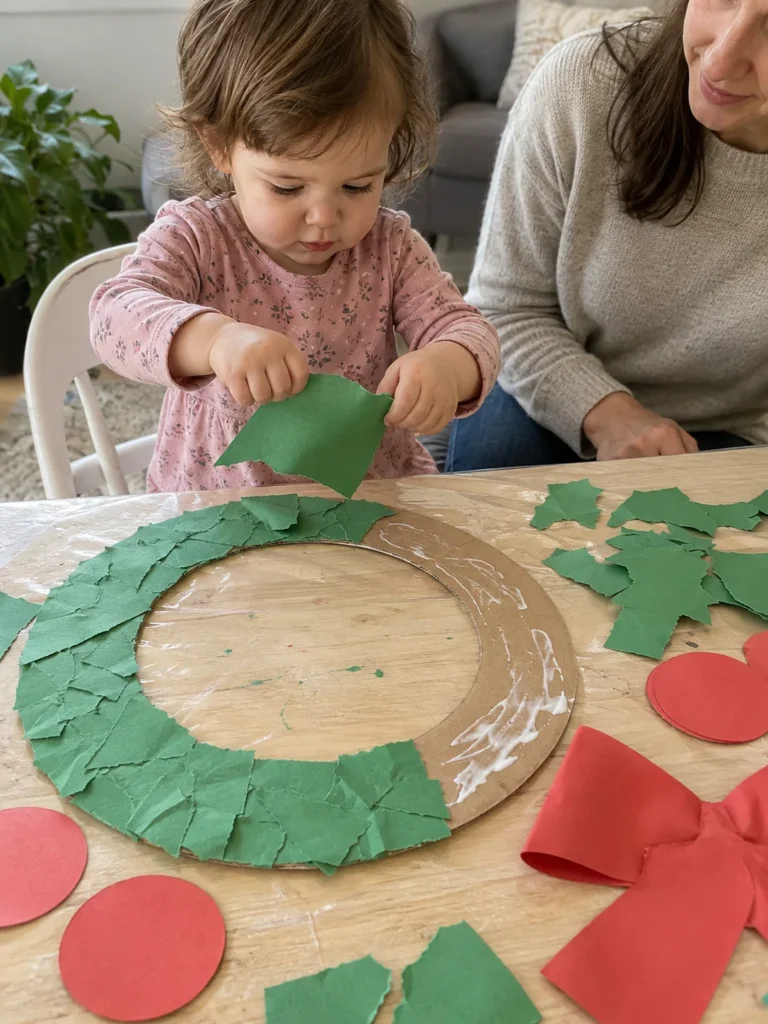
- Cut a large ring from cardboard.
- Help your toddler tear green paper into large pieces.
- Add glue to one section of the cardboard ring and let your child press the pieces down.
- Continue around the ring until most of the cardboard is covered.
- Add large red paper circles and an oversized red bow.
Let some edges curl up naturally. That bit of texture makes the finished wreath look fuller.
8. Popsicle Stick Christmas Tree
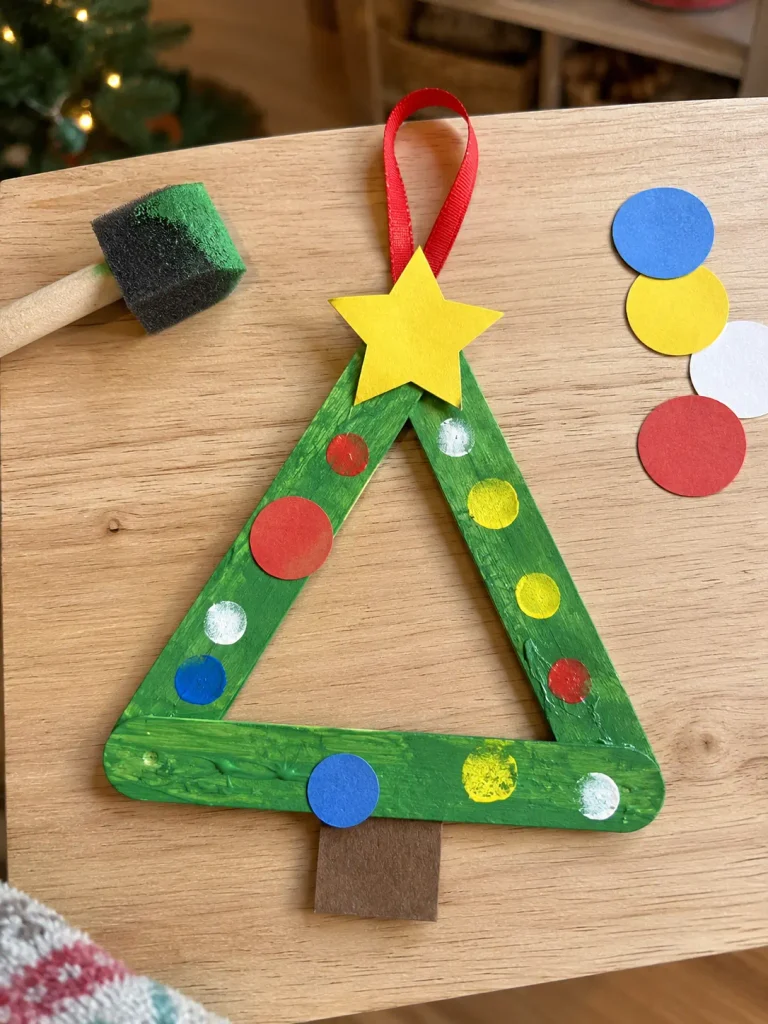
This little tree is small enough to become an ornament, but it still gives a toddler plenty to do. The frame should be prepared by an adult in advance so the child only needs to paint and decorate.
Things You’ll Need
- Three large wooden craft sticks
- Strong glue for adult preparation
- Washable green paint
- Chunky sponge brush
- Large paper circles or washable paint dots
- Brown cardboard strip
- Yellow paper star
- Ribbon for adult use
How to Make It
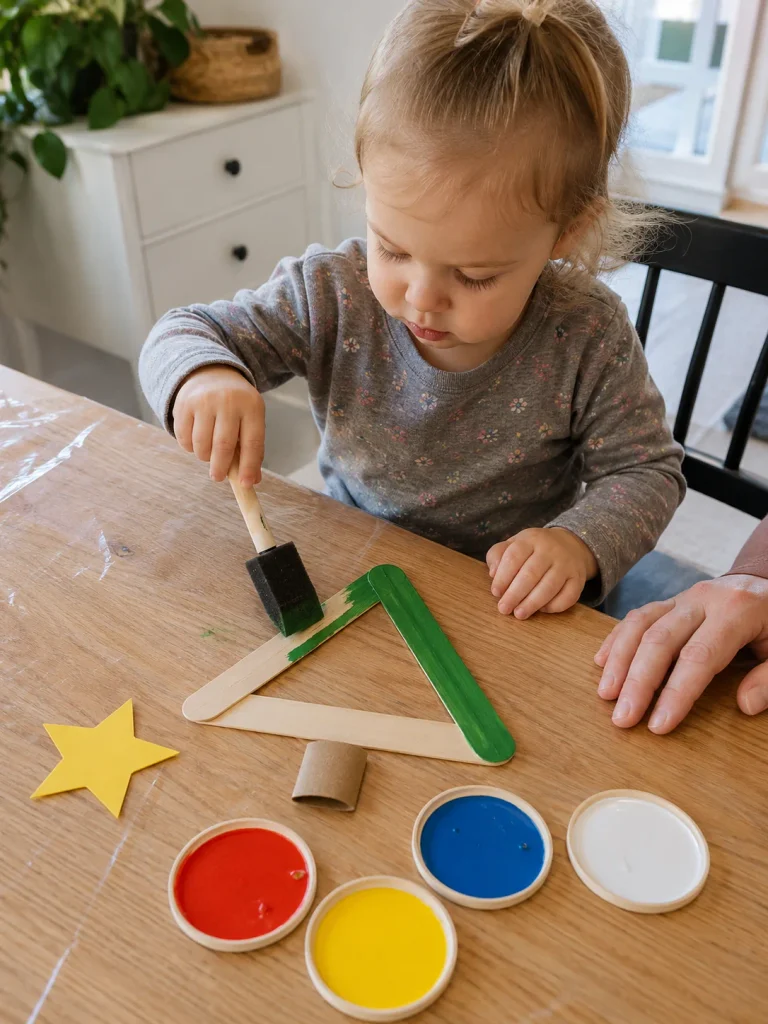
- Glue three craft sticks into a triangle and let the frame dry completely.
- Let your toddler paint the triangle green.
- When dry, add colorful fingerprint dots or large paper circles.
- Attach a small brown trunk and yellow star.
- Add a ribbon loop at the back if you want to hang it on the tree.
Skip sequins and tiny beads. Big painted dots are easier, safer, and look just as festive.
9. Handprint Santa
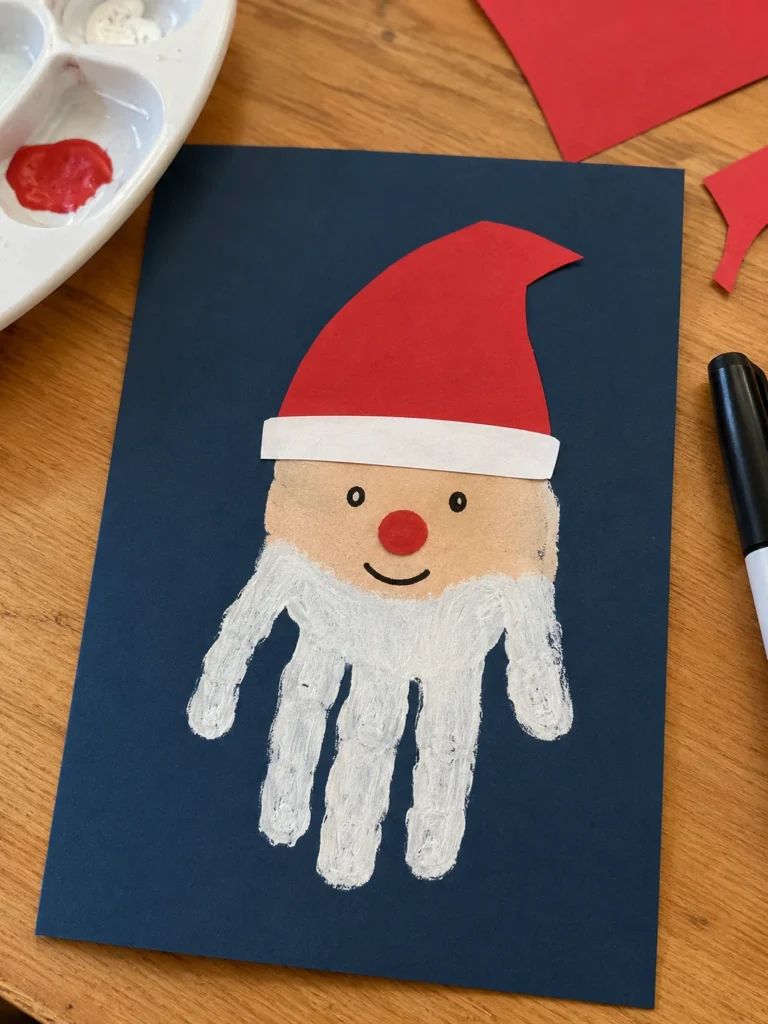
Santa crafts can get unnecessarily complicated. This version keeps it delightfully simple: the fingers become the beard, the palm becomes the face, and a paper hat does the rest.
Things You’ll Need
- Dark blue or deep green cardstock
- White washable paint
- Skin-tone washable paint
- Red and white construction paper
- Black washable marker
- Child-safe glue
How to Make It
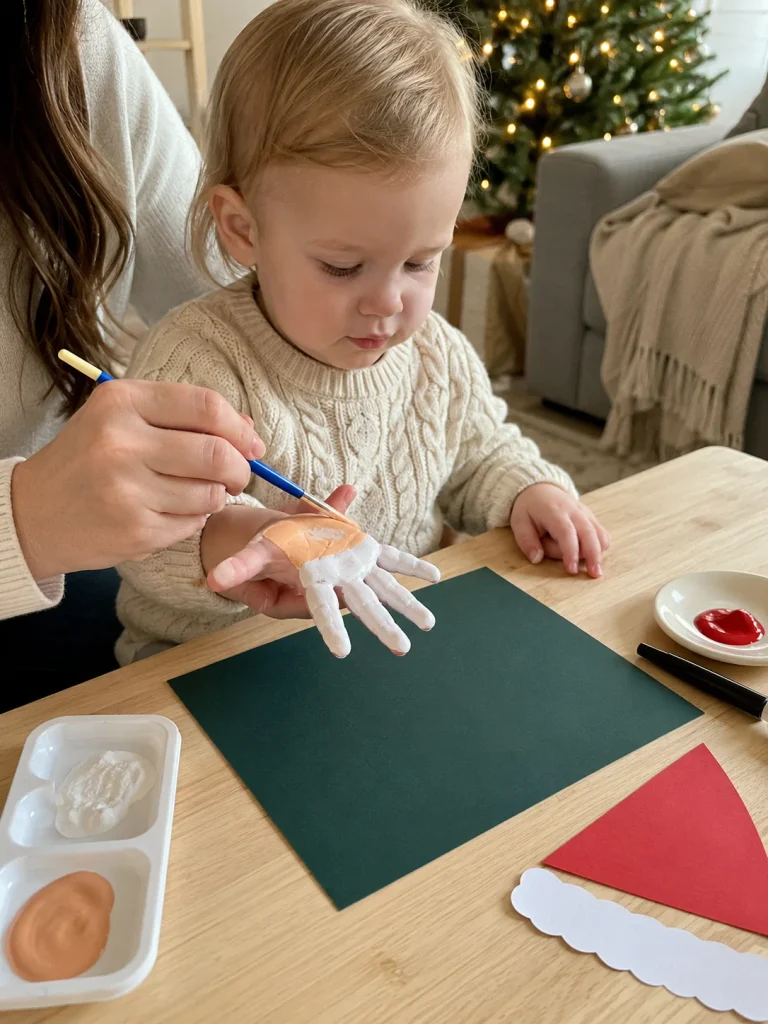
- Paint the fingers and lower palm white.
- Add a skin-tone shade to the upper palm.
- Press the hand onto dark cardstock with the fingers pointing downward.
- Once dry, add a red paper hat with white trim.
- Draw two eyes and a smile, then add a red painted nose.
Do not try to straighten every finger or fix every gap in the paint. A crooked beard is still very clearly Santa.
10. Paper Plate Rudolph
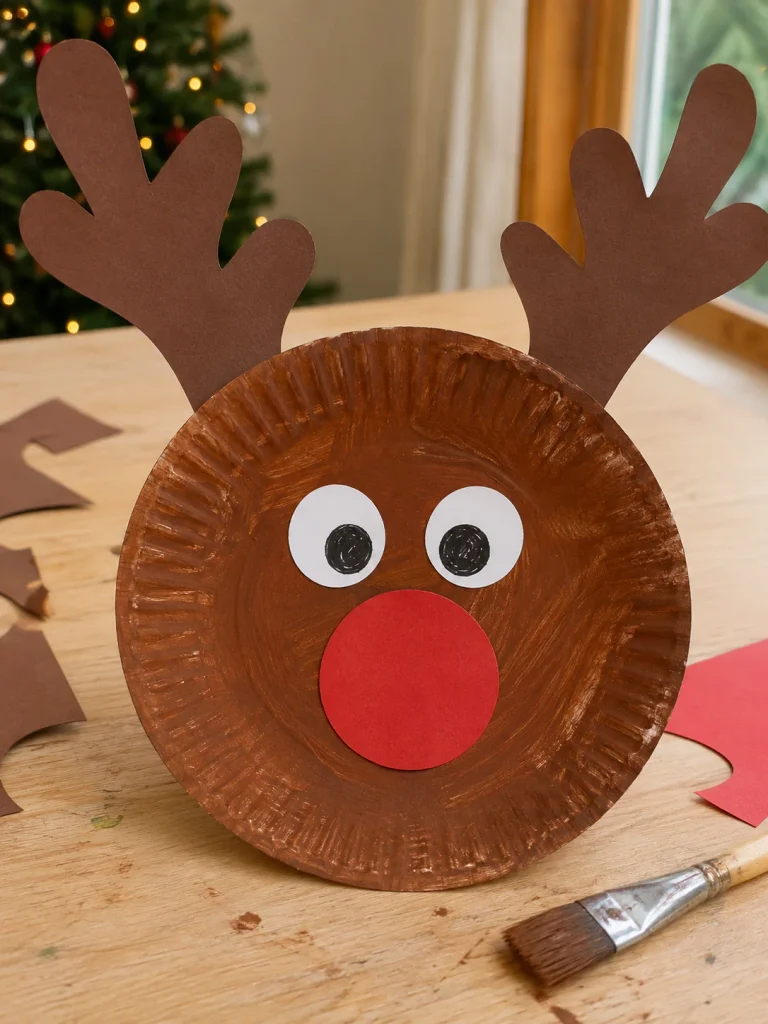
This is a reliable choice for toddlers who love covering large surfaces with paint. The plate gives them plenty of room, and the facial pieces are oversized enough to handle without fiddly placement.
Things You’ll Need
- White paper plate
- Washable brown paint
- Large paintbrush
- Brown, red, white, and black cardstock
- Child-safe glue
- Scissors for adult use
How to Make It
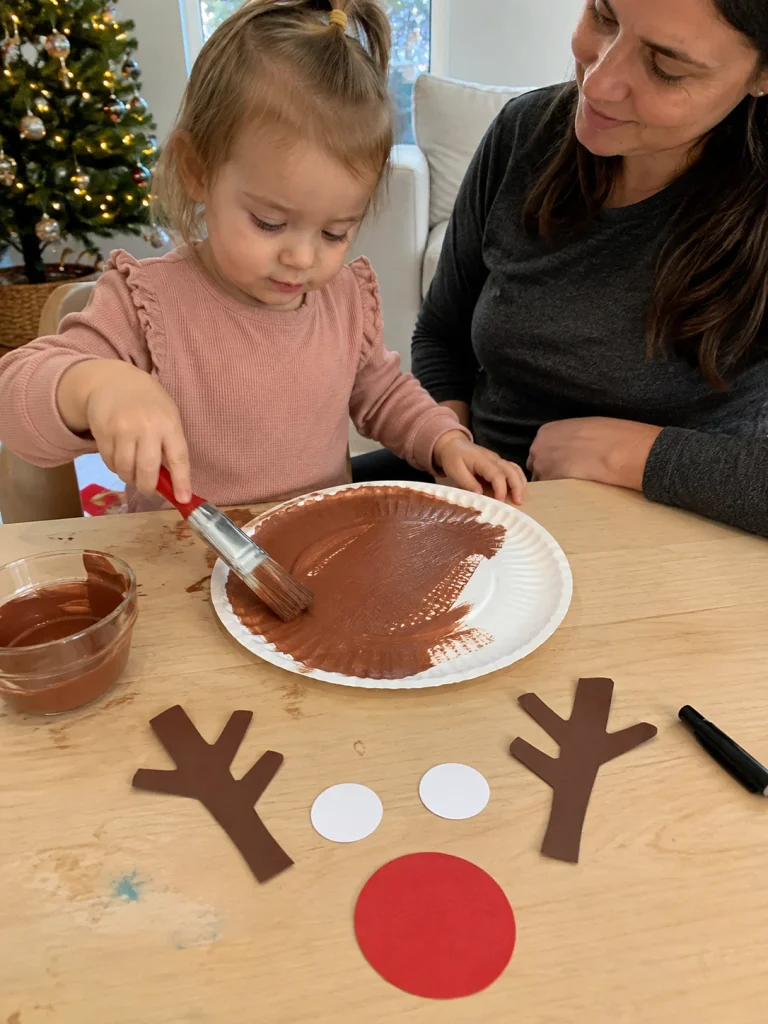
- Let your toddler paint the paper plate brown.
- Leave it to dry while you prepare the antlers and face pieces.
- Glue two large brown antlers behind the top of the plate.
- Add two large white paper eyes with black centers.
- Finish with one big red paper nose.
If you want an extra keepsake touch, trace your toddler’s hands on brown paper and use the cutouts as antlers.
11. Christmas Tree Dot Painting
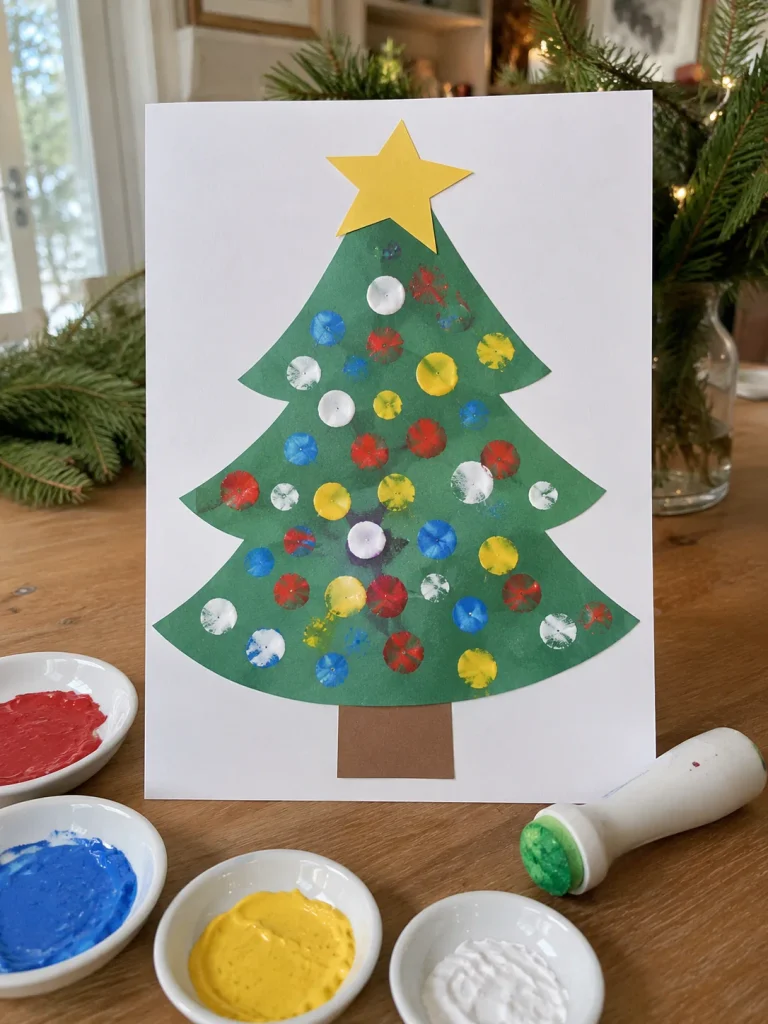
Dot painting is a nice middle ground between free painting and a more structured craft. The tree shape is already there, so your toddler can simply stamp ornaments without worrying about making the tree itself.
Things You’ll Need
- White cardstock
- Large green paper Christmas tree shape
- Round sponge dauber
- Red, yellow, blue, and white washable paint
- Brown cardstock
- Yellow paper star
- Child-safe glue
How to Make It
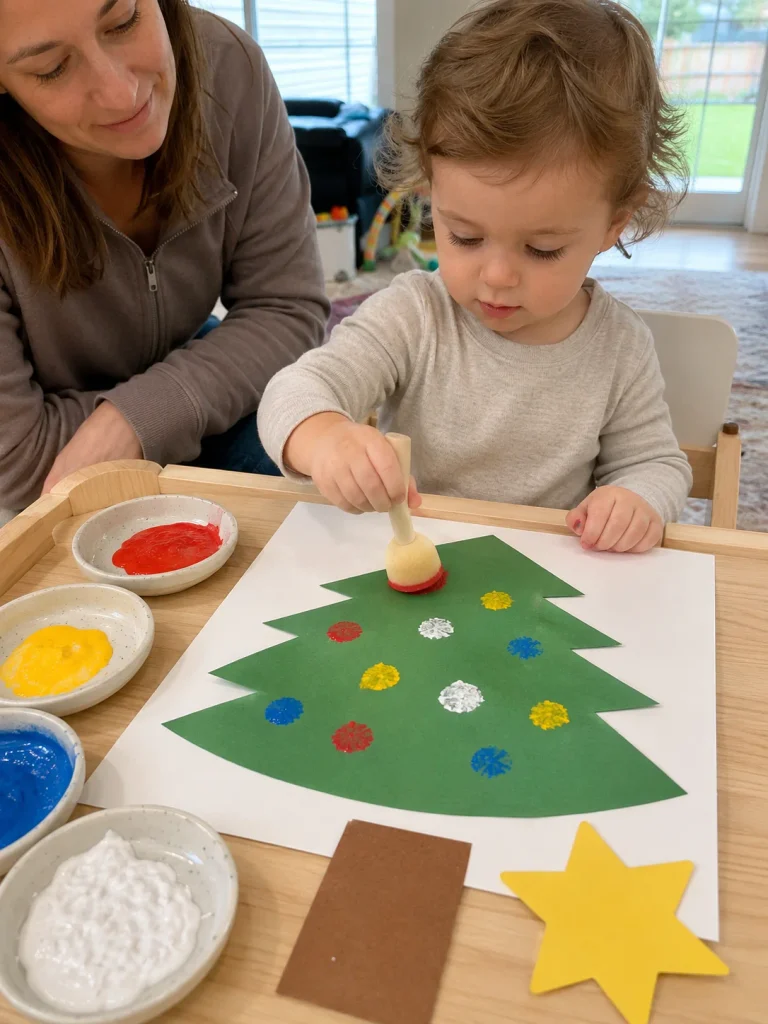
- Glue the green tree shape onto white cardstock.
- Put small amounts of paint into separate dishes.
- Show your toddler how to press the sponge dauber straight down to make a dot.
- Switch colors whenever interest starts to fade.
- Add the trunk and star when the painting is dry.
One branch may end up with ten red dots and another with none. Resist the urge to redistribute them.
12. Tissue Paper Christmas Ornament
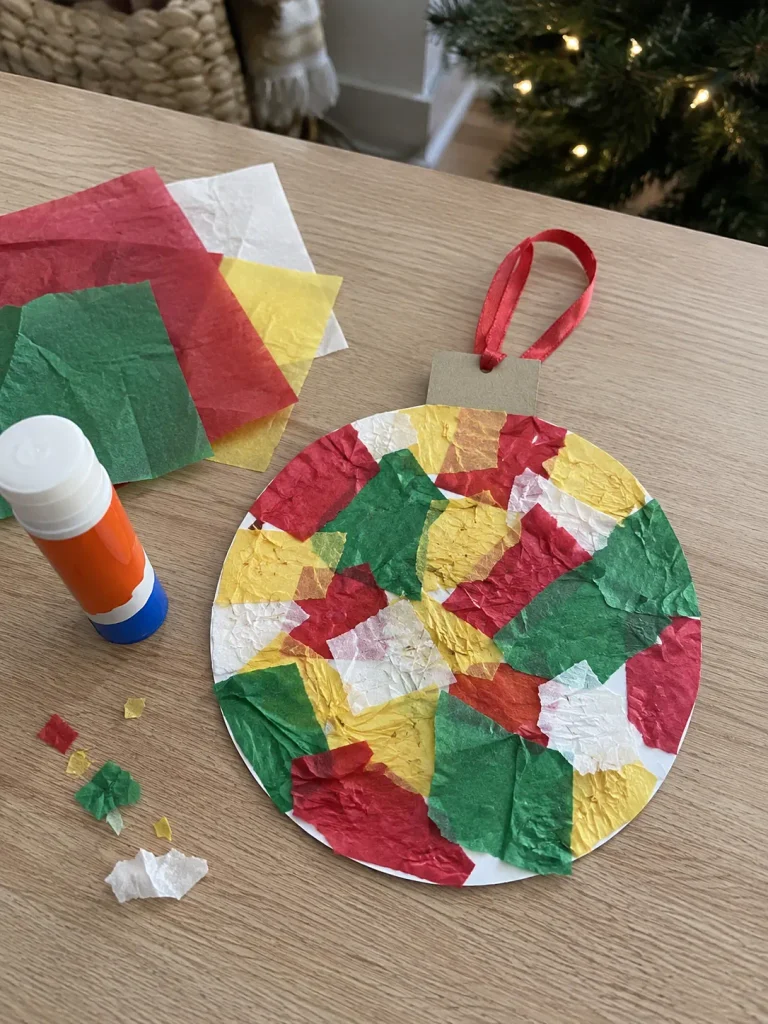
Tissue paper makes this project look much fancier than the effort involved. Wrinkles, overlaps, and uneven edges all add texture, which is handy because toddlers are excellent at producing all three.
Things You’ll Need
- Thick white cardstock
- Red, green, yellow, and white tissue paper
- Child-safe glue
- Grey or gold cardstock for the ornament cap
- Ribbon for adult use
- Scissors for adult use
How to Make It
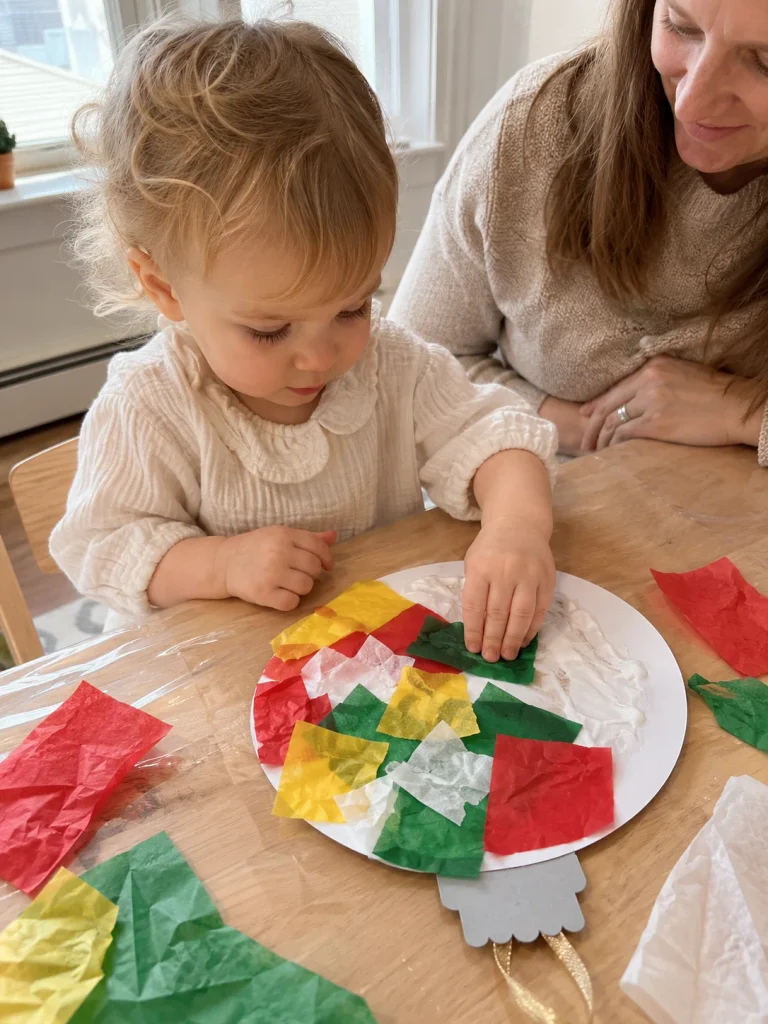
- Cut a large round ornament shape from cardstock.
- Tear tissue paper into pieces that are easy for little fingers to pick up.
- Spread glue over one section of the ornament.
- Let your toddler layer tissue paper over the sticky area, then repeat.
- Add a cardstock cap and ribbon loop after the collage dries.
A few white gaps are perfectly fine. The goal is a colorful toddler collage, not a perfect mosaic.
13. Fork-Painted Christmas Tree
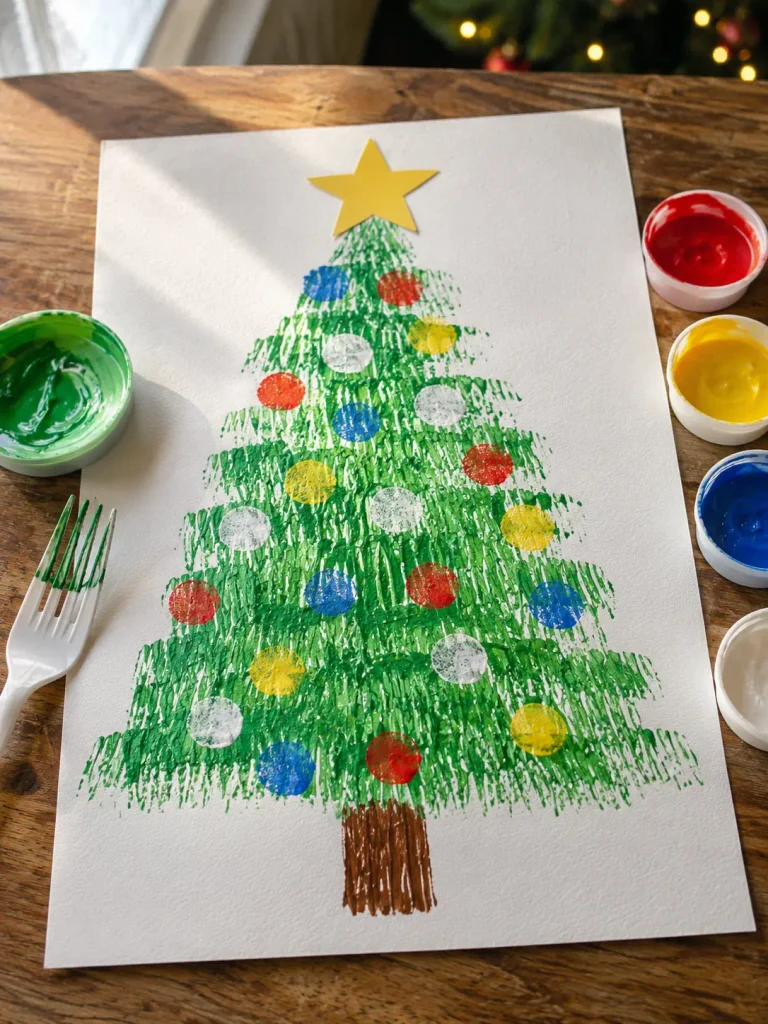
A child-safe plastic fork makes scratchy, pine-needle-like marks that look surprisingly good once they are layered into a tree. It is also different enough from a paintbrush to feel like a brand-new activity.
Things You’ll Need
- White cardstock
- Child-safe plastic fork
- Washable green paint
- Red, yellow, blue, and white washable paint
- Brown paint
- Yellow paper star
How to Make It
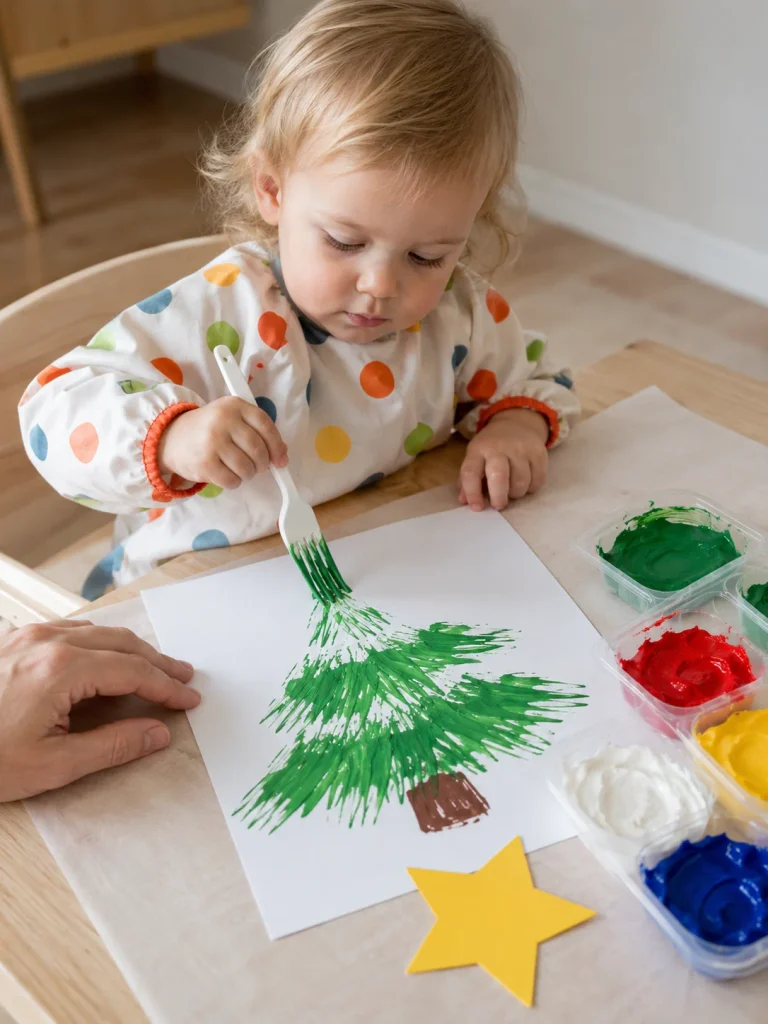
- Put green paint in a shallow tray.
- Dip the fork lightly and press or drag it across the paper.
- Build wide rows at the bottom and shorter rows toward the top.
- Let the tree dry, then add colorful fingerprint ornaments.
- Paint a brown trunk and attach the yellow star.
If the fork turns into a dragging tool rather than a stamping tool, go with it. Those streaks still look like branches.
14. Cardboard Tube Snowman
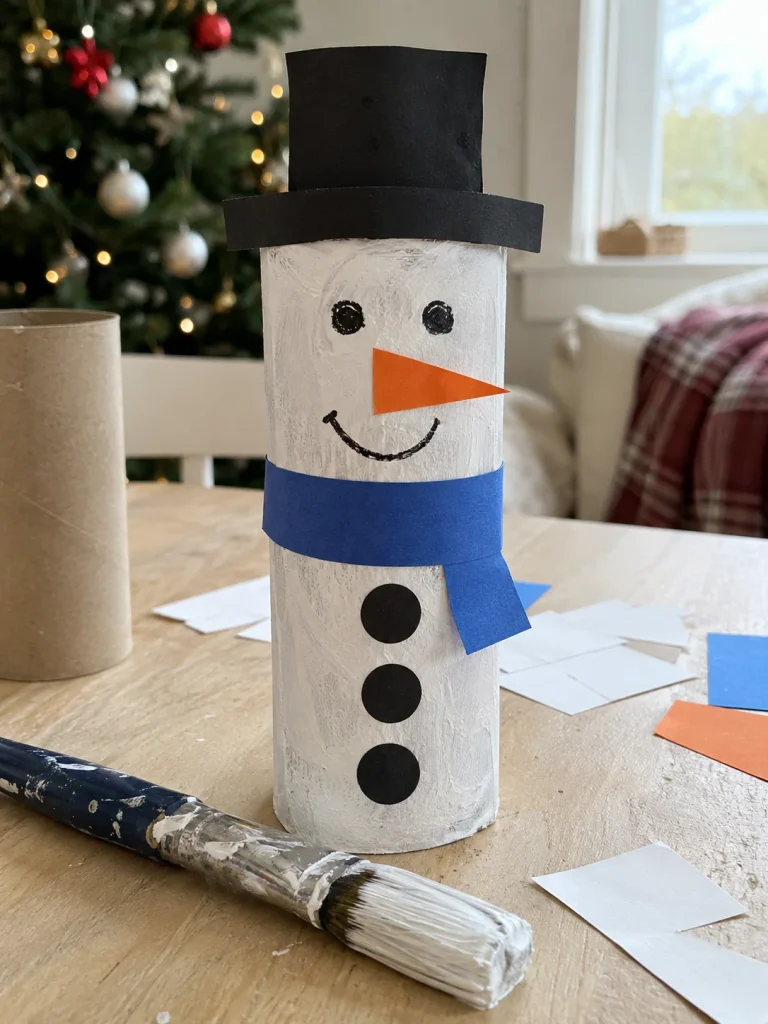
Save a cardboard tube from the recycling bin and you already have the body of a snowman. This is a nice project for toddlers who enjoy painting objects rather than flat paper.
Things You’ll Need
- Clean cardboard tube
- Washable white paint
- Chunky paintbrush
- Blue or red paper for the scarf
- Black paper for the hat and buttons
- Orange paper for the nose
- Washable black marker
- Child-safe glue
How to Make It
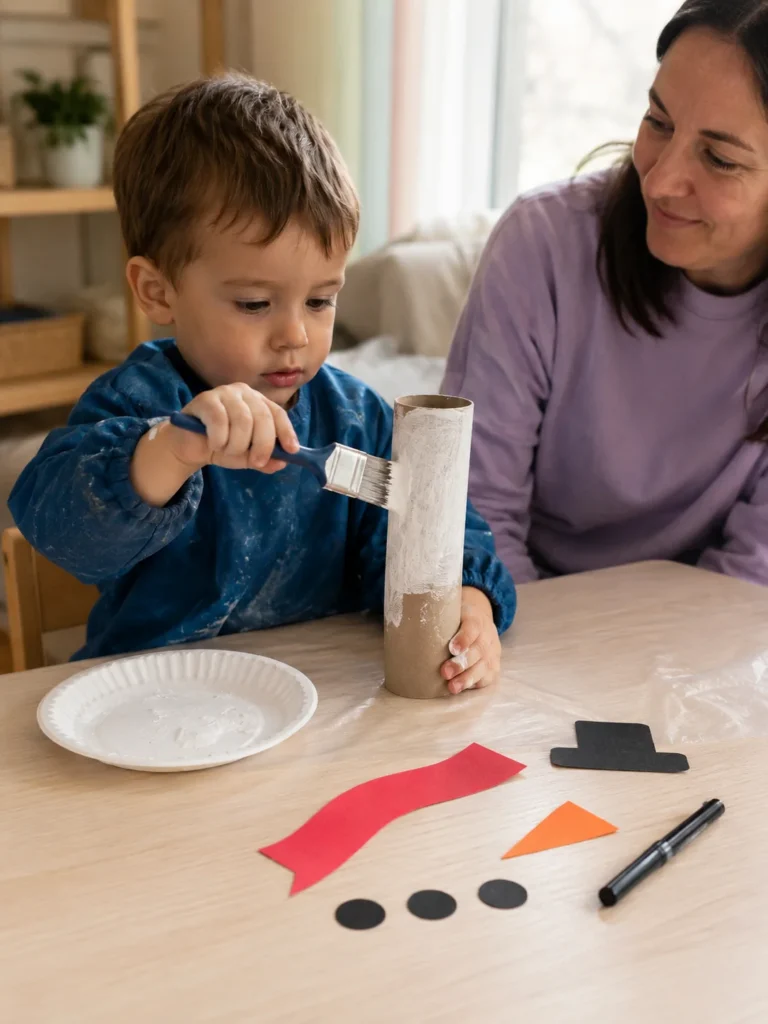
- Let your toddler paint the cardboard tube white.
- Allow it to dry completely before adding paper pieces.
- Wrap a wide paper strip around the middle as a scarf.
- Add a black paper hat and orange triangle nose.
- Draw the smile and eyes, then attach three large black buttons.
Make two or three tubes if you want a snowman family. Toddlers usually take the job of naming them very seriously.
15. Handprint Christmas Wreath
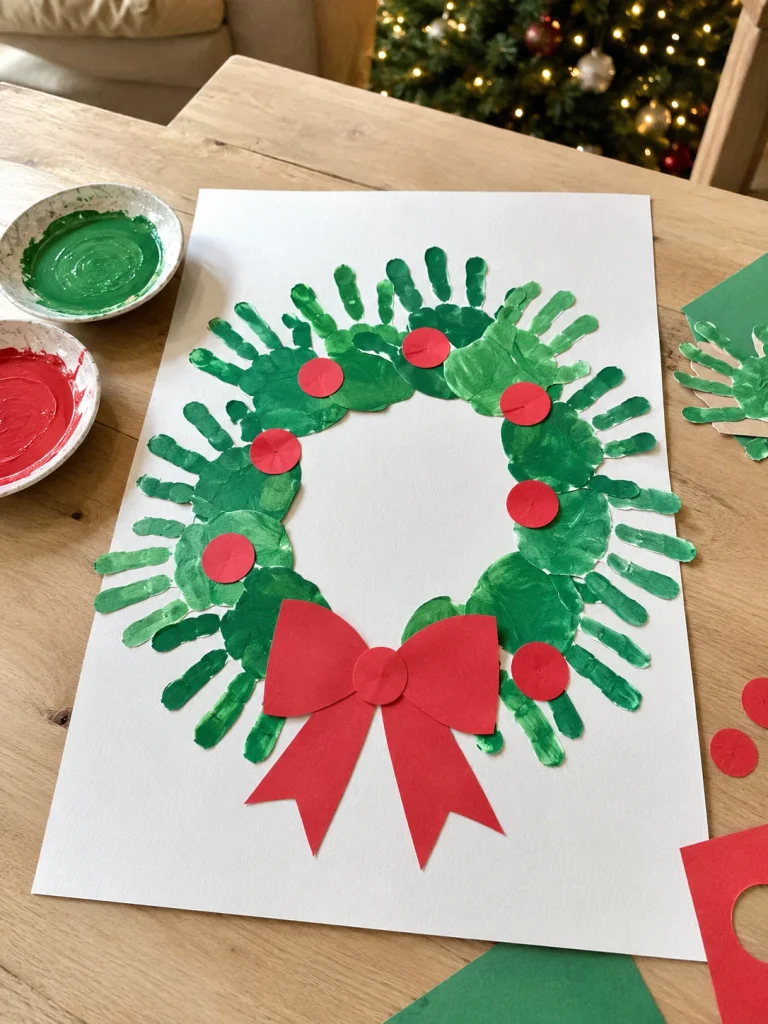
This wreath takes a little more preparation than a single handprint craft, but it makes a beautiful keepsake. Instead of trying to print directly in a perfect circle, make separate handprints first and assemble them after they dry.
Things You’ll Need
- White cardstock
- Washable green paint
- Red washable paint or large red paper circles
- Red cardstock for the bow
- Child-safe glue
- Scissors for adult use
How to Make It
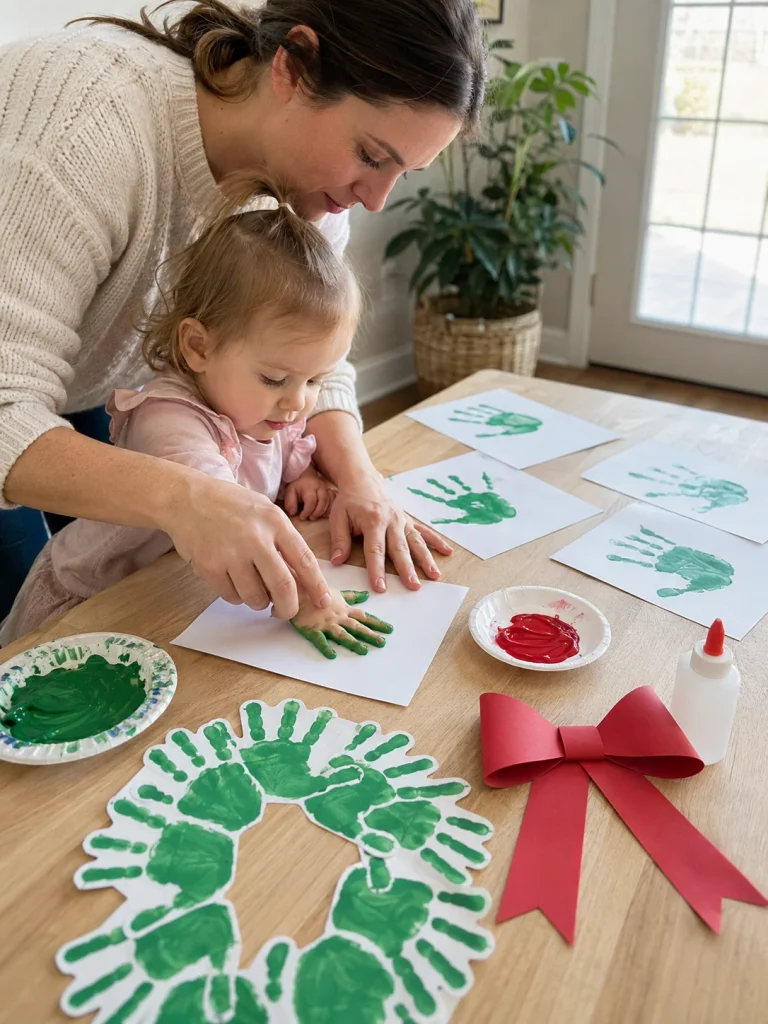
- Make several green handprints on separate sheets of cardstock.
- Let them dry, then cut around the handprints yourself.
- Arrange the hand shapes in a circle with the fingers pointing outward.
- Glue them together with slight overlaps.
- Add red berries and a large red paper bow.
You can leave the center open or add a favorite photo later. Either way, date the back.
16. Paper Christmas Stocking Collage
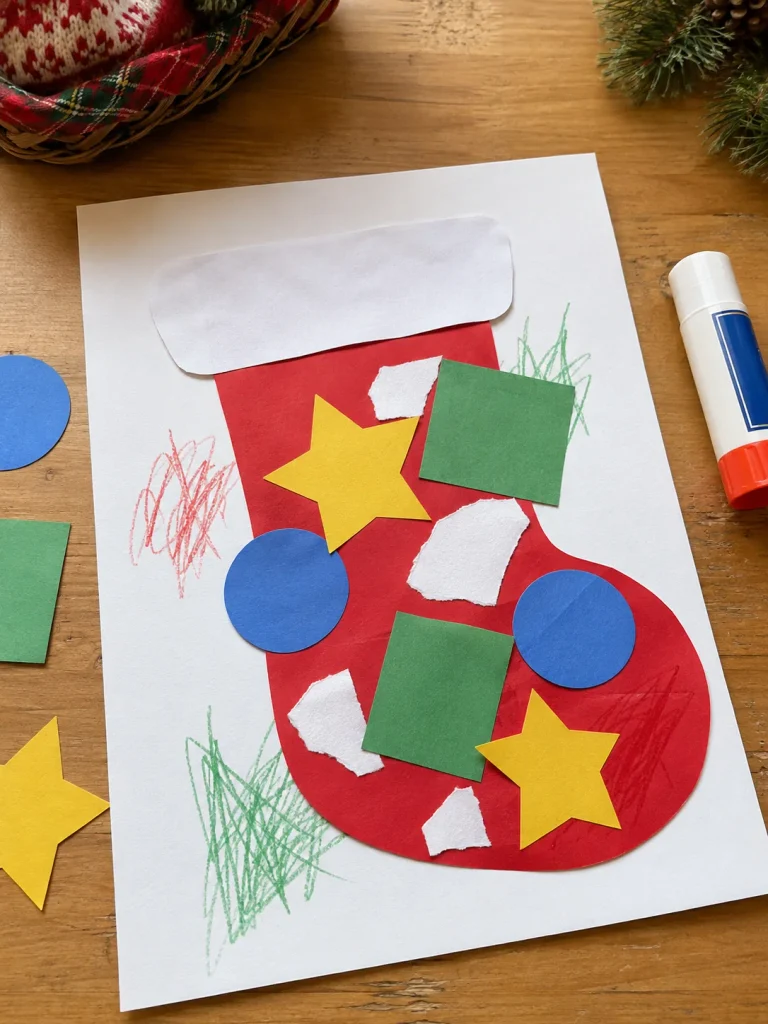
On a day when paint feels like too much work, paper and glue are enough. This stocking collage lets toddlers make the decorating decisions while an adult handles all the cutting ahead of time.
Things You’ll Need
- Large red cardstock stocking shape
- White paper cuff
- Large yellow stars
- Blue circles and green squares
- Torn white paper pieces
- Child-safe glue stick
- Washable crayons
How to Make It
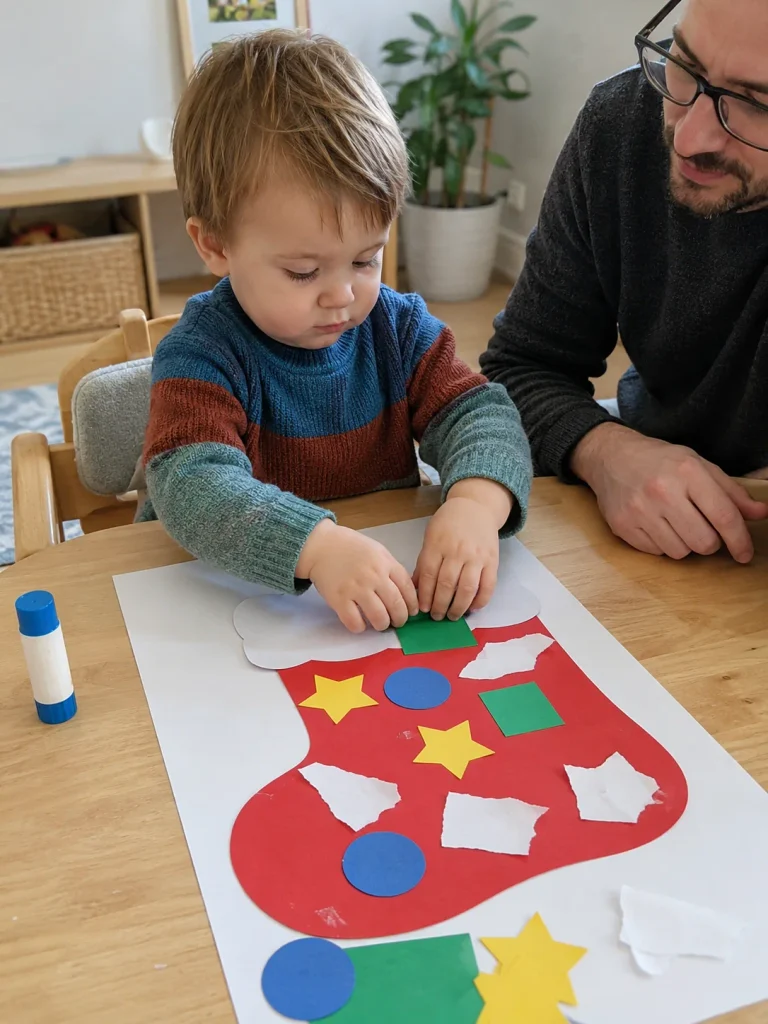
- Glue the red stocking shape onto a larger white sheet.
- Add the wide white cuff at the top.
- Set out only a few large paper shapes at a time.
- Let your toddler glue stars, circles, squares, and torn paper wherever they choose.
- Finish with a few washable crayon scribbles if your child wants more decorating.
A star upside down or a square hanging over the edge does not need fixing. That is the toddler part of the collage.
17. Fingerprint Snowy Christmas Tree
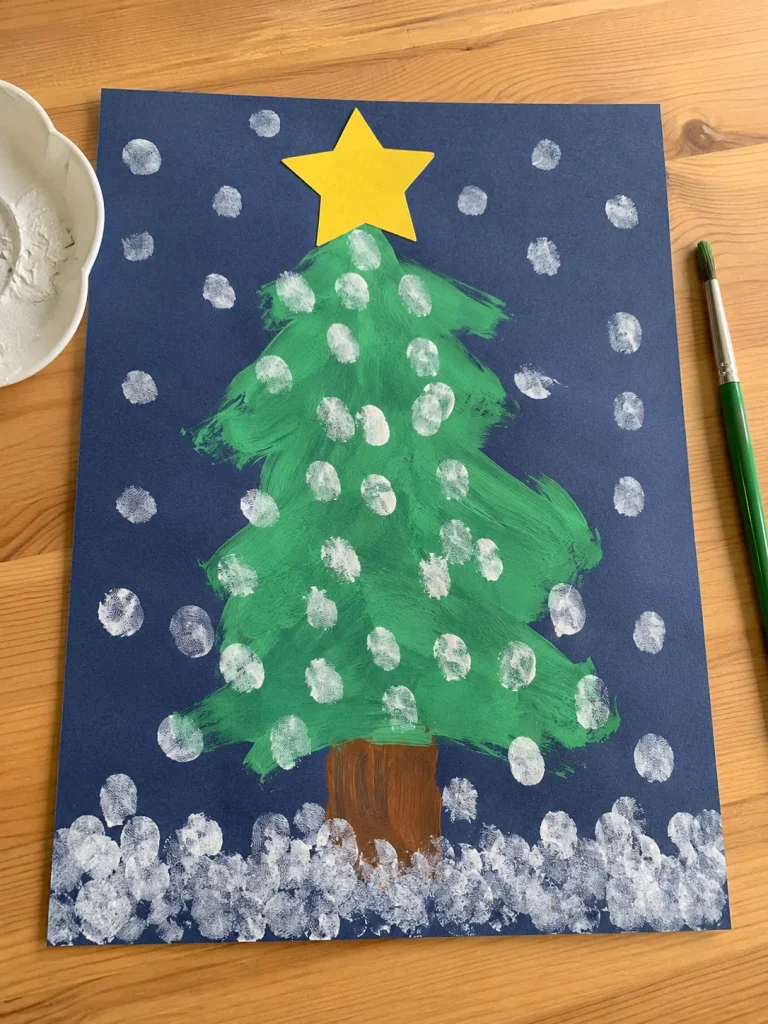
Dark blue cardstock makes white fingerprint snow pop. The finished picture feels wintry without requiring glitter, cotton, or a pile of extra supplies.
Things You’ll Need
- Dark blue cardstock
- Washable green paint
- Wide paintbrush
- White washable paint
- Brown paint
- Yellow paper star
How to Make It
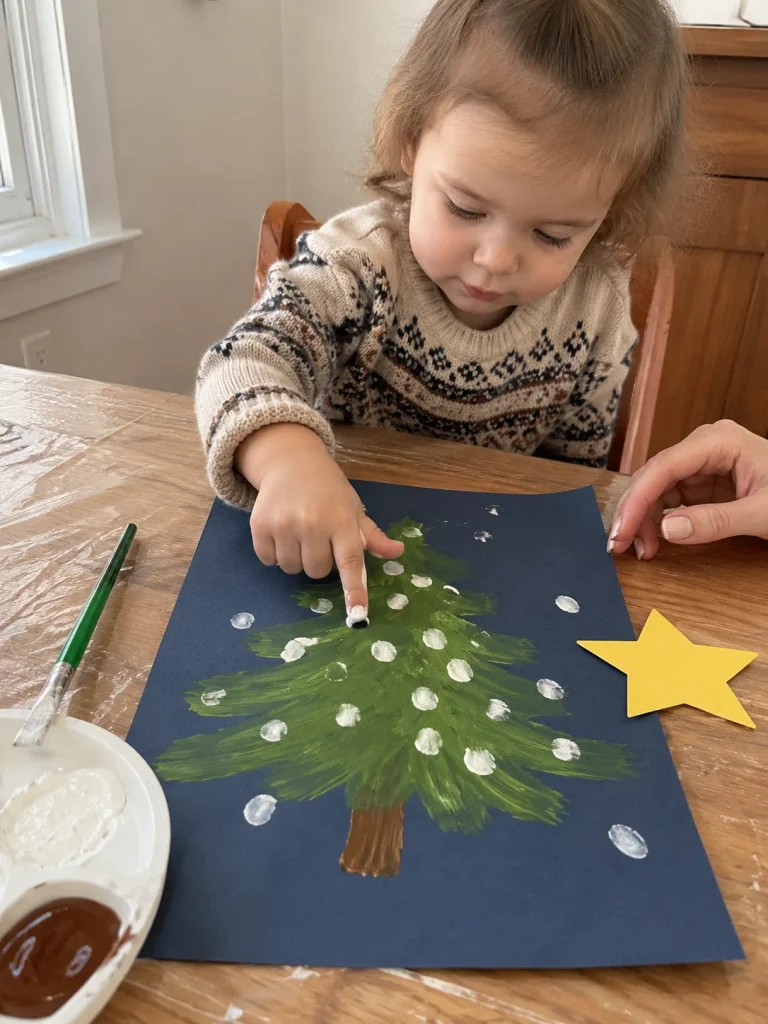
- Paint a loose green Christmas tree onto the blue cardstock.
- Add a simple brown trunk and let everything dry.
- Put a small amount of white paint into a shallow dish.
- Let your toddler press white fingerprints on the branches and around the background.
- Add the yellow star at the top when the paint is dry.
Stop before every inch is covered. A few open patches of dark blue make the falling snow stand out even more.
18. Giant Paper Plate Christmas Ornament
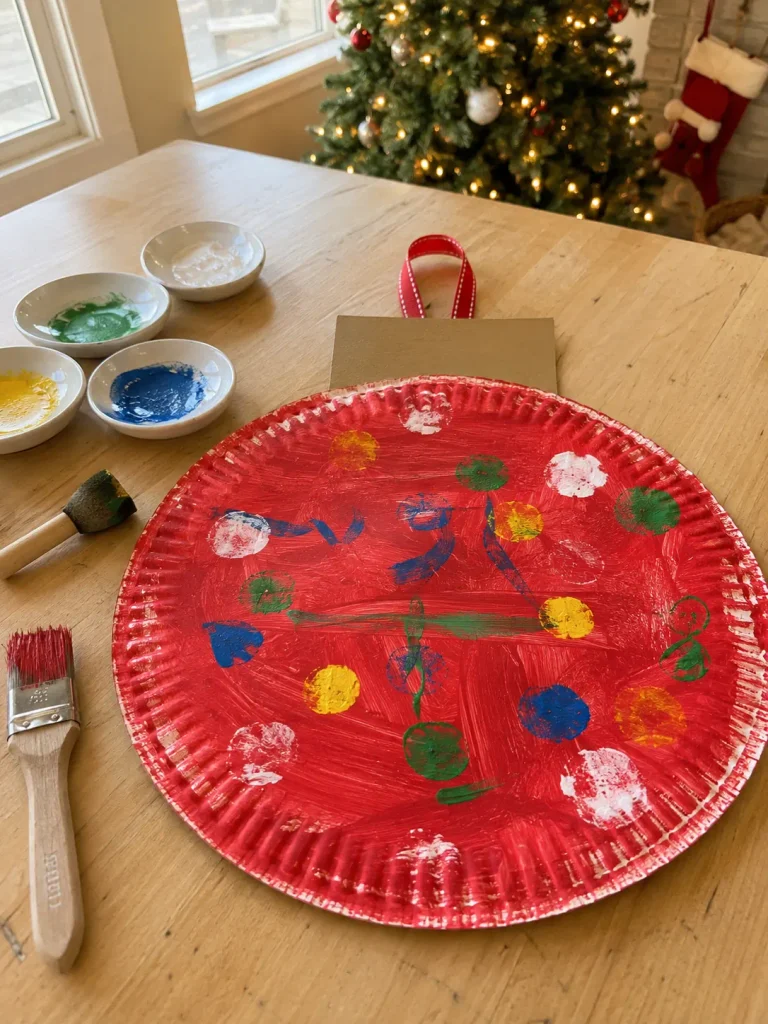
A paper plate is already the right general shape for an oversized Christmas bauble, which means your toddler can skip straight to painting. This one is big, bold, and especially good for kids who like broad brush strokes.
Things You’ll Need
- Large white paper plate
- Washable red paint
- Large paintbrush
- Yellow, blue, green, and white washable paint
- Sponge dauber
- Grey or gold cardstock
- Ribbon for adult use
How to Make It
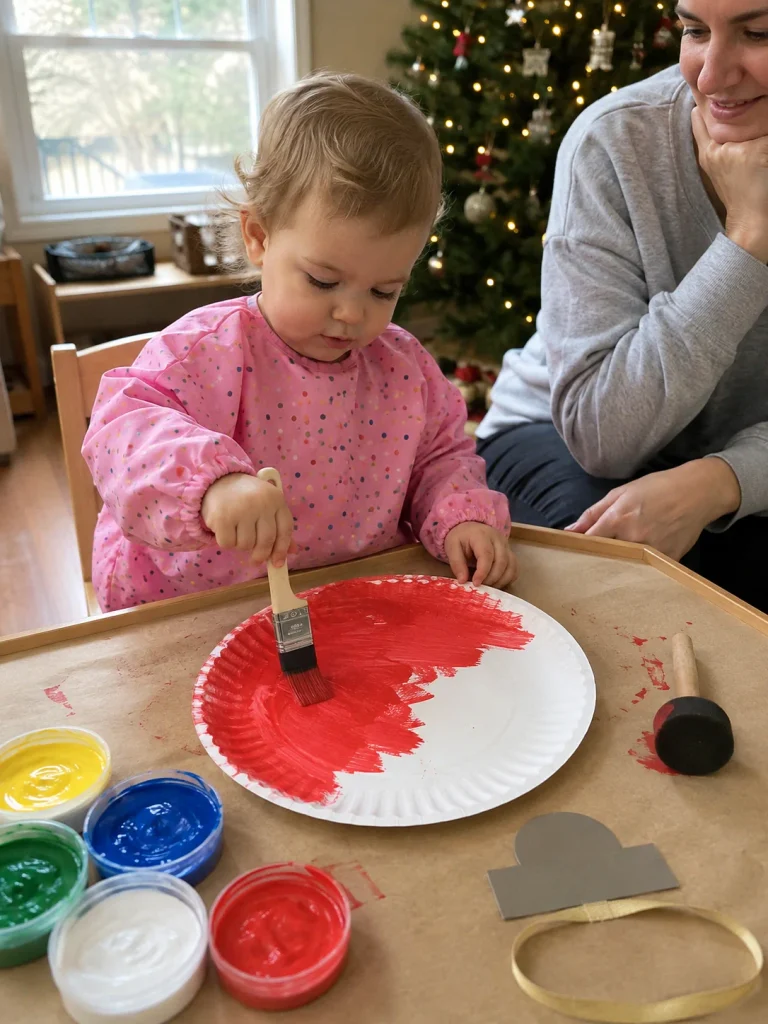
- Let your toddler cover the front of the plate with red paint.
- Allow it to dry before adding another round of decoration.
- Use a sponge dauber or fingertips to add colorful dots.
- Add a few loose painted lines or scribbles if your toddler wants to keep going.
- Attach a cardstock ornament cap and ribbon loop yourself.
Several finished plates look cheerful hanging together on a playroom wall.
19. Salt Dough Handprint Christmas Keepsake
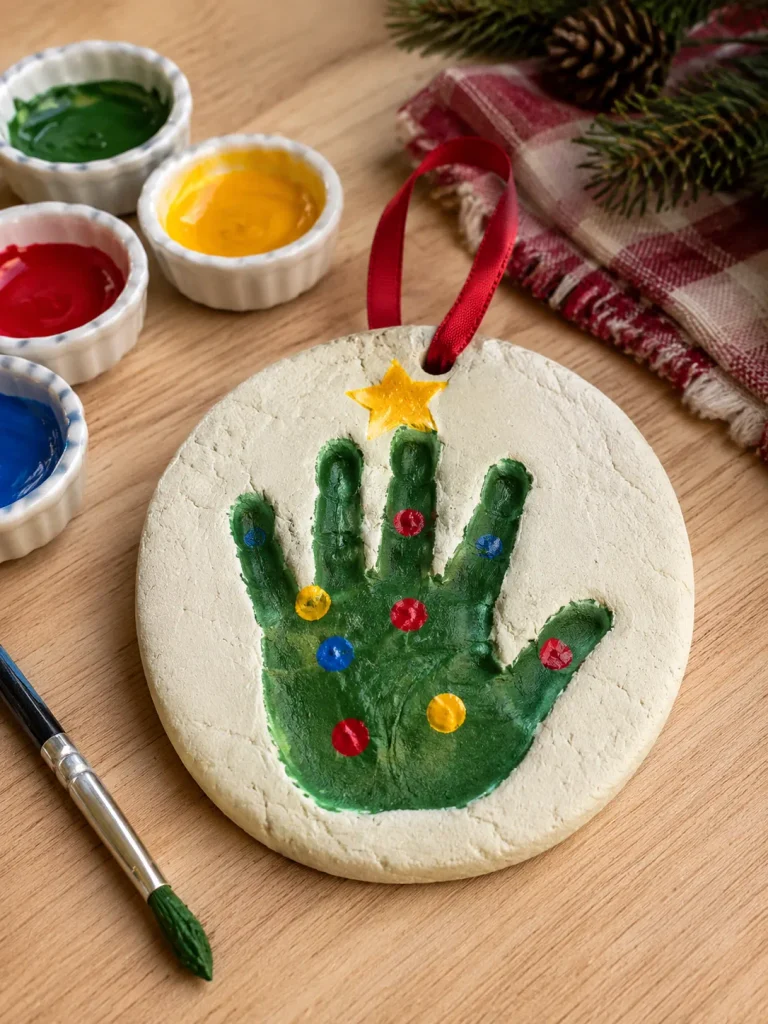
This one takes longer than the paper crafts, but it is the kind of Christmas keepsake families save for years. The toddler’s job is simple: press a hand into the dough and help paint later. The adult handles cutting, baking or drying, and anything hot.
Things You’ll Need
- Flour, salt, and water for basic salt dough
- Rolling pin
- Baking paper
- Adult-safe cutting tool
- Washable paint
- Paintbrush
- Ribbon
How to Make It
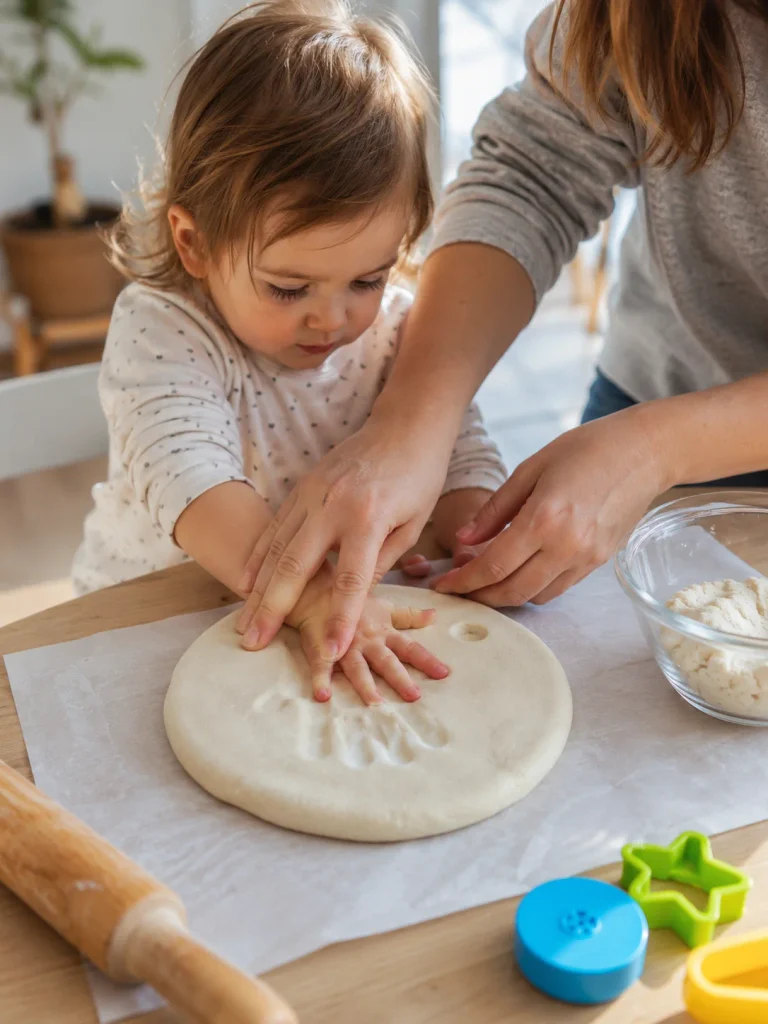
- Prepare a basic salt dough and roll it into a thick round shape.
- Help your toddler press an open hand firmly into the center.
- Make a hanging hole near the top and shape the edge yourself.
- Bake or air-dry according to your salt dough recipe, completely away from your toddler.
- Once cool and hard, paint the handprint green, add colorful dots and a star, then thread ribbon through the hole.
Salt dough is a craft material, not food. Keep it away from mouths and pets, and write the year on the back before storing it.
20. Christmas Present Shape Collage
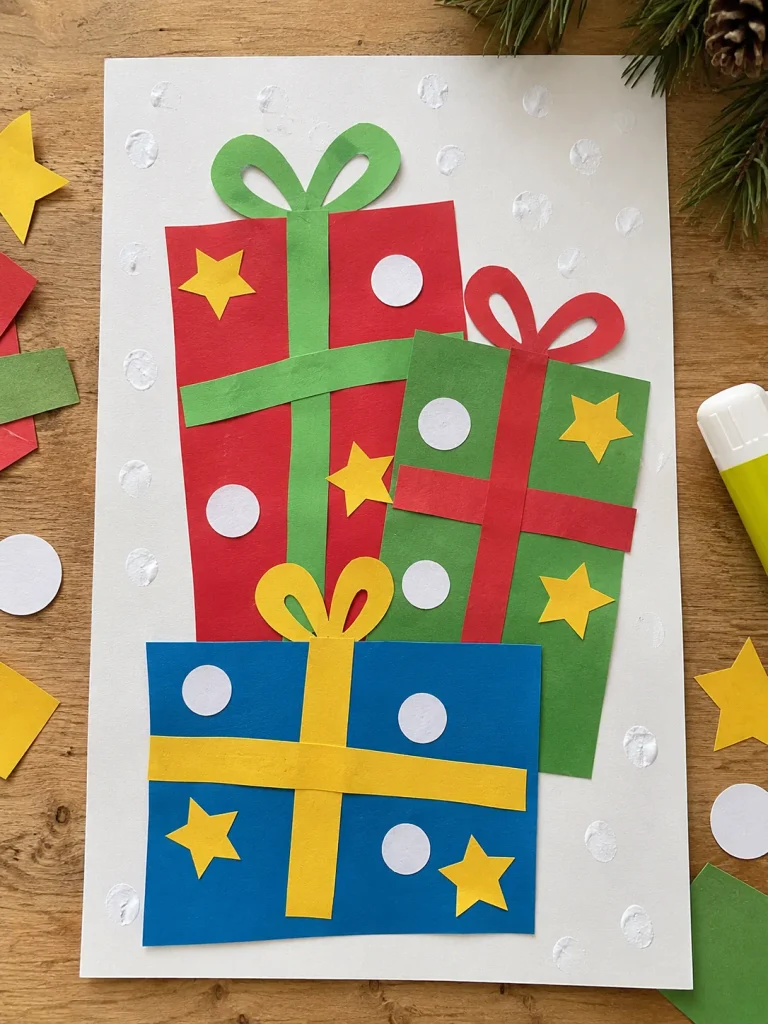
Finish with a collage that gives your toddler plenty of freedom. Three bold gift-box shapes provide the structure, but everything else can land wherever small hands decide it belongs.
Things You’ll Need
- Thick white cardstock
- Large red, green, and blue paper rectangles
- Wide paper ribbon strips
- Large yellow stars and white circles
- Simple paper bow shapes
- Child-safe glue stick
- White washable paint, optional
How to Make It
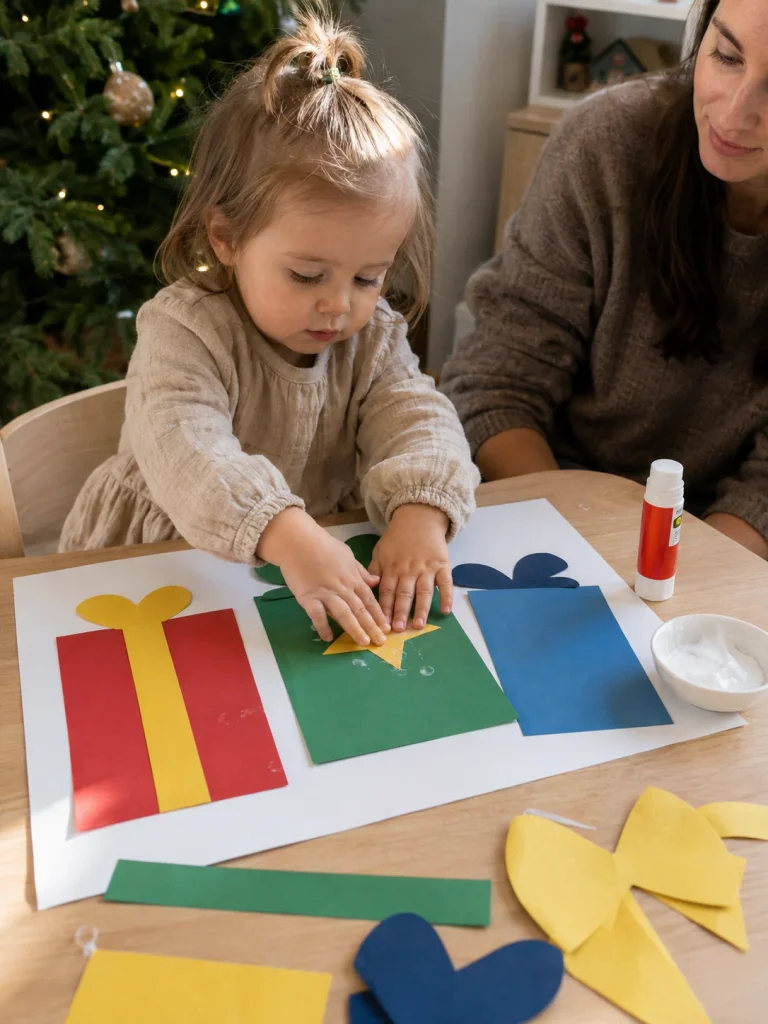
- Arrange three large gift-box shapes on white cardstock and glue them down.
- Add one wide paper ribbon strip to demonstrate what you are making.
- Let your toddler choose the remaining ribbons, bows, stars, and circles.
- Press each piece into place with child-safe glue.
- Add a few white fingerprint snow dots around the presents if your child still wants to craft.
Crooked ribbons are welcome. Real toddler art is much more interesting than perfectly centered gift wrap.
How to Make Christmas Crafting Easier With a Toddler
The craft itself is usually not the difficult part. Timing, attention span, and setup make a much bigger difference. A few small changes can turn the exact same activity from frustrating into genuinely fun.
Prepare Before Your Toddler Sits Down
Cut the shapes first. Open the glue first. Pour the paint first. Put an old cloth under the chair and keep wipes nearby. Once the supplies are visible, toddlers are ready to begin immediately. Ten minutes spent cutting cardboard while they wait can use up most of the attention you were hoping to have.
Put Out Fewer Choices
A table covered with ten paint colors, stickers, cotton, tissue paper, ribbon, markers, and glue may look wonderfully creative to an adult. To a toddler it can be overwhelming. Start with two or three colors or materials. Bring out more only if the child is still interested.
Break the Project Into Stages
There is no rule saying a Christmas craft has to be completed in one sitting. Paint the plate before lunch. Add dots after nap time. Glue on the paper pieces tomorrow. A short, happy craft session is far better than stretching the activity until everyone is tired.
Let It Look Like a Toddler Made It
This may be the hardest part for adults. Your child puts every ornament on the same side of the tree, and you want to spread them out. The star is crooked, so you want to straighten it. Try not to. Those unusual choices are exactly what make the finished piece worth keeping.
Which Crafts Are Easiest for Younger Toddlers?
If your child is just beginning to enjoy structured crafts, choose activities built around one repeated motion: stamp, press, stick, or paint. The easiest options from this list are the Fingerprint Christmas Lights, Sponge-Painted Christmas Tree, Christmas Tree Dot Painting, Giant Paper Plate Christmas Ornament, Torn Paper Christmas Wreath, and Fingerprint Snowy Christmas Tree.
You can simplify almost any project by pre-cutting more pieces, using fewer colors, drawing small details instead of attaching them, and choosing larger materials. Younger toddlers do not need a harder craft to make it valuable. They are already practicing hand control, decision-making, color recognition, sensory exploration, and patience while they play.
Christmas Crafts Worth Saving as Keepsakes
Some crafts are meant to hang on the fridge for a week and then quietly disappear during the January clean-up. Others deserve a place in the memory box.
The Handprint Christmas Tree, Footprint Rudolph, Handprint Santa, Handprint Christmas Wreath, and Salt Dough Handprint Keepsake are especially nice to save because they capture the actual size of your child’s hands or feet. Add a name, age, and year somewhere on the back. It is very easy to think you will remember exactly when each craft was made. Three Christmases later, you probably will not.
Turn Toddler Christmas Crafts Into Homemade Gifts
Grandparents usually do not need another shop-bought Christmas decoration, but a tiny painted handprint is a different story. These crafts can easily become gifts without adding extra work.
- Frame the handprint wreath or snowy tree.
- Fold the fingerprint Christmas lights into cards.
- Use sponge-stamped paper as homemade wrapping paper.
- Turn the craft-stick tree and salt dough keepsake into ornaments.
- Keep several pieces together in a small December scrapbook.
One lovely tradition is making the same handprint craft every year. Put the new version beside the old one and the growth is impossible to miss.
A Quick Note About Glitter
Glitter looks festive. It also has an impressive ability to move from a craft table to the sofa, carpet, child’s hair, and somehow the kitchen a week later. For toddler crafts, loose glitter is rarely necessary. Metallic washable paint, shiny cardstock, foil paper prepared by an adult, or age-appropriate glitter glue can give you sparkle without creating quite as much chaos.
Keep Toddler Craft Time Safe
Use non-toxic, washable materials designed for children and supervise the entire activity. Avoid small beads, loose sequins, tiny bells, small pom-poms, staples, sharp scissors, hot glue guns, and long loose strings around young toddlers. Handle baking, cutting, and stronger adhesives yourself.
Most importantly, watch your child rather than the clock. If the craft stops being fun, stop. You can always finish the star tomorrow.
You Really Do Not Need to Make All 20
There are twenty ideas here because it is useful to have options, not because December needs another checklist. Pick the crafts that match your toddler. One child may happily stamp paint for twenty minutes. Another may hate paint on their hands but spend ages gluing paper shapes onto a stocking.
Follow that preference. Make three crafts. Make ten. Make one spectacularly messy Rudolph that becomes the family favorite for the next decade.
The best Toddler Christmas Craft Ideas are not the ones that turn out perfectly. They are the ones where your child actually gets to do something, make choices, get a little messy, and hand you a finished piece with complete confidence that it belongs on the wall.

