 Skip to content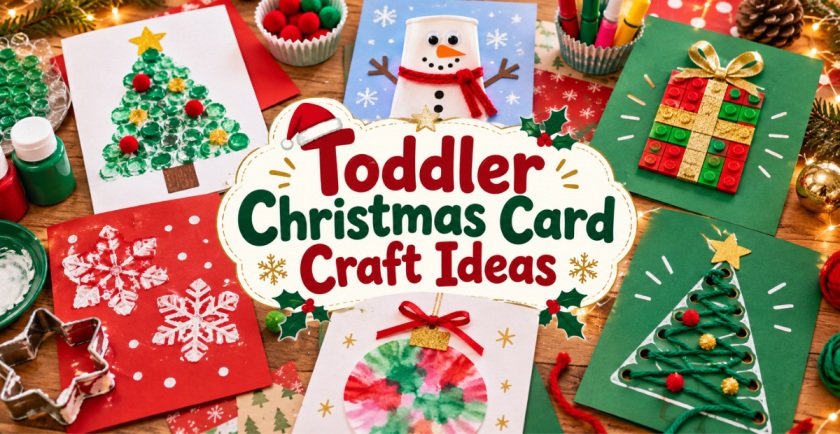
Handmade Christmas cards feel especially meaningful when little hands help create them. Toddlers may not be able to draw perfect Christmas trees, write holiday greetings, or carefully cut paper shapes, but they can stamp, press, roll, squish, glue, dab, drag, and experiment with color. Those simple actions can turn ordinary cardstock into something grandparents, relatives, teachers, and family friends may want to keep long after the holidays are over.
The best toddler christmas card craft ideas are not about creating a flawless finished product. They are about giving young children a chance to participate in the season while exploring texture, color, shape, cause and effect, and simple creative techniques. This collection moves beyond the most common handprint and fingerprint projects and uses bubble wrap, toy cars, building blocks, cupcake liners, coffee filters, ribbon, yarn, paper straws, greenery, salt, foil, and other easy materials.
A Few Tips Before Making Christmas Cards With Toddlers
Toddler craft time usually goes more smoothly when the activity is simple and everything is ready before the child sits down. Use washable, non-toxic paints and markers, child-safe glue, sturdy cardstock, and larger craft pieces that are easy for small hands to manage. Any cutting, hole punching, or preparation involving sharp tools should be completed by an adult.
If your toddler still explores objects with their mouth, avoid tiny beads, sequins, loose buttons, and similarly small decorations. Cover the table before painting and keep a damp cloth or wipes nearby. It also helps to offer only the materials needed for the current step instead of putting an entire craft box within reach. Most importantly, let the child’s contribution remain visible. A toddler Christmas card should look as though a toddler genuinely helped make it.
1. Bubble-Wrap Christmas Tree Card
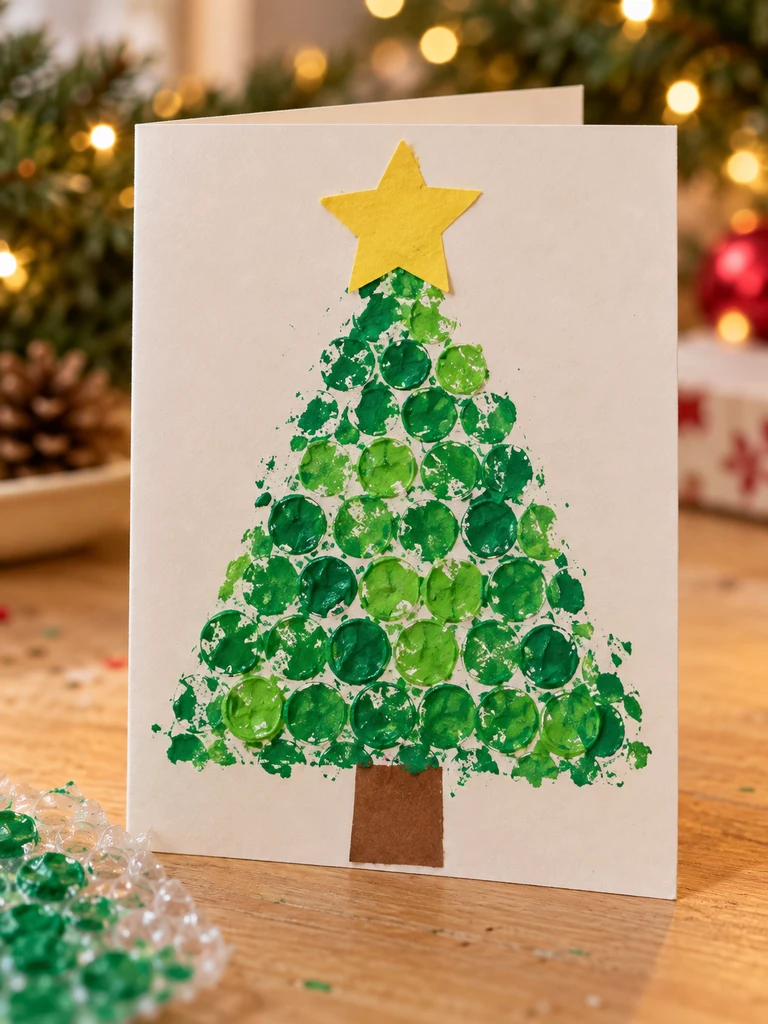
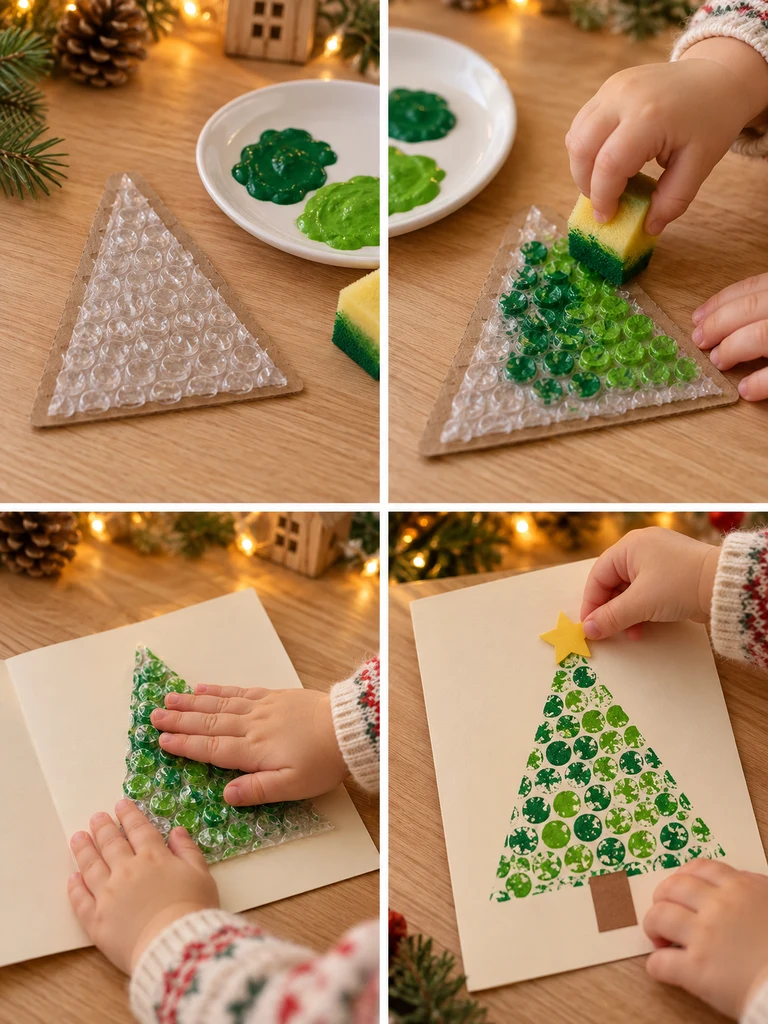
Bubble wrap turns a simple paint activity into a textured Christmas tree filled with tiny dotted impressions. It is especially suitable for toddlers because pressing a large stamp is easier than controlling a fine brush.
What You’ll Need
For this card, gather sturdy white or cream cardstock, bubble wrap, washable green paint, a shallow plate, child-safe glue, brown construction paper, and a yellow paper star.
How to Make It
An adult can cut bubble wrap into a large triangle and, if helpful, attach the flat side to scrap cardboard so the stamp is easier to hold. Spread a thin layer of green paint across the raised bubbles. Help your toddler press the triangle firmly onto the front of the folded card, using both hands so the surface makes contact. Lift it straight upward and let the dotted print dry before adding the trunk and star.
2. Fork-Painted Evergreen Christmas Card
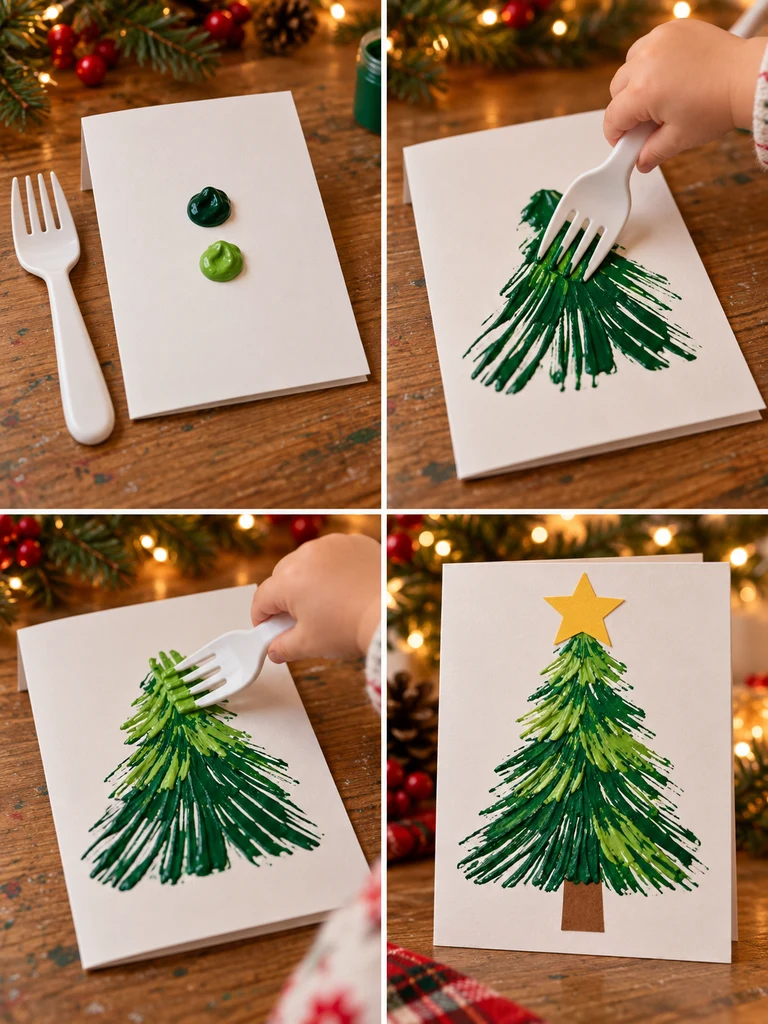
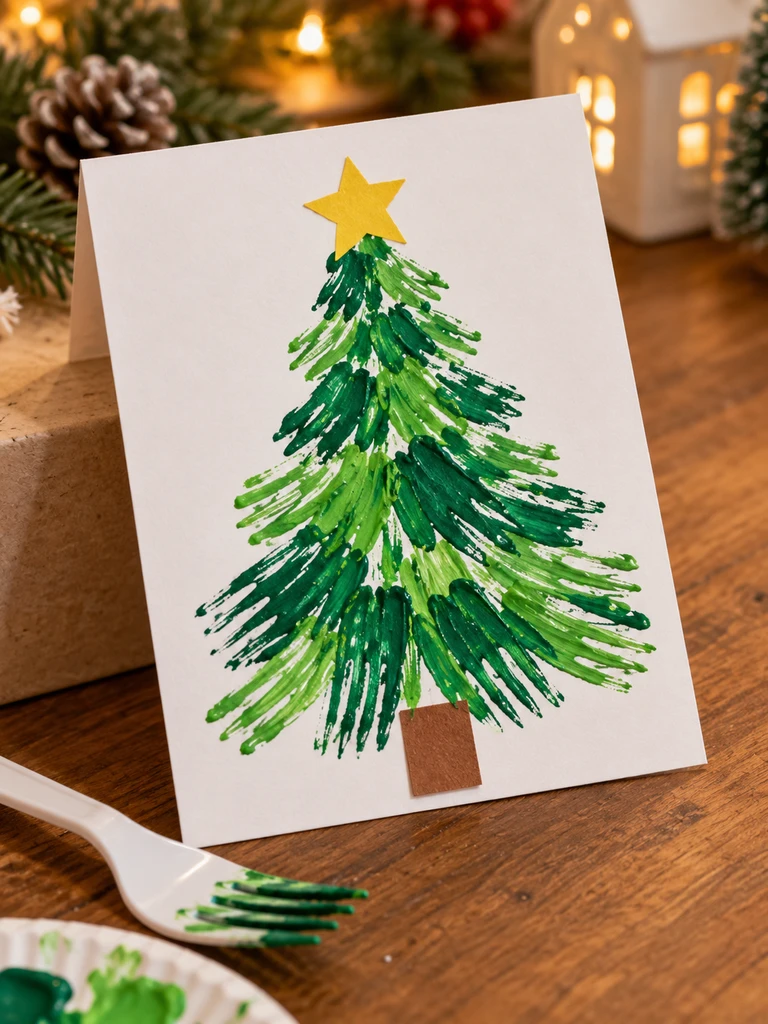
A chunky plastic fork creates long, repeated paint grooves that can look surprisingly similar to evergreen branches. The technique feels more like sensory play than careful painting, which keeps the project relaxed for little hands.
What You’ll Need
For this card, gather heavy white cardstock, a large child-safe plastic fork, dark and light green washable paint, brown paper or marker, and a yellow paper star.
How to Make It
Place a few small drops of green paint down the center of the card. Show your toddler how to set the fork into the wet paint and pull it outward. Make longer strokes toward the bottom and gradually shorter ones toward the top so a loose triangular tree forms. Add a second green shade in a few areas for depth. Let the card dry completely, then attach the simple trunk and star.
3. Corrugated Cardboard Snowy Tree Card
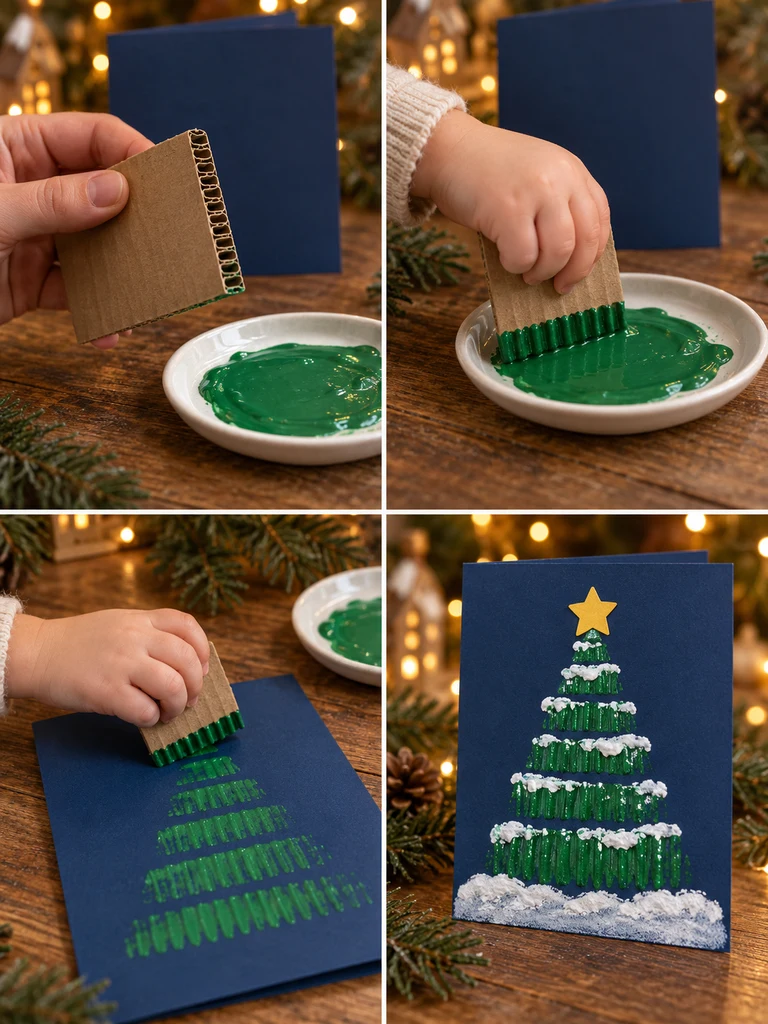
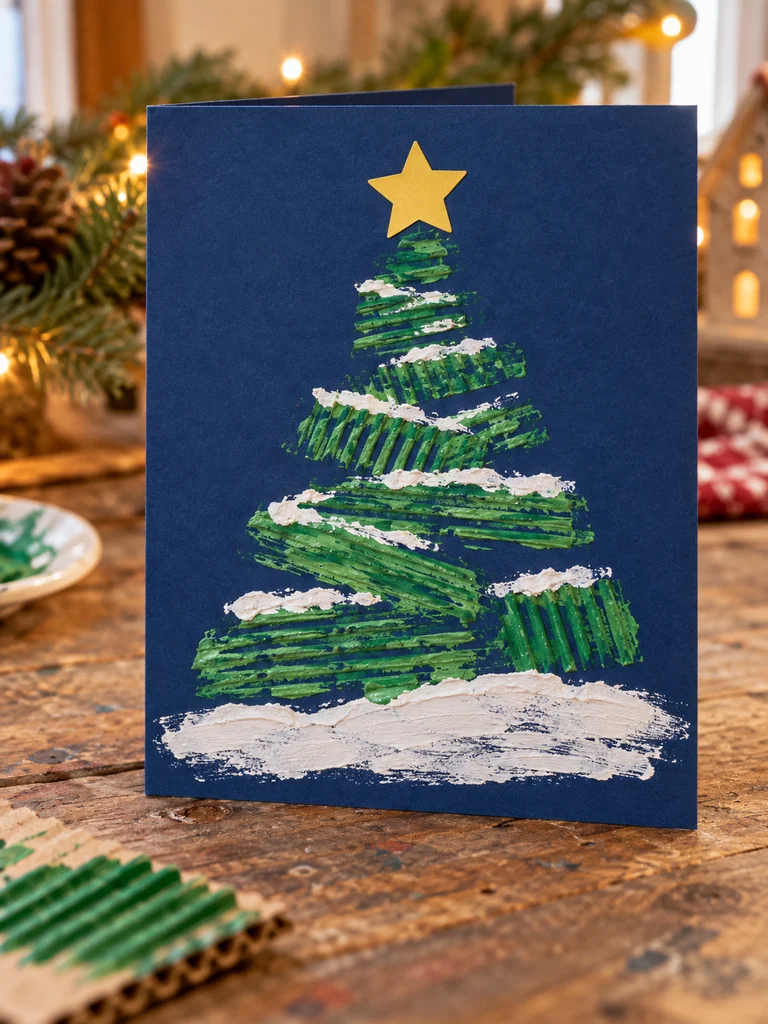
The exposed ridges of corrugated cardboard make a striped stamp that looks completely different from a brush or sponge. Repeated impressions can quickly build a textured Christmas tree with a snowy finish.
What You’ll Need
For this card, gather blue cardstock, a sturdy strip of corrugated cardboard prepared by an adult, green washable paint, white washable paint, a shallow plate, and a yellow paper star.
How to Make It
Expose one ridged edge of the cardboard and dip only that edge lightly into green paint. Help your toddler press it across the blue card, starting with longer impressions near the bottom and shorter marks as you move upward. Layer several prints so the tree feels full rather than perfectly geometric. Once the green paint is dry, add a few white dabs or streaks over the ridges and a simple white snowbank along the base. Finish with the star.
4. Paper Cup Rim Snowman Card
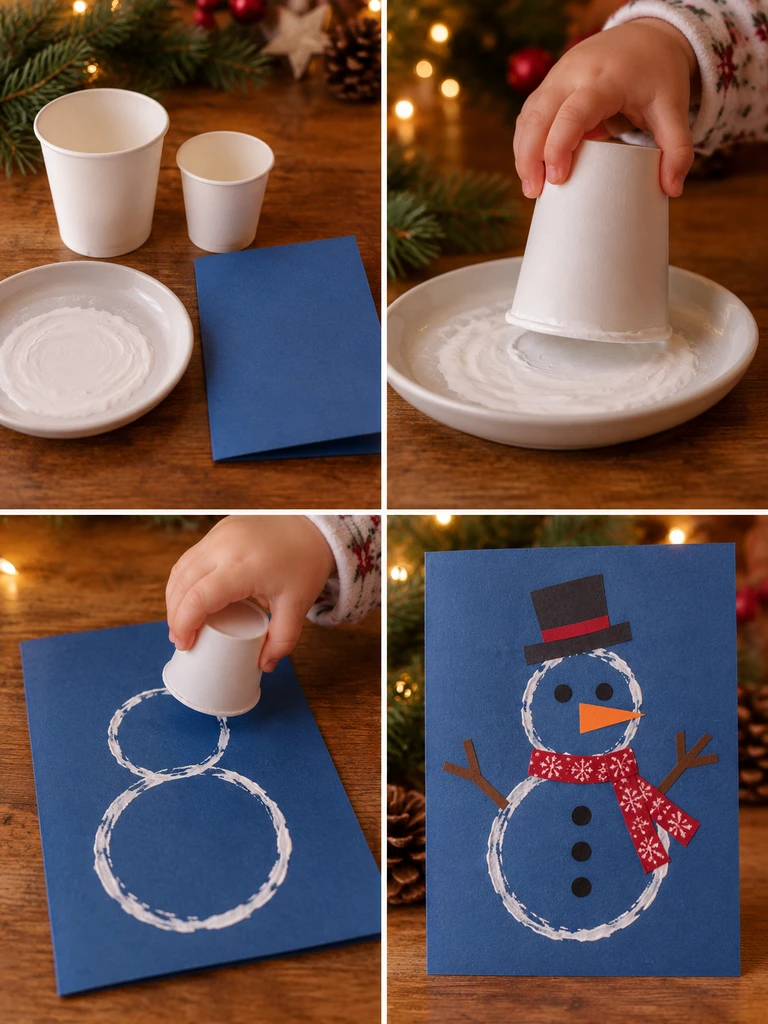
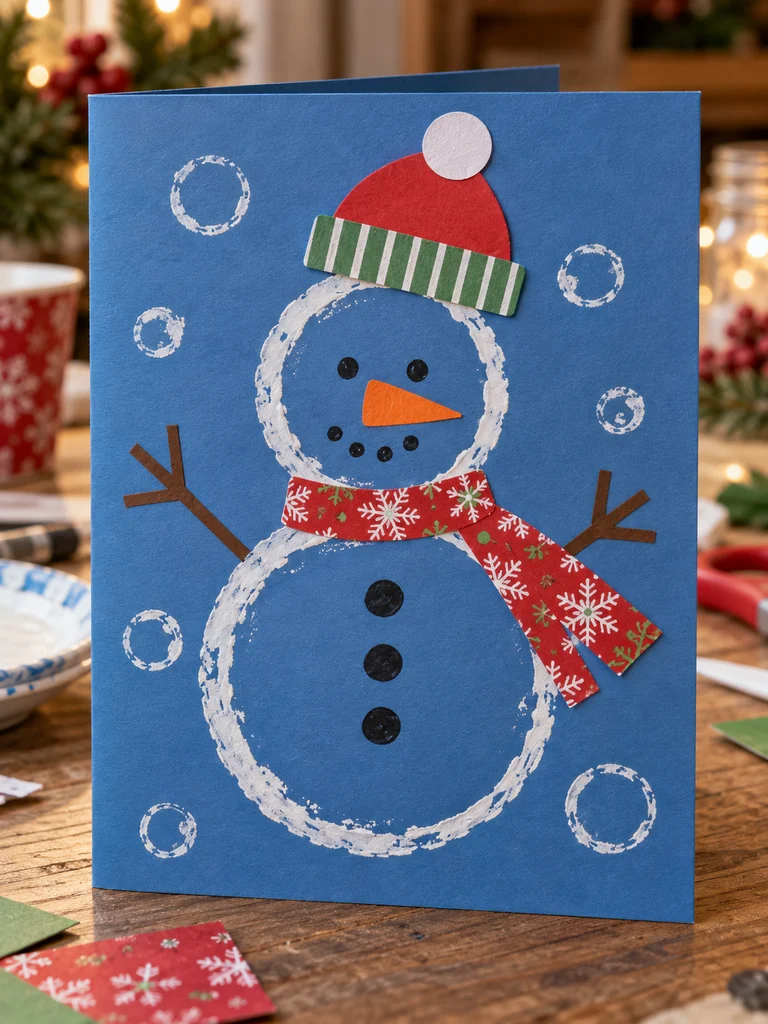
Two ordinary paper cups can become instant snowman stamps. Their rims give toddlers clean circular guides without requiring them to draw round shapes by hand.
What You’ll Need
For this card, gather blue cardstock, two paper cups in different sizes, white washable paint, orange paper, black marker, child-safe glue, and colored paper for a scarf and hat.
How to Make It
Pour a thin layer of white paint onto a flat plate. Dip the rim of the larger cup into the paint and press it onto the lower half of the card. Stamp the smaller cup directly above it for the head. Let the two white rings dry. Add an orange paper triangle for the carrot nose, simple eyes and buttons, stick arms, and an easy paper scarf and hat. A few extra cup-rim prints can become snowballs around the snowman.
5. Building-Block Christmas Present Card
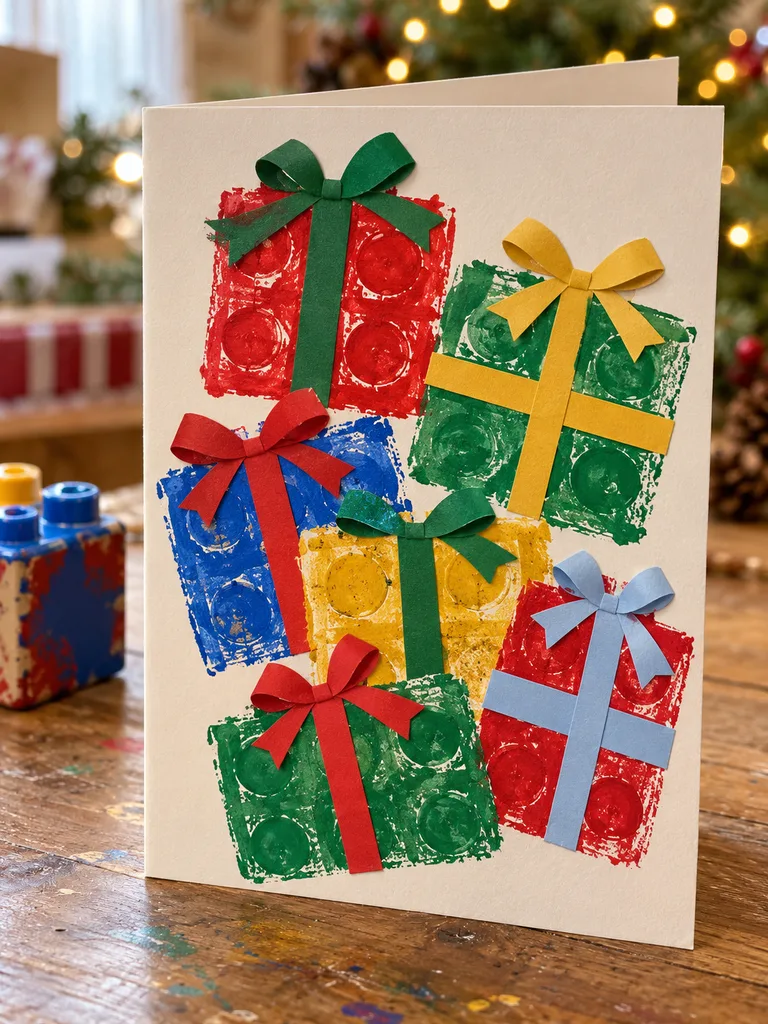
Large building blocks work as sturdy toddler paint stamps, and their square or rectangular shapes naturally resemble wrapped gifts. Familiar toys also make the activity feel inviting before the crafting even begins.
What You’ll Need
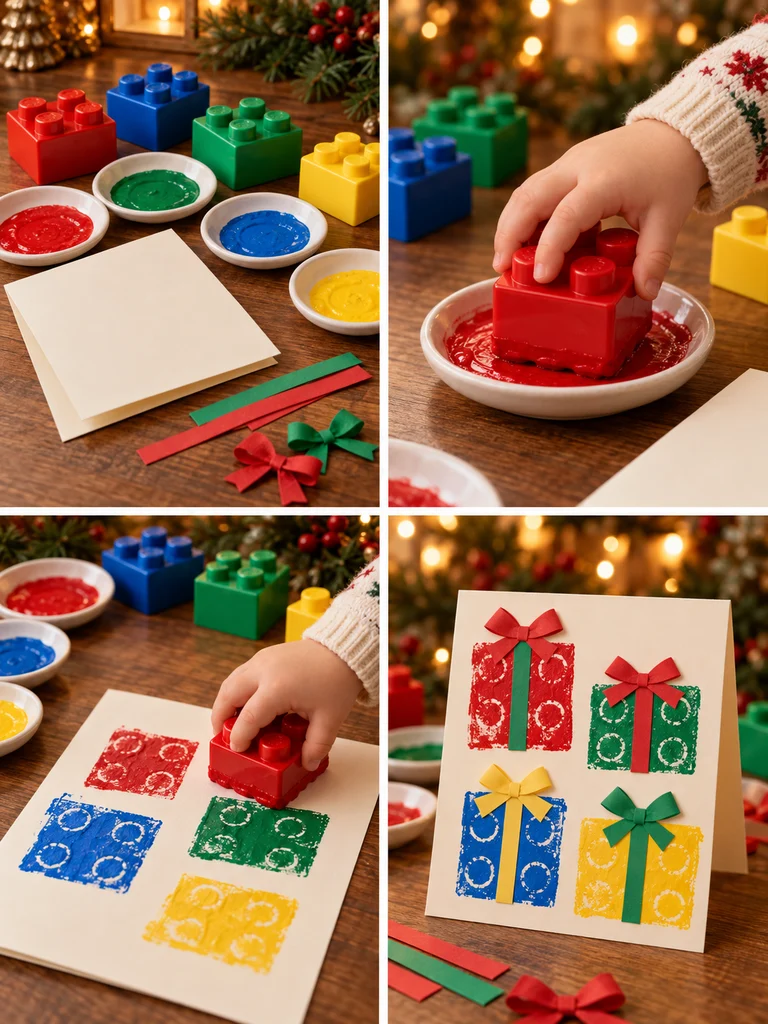
For this card, gather large DUPLO-style building blocks, washable festive paints, white cardstock, narrow construction-paper strips, and child-safe glue.
How to Make It
Set out small amounts of red, green, blue, and yellow paint on separate shallow plates. Let your toddler press the flat textured side of a large block into one color and stamp it onto the card. Repeat with different blocks and colors to create a loose pile of gift shapes. When the paint is dry, add narrow paper strips vertically and horizontally across the stamped rectangles to look like ribbon. Finish with a few simple paper bows.
6. Toy-Car Christmas Tree Tracks Card
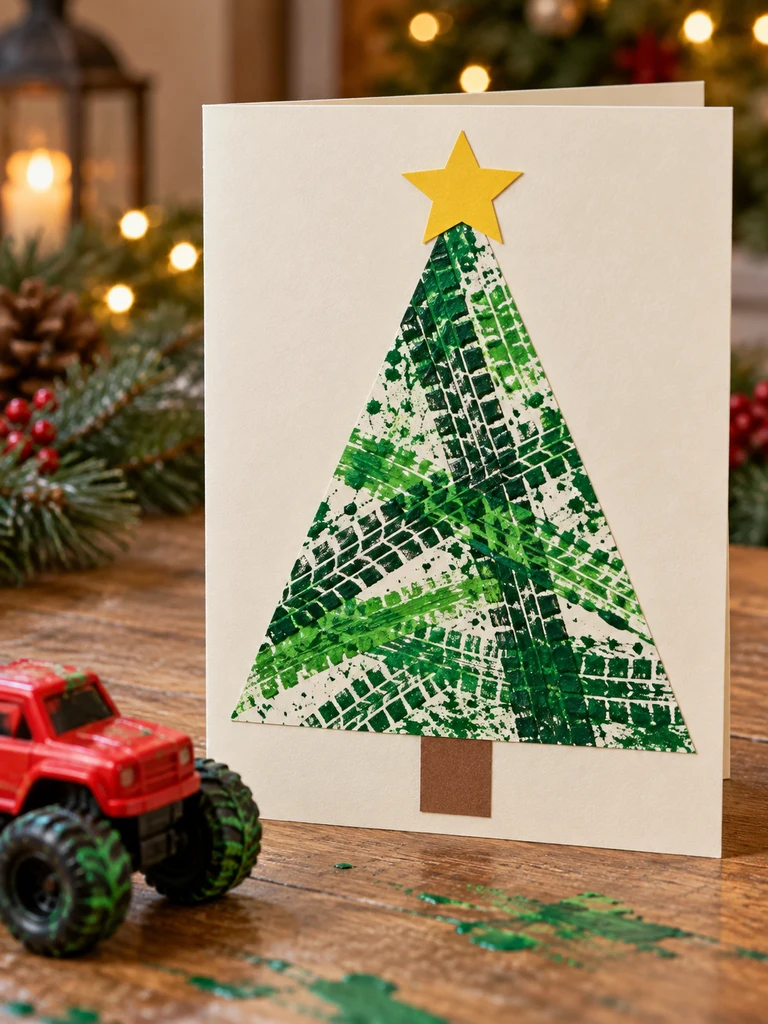
This project turns vehicle play into Christmas art. A washable toy car leaves repeating tread patterns in green paint, and the finished track artwork becomes the surface of a one-of-a-kind Christmas tree.
What You’ll Need
For this card, gather a chunky washable toy car with textured wheels, green washable paint, a shallow tray, white craft paper, folded cardstock, child-safe glue, brown paper, and a yellow star.
How to Make It
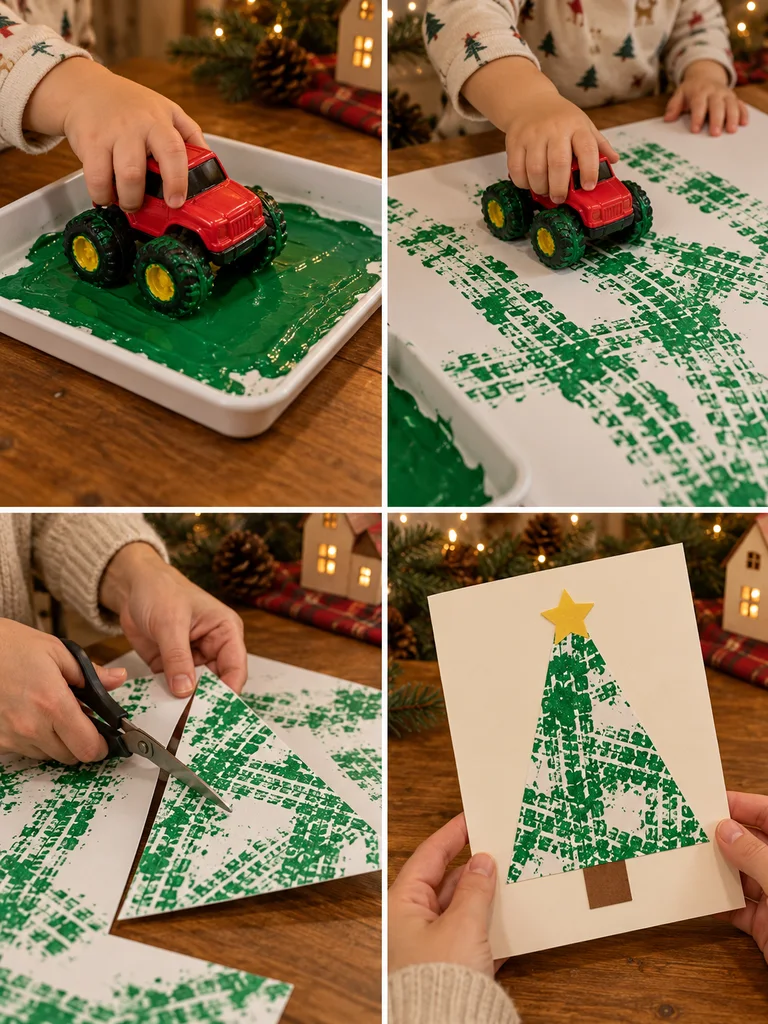
Spread a very thin layer of green paint in a tray and roll the toy car through it so the wheels pick up color without becoming flooded. Let your toddler drive the car back and forth across white paper in several directions. Add a second green shade if desired, then let the track artwork dry fully. An adult can cut a large triangle from the painted sheet. Glue it to the folded card and add a simple trunk and star.
7. Celery-Stamp Christmas Wreath Card
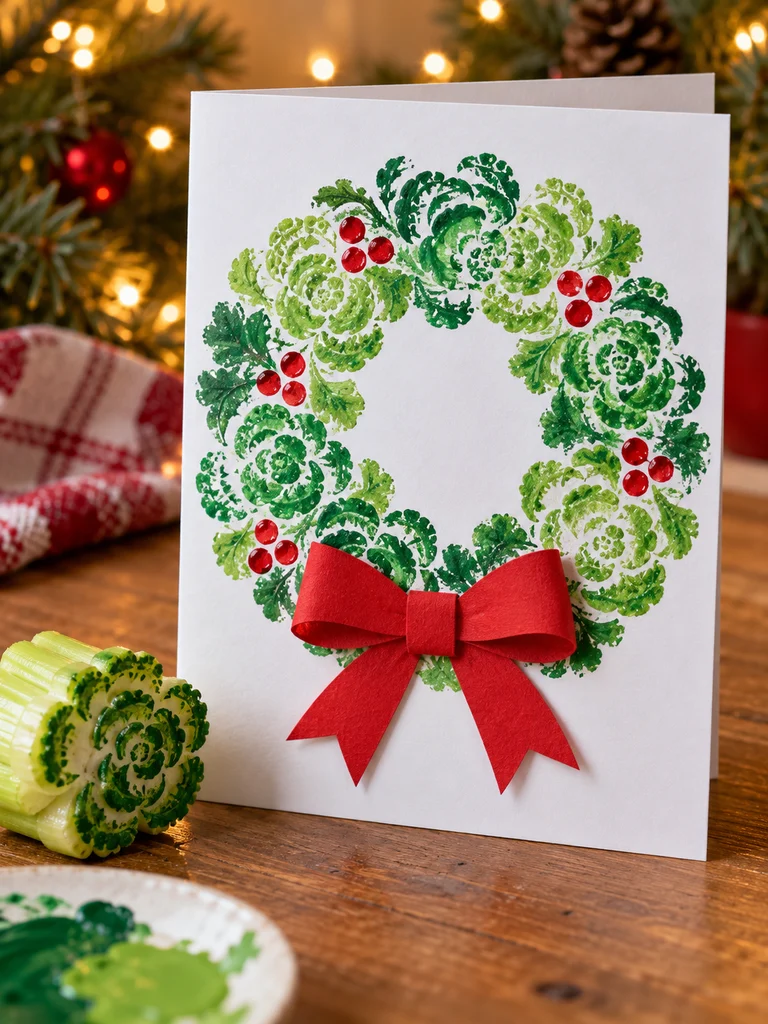
The cut base of a celery bunch creates a naturally leafy, rosette-like stamp. Repeating that print around a circle gives toddlers an easy way to make a wreath without painting individual leaves.
What You’ll Need
For this card, gather an adult-cut celery base, one or two shades of green washable paint, white cardstock, red washable paint, a shallow plate, and a large red paper bow.
How to Make It
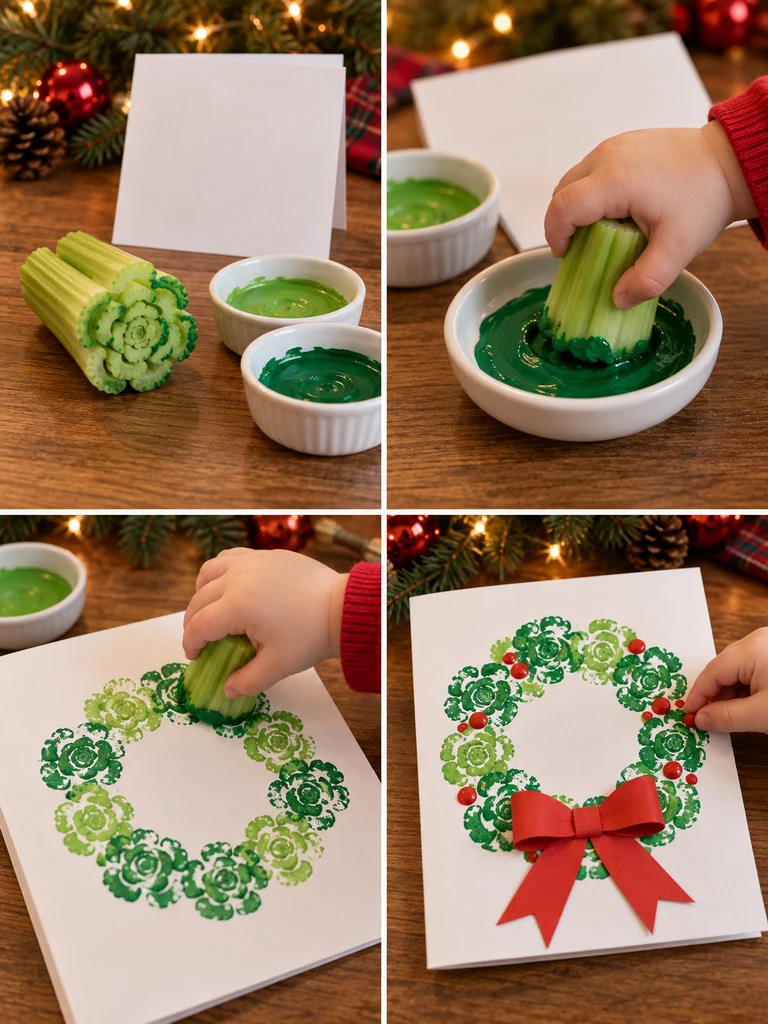
An adult should cut the celery bunch straight across near the base before the activity starts. Dip the cut end lightly into green paint and stamp it around a lightly marked circular guide. Rotate the card as needed so your toddler can work without reaching across wet paint. Continue until the wreath looks full. Let the green paint dry, add a few red berry dabs, and attach the red bow near the bottom.
8. Christmas Cookie-Cutter Stamp Card
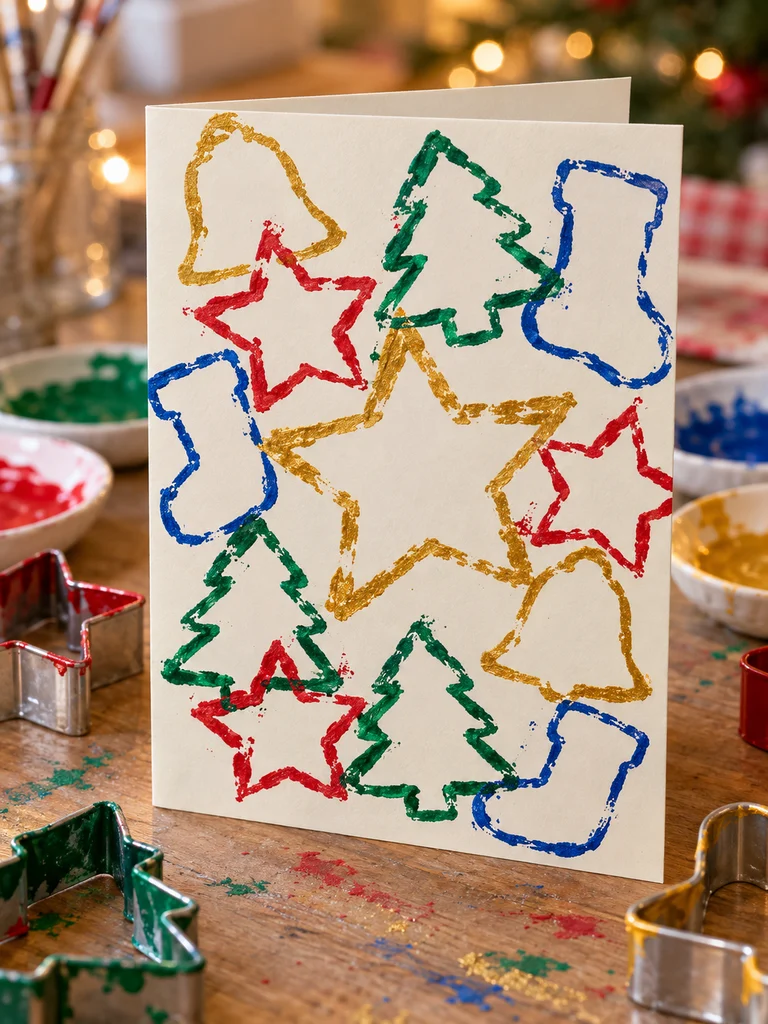
Large cookie cutters become simple outline stamps that give toddlers recognizable Christmas shapes without asking them to draw. Stars, trees, bells, and stockings can overlap into a cheerful holiday pattern.
What You’ll Need
For this card, gather large smooth-edged Christmas cookie cutters, washable paint in several colors, heavy cardstock, and shallow paint dishes.
How to Make It
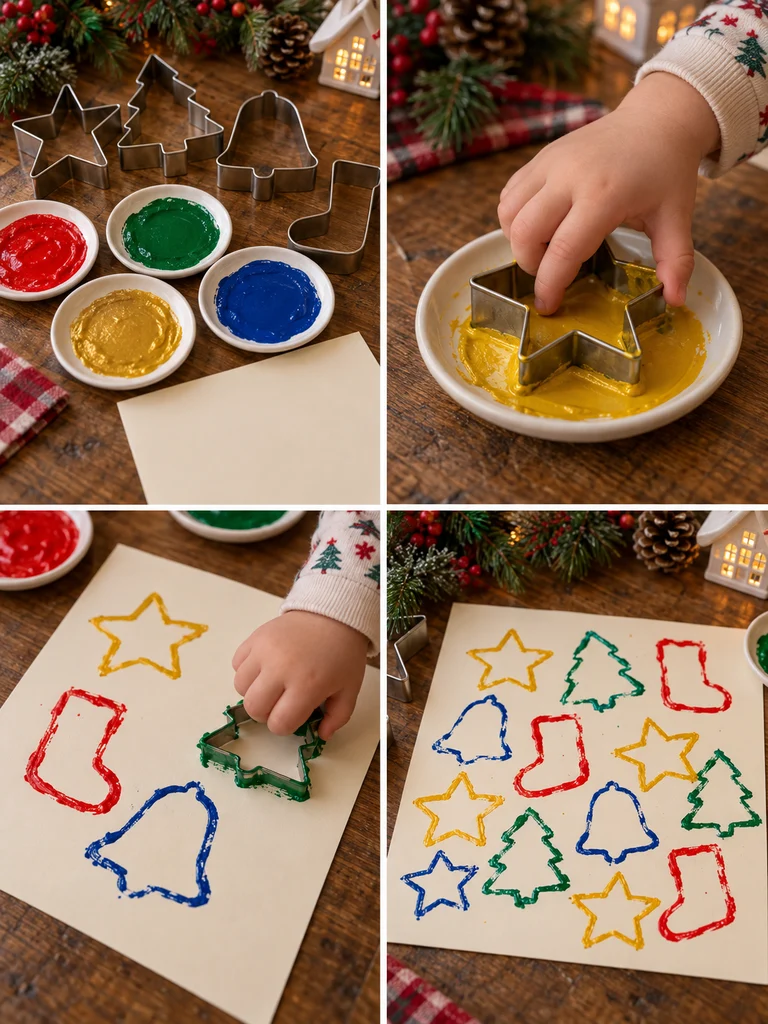
Pour thin layers of paint onto separate plates. Help your toddler press the rim of a cookie cutter into paint, lift it carefully, and stamp it onto the cardstock. Repeat with several shapes and colors, allowing some impressions to overlap. Keep one larger star or tree near the center so the card has a clear focal point. Set the card aside until every outline is fully dry before folding or handling it again.
9. Crumpled Foil Christmas Star Card
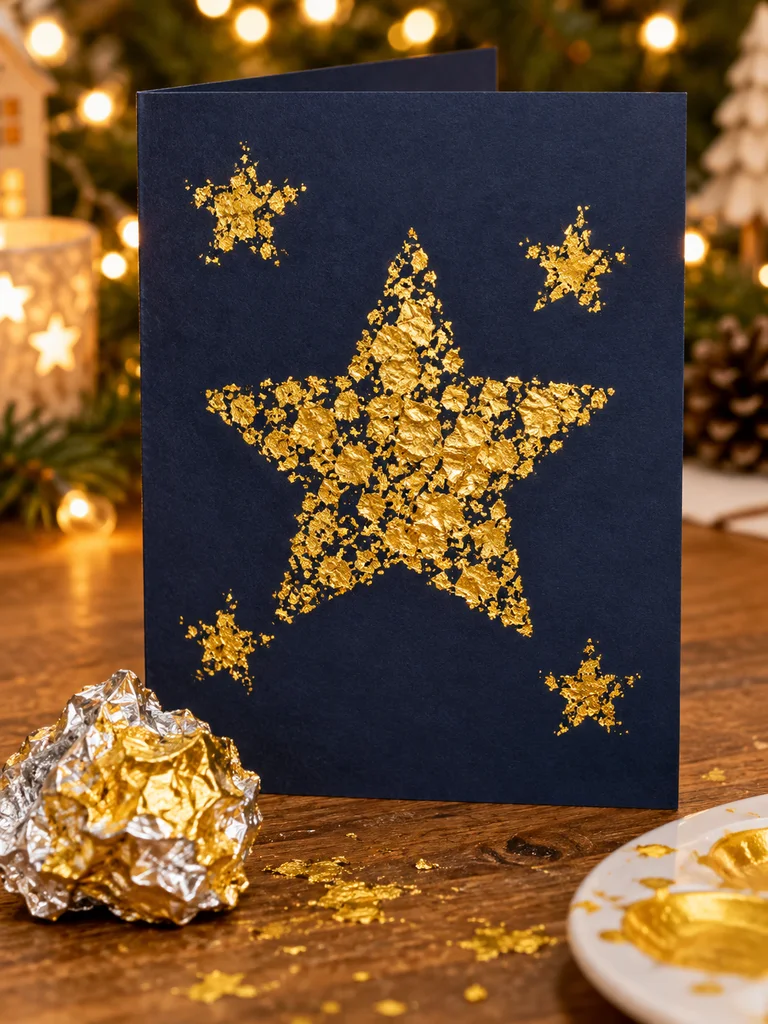
A large crumpled foil ball creates broken, speckled paint marks that make a simple star look almost sparkly. Toddlers only need to dab the foil up and down, so the technique is easy to repeat.
What You’ll Need
For this card, gather dark blue cardstock, a large tightly crumpled foil ball, yellow or gold washable paint, and a simple star outline prepared by an adult.
How to Make It
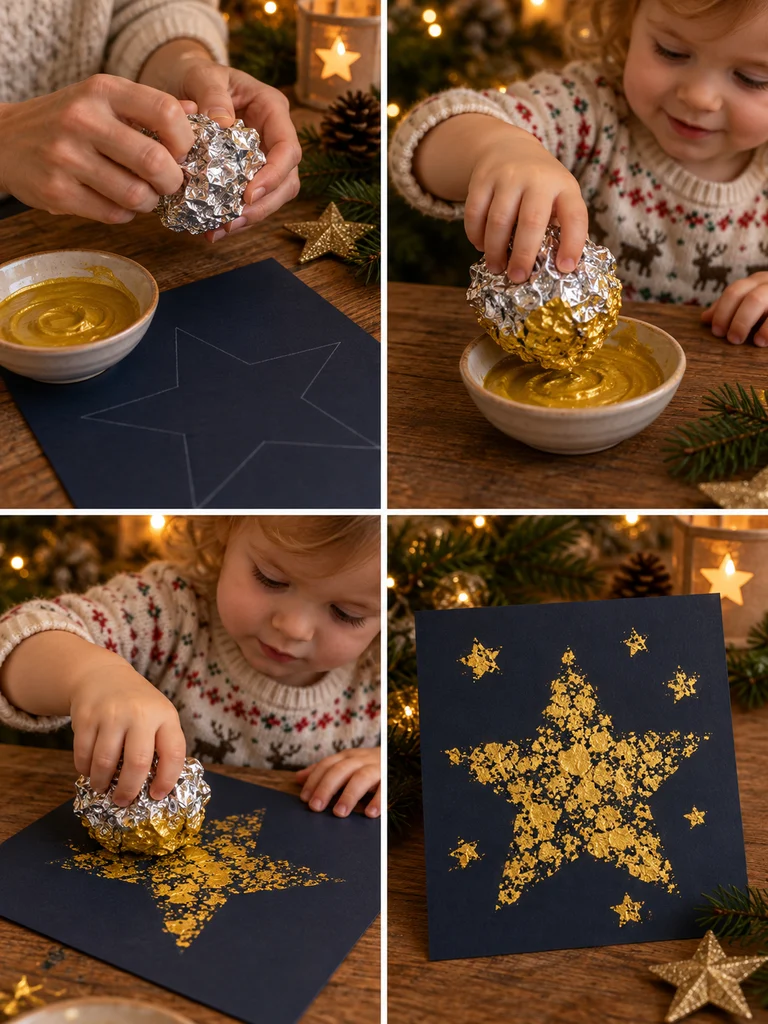
Lightly mark a large star in the center of the card. Make a foil ball large enough to fit comfortably in your toddler’s hand. Dip one side into a thin layer of gold or yellow paint and dab repeatedly inside the star. Move around the whole shape instead of rubbing so the folds in the foil continue to leave a broken texture. Let the star dry, then add a few smaller foil-dabbed stars around it if desired.
10. Masking-Tape Christmas Tree Reveal Card
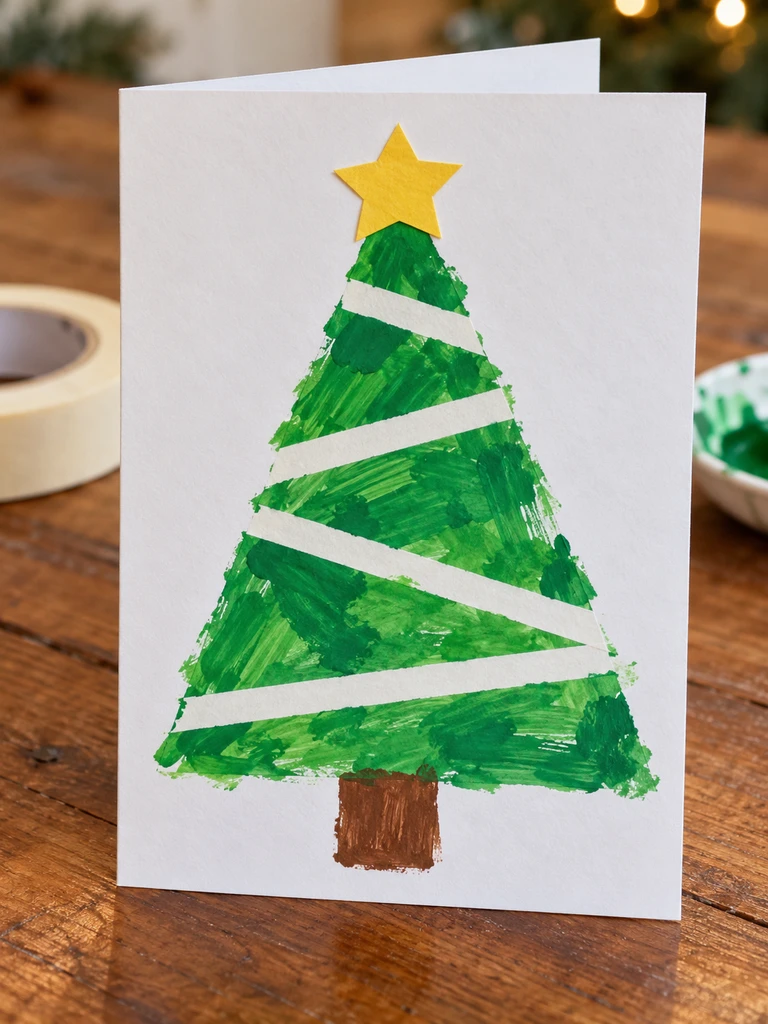
This paint-and-reveal card gives toddlers the freedom to paint broadly while hidden tape creates clean white stripes underneath. Peeling the tape away after drying is the satisfying final step.
What You’ll Need
For this card, gather heavy white cardstock, low-tack masking tape, green washable paint, a broad child-safe brush or sponge, and a yellow paper star.
How to Make It
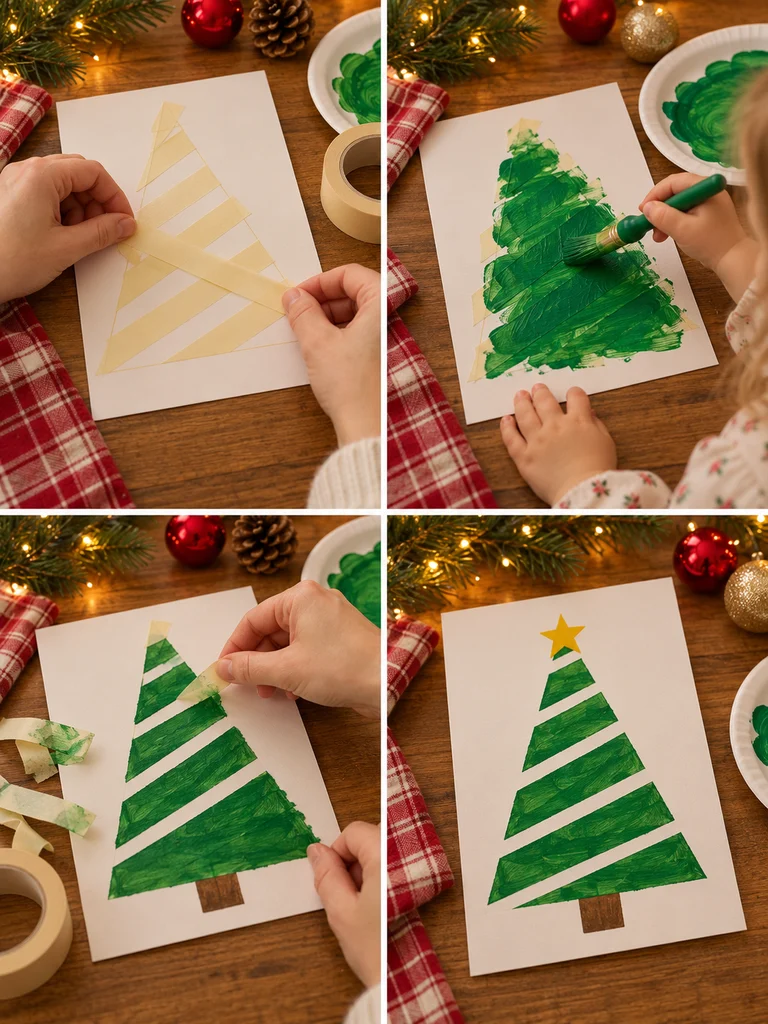
Before your toddler starts, arrange masking-tape strips across a large triangular tree area, using diagonal bands to create the future white stripes. Press the tape edges down gently. Let your child paint freely over the triangle with one or two green shades. Wait until the paint is completely dry, then an adult can peel the tape away slowly. Add the star and a simple trunk after the crisp white lines have been revealed.
11. Coffee-Filter Watercolor Ornament Card
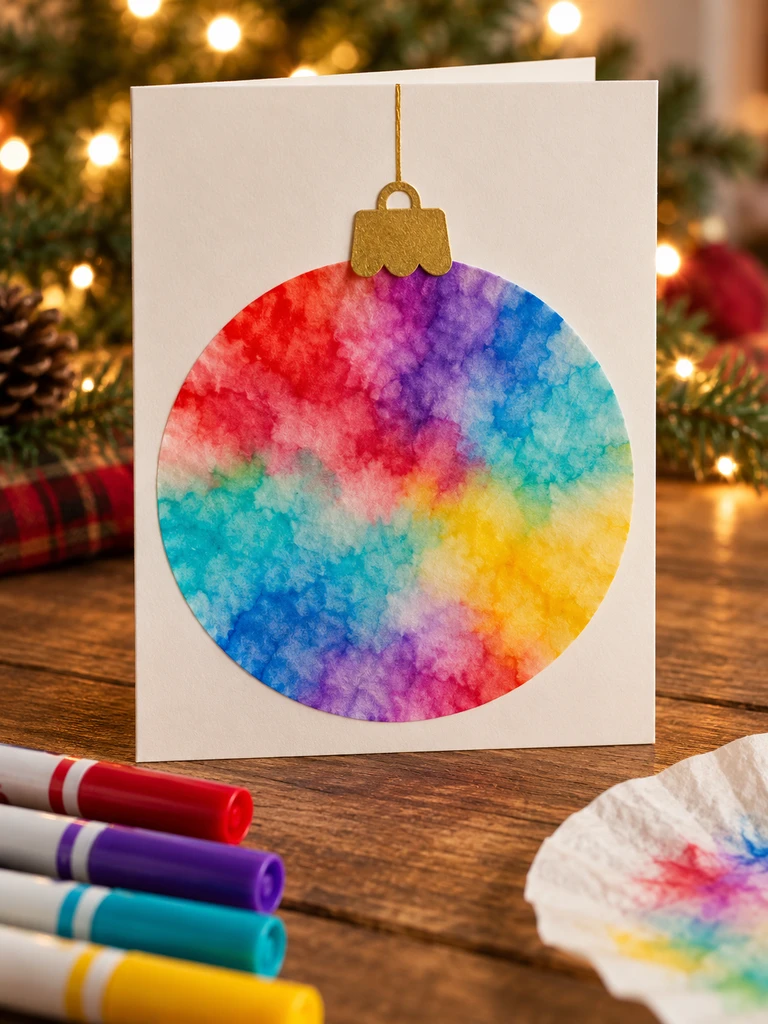
Coffee filters absorb water quickly, allowing washable marker colors to feather and blend into soft watercolor-like patterns. Once dry, the colorful paper becomes a beautiful oversized Christmas bauble.
What You’ll Need
For this card, gather a white coffee filter, washable markers, a small spray bottle of water, paper towels, folded cardstock, child-safe glue, and paper for the ornament cap.
How to Make It
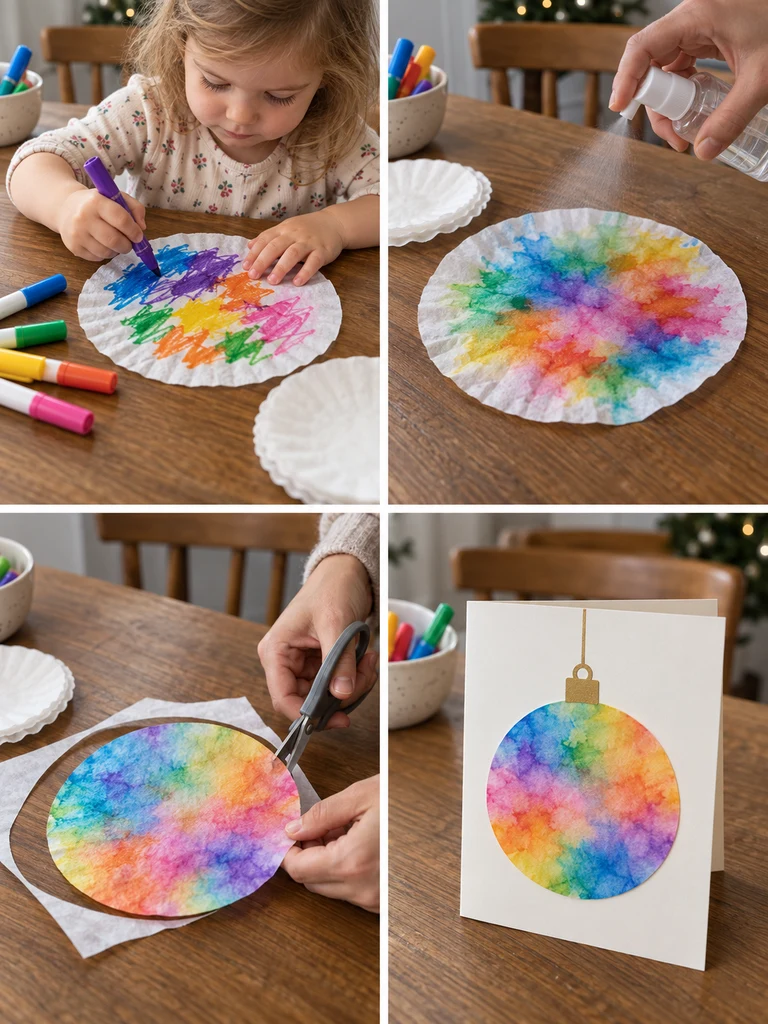
Lay the coffee filter on a protected surface and let your toddler cover it with broad patches and scribbles of several marker colors. Mist it lightly with water and watch the colors spread into one another. Set the filter aside until completely dry. An adult can then cut a large circle from the blended paper and glue it to the card. Add a simple gold or brown ornament cap and a thin hanging line above it.
12. Cupcake-Liner Christmas Tree Card
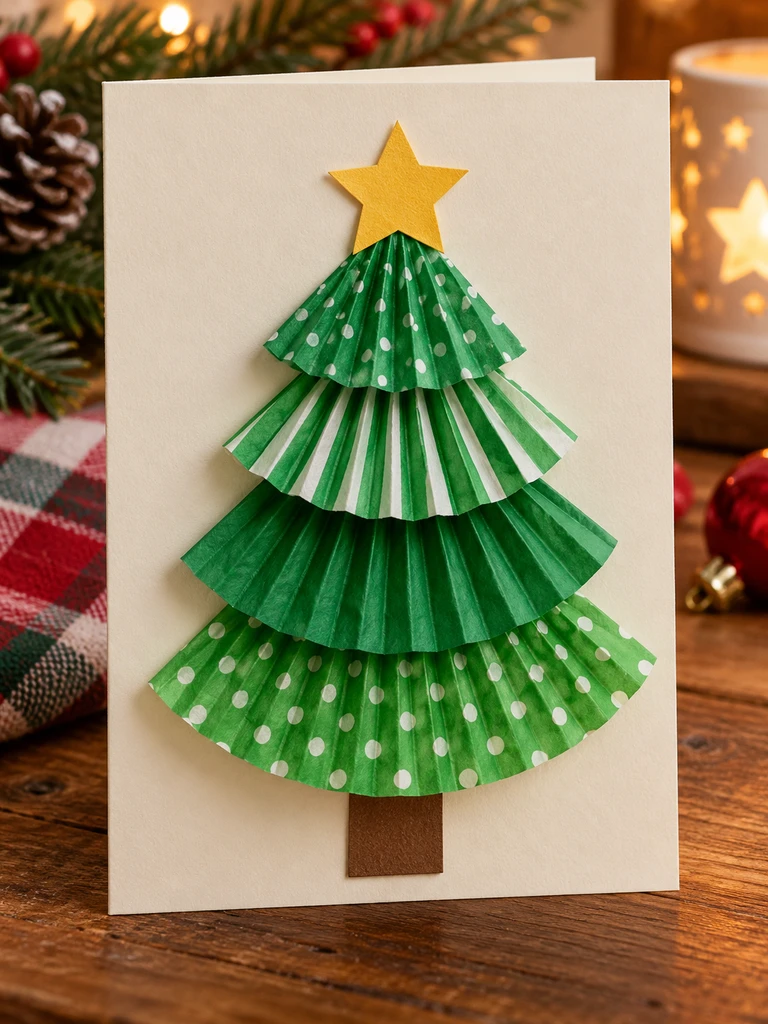
Pleated cupcake liners already have texture and curved edges, so a few folded pieces can become a dimensional layered Christmas tree with very little complicated assembly.
What You’ll Need
For this card, gather three or four green cupcake liners in different shades or patterns, folded cardstock, child-safe glue, brown construction paper, and a yellow star.
How to Make It
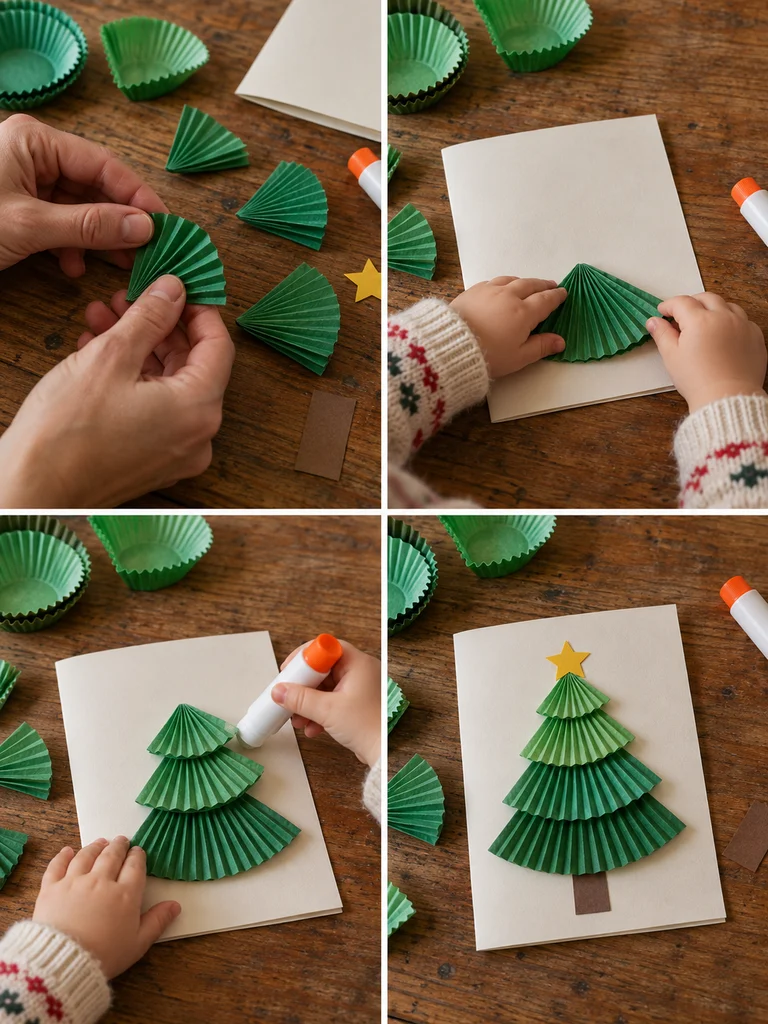
An adult should flatten and fold each cupcake liner into a fan-like or triangular section. Start with the largest piece near the bottom of the card and place progressively smaller folded liners above it, overlapping the edges slightly. Put glue on the card rather than on the loose pieces so a young toddler only has to position and press. Add the trunk beneath the bottom layer and the star above the smallest one.
13. Accordion Paper Christmas Tree Card
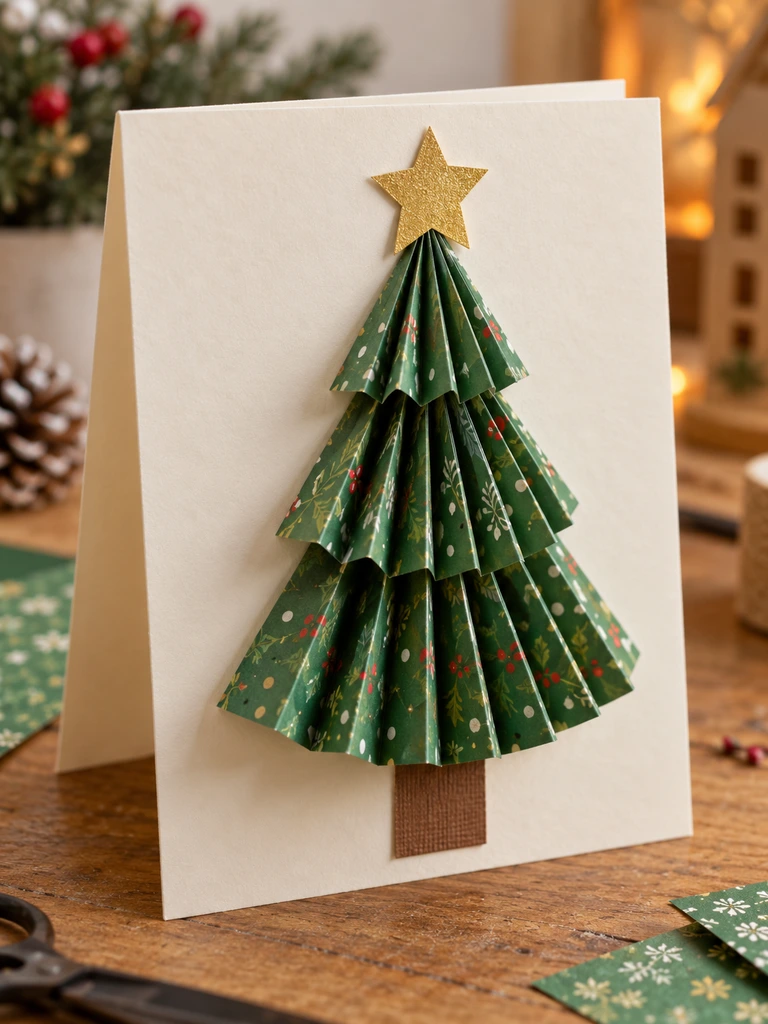
Accordion-folded paper gives a Christmas tree real depth because the pleats stand away from the card and cast small shadows. The finished design feels dimensional even though the materials are very simple.
What You’ll Need
For this card, gather green paper, folded cardstock, child-safe glue, brown construction paper, and a yellow or gold star.
How to Make It
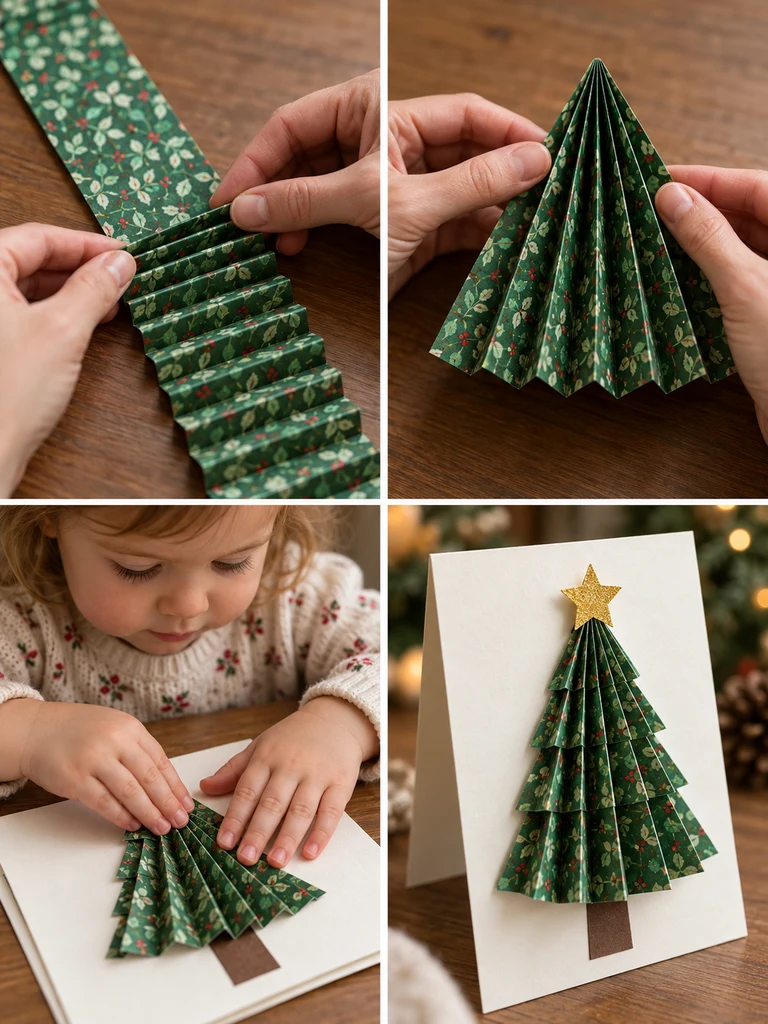
An adult should accordion-fold a wide strip of green paper into narrow back-and-forth pleats. Gently spread one side so the folded strip opens into a fan shape that resembles a tree. Apply glue along the back edge and let your toddler press the prepared piece onto the card. Hold it in place briefly while the adhesive starts to set. Add the small trunk and star once the folded paper is secure.
14. Ribbon-Strip Christmas Tree Card
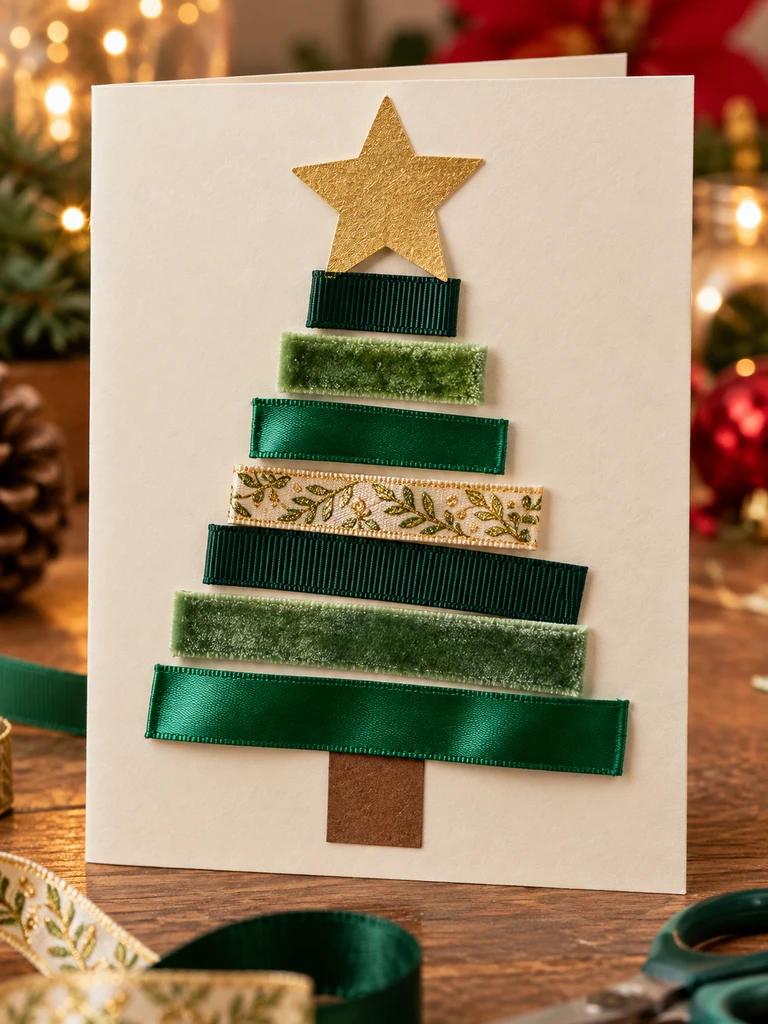
Wide ribbon gives this card a soft, tactile finish that feels very different from paper or paint. Strips cut in graduated lengths can be stacked into a simple tree shape that toddlers can assemble.
What You’ll Need
For this card, gather wide ribbons in green and festive patterns, folded cardstock, child-safe glue, brown paper for the trunk, and a large paper star.
How to Make It
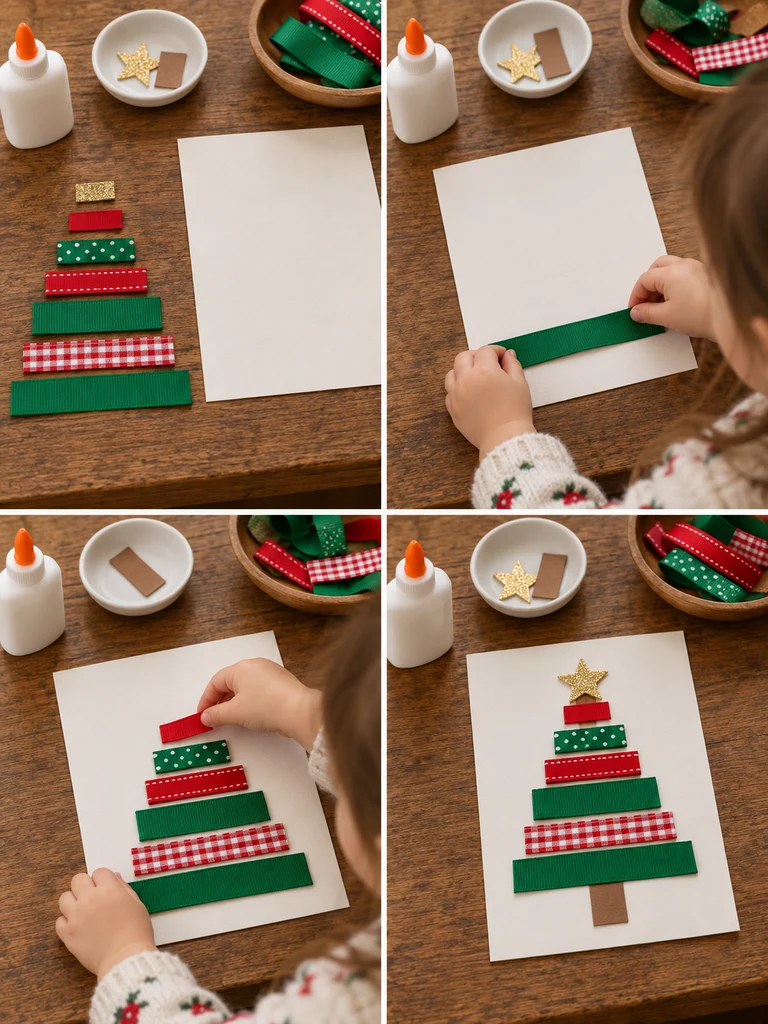
An adult should cut several ribbon strips from longest to shortest. Place a line of glue near the bottom of the card and help your toddler position the longest ribbon horizontally. Continue upward with progressively shorter pieces until the overall shape looks like a tree. Slightly crooked strips are part of the charm. Add the trunk under the lowest ribbon and the star above the shortest one.
15. Chunky Yarn Christmas Tree Card
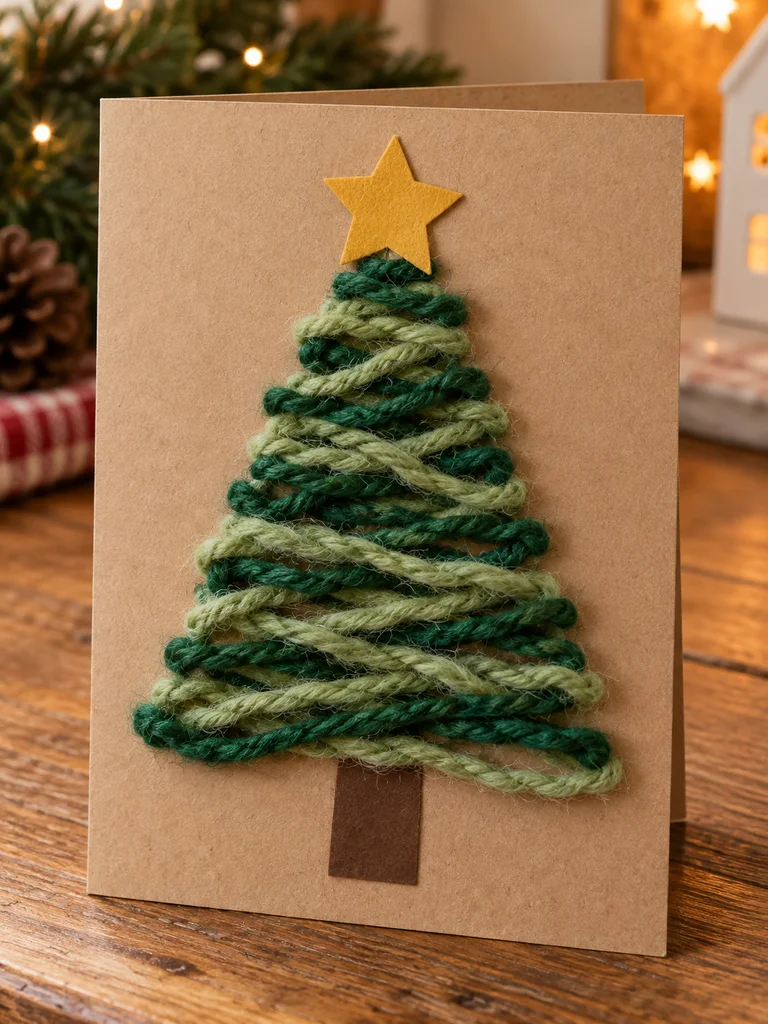
Short lengths of chunky yarn create a soft, cozy tree that feels perfect for a winter card. The activity also gives toddlers a different sensory experience from flat paper and wet paint.
What You’ll Need
For this card, gather short pieces of chunky green yarn, heavy kraft or cream cardstock, child-safe glue, brown construction paper, and a yellow star.
How to Make It
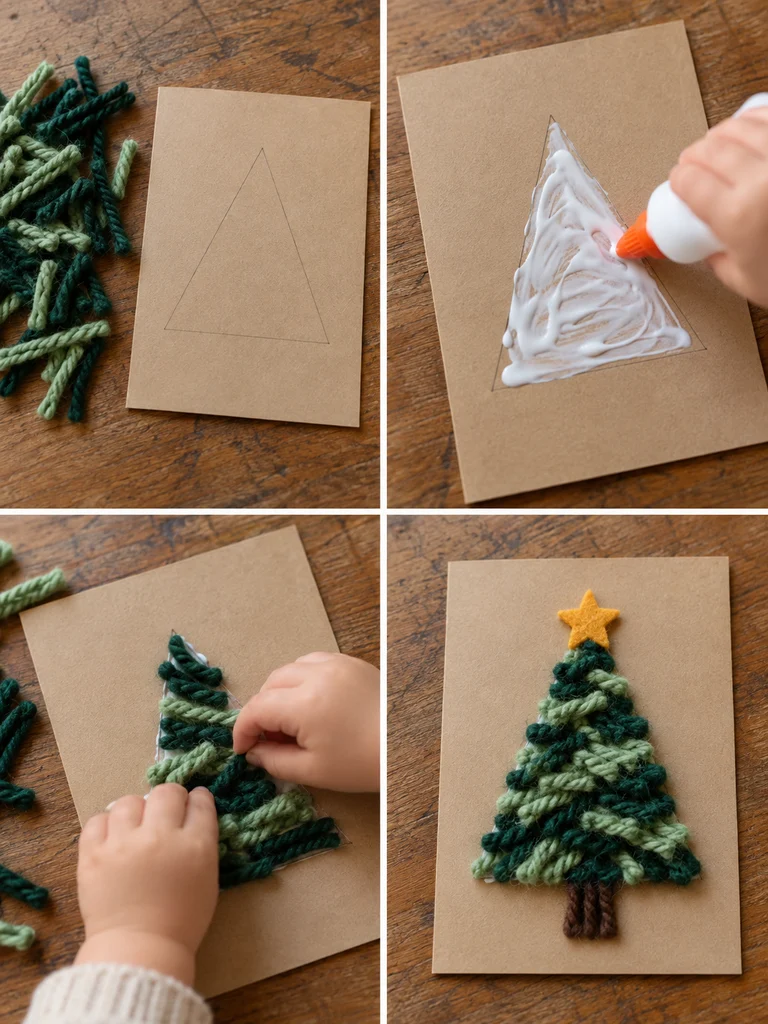
Lightly mark a large triangle as a guide and spread glue inside it. Offer your toddler short yarn pieces a few at a time and help them press the strands across the sticky area. They can lay them horizontally, curve them, or overlap them freely. Continue until most of the triangle is filled but some natural gaps remain. Add the trunk and star after the yarn has been pressed down securely.
16. Paper-Straw Christmas Tree Card
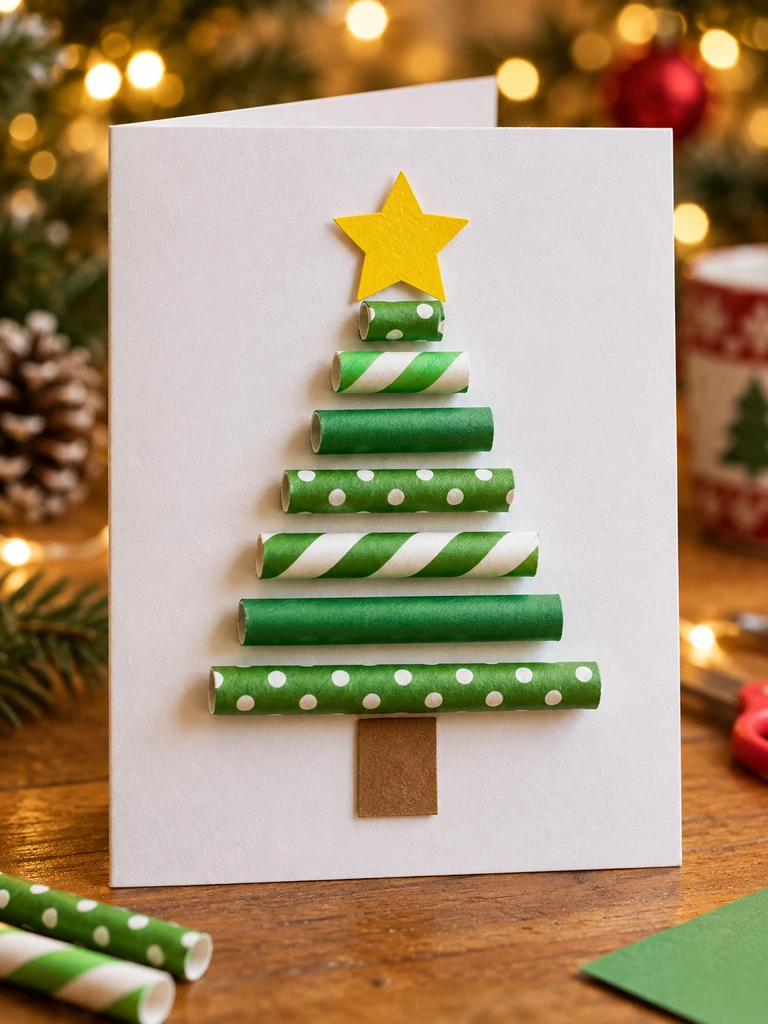
Paper straws make a clean geometric tree with bold horizontal lines. Because the pieces are prepared beforehand, toddlers can concentrate on the easy sorting, arranging, and gluing steps.
What You’ll Need
For this card, gather green paper straws, heavy cardstock, child-safe glue, brown paper, and a yellow star.
How to Make It
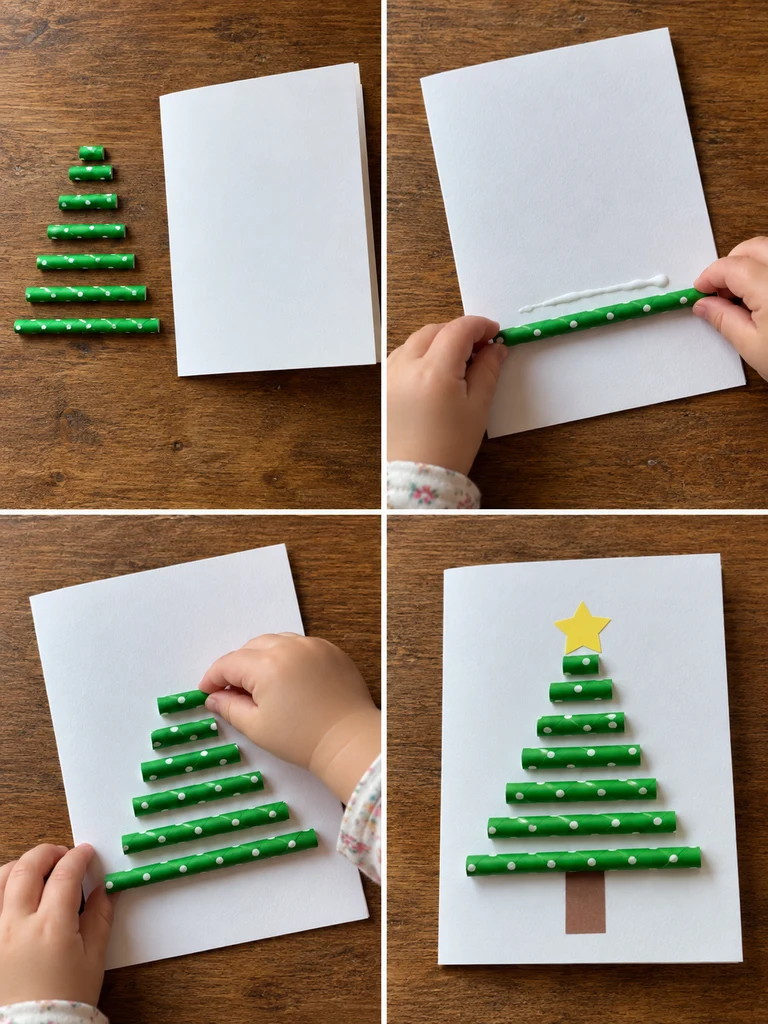
An adult should cut the paper straws into gradually shorter lengths. Lay the pieces beside the card from longest to shortest. Glue the longest piece near the bottom, then continue upward with smaller pieces until a triangular tree forms. If sorting by size is difficult, hand your toddler one straw at a time in the correct order. Add the brown trunk beneath the bottom straw and the star above the shortest one.
17. Mini Paper-Chain Christmas Wreath Card
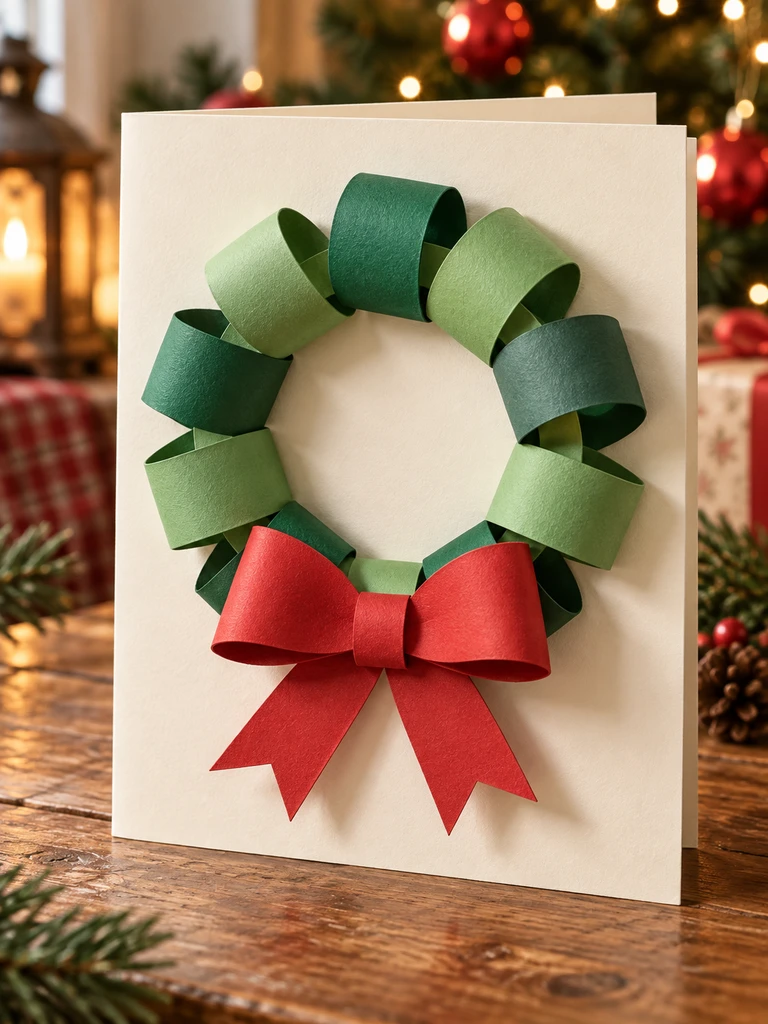
Mini paper loops create a wreath that stands away from the card surface, giving the design more dimension than an ordinary flat collage. The loops can be large and simple enough for toddler placement.
What You’ll Need
For this card, gather short wide strips of green construction paper, child-safe glue, sturdy cream cardstock, and a large red paper bow.
How to Make It
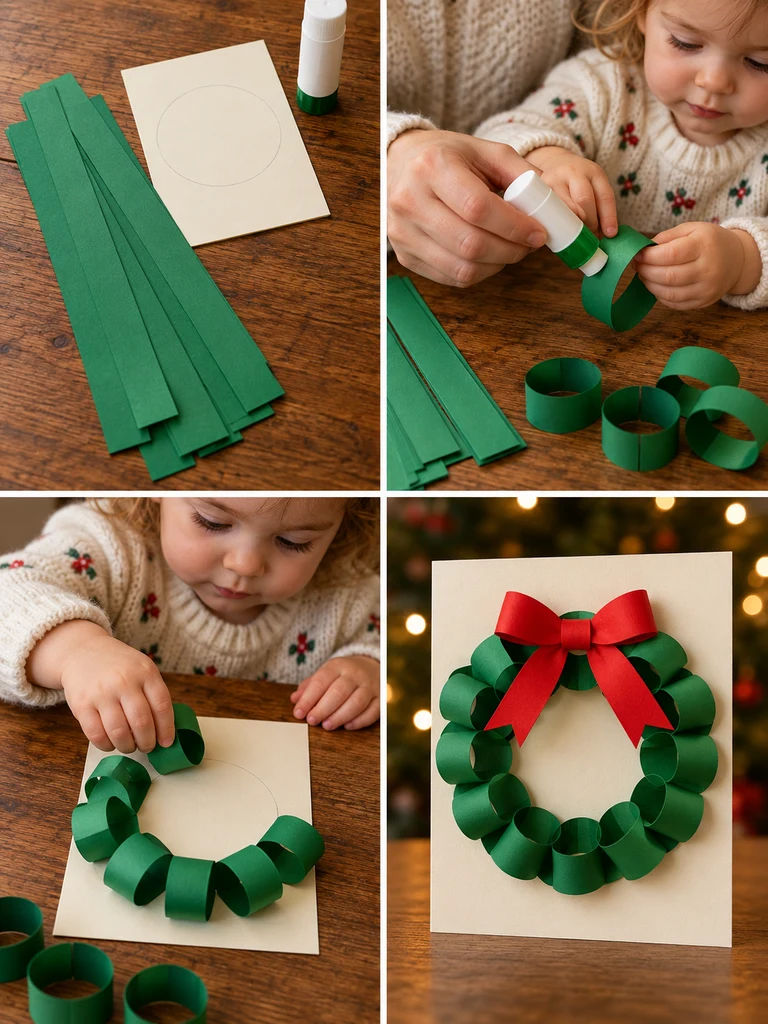
An adult can cut the green paper into short, wide strips. Older toddlers may help curve each strip into a loop while the adult secures the overlap; for younger children, prepare the loops in advance. Lightly mark a circular guide on the card and let your toddler place the loops around it. Glue each piece firmly, building the wreath little by little. Add the large red bow near the bottom after the circle is complete.
18. Paper Doily Snowflake Window Card
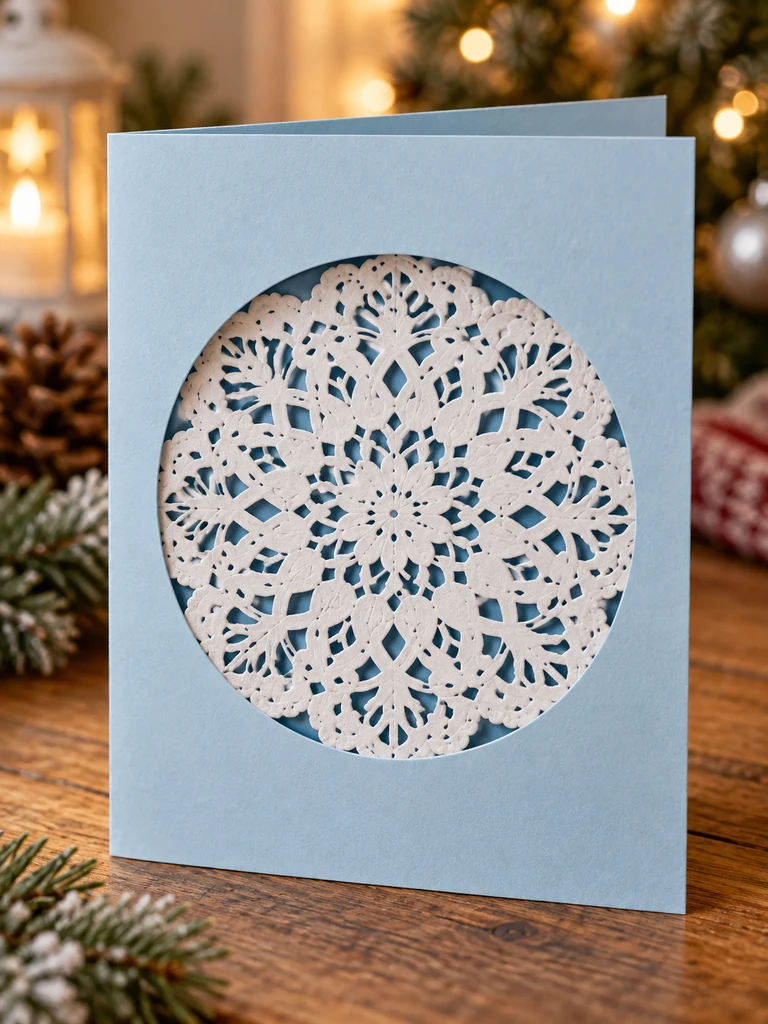
A paper doily already contains an intricate lace pattern, so it can create an elegant snowflake window without asking a toddler to make detailed cuts. The child can still help with the important assembly.
What You’ll Need
For this card, gather pale blue cardstock, a large white paper doily, child-safe glue, darker blue backing paper, and adult-use scissors.
How to Make It
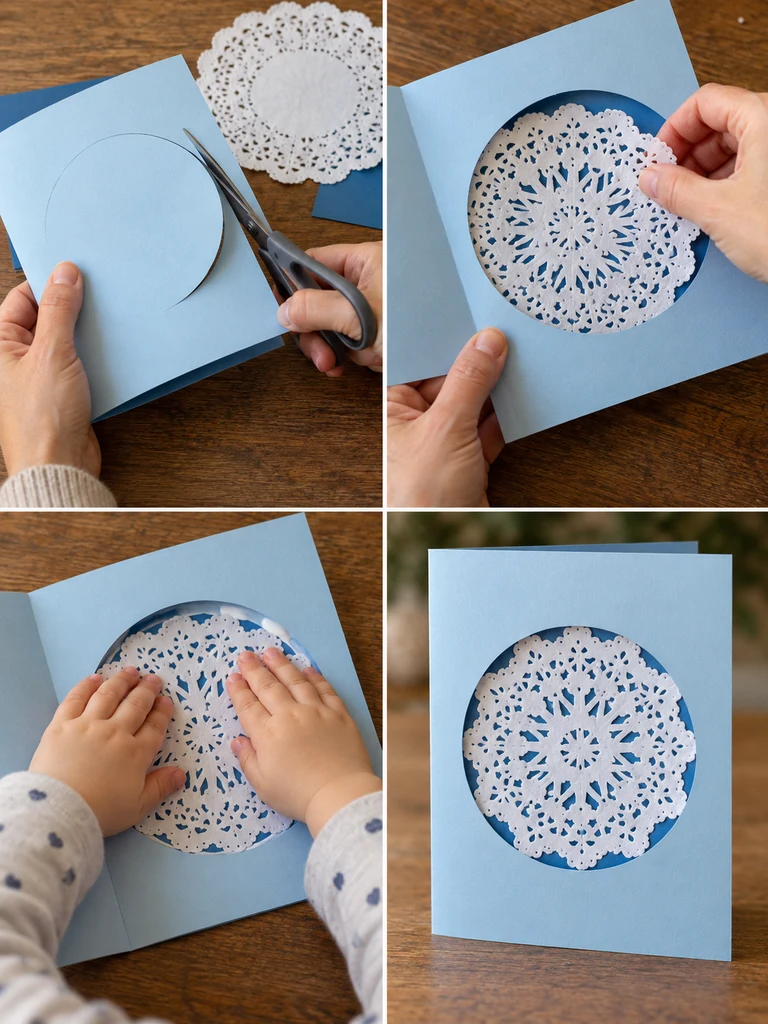
Before the activity begins, an adult should cut a large circular window into the front of the folded card. Open the card and position the doily behind the opening so its lace pattern fills the circle. Apply glue around the inside edges and let your toddler press the doily into place. Add a darker blue sheet behind it if needed to hide the attachment and increase contrast. When the card closes, the white lace should read like a large snowflake.
19. Salt-Texture Christmas Star Card
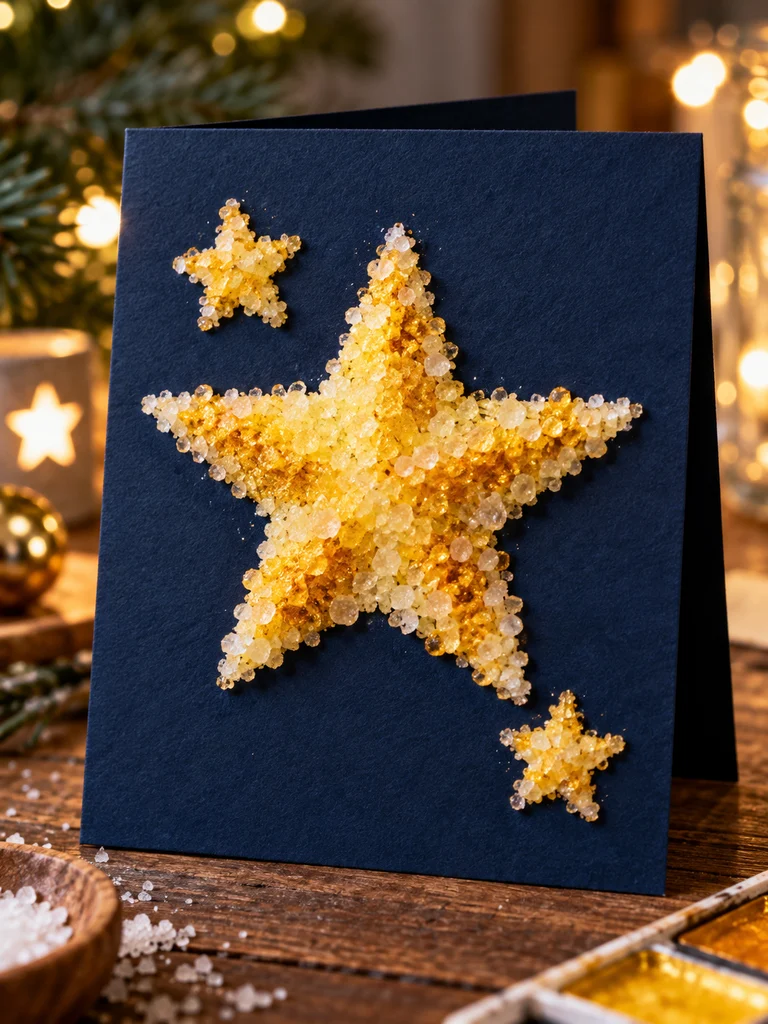
Glue and coarse salt create a raised crystalline line that looks frosty against dark cardstock. Adding diluted color after the salt dries makes the textured star appear to glow.
What You’ll Need
For this card, gather dark blue cardstock, child-safe white glue, coarse salt, washable yellow or gold watercolor, a brush or dropper, and a tray.
How to Make It
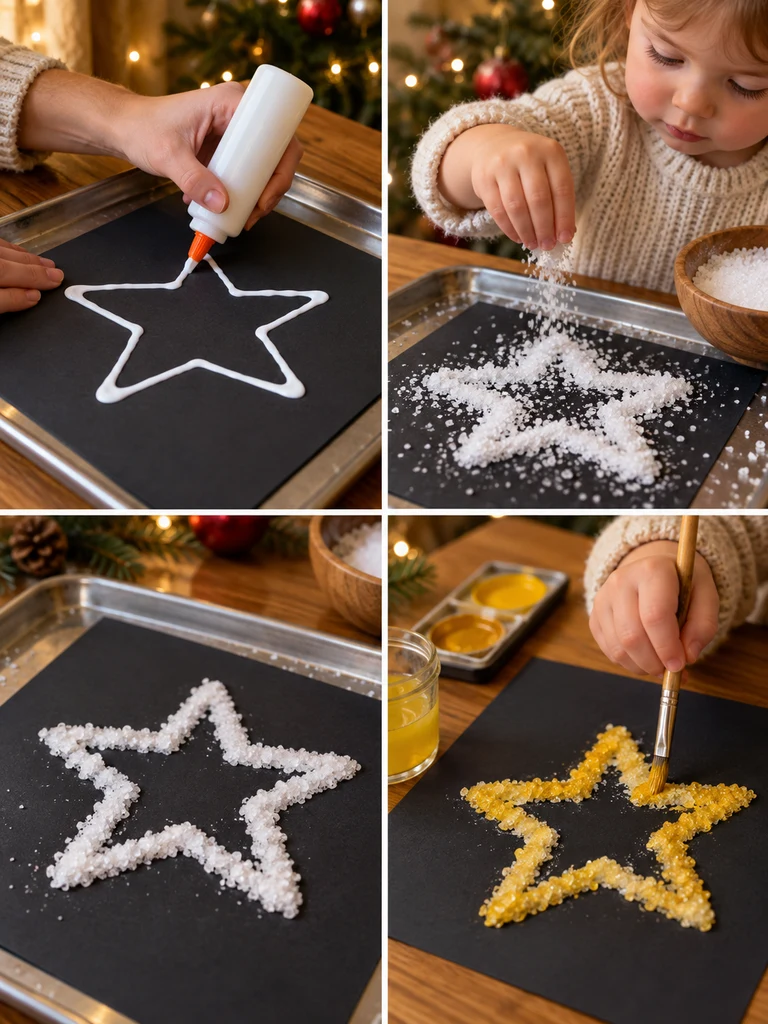
An adult should draw a large star outline with a thick line of glue while the card sits in a tray. Let your toddler sprinkle salt generously over the wet glue, then carefully tip away the excess. Leave the raised white star to dry. Once set, gently touch diluted yellow or gold color onto the salty line and allow the liquid to travel through the crystals. Add one or two smaller salt stars only if there is enough space.
20. Mess-Free Squish-Paint Ornament Card
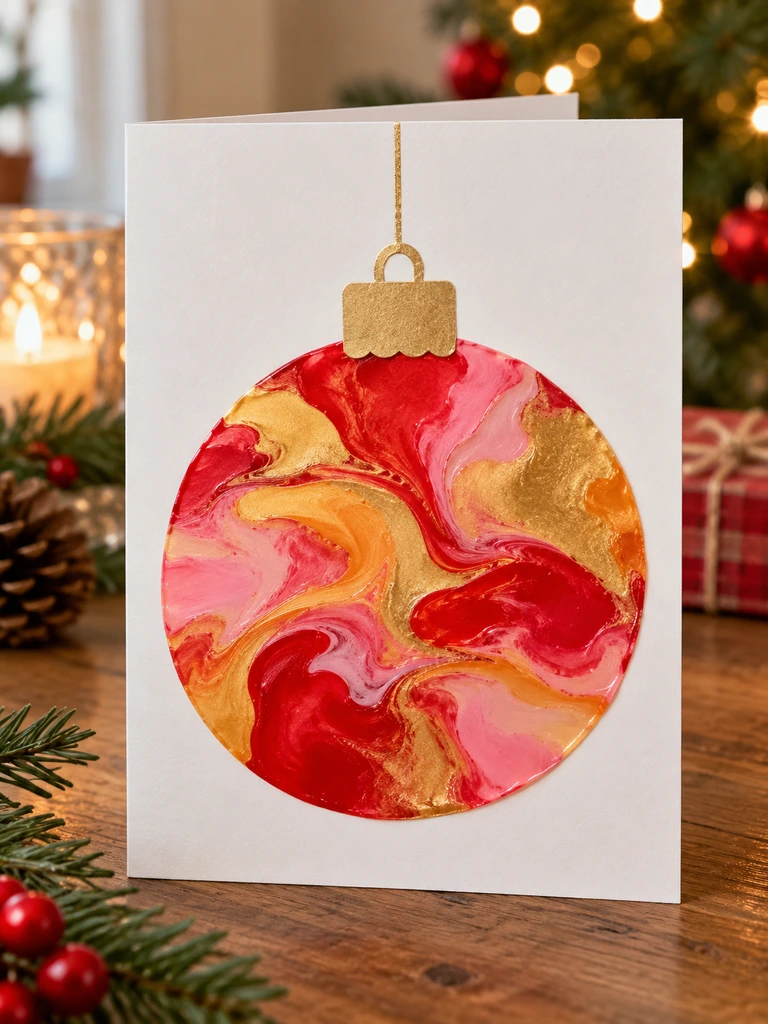
A sealed plastic bag lets toddlers push and blend wet paint without putting paint directly on their hands. The finished marbled circle becomes an oversized Christmas ornament with almost no cleanup.
What You’ll Need
For this card, gather a strong transparent zip-top bag, tape, a large round piece of heavy paper, two or three colors of washable paint, folded cardstock, child-safe glue, and paper for the ornament cap.
How to Make It
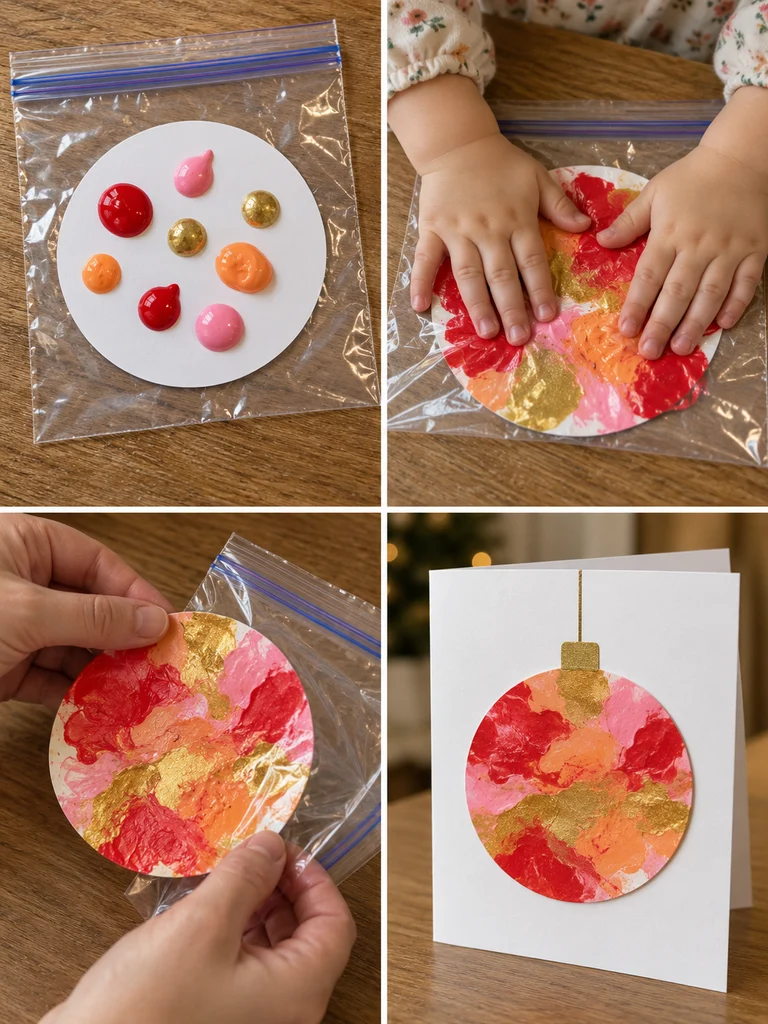
Place the round paper inside the plastic bag and add several small drops of washable paint on top. Seal the bag securely and tape over the closure. Let your toddler press, pat, and push the paint around through the outside of the plastic until much of the circle is covered. An adult can remove the paper carefully and let it dry. Glue the marbled circle onto the card and add a simple cap and hanging line.
21. Evergreen Sprig Nature-Print Card
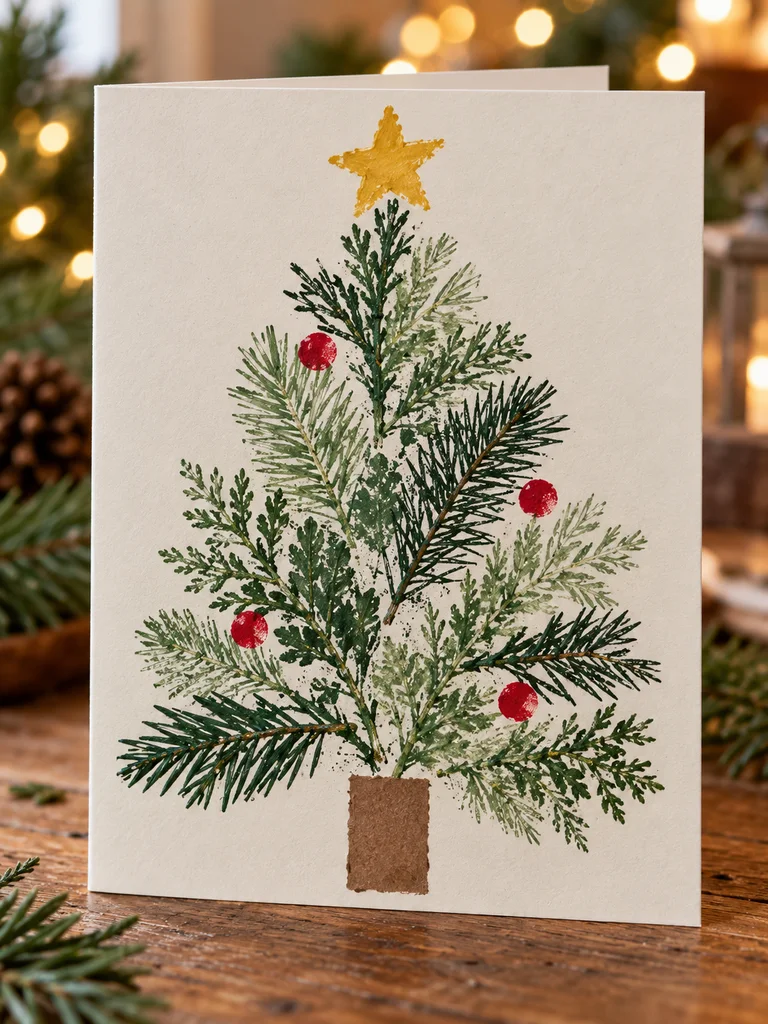
A soft evergreen sprig works like a natural stamp, transferring fine needles and branch patterns directly onto the paper. Each press looks slightly different, which gives the card an organic handmade character.
What You’ll Need
For this card, gather a soft non-prickly evergreen sprig, washable green paint, heavy white or cream cardstock, a shallow paint plate, a sponge, optional red paint, brown paper, and a yellow star.
How to Make It
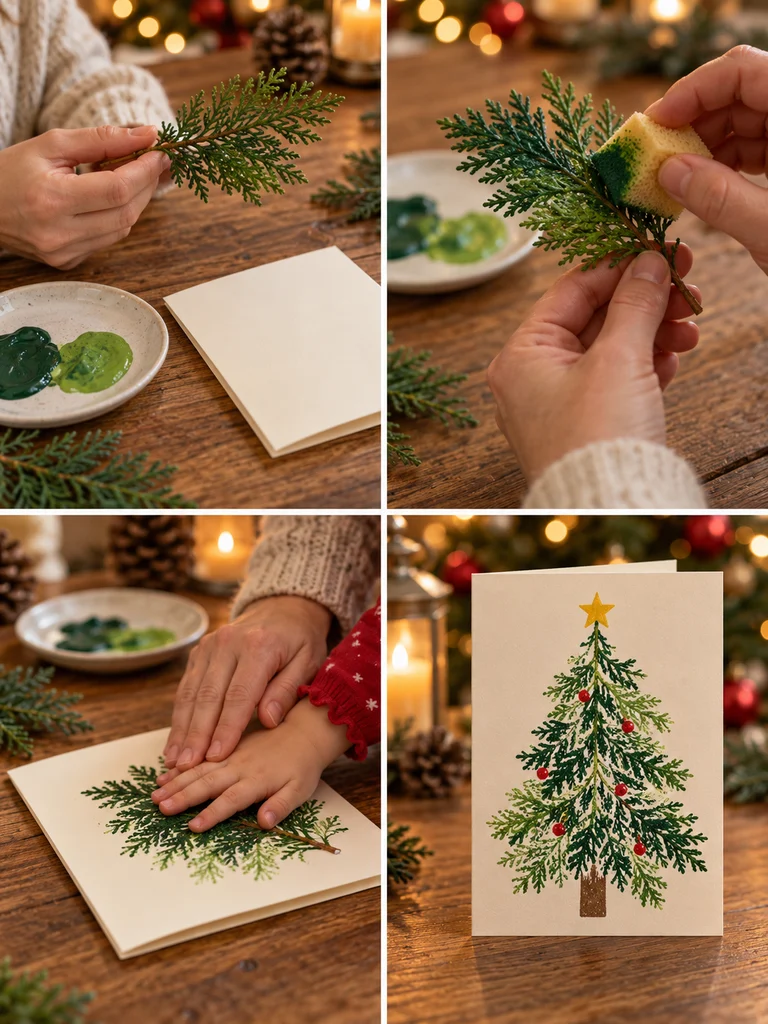
An adult should inspect the sprig first and remove anything sharp. Lightly dab washable green paint onto the underside with a sponge. Place the sprig paint-side down on the cardstock and help your toddler press across it with an open hand. Lift carefully and repeat at different angles, using longer prints near the bottom and smaller ones toward the top until a loose tree shape appears. Let it dry, then add a trunk, star, and a few simple red berry dots.
22. Comb-Texture Christmas Tree Card
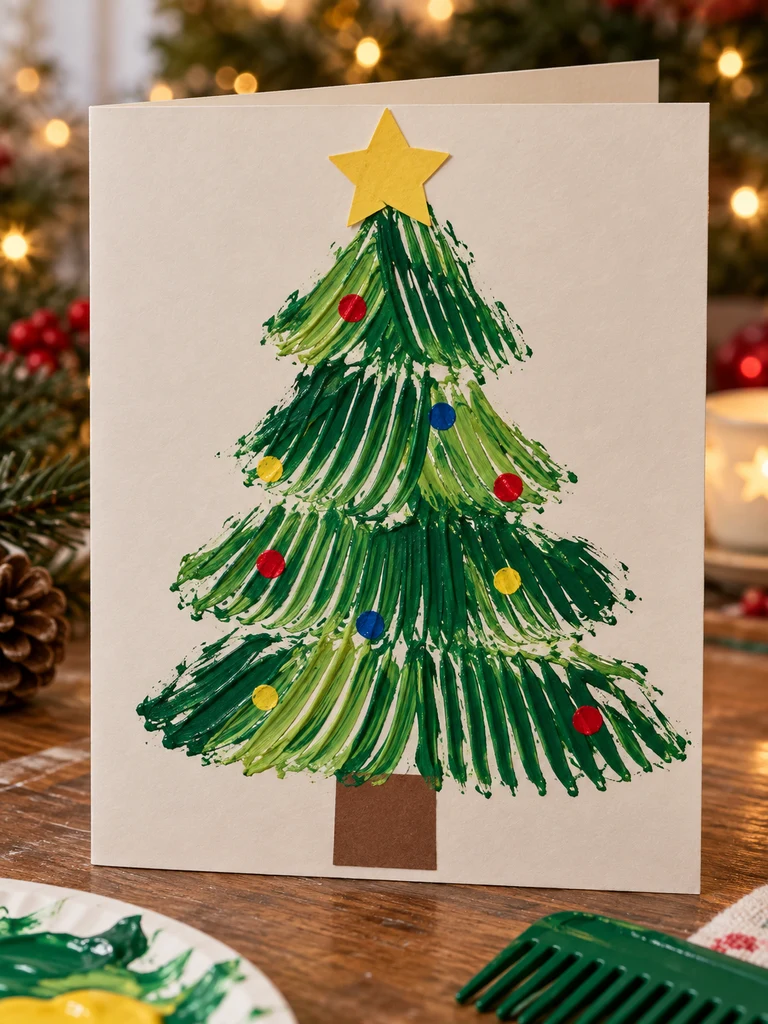
Dragging a wide plastic comb through wet paint produces long parallel grooves that create a bold stylized evergreen texture. The repeated lines make this card visually different from fork painting or ordinary brushwork.
What You’ll Need
For this card, gather a wide rounded children’s comb, dark and light green washable paint, thick cream cardstock, brown construction paper, and a yellow star.
How to Make It
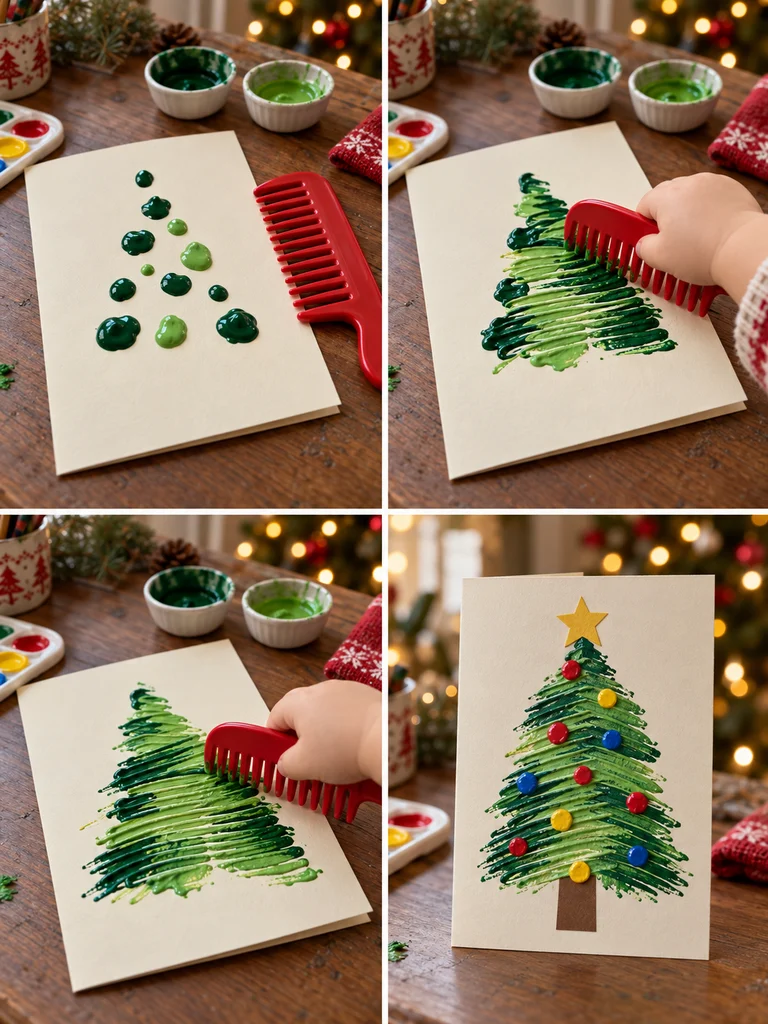
Place several small dabs of green paint inside a loose triangular area. Show your toddler how to set the comb teeth into the wet paint and drag outward. Repeat the motion across the triangle, making broader strokes near the base and shorter marks toward the top when possible. Add a lighter green layer in a few places and comb through it again. Once dry, attach the trunk and star and add only a few large paint-dot ornaments if desired.
23. Lace-Up Christmas Tree Card
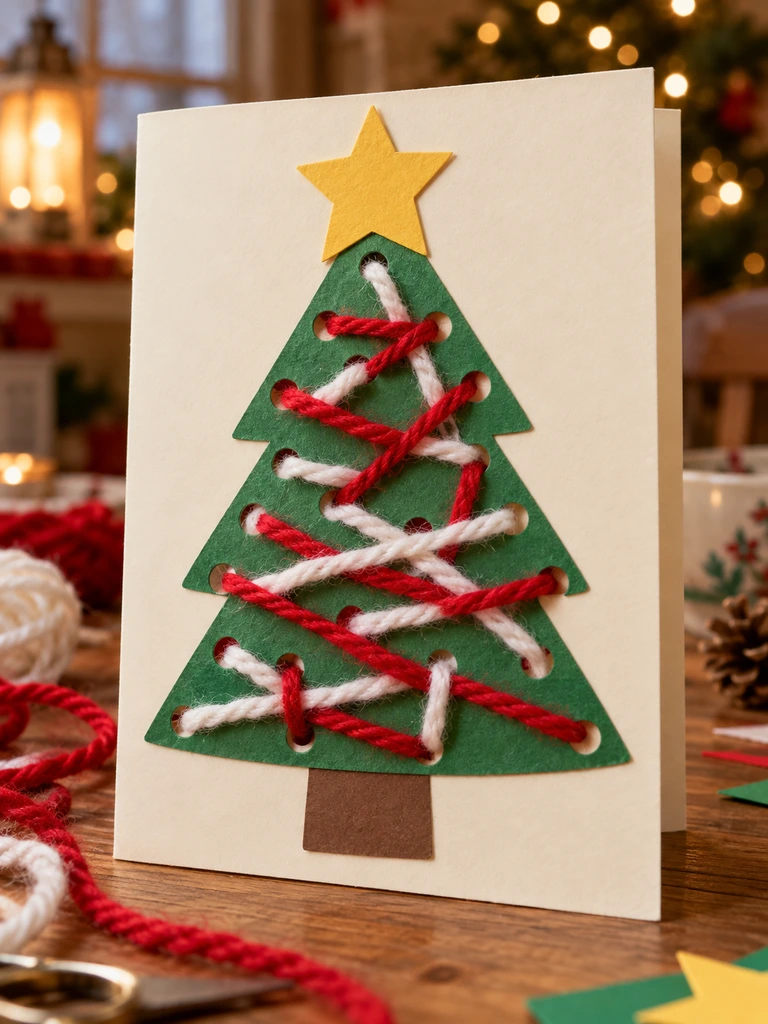
This final card combines Christmas crafting with a simple threading activity. Large punched holes and short lengths of thick yarn let older toddlers practice a basic in-and-out motion while decorating the tree.
What You’ll Need
For this card, gather a large green cardstock tree prepared by an adult, a hole punch, short pieces of thick soft red and white yarn, folded cream cardstock, child-safe glue, brown paper, and a yellow star.
How to Make It
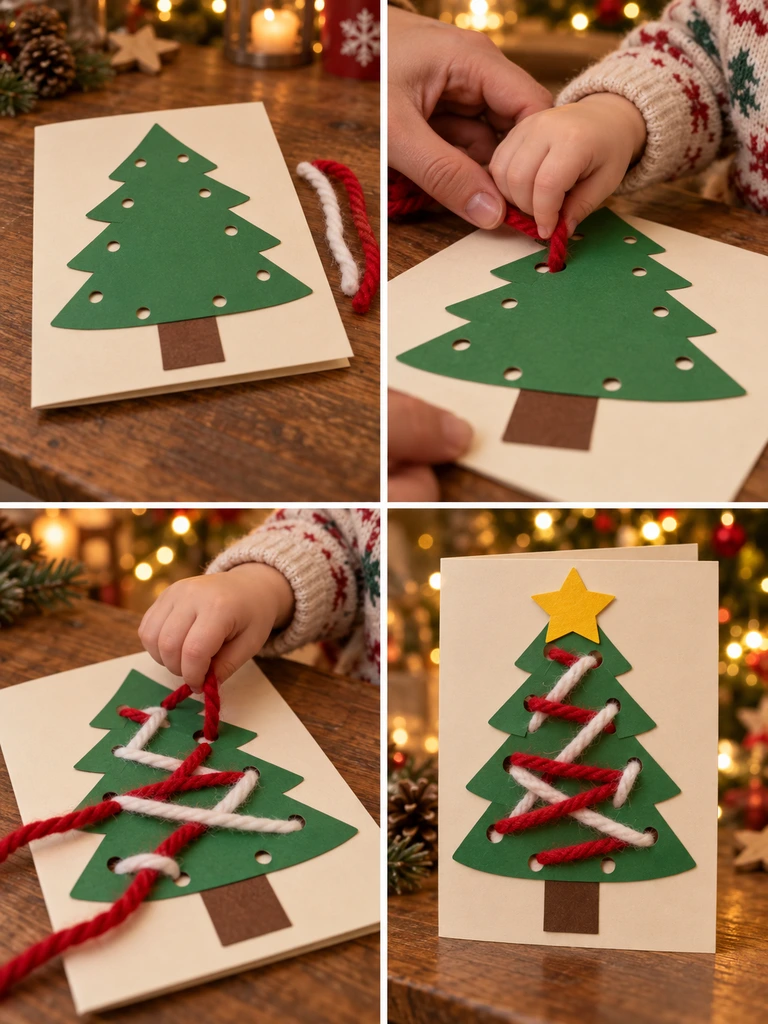
An adult should cut the tree shape and punch large, widely spaced holes around the edges and through the center. Give your toddler a short piece of thick yarn and help guide one end through a hole. Continue in and out through different holes, allowing the yarn to cross the tree in an irregular pattern. Add a second color if desired. An adult should secure the loose ends on the back, glue the finished tree to the card, and add the trunk and star.
How to Turn Toddler Christmas Cards Into Keepsakes
Before mailing or gifting a handmade card, write the child’s name, age, and year somewhere discreetly on the back. That small detail becomes surprisingly valuable later. A card that feels like an afternoon activity today may eventually become a reminder of exactly what your child was able to create at age two or three.
You can also tuck a small photograph inside or write down a funny phrase your toddler currently says about Christmas. For cards you especially love, make an extra version to keep at home. Another easy option is to photograph every finished design before giving it away. Over time, those pictures can become a digital Christmas craft album showing how your child’s creativity changed from one year to the next.
Final Thoughts
The most memorable toddler christmas card craft ideas do not need complicated supplies or advanced artistic skills. Bubble wrap can print a tree, a toy car can create festive tracks, a building block can stamp a present, and a paper cup can create a snowman. Yarn, ribbon, paper straws, cupcake liners, salt, foil, evergreen sprigs, and coffee filters can all become part of something special.
What matters most is finding a technique simple enough for your toddler to genuinely participate in. Adults can handle cutting, folding, taping, and preparation while children enjoy stamping, pressing, rolling, painting, gluing, dragging, threading, and experimenting. Some trees will lean to one side and some paint marks will land in unexpected places. Keep those imperfections. They are the part that proves those little hands were really involved—and years later, they may be exactly what makes the card worth saving.

