 Skip to content
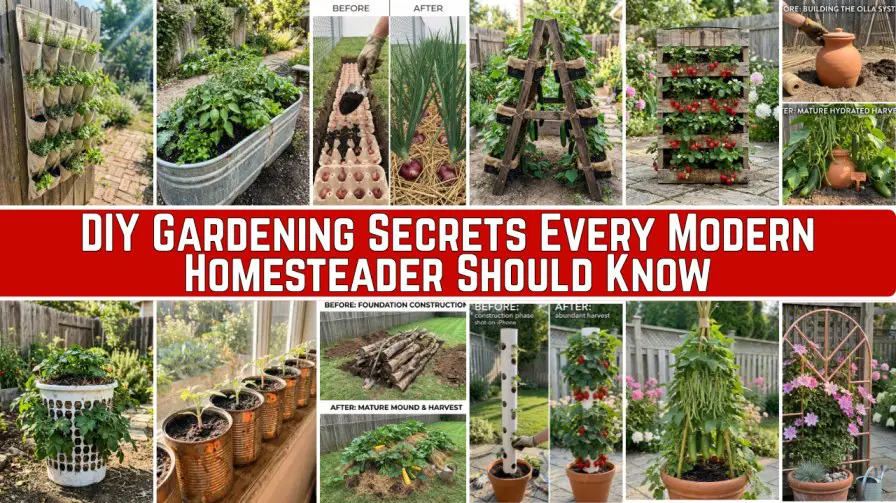
The concept of the “homestead” has been redefined for the modern age. It’s no longer just a remote 40-acre farm; it is a movement. Today, a modern homestead is any space—from a 10th-floor balcony in London to a suburban backyard in Austin, Texas—where a commitment to self-sufficiency and biological respect is practiced. This new philosophy is less about disconnecting from the grid and more about connecting with our food system. We have seen a paradigm shift from the purely aesthetic lawn to the “productive landscape,” where every square foot must justify its existence with a yield.
However, a major barrier for new growers is the perceived entry cost. If you walk into a garden center in the US or Canada, you are met with expensive cedar raised bed kits, premium soil bags, and intricate plastic irrigation systems. The modern homesteader knows the diy gardening secrets that the retailers don’t want you to know: nature doesn’t need expensive gear. Nature needs observation.
The most successful homesteaders in the world practice what is known as “innovative repurposing.” They look at a waste stream—like an old plastic crate or a fallen branch—and see a resource. This isn’t about being “cheap”; it’s about being “resourceful” and creating “closed-loop systems” where everything is used and nothing is wasted.
This guide is not a quick list; it is a technical masterclass. We have aggregated 30 of the most effective, biologically sound, and innovative DIY secrets that have been tested and proven by growers around the world. We will explore the mechanics of soil health, the engineering of vertical growth, the physics of smart irrigation, and the aesthetics of nature-inspired design. Get ready to transform your backyard into a high-yield oasis.
Revolutionary Planting Vessels
The standard plastic pot is one of the least efficient ways to grow a plant. Solid plastic walls restrict airflow, leading to “root circling,” where the roots become trapped in a tight knot against the plastic. In the ground, roots explore widely; in a pot, they starve for oxygen. The modern homesteader uses repurposed containers that prioritize root health above all else.
1. The Aerated Crate System

We have all seen the ubiquitous black or colorful mesh plastic crates used for transporting vegetables. Instead of returning them, the secret is to use them as modular, highly aerated planters.
- The “Why”: Solid pots are oxygen deserts. Roots thrive on air. When a root reaches the mesh opening, it encounters dry air and naturally stops growing (this is called “air-pruning”). This signals the plant to create finer, more efficient feeder roots rather than one long, circled taproot.
- The Execution: You cannot put soil directly into the crate. You must line it with a breathable material. Natural burlap (jute) is the gold standard, as it provides perfect drainage and airflow while keeping the soil in place. Cut a burlap sack to fit, line the crate, and fill it with a rich, well-draining potting mix.
- Pro-Tip: These are modular. You can stack them or line them up to create “raised beds” without the carpentry. If your burlap breaks down after a season, it simply becomes compost for the next layer.
2. The Vertical Potato Tower

Growing potatoes in the traditional manner requires immense space and “hilling,” where you continually mounding soil around the growing stem. A vertical tower compresses this into a two-foot footprint.
- The “Why”: A potato plant generates tubers from its stem, not its roots. By forcing the stem to grow up through a vertical column of soil, you are encouraging the creation of tubers along the entire length of that stem. A 2-foot diameter basket can yield 20+ pounds of potatoes.
- The Execution: A cheap, perforated plastic laundry basket is the perfect vessel. Place a layer of straw and 6 inches of soil at the bottom. Plant your “seed potatoes” (potatoes with growing “eyes”). As the green leaves appear, add more soil mixed with straw to bury the stem, leaving just the very top leaves exposed. Repeat this process until you reach the top.
- The Troubleshooting: If you are in a very hot climate (like the Southern US), a black basket will cook your potatoes. Use a white basket to reflect heat. And never use tires—they leach toxic chemicals into the soil over time.
3. Pocket Herb Stations
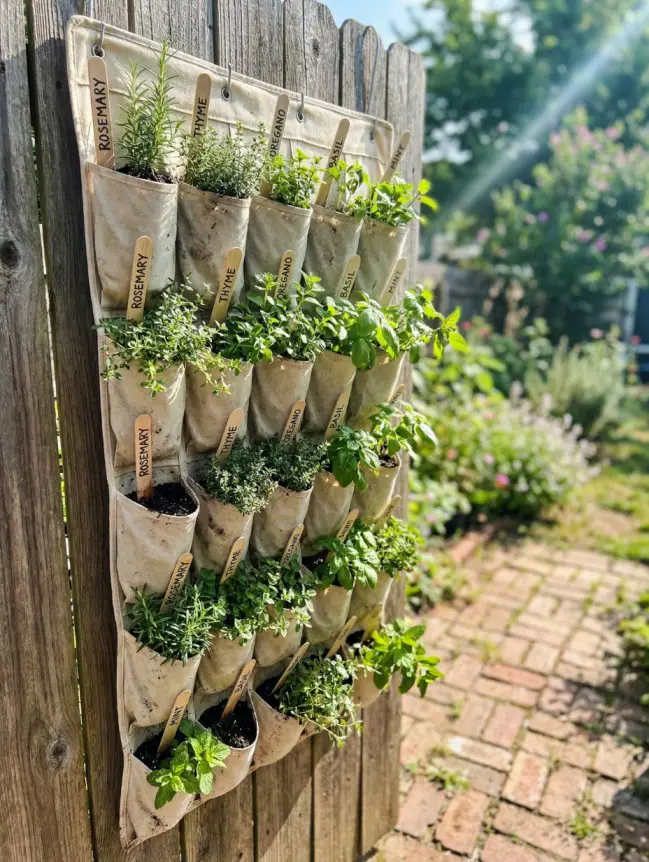
If you are an urban gardener in a city like London or Seattle, ground space is zero. The solution is vertical.
- The “Why”: Herbs like Rosemary, Thyme, and Oregano are Mediterranean natives. They love two things: intense sun and fast-draining, arid soil. They hate sitting in wet clay. A vertical canvas system allows for rapid drainage and excellent root transpiration.
- The Execution: Repurpose a standard canvas (or heavy jute) over-the-door shoe organizer. Avoid the clear plastic versions, as they trap heat and invite root rot. Fill the pockets with a 50/50 mix of potting soil and perlite. Hang the organizer on a sunny fence or balcony railing and plant a different herb in each of the 24 pockets.
- The Warning: Because they are so small and aerated, these pockets dry out fast. In the peak of summer, they will require daily watering or a small DIY drip system to survive.
4. Reclaimed Galvanized Steel Troughs
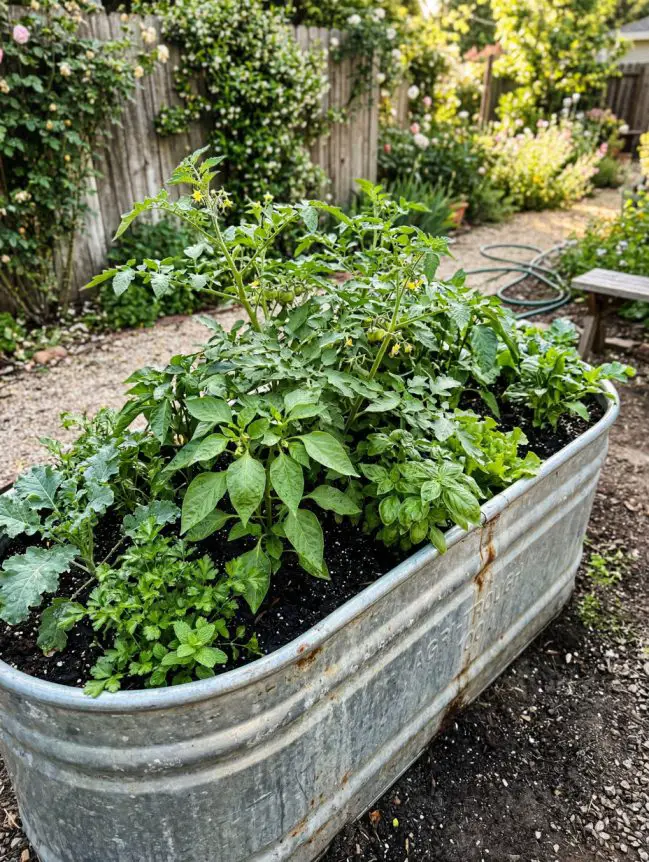
The “Industrial Farmhouse” or “Country Chic” aesthetic is highly coveted, but new metal planters are extremely expensive. The secret is to use old livestock waterers or laundry tubs.
- The “Why”: Metal heats up quickly, which is fantastic for starting heat-loving crops like Tomatoes and Peppers in the early spring, especially in cooler regions like the Northern UK or Canada. The metal will store and radiate heat back into the soil during the cool night.
- The Execution: Look for “farm auctions” or “estate sales.” Don’t worry about rust—a small amount is an iron amendment, though excessive rust should be treated with a metal primer. The most critical step is drainage. Use a high-torque drill with a 1/2-inch metal bit and drill a grid of holes along the entire bottom. Line the base with 3 inches of gravel or crushed oyster shells to prevent the holes from clogging with soil.
- Aesthetic Tip: If you want the shiny look, use a metal polish. If you want a patina, spray the surface with a mix of vinegar and salt.
5. Tin Seedling Pots
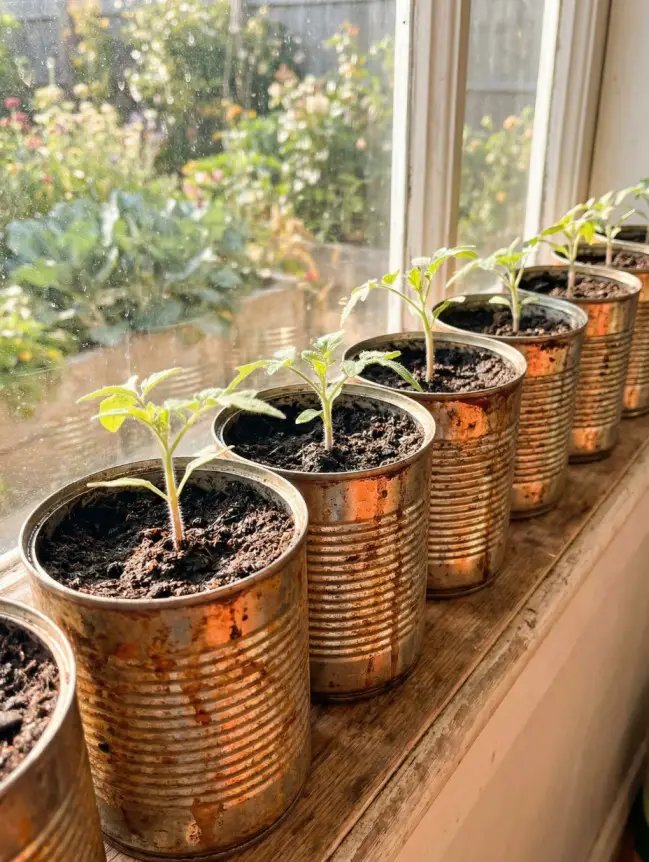
The period right after a plant sprouts is called the “nursery” phase, and seedlings are extremely sensitive to cold.
- The “Why”: Large, recycled food tins (like those used for canned beans) are excellent “heat sinks” for a windowsill nursery. They absorb the heat from the window during the day and keep the delicate seedling’s roots warm through the night, which prevents “damping off” (a fungal disease that kills cold seedlings).
- The Execution: Clean the cans thoroughly. Use a hammer and a large nail to puncture 5 drainage holes in the bottom. For an aesthetic touch, remove the labels and let them develop a vintage patina, or paint them with chalk paint. Plant your tomatoes, peppers, or basil in these tins on a sunny, south-facing windowsill.
- Pro-Tip: Metal cans can overheat. If your tin is in direct, punishing sunlight all day, it can scorch the roots. Keep an eye on the soil temperature.
6. Thermal Cloches
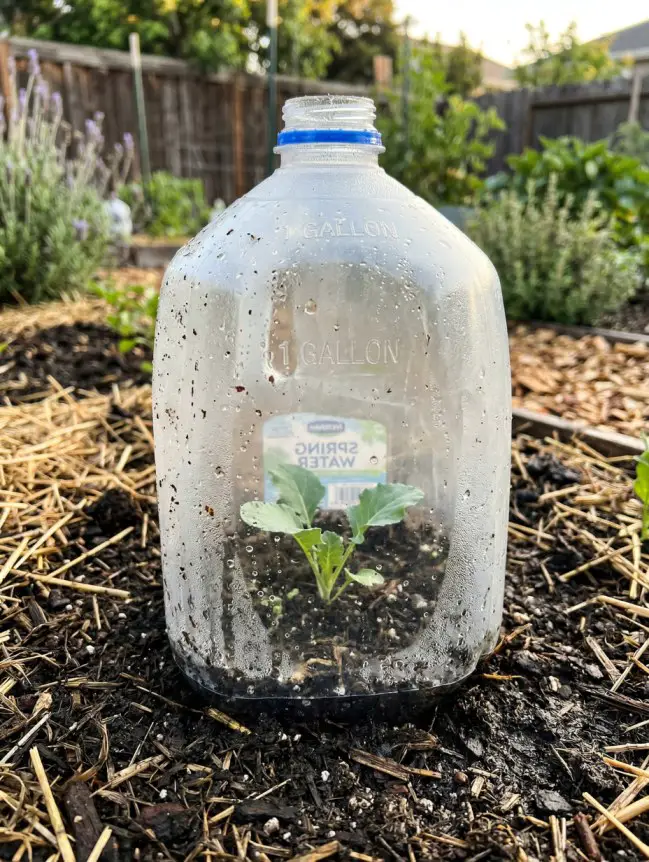
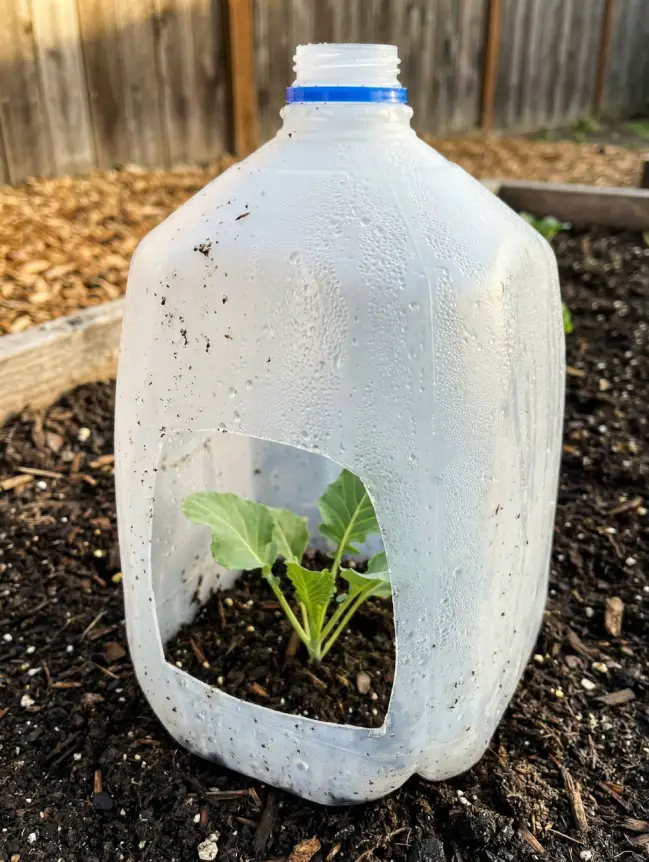
In Tier 1 countries, the transition from winter to spring is notoriously unpredictable. A late-season frost can destroy your early plantings of broccoli or lettuce. The simple cloche acts as an individual emergency greenhouse.
- The “Why”: Standard clear cloches are glass or hard plastic and are expensive. You can create a high-performance, single-use cloche using a clear 1-gallon plastic jug (like a water or juice container). The clear plastic creates a true “micro-greenhouse.” Sunlight passes through the plastic, warms the soil, and the resulting warm air is trapped inside, raising the temperature by 5–10 degrees.
- The Execution: Cut the entire bottom off the jug. Place it firmly over the seedling during the evening of a forecasted frost. Crucially, in the morning, you MUST remove the cap from the top of the jug or remove the cloche entirely. The “Greenhouse Effect” is powerful; a sealed cloche in morning sun will cook your plant in an hour.
Subterranean Secrets & Soil Fertility
The most important phrase in all of gardening is: Feed the soil, not the plant. Healthy soil is not a collection of sand and dirt; it is a complex, living ecosystem of bacteria, fungi, and microbes (the “soil food web”). When you add chemical fertilizers, you feed the plant directly, but you slowly starve the soil life, making your garden dependent on the next chemical fix. A modern homesteader uses biological shortcuts and upcycled waste streams to build soil fertility permanently and create a drought-proof garden foundation.
7. Sheet Mulching (Lasagna Gardening)
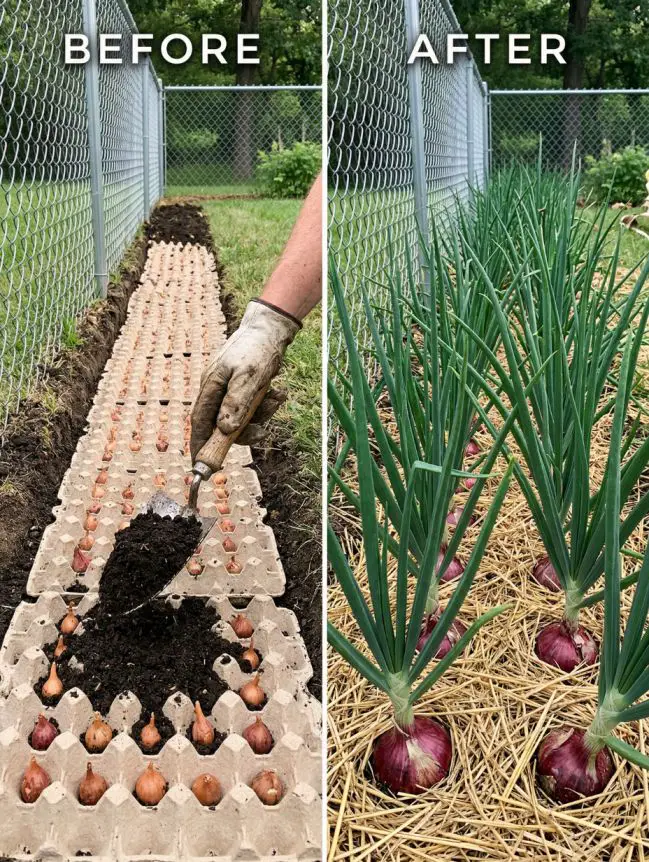
If you have a section of lawn you want to convert to a garden, do not spend hours digging or tilling. Tilling breaks the delicate fungal networks in the soil and releases stored carbon. The solution is sheet mulching.
- The “Why”: We are creating a nutrient-dense stack that will decompose directly on the lawn, smothering the grass while building premium topsoil. The grass and weeds underneath will die and rot, releasing their nitrogen directly into the new bed.
- The Execution (The 5 Layers):
- Mow: Mow the existing grass as short as possible.
- Layer 1 (Nitrogen): A thin layer of nitrogen-rich material, like fresh grass clippings or a small amount of manure. This acts as an accelerator.
- Layer 2 (Carbon Barrier): A complete, overlapping barrier of plain brown corrugated cardboard or thick, wet newspaper (no glossy or colored print). This smothers the grass below. Wet the cardboard until it is soaked.
- Layer 3 (The Soil): 6–12 inches of rich compost or topsoil mixed with compost.
- Layer 4 (The Mulch): A 3-inch top layer of straw, wood chips, or shredded leaves.
- Pro-Tip: You can plant directly into the top soil layer (Layer 3) on the same day you build the bed. This is the ultimate, low-effort way to start a new garden bed.
8. Hügelkultur Mound Foundations
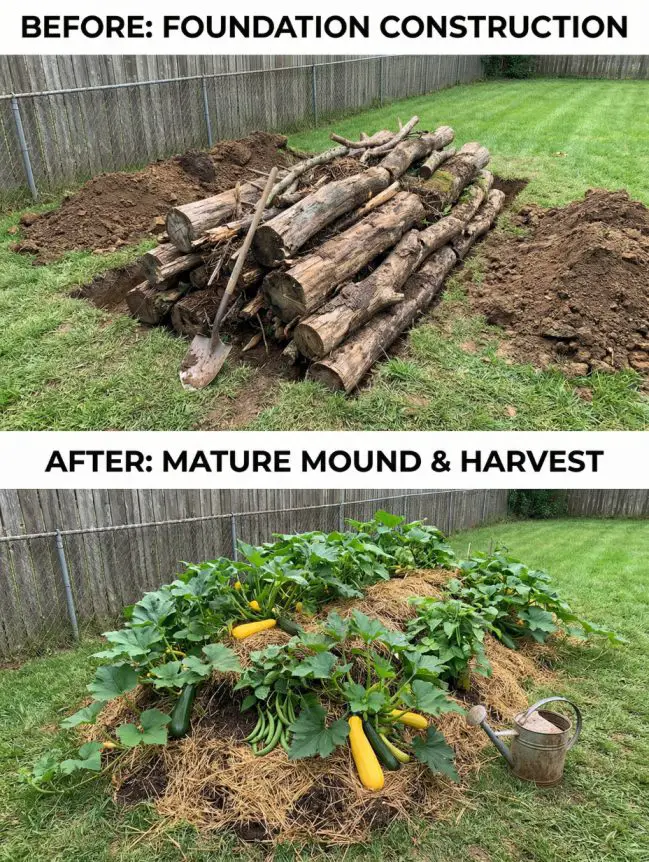
Drought is becoming a critical issue in the Western US and parts of the UK. Hügelkultur is a 500-year-old European permaculture technique designed to create a subterranean water sponge.
- The “Why”: You are creating a buried reserve of rotting wood. This wood stores nitrogen and acts like a massive biological sponge, absorbing and holding massive amounts of rainfall. In a established hügelkultur bed, you may only need to water once a month—or never—even in severe heat. As the wood rots, it also releases heat, extending your growing season by several weeks.
- The Execution: Dig a 2-foot trench (or use a raised bed frame). Fill the bottom with hardwood logs and branches (hardwood like Oak or Maple is best; avoid Black Walnut or Cedar, as they can inhibit plant growth). Pile “green” waste (grass, compost) on top, then “brown” waste (straw, leaves), and finally a foot of topsoil. The resulting mound will shrink over time as the logs decompose.
- The Troubleshooting: The decomposition of the logs will “borrow” nitrogen from the soil for the first season. Compensate by heavily fertilizing your top-layer soil with a nitrogen-rich amendment like compost or aged manure.
9. The Vertical Crate A-Frame Trellis
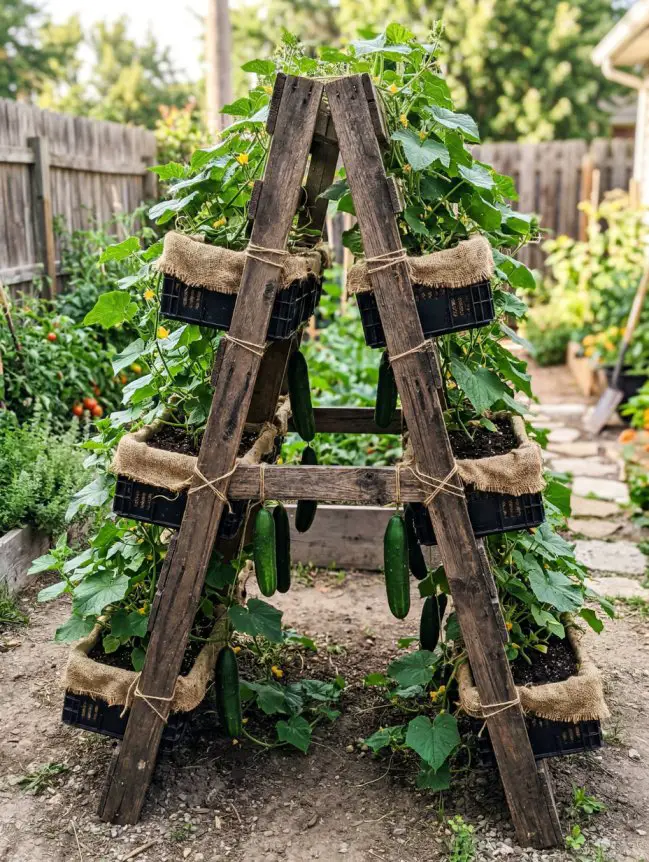
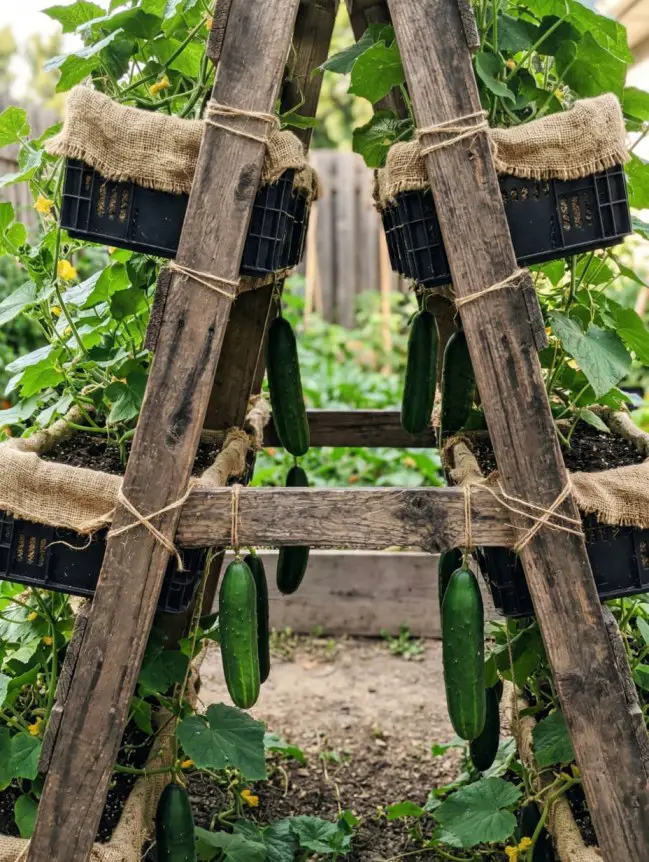
If you are a modern homesteader looking to grow heavy vining crops like cucumbers or summer squash, this upcycled structure will change your life. Forget about heavy-gauge wires or expensive store-bought arches; the secret to a pest-free, high-yield vertical harvest lies in the modular logic of a wooden A-frame.
- The “Why”: Vining plants (like Cucumbers) are highly susceptible to “Powdery Mildew,” a fungal disease that thrives in the damp, shaded, still-air environment created when vines sprawl on the soil. The A-frame trellis is a biological intervention. It lifts the entire plant 4 feet off the ground, ensuring 360-degree airflow around every leaf. Improved ventilation prevents mildew, keeps the fruit perfectly clean, and forces the cucumbers to grow straight and uniform.
- The Execution: Construct a simple A-frame structure using reclaimed wood (like old pallets) or sturdy branches. Mount your aerated Vegetable Crates (repurposed from Idea 1) onto the slanted sides of the frame. Plant your vining crop in the crate or at the base, and as the main stem grows, train it to climb up the frame. The heavy fruit will naturally spill over the top and hang down, creating the same high-airflow and clean-harvest.
- The Structural Secret: While the setup is simple, you must ensure the structure can handle the weight. A single full-sized cucumber vine can hold 10–15 pounds of fruit at its peak. When building your A-frame, lash the main poles tightly with natural jute twine or use strong screws. As the fruit gets heavy, create “slings” from old pantyhose or burlap to support the heaviest squash, which ensures they don’t break the main vine.
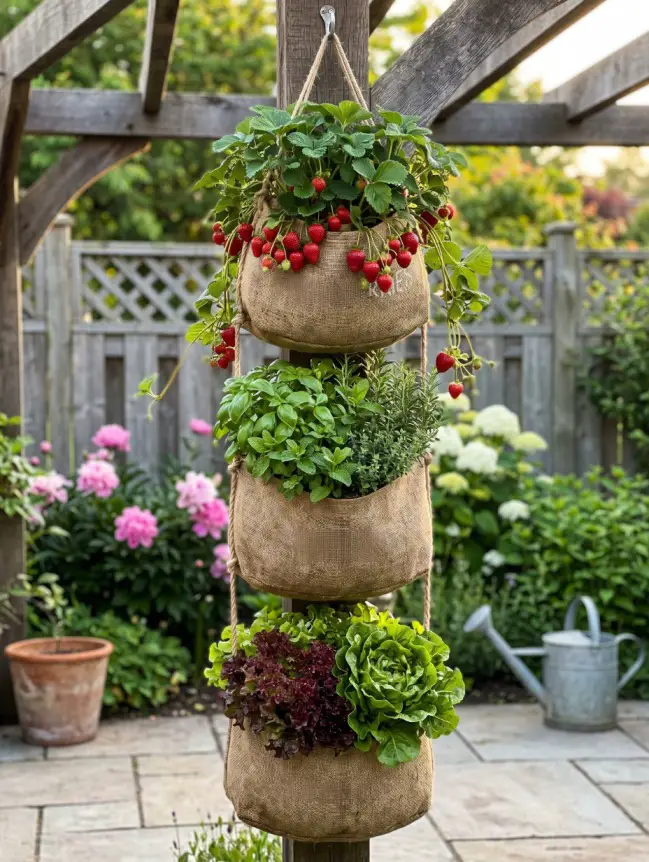
10. The Vertical Strawberry “Living Pillar”
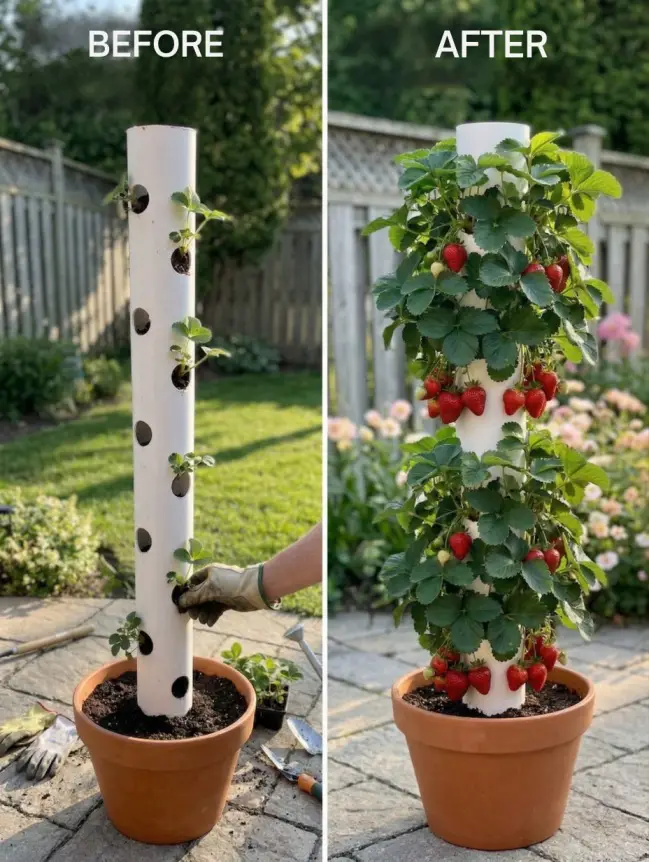
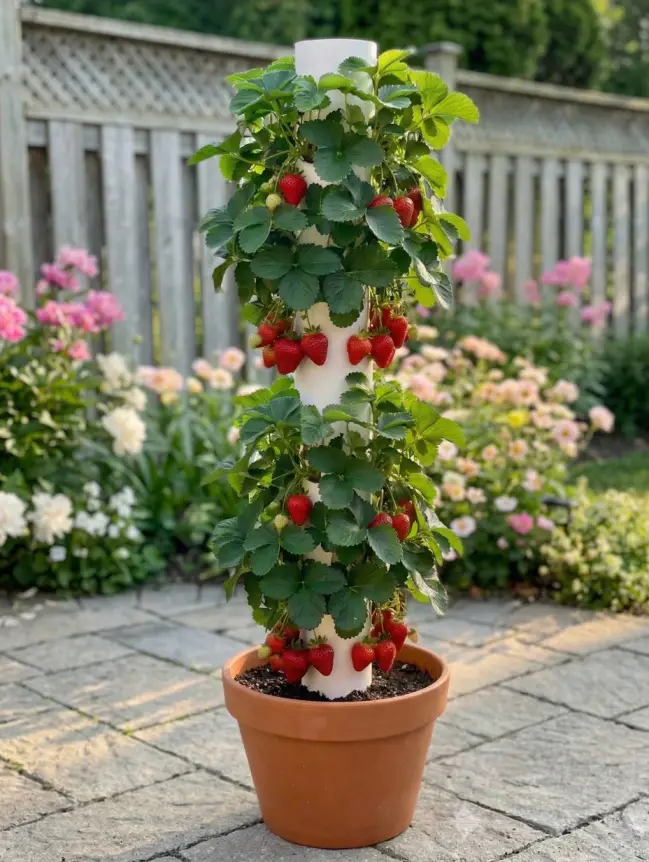
Instead of letting strawberries crawl on the ground where slugs and rot can get them, this method uses vertical gravity to create a “water-fall” of fruit. It’s the ultimate small-space hack that looks like a high-end garden installation.
The Result: A 5-foot tall pillar of cascading green leaves and bright red berries. It’s a self-contained ecosystem that acts as a stunning focal point for any patio or backyard.
The “Why”: Strawberries are prone to soil-borne pests and fruit rot. By lifting them into a vertical pillar, you get 100% clean fruit, zero slug damage, and you can grow 50 plants in the footprint of just one.
The Execution: Use a large, 6-inch diameter PVC pipe or a series of stacked, offset Aerated Crates. If using a pipe, drill 3-inch “planting pockets” every 6 inches in a staggered pattern. Fill the center with a mix of compost and perlite. Insert a smaller, perforated “watering tube” down the middle to ensure even moisture from top to bottom.
11. The Upside-Down “Gravity” Tomato Planter
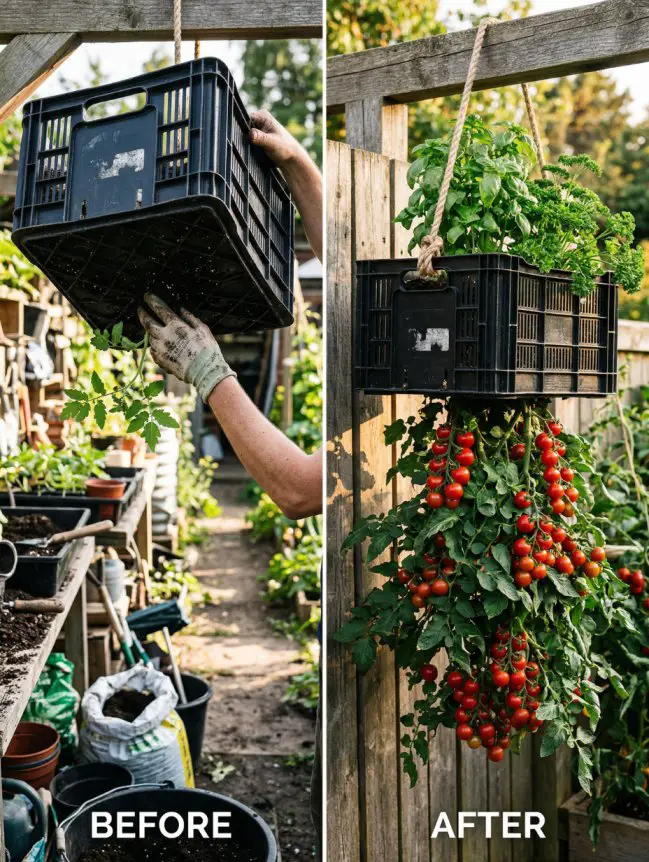
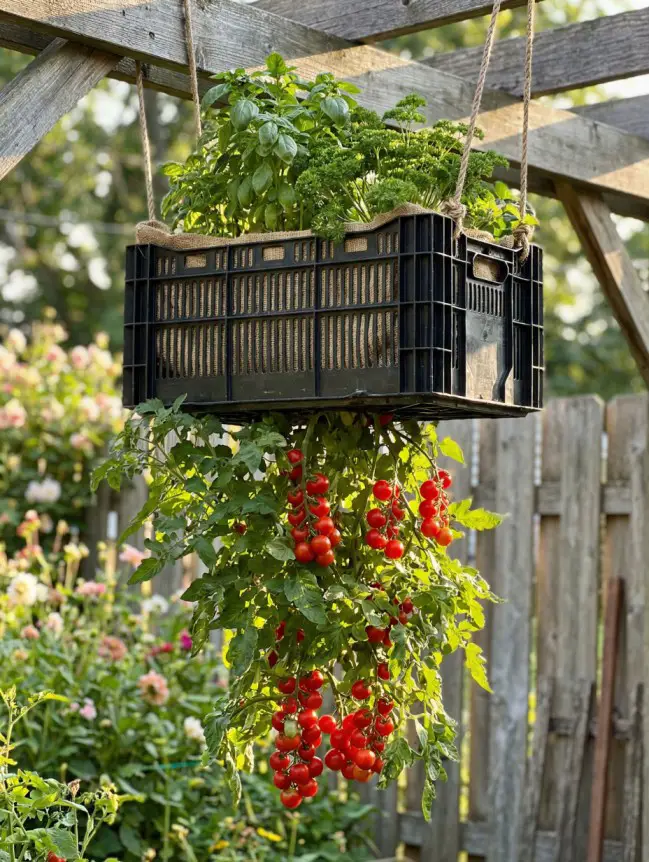
Stop fighting gravity and start using it. Growing tomatoes upside down is the ultimate solution for urban gardeners with zero floor space and those tired of battling soil-borne diseases.
- The “Why”: When tomatoes grow downward, you eliminate the need for stakes, cages, or tying. More importantly, it keeps the foliage away from the ground, which prevents Septoria Leaf Spot and Early Blight—fungal diseases that jump from the soil to the leaves. Gravity also pulls water and nutrients directly to the fruit more efficiently.
- The Execution: Take a sturdy 5-gallon bucket or a large repurposed Aerated Crate. Drill a 2-inch hole in the bottom. Carefully thread a young tomato seedling through the hole from the inside, so the roots are inside and the stem hangs out. Fill the bucket with a high-quality potting mix.
- The Bonus: You can plant herbs like Basil or Parsley in the top of the bucket. It’s a dual-crop system where the water you pour on the herbs trickles down to feed the tomato roots below.
12. The Solar-Powered Bottle Dripper & Humidity Bell
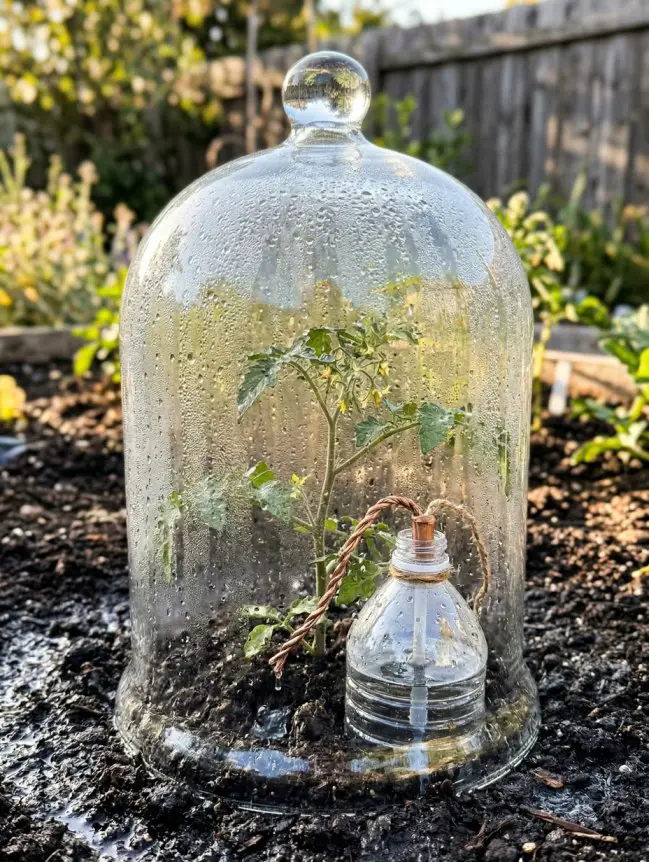
Forget about daily watering or expensive irrigation systems. If you want to grow thirsty plants like tomatoes or peppers, this ingenious repurposing hack creates a self-contained ecosystem that ensures deep-root hydration while using 90% less water.
- The “Why”: Traditional overhead watering is wasteful. Much of the water evaporates from the soil surface before it reaches the roots. Plants also require a high-humidity, consistent environment to thrive. This structure uses solar heat (the sun) to create a perfect microcosm, while gravity handles the slow, efficient irrigation.
- The Execution: Take a clean, 1-liter clear plastic water bottle (the dripper) and a large, wide-mouth glass or clear plastic jar (the humidity bell/cloche). Cut a small “V” notch in the neck of the water bottle and bury it several inches deep into the soil next to your young plant. Water will slowly drip from the notch, straight to the roots.
- The Result: Cover the entire plant and bottle with the clear cloche/jar. The sun heats the air inside, causing water from the soil and the plant to evaporate and condense on the inside of the glass. This condensation trickles down the walls and “re-enters” the soil, recycling the moisture. The plant is constantly watered, protected from pests, and living in a warm, high-humidity, stress-free environment, leading to massive growth.
Vertical Infrastructure & Engineering
The most underutilized space in any garden is “up.” By training your plants to grow vertically, you are not just saving square footage; you are using engineering to create a healthier growing environment. Airflow is a critical and overlooked factor. By lifting plants like cucumbers and squash off the ground, you drastically reduce their exposure to soil-borne fungal diseases, like “Powdery Mildew.” Vertical engineering is not just about space; it is a critical integrated pest management (IPM) solution.
13. Natural Bamboo Teepees
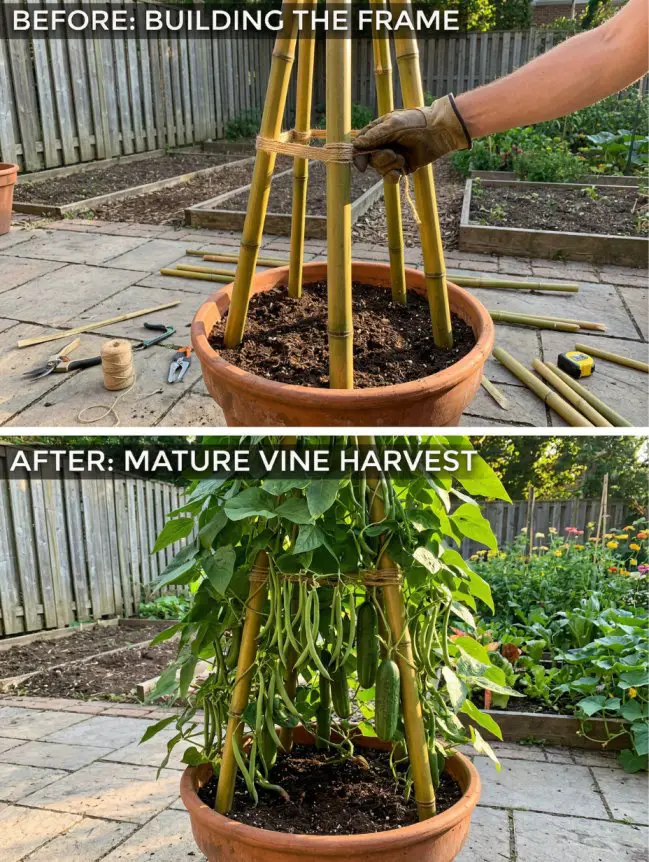
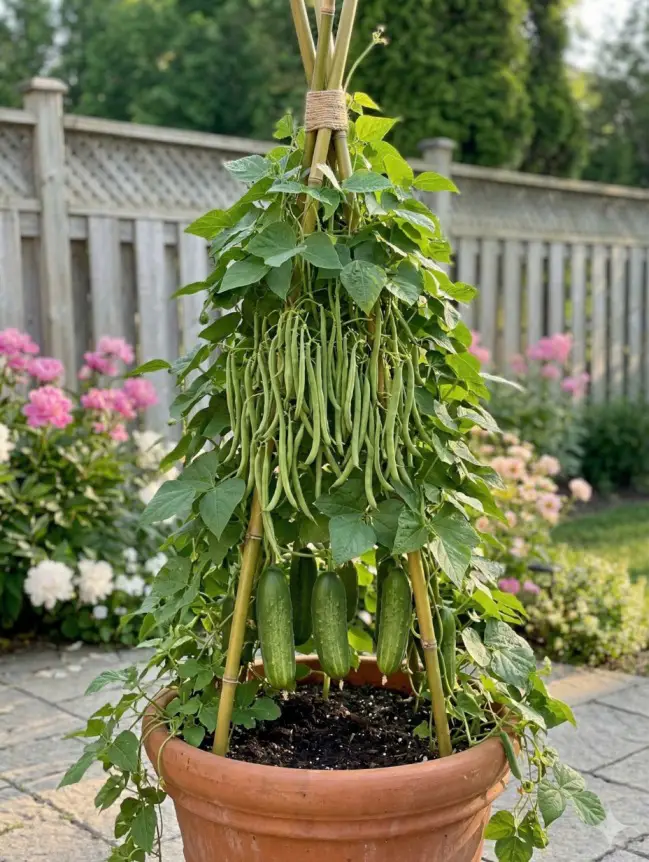
Trellising in Tier 1 countries is often dominated by ugly, non-recyclable plastic or cheap, breaking wood.
- The “Why”: A bamboo teepee is a perfect, sustainable engineering structure. Because it is a cone shape, it is naturally strong and can withstand significant wind loads in open regions like the Midwest or Northern UK. Unlike plastic, it is biodegradable and adds to the “slow-living” aesthetic of a modern homestead.
- The Execution: Use 3, 4, or 5 poles of 6-foot bamboo (or strong, straight branches, like willow). Drive the bases 6 inches into the soil. Bring the tops together and lash them tightly using natural jute twine or even strips of old leather (do not use plastic zip ties, as they will degrade in the sun and make a microplastic mess). Plant climbing beans, peas, or sweet peas at the base of each pole.
- Pro-Tip: As the beans grow, use a “clove hitch” knot with the jute twine to create a temporary, horizontal “ladder” between the main poles. This gives the plant more surface area to grip.
14. Fence-Integrated Gutter Beds
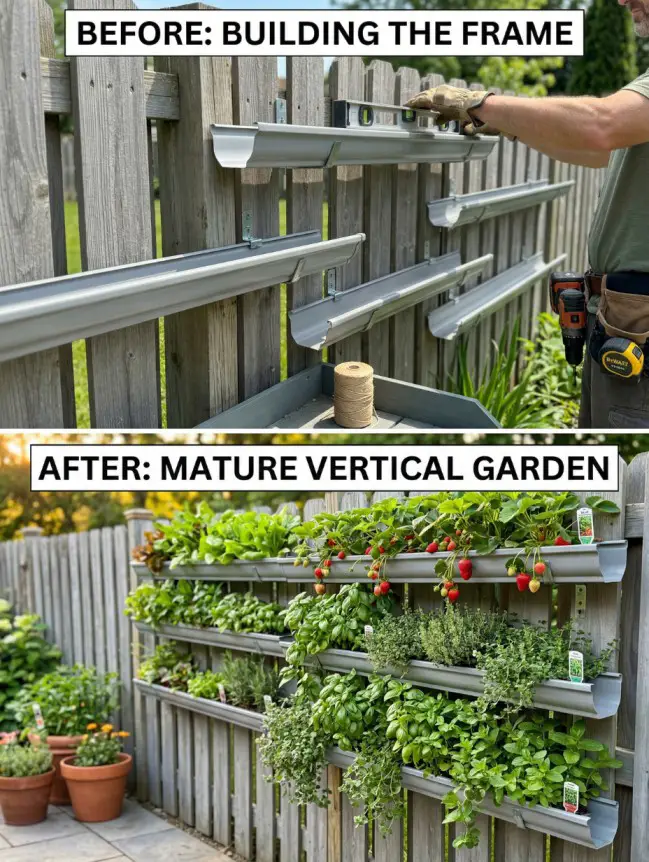

Rethink your fence not as a boundary, but as a potential vertical food system. Gutter gardening is the ultimate low-cost, high-yield urban secret.
- The “Why”: This is a form of “Hydroponic Lite” gardening. Standard white PVC gutters reflect sun and create an incredibly warm, controlled environment for shallow-rooted, cold-loving crops like “cut and come again” salad greens, arugula, and spinach. The elevation protects these vulnerable plants from ground pests like rabbits, slugs, and snails.
- The Execution: Use standard residential gutters. Cut them to length and mount them securely to your fence with gutter brackets (use two screws per bracket for stability). This system requires a very specific, lightweight soil mix, as the gutters are small. Do not use standard clay-heavy garden soil. Use a mix of 50% peat moss (or coconut coir) and 50% perlite (or vermiculite) to create a perfect drainage environment. Drill 1/4-inch drainage holes every 6 inches.
15. The Suspended A-Frame Trellis
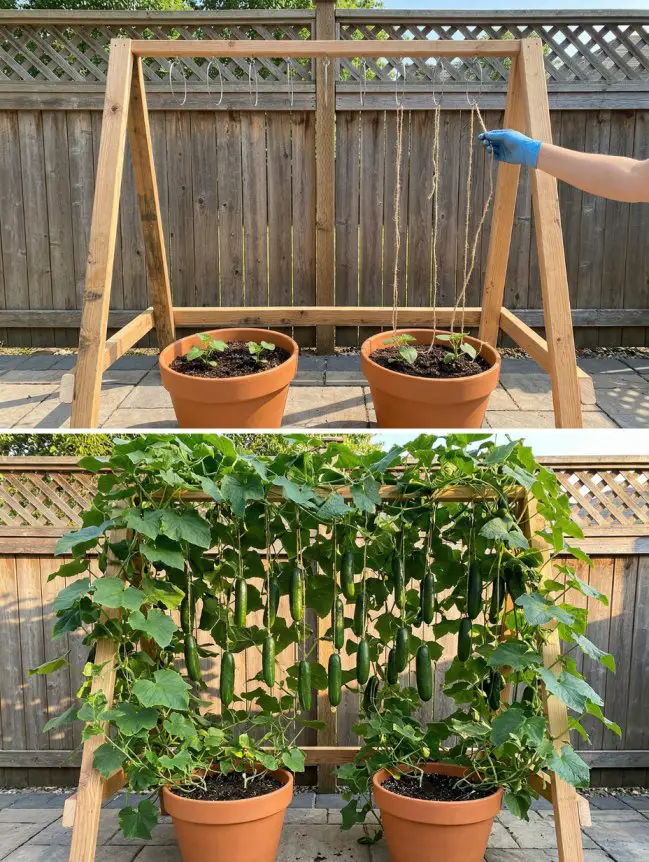
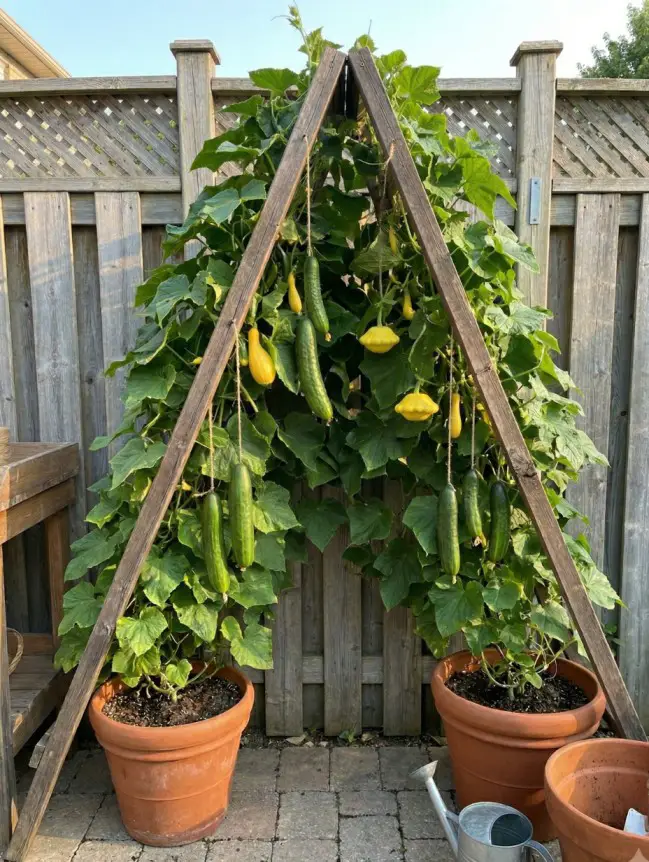
You’ve likely seen those incredible photos of cucumbers hanging perfectly straight in mid-air and wondered if they’re even real. They aren’t just for show—this vertical setup is actually a “biological cheat code” that traditional farmers have kept quiet for centuries to grow massive harvests in tiny spaces.
- The “Why”: Crops like cucumbers and summer squash are highly prone to soil-borne diseases. A-Frame trellising is a structural intervention. It lifts the plant off the damp ground. More importantly, it provides 360-degree airflow around the leaves. Poor airflow is what triggers diseases like “Powdery Mildew.” By improving ventilation, you eliminate the conditions that mildew needs to grow. It also yields perfectly straight, clean, and uniform fruit.
- The Execution: (Referring to image 8 in your mind) Build an A-frame from repurposed wood (like old pallets or tree branches). Mount your modular crates on the sides (Idea 1), or simply build a traditional soil bed at the base. Plant your vining crop, and as the main vine grows, it will spill over the top and hang. For heavy fruit like squash, you may need to create “fruit slings” from old stockings or burlap to support the weight.
16. The Vertical Pallet Strawberry Tower
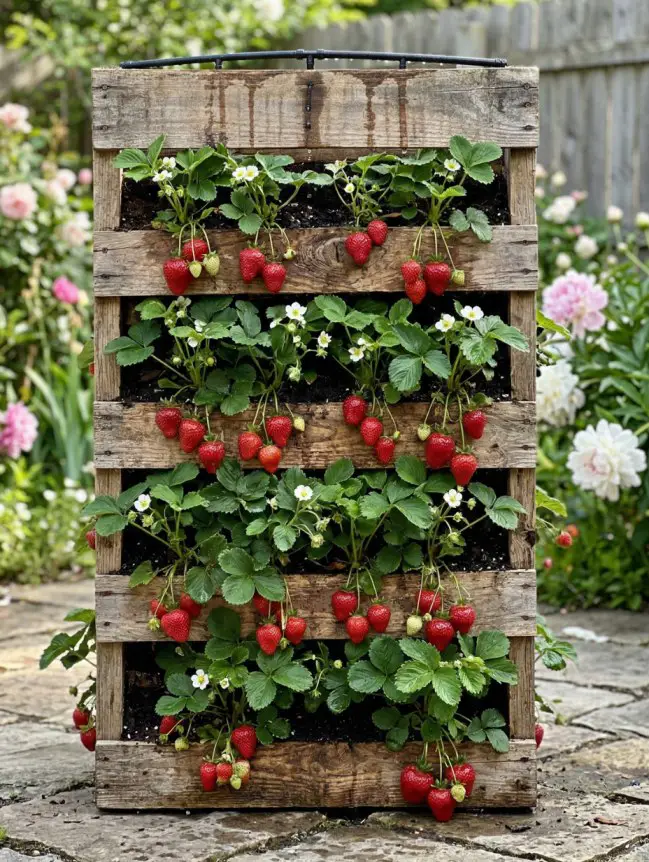
Why waste valuable ground space on strawberries when you can grow dozens of plants vertically? This ingenious upcycling hack turns a standard wooden pallet into a self-contained, high-yield strawberry ecosystem that looks like a living art piece.
- The “Why”: Standard ground planting limits how many strawberry plants you can grow and leaves the fruit vulnerable to slugs, rot, and dirt. This structure solves all of that. It uses a single pallet to create several tiers of planting beds, maximizing vertical space while elevating the fruit. The elevated position keeps berries clean, prevents rot by improving drainage and airflow, and makes harvesting effortless without bending over.
- The Execution: Stand a clean pallet vertically. Line the inside of the slats with landscape fabric or a burlap barrier to hold soil. Fill the resulting “shelves” with a rich compost and soil mix. Plant strawberry plugs directly into the horizontal openings. As they grow, they will trail beautifully, creating a dense green and red curtain. This structure also features integrated irrigation
17. Architectural Copper Trellising
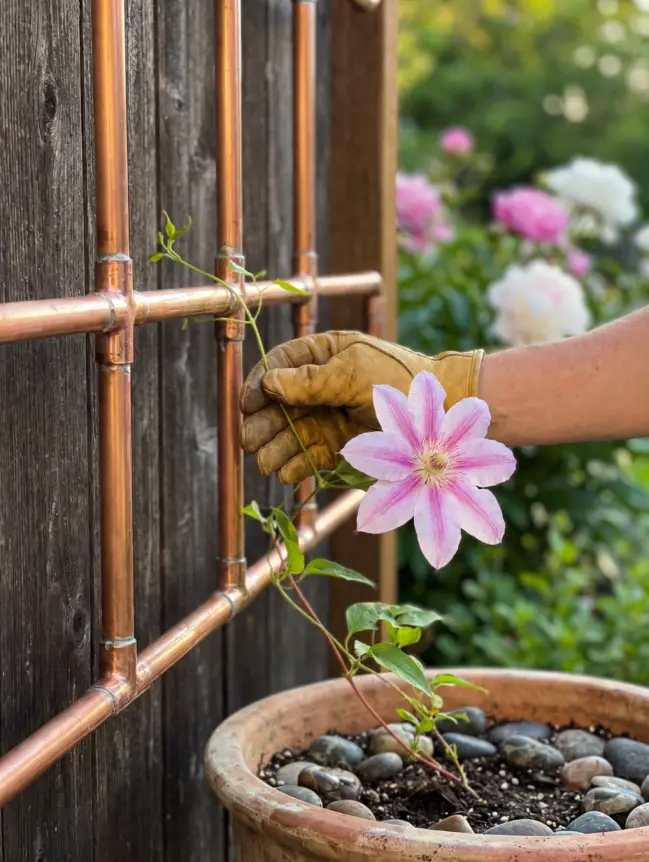
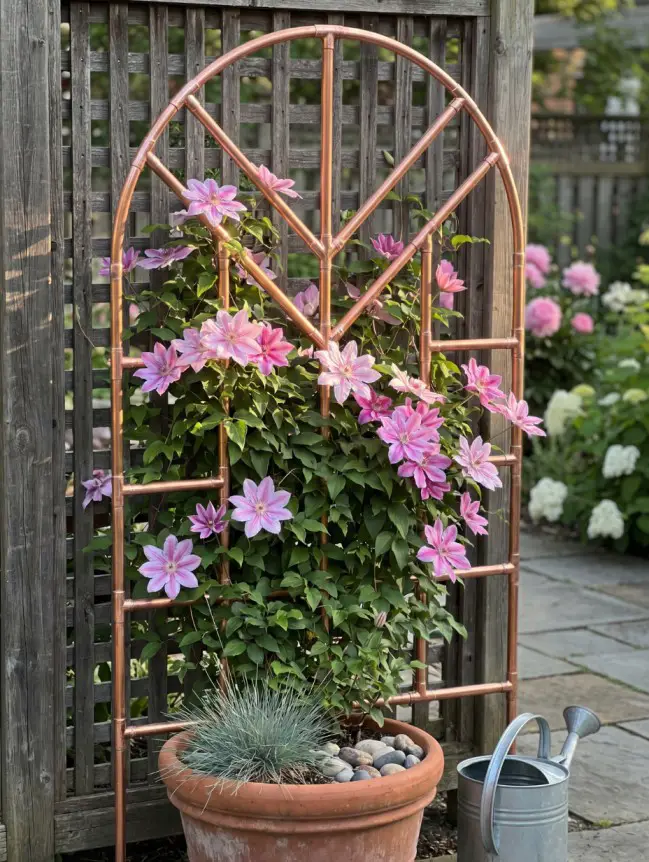
If you want a modern, designer look that is also incredibly durable and functional, reclaim copper plumbing scraps.
- The “Why”: Copper isn’t just beautiful. As it oxidizes in the elements, it develops a vibrant, green patina that Tier 1 homeowners love. More importantly, copper ions react negatively with the mucus layer of slugs and snails, creating a natural, static-charge barrier that repels them. It also never rots, unlike wood.
- The Execution: Look for copper pipe (even old, tarnished plumbing scrap works). Use standard copper “elbow” joints to build a structure—a simple ladder or a modern grid pattern. You can even use thin copper wire to lash the pieces together. It’s a permanent garden structure that adds value to your property.
18. Jute Sack Vertical Grow Bags
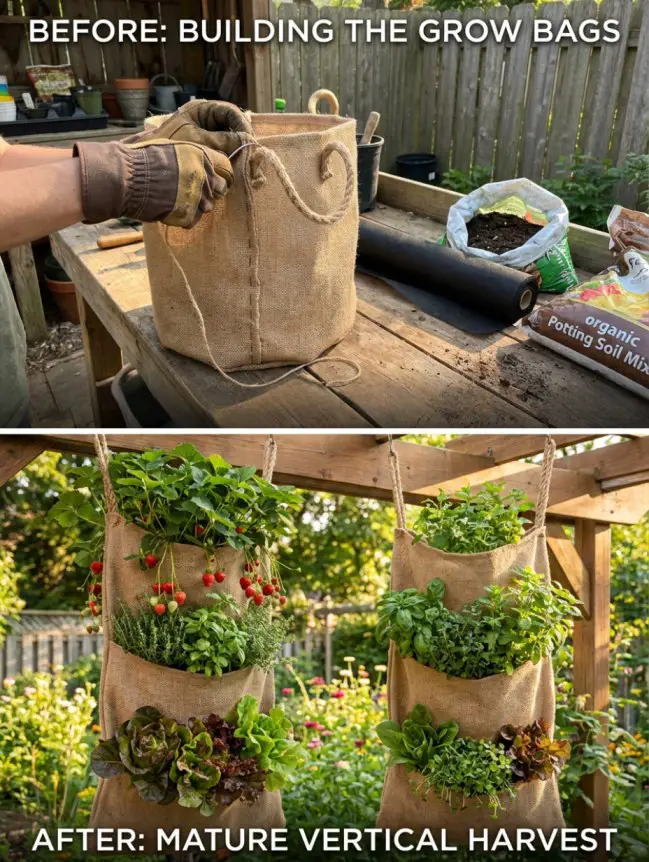
Potato towers are effective, but “rolled-up” burlap sacks offer a different kind of modular vertical system.
- The “Why”: Burlap (jute) is the ideal container material. Unlike solid plastic bags, jute is highly breathable. It naturally air-prunes roots, prevents circling, and allows for perfect drainage. The whole system is 100% biodegradable, meaning at the end of the season, you can compost the entire setup.
- The Execution: Repurpose heavy-duty jute bags (like coffee or rice sacks). Roll the top edge down until the bag is only 1 foot tall. Fill it with a soil/straw mix. Plant your potatoes. As they grow, unroll the sack and add more soil to hill the stem. This is perfect for urban balconies in Seattle or Vancouver.
Advanced Hydration & Micro-Climates
In a world of water scarcity, a modern homesteader knows that a hose or sprinkler is a tool of waste. A sprinkler wastes 50–70% of its water to surface evaporation before it ever reaches the roots. Plants don’t drink water from their leaves; they drink from their roots. We must deliver water precisely to the root zone, minimize evaporation, and use engineering to create a self-regulating garden.
19. Subsurface Deep-Root Irrigation

A major failure point for new gardeners is “shallow watering,” which encourages roots to grow only at the surface where they are vulnerable to heat.
- The “Why”: We need to train our plant roots to grow deep where the soil is cooler and more moist. Subsurface irrigation is the solution. It puts water precisely 6–12 inches below the soil surface, preventing “capillary rise” and surface evaporation.
- The Execution: Repurpose a plastic water or juice bottle. (Referencing idea 4 and image 7). Use a nail or a small drill bit to puncture a tight grid of holes along the bottom two-thirds of the bottle. Dig a hole, bury the bottle completely up to its neck near your plant (like a tomato or cucumber), and fill it with water. Add a cap to prevent mosquito breeding. The water will slowly seep out, encouraging roots to grow down toward the water source.
- The Troubleshooting: Over time, the holes can become clogged with soil. Add a small amount of gravel to the base of the bottle before you plant to create a “sump” that prevents soil from packing in the holes.
20. The Ancient Terracotta Olla Hack
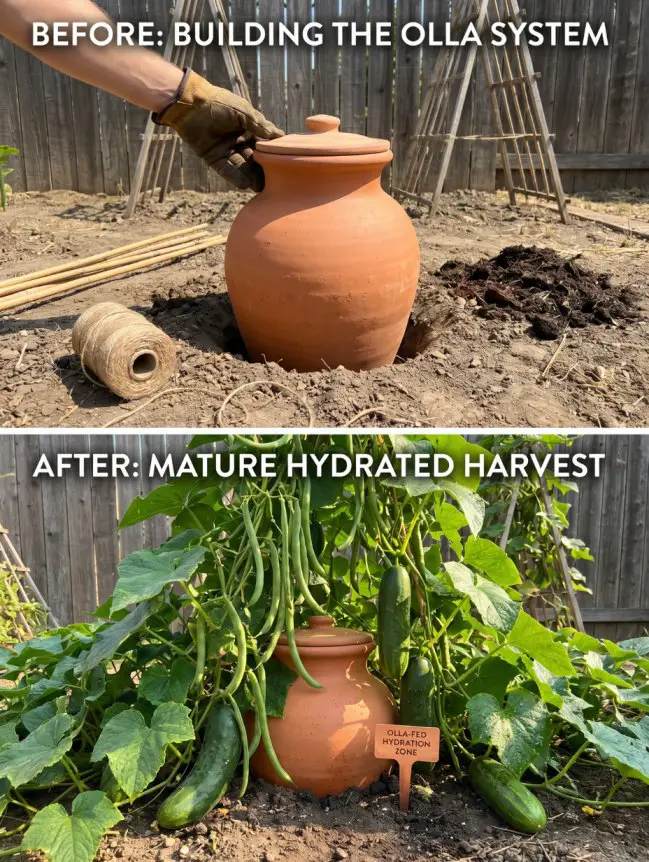
This is a 2,000-year-old Egyptian technique that is, biologically, the most efficient non-electric irrigation system in the world.
- The “Why”: This system uses the physics of soil mechanics, known as “Soil Moisture Tension.” When an unglazed clay pot (an “Olla”) is filled with water and buried, water seeps through the porous clay and is drawn into the soil. Crucially, it only releases water when the surrounding soil is dry. As the soil gets wet, the flow stops. It is a true, plant-demand self-watering system with near-zero waste.
- The Execution: True ollas are expensive. You can build one from a standard unglazed (terracotta) pot. (This is related to image 10 and 11, the “heat traps” principle, but for water). Use a powerful plumbing adhesive (like E6000) or 100% silicone. Plug the drainage hole of a standard terracotta pot with a small tile or cork. Bury the pot up to its neck in the center of a garden bed and fill it with water. For a true “olla,” glue two pots together at the rim, plugging one hole and using the other as the fill point.
- Warning for Tier 1 Winters: You MUST remove ollas from the ground and store them inside during the winter in regions with a deep freeze (US Midwest, Canada, UK). Water inside the clay pores will freeze and expand, shattering the pot.
21. Glass Bottle Thermal Heat Sinks
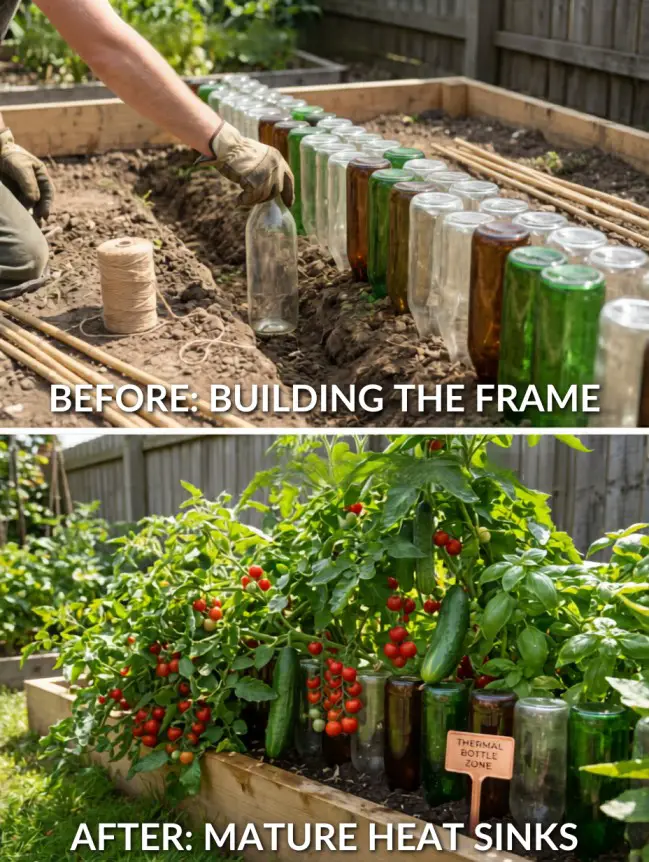

Water has an incredible ability to absorb, store, and radiate heat. This is known as high “Thermal Mass.”
- The “Why”: We can use thermal mass to stabilize soil temperature. In inverted glass bottle borders, the bottles are not just aesthetic; they are “thermal batteries.” They absorb intense daytime heat, preventing the soil from overheating. At night, as the air temperature drops, the bottles slowly radiate that stored heat back into the soil, keeping it warm and preventing roots from being shocked by cold. This can hasten growth, especially for cold-sensitive crops like strawberries and nightshades.
- The Execution: Collect colorful glass wine or beer bottles (clear, green, and blue are excellent, as clear allows the water to heat up fastest). Invert them and bury them neck-down around the border of your bed. For maximum effect, fill the bottles completely with water first, though even empty ones work to some degree.
22. The Recycled Glass Bottle Thermal Mass Wall
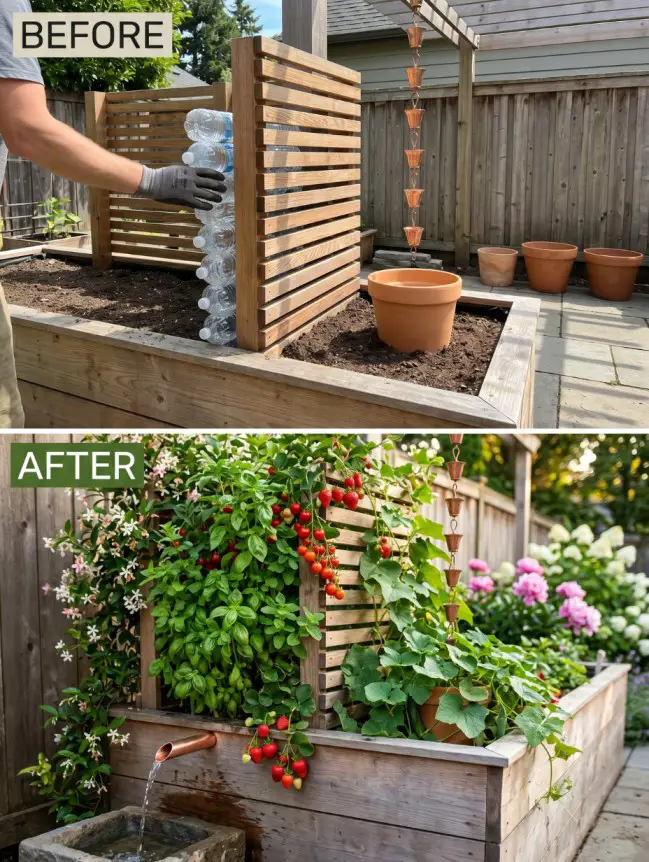
Why buy expensive concrete or stone for temperature regulation when you can use stunning, upcycled glass? This ingenious hack transforms diverse clear, brown, and green glass bottles into a sophisticated, visually complex thermal mass wall that stabilizes your garden beds or greenhouse during extreme heat or sudden cold snaps.
- The “Why”: Standard wooden raised beds often struggle with temperature regulation, getting too hot in the sun and too cold at night. This upcycling hack adds significant “thermal mass” to your structure. The densely packed bottles act like batteries, absorbing solar heat during the day and radiating it back to the soil and plants at night, stabilizing the root temperature.
- The Execution: Replace a portion of your traditional wooden raised bed wall with an intricately slatted frame. Create precise slots to densely pack the varied clear, brown, and green glass bottles. In this final image, the wall is complete. The diverse bottles create a shimmering, stained-glass mosaic effect, packed tightly to absorb maximum energy. The garden bed behind it is overflowing with heat-loving crops, including large, ripe cucumbers and tomatoes, which are thriving thanks to the regulated soil temperature. Micro-irrigation lines are woven through the upper slat work, hidden by foliage.
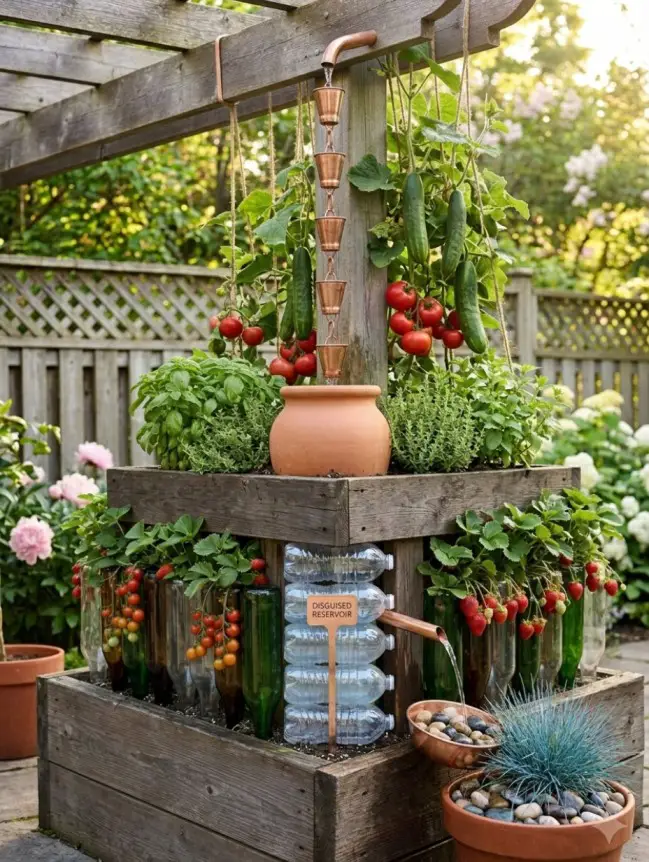
23. Oyster Shell & Trace Mineral Layers
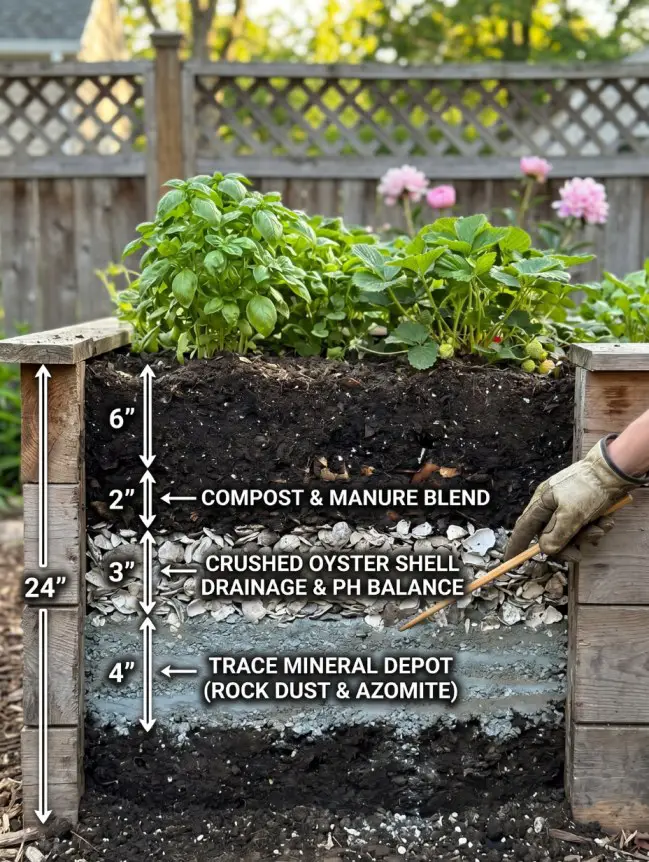
Many Tier 1 growers make the mistake of using standard river gravel in the base of their pots. Gravel does nothing but provide drainage. The modern homesteader adds function.
- The “Why”: Use crushed oyster shells instead of gravel. (Related to the “Bio-Available Calcium” and “Zinc Leaching” principles—it’s about long-term nutrient release). Oyster shells are 95% calcium carbonate, but they also contain essential trace minerals like magnesium and phosphorus. As they slowly decompose over many years, they release these micronutrients to the soil, building long-term fertility.
- The Execution: Layer 1 inch of crushed, clean oyster shells (or shell grit, available from feed stores in the US/UK) in the bottom of all your container plants and your galvanized troughs. It is the ultimate slow-release mineral amendment.
24. The Aerated Crate & Bamboo Teepee Fusion System
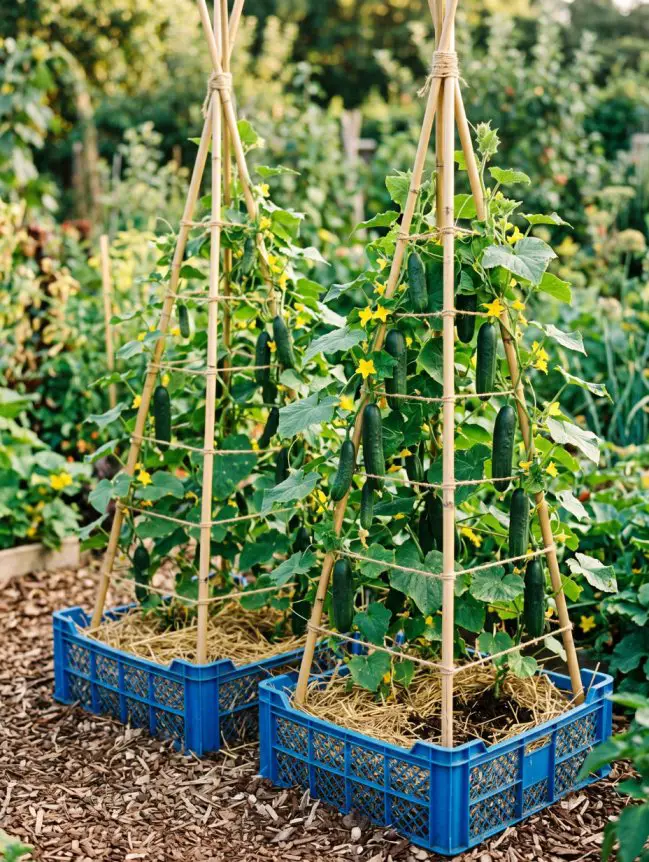
If there is one image that perfectly captures the modern homesteader philosophy, it is this: two blue mesh crates loaded with golden straw, crowned with handmade bamboo teepees, and dripping with full-sized, perfectly straight cucumbers.
The “Why”: This technique marries two systems — the Aerated Crate (Secret #1) and the Natural Bamboo Teepee (Secret #13). The mesh crate delivers maximum root oxygenation at the base, while the bamboo structure lifts the entire plant canopy 4–5 feet off the ground, providing 360-degree airflow from soil to tip. This is the single most effective prevention against Powdery Mildew and Septoria Leaf Spot.
The Execution:
- Line your mesh crate with thick burlap, fill with compost and potting soil, and add a 3-inch layer of straw mulch on top to reduce surface evaporation.
- Drive 5 bamboo poles into the four corners and center of the crate, lash the tops with jute twine, and tie 3–4 horizontal rungs between the poles at 12-inch intervals to create a climbing ladder for the vines.
Pro-Tip: Place the crates on a 3-inch bed of wood chip mulch to suppress weeds, retain ground moisture, and create a clean, polished aesthetic around the base.
25. The Pallet & Straw Watermelon Platform
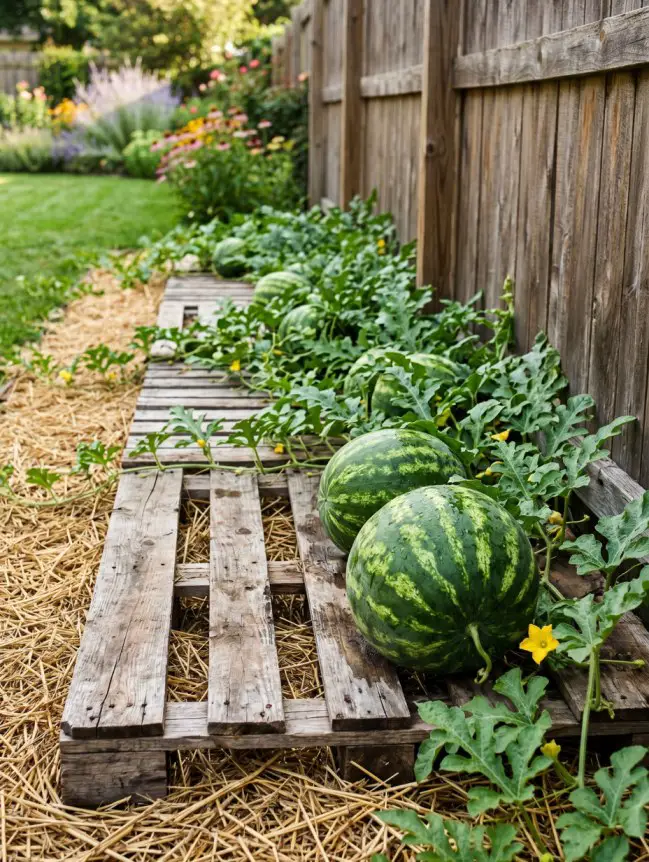
Growing watermelons in a suburban backyard is no longer impractical. This technique uses reclaimed wooden pallets as elevated platforms, laid in a row along a boundary fence and surrounded by deep straw mulch.
The “Why”: Watermelons are devastated by “flat rot” — caused by fruit sitting in direct contact with damp earth. A slatted wooden pallet elevates the fruit off the ground, circulates air beneath it, and repels ground-dwelling slugs and pests. The surrounding straw mulch retains moisture, regulates soil temperature, and slowly decomposes into a rich carbon amendment.
The Execution:
- Lay heat-treated (HT-marked) reclaimed pallets flat in a row along a south-facing fence. Spread a 4–6 inch layer of straw between and around the pallets and amend the soil beneath with compost.
- Plant watermelon seedlings at the base of the pallets into the compost-amended soil, not inside the pallet slats. Allow the fruit to sprawl naturally and come to rest on the pallet surface as it develops.
Pro-Tip: For very large varieties, create simple cradles from burlap strips tied between pallet slats to cushion and support the weight of each melon and prevent pressure marks on the skin.
26. The Overhead Canopy Pot System for Climbing Gourds
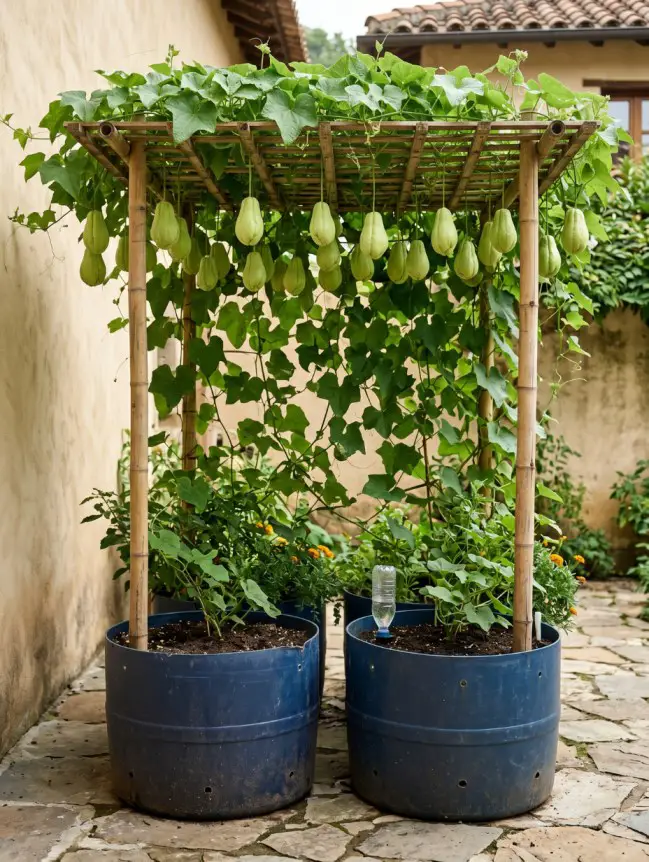
This system represents the apex of space efficiency. Two repurposed plastic tubs serve as the root vessels, while a simple overhead frame of wire or bamboo — set at 5–6 feet — becomes a living canopy roof draped in dozens of hanging chayote or bottle gourds.
The “Why”: Gourds and climbing squash have a powerful instinct to grow upward and spread laterally toward light. A wide, flat horizontal canopy works with this biology, maximizing leaf surface area for photosynthesis. The fruit then hangs perfectly straight downward, as gravity intends, requiring zero support and growing uniformly clean.
The Execution:
- Fill two large repurposed containers with rich compost and aged manure. Install a subsurface irrigation bottle (Secret #19) in each pot before filling, as shown by the white plastic bottles visible at the base in the image.
- Build a sturdy overhead frame using four posts connected at the top by horizontal cross-members of heavy wire or bamboo. Train the vine up a vertical guide wire to the canopy, then allow it to spread freely across the horizontal surface.
Pro-Tip: The dense canopy creates a naturally shaded area underneath — an unexpected bonus for a hot patio or rooftop garden.
27. The Reclaimed Ladder A-Frame Squash Trellis

An old wooden ladder, no longer safe for human use, becomes one of the most structurally perfect and visually dramatic trellis solutions available. Propped at a 45-degree angle, it holds heavy pumpkins and squash suspended in mid-air like living sculpture.
The “Why”: Ground-grown squash suffers from three enemies: flat rot, slug damage, and distorted shapes from resting on uneven soil. An angled ladder solves all three simultaneously. The evenly spaced rungs are already perfectly proportioned for vine training, and fruit hanging freely in open air develops a dramatically more uniform, symmetrical shape.
The Execution:
- Drive two sturdy stakes into the ground and prop an old wooden ladder against them at a 45-degree angle. Secure the ladder to the posts at two or three points using heavy-gauge wire.
- Plant squash or pumpkin seedlings at the base. As the main vine grows, weave it through the rungs and train it upward. For large fruit, tie strips of burlap between two rungs to create a hammock-style sling that supports the weight of each squash.
Pro-Tip: Position standard wire tomato cages at the base of the ladder to contain the densest part of the foliage and support lower-growing fruit, exactly as shown in the image.
28. The Pergola Trellis & Tiered Raised Bed Corner System

A backyard corner — sheltered on two sides and often ignored — becomes the most productive square footage in the entire garden. Tiered wooden raised beds at ground level are combined with a full-height lattice wall and an overhead pergola arbor to exploit every inch of vertical space.
The “Why”: A corner creates a natural windbreak and a warm microclimate that benefits heat-loving crops. The lattice pergola wall allows climbing beans and cucumbers to reach 6 feet high, while the staggered raised beds create distinct microclimates at different heights — perfect for growing a diverse range of crops in one concentrated zone.
The Execution:
- Build three to four raised bed frames at varying heights (6, 12, and 18 inches) and stagger their positions to create a stepped, tiered effect. Fill each with premium compost.
- Construct the lattice trellis wall using timber uprights and standard diamond-pattern lattice panels attached firmly to existing fence posts. Add a simple pergola beam across the top to carry the weight of climbing plants.
Pro-Tip: Use gravel mulch between the beds. It reflects light up into the base of the plants and prevents soil splash-back of fungal pathogens during rain.
29. The Stacked Crate Potato Tower
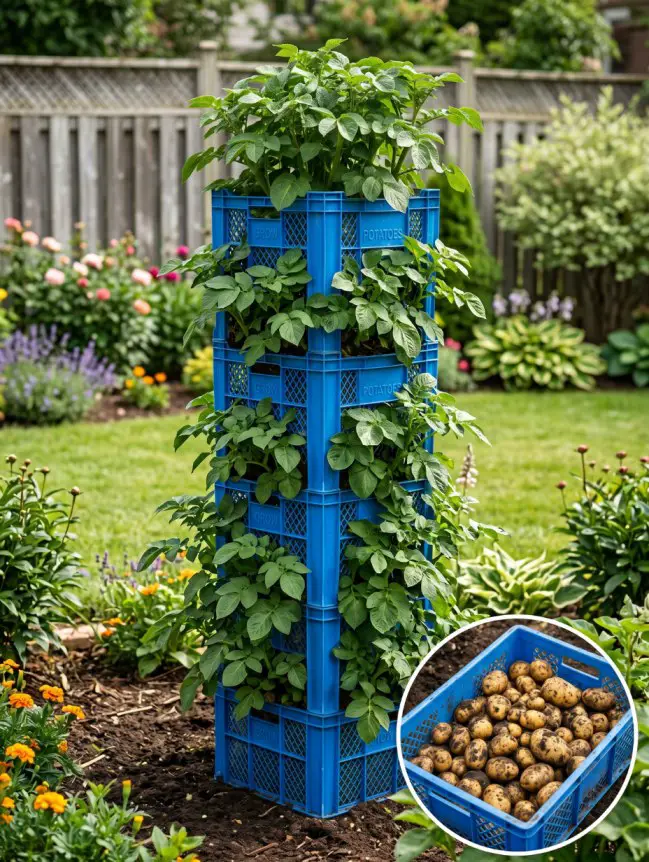
The image says everything: a five-crate tower of blue mesh, 5 feet tall, with potato foliage bursting from every level — and an inset photograph showing an entire crate filled to the brim with large, clean potatoes at harvest.
The “Why”: This is the Vertical Potato Tower (Secret #2) scaled up using the same mesh crates as Secret #1. By stacking crates and progressively burying the growing stem with soil, you engineer one plant to produce tubers across a 4-foot-tall column instead of a 12-inch pot. The mesh sides simultaneously provide root oxygenation and air-pruning at every level.
The Execution:
- Start with one burlap-lined crate filled with a 50/50 mix of compost and straw. Plant 2–3 seed potatoes 4 inches below the surface. When the foliage reaches 6–8 inches above the rim, stack a second filled crate on top, burying the stem and leaving only the top few leaves exposed.
- Repeat — adding one crate each time the foliage outgrows the current top level — until the tower reaches five crates high. Disassemble from the top down at harvest; each level will reveal a dense layer of clean potatoes.
Climate Note: In hot climates, use white or light-colored crates. Dark containers absorb heat and can cook the tubers before harvest.
30. The Recycled Bottle Vertical Drip Wall
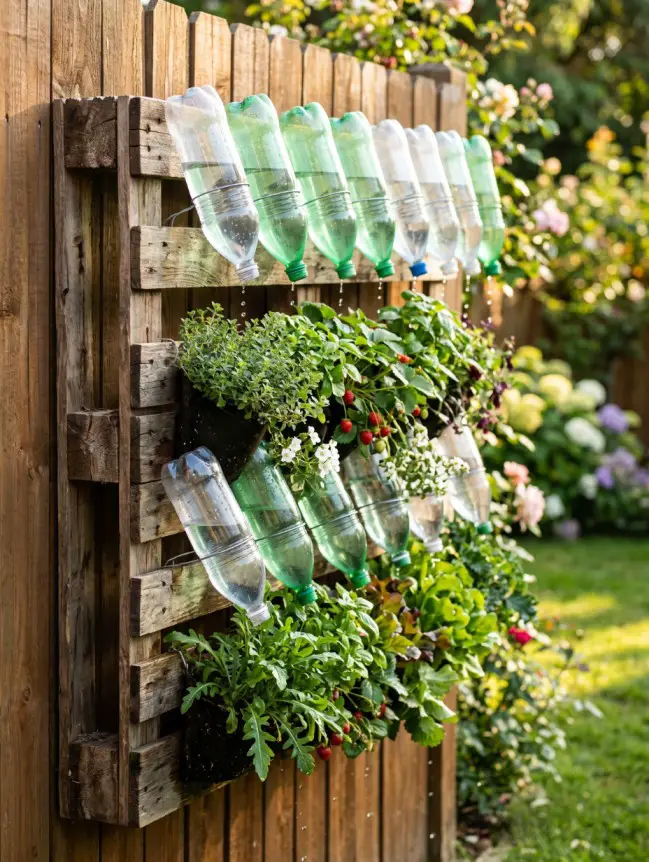
Most urban gardeners waste 60–70% of their water through surface evaporation. This ingenious wall-mounted system uses nothing but repurposed plastic bottles and a simple wooden frame to deliver slow, precise, gravity-fed drip irrigation directly to the roots of herbs, salad greens, and strawberries — simultaneously creating a stunning living wall feature.
The “Why”: Each bottle acts as an individual drip reservoir, releasing water slowly through a small punctured hole directly into the root zone of the plant below it. Because each plant has its own dedicated water supply, there is zero competition for moisture, zero surface evaporation, and zero runoff waste. The result is up to 80% less water usage compared to overhead watering, with dramatically faster and healthier plant growth.
The Execution:
- Mount a simple reclaimed wooden pallet or timber frame flat against a sunny fence or wall. Drill evenly spaced holes across the frame just wide enough to hold a standard 1.5-liter plastic bottle at a slight downward angle with the cap end pointing toward the planting pocket below.
- Puncture a single small hole in the cap of each bottle, fill each bottle with water, and screw the cap back on. Gravity will pull a slow, steady drip from each bottle directly into the soil of the plant positioned below it.
Pro-Tip: Add a few drops of liquid seaweed fertilizer into each bottle once a week. Every watering cycle becomes a gentle, automatic feeding cycle — a fully self-regulating, zero-waste nutrition system.
Conclusion: The Future of Self-Sufficiency
The “Modern Homesteader” is not someone who has the biggest budget or the fanciest technology. It is someone who understands biology and uses observation to solve problems. We can achieve massive yields, build superior soil, and create a resilient, drought-proof backyard—all while spending near zero at the garden center. The secret isn’t in what you buy; it’s in what you see. Nature recycles everything; we should, too. Every piece of trash is a potential tool, every organic “scrap” is potential soil gold, and every structural problem is a vertical engineering opportunity. By adopting these 30 innovative secrets, you are not just gardening; you are practicing the ultimate form of self-sufficiency and respecting the natural world that feeds you.
