
Once the Christmas decorations come down, your front door can suddenly look a little empty. But winter is far from over, and there are plenty of beautiful ways to keep your entrance feeling cozy and welcoming without relying on traditional holiday decorations. That is where these DIY winter door hanger ideas come in.
From snowy wooden signs and rustic pinecone bundles to cozy mittens, miniature sleds, winter baskets, and Scandinavian-inspired designs, there are so many creative alternatives to an ordinary wreath. Better still, many of these projects can be made using inexpensive craft supplies, thrift-store finds, scrap wood, faux greenery, yarn, and items you may already have around the house.
Whether your decorating style leans farmhouse, modern, woodland, rustic, minimalist, or playful, there is something here that can work beautifully on your front door. You can also customize the colors, ribbon, wording, and greenery to complement your home.
Here are 23 creative DIY winter door hanger ideas you can make at home and enjoy throughout January, February, and the rest of the cold-weather season.
1. Rustic Wooden Snowflake Door Hanger
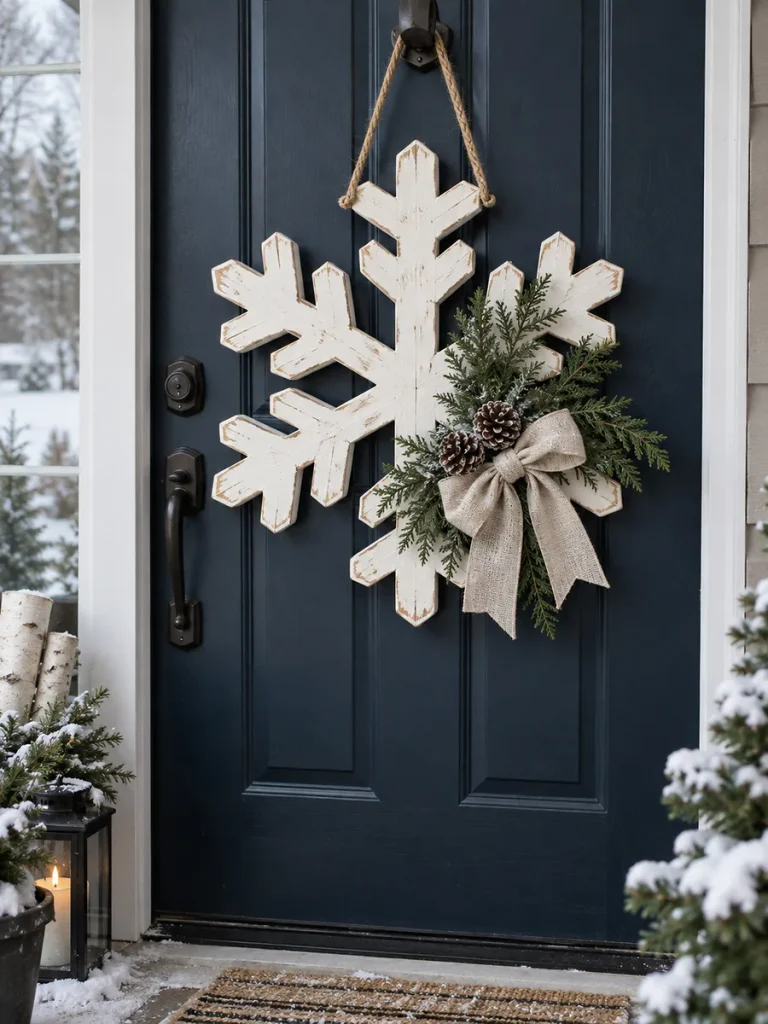
A large wooden snowflake makes an elegant winter decoration that feels seasonal without looking overly Christmas-themed. Its simple shape works especially well against dark navy, black, green, or natural wood doors. Keeping the colors soft and neutral gives the finished piece a timeless farmhouse look.
What You’ll Need
- Large unfinished wooden snowflake
- White or ivory craft paint
- Small paintbrush
- Fine-grit sandpaper
- Faux cedar or pine stems
- Two or three pinecones
- Neutral ribbon
- Jute rope
- Hot-glue gun
- Clear protective sealer
How to Make It
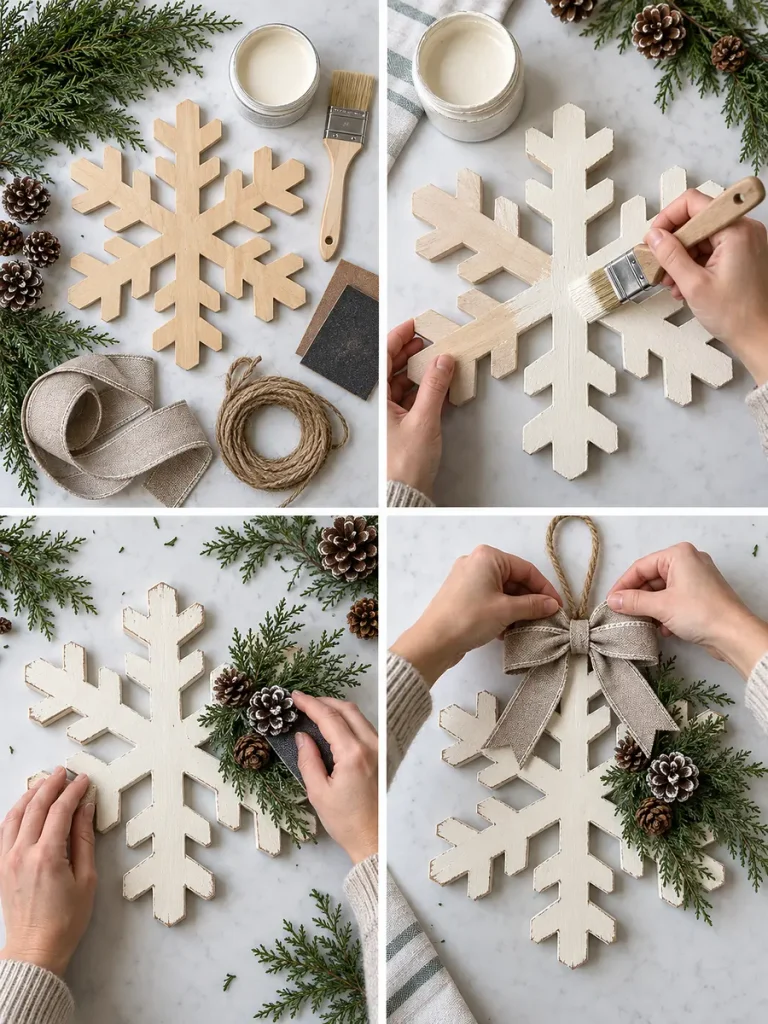
- Paint the entire wooden snowflake with white or ivory craft paint and allow it to dry.
- Lightly sand the edges so a little natural wood shows through for a distressed effect.
- Arrange several short pine or cedar stems around one side of the snowflake.
- Glue pinecones over the greenery and finish the arrangement with a small linen, velvet, or plaid bow.
- Attach a loop of jute rope to the back for hanging.
- Apply clear sealer if the hanger will be exposed to outdoor weather.
2. Cozy Winter Mitten Door Hanger
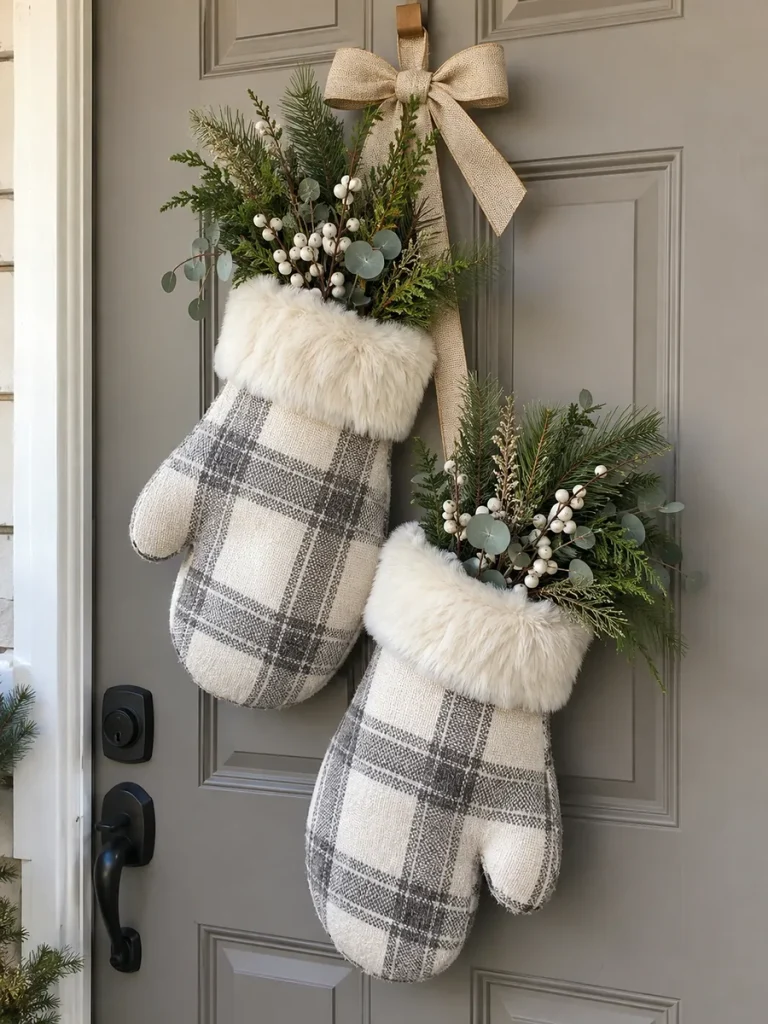
Oversized mittens instantly create a cozy cold-weather feeling and make an adorable alternative to a wreath. Choose fabric in cream, gray, dusty blue, or subtle plaid so the design can remain on display long after the holidays are over.
What You’ll Need
- Thick felt or winter fabric
- Mitten template
- Fabric scissors
- Fabric glue or sewing supplies
- Faux fur trim
- Faux evergreen stems
- White berry picks
- Ribbon or thick cord
- Hot-glue gun
How to Make It
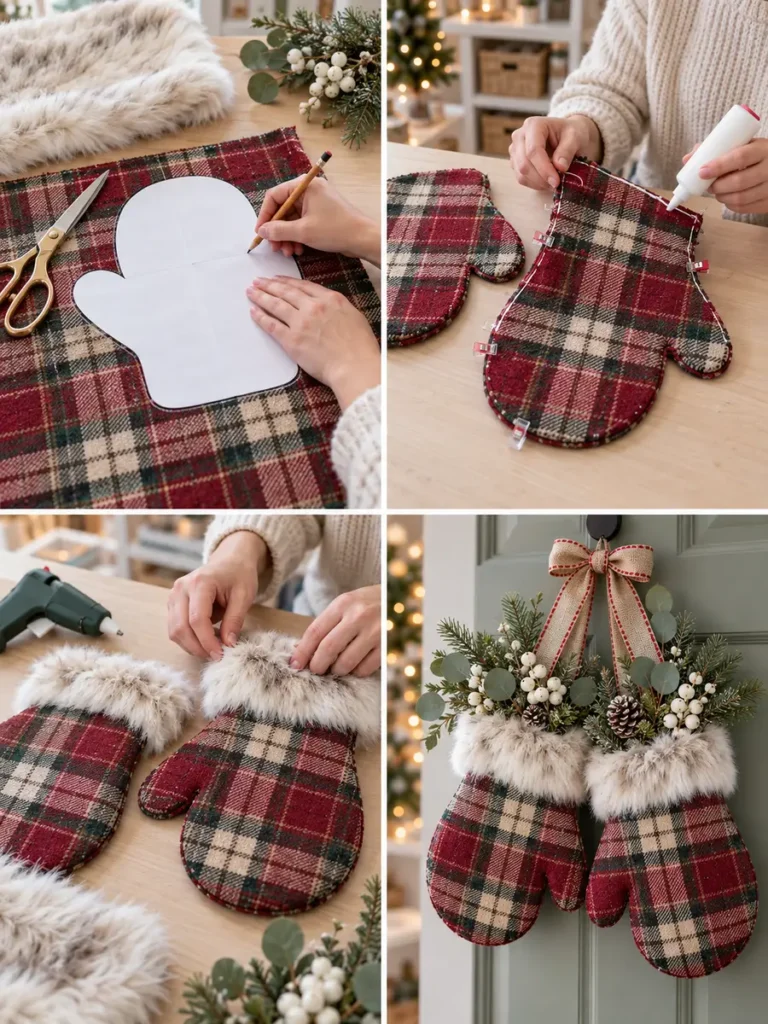
- Trace two oversized mitten shapes onto your fabric and cut them out.
- Glue or sew the edges together while leaving the upper cuff open.
- Add a strip of faux fur around each cuff to create a soft winter finish.
- Fill one or both mittens with artificial pine, cedar, eucalyptus, and white berries.
- Connect the mittens with ribbon so that one hangs slightly lower than the other.
- Add a small bow near the top and use the remaining ribbon as the hanging loop.
3. Mini Wooden Sled Door Hanger
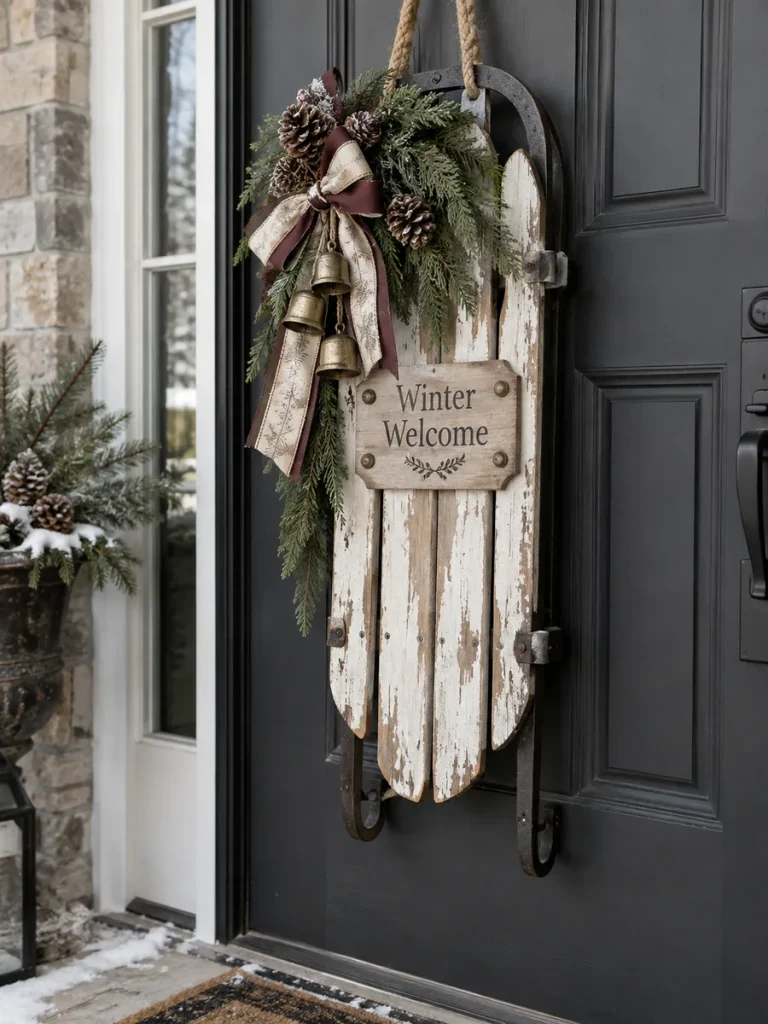
A miniature sled brings nostalgic winter charm to a front door and can easily be styled so it feels appropriate from December through February. Instead of bright Christmas red, try natural wood, weathered white, gray, or muted burgundy.
What You’ll Need
- Small unfinished decorative wooden sled
- White or gray craft paint
- Sandpaper
- Faux pine stems
- Pinecones
- Small decorative bells
- Wired ribbon
- Small wooden sign
- Lettering stencil
- Hot-glue gun
How to Make It
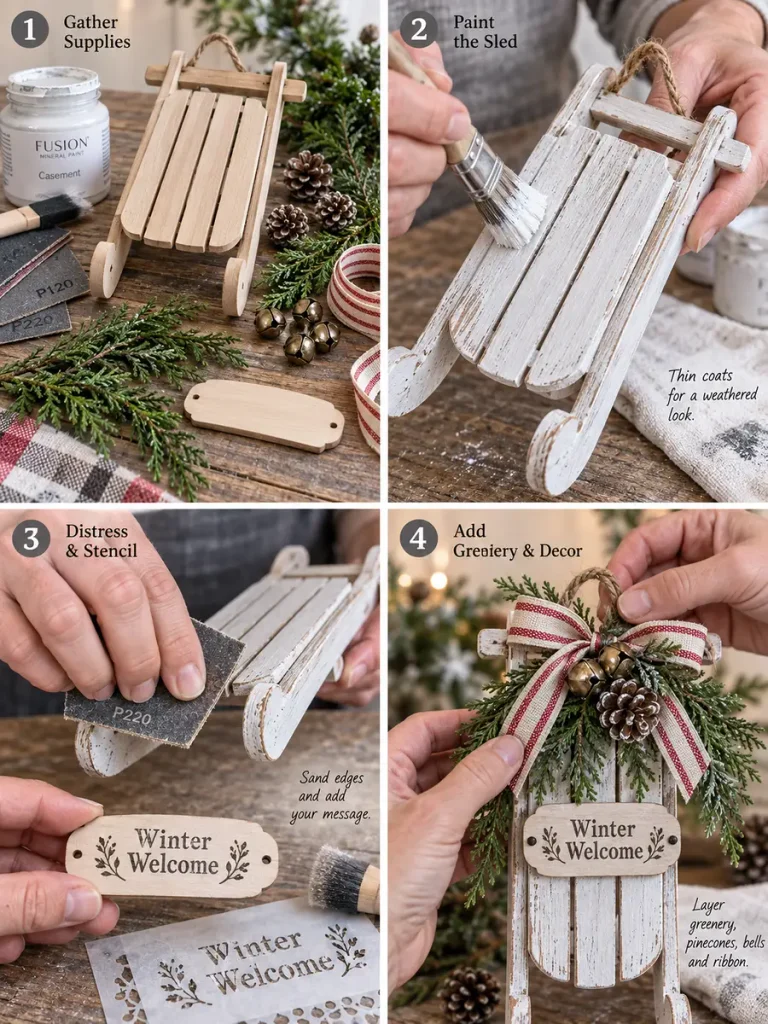
- Paint the sled lightly and let some of the original wood remain visible.
- Once dry, sand selected edges to give it a naturally weathered appearance.
- Add the words “Winter Welcome” to a small wooden plaque using paint or a stencil.
- Attach the sign near the center of the sled.
- Arrange greenery, pinecones, and a few bells across the upper section.
- Finish with a softly tied ribbon and hang the sled using sturdy twine or its existing rope.
4. Vintage Ice Skate Winter Door Hanger
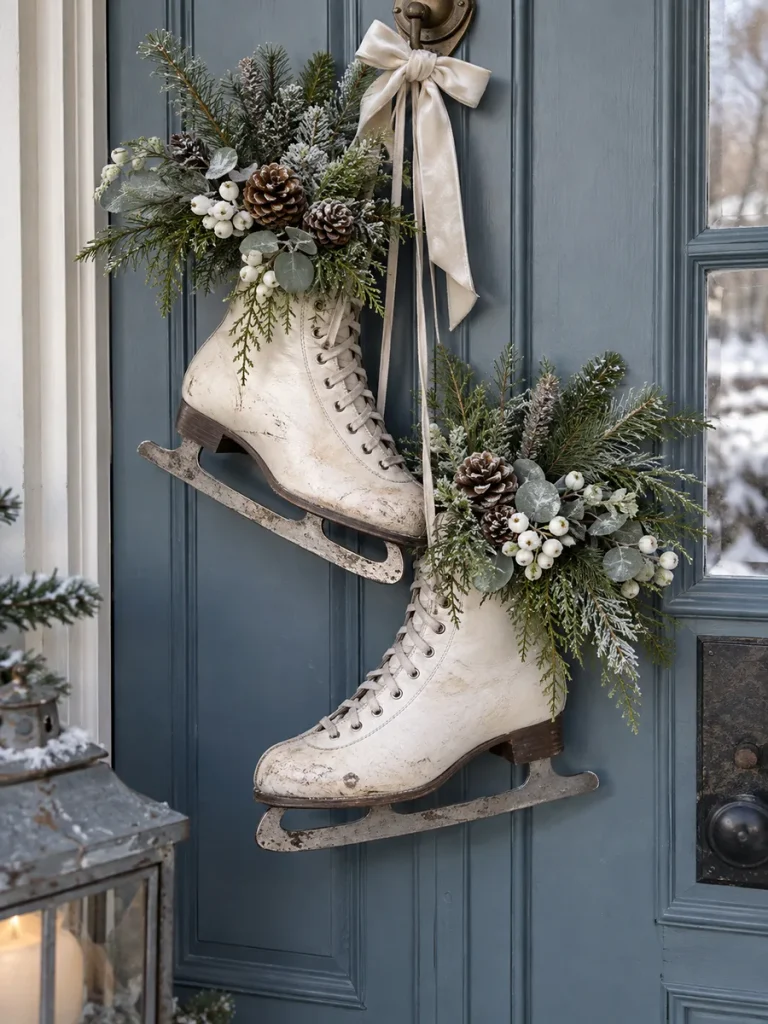
Old-fashioned ice skates make one of the most distinctive DIY winter door hanger ideas, especially for vintage, cottage, or farmhouse-style homes. Real thrifted skates work beautifully, but lightweight decorative versions are easier to hang on some doors.
What You’ll Need
- One pair of old or decorative ice skates
- Faux evergreen branches
- Eucalyptus stems
- White berry picks
- Small pinecones
- Ribbon
- Optional faux snow spray
- Floral wire
How to Make It
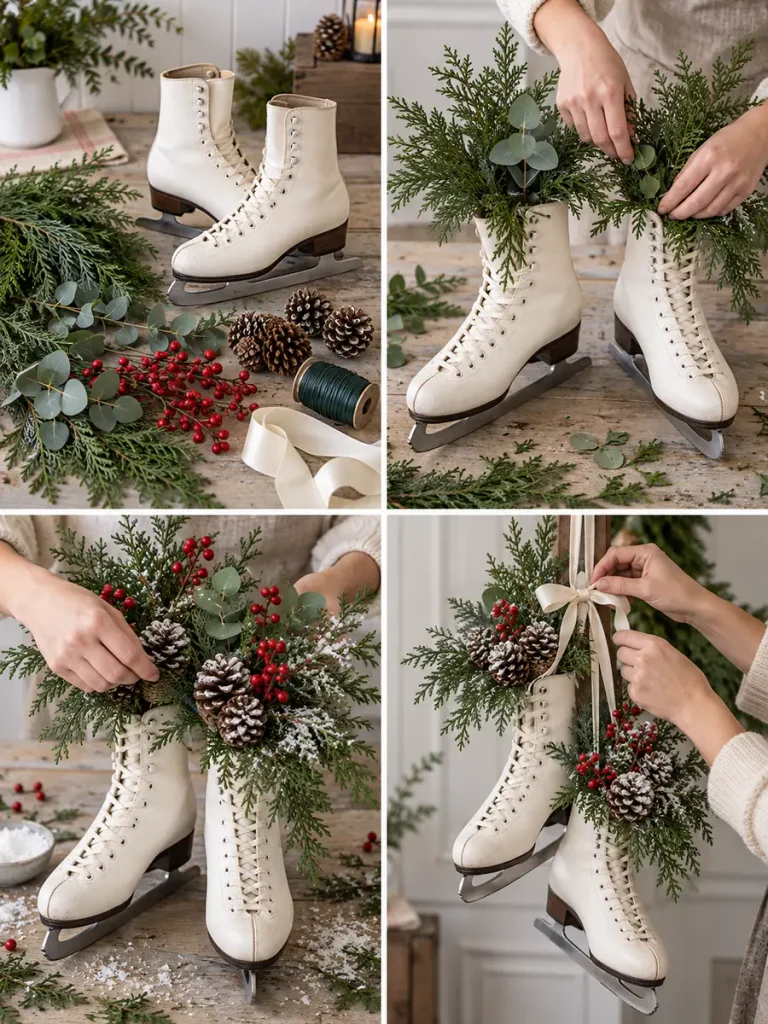
- Clean the skates thoroughly before decorating.
- Place short pieces of pine, cedar, eucalyptus, and berries inside each skate opening.
- Secure the greenery with floral wire so the stems cannot fall out when the door moves.
- Add a few pinecones among the branches.
- Lightly frost the greenery with faux snow if you want a snowy appearance.
- Tie the skate laces together so one skate hangs slightly below the other.
- Add a simple ribbon bow where the laces meet.
5. Snow-Covered Pinecone Hanging Bundle
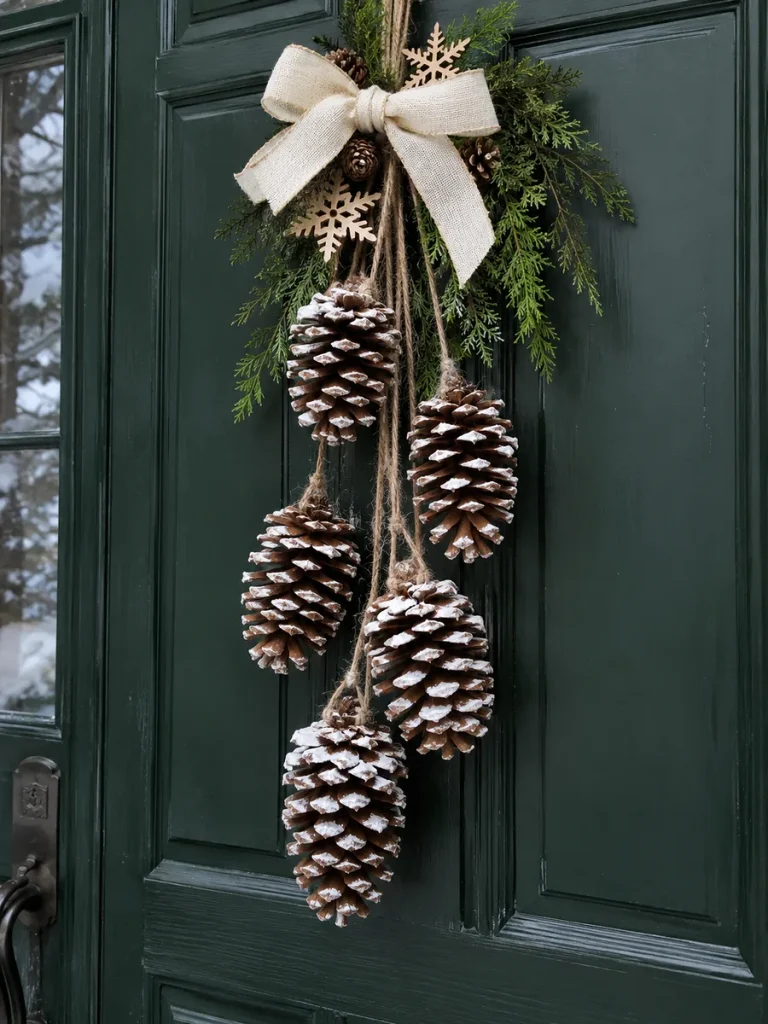
If you love nature-inspired decorating, a pinecone bundle is inexpensive, rustic, and wonderfully easy to customize. The vertical arrangement also provides a refreshing change from circular wreaths.
What You’ll Need
- Five to seven large pinecones
- White craft paint
- Small sponge or brush
- Jute twine
- Faux cedar stems
- Small wooden snowflakes
- Cream ribbon
- Hot-glue gun
How to Make It
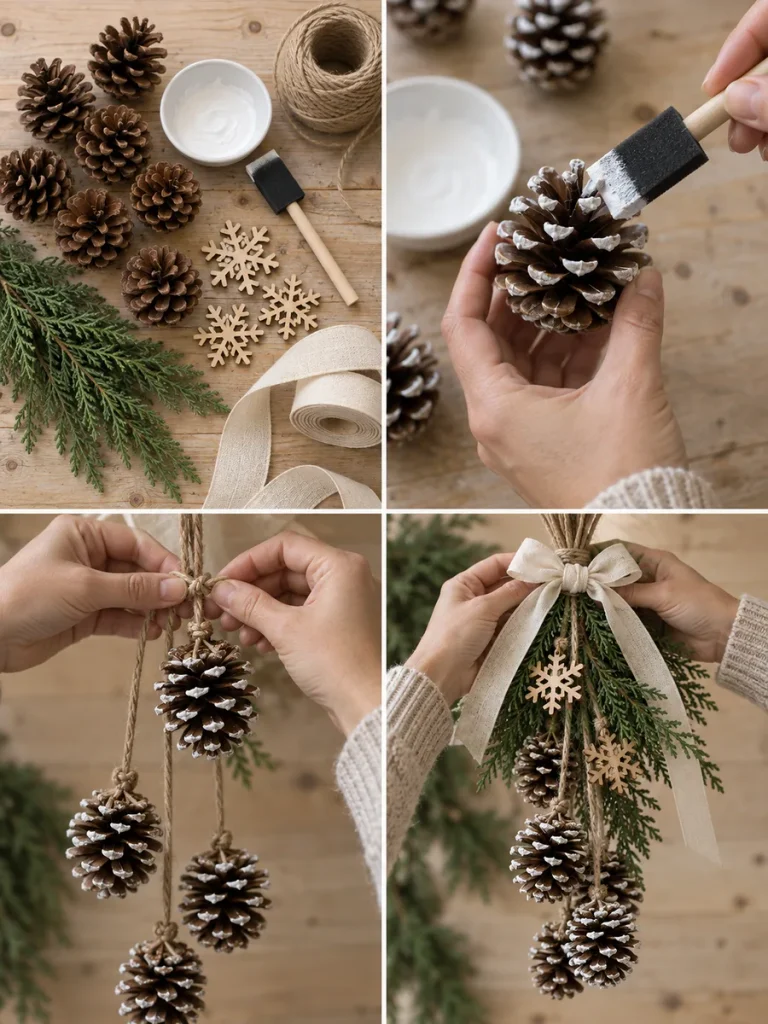
- Brush small amounts of white paint across the tips of each pinecone to imitate freshly fallen snow.
- Cut several lengths of jute in slightly different sizes.
- Attach a pinecone securely to the end of each piece of twine.
- Gather the cords together at the top so the pinecones hang at staggered heights.
- Add cedar sprigs around the knot to create fullness.
- Glue a few miniature wooden snowflakes among the greenery.
- Finish with a cream ribbon and create a strong hanging loop at the back.
6. Winter Birch Branch Door Hanger
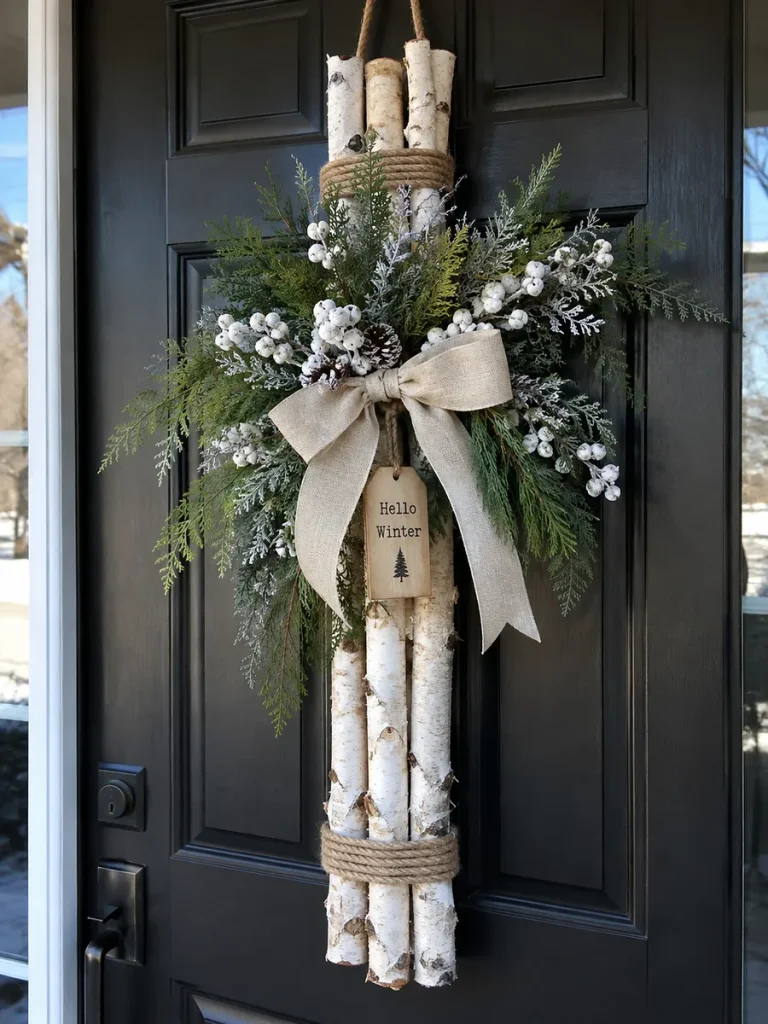
Birch branches bring beautiful natural texture to winter decorating. Their pale bark pairs especially well with green cedar, white berries, and neutral ribbon, creating a simple woodland-inspired door hanger.
What You’ll Need
- Four to six thin birch branches
- Natural jute rope
- Faux cedar or fir stems
- Frosted berry stems
- Neutral fabric ribbon
- Small wooden tag
- Black paint marker
- Floral wire
How to Make It
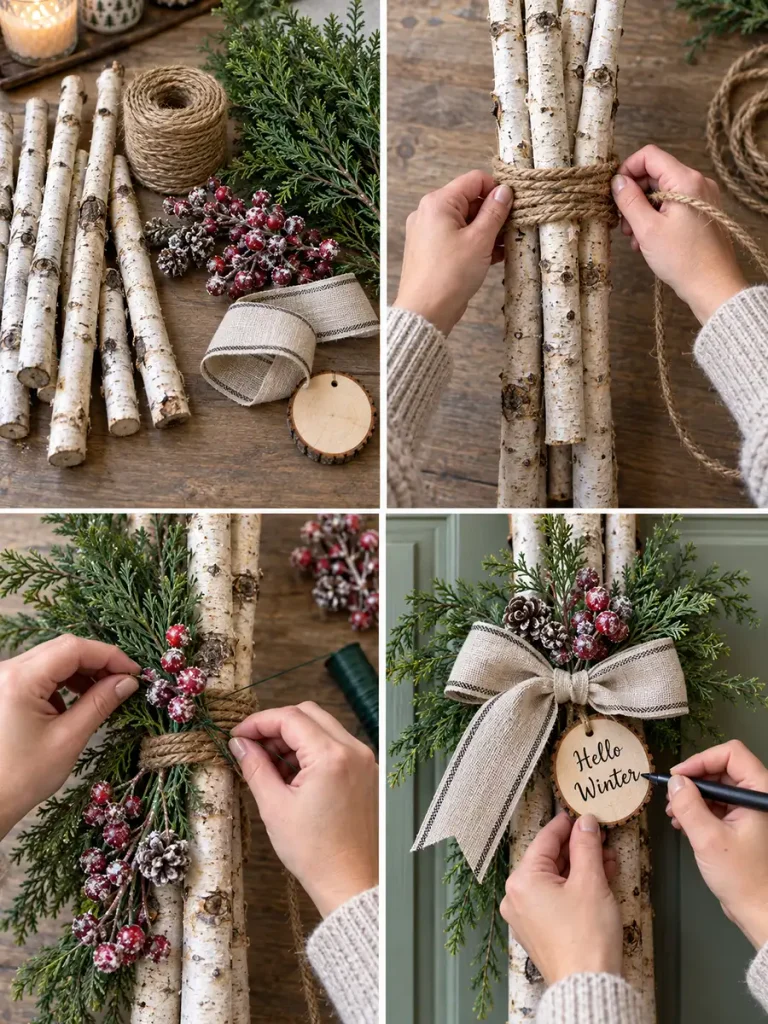
- Arrange the birch branches into a neat vertical bundle.
- Wrap jute rope securely around the upper third of the branches.
- Layer cedar or fir stems over the rope and attach them with floral wire.
- Tuck several frosted berry stems between the greenery.
- Write “Hello Winter” on a small wooden tag and attach it near the center.
- Add a relaxed linen or cotton bow.
- Tie another length of strong rope around the back to create a hanging loop.
7. Wooden Snowman Face Door Hanger
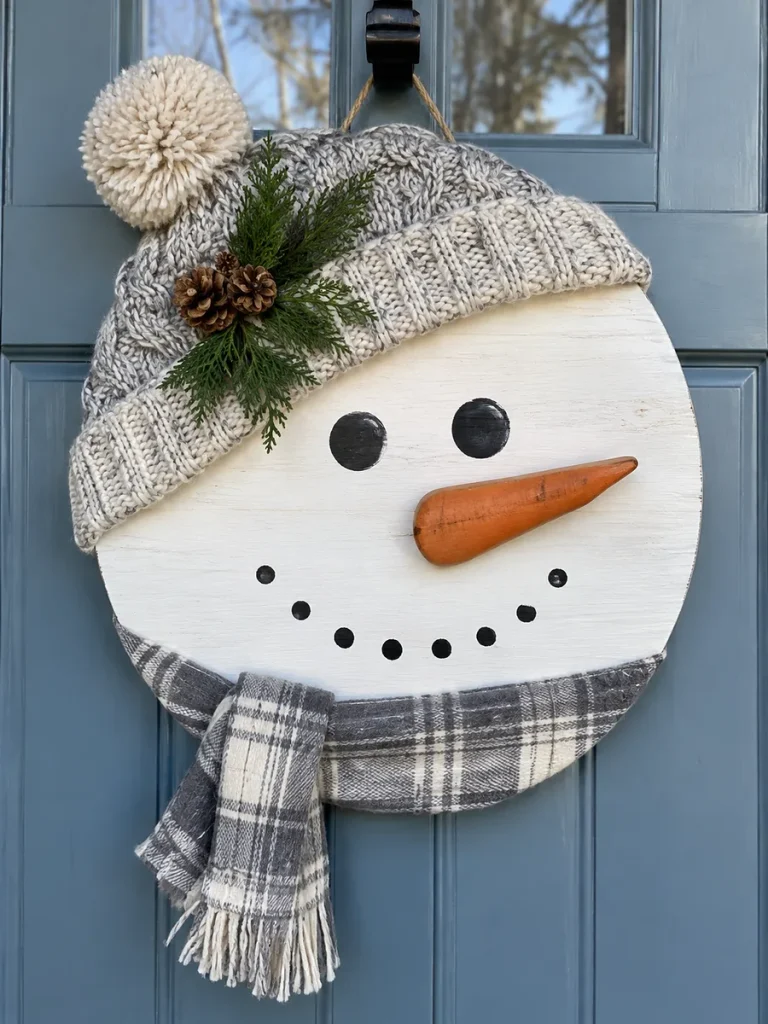
A snowman door hanger is playful enough for families while still looking polished when you use simple colors and clean details. A round wooden blank provides the perfect base for an oversized snowman face.
What You’ll Need
- Large round wood blank
- White craft paint
- Black paint
- Orange paint
- Small brushes
- Plaid fabric
- Faux greenery
- Yarn or knit fabric
- Hot-glue gun
- Hanging ribbon
How to Make It
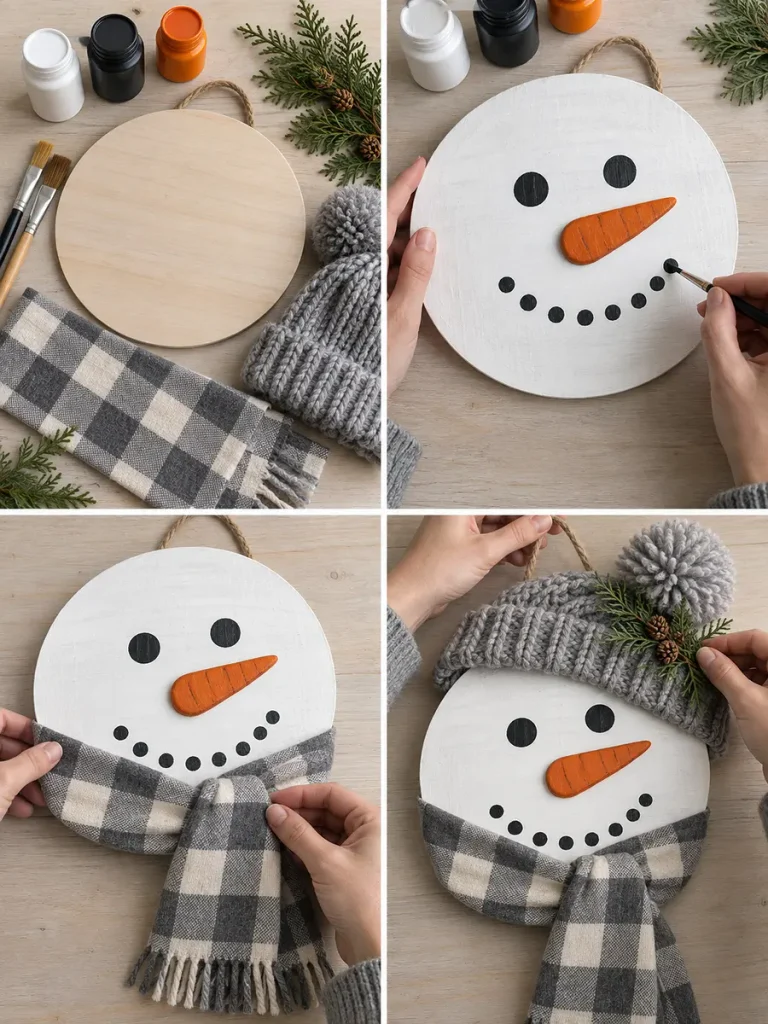
- Paint the wood round white and allow it to dry completely.
- Paint two simple black eyes, a subtle dotted smile, and an orange carrot-shaped nose.
- Create a scarf effect across the lower portion using a strip of plaid fabric.
- Add a small bundle of greenery near the top edge.
- Make a simple winter hat using knit fabric or thick yarn and attach it securely.
- Add ribbon or rope to the back.
- Keep the facial details minimal so the finished snowman feels charming rather than overly cartoonish.
8. Winter Basket Door Hanger
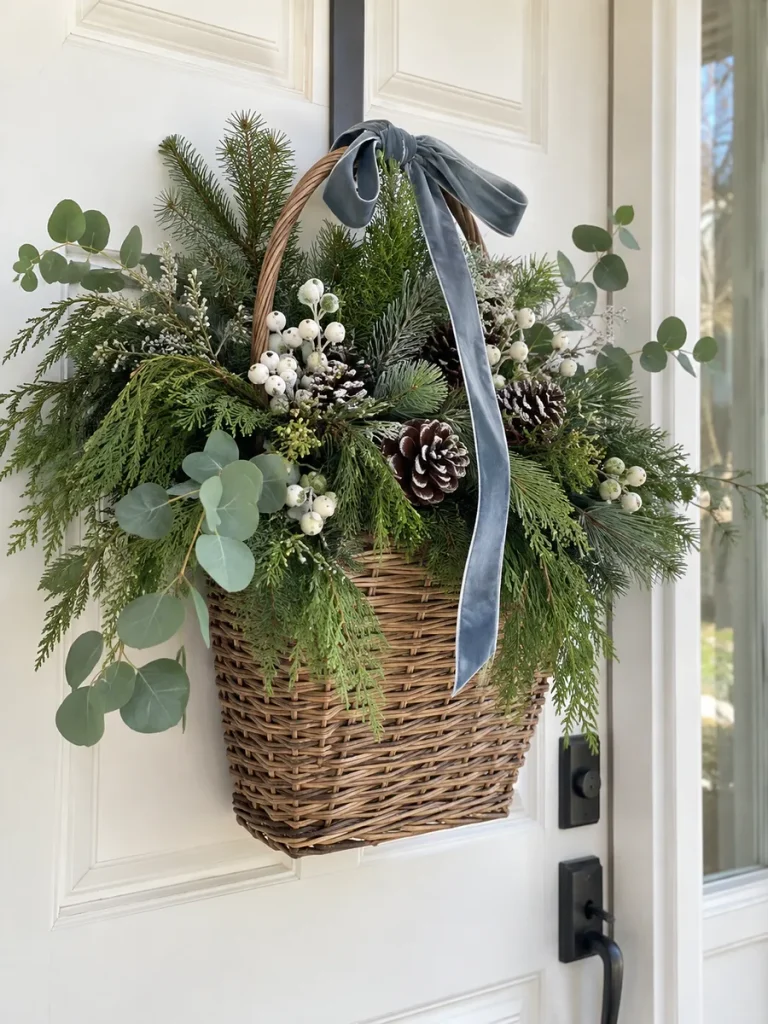
A flat-backed hanging basket gives your front door the relaxed elegance of a winter floral arrangement. It is especially useful because you can replace individual stems whenever you want a slightly different seasonal look.
What You’ll Need
- Flat-backed wicker basket
- Faux cedar stems
- Pine branches
- Eucalyptus
- White berries
- Pinecones
- Floral foam
- Floral wire
- Velvet or linen ribbon
How to Make It
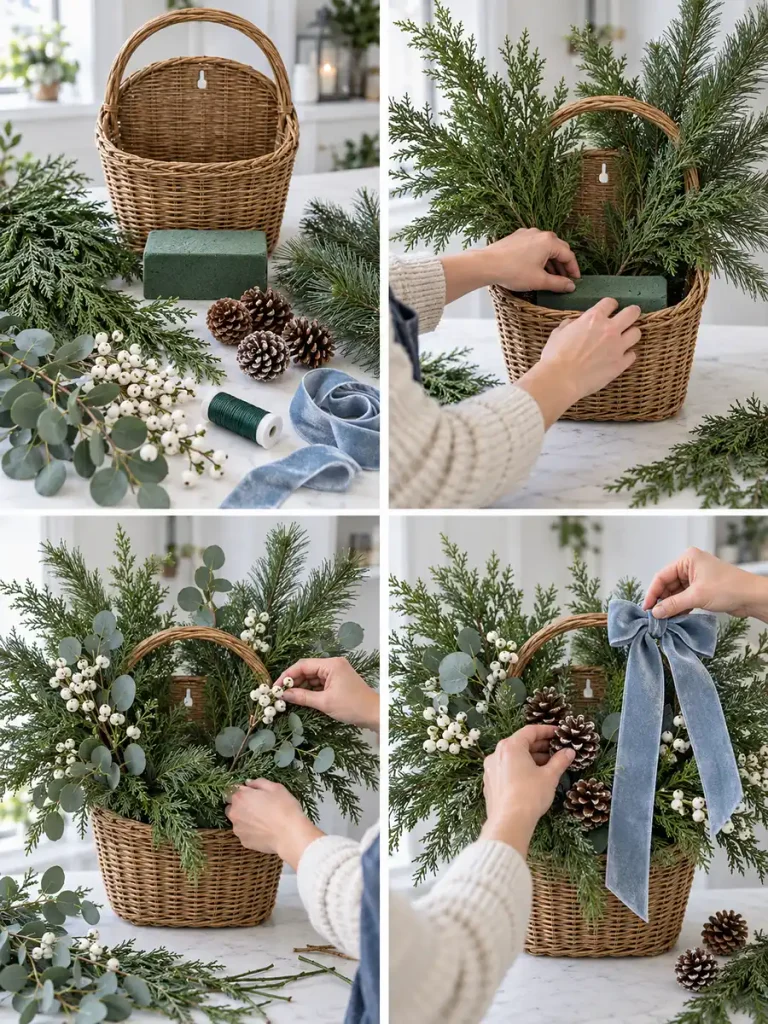
- Place a small piece of floral foam inside the basket.
- Insert the longest pine and cedar stems toward the back.
- Add eucalyptus around the edges to soften the arrangement.
- Fill open areas with white berry stems and a few natural-looking pinecones.
- Adjust the stems until the basket looks full without becoming overcrowded.
- Tie ribbon around the basket handle.
- Use floral wire to reinforce heavier stems and prevent them from shifting whenever the door opens.
9. Chunky Yarn Snowflake Door Hanger
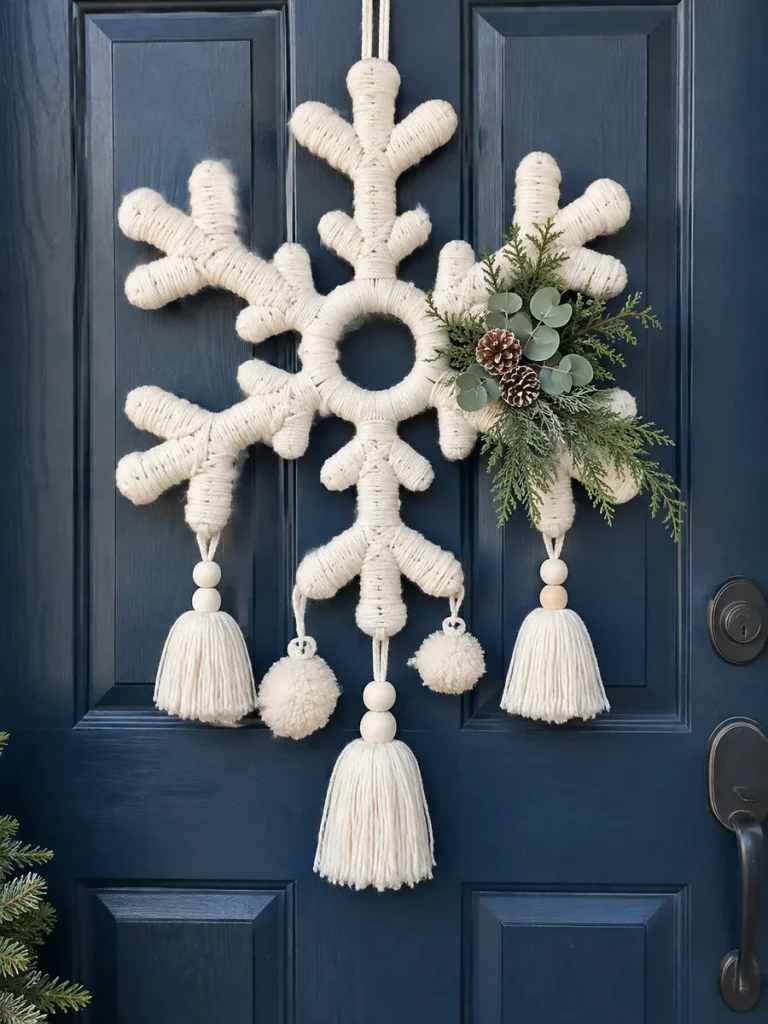
Soft yarn adds a cozy texture that works beautifully for winter. Wrapping a simple snowflake frame in chunky cream yarn creates a handmade piece that feels warm and inviting despite its icy shape.
What You’ll Need
- Wooden or wire snowflake frame
- Chunky cream or white yarn
- Scissors
- Hot-glue gun
- Small pom-poms
- Faux greenery
- Cotton cord
How to Make It
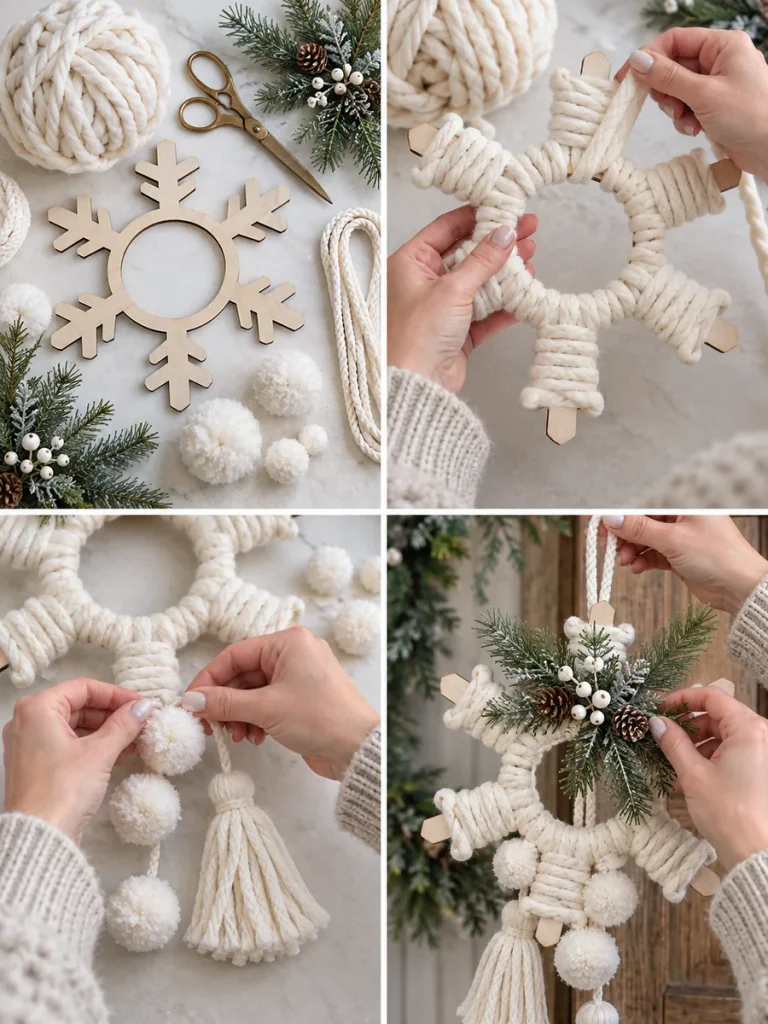
- Secure one end of the yarn to the back of your snowflake frame.
- Wrap the yarn tightly around every section until the frame is completely covered.
- Glue loose ends discreetly to the back.
- Add several handmade tassels or pom-poms near the lower points.
- Attach a small cluster of evergreen branches to one side for extra texture.
- Add a cotton cord loop to the top.
- Display this design on a covered front door because yarn can absorb moisture when directly exposed to rain or snow.
10. Buffalo Check Winter Door Sign
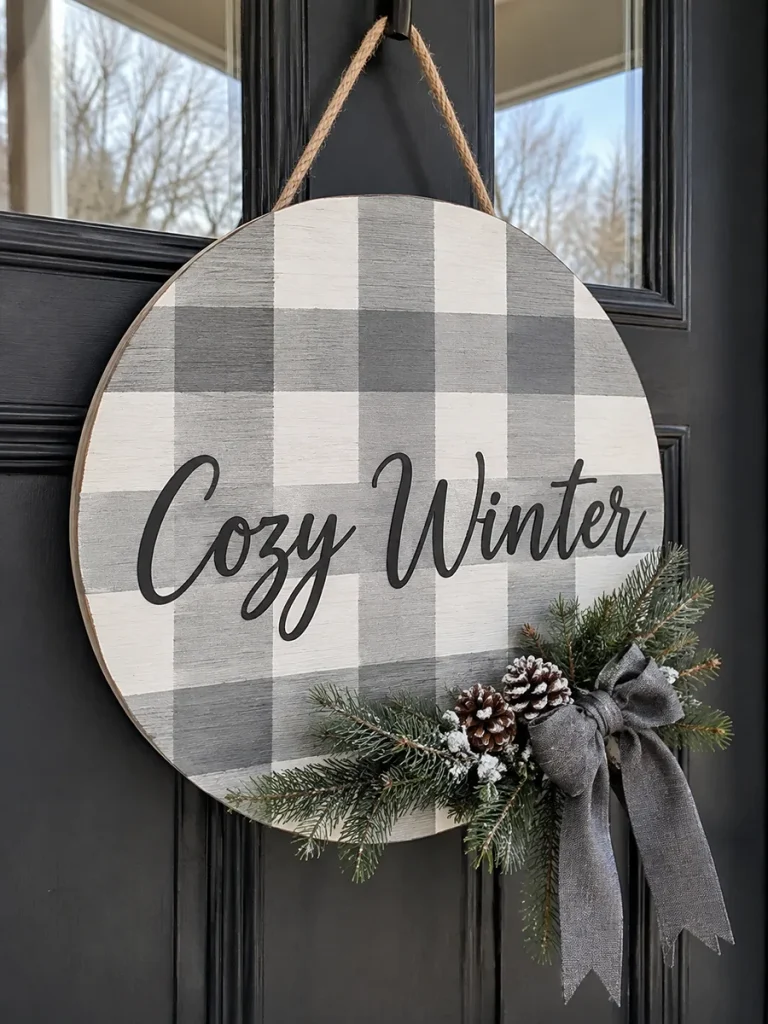
Buffalo check works beautifully with farmhouse décor and can be adapted for winter by choosing gray, white, black, or soft blue instead of bright holiday colors. A wood round makes an easy base for this bold pattern.
What You’ll Need
- Large wooden round
- White paint
- Gray or black paint
- Painter’s tape
- Foam brush
- Letter stencil
- Faux pine stems
- Ribbon
- Hot-glue gun
How to Make It
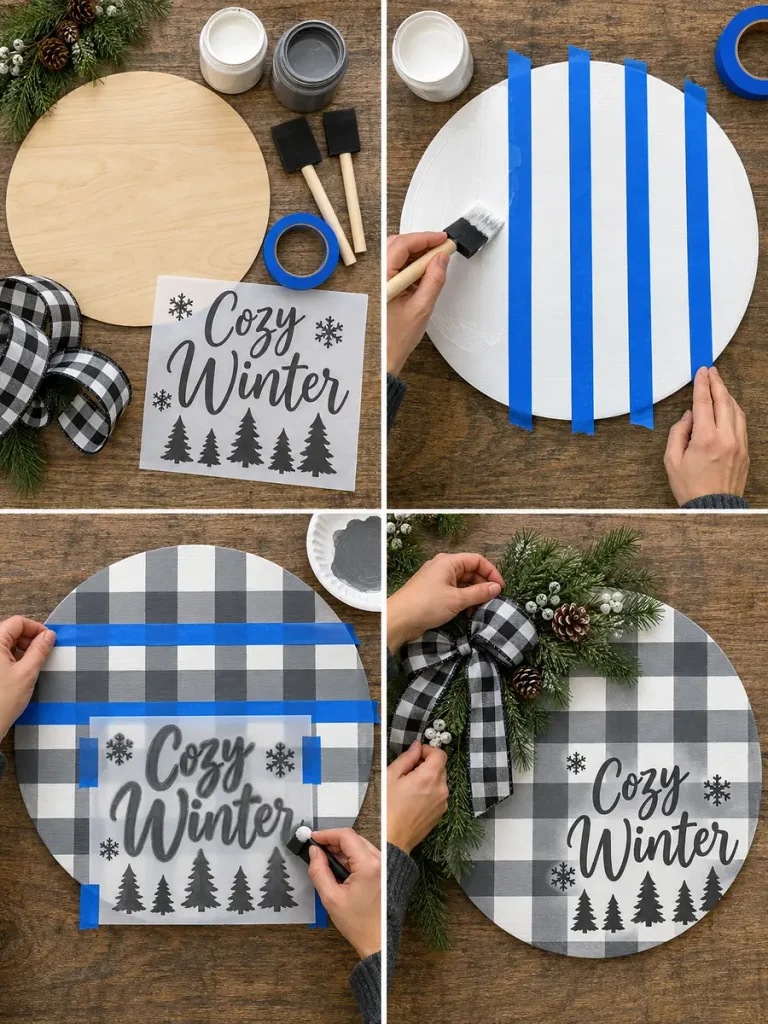
- Paint the wood round with a white base coat.
- Once dry, use painter’s tape to create evenly spaced vertical stripes.
- Paint the exposed areas gray, remove the tape, and repeat horizontally to form a check pattern.
- Add “Cozy Winter,” “Welcome Winter,” or another short phrase across the center.
- Attach pine sprigs along one edge.
- Add a coordinating bow without covering the lettering.
- Attach strong ribbon or rope to the back before hanging.
11. Hanging Winter Lantern Door Decoration
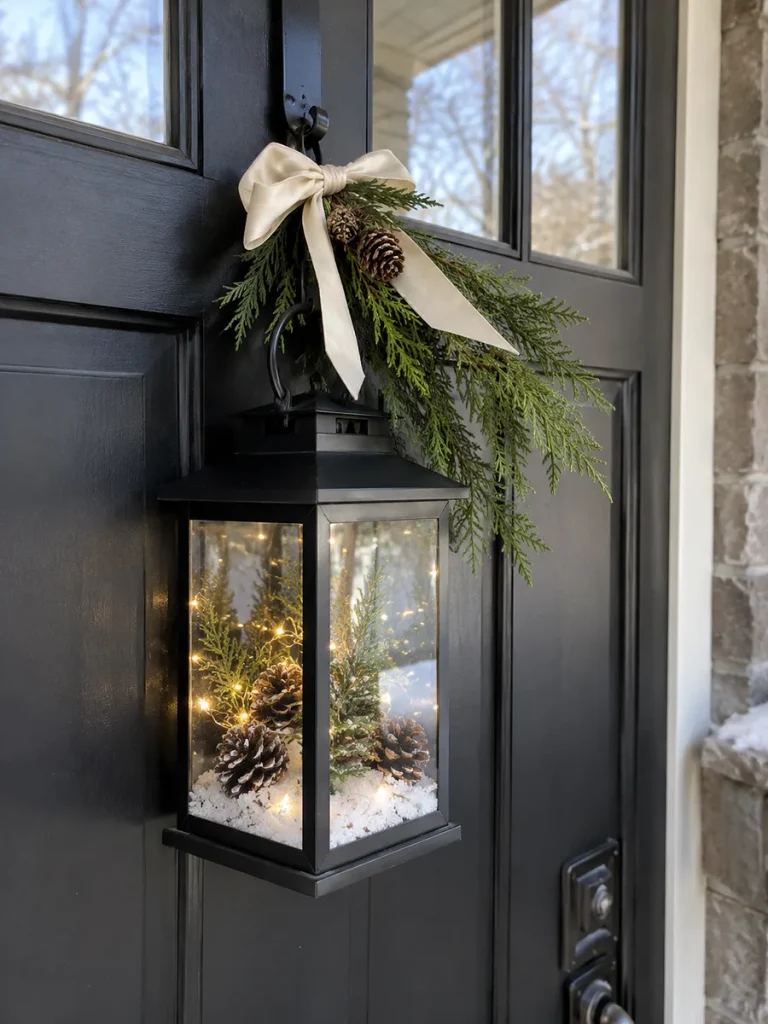
A small lightweight lantern can make an unexpected and attractive winter door hanger. Filled with pinecones and faux snow, it creates cozy cabin character during both daylight and evening hours.
What You’ll Need
- Lightweight decorative lantern
- Faux snow
- Mini pinecones
- Tiny evergreen sprigs
- Battery-powered micro lights
- Cedar stems
- Ribbon
- Floral wire
How to Make It
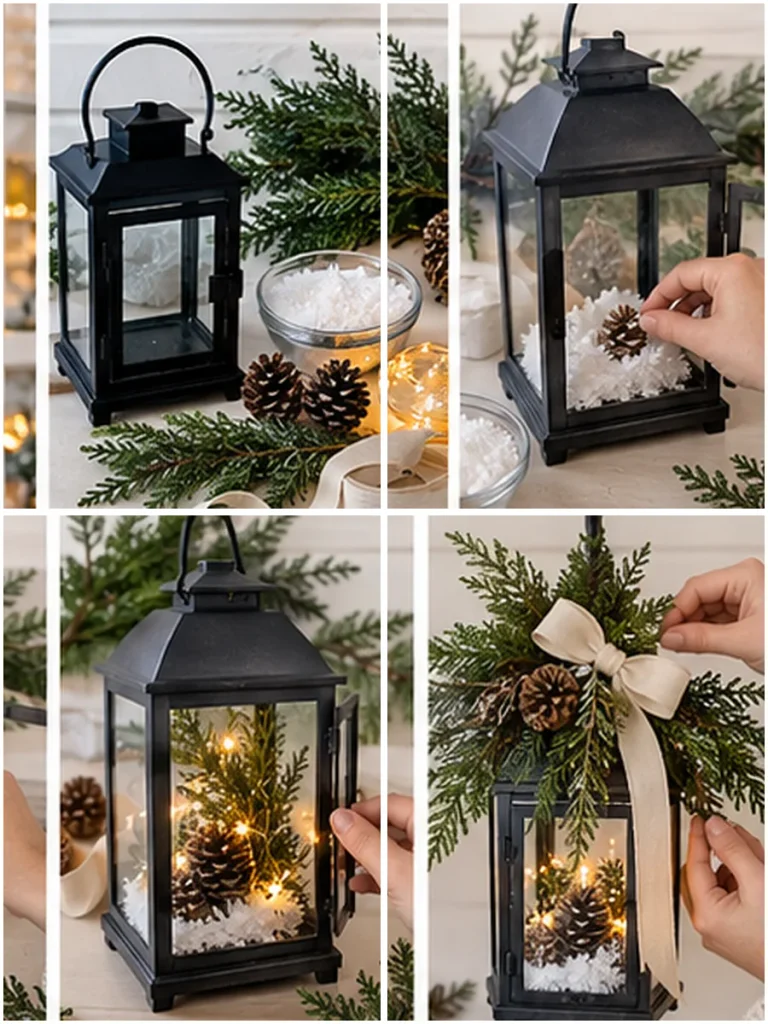
- Make sure the lantern is lightweight enough for your door and hanger.
- Place a little faux snow along the bottom.
- Add miniature pinecones and greenery inside.
- Wind battery-powered micro lights around the arrangement if desired.
- Close the lantern securely.
- Tie cedar sprigs around the handle with floral wire.
- Add a ribbon bow and create a sturdy hanging loop.
- Avoid glass lanterns on doors that are frequently opened or exposed to strong winds.
12. Wooden Winter Cabin Door Hanger
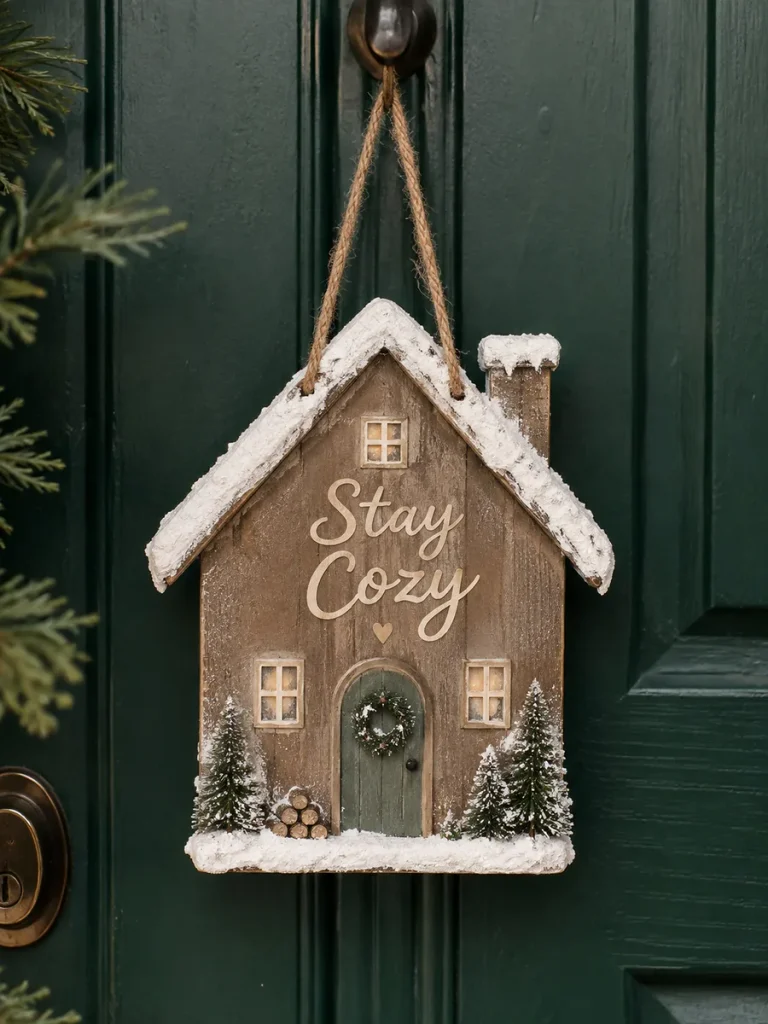
A tiny snowy cabin scene brings storybook charm to winter decorating. This project works particularly well for rustic homes, woodland porches, and anyone who loves cozy cabin-inspired décor.
What You’ll Need
- Wooden house-shaped blank
- Brown, white, and gray paint
- Fine paintbrushes
- Mini wooden trees
- Faux snow
- Small wood letters
- Craft glue
- Jute rope
How to Make It
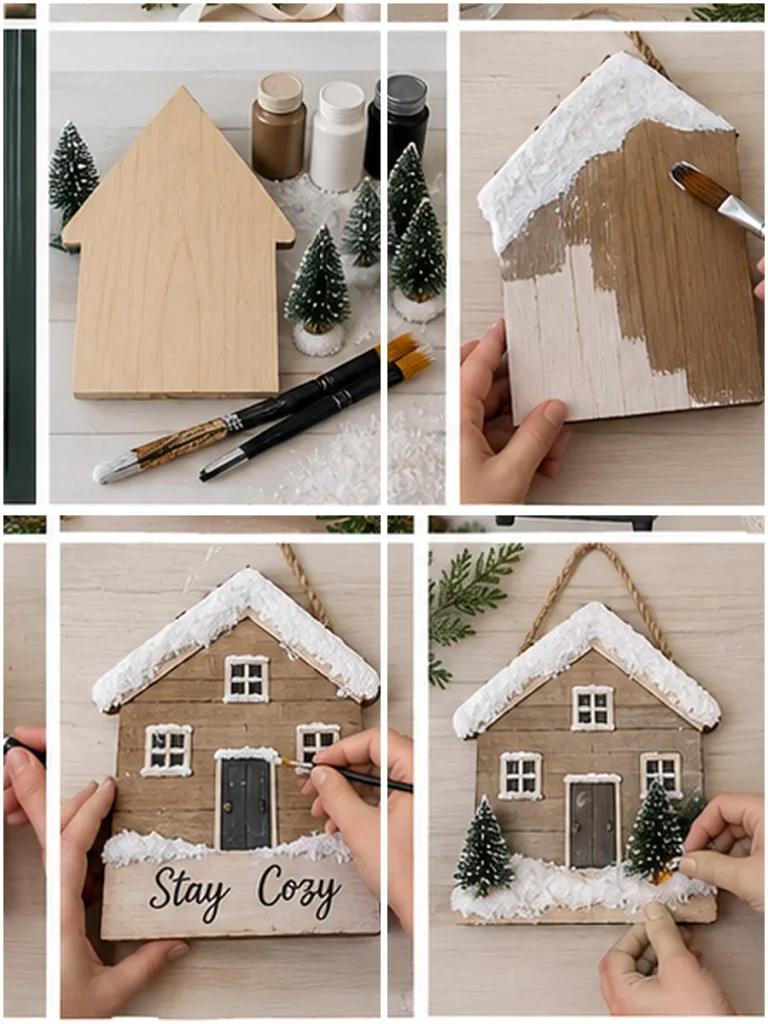
- Paint the house blank in a warm wood tone or muted neutral shade.
- Add white paint along the roofline to imitate snow.
- Paint small windows and a simple front door.
- Attach miniature evergreen trees near the lower edge.
- Add a little textured faux snow around their bases.
- Paint or attach the words “Stay Cozy” near the center.
- Drill two small holes near the top if needed and thread jute rope through them for hanging.
13. Felt Winter Pocket Door Hanger
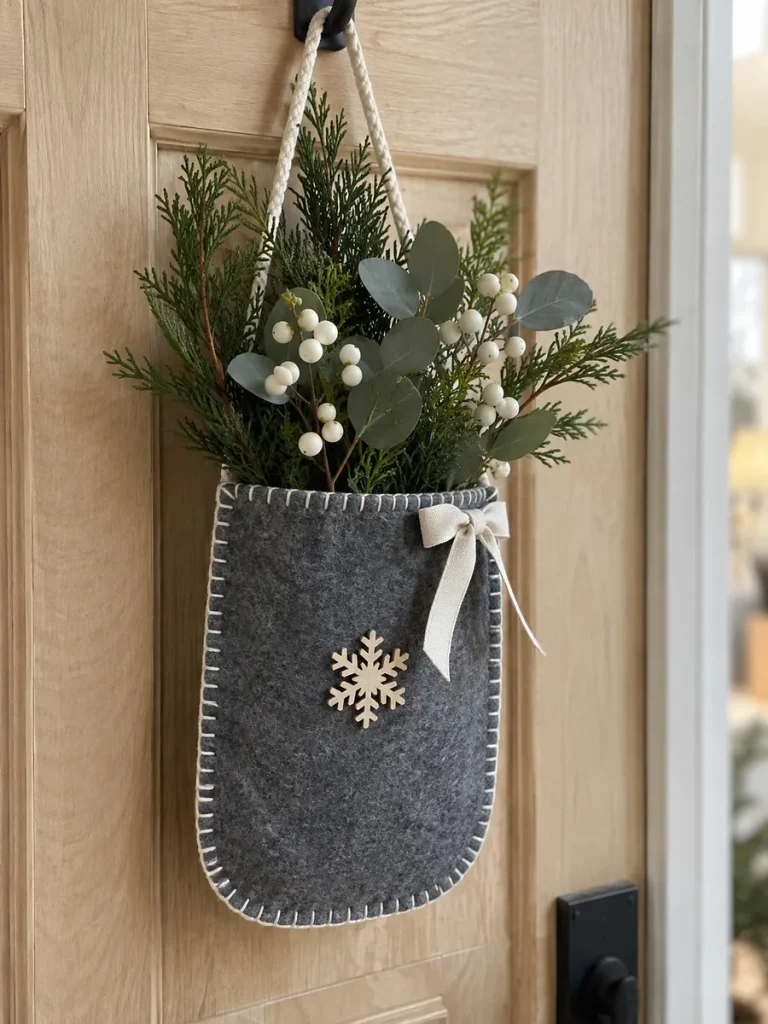
A fabric pocket filled with greenery combines the softness of winter textiles with the natural appearance of evergreen branches. Because it uses lightweight materials, it is also a good choice for apartment doors.
What You’ll Need
- Thick gray or cream felt
- Fabric scissors
- Needle and thread or fabric glue
- Decorative cord
- Faux cedar
- Eucalyptus stems
- White berries
- Wooden snowflake
- Ribbon
How to Make It
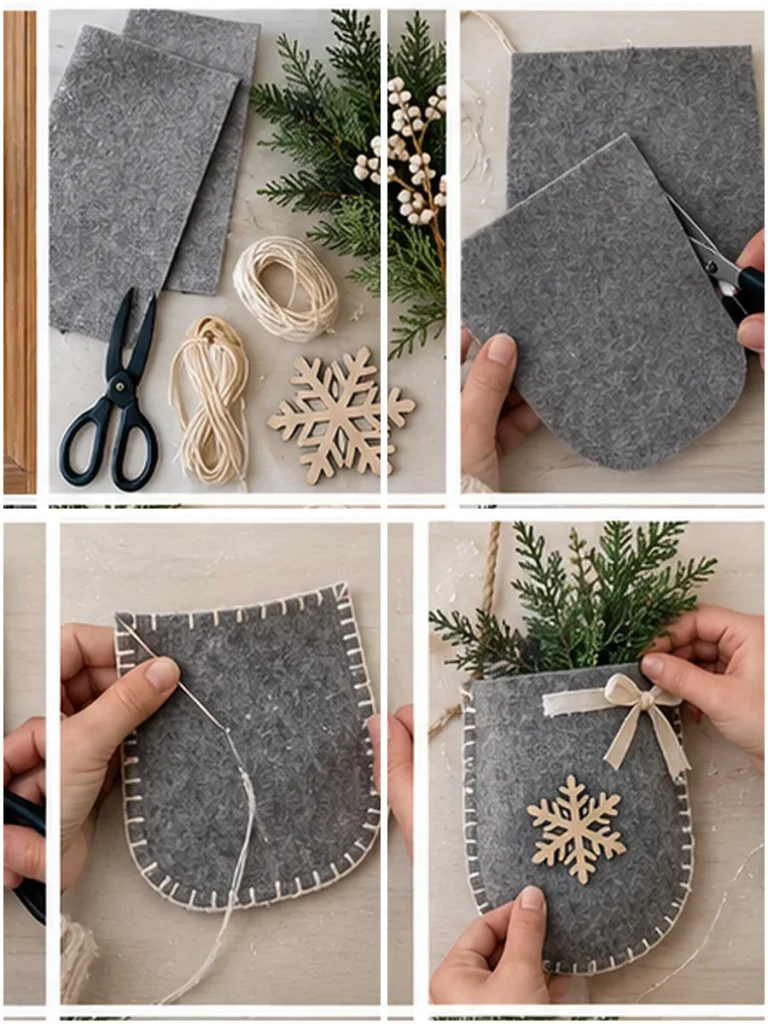
- Cut two matching pocket shapes from thick felt.
- Sew or glue the sides and bottom together, keeping the upper edge open.
- Add visible blanket stitching around the edges if you want a handmade finish.
- Fill the pocket with cedar, eucalyptus, and white berries.
- Attach a wooden snowflake to the front.
- Add decorative cord to both upper corners.
- Finish with a small ribbon bow.
- Keep the hanger beneath a covered porch so the felt stays clean and dry.
14. Winter Woodland Animal Door Hanger
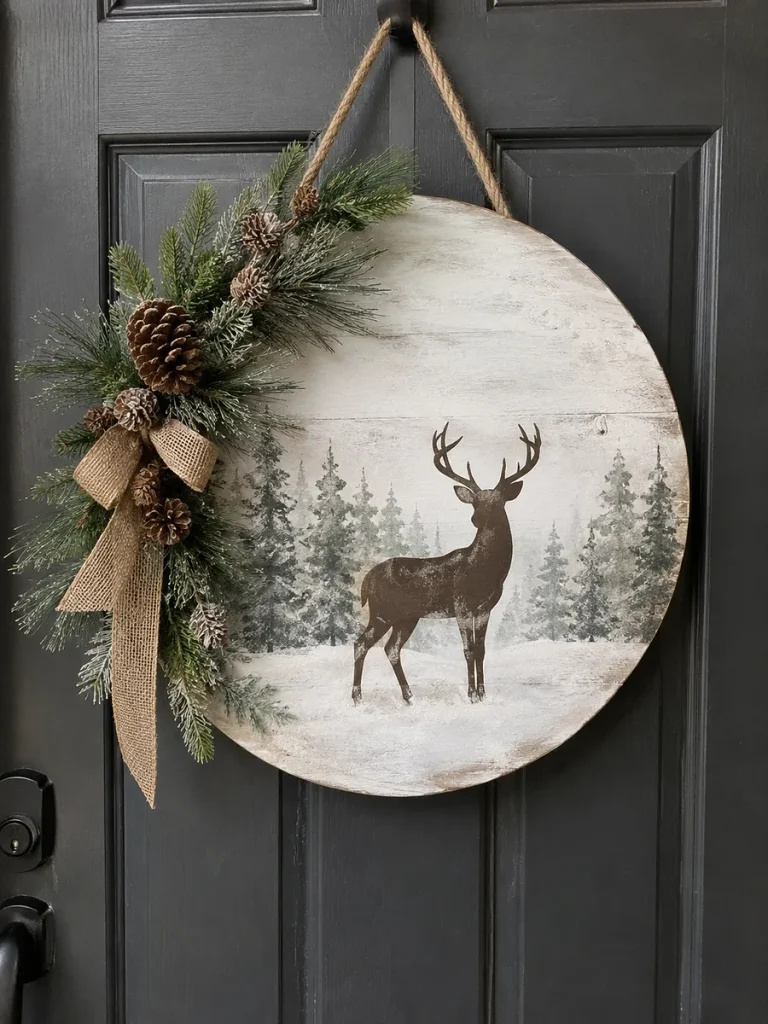
A deer, rabbit, fox, or moose silhouette adds a peaceful woodland theme to your winter entrance. Instead of using bright colors, create a misty forest scene with soft whites, greens, grays, and natural wood tones.
What You’ll Need
- Wooden round
- White, gray, and muted green paint
- Animal silhouette stencil
- Sponge brush
- Fine paintbrush
- Faux pine
- Mini pinecones
- Jute ribbon
How to Make It
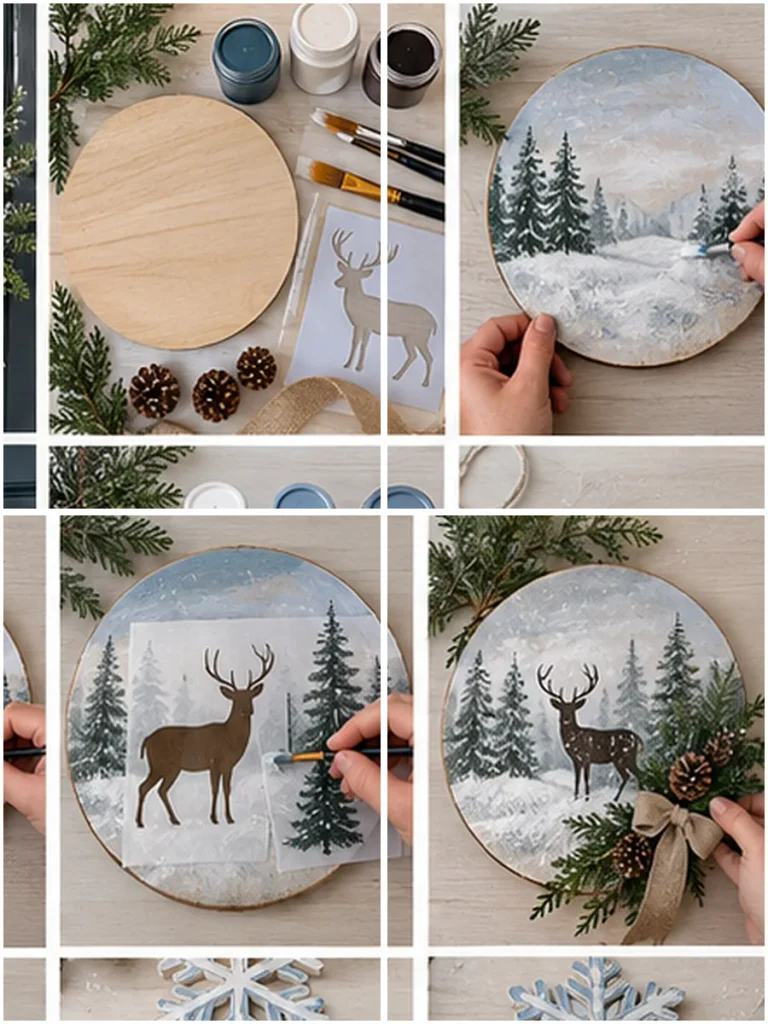
- Paint the wooden round with a pale gray or white base.
- Add loosely painted evergreen trees across the background.
- Use a stencil to paint a dark deer, rabbit, fox, or moose silhouette in the foreground.
- Dab white paint along the ground and trees to create a snowy effect.
- Attach pine sprigs to one side of the sign.
- Add miniature pinecones over the greenery.
- Finish the piece with jute ribbon and a sturdy hanging loop.
15. Oversized Wooden Snowflake Trio
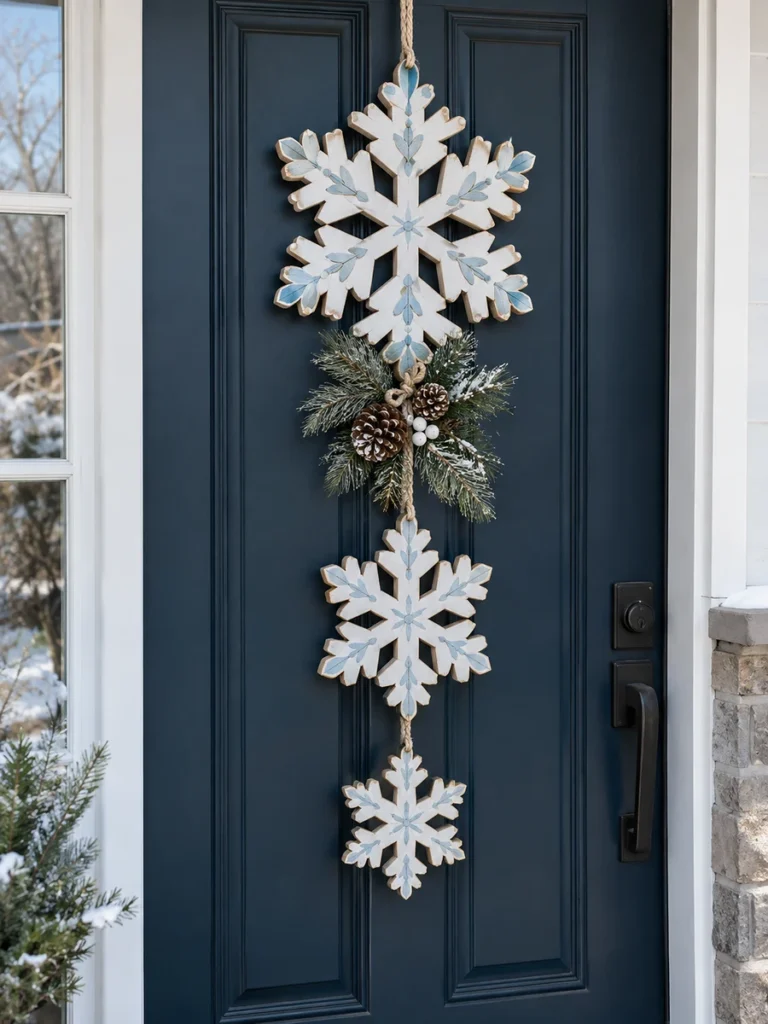
Three vertically connected snowflakes create an impressive door decoration without requiring a large amount of material. Using several different sizes helps the design look balanced while drawing the eye down the length of the door.
What You’ll Need
- Three wooden snowflakes in different sizes
- White craft paint
- Pale blue or silver paint
- Jute or cotton cord
- Faux evergreen stems
- Small pinecones
- Hot-glue gun
How to Make It
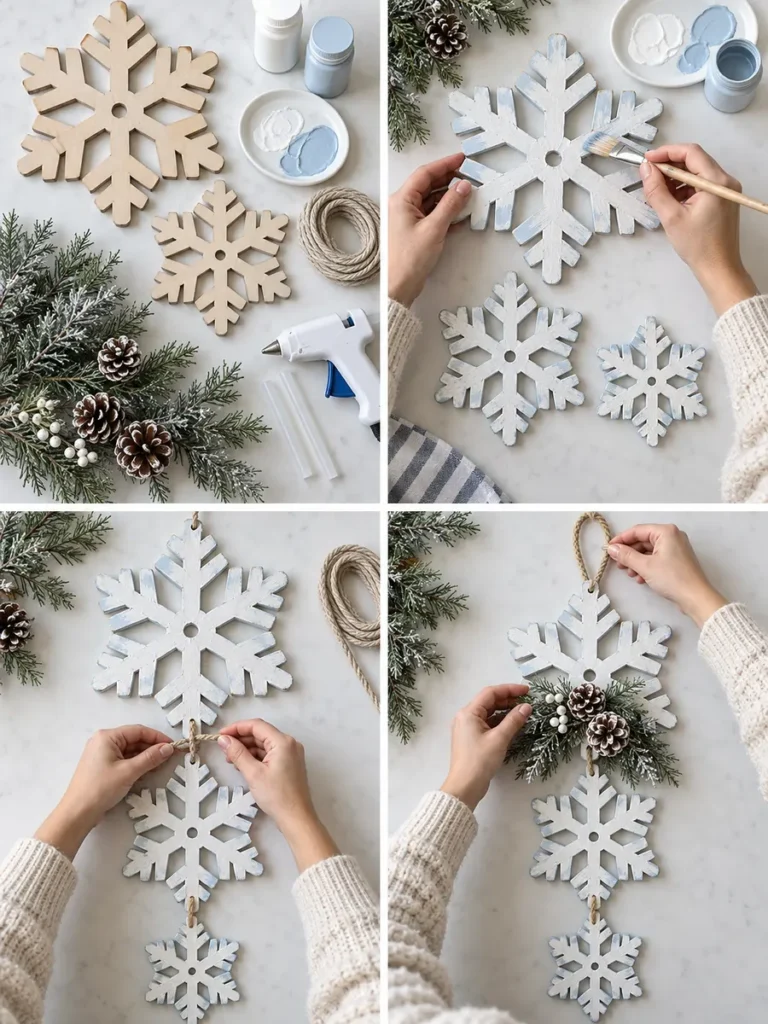
- Paint each snowflake white and let them dry.
- Add small blue, silver, or natural wood accents to distinguish each shape.
- Arrange the largest snowflake at the top, followed by the medium and smallest pieces.
- Connect them with short lengths of sturdy cord.
- Add a small greenery cluster between the top and middle snowflake.
- Decorate the cluster with tiny pinecones.
- Create a hanging loop above the largest snowflake and check that all three pieces hang straight.
16. Winter Mason Jar Door Hanger
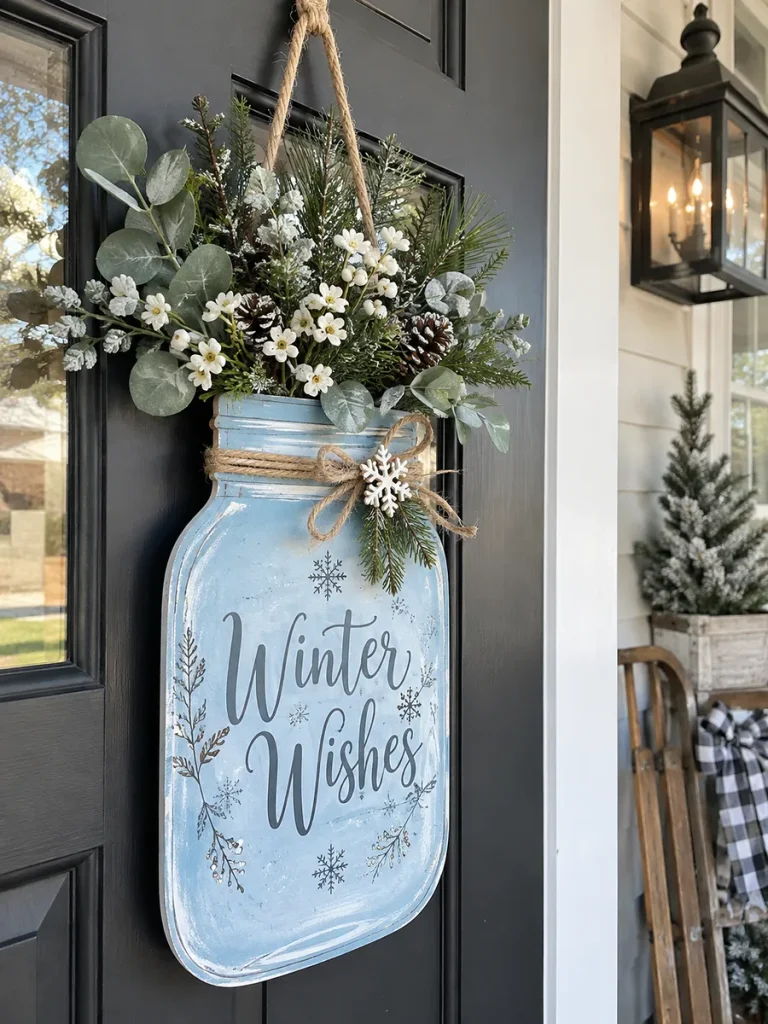
A wooden mason jar silhouette makes a cheerful farmhouse-style base for artificial winter flowers and greenery. The finished piece gives you the look of a hanging floral arrangement without the weight of an actual glass jar.
What You’ll Need
- Wooden mason jar cutout
- Pale blue or white paint
- Paintbrush
- Letter stencil
- Faux pine
- White flowers
- Eucalyptus
- Floral wire
- Hot-glue gun
- Rope
How to Make It
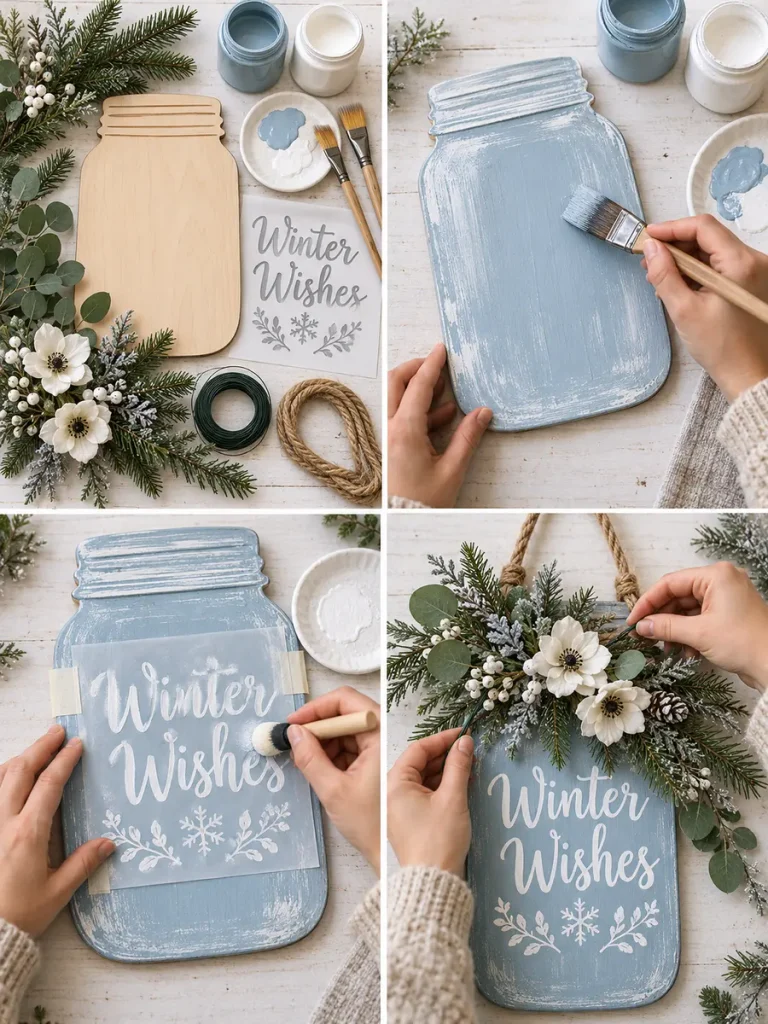
- Paint the mason jar cutout pale blue, frosted white, or soft gray.
- Add subtle highlights around the edges to create dimension.
- Stencil “Winter Wishes” across the front.
- Layer faux pine and eucalyptus above the jar opening.
- Add several small white flowers between the greenery.
- Secure the stems with floral wire before gluing them to the wood.
- Add a rope hanger to the back.
- Keep the arrangement slightly asymmetrical for a relaxed farmhouse look.
17. Scandinavian Winter Star Hanger
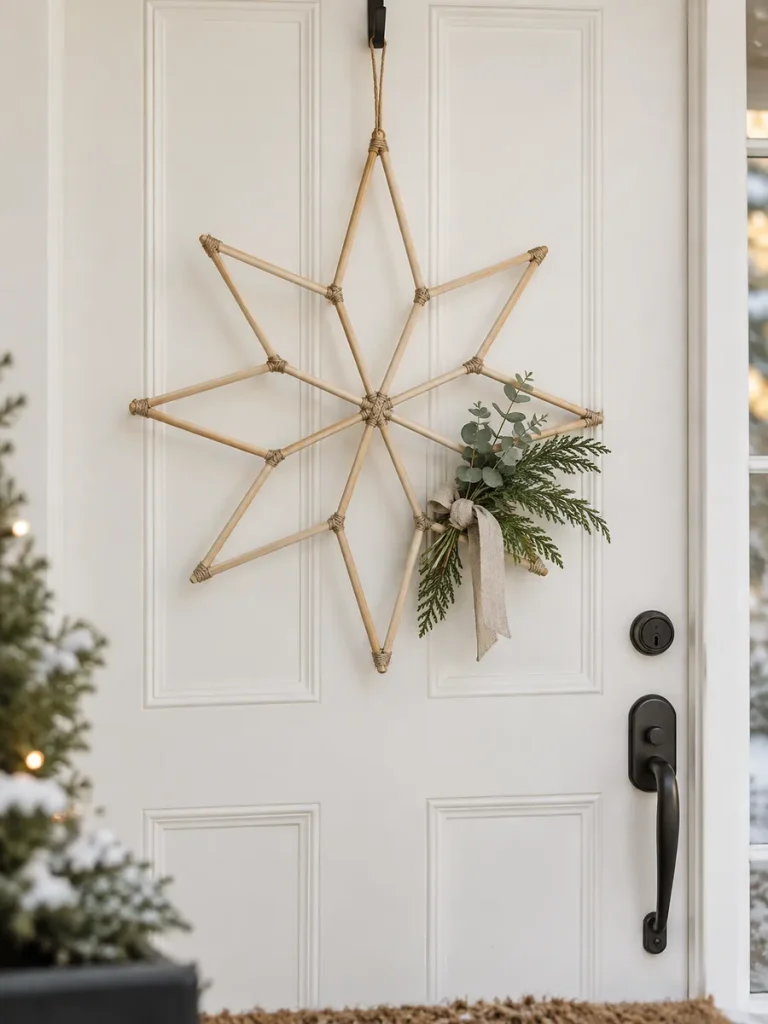
For a cleaner and more modern front door, try a Scandinavian-inspired star. Natural wood, minimal greenery, and lots of open space keep this project simple while still making a strong visual statement.
What You’ll Need
- Thin wooden dowels or craft sticks
- Wood glue
- Natural twine
- Faux eucalyptus
- Cedar sprigs
- Linen ribbon
- Optional white paint
How to Make It
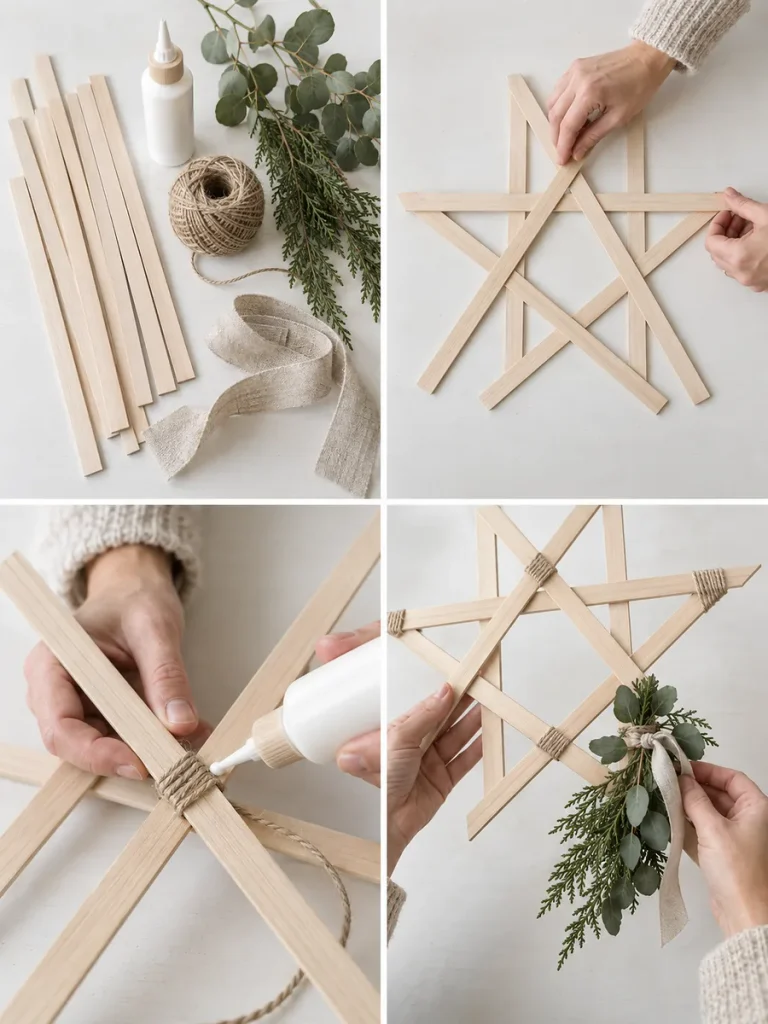
- Arrange the wooden pieces into a large geometric star.
- Glue each overlapping section firmly and allow the structure to dry.
- Leave the wood natural or add a thin coat of matte white paint.
- Wrap twine around the joints both for decoration and extra support.
- Attach a small bundle of eucalyptus and cedar near one lower corner.
- Tie a narrow linen ribbon around the greenery.
- Add a simple hanging loop at the top.
- Resist adding too many embellishments because the minimal look is part of the design.
18. Snowy Evergreen Swag Door Hanger
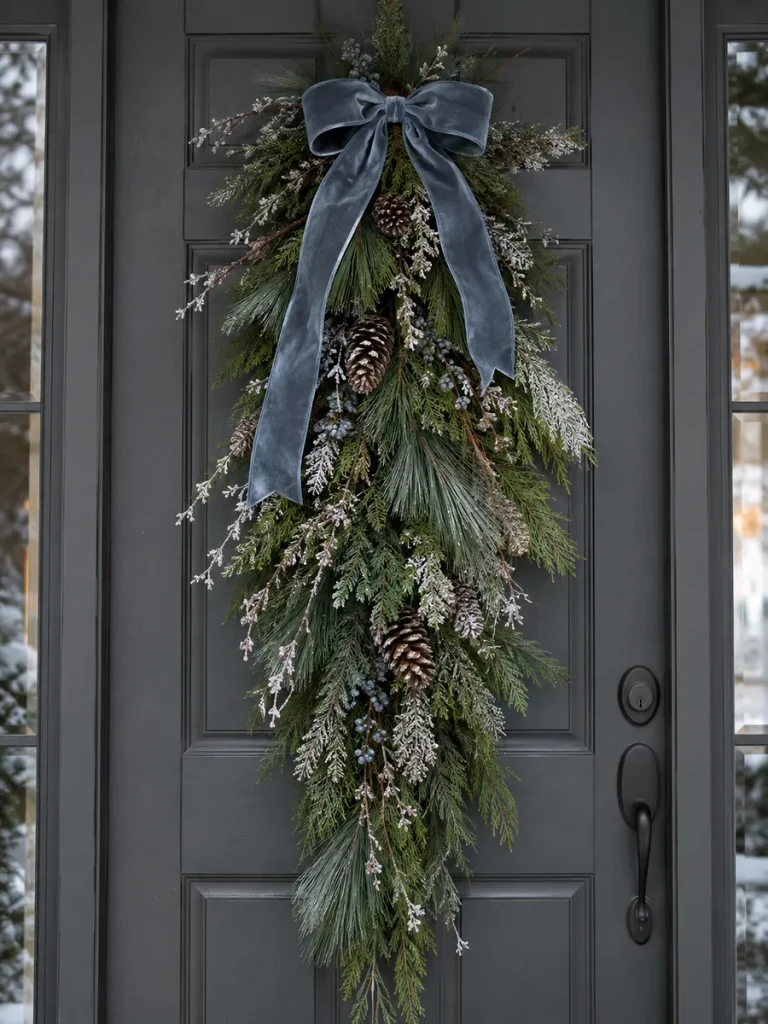
An evergreen swag is one of the easiest ways to create an elegant winter front door without making a wreath. The long vertical shape is especially attractive on narrow or tall doors.
What You’ll Need
- Faux pine branches
- Cedar stems
- Fir stems
- Frosted branches
- Pinecones
- Floral wire
- Velvet or plaid ribbon
- Faux snow spray
How to Make It
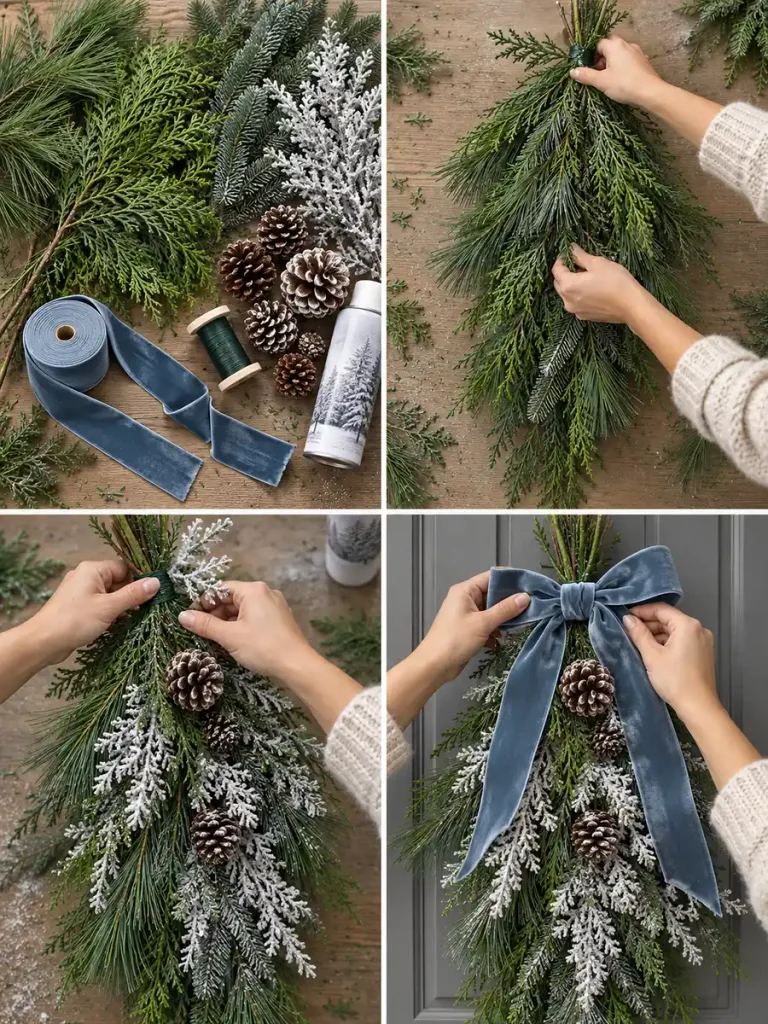
- Place the longest evergreen branch in the center.
- Layer shorter cedar and fir stems on both sides to create a tapered shape.
- Wrap floral wire tightly around the upper section to hold everything together.
- Add several frosted branches throughout the swag.
- Wire pinecones into the arrangement.
- Mist selected branch tips with faux snow.
- Cover the wired section with a large velvet, linen, or plaid bow.
- Use strong floral wire or ribbon to hang the finished swag.
19. DIY Winter Hat Door Hanger
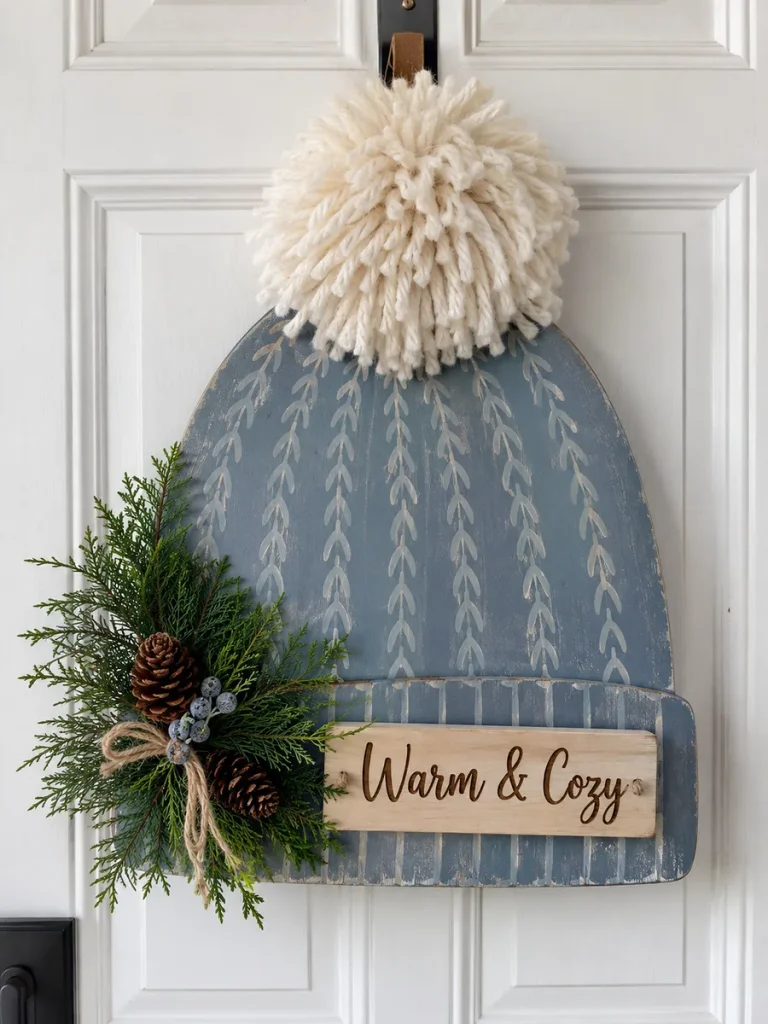
An oversized knit-hat design brings a playful element to winter decorating and looks particularly cute on family homes or children’s playroom doors. Using wood instead of fabric also makes it more durable outdoors.
What You’ll Need
- Plywood or sturdy wooden hat cutout
- Winter-colored paints
- Paintbrushes
- Thick yarn
- Cardboard
- Small wooden sign
- Faux greenery
- Hot-glue gun
How to Make It
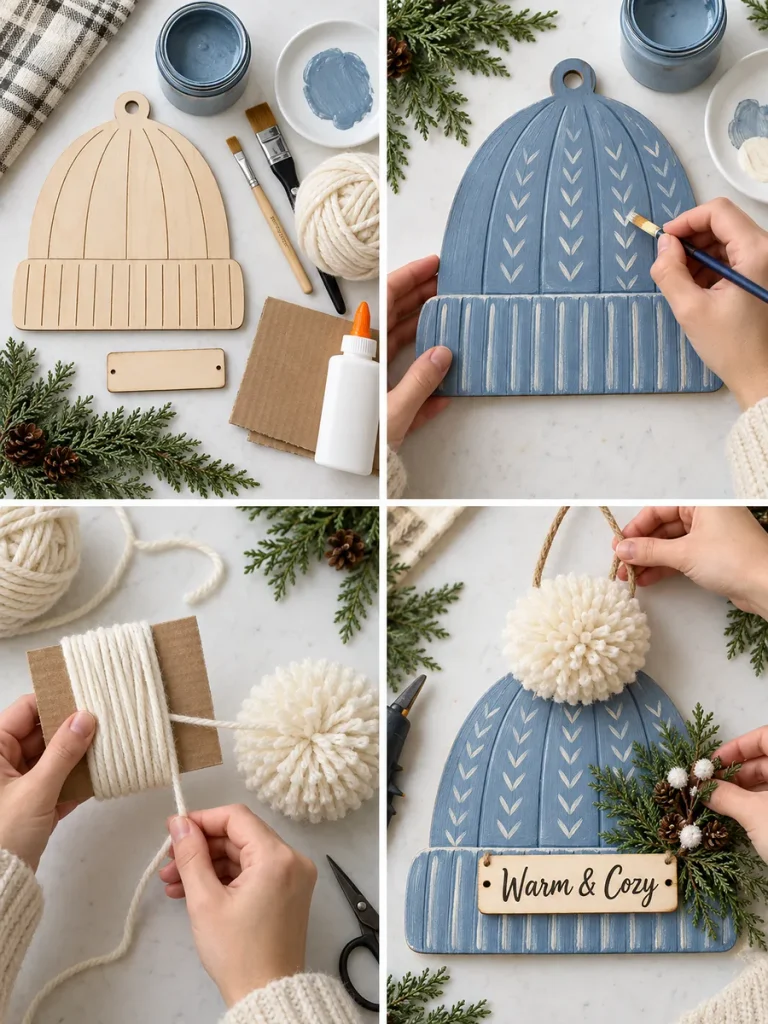
- Cut or purchase a large beanie-shaped wood blank.
- Paint the hat in cream, dusty blue, gray, or another winter shade.
- Add simple painted lines to imitate a knitted pattern.
- Make a large fluffy pom-pom from thick yarn and attach it at the top.
- Paint “Warm & Cozy” onto a small wooden label.
- Attach the label near the lower section of the hat.
- Add a small greenery arrangement along one side.
- Finish by attaching hanging cord securely to the back.
20. Frosted Eucalyptus Hoop Hanger
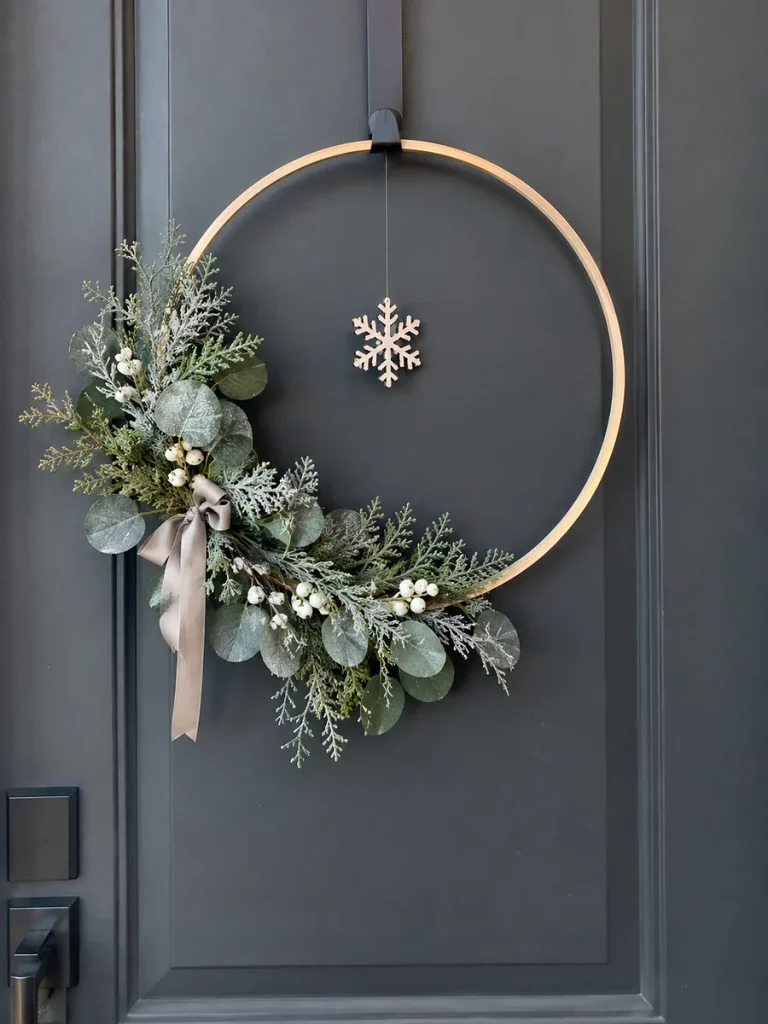
A floral hoop offers a lighter, more contemporary alternative to a full wreath. Decorating only one section of the hoop creates an airy design that works wonderfully with minimalist and modern homes.
What You’ll Need
- Wooden embroidery hoop or metal floral hoop
- Faux eucalyptus
- Frosted cedar
- White berries
- Small wooden snowflake
- Floral wire
- Neutral ribbon
- Clear thread or fishing line
How to Make It
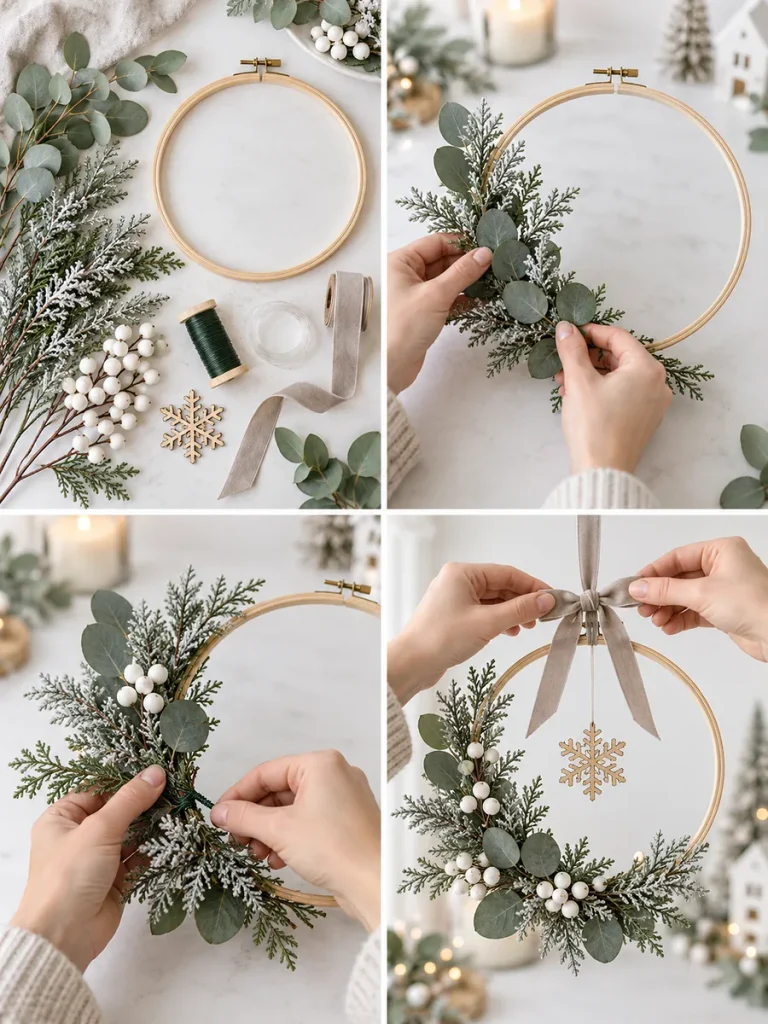
- Choose one side of the hoop for your greenery arrangement.
- Layer eucalyptus and frosted cedar around approximately one-third of the hoop.
- Secure everything tightly using floral wire.
- Add a few white berries between the leaves.
- Suspend a small wooden snowflake inside the center using clear thread.
- Tie a small neutral ribbon where the greenery begins.
- Leave the remaining portion of the hoop uncovered to maintain the simple, modern appearance.
21. Rustic Winter Bell Door Hanger
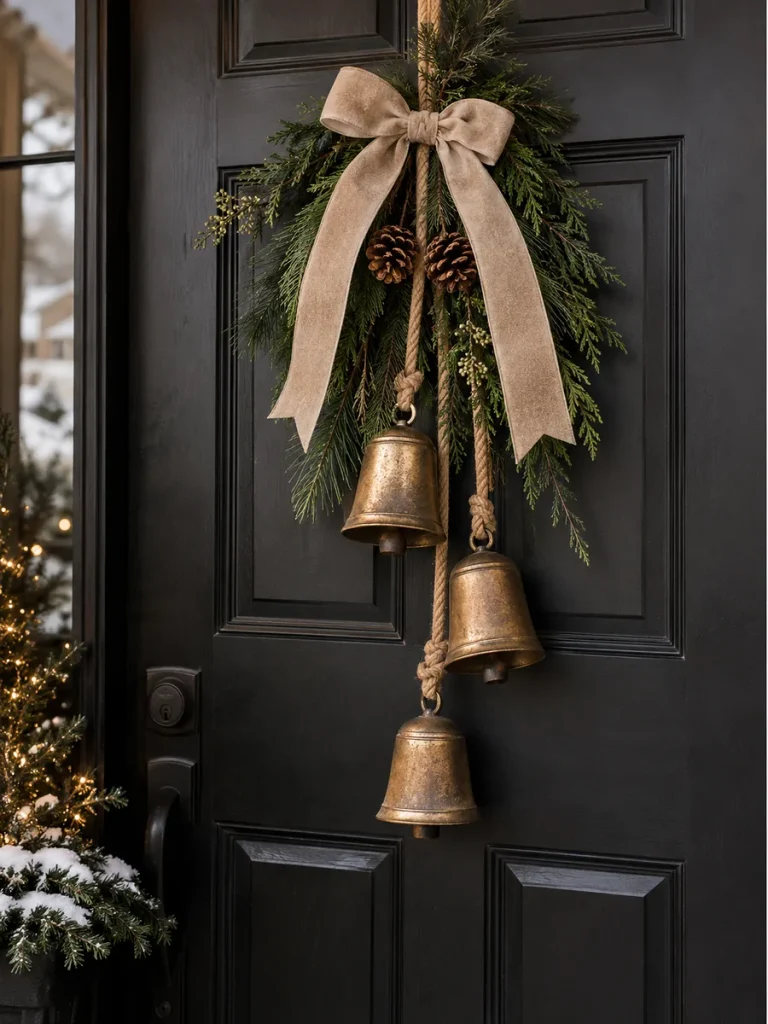
Oversized bells combined with evergreen branches create a traditional winter look without feeling limited to Christmas. Antique brass, aged silver, or galvanized finishes work particularly well for January decorating.
What You’ll Need
- Two or three decorative metal bells
- Thick jute rope
- Faux cedar or pine
- Pinecones
- Velvet or linen ribbon
- Floral wire
- Strong hanging cord
How to Make It
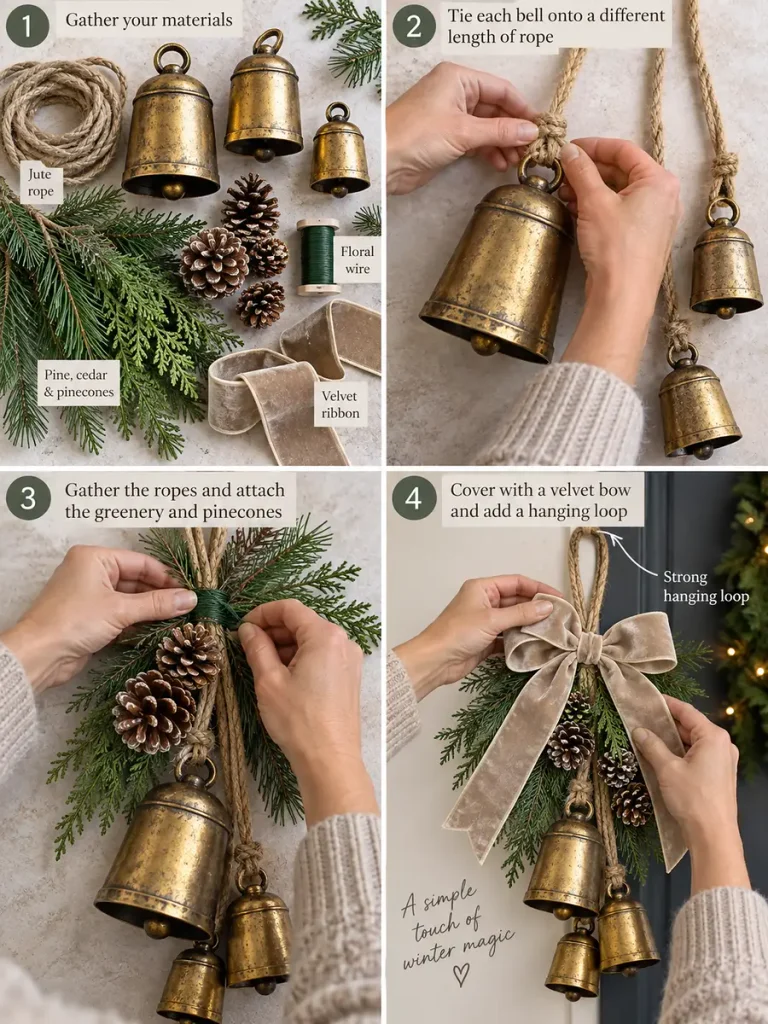
- Cut several pieces of rope in different lengths.
- Attach one bell securely to the end of each rope.
- Gather the ropes so the bells hang at staggered heights.
- Tie a bundle of pine and cedar around the upper knot using floral wire.
- Add one or two pinecones between the branches.
- Cover the attachment area with a wide velvet or linen bow.
- Add a separate hanging loop to prevent the decorative rope from carrying all the weight.
- Make sure the bells cannot strike or damage your door.
22. Snowy Mountain Wood Slice Hanger
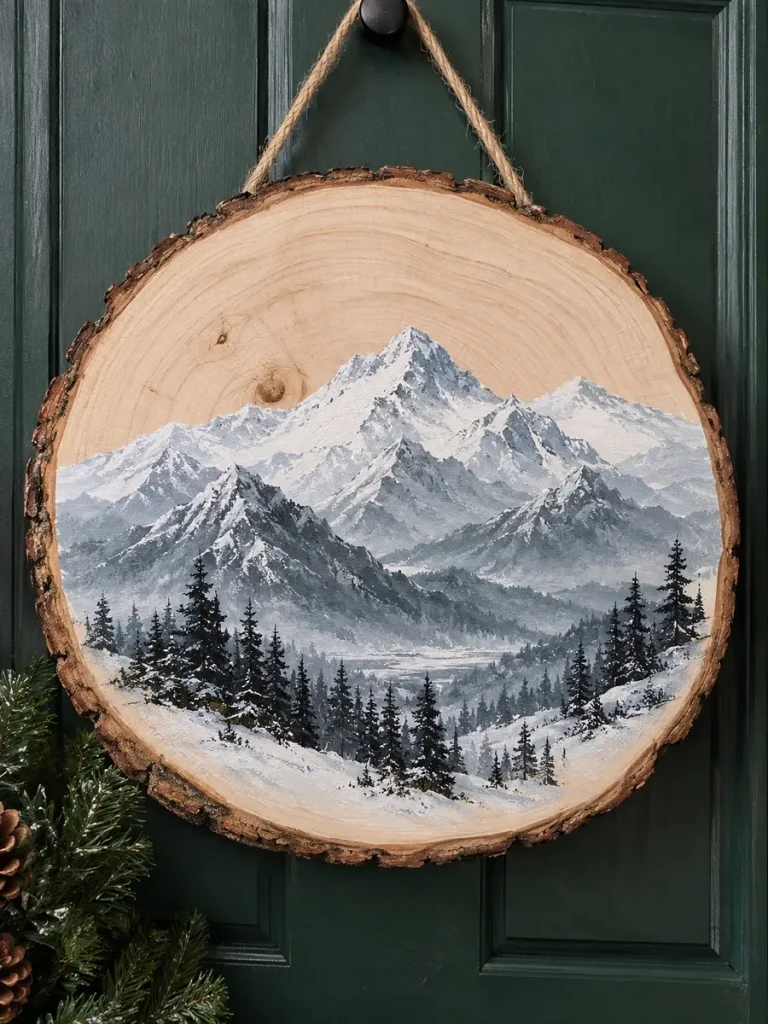
Bring a peaceful winter landscape directly to your front door with a hand-painted mountain scene. This is a lovely project for anyone who enjoys painting and wants something completely different from greenery-heavy door décor.
What You’ll Need
- Large natural wood slice or wood round
- White paint
- Gray paint
- Muted blue paint
- Small artist brushes
- Pencil
- Clear sealer
- Jute rope
How to Make It
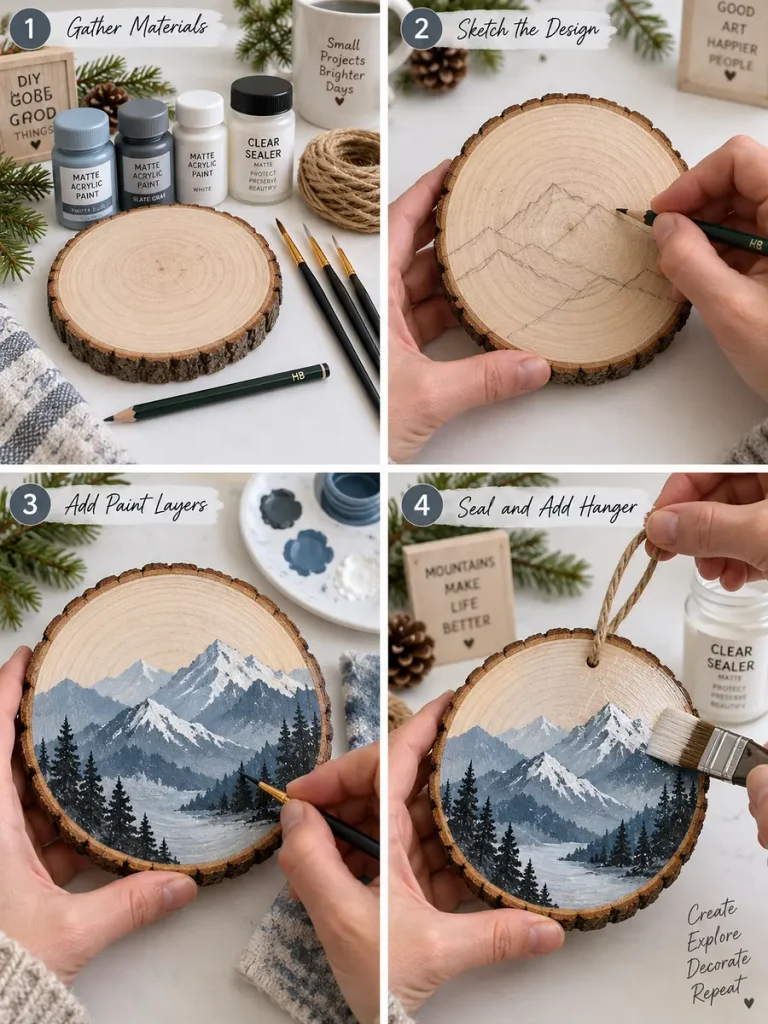
- Lightly sketch several overlapping mountain peaks across the wooden surface.
- Paint the distant mountains in pale blue-gray shades.
- Use darker gray for the closer peaks to create depth.
- Add white snow along the mountain tops.
- Paint several tiny evergreen trees near the bottom edge.
- Leave portions of the natural wood visible for warmth and texture.
- Once completely dry, protect the artwork with clear sealer.
- Add jute rope through drilled holes or attach a strong hanger to the back.
23. Personalized Winter Welcome Door Hanger

A personalized wooden sign makes a beautiful final project because you can adapt it to your family and reuse the base throughout different seasons. Keep the central design relatively simple so the decorative greenery remains easy to swap later.
What You’ll Need
- Large wooden round
- Neutral paint
- Letter stencils or vinyl lettering
- Faux evergreen stems
- Pinecones
- Wooden snowflakes
- Ribbon
- Hot-glue gun
- Hanging rope
- Clear sealer
How to Make It
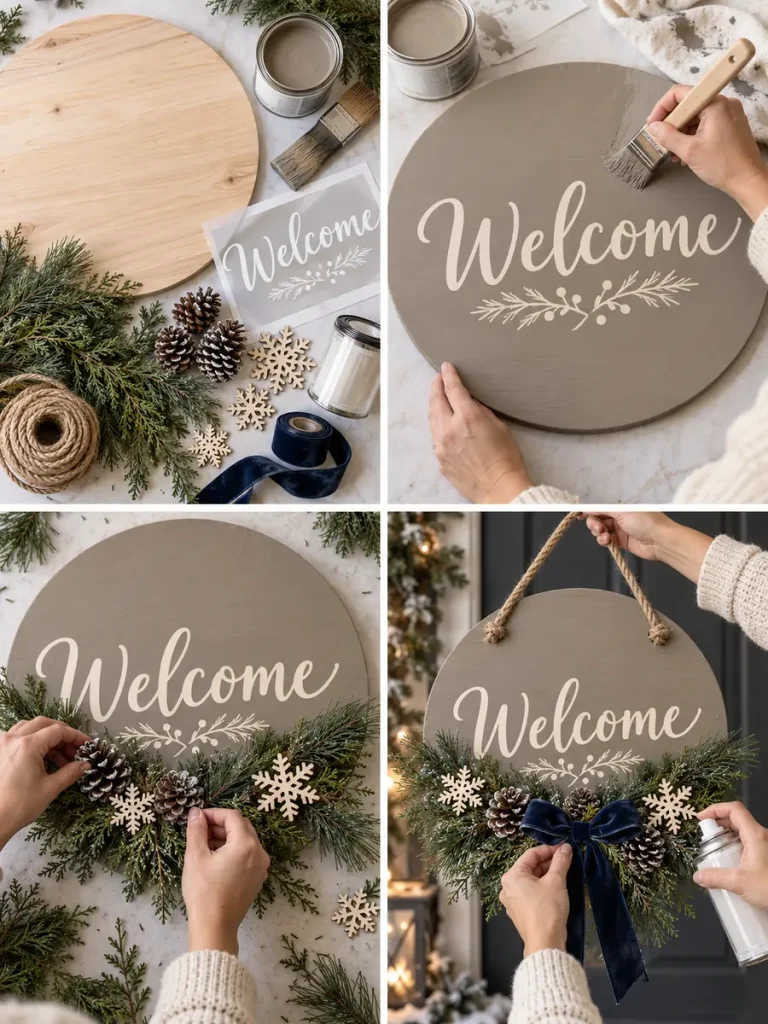
- Paint the wood round in white, taupe, gray, pale blue, or another winter-neutral shade.
- Add your family surname, house number, or the word “Welcome” across the center.
- Arrange evergreen branches along the lower third of the sign.
- Tuck pinecones and small wooden snowflakes between the stems.
- Add a ribbon bow toward one side.
- Attach the greenery in a way that allows you to remove it later if you want to reuse the sign for spring.
- Seal the wood and attach a strong hanging rope.
How to Make Your DIY Winter Door Hangers Look More Expensive
One of the best things about homemade winter decorations is that you do not have to spend much to achieve a polished look. A few thoughtful styling choices can make even inexpensive craft-store materials appear far more sophisticated.
Start by limiting your color palette. Two or three main colors usually create a more cohesive result than using every winter shade at once. Cream, white, forest green, muted blue, gray, natural wood, antique gold, and soft brown all work beautifully together.
Texture is equally important. Try pairing smooth painted wood with fluffy yarn, evergreen branches, linen ribbon, woven baskets, pinecones, or aged metal. Contrasting surfaces add dimension without requiring lots of extra decorations.
Choose realistic greenery whenever possible, particularly for pieces displayed close to eye level. Mixing two or three varieties—such as pine, cedar, and eucalyptus—also makes artificial arrangements look more natural.
Finally, avoid overcrowding your project. Leave some empty space around lettering and decorative features. Clean arrangements often look more professionally designed than pieces covered from edge to edge.
Protecting Your Winter Door Hanger Outdoors
Before hanging your finished project outside, consider how much weather your front door receives. A covered porch gives you far more flexibility than a completely exposed entrance.
Wooden signs should be protected with a suitable clear outdoor sealer, especially around the edges where moisture can soak into unfinished wood. Painted designs should also be completely dry before the protective coat is added.
Fabric, felt, yarn, and faux-fur projects are best kept beneath a covered porch because repeated exposure to rain and snow can cause staining or damage. When using greenery or heavier decorations, reinforce them with floral wire rather than relying only on hot glue.
Wind is another important consideration. Keep large decorations securely attached and avoid loose pieces that could hit the door or nearby glass.
With a little protection, many of these handmade door hangers can be enjoyed throughout the entire winter season and stored away for another year.
Final Thoughts
Winter offers plenty of decorating inspiration even after the holiday season has ended. From snowy mountain signs and Scandinavian stars to ice skates, baskets, pinecone bundles, cozy mittens, wooden sleds, and frosted greenery, these DIY winter door hanger ideas show just how many creative possibilities there are beyond a traditional wreath.
You do not need expensive supplies or advanced crafting skills to create something beautiful. Start with the project that best matches your existing porch décor, then make it your own by changing the colors, ribbon, wording, greenery, or finishing details.
Whether you prefer rustic farmhouse charm, soft woodland elements, modern minimalism, or playful winter decorations, a handmade door hanger can instantly make your entrance feel warmer and more inviting during the coldest months of the year.
