 Skip to content
The holiday season is that magical time of year when homes sparkle with warmth, laughter, and creativity. But you don’t need to spend a fortune to make your space look festive — sometimes, the most beautiful decorations are the ones you craft yourself. That’s where easy DIY Christmas hanging decoration ideas come in!
From handmade paper stars to twinkling mason jar lanterns, these simple hanging décor pieces can instantly transform any corner of your home into a cozy winter wonderland. Whether you’re decorating your tree, brightening up your windows, or adding charm to your porch, DIY hangings bring a personal touch that store-bought ornaments just can’t match.
The best part? You don’t need special tools or expert skills — just a few basic supplies, a little time, and lots of holiday spirit. In this guide, we’ll explore creative, budget-friendly, and beginner-friendly DIY hanging decorations that you can make with family and friends. Get ready to fill your home with handmade magic and heartwarming festive cheer this Christmas!
[This post may contain affiliate links. What does that mean to you? Well, if you click on a product and make a purchase, I may get some compensation from you at no charge. If you want to read the boring stuff my full disclosure can be found here.]
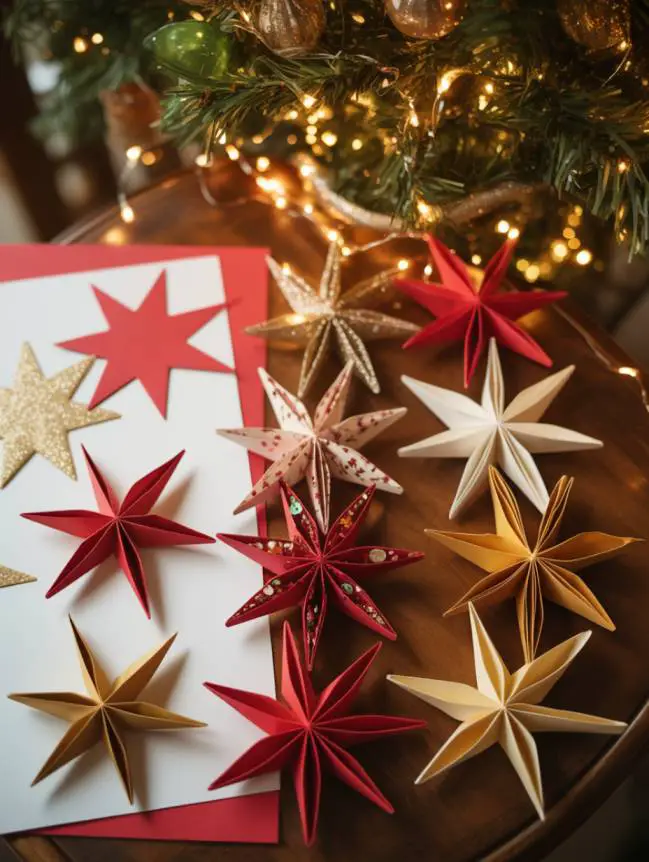
1. Paper & Cardboard Hanging Crafts
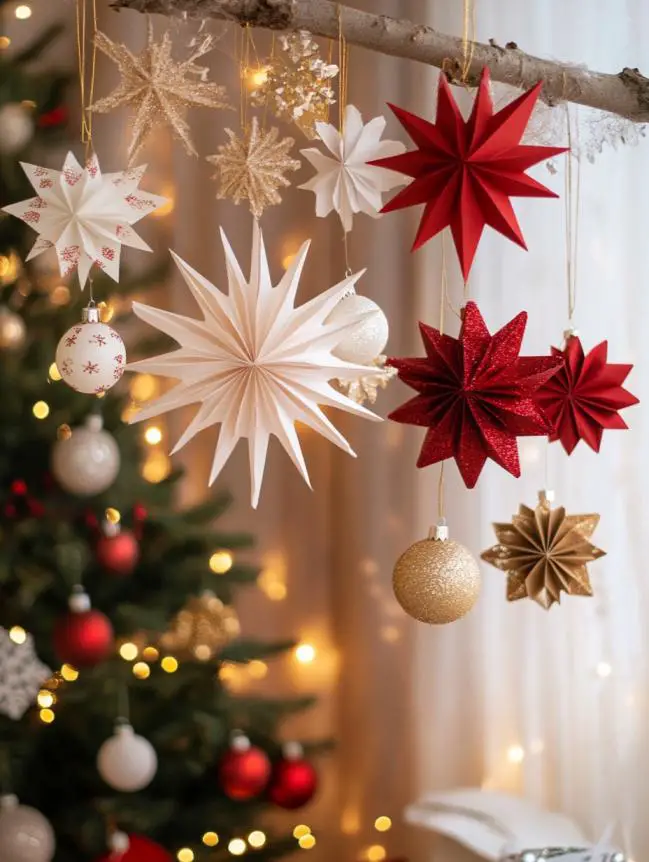
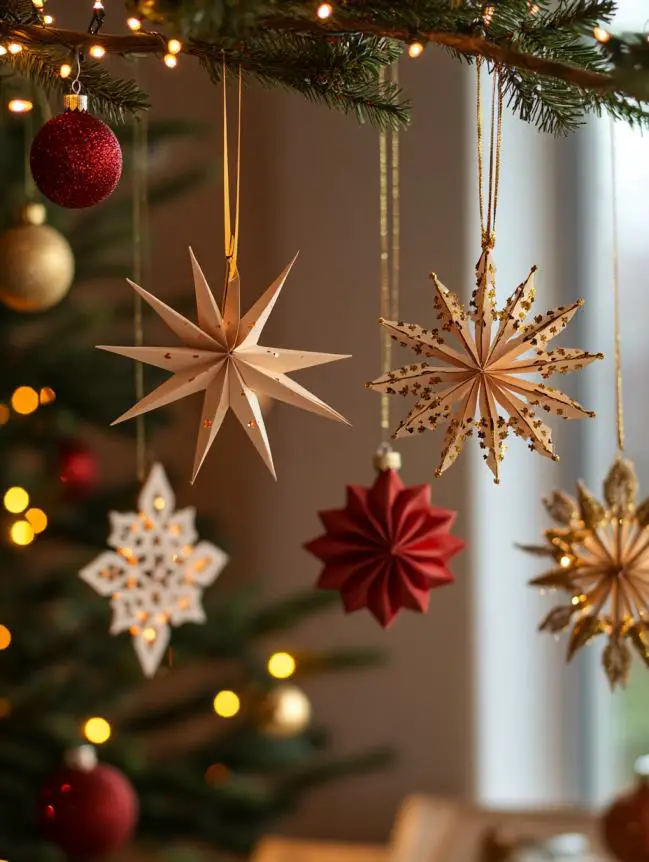
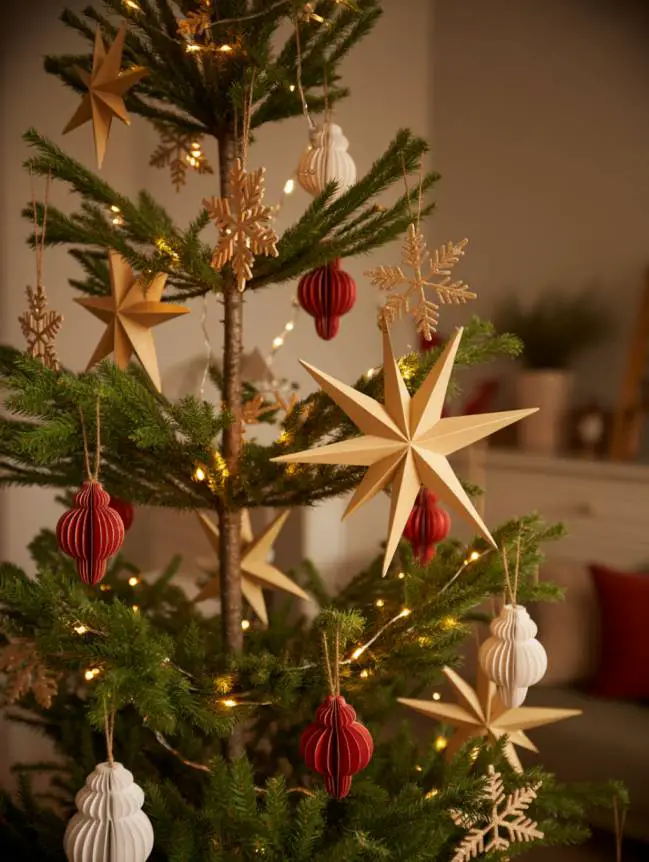
Create festive magic with simple paper and cardboard crafts! Make snowflakes, stars, or mini trees using colored paper or recycled boxes. Add glitter, ribbons, or sequins for sparkle and hang them with twine or thread. These easy, eco-friendly decorations bring a handmade charm to your Christmas décor — perfect for kids and adults alike.
Materials You’ll Need
- Colored or white craft paper / recycled cardboard
- Scissors
- Glue or double-sided tape
- String or twine
- Glitter, ribbons, or sequins (optional)
- Pencil and ruler for tracing shapes
Step-by-Step: DIY Paper Star Ornament
Step 1: Cut out two identical star shapes from paper or cardboard.
Step 2: Decorate each star with glitter, sequins, or ribbons.
Step 3: Fold both stars gently down the middle to create a 3D effect.
Step 4: Glue the stars together, leaving a small gap at the top.
Step 5: Thread a piece of string or twine through the top and tie a loop.
✨ Your simple paper star ornament is ready to hang on the tree, window, or wall!
2. Natural & Rustic Hanging Decor

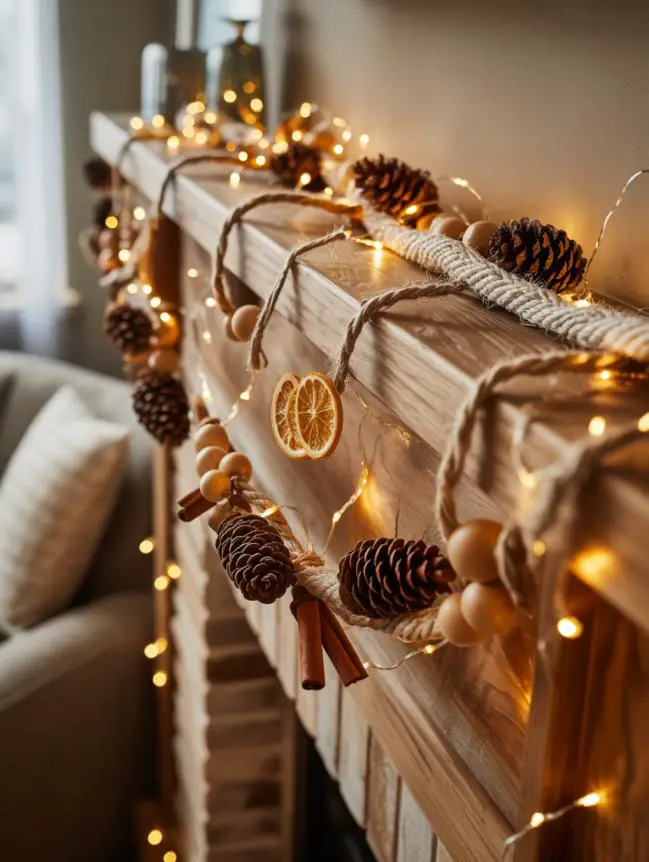
Bring the cozy charm of nature into your home with natural and rustic Christmas hangings. Using simple materials like pinecones, cinnamon sticks, dried orange slices, and jute twine, you can create beautiful decorations that smell amazing and look timeless. These crafts add a warm, farmhouse touch to your holiday décor — perfect for those who love simplicity and nature-inspired beauty.
Materials You’ll Need
- Pinecones or acorns
- Dried orange slices or cinnamon sticks
- Jute twine or natural string
- Wooden beads or small bells (optional)
- Hot glue gun or strong craft glue
Step-by-Step: DIY Pinecone & Orange Garland
Step 1: Gather pinecones, dried orange slices, and cinnamon sticks.
Step 2: Tie a piece of jute twine around each item, leaving some space between them.
Step 3: Add small bells or wooden beads for extra charm.
Step 4: Secure everything with glue to prevent slipping.
Step 5: Hang the garland along your mantel, window, or doorway.
✨ Result: A beautifully rustic, fragrant decoration that fills your home with the scent of Christmas and cozy countryside warmth.
3. DIY Christmas Baubles & Ornaments

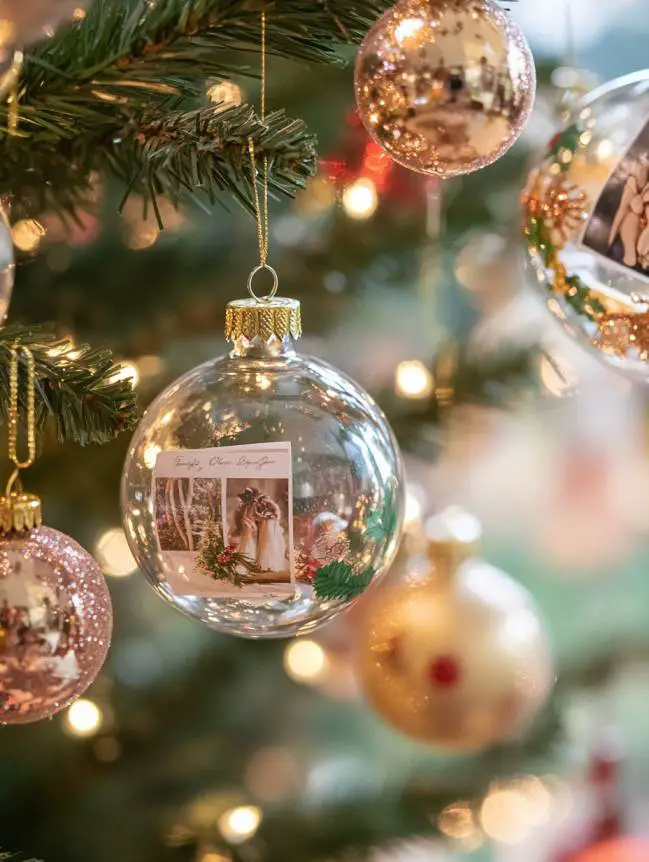
Add a personal sparkle to your tree with handmade Christmas baubles and ornaments. Instead of buying expensive ones, you can easily transform plain balls or everyday items into festive showpieces. These DIY ornaments are fun to make, customizable, and make your Christmas décor truly one of a kind.
Materials You’ll Need
- Plain plastic or glass baubles
- Acrylic paints or glitter glue
- Small photos, ribbons, or beads
- Fake snow or confetti
- Hot glue gun and craft tweezers


Step-by-Step: DIY Personalized Bauble Ornament
Step 1: Open the bauble and add a bit of fake snow or glitter inside.
Step 2: Insert a tiny photo, a small note, or a name tag for personalization.
Step 3: Close the bauble and seal it tightly with glue if needed.
Step 4: Decorate the outside using ribbons, beads, or painted designs.
Step 5: Add a thread or gold string loop for hanging.
✨ Result: A sparkling, sentimental ornament that captures memories and adds a magical touch to your Christmas tree.
4. Festive Hanging Lanterns & Light Jars
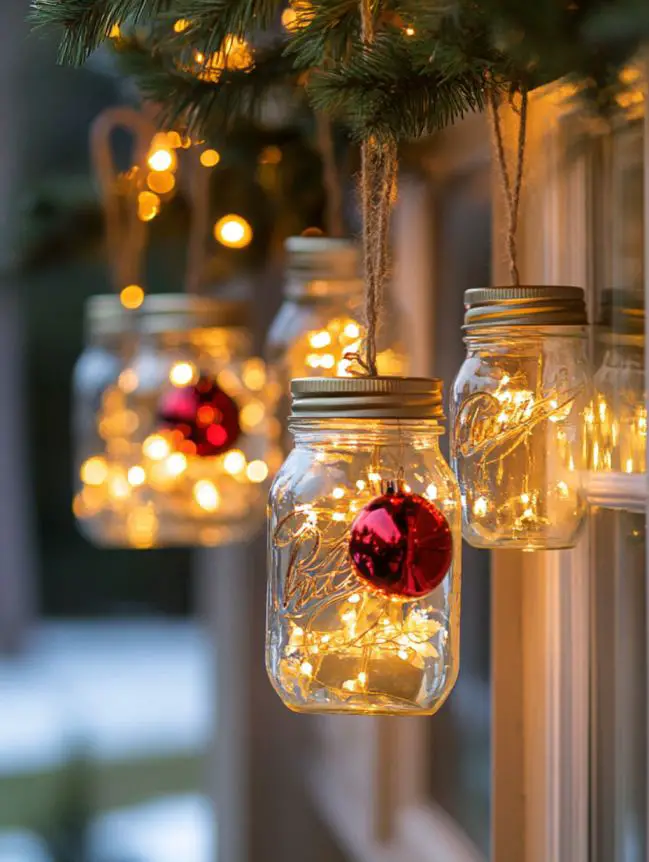
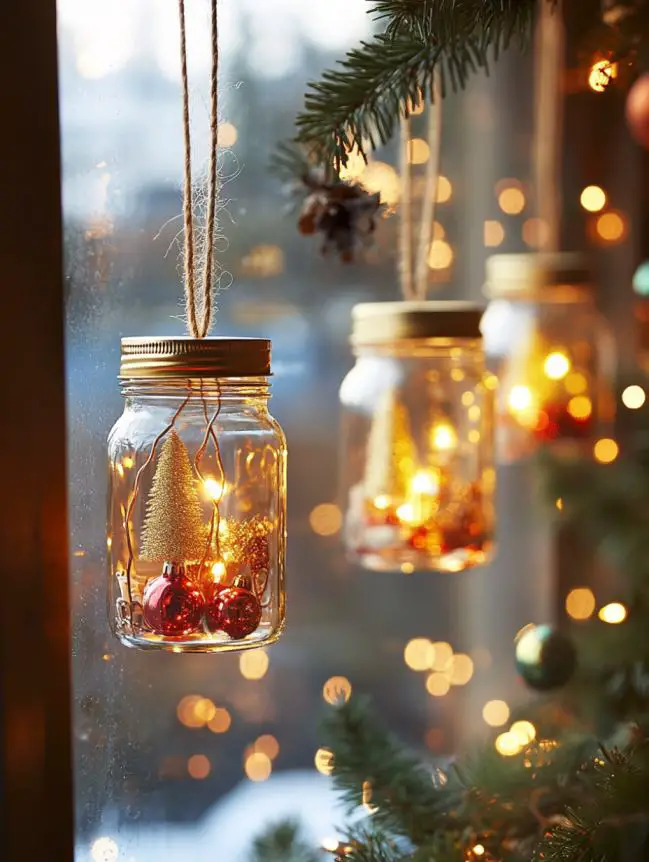
Light up your holidays with DIY hanging lanterns and glowing jars that create a warm, magical atmosphere. These simple crafts can turn ordinary mason jars or tin cans into twinkling lights perfect for balconies, porches, or cozy corners indoors.
💡 Materials You’ll Need
- Mason jars or empty tin cans
- LED tea lights or fairy lights
- Paint, glitter, or lace ribbons
- Twine or wire for hanging
- Nail and hammer (for tin cans)
Step-by-Step: DIY Mason Jar Lantern
Step 1: Clean your mason jar and remove any labels.
Step 2: Paint or decorate the outside with glitter or lace for a festive touch.
Step 3: Place an LED tea light or a small string of fairy lights inside.
Step 4: Wrap twine or wire around the jar’s neck to create a hanging handle.
Step 5: Hang it near windows, entryways, or your Christmas tree for a soft golden glow.
✨ Result: A beautiful handmade lantern that brings warmth, light, and holiday cheer to any space.
5. Hanging Decor Using Recycled Materials
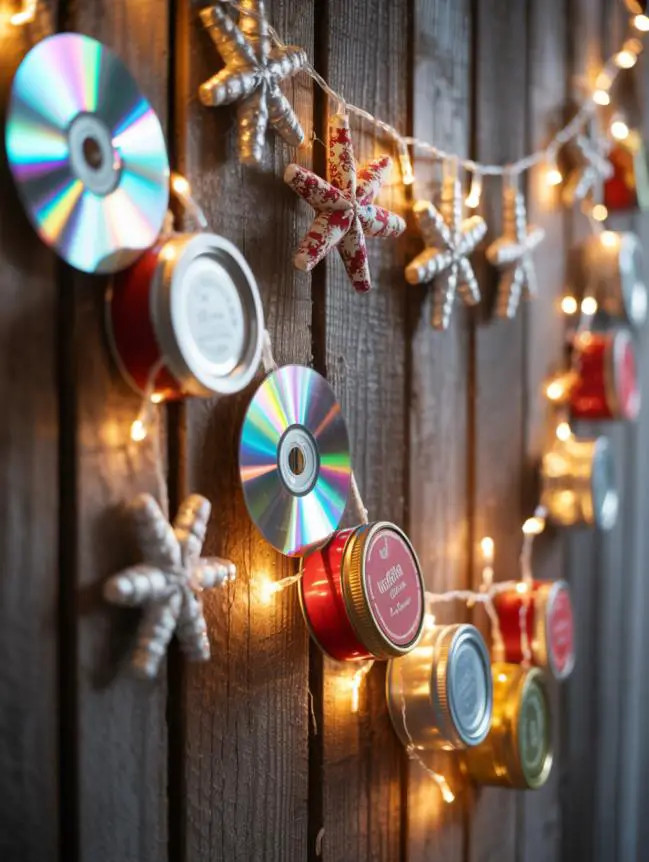
Turn everyday waste into festive treasures with DIY hanging decorations made from recycled materials. This eco-friendly approach not only saves money but also helps reduce waste — all while adding a creative, unique touch to your Christmas décor. Perfect for those who love sustainable crafting with style!
Materials You’ll Need
- Old CDs or DVDs
- Bottle caps or jar lids
- Fabric scraps or old ribbons
- Plastic bottles or containers
- Glue, paint, and string
Step-by-Step: DIY CD Snowflake Ornament
Step 1: Cut or break old CDs into small pieces with shiny edges.
Step 2: Arrange the pieces in a snowflake shape on a piece of cardboard or lid.
Step 3: Glue the pieces in place, creating a mosaic-like shimmer.
Step 4: Paint the edges or add a small bow for decoration.
Step 5: Punch a hole at the top and tie a string to hang it.
✨ Result: A sparkling, eco-conscious ornament that catches the light beautifully and reminds everyone that creativity and sustainability can go hand in hand this Christmas.
6. Door & Window Hangings

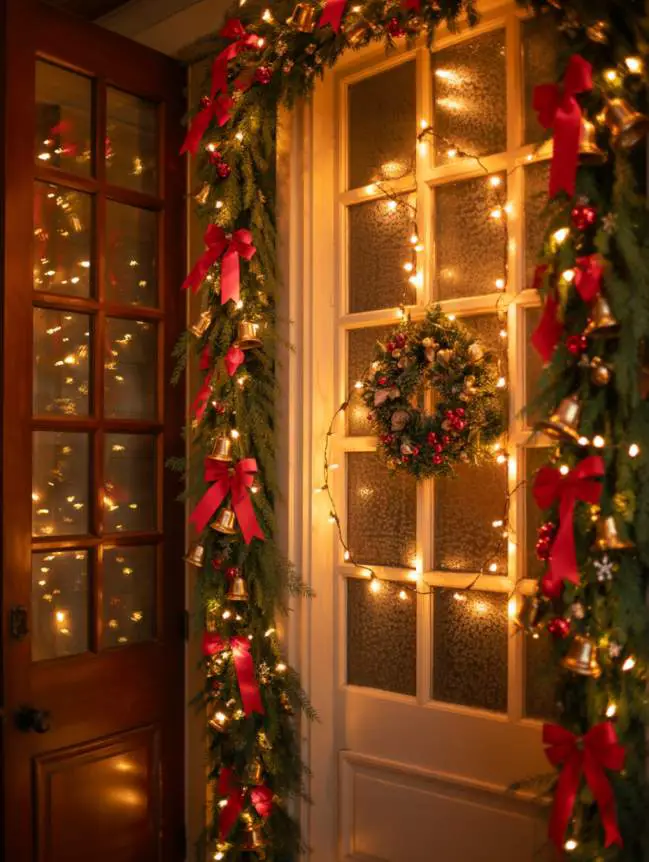
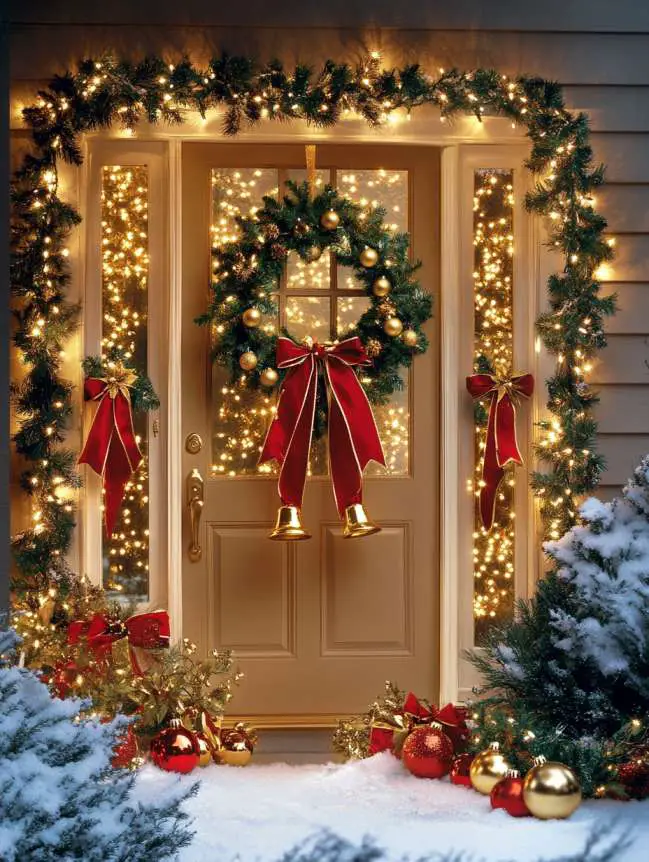
Make every entrance feel festive with DIY door and window hangings that welcome guests with holiday cheer. From ribbon wreaths to jingle bell strings, these simple crafts instantly brighten up your home and add a warm, inviting touch to every corner.
Materials You’ll Need
- Ribbons or fabric strips
- Mini bells, ornaments, or pine branches
- Glue gun or thread
- Scissors and wire hoops (for wreaths)
- Beads or fairy lights (optional)


Step-by-Step: DIY Ribbon & Bell Door Hanging
Step 1: Cut several ribbons in festive colors like red, gold, and green.
Step 2: Tie small bells or ornaments to the ends of each ribbon.
Step 3: Gather the ribbons together and secure them at the top with a knot or glue.
Step 4: Add a loop for hanging and a decorative bow for finishing.
Step 5: Hang it on your door or window where it can sway and jingle with the breeze.
✨ Result: A cheerful, musical decoration that spreads joy every time someone walks by — perfect for creating that classic Christmas welcome.
7. Fabric & Felt Christmas Hangers
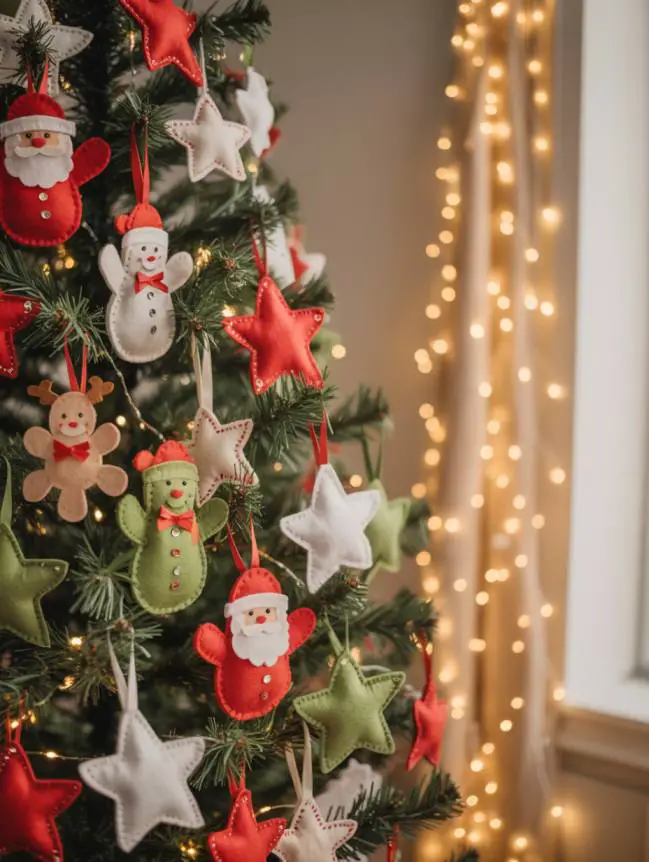
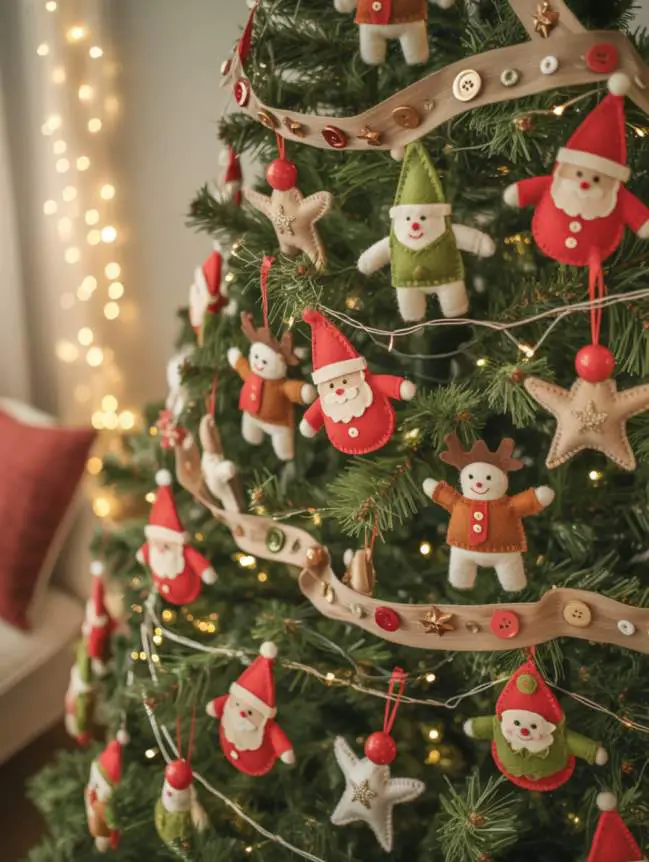


Add a soft, handmade charm to your holiday décor with DIY fabric and felt Christmas hangers. These cute, lightweight decorations are easy to craft and look adorable on trees, walls, or even gift packages. They’re perfect for adding warmth and personality to your home — or for creating thoughtful handmade gifts.
Materials You’ll Need
- Felt sheets or scrap fabric (red, green, white, gold)
- Scissors and pencil for tracing shapes
- Needle and thread (or hot glue)
- Cotton or wool for stuffing (optional)
- Buttons, sequins, or beads for embellishment
- Ribbon or string for hanging
Step-by-Step: DIY Felt Santa Ornament
Step 1: Draw and cut out two identical Santa shapes (or stars, hearts, or trees) from felt.
Step 2: Stitch or glue the edges together, leaving a small opening.
Step 3: Stuff lightly with cotton to give it a plush look, then seal the opening.
Step 4: Add buttons, sequins, or beads for decoration.
Step 5: Attach a ribbon loop at the top for hanging.
✨ Result: A cozy, handmade ornament that brings softness, color, and heartfelt warmth to your Christmas tree and home décor.
8. Hanging Decorations for Small Spaces
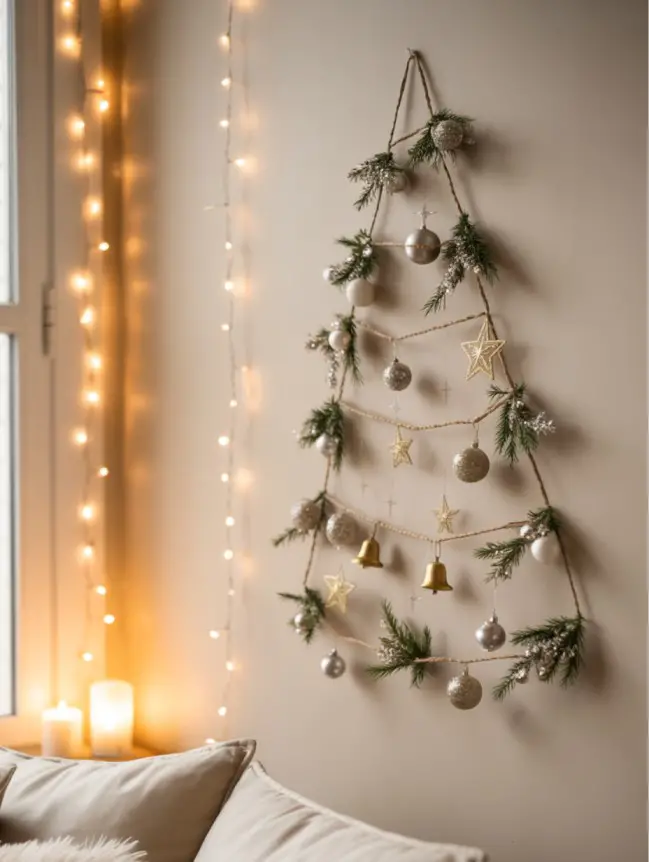

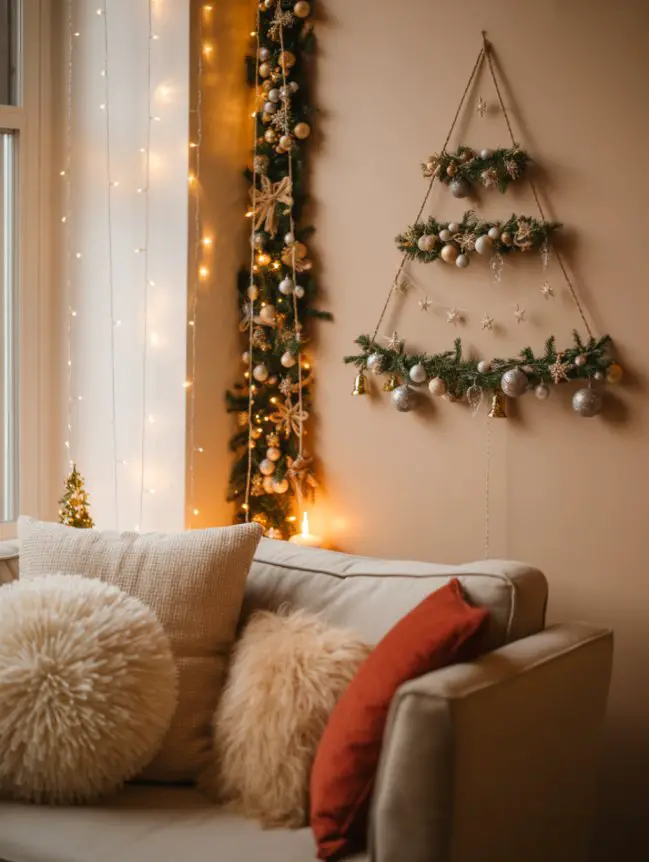
Even if you’re short on space, you can still go big on holiday cheer! DIY hanging decorations for small spaces are perfect for apartments, offices, or cozy homes where every inch counts. Think vertical garlands, mini wall trees, and ceiling hangers that add Christmas magic without clutter.
Materials You’ll Need
- String lights or fairy lights
- Small ornaments or baubles
- Wooden sticks, twigs, or hangers
- Command hooks or adhesive clips
- Ribbons, mini wreaths, or paper cutouts (optional)


Step-by-Step: DIY Vertical Ornament Garland
Step 1: Cut a long piece of string or twine — around the height of your wall or window.
Step 2: Tie small ornaments, bells, or stars along the string at even intervals.
Step 3: Add fairy lights around the garland for a soft glow.
Step 4: Use a command hook or clip to hang it vertically.
Step 5: Drape it against a wall, door frame, or window for a space-saving festive touch.
✨ Result: A sleek, elegant display that brings Christmas sparkle to even the smallest corners — proof that holiday spirit doesn’t need a lot of space, just a little creativity.
9. Hanging Snow Globe Ornaments
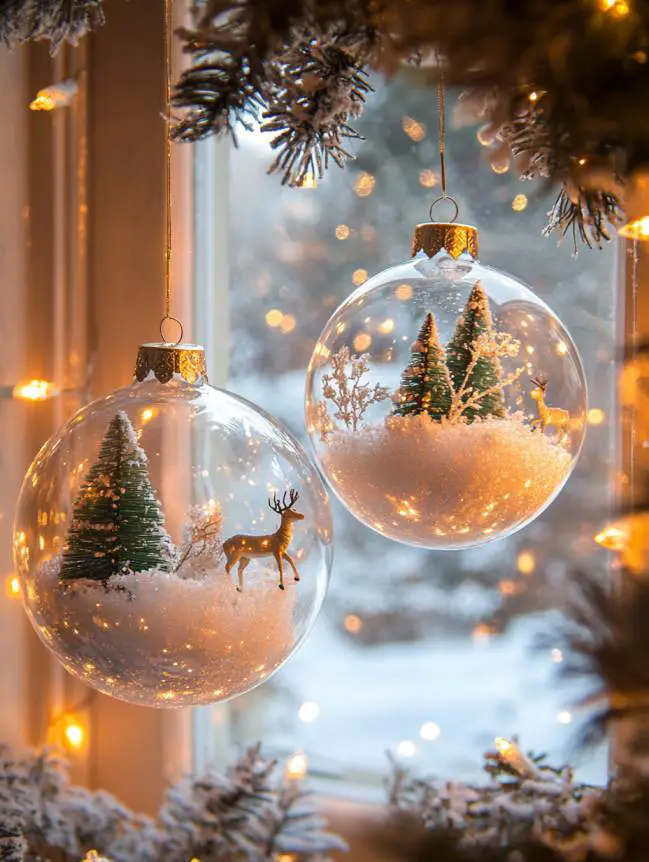

Create your very own mini winter wonderlands with DIY hanging snow globes! These adorable ornaments capture the spirit of Christmas in a small, glittering scene — perfect for trees or windows.
Materials You’ll Need
- Clear plastic ornaments or small jars
- Faux snow or cotton
- Mini figurines (trees, reindeer, Santa, etc.)
- Hot glue gun
- Ribbon for hanging (optional)


Step-by-Step: DIY Hanging Snow Globe
Step 1: Open your ornament and add a small layer of faux snow.
Step 2: Glue tiny figurines inside to create a winter scene.
Step 3: Close and seal the ornament carefully.
Step 4: Tie a ribbon loop on top for hanging.
Step 5: Hang them near lights to make the snow sparkle!
✨ Result: Cute, glittering ornaments that look store-bought but carry your personal touch.
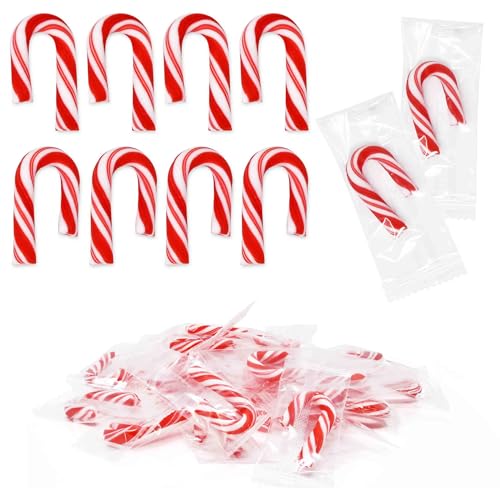
10. Candy Cane & Sweet Treat Hangings
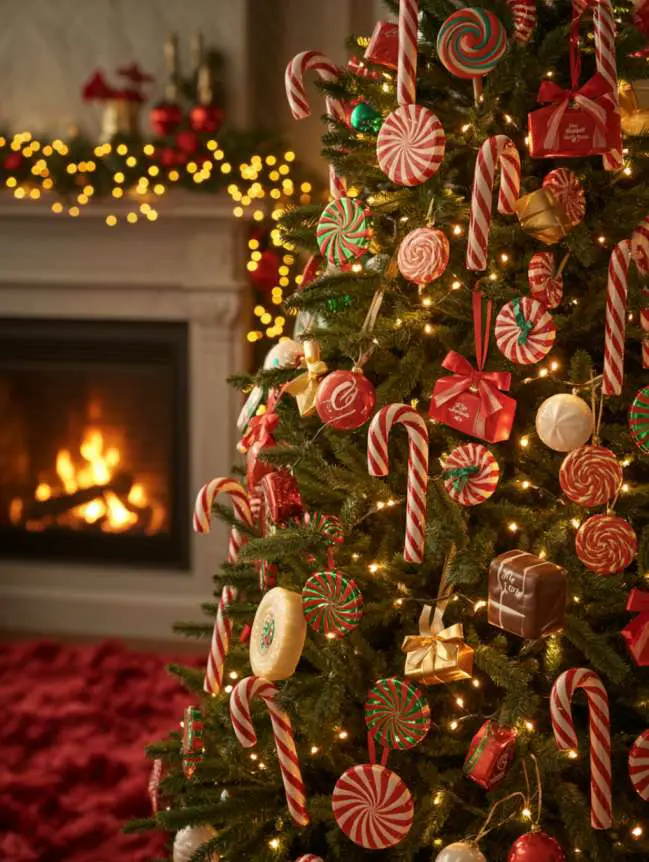
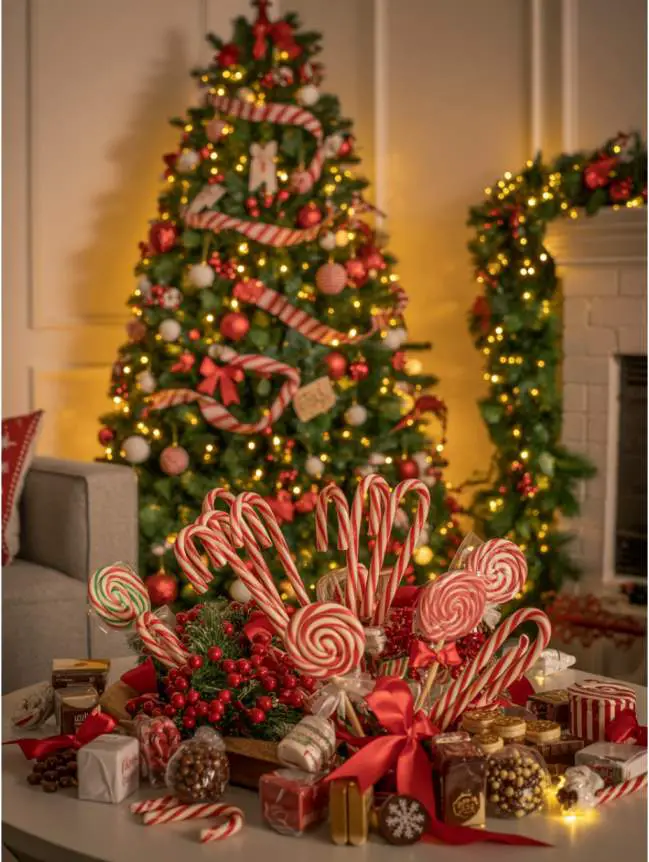
Add some sugary cheer to your décor with candy-inspired hangings that double as both decoration and snacks! These are especially fun for kids and perfect for parties.
Materials You’ll Need
- Candy canes, lollipops, or wrapped chocolates
- Clear thread or thin ribbon
- Mini gift tags (optional)
- Glue dots or tape


Step-by-Step: DIY Candy Hanging Garland
Step 1: Tie ribbons around candy canes or small sweets.
Step 2: Attach them along a clear string or fairy light wire.
Step 3: Add mini tags with festive wishes or names.
Step 4: Hang it near your dining area or Christmas tree.
Step 5: Let guests pick a candy for a sweet surprise!
✨ Result: A playful, edible decoration that fills your home with color, fun, and festive delight.
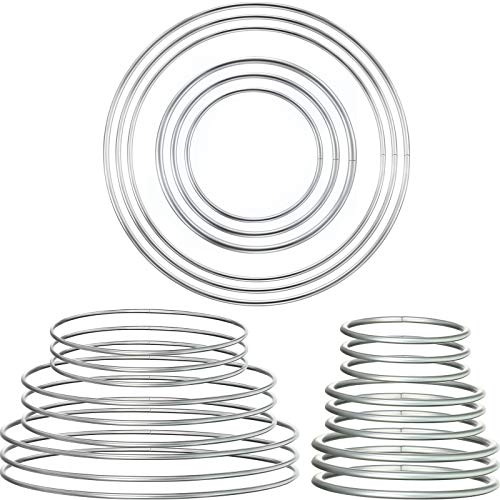
11. Starry Ceiling Hangings
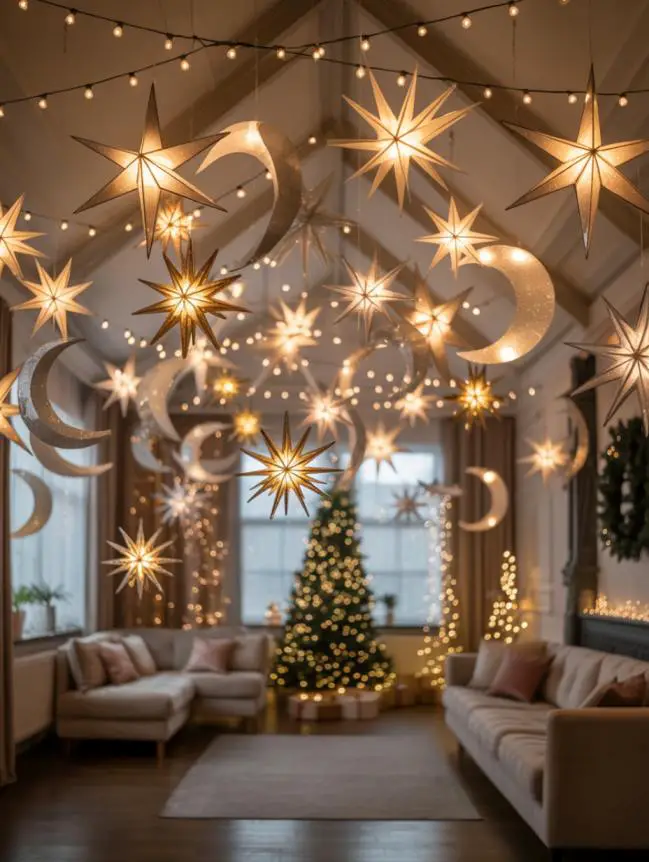
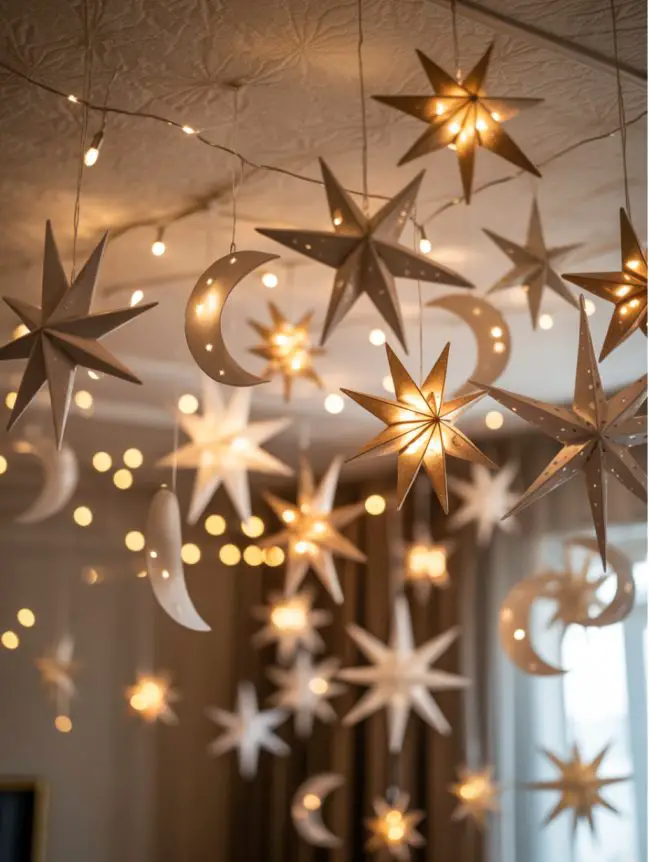
Transform your ceiling into a twinkling night sky with hanging stars and moon decorations. It’s a dreamy way to make your home feel like a magical Christmas wonderland.
Materials You’ll Need
- Metallic or glitter paper (gold, silver, white)
- String or fishing line
- Tape or ceiling hooks
- LED fairy lights
Step-by-Step: DIY Star & Moon Ceiling Decor
Step 1: Cut out stars and moon shapes in various sizes.
Step 2: Punch small holes and tie each one with string.
Step 3: Hang them from your ceiling at different lengths.
Step 4: Add fairy lights between them for extra sparkle.
Step 5: Dim your lights and enjoy your glowing indoor sky!
✨ Result: A magical overhead display that brings wonder and warmth to every holiday evening.
12. Mini Plant & Herb Hangings
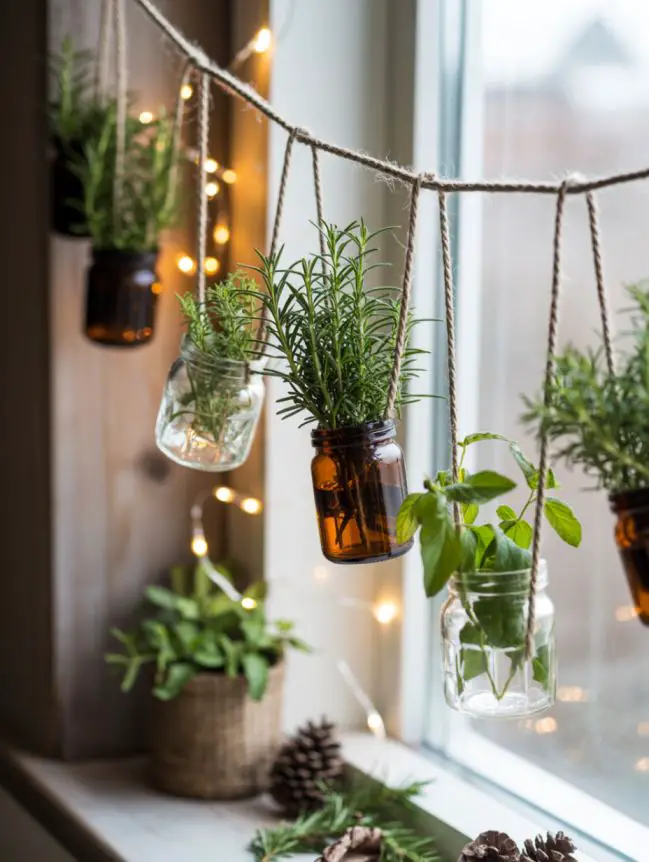
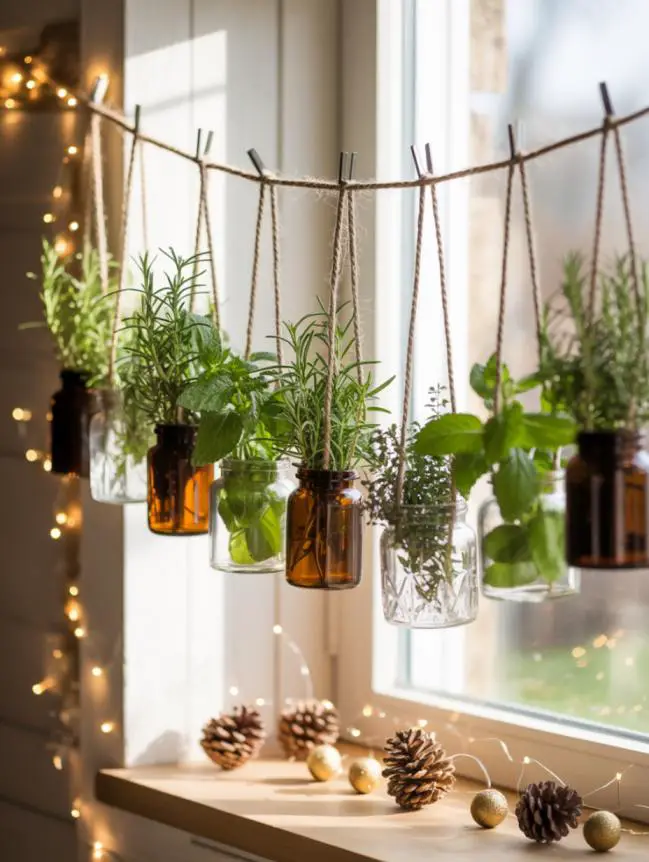
Bring freshness to your Christmas décor with mini plant hangings that combine greenery and festive spirit. Perfect for small corners, kitchen windows, or balconies, these living decorations keep your home smelling fresh and looking vibrant.
Materials You’ll Need
- Small glass jars or recycled bottles
- Fresh herbs (rosemary, mint, thyme) or mini succulents
- Twine or wire for hanging
- Water or soil depending on plant type
- Tiny bows or ornaments for decoration (optional)
Step-by-Step: DIY Hanging Mini Planter
Step 1: Clean the jars and fill them halfway with soil or water.
Step 2: Add your chosen herbs or small plants.
Step 3: Wrap twine securely around the jar’s neck to create a hanger.
Step 4: Add a small ribbon or charm for a festive touch.
Step 5: Hang them by the window for a natural, Christmassy scent.
✨ Result: A refreshing mix of nature and holiday décor — beautiful, aromatic, and eco-friendly.
13. Scented Sachet Ornaments
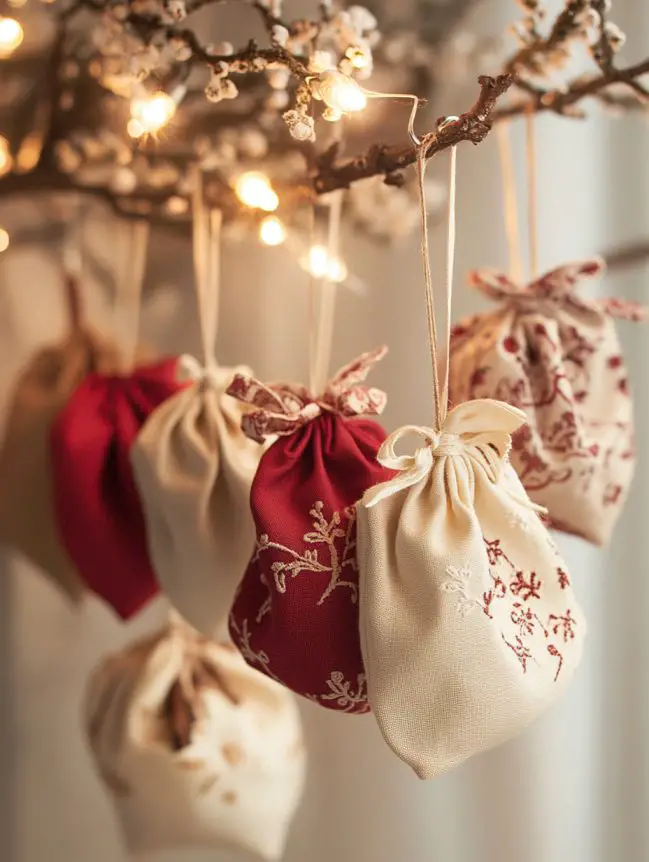
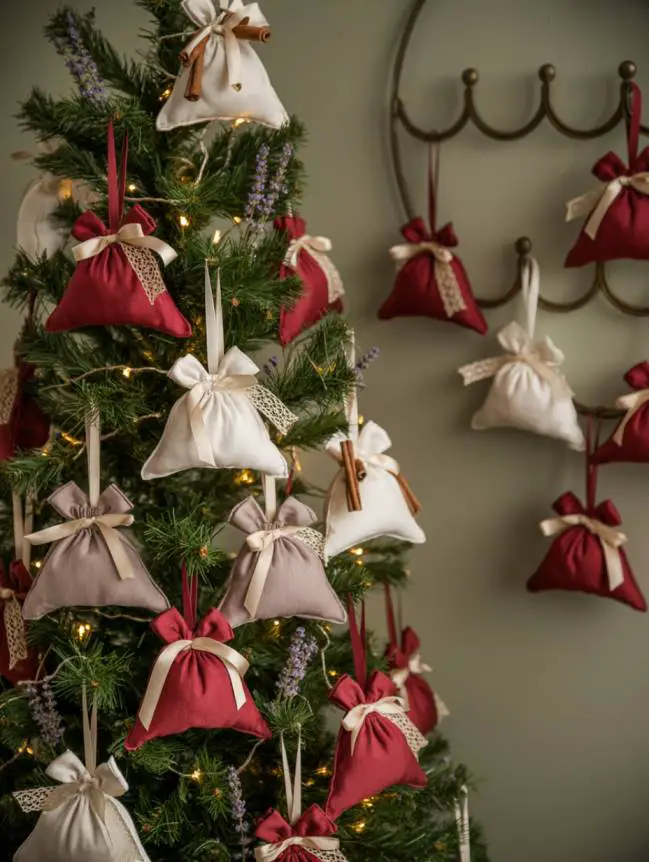

Add a delightful fragrance to your home with DIY scented sachet ornaments. These are perfect for hanging on trees, doorknobs, or closets — filling your space with warm, festive aromas all season long.
Materials You’ll Need
- Small fabric pouches or scraps
- Dried lavender, cloves, or cinnamon
- Needle, thread, or glue
- Ribbon or lace string
Step-by-Step: DIY Scented Hanger
Step 1: Cut two small squares of fabric and sew or glue three sides together.
Step 2: Fill the pouch with dried herbs or potpourri.
Step 3: Close the top and tie it with a ribbon.
Step 4: Add decorative lace or beads if desired.
Step 5: Hang it near the tree, wardrobe, or window.
✨ Result: A soothing, beautifully scented ornament that doubles as natural air freshener.
14. Holiday Chime Decorations
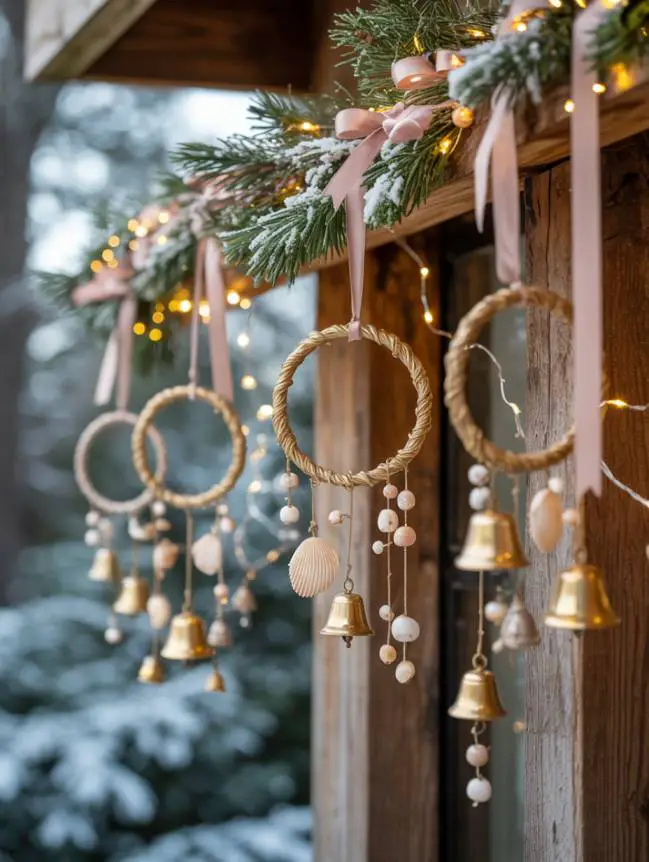
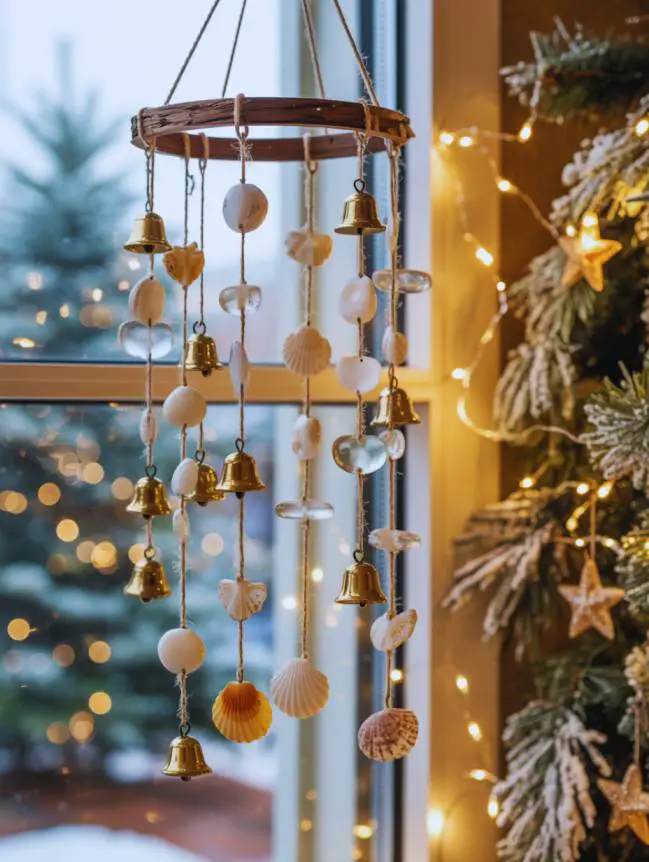
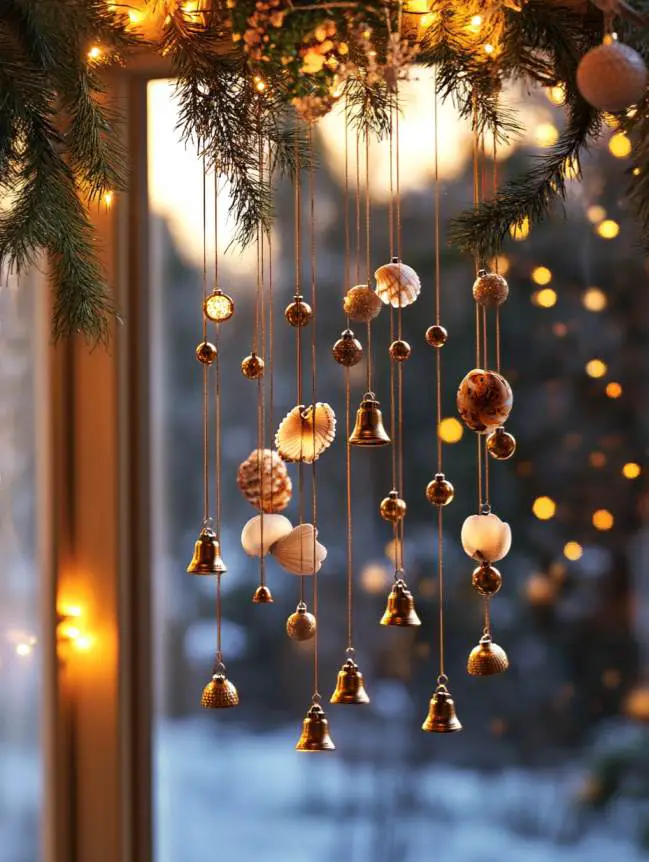
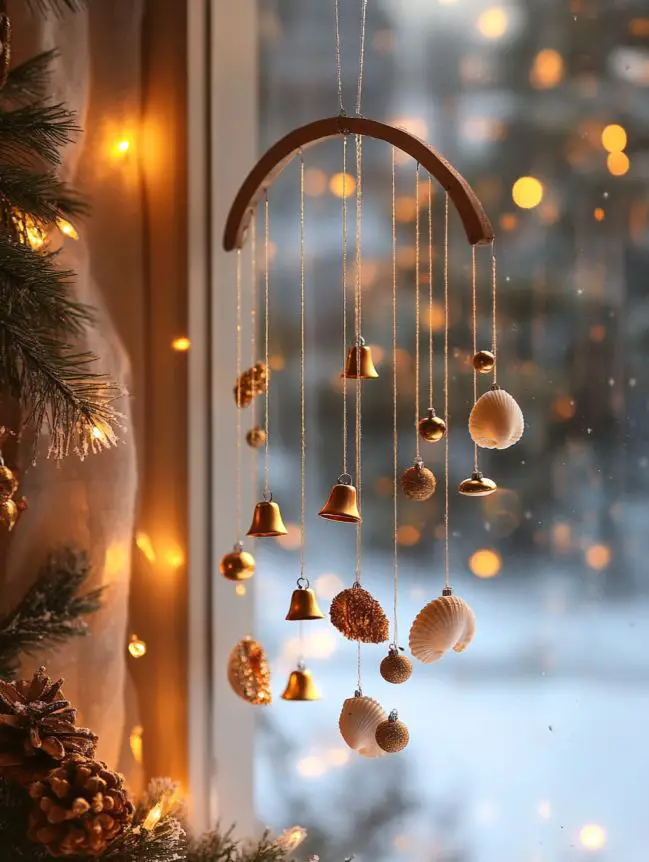
Fill your home with the gentle sounds of joy using DIY holiday wind chimes. Made with bells, shells, or beads, these hanging pieces tinkle softly whenever the breeze passes by — adding magic to your porch or windows.
Materials You’ll Need
- Small bells or seashells
- Metal rings or wooden sticks
- Twine, thread, or fishing line
- Beads for extra charm
Step-by-Step: DIY Christmas Wind Chime
Step 1: Tie strings of bells, beads, or shells in varying lengths.
Step 2: Attach them evenly around a ring or stick.
Step 3: Add one longer string in the center for balance.
Step 4: Hang it by your window, door, or balcony.
Step 5: Enjoy the soft festive jingles in the winter breeze.
✨ Result: A musical decoration that spreads calm, warmth, and Christmas cheer every time it moves.
15. Angel & Star Mobiles
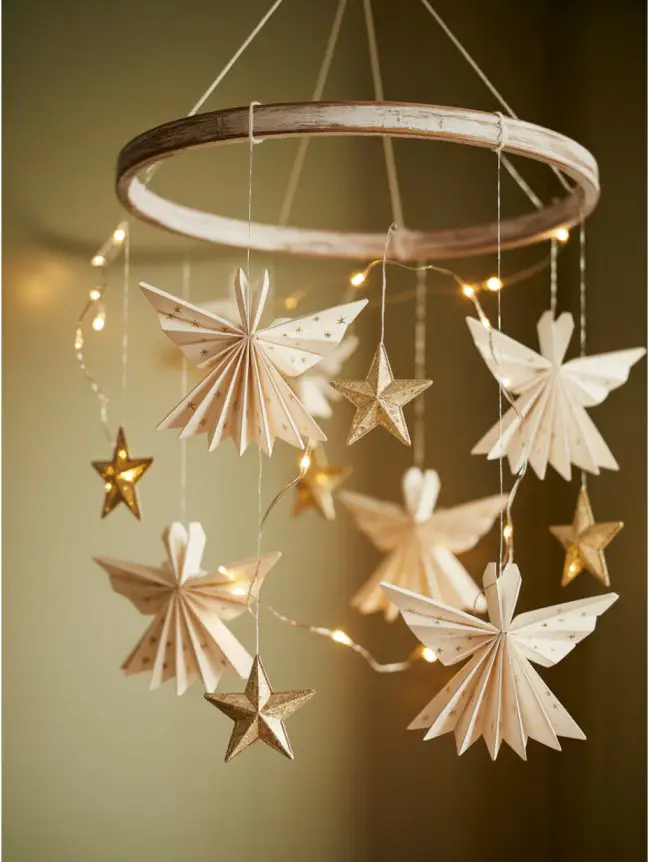
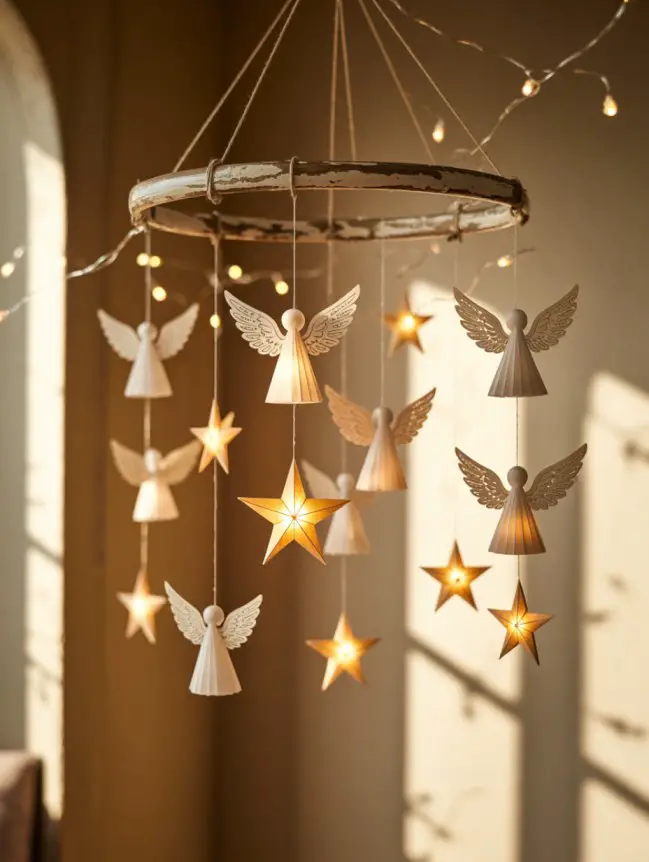
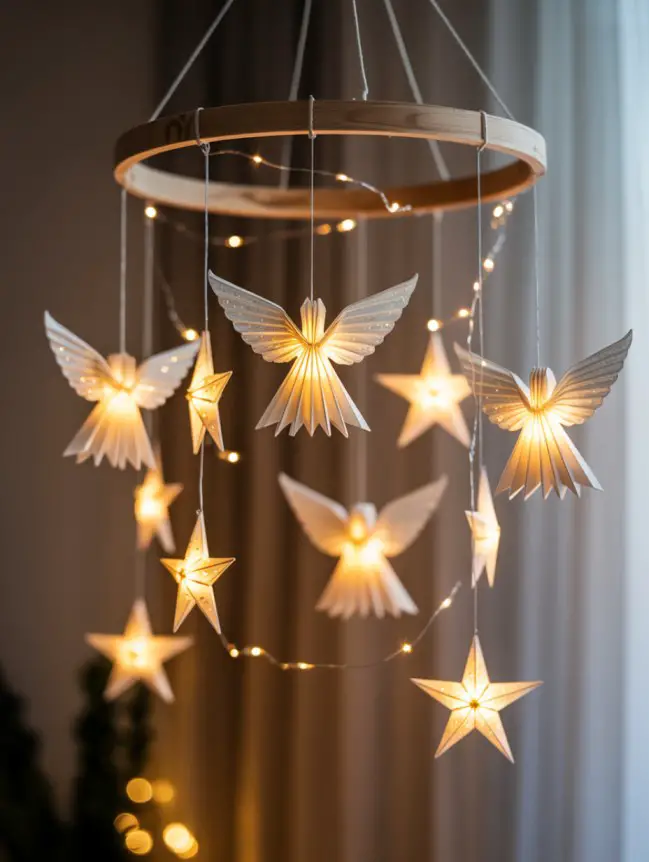
Add a heavenly touch to your décor with DIY angel and star mobiles — perfect for kids’ rooms or quiet reading corners. They sway gently, catching light and creating a peaceful, dreamy vibe.
Materials You’ll Need
- White or golden paper
- Scissors and glue
- Thread or thin string
- Wooden embroidery hoop or ring
- Glitter or metallic pens for detailing
Step-by-Step: DIY Angel Mobile
Step 1: Cut small angel and star shapes from paper.
Step 2: Decorate them with glitter or gold outlines.
Step 3: Tie each shape to a string at different lengths.
Step 4: Attach all strings to a hoop or ring.
Step 5: Hang it near a window where light can shine through.
✨ Result: A delicate, celestial decoration that fills your home with peace, beauty, and soft holiday glow.
16. Mini Gift Box Garlands
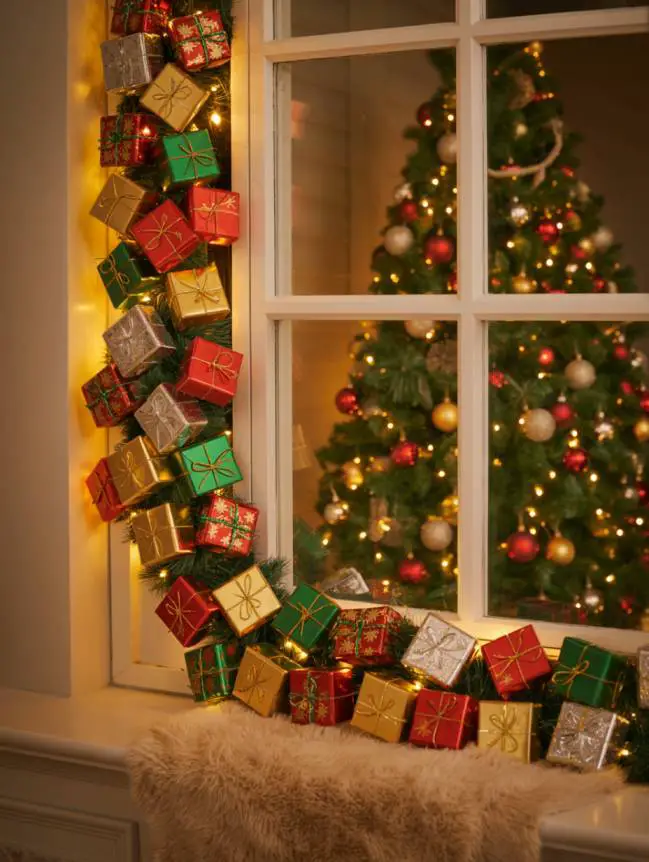
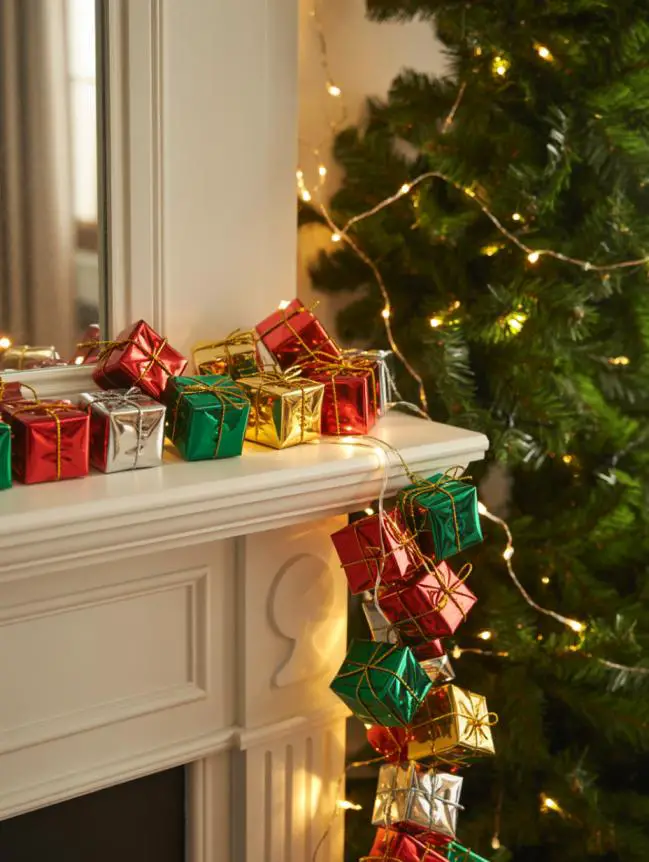
Add a playful twist to your décor with tiny gift box hangings that look adorable on walls, doors, or the Christmas tree. They bring color, surprise, and that festive “unwrap me” excitement to every corner!
Materials You’ll Need
- Small cardboard boxes or folded paper cubes
- Wrapping paper or craft paper
- Ribbon or twine
- Mini gift tags or stickers
- Glue or tape
Step-by-Step: DIY Mini Gift Garland
Step 1: Wrap small boxes in colorful gift paper like real presents.
Step 2: Add ribbons or bows to each for a festive finish.
Step 3: Attach the boxes along a twine using glue or clips.
Step 4: Hang across your mantel, doorway, or stair railing.
Step 5: Add small tags with names or messages for a personal touch.
✨ Result: A charming, cheerful garland that looks like Santa dropped off gifts right into your living room.
17. Snowflake Curtain Hangings
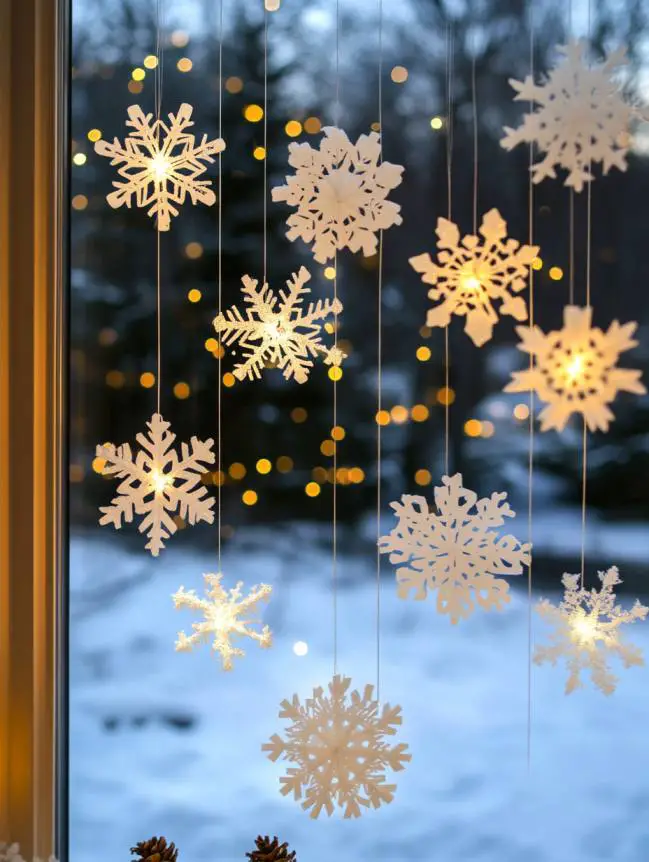
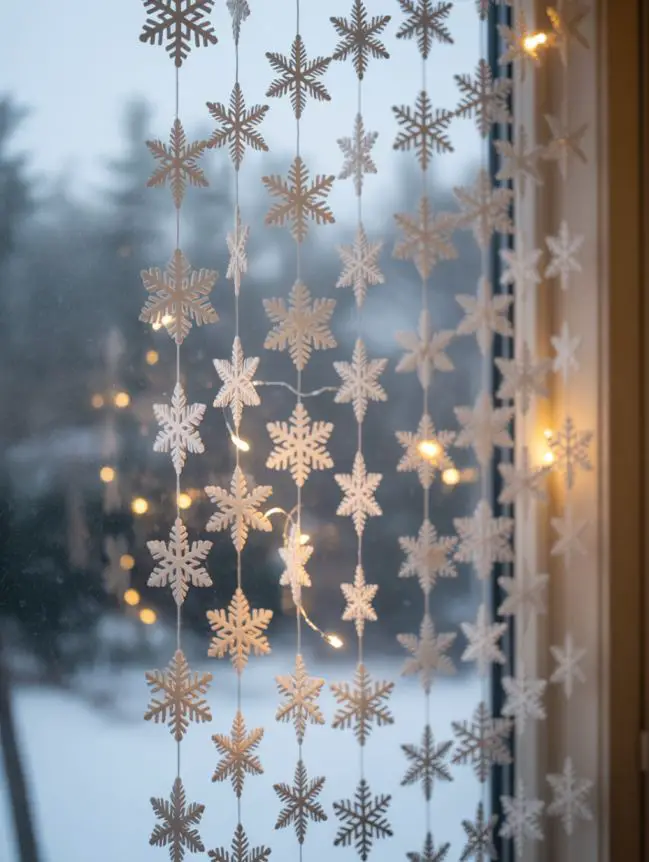
Turn any doorway or window into a shimmering winter scene with DIY snowflake curtains. It’s light, elegant, and perfect for creating that magical white Christmas vibe indoors.
Materials You’ll Need
- White paper or felt sheets
- Scissors and hole punch
- Clear thread or fishing line
- Tape or curtain rod
Step-by-Step: DIY Snowflake Curtain
Step 1: Cut out snowflakes of different sizes and patterns.
Step 2: Punch small holes at the top of each.
Step 3: String them vertically on clear thread, spacing them evenly.
Step 4: Attach each thread to a rod or tape them to your wall or doorway.
Step 5: Add soft fairy lights for an extra dreamy glow.
✨ Result: A floating snow curtain that dances with every breeze — elegant, magical, and picture-perfect for the holidays.
18. Rustic Wooden Slice Hangings
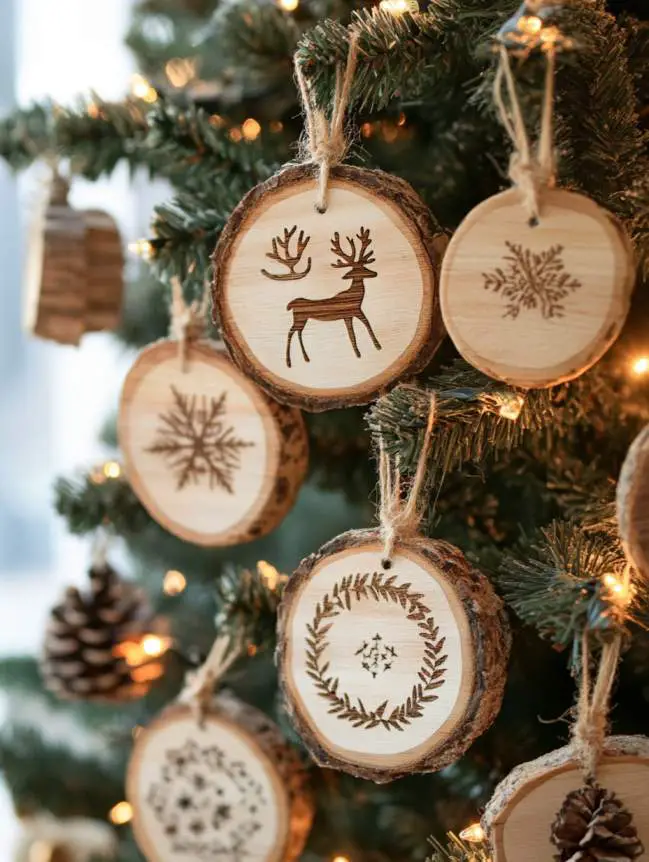
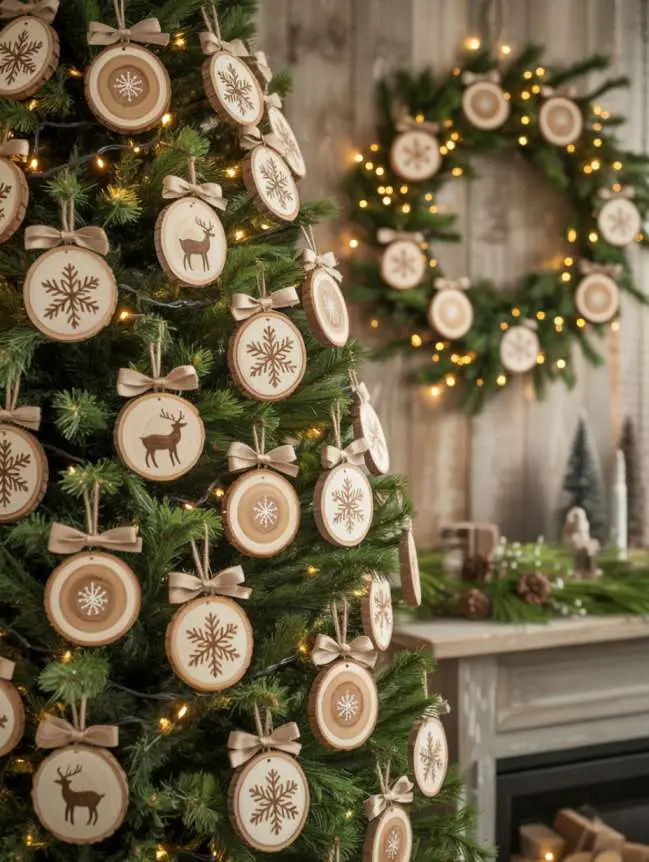
Add a cozy cabin feel with wooden slice ornaments that blend nature and artistry. These rustic hangings look stunning on trees, wreaths, or as wall accents.
Materials You’ll Need
- Small wooden slices (available online or cut from branches)
- Paint, markers, or wood-burn tool
- Jute string or twine
- Small stencil designs (stars, hearts, initials)
Step-by-Step: DIY Rustic Ornament
Step 1: Sand the wooden slice smooth if needed.
Step 2: Paint or burn a festive design like a reindeer, tree, or name initial.
Step 3: Drill or poke a small hole at the top.
Step 4: Thread jute or twine through and tie a loop.
Step 5: Hang on your tree or wall for a farmhouse look.
✨ Result: Natural, earthy ornaments that add warmth and authenticity to your holiday décor.
19. Hanging Mini Wreath Ornaments
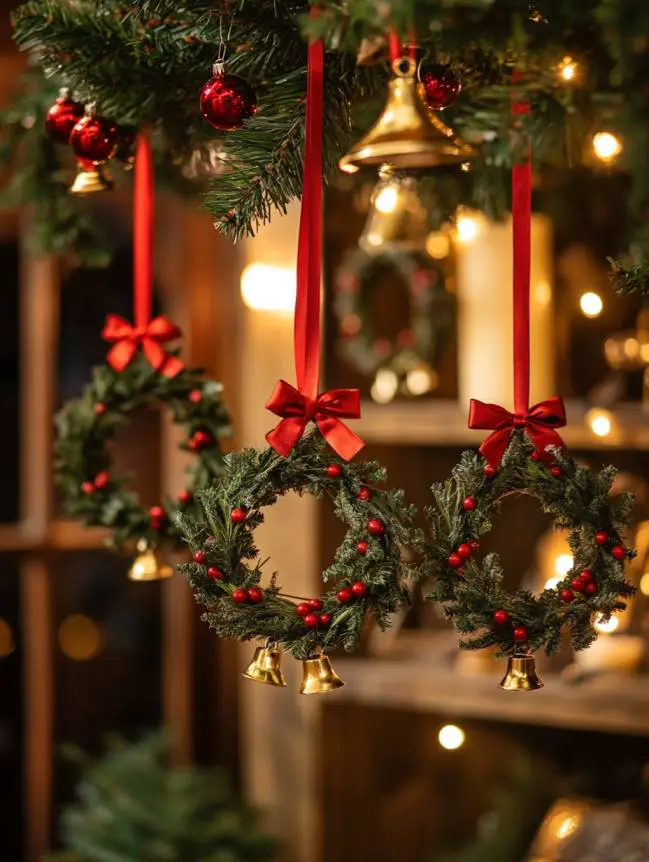
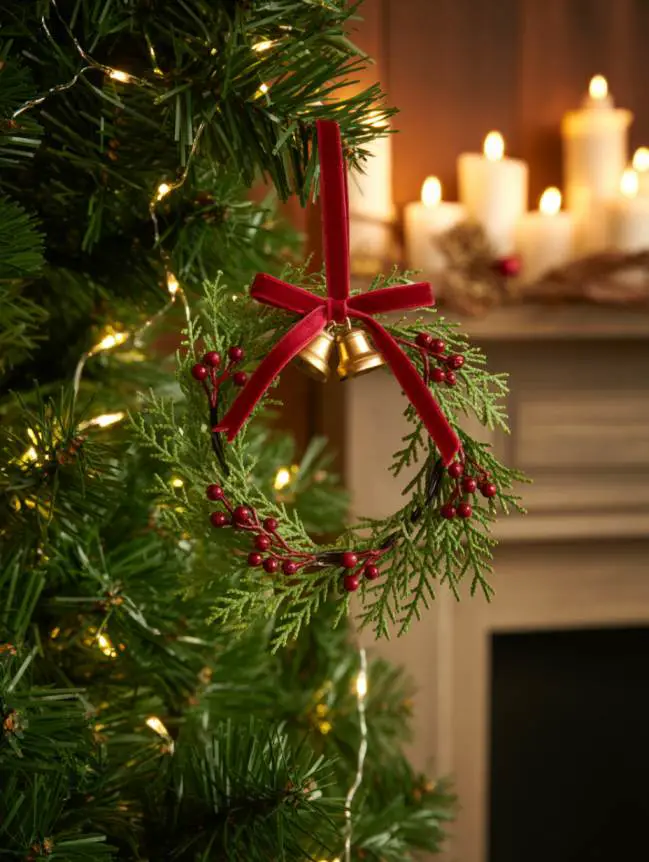

Small wreaths can be just as charming as full-sized ones! These mini hanging wreaths are perfect for Christmas trees, door handles, or even as napkin rings for your festive dinner setup.
Materials You’ll Need
- Small embroidery hoops or metal rings
- Artificial pine leaves or green garlands
- Red ribbon or twine
- Tiny ornaments, berries, or bows
- Glue gun or floral wire
Step-by-Step: DIY Mini Wreath Ornament
Step 1: Wrap the ring with green garland or faux leaves.
Step 2: Secure ends with floral wire or glue.
Step 3: Add tiny berries, bows, or ornaments for color.
Step 4: Tie a red ribbon on top to hang it.
Step 5: Hang them on your tree or around doorknobs.
✨ Result: Adorable, reusable mini wreaths that add a polished, traditional Christmas touch anywhere.
20. Hanging Paper Dove Mobiles

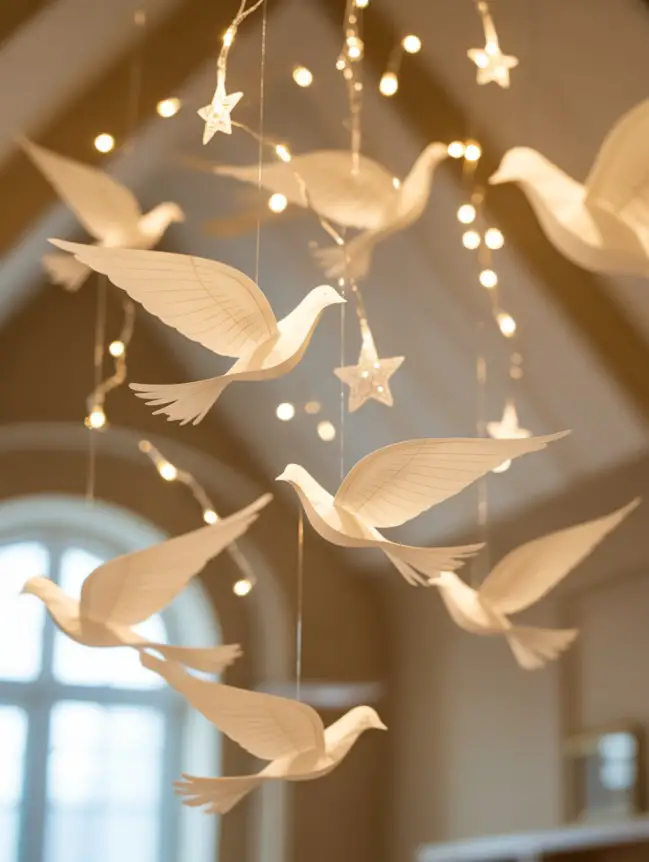
Add peace and elegance to your décor with paper dove hangings — a simple yet symbolic craft that represents love, serenity, and festive spirit.
Materials You’ll Need
- White cardstock or paper
- Scissors and pencil
- String or fishing line
- Glue or tape
- Silver glitter (optional)
Step-by-Step: DIY Paper Dove Hanging
Step 1: Trace and cut out dove shapes from paper.
Step 2: Fold wings slightly upward for a 3D effect.
Step 3: Glue a short piece of string on top for hanging.
Step 4: Decorate lightly with silver glitter or outline.
Step 5: Hang them near windows or lights to let them “fly” in the breeze.
✨ Result: Peaceful, floating doves that add lightness and calm to your Christmas atmosphere.
21. Hanging Christmas Stocking Garland

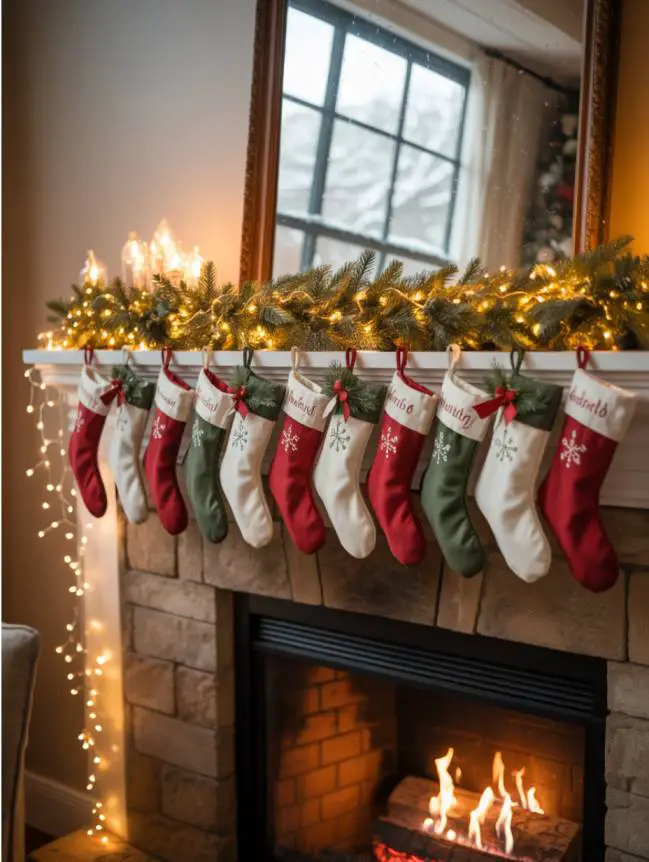
Combine tradition and style with a DIY stocking garland — cute, functional, and fun for both kids and adults. You can fill each stocking with goodies or simply use them as colorful décor.
Materials You’ll Need
- Mini fabric stockings (or make them from felt)
- Twine or ribbon
- Clothespins or clips
- Small candies, gifts, or messages (optional)
Step-by-Step: DIY Stocking Garland
Step 1: Make or buy mini stockings in red, green, and white.
Step 2: Clip them evenly along a twine or ribbon.
Step 3: Add candy canes, chocolates, or notes inside.
Step 4: Decorate with mini bows or holly leaves.
Step 5: Hang the garland over a fireplace, wall, or window.
✨ Result: A festive and functional decoration that adds color, joy, and holiday spirit wherever it’s hung.
22. Hanging Cookie Ornaments

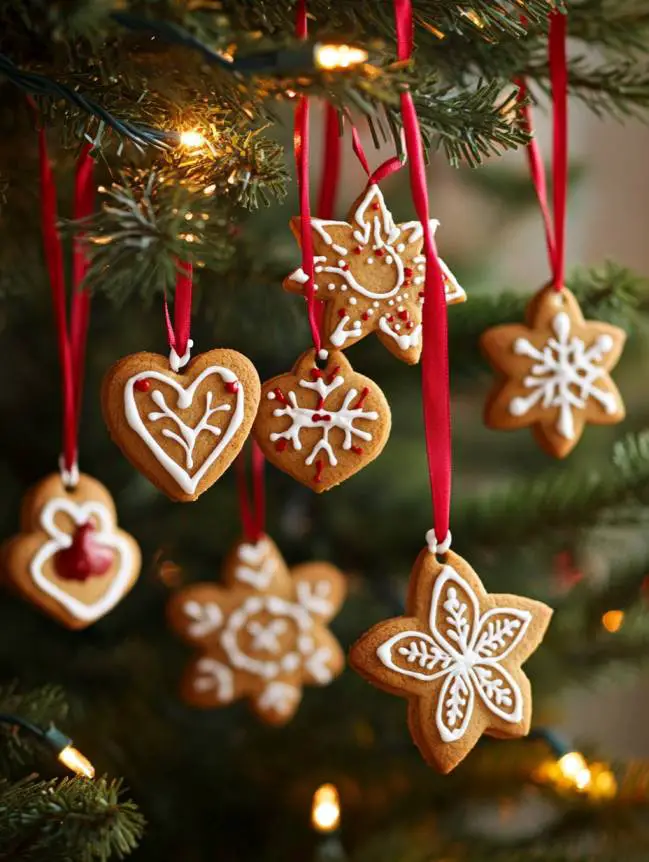
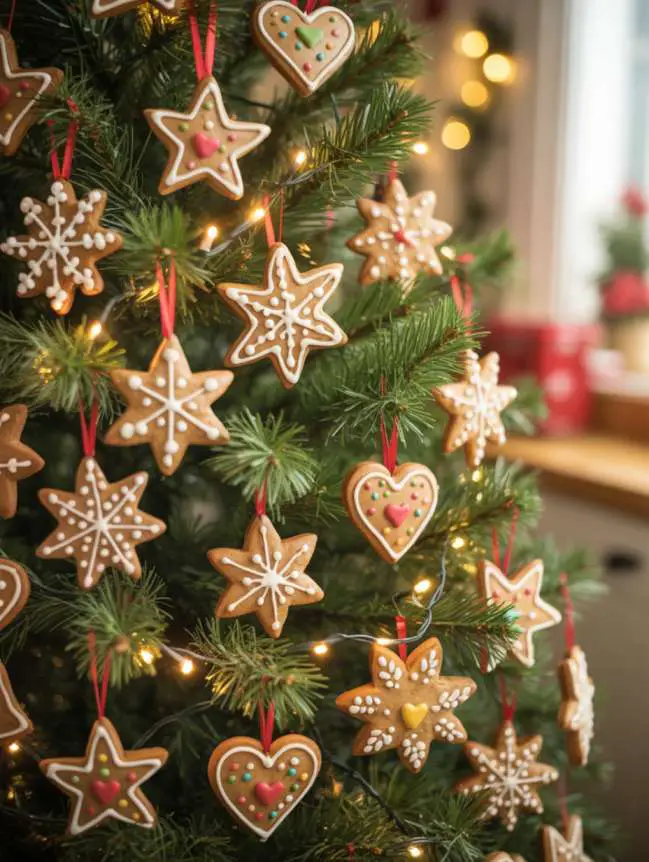
Nothing says Christmas like the smell of freshly baked cookies — and now, they can double as décor! DIY cookie ornaments are sweet, creative, and completely edible. Perfect for family fun or gifting to guests after the holidays.
Materials You’ll Need
- Cookie dough (gingerbread or sugar cookie works best)
- Rolling pin and cookie cutters (stars, trees, hearts)
- Straw or skewer (for hole)
- Ribbon or twine
- Icing and sprinkles for decoration
Step-by-Step: DIY Cookie Ornament
Step 1: Roll out your cookie dough and cut shapes using cutters.
Step 2: Make a small hole near the top of each cookie using a straw.
Step 3: Bake and cool completely.
Step 4: Decorate with icing, glitter sugar, or candy bits.
Step 5: Thread ribbon through the hole and hang them on your tree or garland.
✨ Result: Adorable, fragrant cookie ornaments that fill your home with warmth, sweetness, and Christmas joy.
23. Jingle Bell Chandeliers
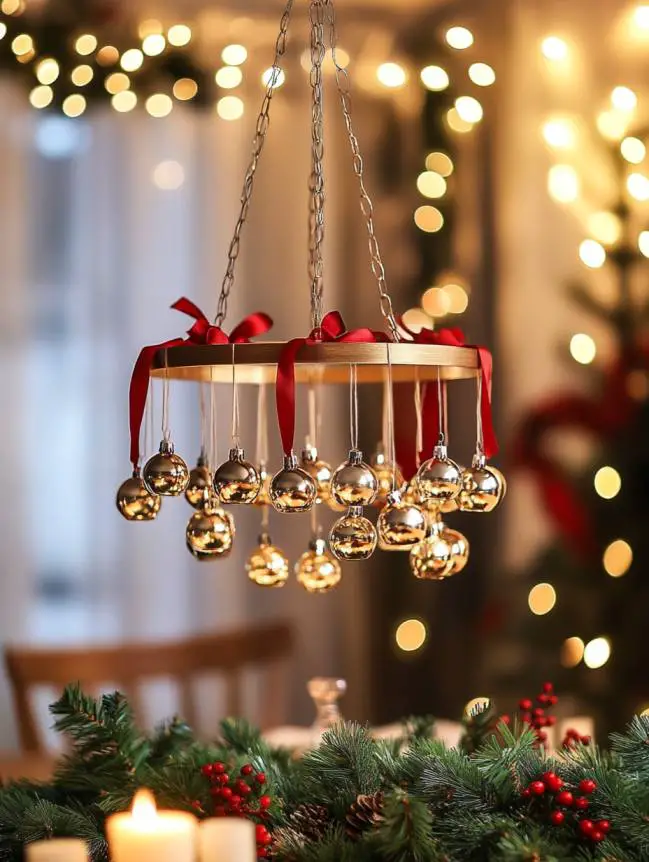

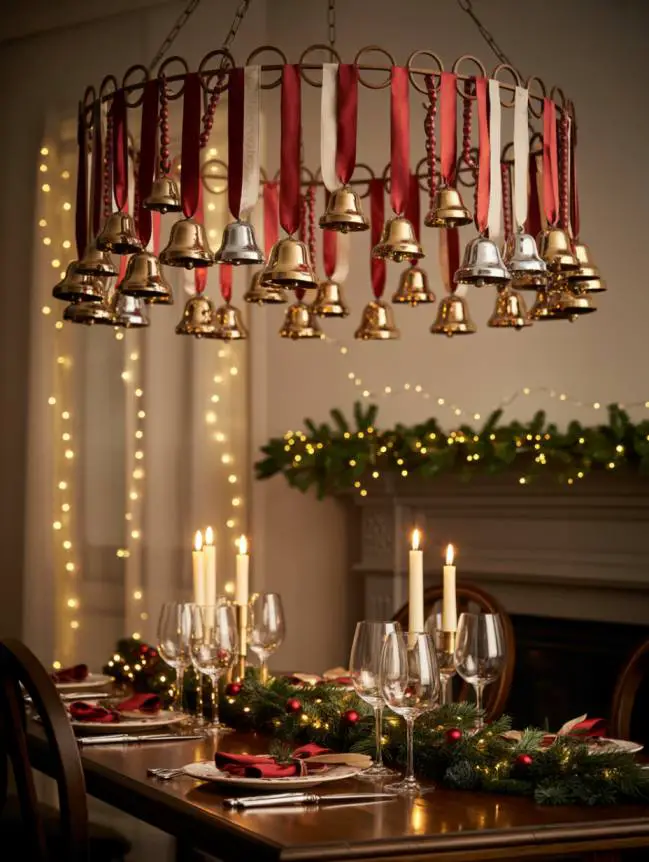
Turn the sound of Christmas into a centerpiece with DIY jingle bell chandeliers — elegant yet playful hangings that fill your home with cheerful jingles.
Materials You’ll Need
- Metal or wooden ring (or embroidery hoop)
- Dozens of small bells in gold, silver, or red
- Ribbons or strings
- Glue or wire
- Hook or sturdy string for hanging
Step-by-Step: DIY Jingle Bell Chandelier
Step 1: Tie multiple ribbons with bells at their ends.
Step 2: Secure each ribbon around the ring at varying lengths.
Step 3: Add extra bows, ornaments, or greenery around the ring.
Step 4: Tie a strong string on top for hanging.
Step 5: Hang it above your dining area or entryway.
✨ Result: A dazzling, musical chandelier that jingles gently with every breeze — bringing festive sound and sparkle to your space.
24. Fairy Light Balloon Orbs
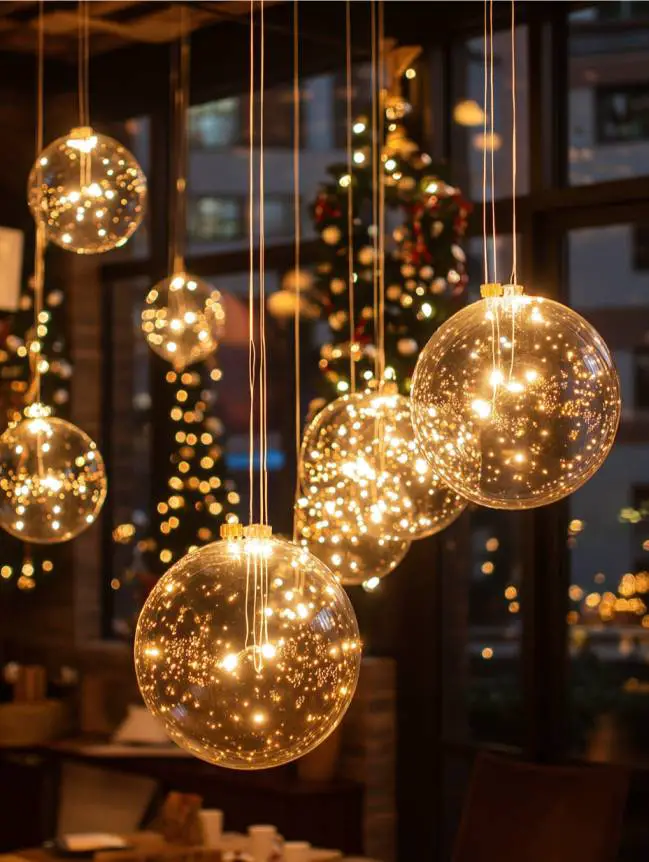
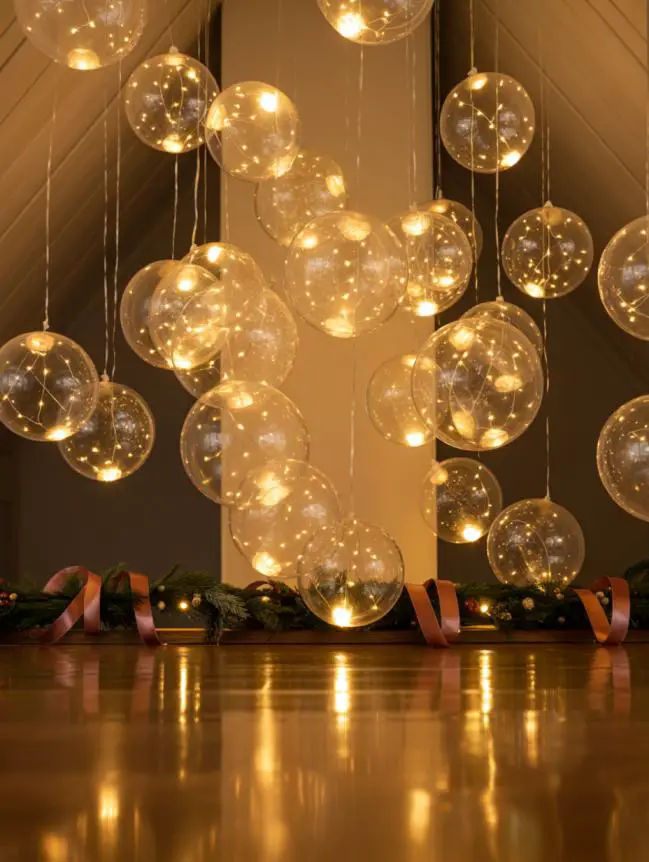
Create floating magic with fairy light balloon hangings — stunning glowing orbs that make your Christmas décor look straight out of a fantasy movie.
Materials You’ll Need
- Transparent balloons
- LED fairy lights (battery-operated)
- String or ribbon
- Adhesive hooks or tape
- Small ornaments or snowflake cutouts (optional)
Step-by-Step: DIY Fairy Light Balloon Orb
Step 1: Inflate clear balloons to your desired size.
Step 2: Wrap fairy lights gently around each balloon.
Step 3: Secure ends with tape or small clips.
Step 4: Tie a ribbon and hang from ceiling or curtain rod.
Step 5: Turn on the lights for an instant glowing display.
✨ Result: Mesmerizing light orbs that create a dreamy, soft-glowing Christmas ambiance — perfect for parties and cozy nights.
25. Macramé Christmas Wall Hangers
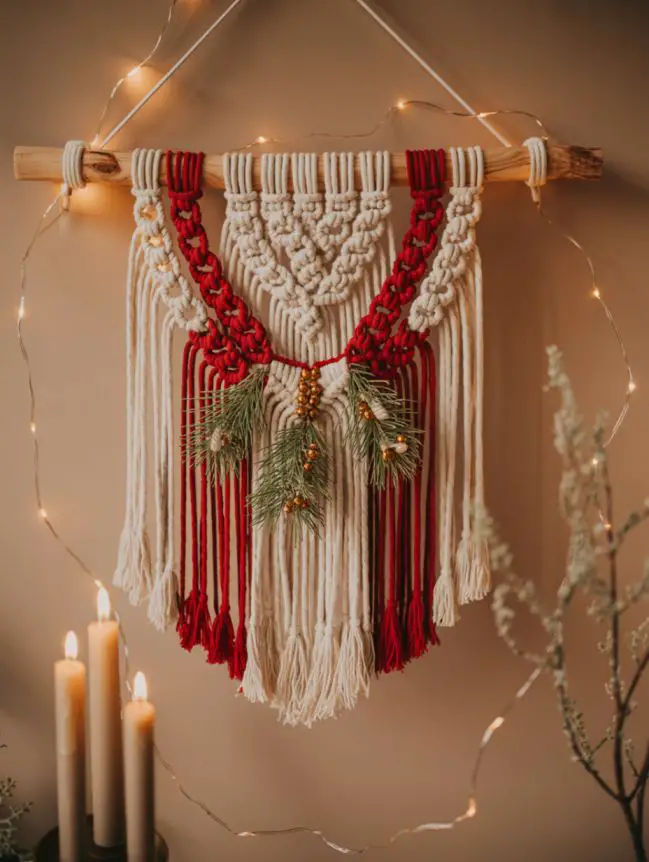
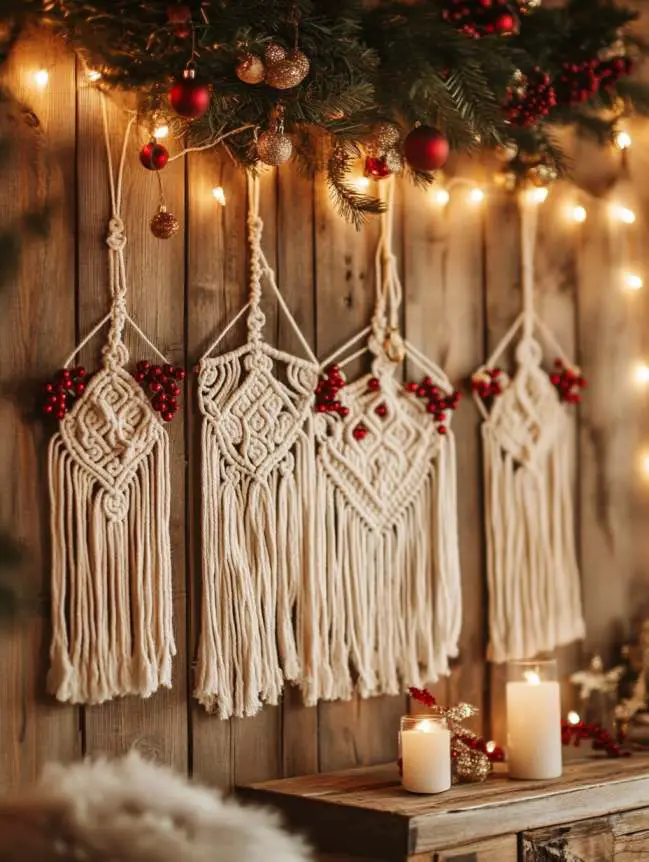
Combine art and festivity with DIY macramé Christmas hangers — elegant pieces that add texture, warmth, and boho charm to your décor.
Materials You’ll Need
- Cotton macramé cord (white, cream, or red)
- Wooden dowel or stick
- Scissors
- Beads, pine sprigs, or tiny ornaments
- Optional: macramé pattern guide
Step-by-Step: DIY Macramé Wall Hanger
Step 1: Cut multiple cords and tie them to a dowel using a lark’s head knot.
Step 2: Follow a simple knot pattern (square or spiral knots).
Step 3: Add beads or small ornaments midway for a festive look.
Step 4: Trim the bottom cords into a triangle or V-shape.
Step 5: Hang on a wall or door using a ribbon loop.
✨ Result: A chic, handmade piece that blends holiday warmth with timeless macramé style — perfect for minimalist or rustic Christmas décor.
Conclusion: Bring the Magic Home This Christmas
Christmas décor doesn’t have to be expensive or complicated — sometimes, the most meaningful decorations are the ones made by hand. With these easy DIY Christmas hanging decoration ideas, you can fill your home with warmth, color, and creativity. From rustic pinecone garlands to glowing fairy-light orbs, every craft here adds a personal touch that store-bought décor simply can’t match.
Whether you’re decorating with your family, crafting solo on a cozy weekend, or looking for eco-friendly projects, these ideas let you create beauty from the simplest materials. Every ribbon, bell, and handmade ornament tells a story — your story — of care, creativity, and the joy of giving.
So, grab your glue gun, gather your ribbons and glitter, and start crafting your own Christmas wonderland today. Remember, it’s not about perfection — it’s about the love and laughter that go into each piece.
✨ Let your creativity shine, and make this Christmas one to remember — handmade, heartfelt, and full of light!
Final Tips for Perfect DIY Hangings
✅ Use lightweight materials — they’re easier to hang and safer around kids or pets.
✅ Mix and match textures — combine paper, fabric, and natural elements for visual depth.
✅ Add fairy lights — a soft golden glow enhances any handmade decoration.
✅ Go eco-friendly — reuse paper, jars, and cardboard whenever possible.
✅ Personalize everything — add names, dates, or small notes to make each piece special.
Last update on 2026-03-20 / Affiliate links / Images from Amazon Product Advertising API