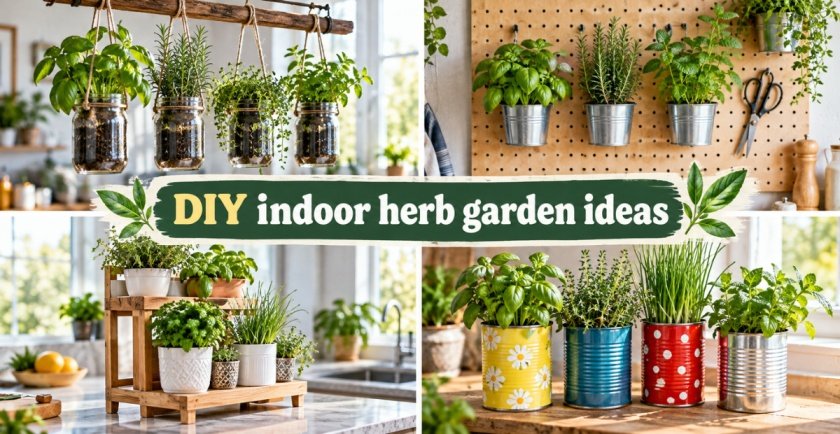
Growing fresh herbs indoors is one of the easiest ways to make your home feel greener, fresher, and more useful at the same time. A small basil plant beside the kitchen window can provide leaves for pasta and salads, while mint, parsley, rosemary, thyme, and chives can add both fragrance and color to everyday spaces.
The best part is that you do not need a backyard or even a balcony to enjoy homegrown herbs. With a little creativity, empty walls, sunny windows, kitchen counters, shelves, hanging corners, and even the side of a refrigerator can become productive growing spaces.
These DIY indoor herb garden ideas include simple recycled projects, decorative planters, space-saving vertical gardens, hanging systems, and more stylish indoor displays. Each project can be adapted to suit your home, available space, and the herbs you use most often.
Whether your style is rustic farmhouse, modern minimal, cottage-inspired, industrial, or simply practical, there is an indoor herb garden here that can work beautifully in your home.
1. Rustic Mason Jar Herb Garden on a Wooden Board
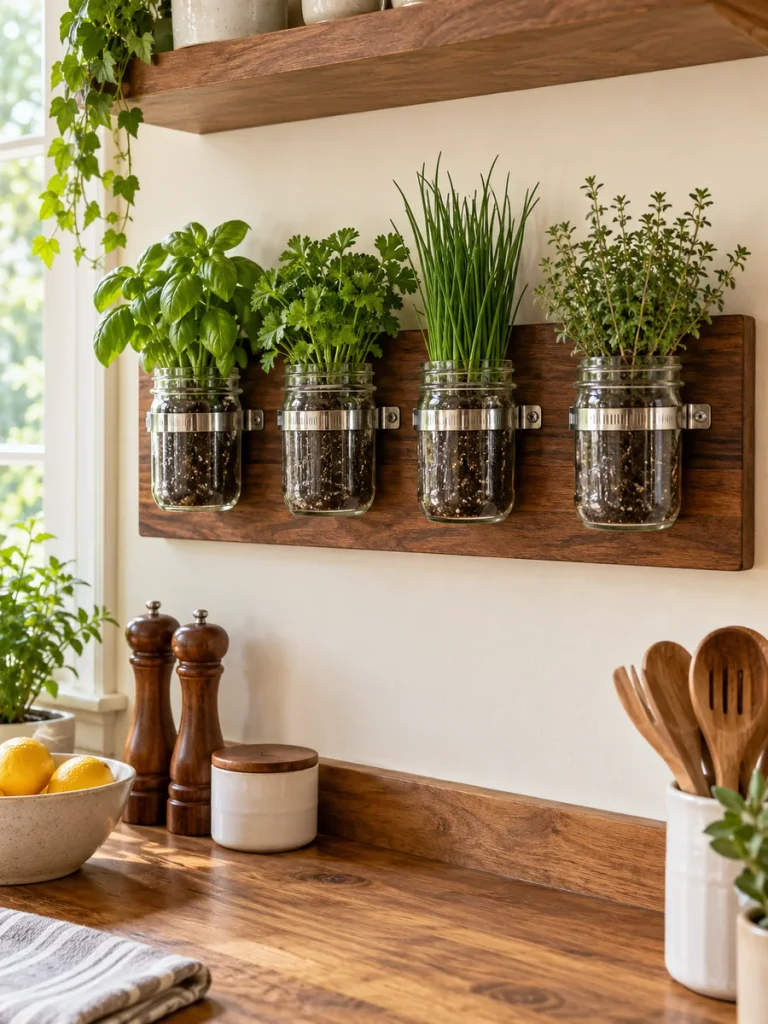
A wall-mounted mason jar garden is a lovely way to combine fresh herbs with rustic kitchen decor. Instead of filling up a windowsill with separate pots, this project moves the herbs vertically and turns them into part of the wall display.
The clear glass jars let you see the greenery from every angle, while a stained wooden board adds warmth and a handmade farmhouse feel. This is especially useful in small kitchens where the counters are already crowded with appliances, jars, and cooking essentials.
You can grow several different herbs together on one board and label each container so they are easy to identify while cooking. Basil, parsley, chives, and thyme all look beautiful in this arrangement.
What You’ll Need
- Wooden board
- 3–5 mason jars
- Metal jar clamps
- Screws
- Small nursery pots or planting inserts
- Potting mix
- Herb plants
- Sandpaper
- Wood stain or paint
- Small herb labels
How to Make It
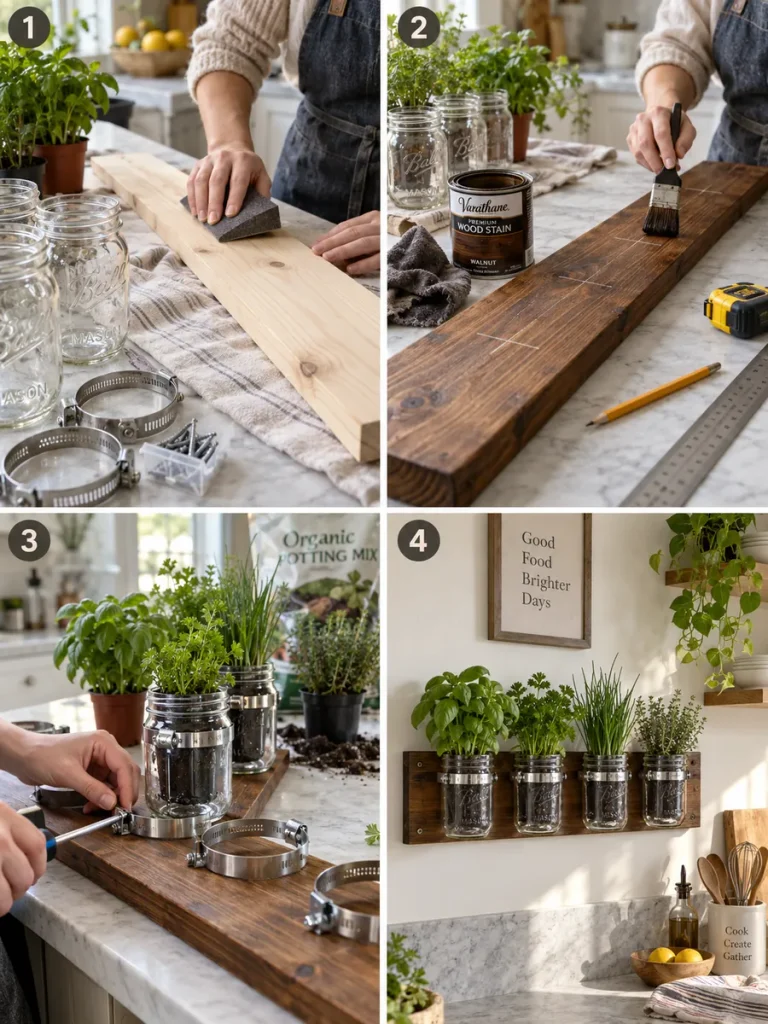
- Choose a wooden board long enough to hold all your jars with enough space between them.
- Sand the entire board until the surface and edges feel smooth.
- Apply your preferred wood stain or paint and let it dry completely.
- Measure and mark the position of every jar.
- Attach wide metal clamps securely to the marked points.
- Place small nursery pots or removable planting inserts inside the mason jars.
- Add potting mix and plant one herb variety in each container.
- Tighten the clamps around the jars.
- Add small labels beneath each herb.
- Mount the finished board securely near a bright kitchen window.
Styling Tip: Use dark walnut-stained wood, clear jars, and handwritten black labels for a cozy farmhouse-style finish.
2. Tiered Wooden Countertop Herb Garden
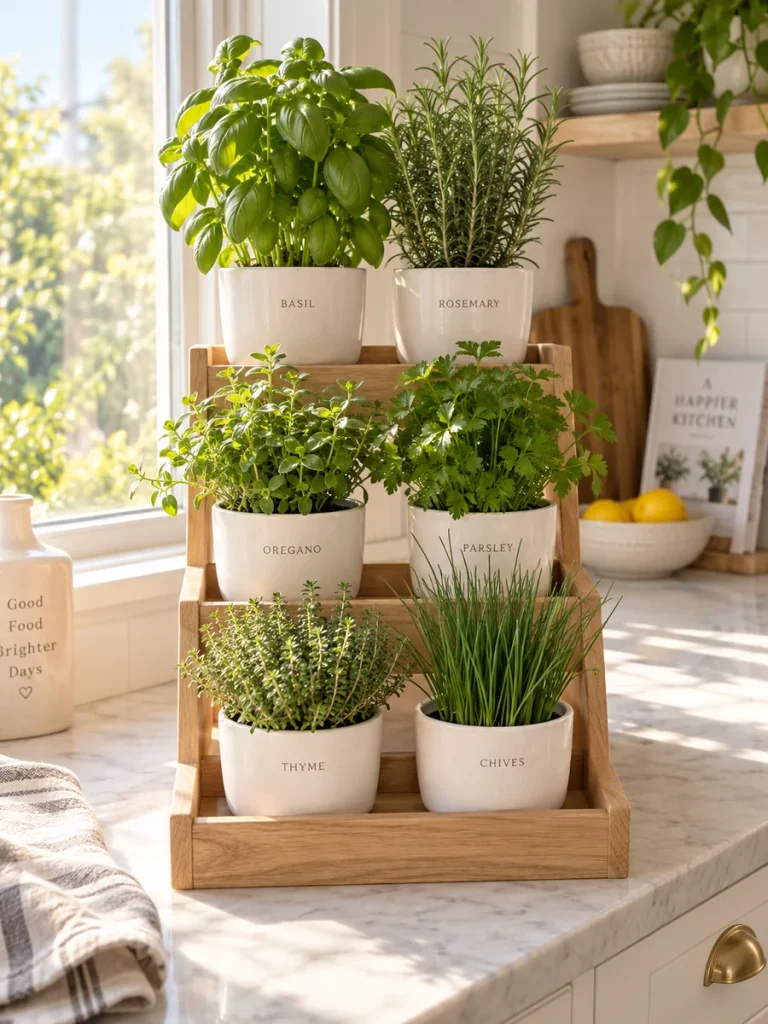
A tiered herb planter is perfect when you want to grow several herbs but only have a narrow section of counter available. By stacking the pots at different heights, you can fit more plants into the same footprint while still keeping every herb visible.
The stepped design also helps prevent taller herbs from completely hiding smaller ones. Basil and rosemary can sit toward the back, while thyme, oregano, and chives can be arranged along the lower levels.
This type of garden looks especially attractive beside a kitchen window because each tier catches the light differently. It also makes a great centerpiece for a kitchen island if the space receives enough natural light.
What You’ll Need
- Wooden boards
- Small wooden blocks
- Wood screws
- Drill
- Sandpaper
- Moisture-resistant wood finish
- 3–6 small herb pots
- Potting mix
- Herb plants
How to Make It
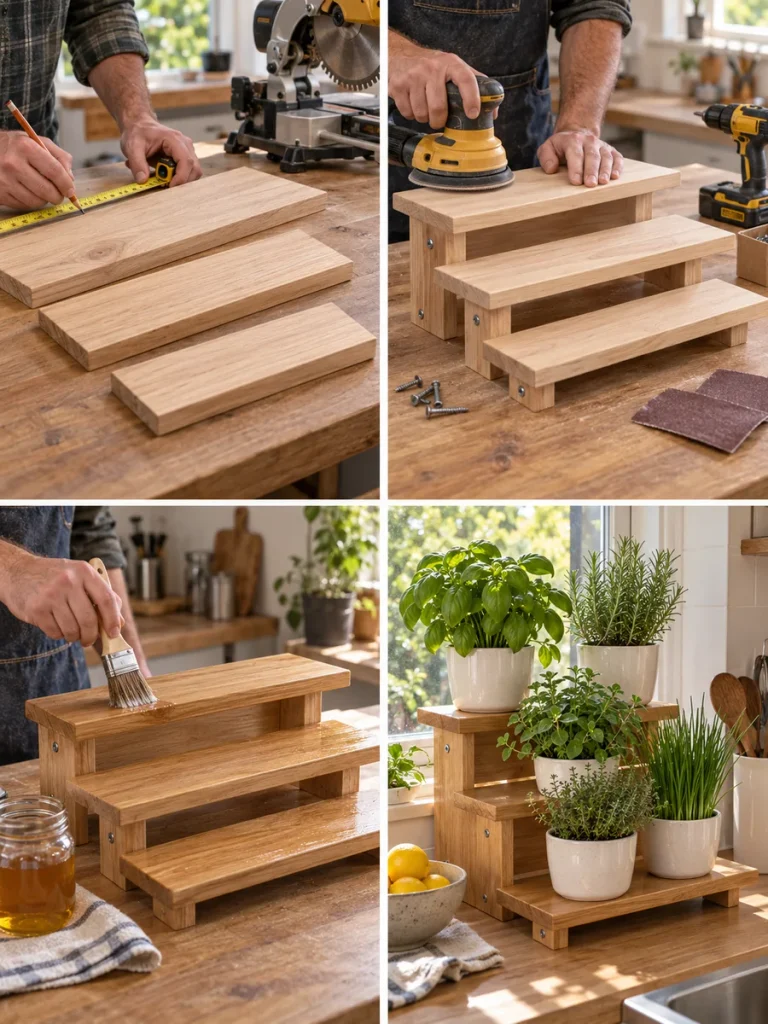
- Cut three wooden platforms in gradually decreasing sizes.
- Sand every piece thoroughly, including the corners.
- Use wooden blocks to raise the second and third levels.
- Screw the platforms together securely to create a staircase shape.
- Apply a protective finish suitable for indoor use.
- Allow the wood to dry completely.
- Arrange the herb pots across the three levels.
- Place taller basil, parsley, or rosemary toward the back.
- Position thyme, oregano, or chives along the front.
- Set the finished planter beside a bright window.
Styling Tip: Use identical cream-colored or terracotta pots to make the tiered garden look neat and coordinated.
3. Hanging Terracotta Pot Herb Garden
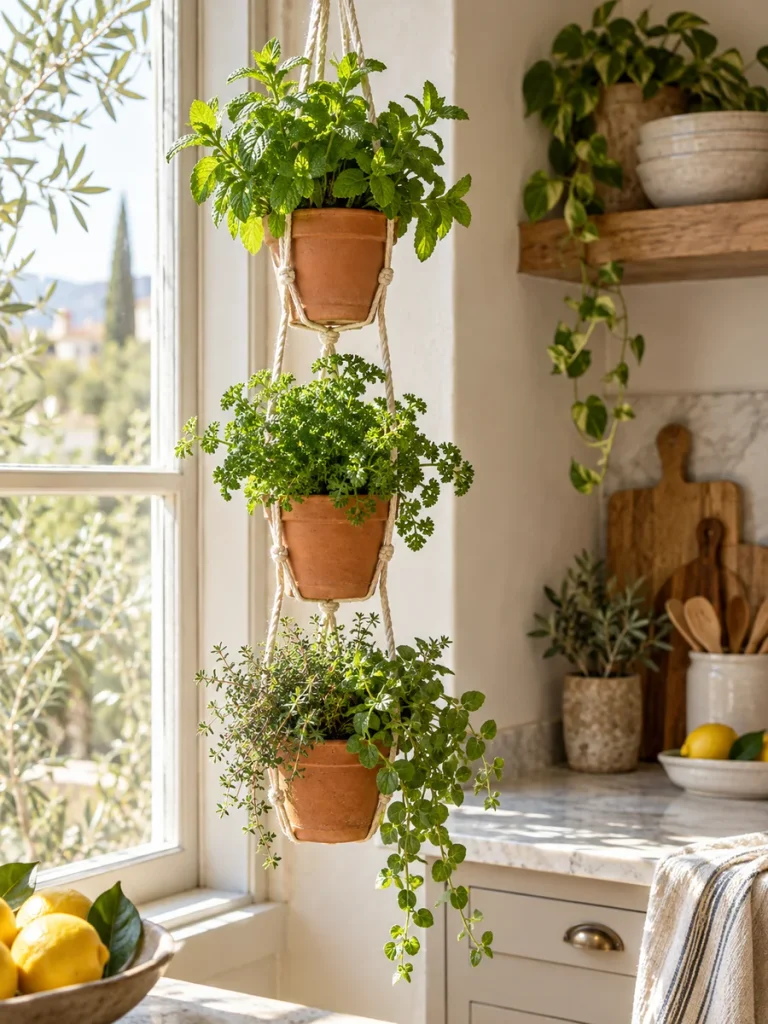
Terracotta pots have a timeless garden look, but they become even more interesting when suspended vertically indoors. A hanging herb garden allows you to grow several plants without using valuable shelves or counters.
The warm orange tones of terracotta contrast beautifully with fresh green herbs, making the arrangement decorative enough to become a feature in your kitchen or dining area. The vertical placement also works especially well beside tall windows.
You can hang three or four pots in a single column or create two matching hanging arrangements on either side of a window. Compact herbs such as thyme, parsley, mint, and oregano work particularly well.
What You’ll Need
- Small terracotta pots
- Strong cotton rope
- Secure ceiling or wall hook
- Potting mix
- Herb plants
- Small saucers or removable inner pots
- Optional paint
How to Make It
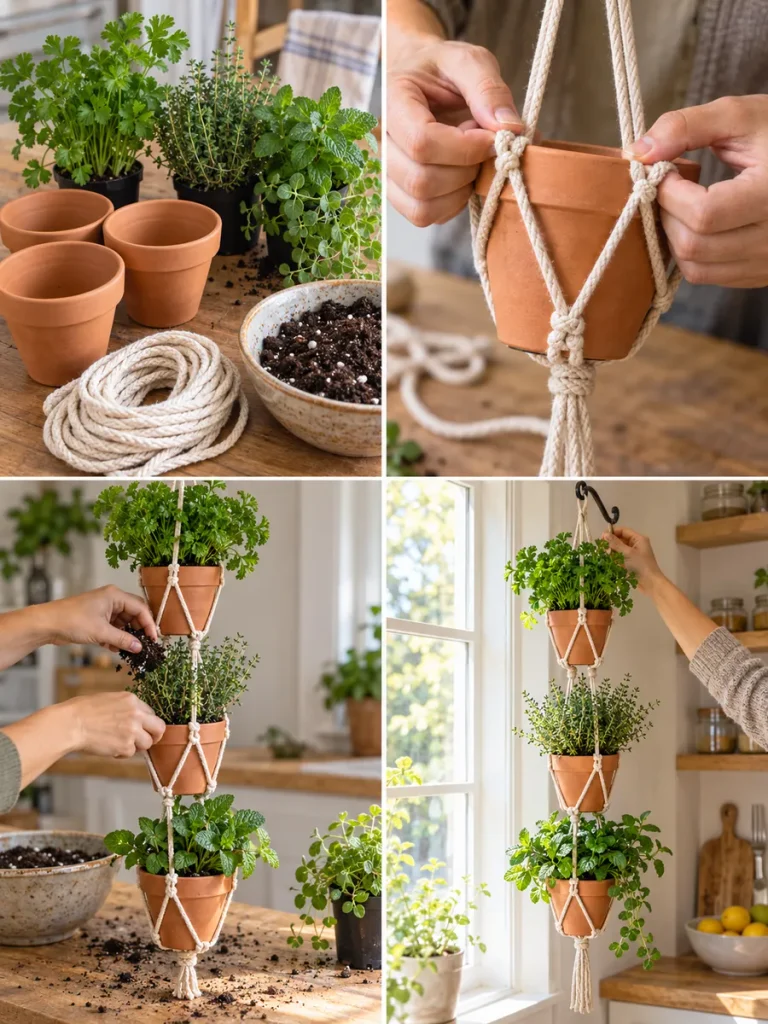
- Choose lightweight terracotta pots in similar sizes.
- Paint simple stripes or patterns if you want a decorative finish.
- Cut strong rope into equal lengths.
- Tie secure supports around the first pot.
- Repeat the process for the second and third pots.
- Leave enough distance between each level for the herbs to grow.
- Fill the pots with potting mix.
- Plant mint, parsley, oregano, or thyme.
- Attach the hanging system to a strong hook.
- Position it near a bright window.
Styling Tip: Natural terracotta with cream rope creates a relaxed Mediterranean-inspired look.
4. DIY Magnetic Refrigerator Herb Garden
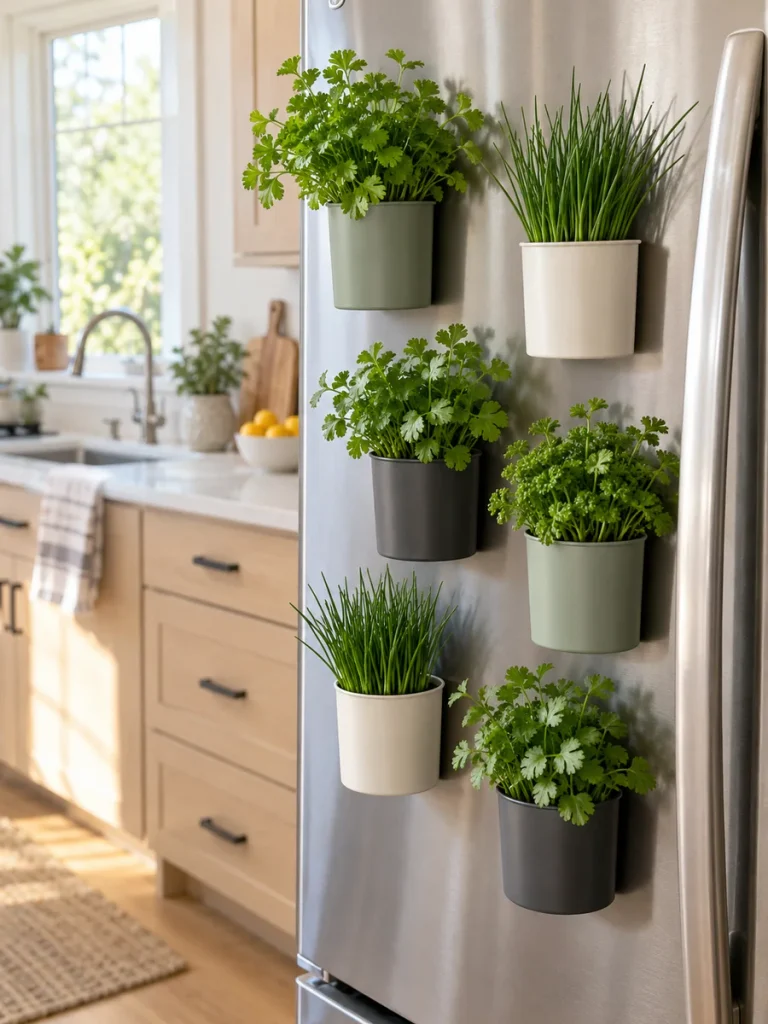
The side of a refrigerator is often completely unused, making it a clever location for a compact herb garden. Magnetic planters can turn this overlooked vertical surface into a practical growing area.
This idea works best for lightweight herbs and small containers. Because the planters stay close to the cooking area, you can quickly snip chives, parsley, or cilantro while preparing meals.
The containers can also become part of your kitchen decor. Paint them in one color family for a modern appearance or use several muted shades for something more playful.
What You’ll Need
- Lightweight metal containers
- Strong magnets
- Waterproof adhesive
- Small nursery pots
- Potting mix
- Small herb plants
- Paint
- Plant labels
How to Make It
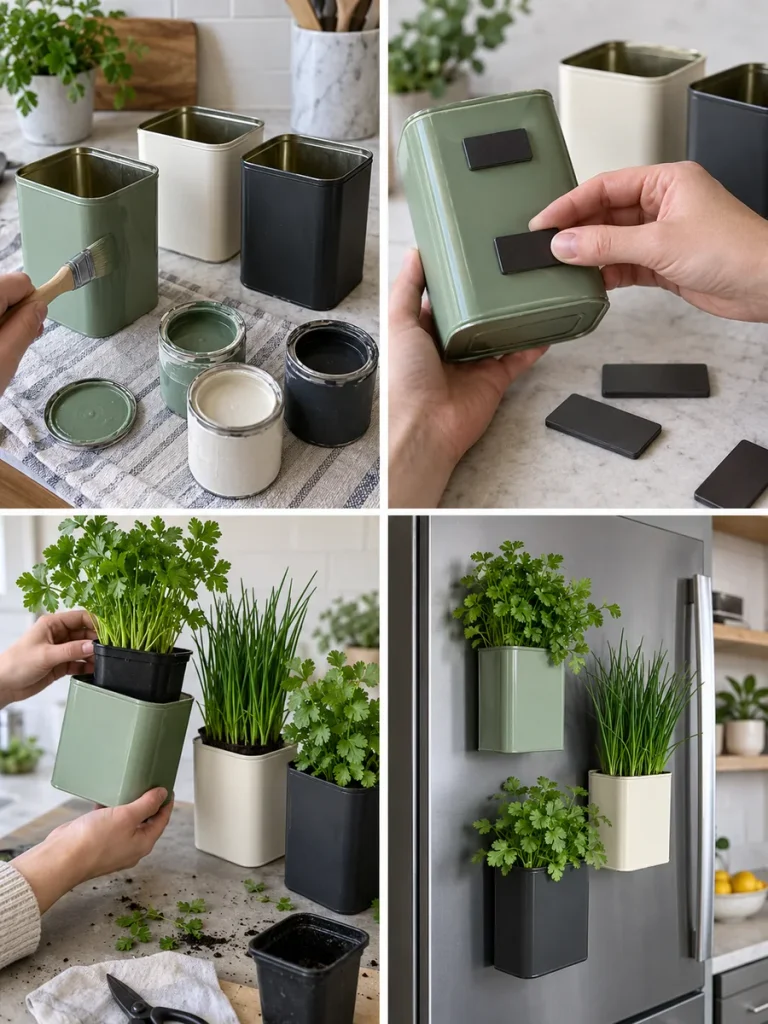
- Clean the metal containers thoroughly.
- Smooth or cover any sharp edges.
- Paint the outside and allow it to dry.
- Attach strong magnets to the backs using waterproof adhesive.
- Allow the adhesive to cure fully.
- Test each empty container on the refrigerator.
- Insert small nursery pots inside the containers.
- Plant chives, parsley, or cilantro.
- Add labels.
- Arrange the planters in a staggered pattern.
Styling Tip: Matte sage green, white, and charcoal containers work beautifully in modern kitchens.
5. Repurposed Wooden Crate Herb Garden
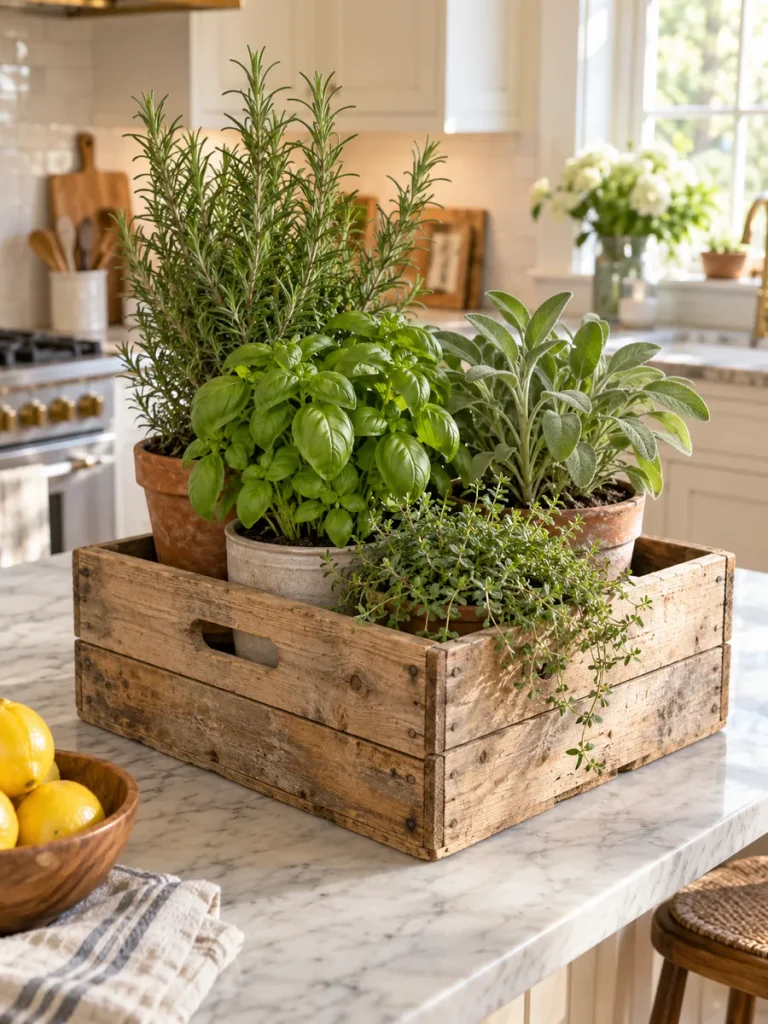
A wooden crate can become a charming portable indoor herb garden with very little work. The shape naturally holds several pots together while giving the arrangement a rustic, collected appearance.
One of the biggest advantages of a crate garden is that you can move the entire group of herbs at once. If one kitchen window receives better sunlight during part of the day, simply carry the crate to the brighter position.
The deeper structure also lets you create a layered arrangement. Taller rosemary can sit at the back while basil, sage, and thyme fill the middle and front.
What You’ll Need
- Small wooden crate
- Sandpaper
- Wood stain or paint
- Waterproof liner or tray
- Small herb pots
- Potting mix
- Basil
- Rosemary
- Sage
- Thyme
How to Make It
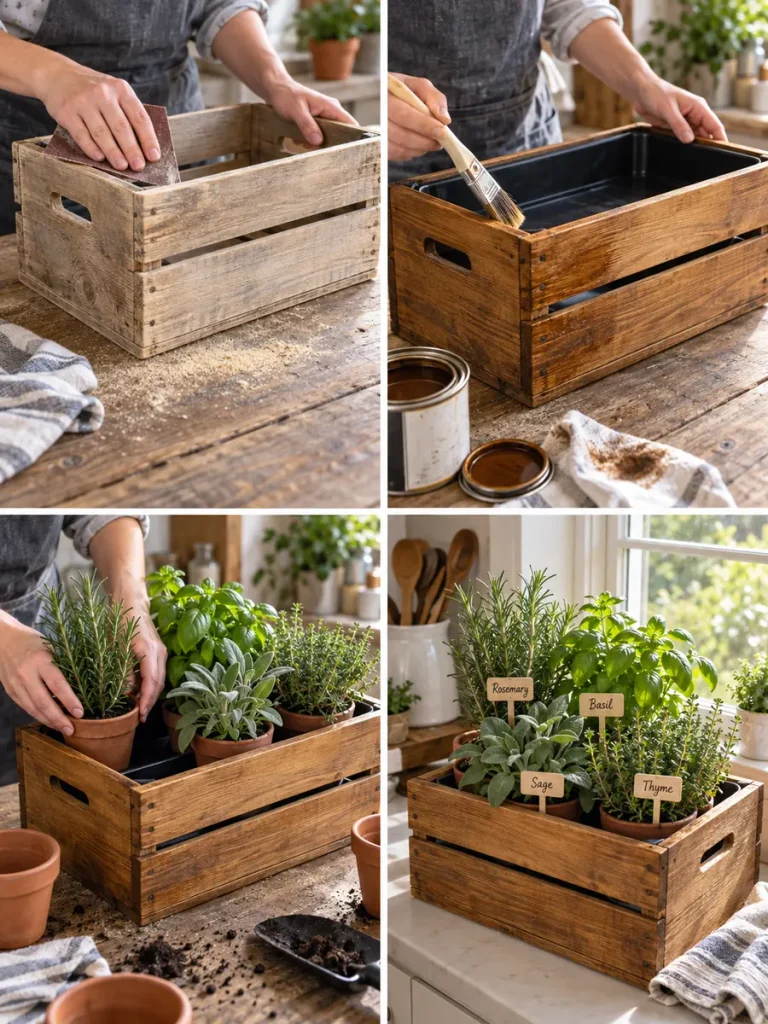
- Clean the wooden crate carefully.
- Sand any rough edges and splinters.
- Apply a stain, paint, or protective finish.
- Place a waterproof tray or liner inside.
- Arrange several individual herb pots within the crate.
- Place rosemary or another taller herb toward the back.
- Add basil and sage through the center.
- Put thyme or oregano toward the front.
- Add small wooden labels.
- Place the finished crate near a bright window.
Styling Tip: Keep some natural wood grain visible to preserve the rustic farmhouse character.
6. Vertical Pegboard Herb Garden
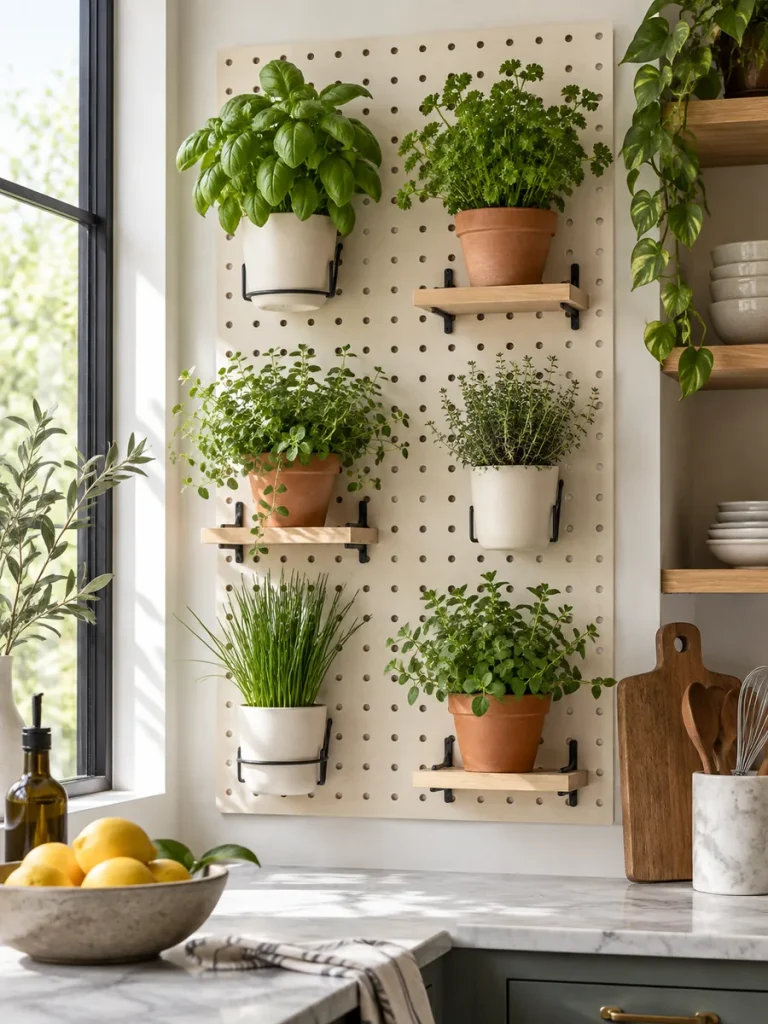
A pegboard herb garden is one of the most flexible options for anyone who likes to rearrange plants often. Unlike a fixed shelf, the hooks and pot holders can be moved whenever the herbs grow or your needs change.
This makes the project especially useful for a kitchen wall where you want a clean, organized look. Herbs can be spaced evenly, mixed with small tools, or grouped according to how often you use them.
The result feels more like a functional gardening station than a simple row of pots, and it can be customized to match almost any interior style.
What You’ll Need
- Wooden or metal pegboard
- Wall mounting hardware
- Pegboard hooks
- Pot holders
- Lightweight pots
- Potting mix
- Herb plants
- Labels
How to Make It
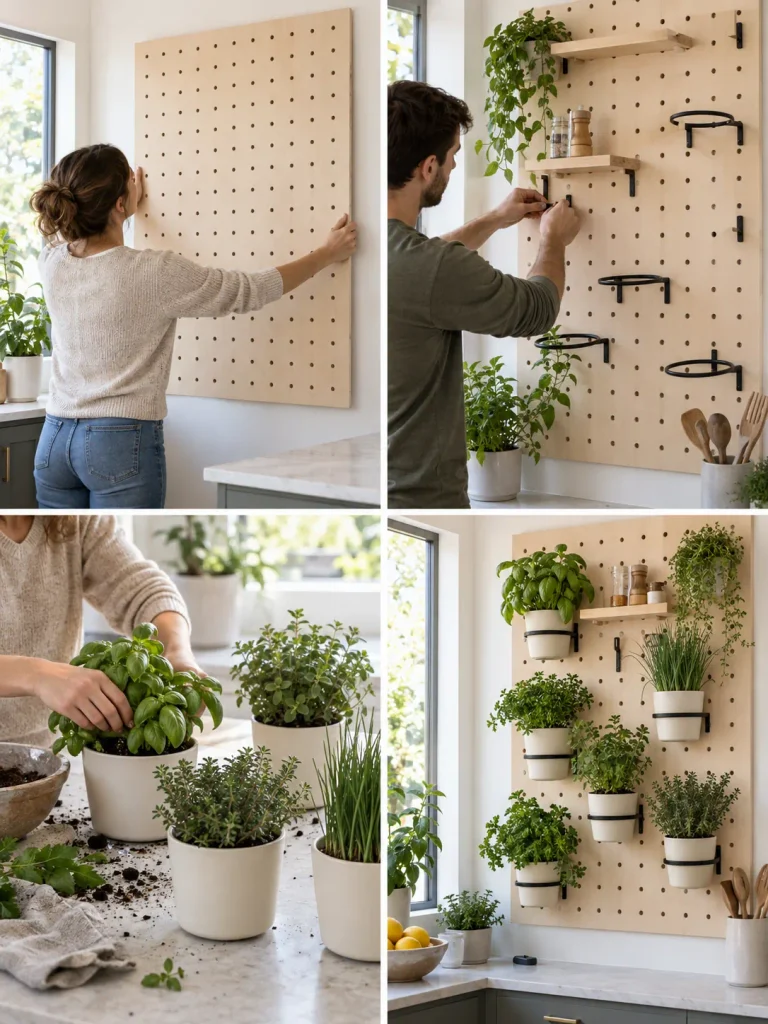
- Choose a wall that receives enough natural light.
- Mount the pegboard securely.
- Add hooks at several different heights.
- Attach compatible pot holders.
- Place lightweight containers inside the holders.
- Fill each pot with potting mix.
- Plant basil, oregano, parsley, thyme, and chives.
- Leave enough space between containers.
- Add herb labels or a small decorative sign.
- Rearrange the pots as the plants grow.
Styling Tip: Paint the pegboard soft beige, white, or muted green so the herbs remain the visual focus.
7. Upcycled Tin Can Herb Garden
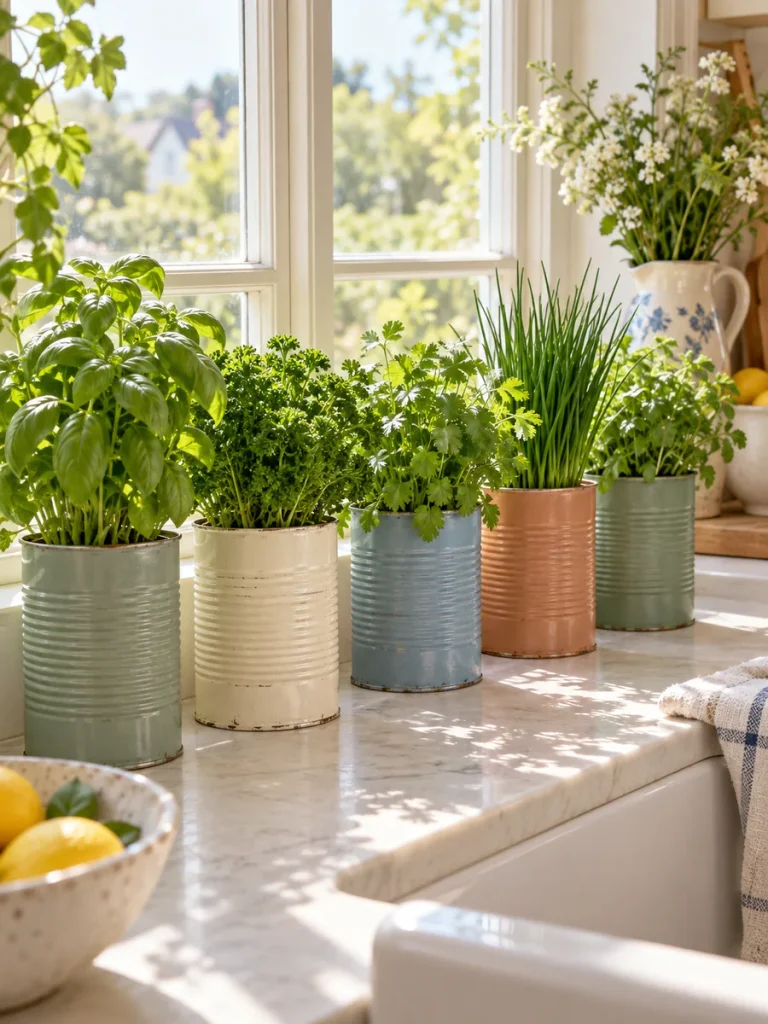
Empty food cans can easily become attractive herb planters instead of going straight into the recycling bin. Their narrow shape makes them perfect for windowsills where larger containers might not fit.
With a little paint, these simple cans can look surprisingly polished. You can give every container the same finish for a clean modern look or use different shades to create a cheerful cottage-style collection.
Because the cans are inexpensive, this is also a good DIY project for beginners who want to experiment with growing herbs indoors without buying expensive planters.
What You’ll Need
- Empty food cans
- Paint
- Paintbrush
- Small nursery pots or drainage materials
- Potting mix
- Herbs
- Labels
How to Make It
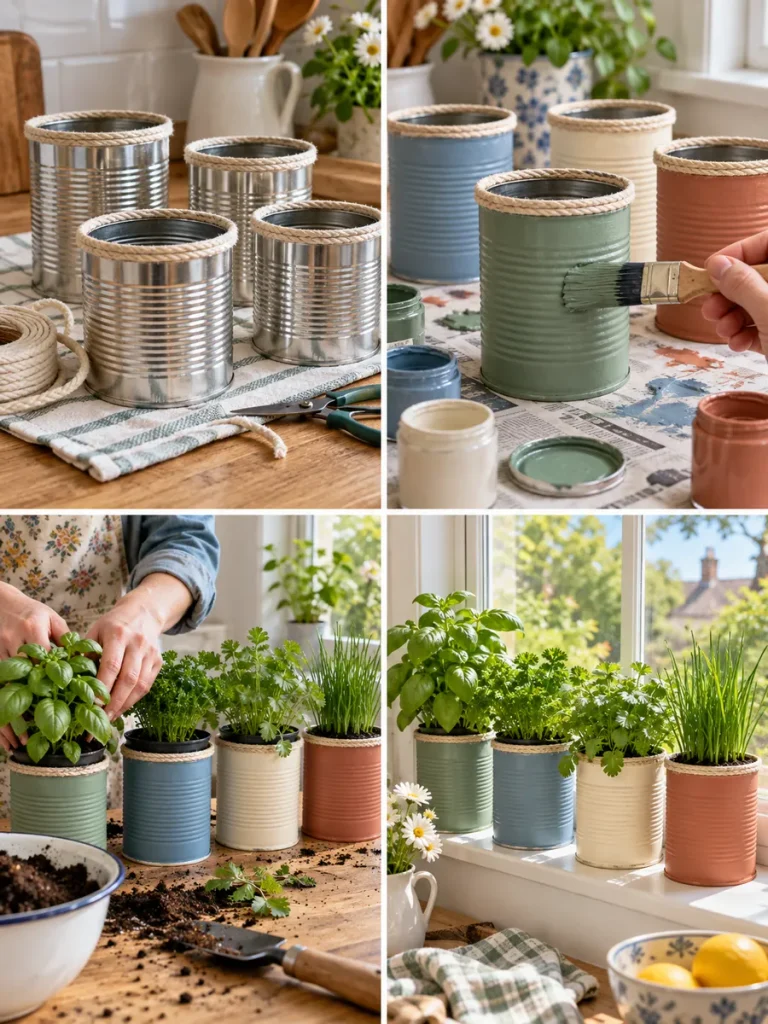
- Wash the cans thoroughly.
- Remove labels and adhesive residue.
- Smooth or cover any sharp edges.
- Paint the cans in your chosen colors.
- Allow the paint to dry completely.
- Insert small nursery pots or prepare suitable drainage.
- Add potting mix.
- Plant parsley, basil, cilantro, or chives.
- Add handwritten labels.
- Line the cans across a bright windowsill.
Styling Tip: Use muted pastel shades such as sage, cream, dusty blue, and soft terracotta for a cozy cottage look.
8. Vintage Tea Box Herb Garden
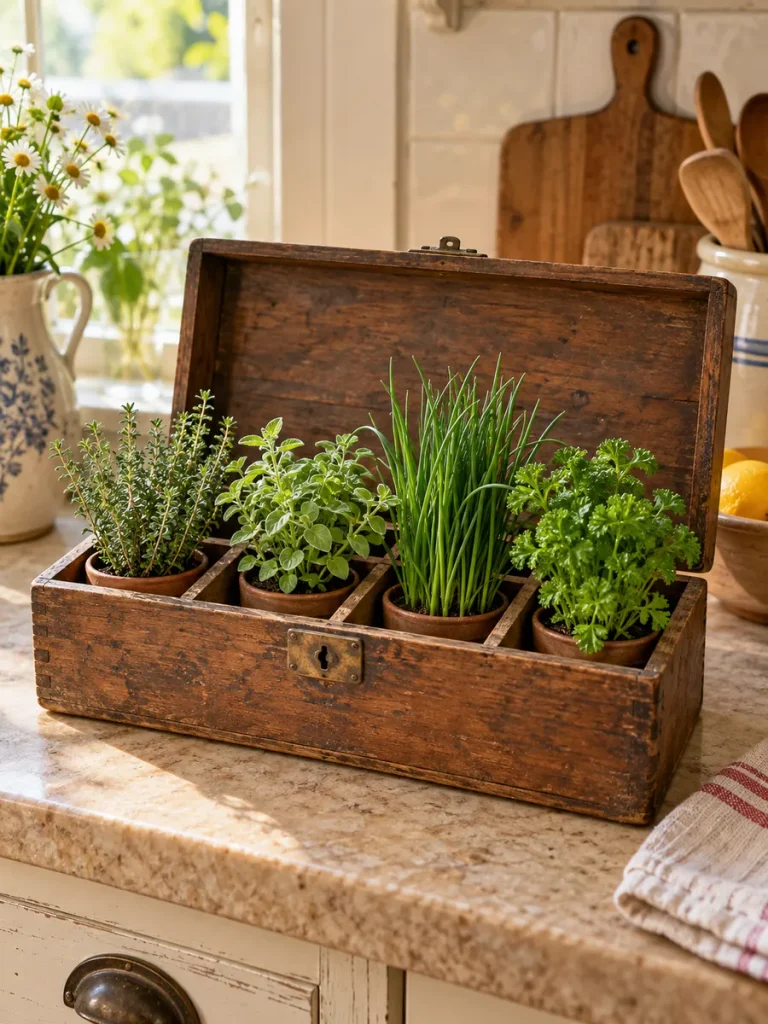
A divided wooden tea box is ideal for creating a compact herb garden because the small compartments naturally organize each plant. Instead of storing tea bags, each section can hold a miniature pot of fresh herbs.
The project works particularly well for herbs that stay relatively compact, such as thyme, oregano, chives, and parsley. Because every herb has its own compartment, the arrangement feels neat and intentionally designed.
An older wooden box also brings character to a kitchen. The combination of aged wood, handwritten labels, and fresh green foliage creates a charming vintage appearance.
What You’ll Need
- Wooden tea box
- Small nursery pots
- Waterproof liner
- Potting mix
- Thyme
- Oregano
- Chives
- Parsley
- Labels
How to Make It
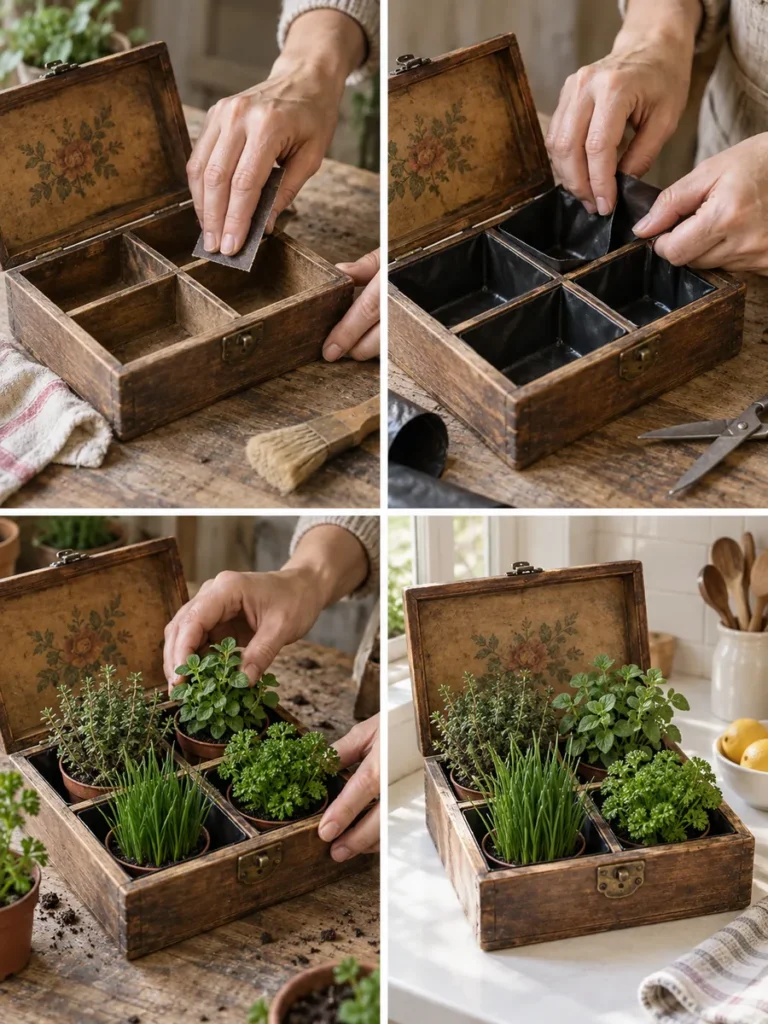
- Clean the tea box thoroughly.
- Sand any rough sections.
- Add waterproof protection inside the compartments.
- Place a small nursery pot into each section.
- Fill the pots with suitable potting mix.
- Plant one herb variety in each pot.
- Add small handwritten labels.
- Keep taller herbs toward the back.
- Leave the lid open if it has decorative details.
- Place the finished box near a bright window.
Styling Tip: Use aged brass labels or handwritten kraft-paper tags to strengthen the vintage look.
9. DIY Ladder Shelf Herb Garden
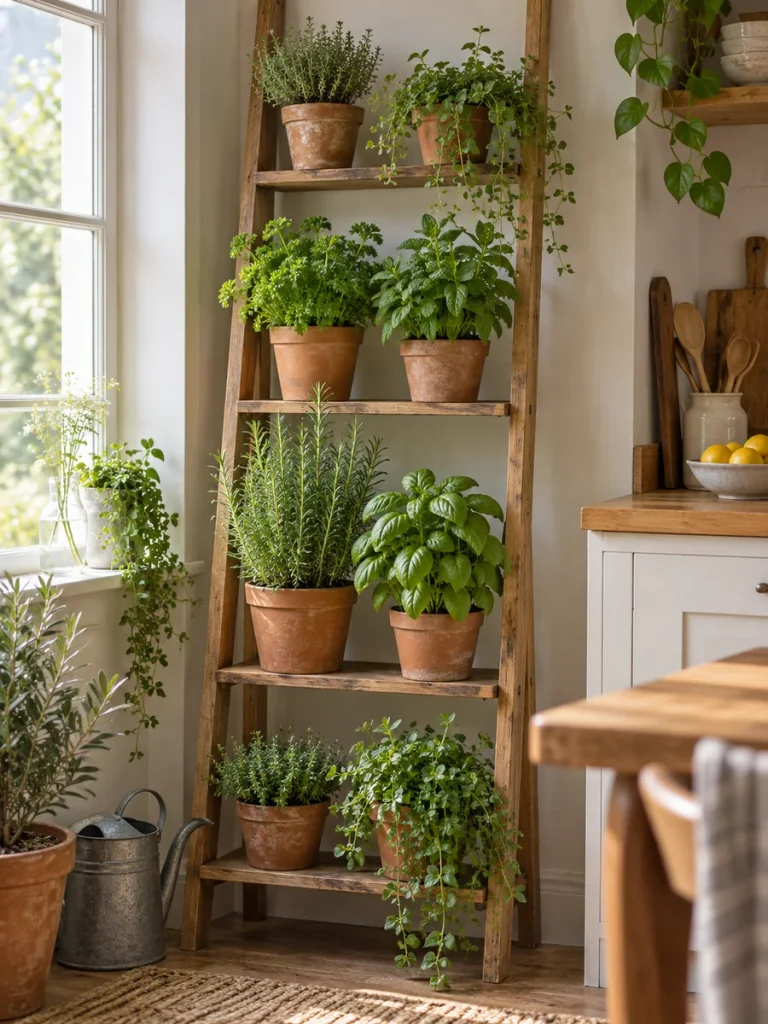
A ladder shelf creates multiple growing levels without taking over the room. It is especially useful when you have a narrow section beside a window but not enough space for a wide plant stand.
The different shelf heights let you arrange herbs by size. Larger rosemary or basil plants can sit lower down, while compact thyme, parsley, and chives can occupy the upper shelves.
As the herbs grow, the ladder begins to resemble a miniature indoor garden. It can also become a strong decorative feature in kitchens, breakfast areas, or dining rooms.
What You’ll Need
- Wooden ladder shelf
- Small herb pots
- Waterproof saucers
- Potting mix
- Basil
- Rosemary
- Mint
- Parsley
- Thyme
How to Make It
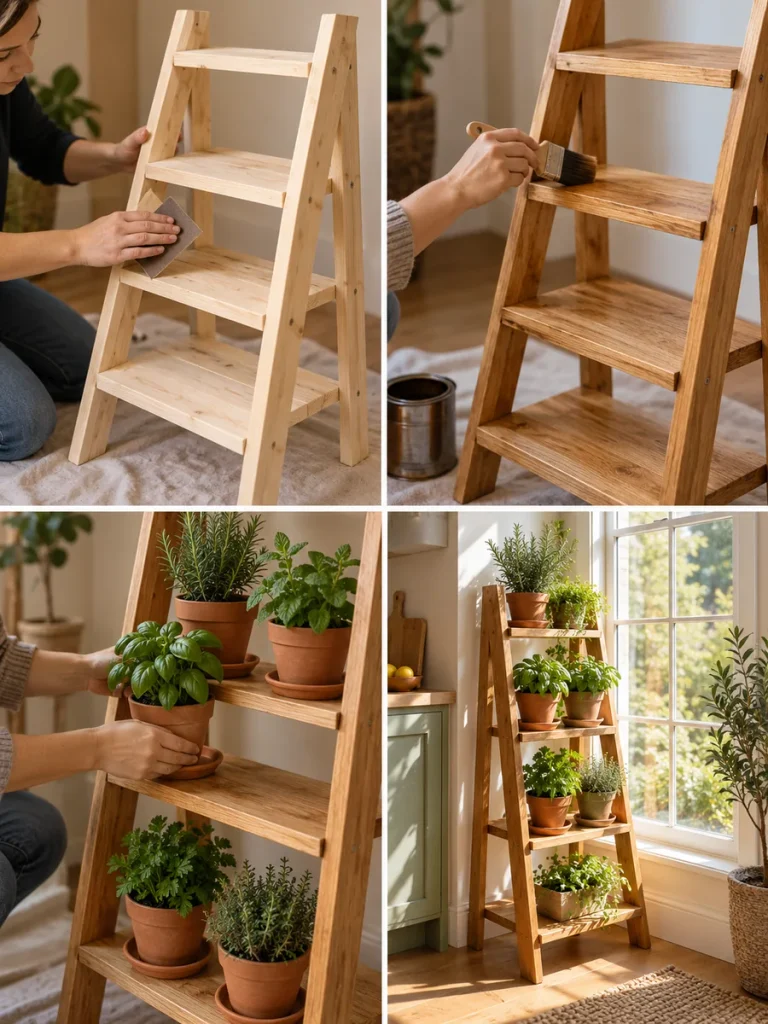
- Clean and sand the ladder shelf.
- Paint or stain it if desired.
- Place it near a bright window.
- Add waterproof saucers to every level.
- Position larger herb pots on the lower shelves.
- Add medium-sized plants through the middle.
- Place compact thyme, parsley, or chives higher up.
- Allow trailing oregano to soften one or two edges.
- Rotate pots occasionally.
- Keep enough space between plants for airflow.
Styling Tip: Natural wood paired with terracotta pots creates a warm cottage-garden feel.
10. Hanging Glass Jar Herb Garden
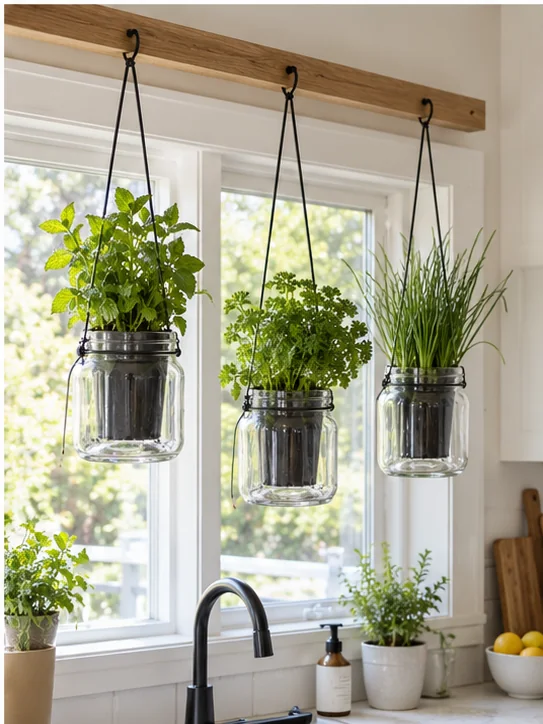
A hanging glass herb garden feels lighter and more contemporary than traditional pots. Because the glass is transparent, the containers do not visually crowd the window or wall around them.
This project is especially effective in modern kitchens with clean lines and neutral colors. The greenery appears to float in front of the window, creating a soft botanical effect.
Using removable nursery pots inside the jars also makes watering easier and helps prevent excess moisture from collecting around the roots.
What You’ll Need
- Wide glass jars
- Small nursery pots
- Strong rope or wire
- Wooden hanging rail
- Hooks
- Potting mix
- Herb plants
How to Make It
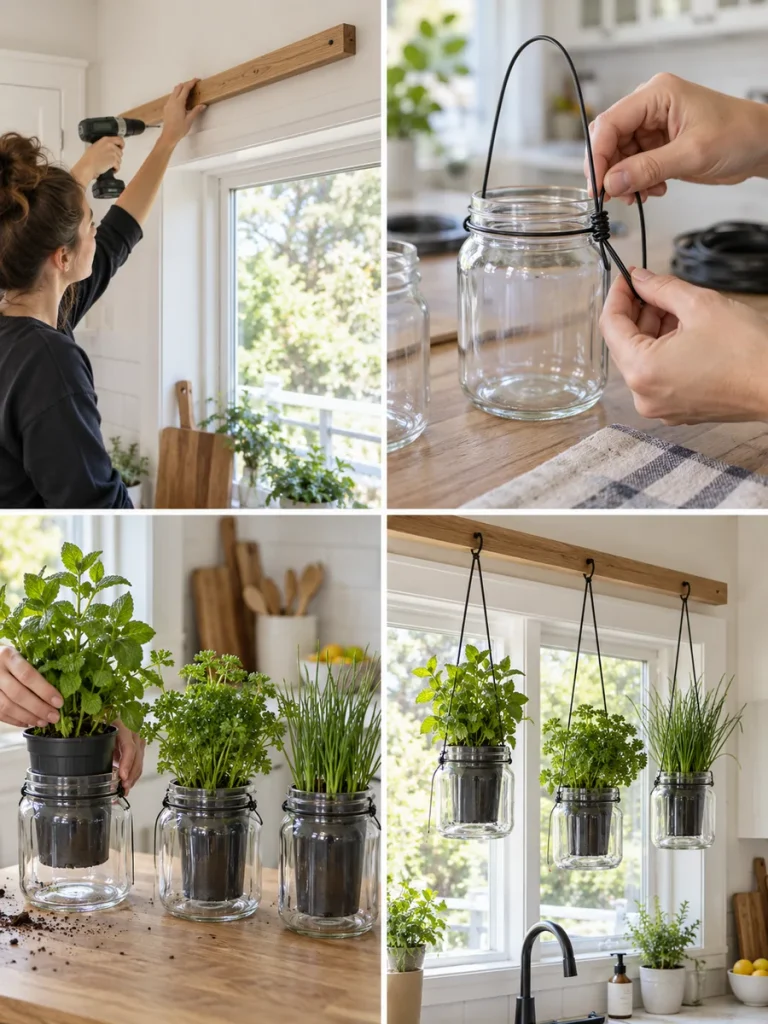
- Install a sturdy wooden rail near a bright window.
- Prepare strong hanging supports for each jar.
- Place small nursery pots inside the glass containers.
- Fill the pots with potting mix.
- Plant mint, parsley, or chives.
- Suspend each jar from the rail.
- Vary the hanging heights slightly.
- Leave enough space between jars.
- Remove the inner pots when watering.
- Return them after excess water drains away.
Styling Tip: Keep the jars completely clear and use simple black or brass hardware for a clean modern look.
11. Wooden Pallet Herb Wall
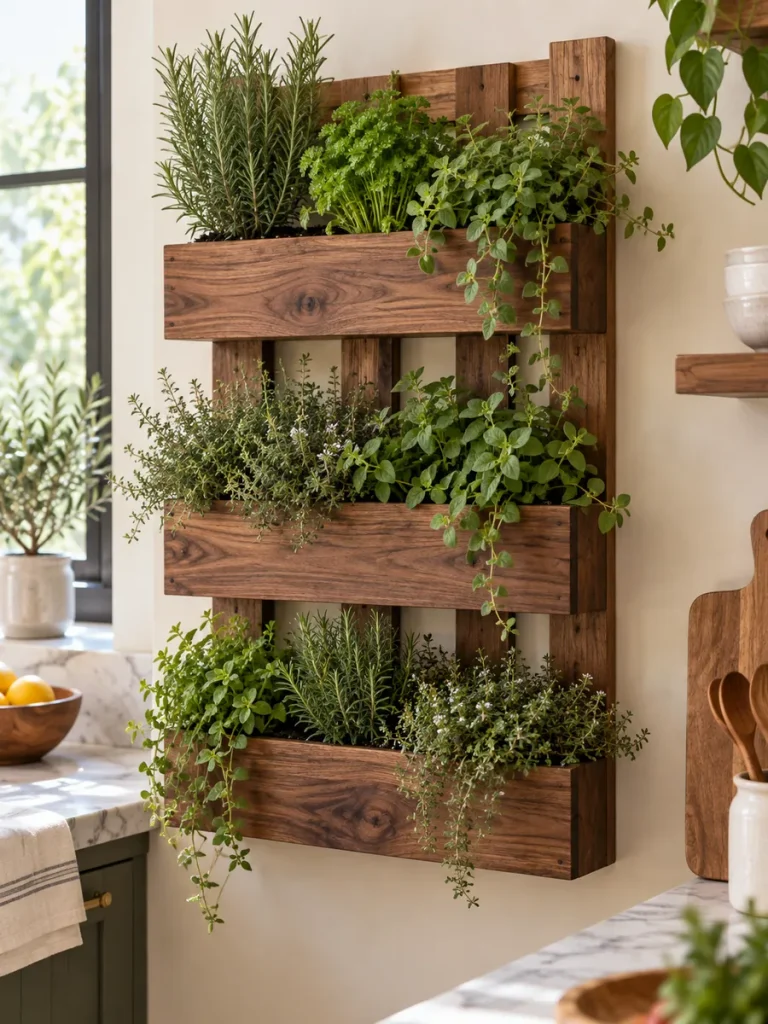
A pallet-style herb garden can turn a plain wall into a lush growing feature. It is a good choice for anyone who loves rustic decor but still wants the planting area to feel organized.
The horizontal sections naturally create separate planting zones, making it easy to group herbs according to size or use. Rosemary and parsley can grow upright, while thyme and oregano can trail slightly over the edges.
Once the plants become established, the wood begins to disappear behind the foliage, giving the wall a fuller garden-like appearance.
What You’ll Need
- Small wooden pallet
- Sandpaper
- Wood stain or paint
- Small planter boxes
- Screws
- Waterproof liners
- Potting mix
- Herbs
How to Make It
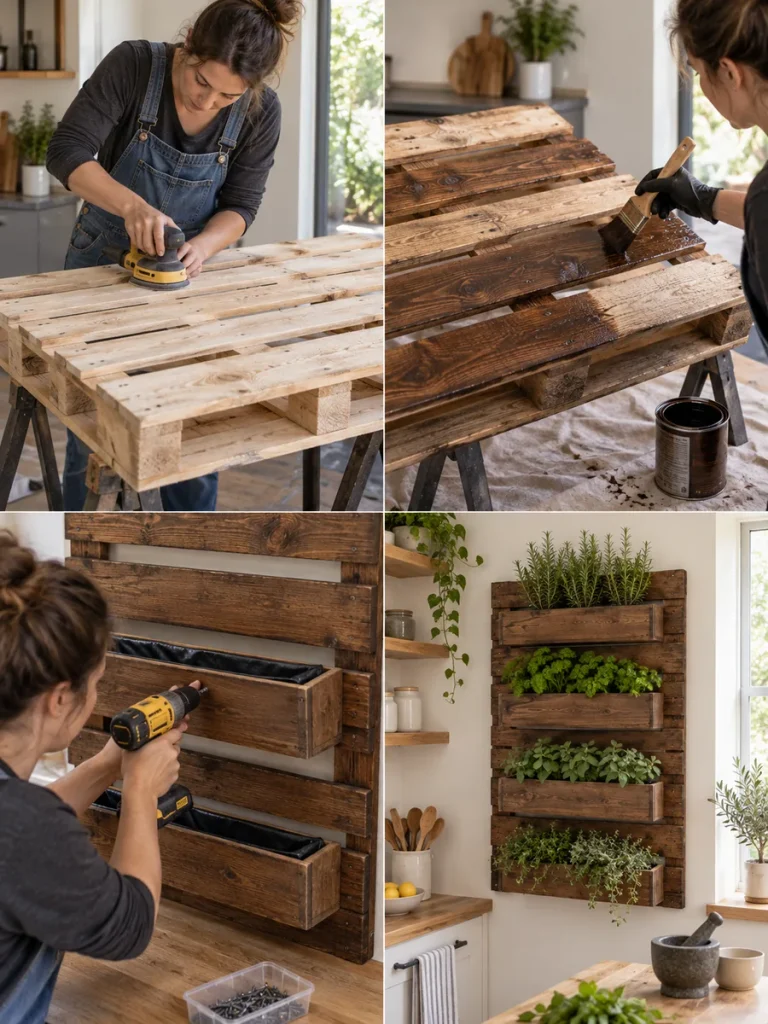
- Choose clean wood that is suitable for indoor use.
- Sand the pallet thoroughly.
- Apply a wood finish or paint.
- Attach shallow planter boxes across the front.
- Add waterproof liners.
- Fill the containers with potting mix.
- Plant rosemary, parsley, oregano, and thyme.
- Allow trailing herbs to grow over the edges.
- Secure all planters firmly.
- Mount the pallet securely to the wall.
Styling Tip: A deep walnut finish looks especially attractive against white or cream walls.
12. Minimalist Ceramic Herb Garden Tray
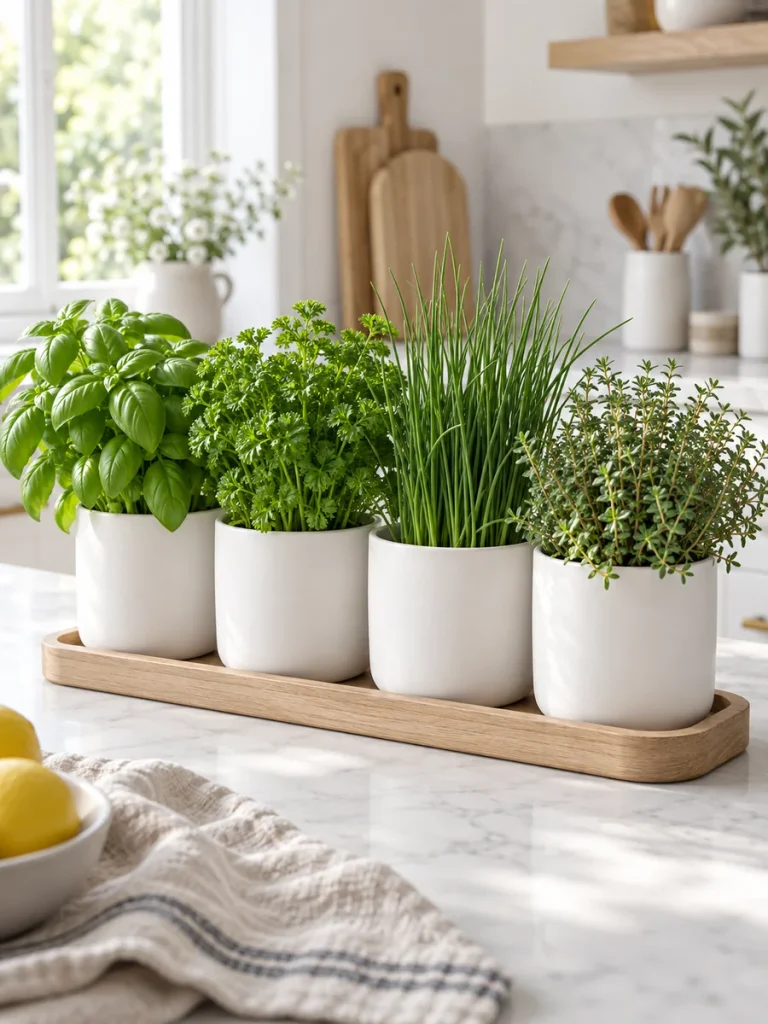
Sometimes the simplest indoor garden can be the most elegant. A row of matching ceramic pots arranged on a wooden tray creates a clean and polished display without requiring complicated construction.
This project works beautifully in modern or Scandinavian-style kitchens where too many different materials can make the space feel busy. Using matching containers keeps the focus on the shapes and colors of the herbs.
Because every herb remains in its own pot, it is also easier to move, rotate, water, or replace individual plants when needed.
What You’ll Need
- Wooden tray
- Matching ceramic pots
- Potting mix
- Basil
- Parsley
- Chives
- Thyme
- Plant markers
- Saucers
How to Make It
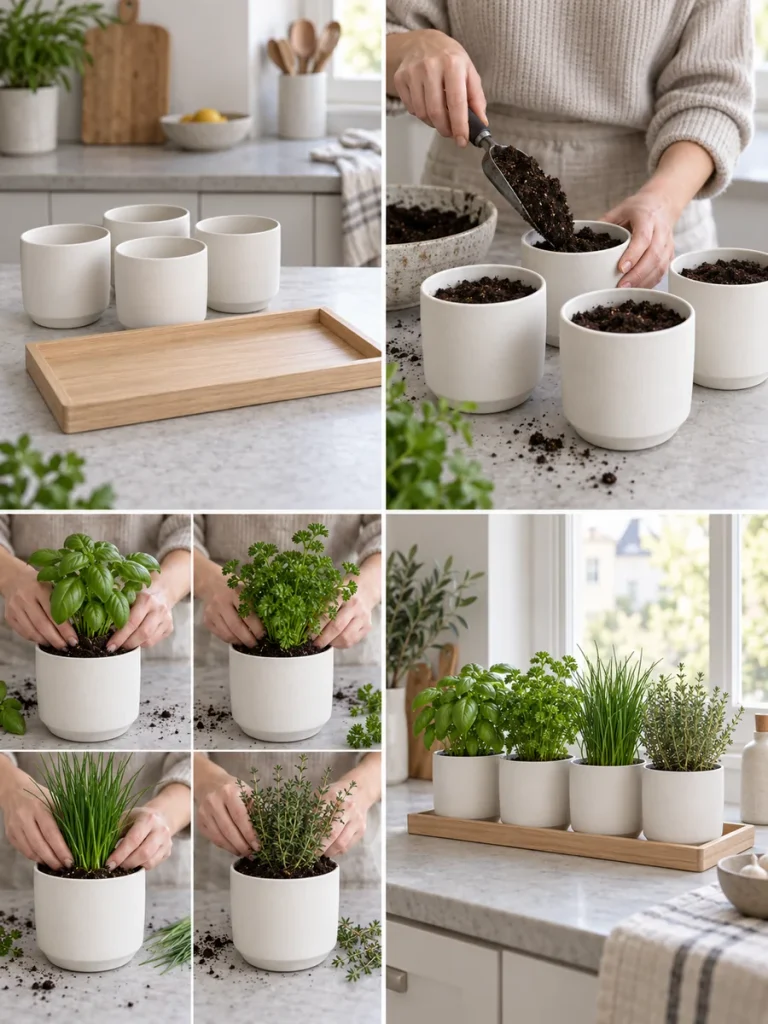
- Choose three to five ceramic pots with drainage holes.
- Place a saucer beneath each container.
- Fill the pots with suitable potting mix.
- Plant one herb variety in each pot.
- Arrange taller basil or parsley toward the back.
- Put thyme and chives toward the front.
- Add matching plant markers.
- Place all the pots on the wooden tray.
- Move the arrangement beside a bright window.
- Rotate the pots periodically.
Styling Tip: White pots with pale natural wood create a calm and minimalist display.
13. Hanging Gutter Herb Garden
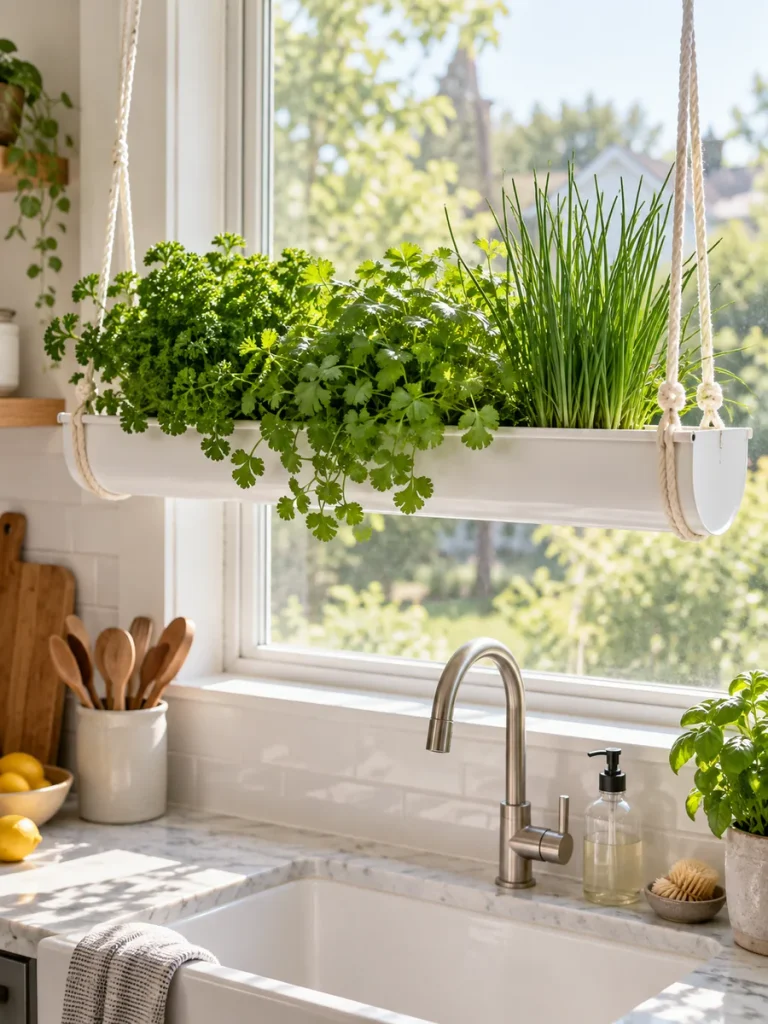
A short section of rain gutter can become a surprisingly stylish indoor planter. Its long, narrow shape is ideal for growing several herbs in a straight row without needing multiple individual containers.
This idea works especially well in front of a sunny window where the gutter can hang horizontally. Parsley, cilantro, and chives create a soft green strip that looks almost like a miniature indoor window box.
Painting the gutter can completely change its appearance, helping it blend into modern, farmhouse, or industrial interiors.
What You’ll Need
- Clean rain gutter section
- End caps
- Drill
- Strong rope
- Secure hooks
- Potting mix
- Parsley
- Cilantro
- Chives
How to Make It
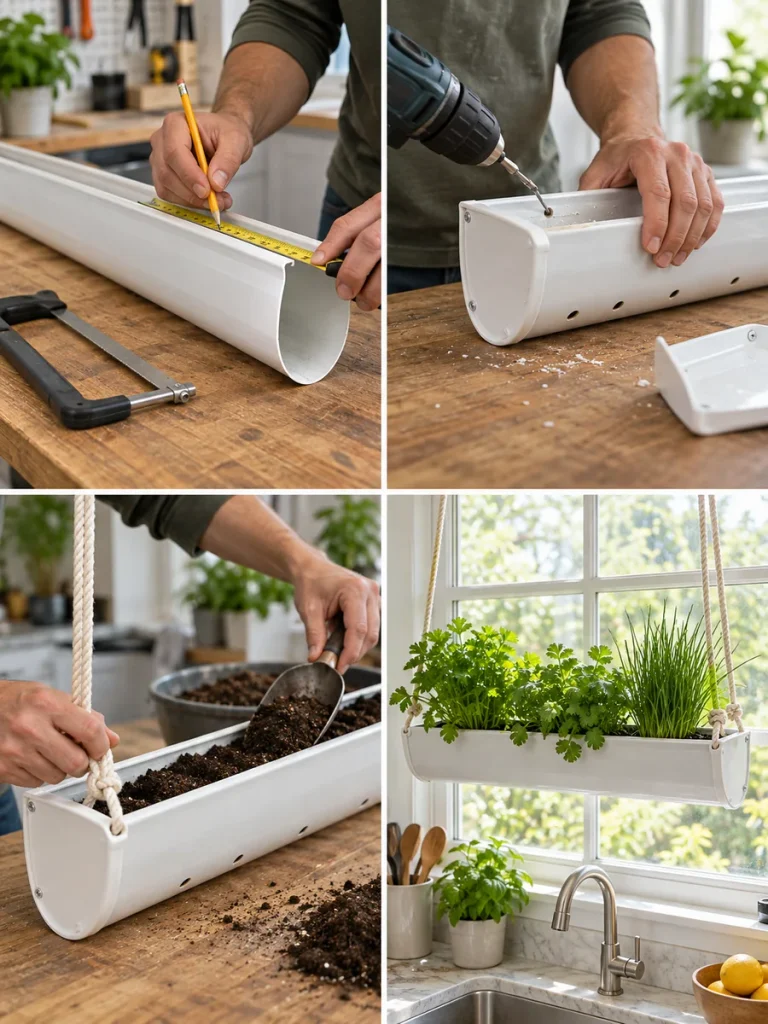
- Cut the gutter to the desired length.
- Smooth all cut edges carefully.
- Attach secure end caps.
- Drill small drainage holes along the base.
- Create hanging holes near both ends.
- Thread strong rope through the openings.
- Fill the gutter with lightweight potting mix.
- Plant parsley, cilantro, and chives.
- Attach the ropes to strong hooks.
- Hang the finished planter near a sunny window.
Styling Tip: Matte black gives the planter a modern industrial look, while white works well in bright minimalist kitchens.
14. Wall-Mounted Test Tube Herb Propagation Garden
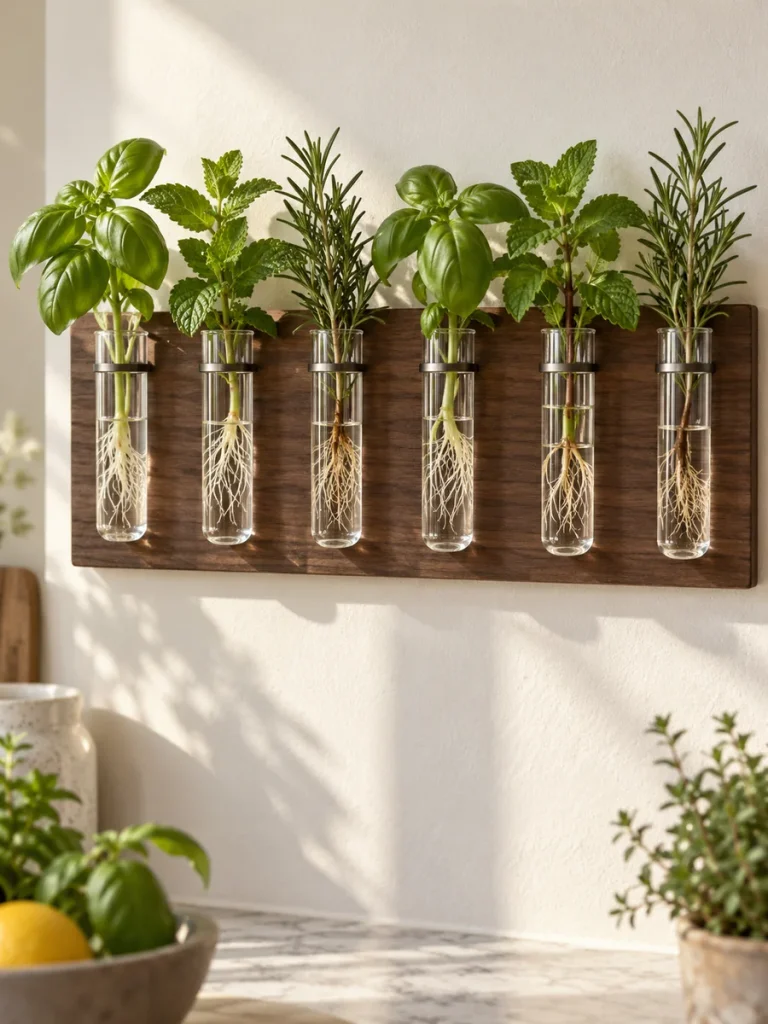
A test tube propagation wall is a beautiful way to display herb cuttings while they develop roots. Unlike a traditional planter, this project lets you watch the entire rooting process through clear glass.
Basil and mint cuttings work especially well for this type of project. As the roots begin to appear, the tubes become more interesting and the display starts to look like a living botanical experiment.
It is a great option for anyone who enjoys propagating plants and wants something decorative for an empty wall at the same time.
What You’ll Need
- Wooden board
- Glass propagation tubes
- Tube holders
- Screws
- Herb cuttings
- Water
- Wall mounting hardware
How to Make It
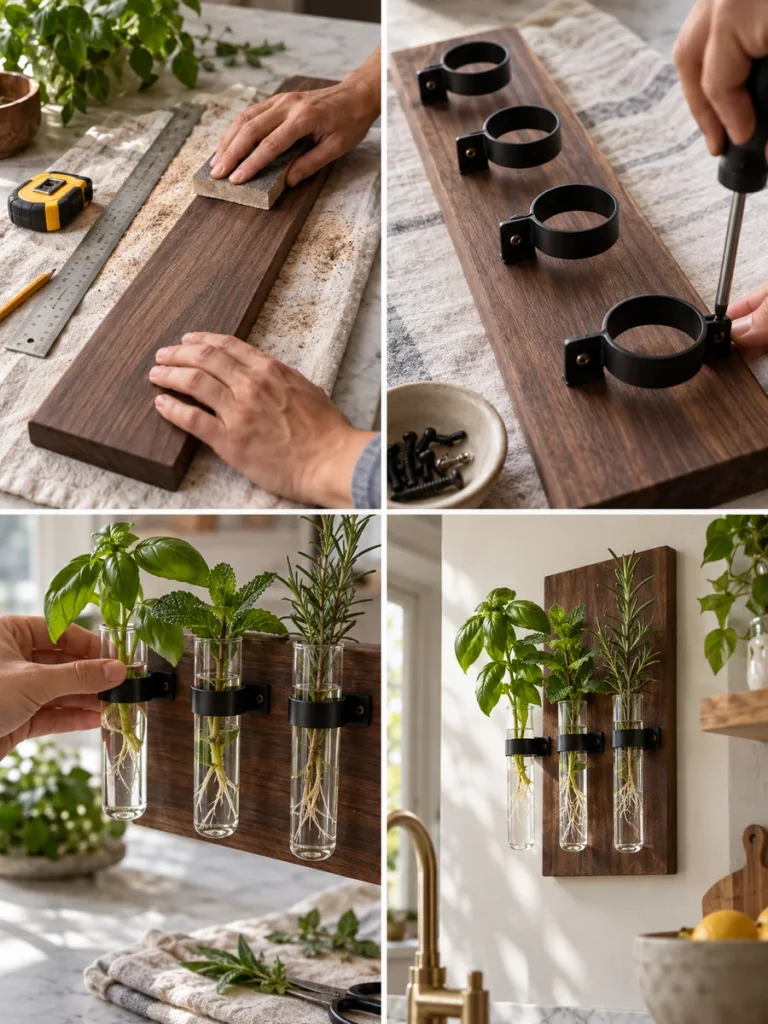
- Sand and finish the wooden board.
- Mark evenly spaced positions for the tubes.
- Attach secure tube holders.
- Mount the board on the wall.
- Fill every tube with fresh water.
- Take healthy basil, mint, or rosemary cuttings.
- Remove leaves that would sit below the waterline.
- Place one cutting into each tube.
- Position the display in bright indirect light.
- Refresh the water regularly.
Styling Tip: Use a narrow dark wooden board with evenly spaced tubes for an elegant botanical-laboratory appearance.
15. Self-Watering Bottle Herb Garden
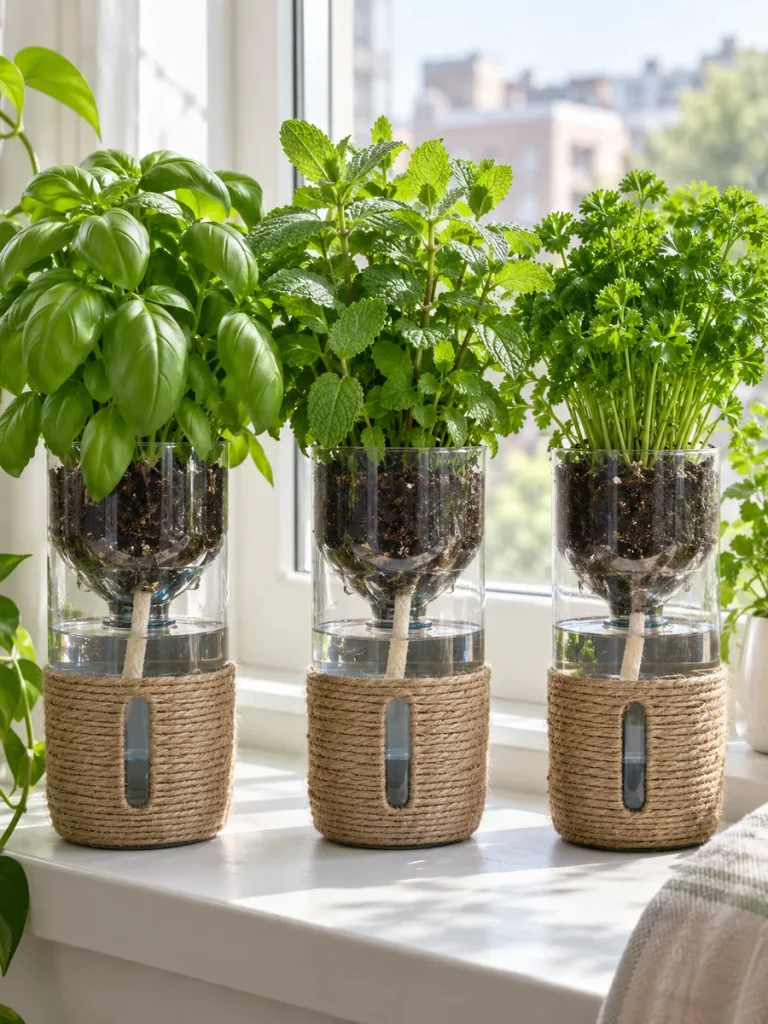
A recycled plastic bottle can be transformed into a simple self-watering planter using a cotton wick and a small water reservoir. It is an inexpensive project that also gives disposable bottles another purpose.
The upper part of the bottle holds the plant and potting mix, while the lower section stores water. The wick gradually carries moisture upward as the soil begins to dry.
This design can be especially useful for herbs such as basil, mint, and parsley, but you should still check the soil regularly rather than relying entirely on the reservoir.
What You’ll Need
- Plastic bottles
- Scissors or craft knife
- Cotton wick
- Potting mix
- Herb seedlings
- Water
- Decorative paint or wrap
How to Make It
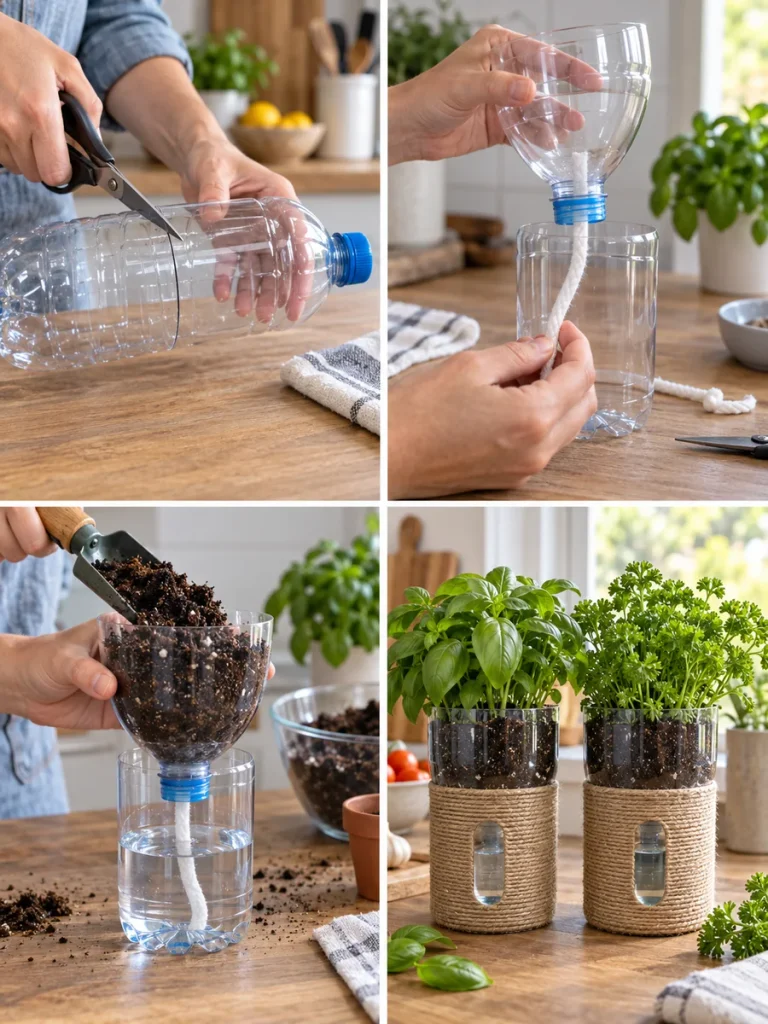
- Wash and dry the bottle thoroughly.
- Cut it into two sections.
- Turn the upper half upside down.
- Thread a cotton wick through the bottle opening.
- Insert the upper section into the lower reservoir.
- Fill the top with potting mix.
- Plant basil, parsley, or mint.
- Add water to the lower reservoir.
- Check that the wick reaches both the soil and water.
- Decorate the outside if desired.
Styling Tip: Wrap the reservoir in jute or waterproof decorative paper while leaving a narrow window to monitor the water level.
16. Window-Fitted Wooden Herb Shelf
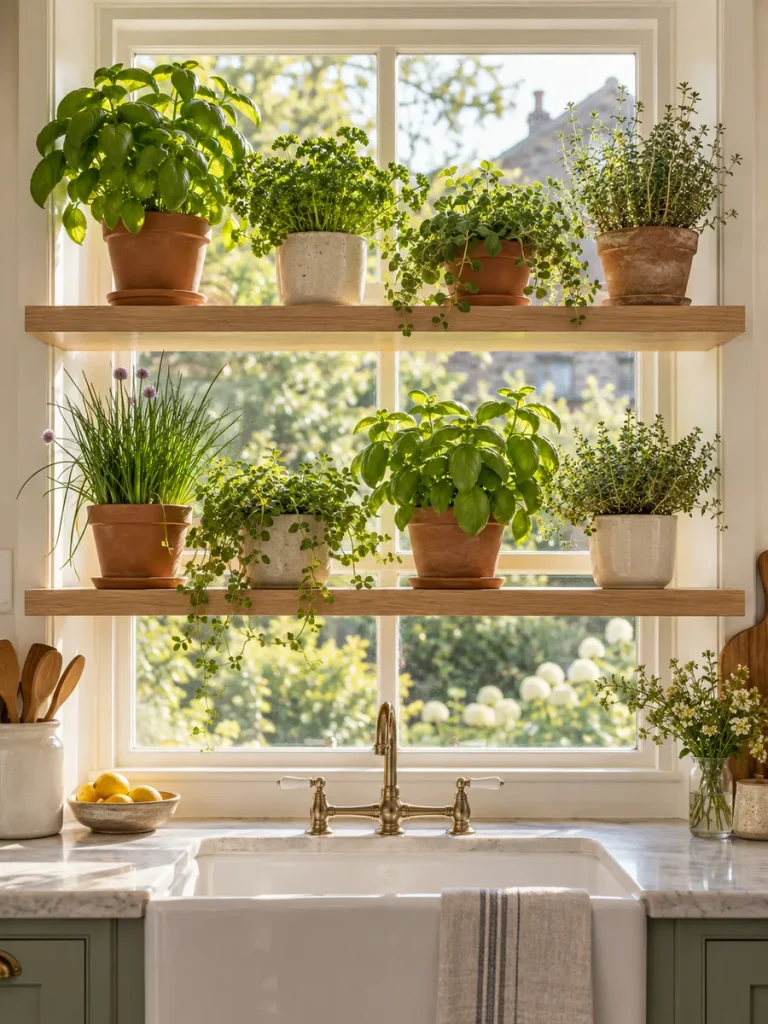
A kitchen window can hold more than one narrow row of pots if you make use of the vertical space. Adding one or two slim wooden shelves creates extra growing room without taking away valuable counter space.
The sunlight filtering through the leaves can make the whole window look softer and greener. From inside the kitchen, the shelf feels almost like a miniature garden wall.
This project is particularly useful for apartments where windows are the only locations receiving strong natural light.
What You’ll Need
- Wooden shelf boards
- Brackets
- Screws
- Measuring tape
- Sandpaper
- Protective wood finish
- Small herb pots
- Saucers
How to Make It
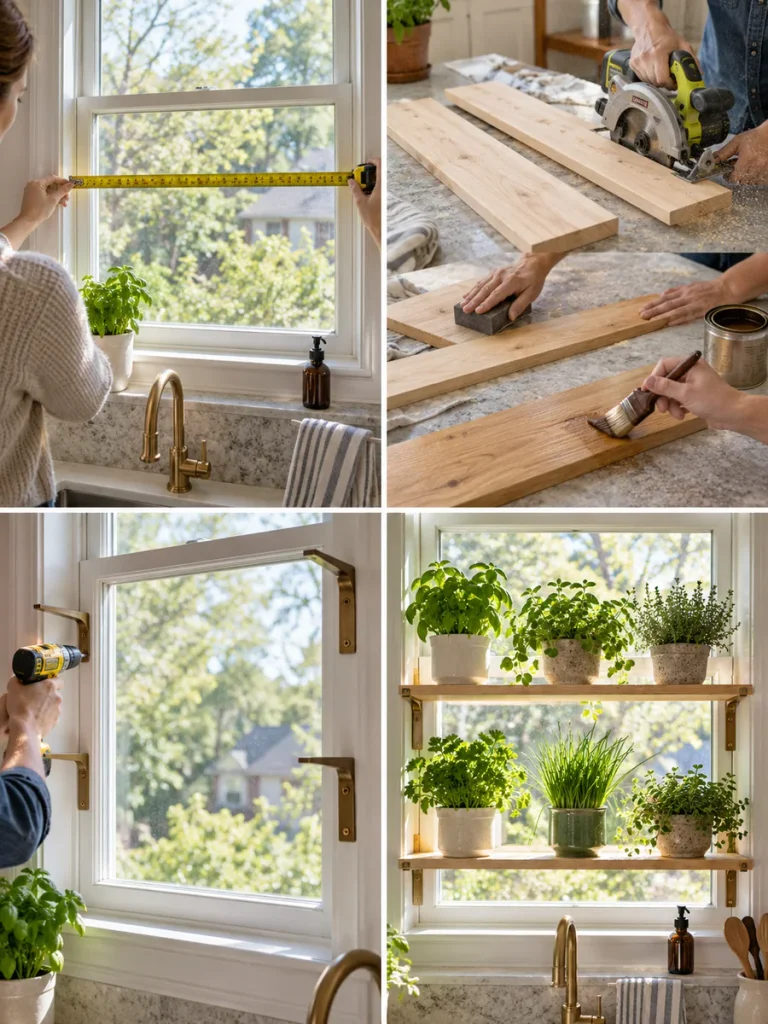
- Measure the width of the window carefully.
- Cut the shelf boards to fit.
- Sand the wood until smooth.
- Apply a moisture-resistant finish.
- Mark the bracket positions.
- Install the brackets securely.
- Attach one or two shelves.
- Place small herb pots on saucers.
- Arrange taller herbs where they will not shade smaller ones.
- Leave enough space for the window to remain functional.
Styling Tip: Use thin natural-wood shelves to make the herbs appear almost as if they are floating across the window.
17. Copper Pipe Hanging Herb Garden
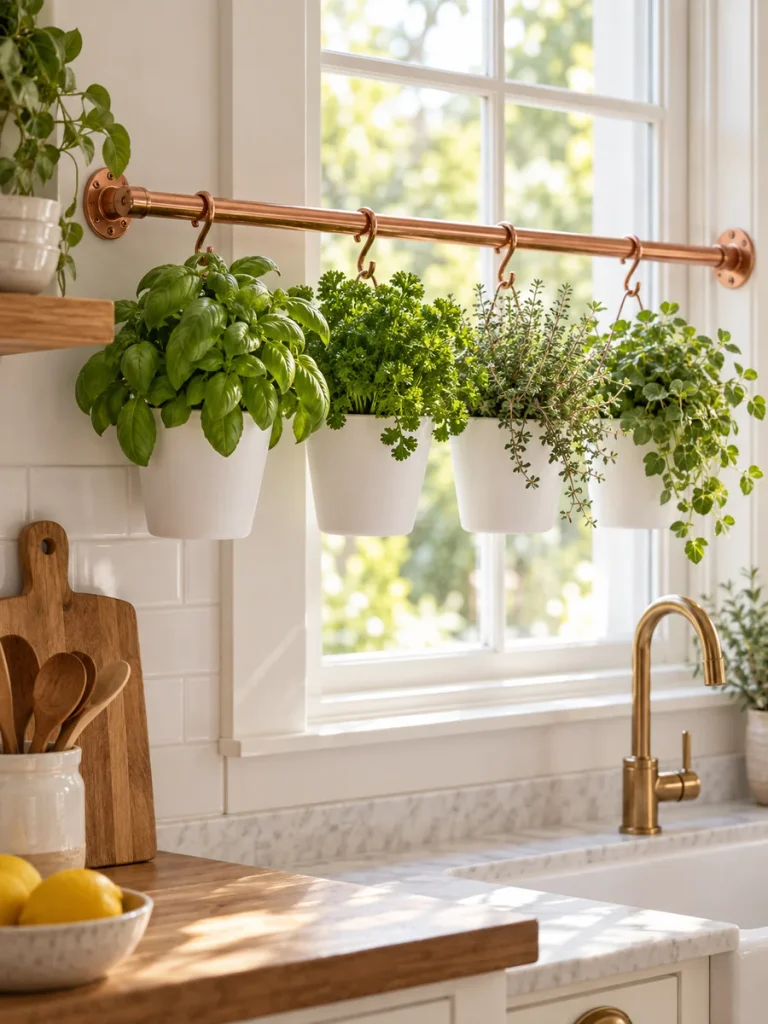
Copper and greenery make a beautiful combination. A copper-colored rod or pipe can act as a hanging rail for several lightweight herb pots, creating a garden that feels modern and decorative.
The warm metallic finish stands out against fresh green leaves and looks especially good in kitchens with white, black, cream, or wood cabinetry.
Because the pots are suspended individually, you can adjust their position whenever a plant needs more space or light.
What You’ll Need
- Copper pipe or copper-finish rod
- Wall brackets
- S-hooks
- Lightweight hanging planters
- Potting mix
- Herb plants
How to Make It
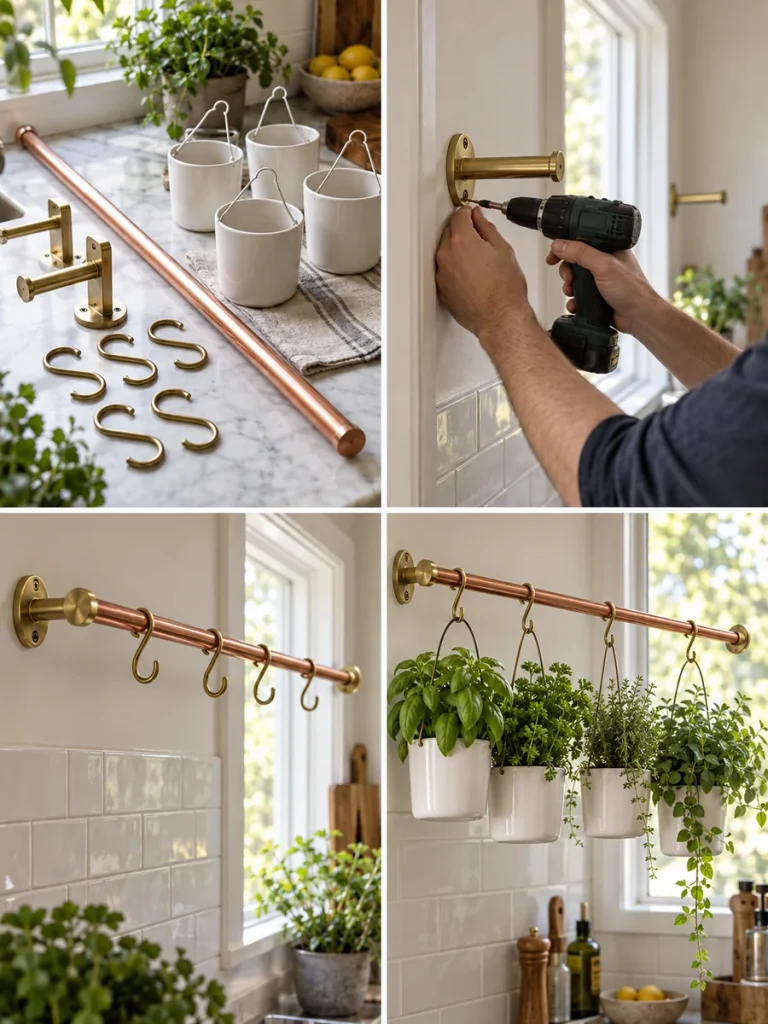
- Measure the available wall or window space.
- Cut the rod to the correct length.
- Install sturdy wall brackets.
- Secure the pipe or rod in place.
- Add several S-hooks.
- Hang lightweight planters from the hooks.
- Plant basil, parsley, thyme, or oregano.
- Stagger the heights slightly.
- Leave enough room between pots.
- Remove individual pots for watering when needed.
Styling Tip: Pair copper hardware with white or matte black pots for a sophisticated modern finish.
18. Repurposed Shoe Organizer Herb Wall
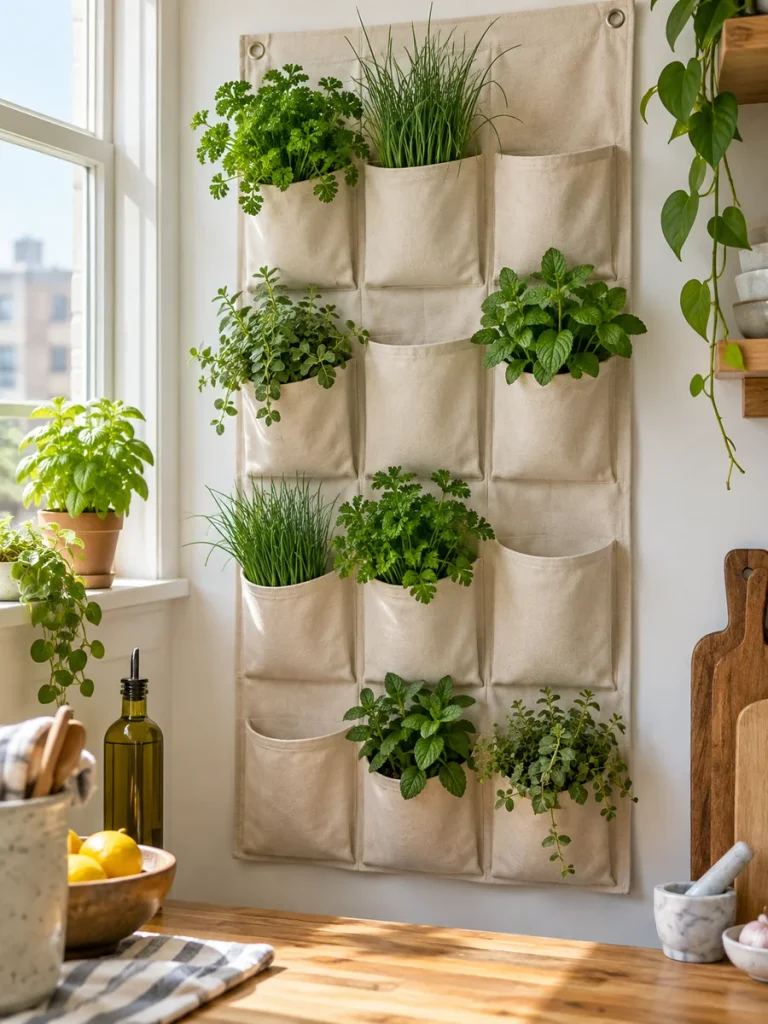
A hanging shoe organizer offers dozens of pockets that can be repurposed as a vertical plant display. Rather than filling every pocket, use selected sections to create a spaced-out herb garden.
This is one of the best ideas for very small homes because the entire garden hangs flat against the wall or door. It can hold more herbs than a single shelf while using almost no floor space.
Placing removable pots inside the pockets makes the system easier to water and helps protect the fabric from constant moisture.
What You’ll Need
- Hanging shoe organizer
- Strong wall hooks
- Lightweight nursery pots
- Waterproof liners
- Potting mix
- Herbs
- Labels
How to Make It
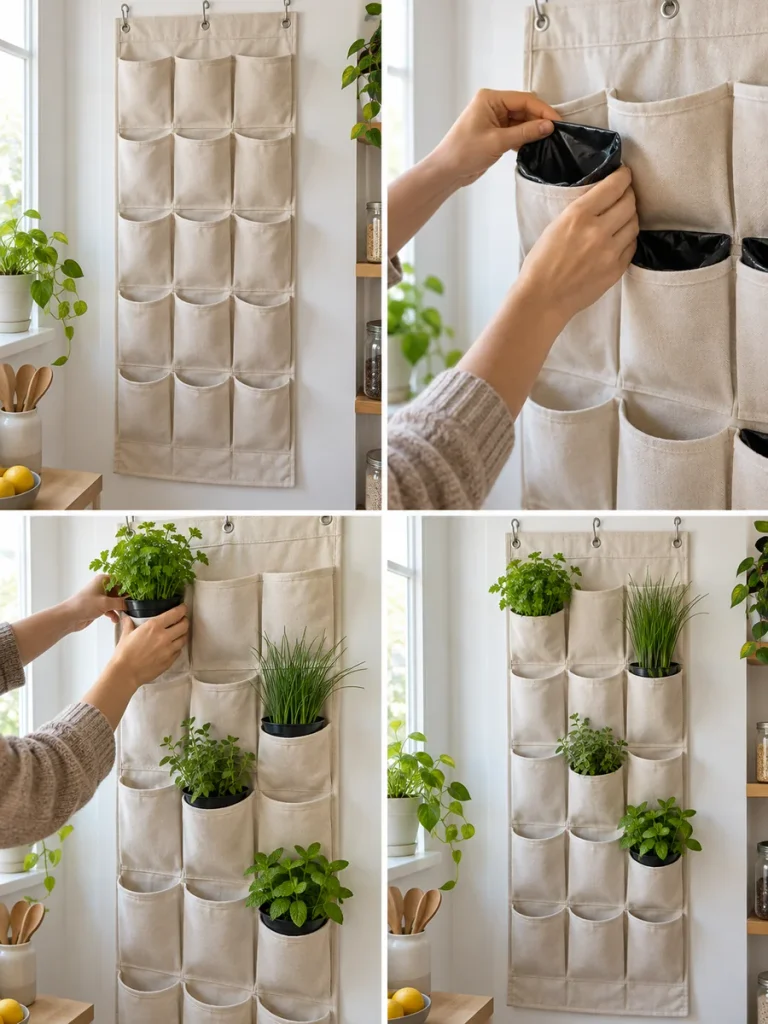
- Choose a strong organizer.
- Mount it securely to the wall.
- Add waterproof protection inside selected pockets.
- Place small nursery pots into those pockets.
- Fill the pots with potting mix.
- Plant parsley, chives, oregano, or mint.
- Leave some pockets empty to improve airflow.
- Add plant labels.
- Keep taller herbs toward the lower rows.
- Remove individual pots for watering.
Styling Tip: Using every second pocket creates a cleaner, more organized pattern.
19. Vintage Drawer Indoor Herb Garden
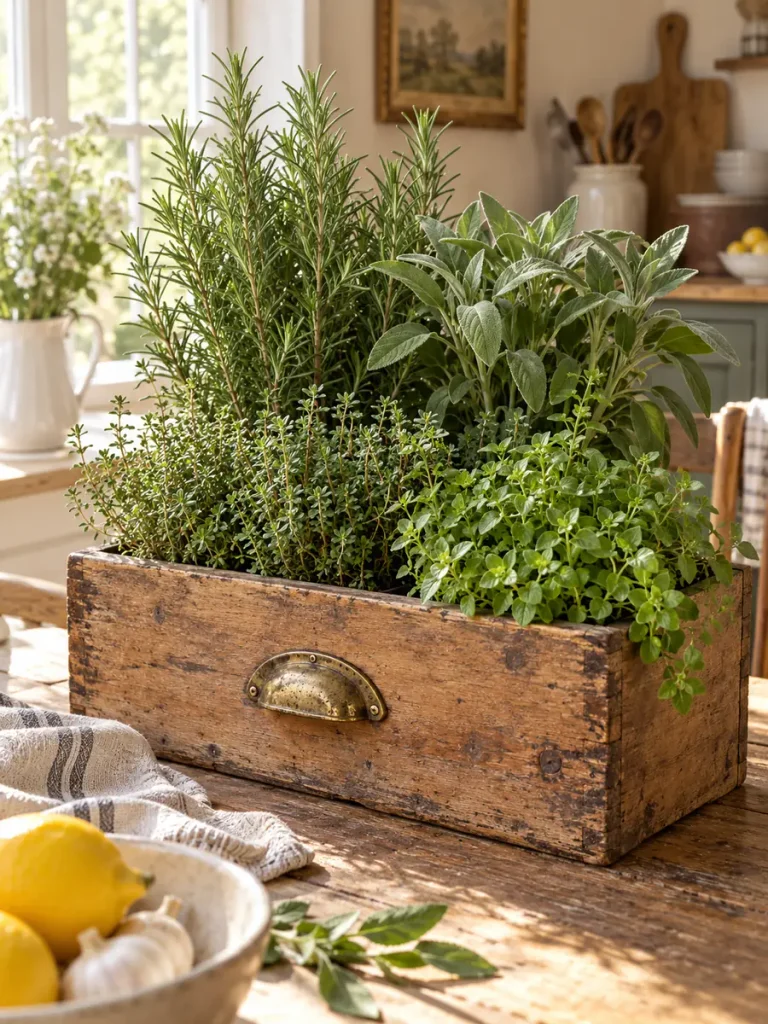
An old wooden drawer can become a beautiful shallow container for several herb pots. The original handle, worn wood, and aged finish give the project character that new planters often lack.
Because the drawer stays portable, it is easy to move the entire display closer to sunlight or onto a table when you want to use the herbs.
The rectangular shape also makes it simple to arrange herbs in layers, with taller rosemary or sage in the back and lower thyme or oregano toward the front.
What You’ll Need
- Old wooden drawer
- Sandpaper
- Wood finish
- Waterproof tray
- Small herb pots
- Rosemary
- Sage
- Thyme
- Oregano
How to Make It
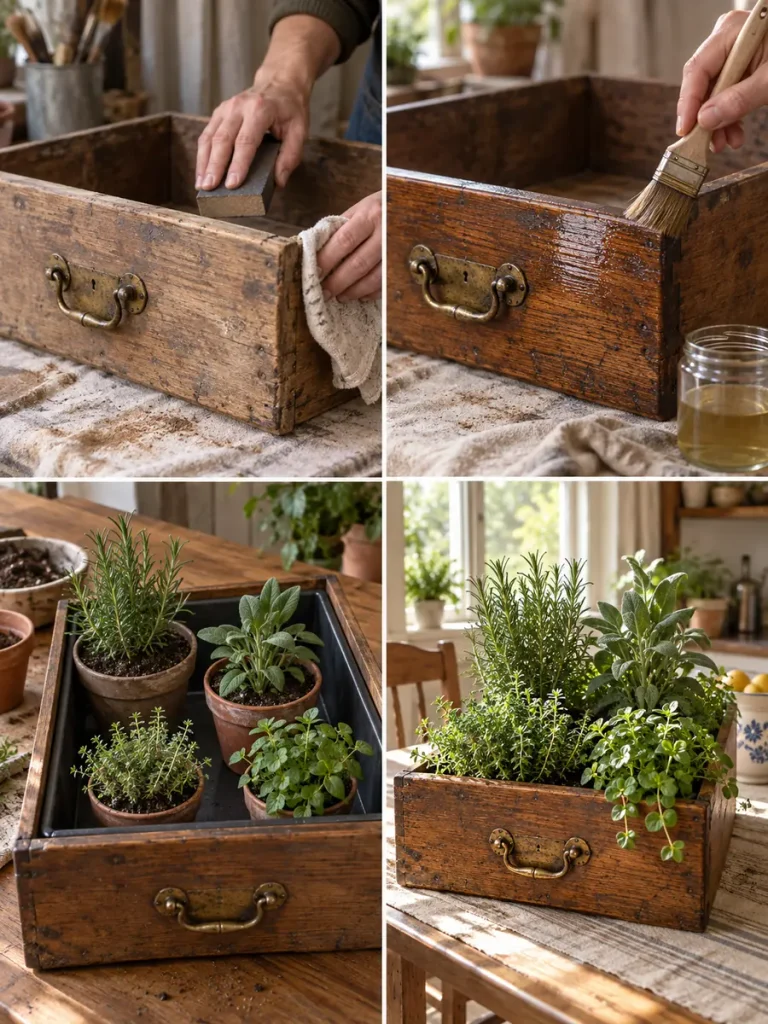
- Clean the drawer thoroughly.
- Remove loose paint or rough sections.
- Sand the wood carefully.
- Apply a protective finish.
- Place a waterproof tray inside.
- Arrange individual herb pots within the drawer.
- Put rosemary or sage toward the back.
- Place thyme and oregano toward the front.
- Add labels if desired.
- Replace the drawer handle with a decorative one if needed.
Styling Tip: Leave some of the original worn finish visible so the piece still feels vintage.
20. Three-Level Hanging Basket Herb Garden
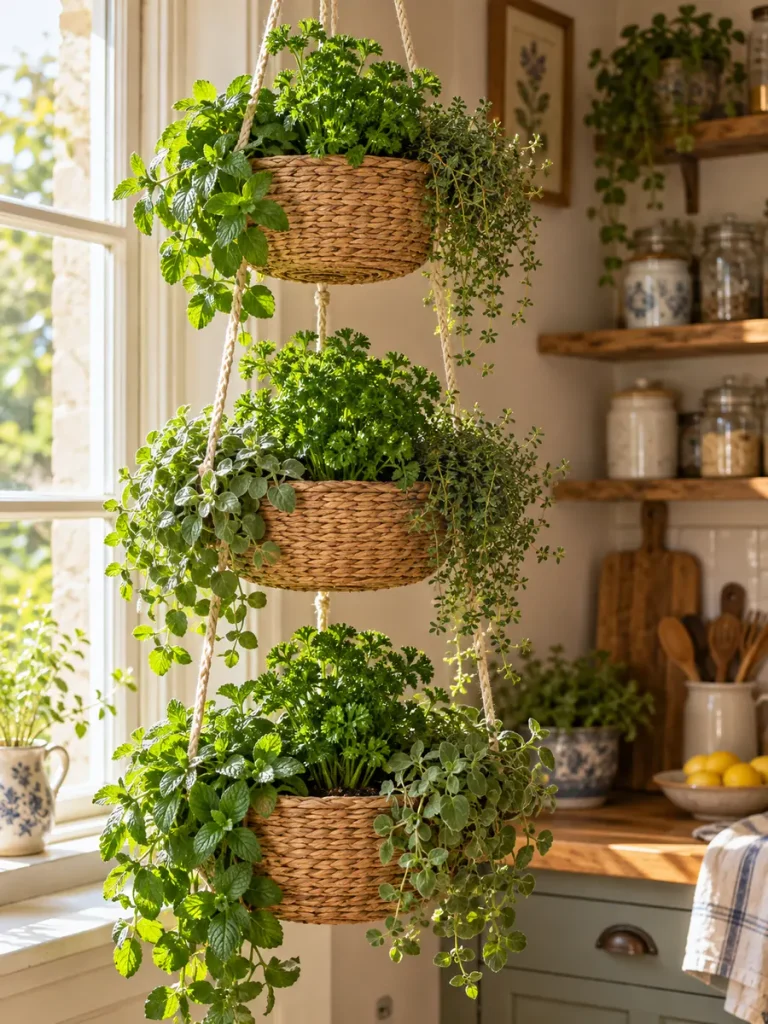
Stacking baskets vertically creates a lush hanging herb garden that makes use of unused overhead space. This is an excellent option for kitchens with a bright window but very little room on the counter or floor.
The different levels can hold herbs with contrasting growth habits. Upright parsley can grow through the middle while thyme, oregano, or mint soften the edges.
Once the plants become fuller, the baskets create a cascading effect that feels more like decorative greenery than a practical kitchen garden.
What You’ll Need
- Three lightweight baskets
- Strong chain or rope
- Hooks
- Small herb pots
- Potting mix
- Mint
- Thyme
- Oregano
- Parsley
How to Make It
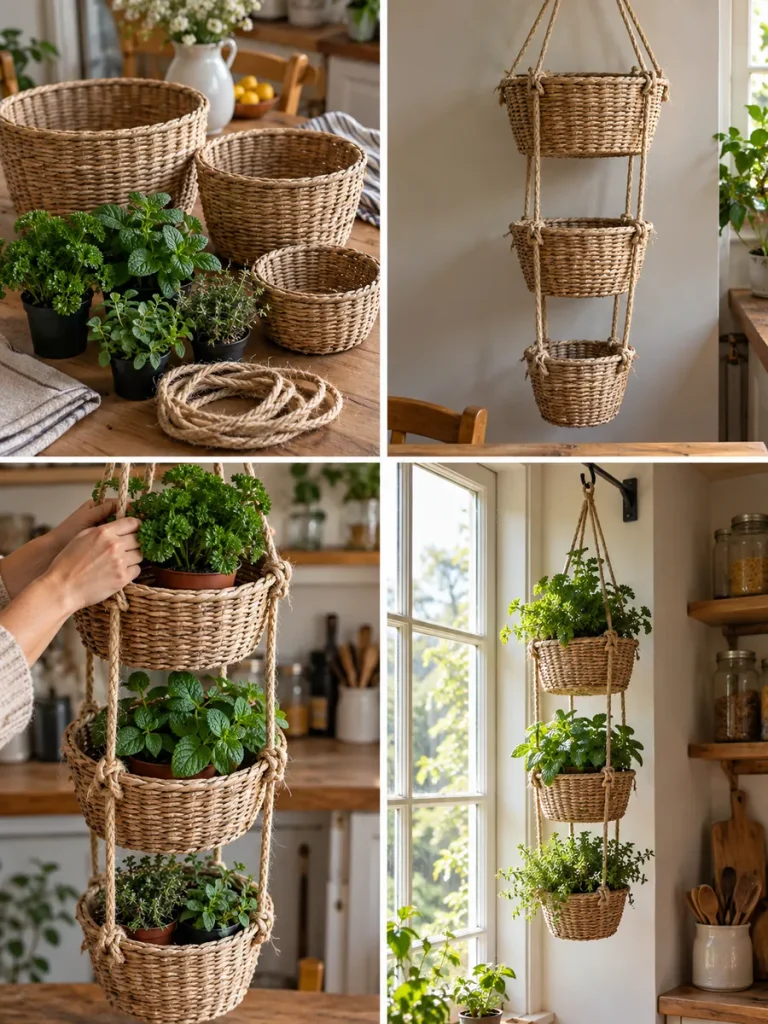
- Choose three lightweight baskets.
- Arrange them from largest to smallest.
- Attach strong chains or ropes at balanced points.
- Connect the baskets vertically.
- Test the system before adding plants.
- Place removable herb pots inside each basket.
- Add trailing herbs around the outer edges.
- Put upright herbs in the center.
- Attach the system to a secure ceiling hook.
- Hang it beside a bright window.
Styling Tip: Woven baskets create a cozy cottage look, while black wire baskets feel more modern.
21. DIY Herb Garden Coffee Station
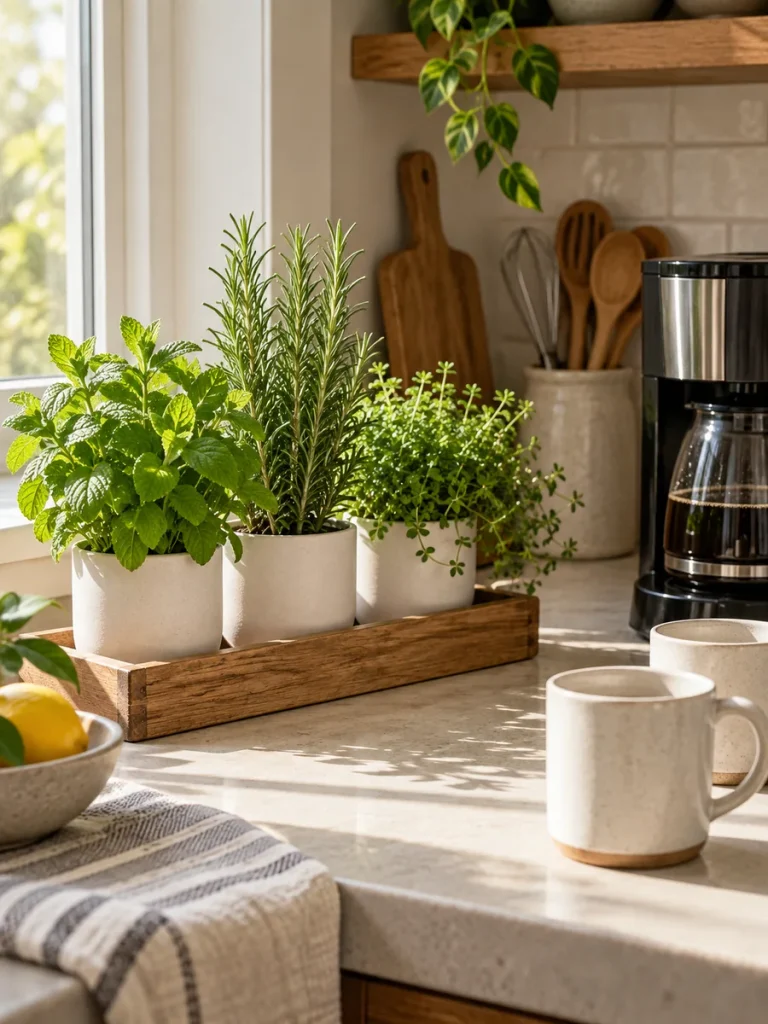
A coffee or tea corner can become even more inviting when fresh herbs are added to the setup. Mint, rosemary, and other aromatic plants bring natural color to an area that might otherwise be filled only with mugs and appliances.
Mint is particularly useful because you can snip a few leaves for tea or cold drinks. Rosemary adds height and fragrance, helping the arrangement feel more like a styled kitchen display.
By using matching pots and a narrow tray, the herbs feel like an intentional part of the coffee station rather than separate plants placed nearby.
What You’ll Need
- Narrow wooden tray
- 2–3 matching pots
- Potting mix
- Mint
- Rosemary
- Another compact herb
- Herb labels
- Small decorative accessories
How to Make It
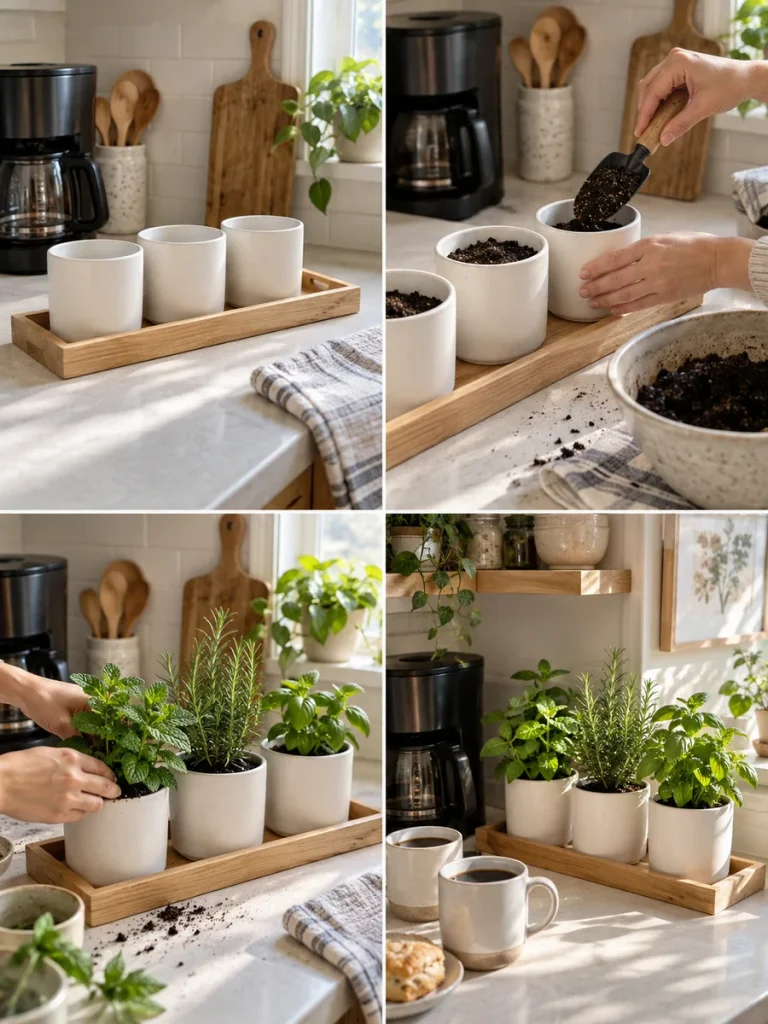
- Clear a small section beside the coffee or tea setup.
- Place a narrow wooden tray on the counter.
- Add matching herb pots.
- Fill them with suitable potting mix.
- Plant fresh mint in one container.
- Add rosemary to another.
- Plant another compact herb in the final pot.
- Add simple labels.
- Keep surrounding accessories minimal.
- Make sure the plants receive enough light.
Styling Tip: White pots, warm natural wood, and simple ceramic mugs create a cozy coordinated look.
22. Mini Greenhouse Herb Garden for the Kitchen
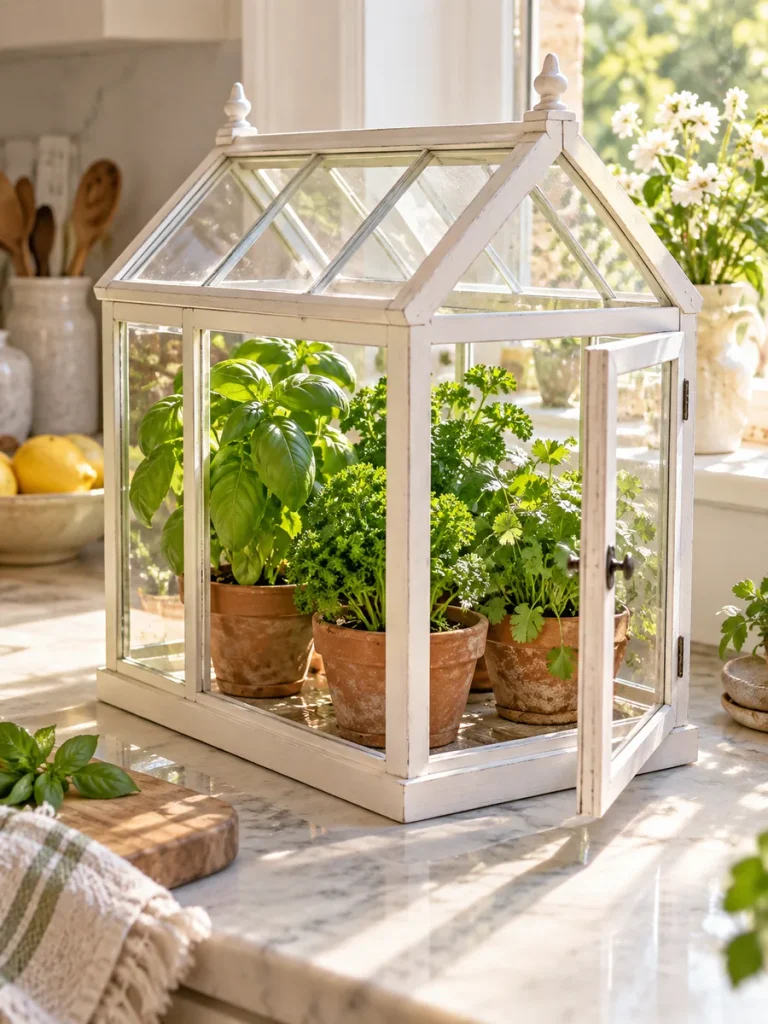
A miniature greenhouse turns a few ordinary herb pots into a real statement piece. The clear walls allow light to reach the plants while giving the entire arrangement the appearance of a tiny conservatory.
This project looks especially attractive on a wide windowsill, kitchen counter, or breakfast-area table. It can hold several herbs while keeping them visually grouped together.
The structure should still be opened regularly for airflow, especially when direct sun warms the interior.
What You’ll Need
- Thin wooden strips
- Clear acrylic panels
- Wood glue
- Small hinges
- Screws
- Small herb pots
- Basil
- Parsley
- Cilantro
How to Make It
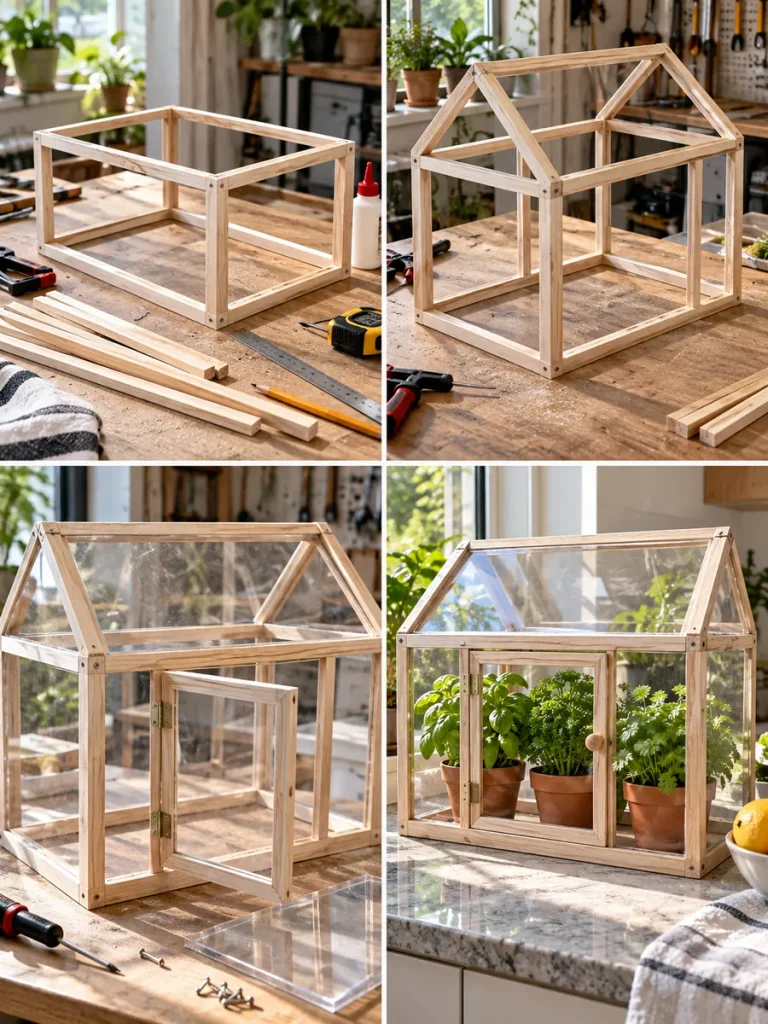
- Measure the area where the greenhouse will sit.
- Build a simple wooden rectangular base.
- Attach upright corner supports.
- Build the side and roof frame.
- Add clear acrylic panels.
- Create a small hinged door or opening.
- Place individual herb pots inside.
- Arrange basil, parsley, and cilantro.
- Keep taller plants toward the back.
- Open the greenhouse regularly for airflow.
Styling Tip: Paint the wooden frame soft white for a classic mini-conservatory look.
23. Living Herb Wall in a Decorative Picture Frame
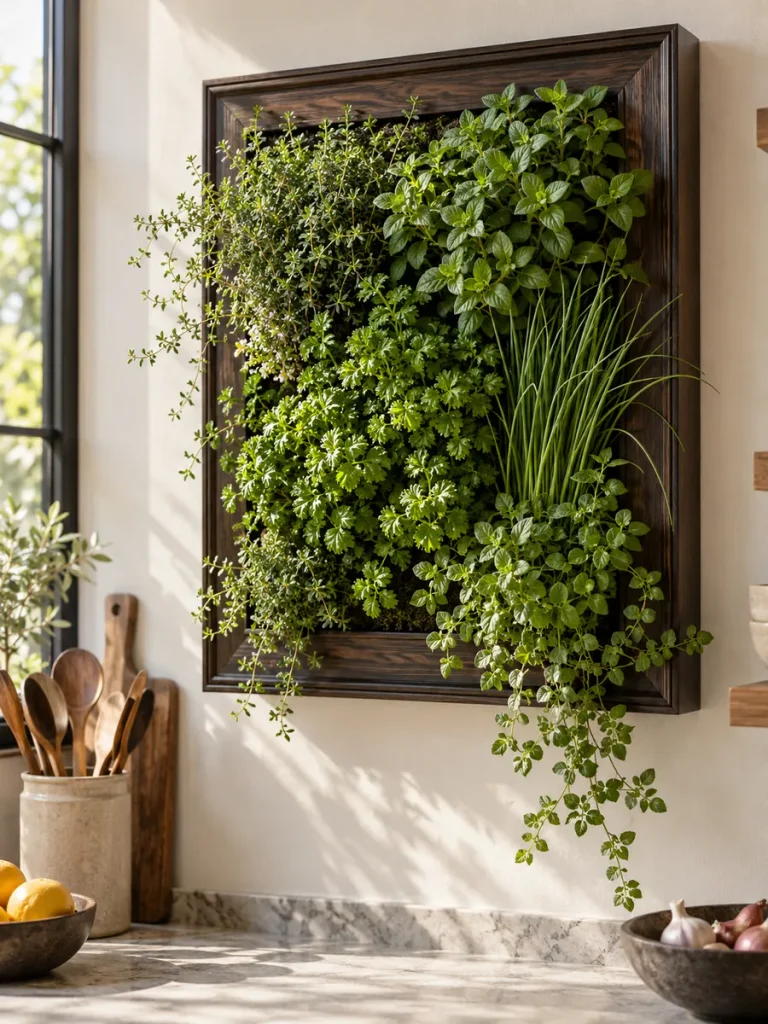
A framed herb garden is one of the most dramatic ways to turn edible plants into home decor. Instead of hanging traditional artwork, you create a living display filled with thyme, oregano, parsley, and chives.
The herbs provide different leaf shapes, textures, and shades of green, helping the frame look full and layered. A few trailing stems can extend beyond the edges to soften the rectangular shape.
This project works best when the frame is deep enough to hold lightweight planting pockets or small removable pots safely.
What You’ll Need
- Deep wooden shadow-box frame
- Lightweight planting pockets or small pots
- Waterproof backing
- Potting mix
- Thyme
- Oregano
- Chives
- Parsley
- Wall mounting hardware
How to Make It
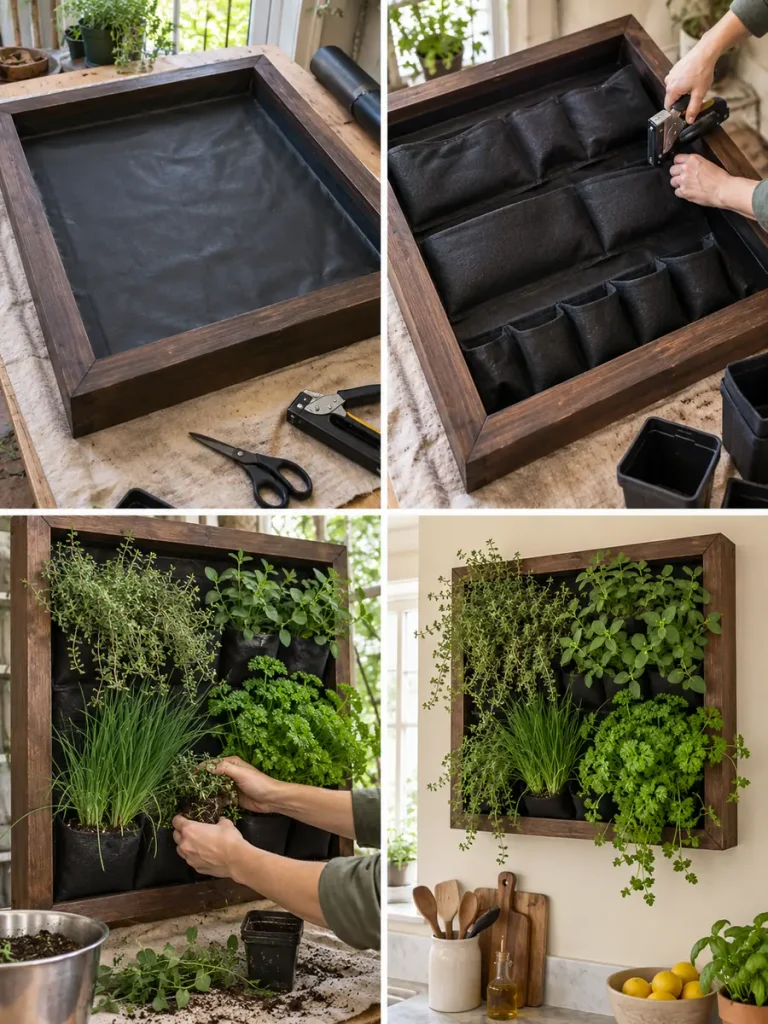
- Choose a deep and sturdy wooden frame.
- Protect the back with waterproof material.
- Install lightweight planting holders inside.
- Add small pots or planting pockets.
- Fill them with suitable potting mix.
- Plant thyme and oregano toward the edges.
- Add parsley and chives through the center.
- Let some foliage extend beyond the frame.
- Secure all containers firmly.
- Mount the completed frame near suitable light.
Styling Tip: A dark wooden frame against a pale wall makes the green herbs stand out beautifully.
Tips for Growing Herbs Indoors Successfully
Creating a beautiful planter is only part of the process. Your herbs also need the right growing conditions if you want them to stay attractive and productive.
Give Herbs Plenty of Light
Most culinary herbs prefer a bright location. A sunny kitchen window is often the easiest place to start, especially for basil, rosemary, thyme, and oregano.
If your home receives limited natural light, you can use a suitable indoor grow light to supplement it.
Avoid Overwatering
Indoor herbs usually dry out more slowly than outdoor plants.
Instead of watering on a strict schedule, check the potting mix first. Water when the plant actually needs moisture and allow excess water to drain away.
Use Good Drainage
Drainage holes help protect herb roots from sitting in water for long periods.
If your decorative container does not have drainage, place a smaller nursery pot inside it and remove the inner pot when watering.
Harvest Regularly
Regular harvesting keeps many herbs compact and encourages fresh growth.
Pinch basil above a healthy pair of leaves, trim chives as needed, and remove parsley stems from the outside of the plant.
Leave Space Between Plants
Do not pack your herbs too tightly together just to make the garden appear fuller.
Adequate spacing helps light reach the foliage and improves airflow around the plants.
Rotate Pots Occasionally
Plants naturally lean toward the strongest light source.
Rotating the pots every few days or weeks can help keep the growth more balanced.
Best Herbs to Grow Indoors
Basil
Basil grows quickly and is useful for pasta, pizza, pesto, salads, and sauces. It performs best in a warm, bright location.
Mint
Mint produces lots of fresh leaves and is excellent for teas, drinks, desserts, and savory recipes. Keeping it in its own pot helps prevent it from crowding nearby plants.
Parsley
Parsley creates dense green foliage and can be harvested gradually over a long period.
Chives
Chives stay fairly compact and their narrow leaves look especially neat in small indoor planters.
Thyme
Thyme is ideal for hanging planters and rustic displays because of its small leaves and slightly spreading growth.
Oregano
Oregano can gently trail over the side of elevated pots, making it both useful and decorative.
Rosemary
Rosemary provides height, fragrance, and strong architectural shape. It prefers plenty of light and good drainage.
Cilantro
Cilantro is useful for fresh cooking and works well in smaller indoor pots, although repeated sowing may be needed for a continuous supply.
Where to Place Your DIY Indoor Herb Garden
The best location for an indoor herb garden is usually determined by light rather than decoration.
A sunny kitchen windowsill works well for small pots, tin can gardens, and ceramic herb trays.
An empty wall close to natural light can support a pegboard garden, pallet planter, propagation station, or framed herb wall.
A wide countertop is suitable for wooden crates, miniature greenhouses, tea boxes, and tiered planters.
Hanging systems can make use of the space directly in front of a bright window without taking up counter or floor space.
If the spot you love is too dark for herbs, consider adding suitable supplemental lighting rather than forcing the plants to grow in poor conditions.
Frequently Asked Questions
What are the easiest herbs to grow indoors?
Basil, mint, parsley, chives, thyme, and oregano are popular choices for beginners, provided they receive enough light and proper watering.
Can herbs grow indoors all year?
Yes. Many herbs can be grown indoors throughout the year when they have suitable light, temperatures, airflow, and moisture.
Do indoor herbs need direct sunlight?
Different herbs have different requirements, but many culinary varieties perform best in strong natural light.
Do indoor herb pots need drainage?
Drainage is highly recommended. If your decorative container has no drainage holes, place a smaller draining pot inside it.
How often should indoor herbs be watered?
There is no universal watering schedule. Check the potting mix and water according to the needs of the individual herb.
Can several herbs grow in one container?
Yes, but they should have similar water, light, and soil requirements. Separate pots are often easier for beginners because every herb can be cared for individually.
Final Thoughts
A beautiful indoor herb garden does not require a large home, expensive planters, or complicated gardening skills. A single wall, narrow windowsill, unused drawer, wooden crate, or hanging corner can provide enough space to begin growing fresh herbs.
The most successful DIY indoor herb garden ideas combine creative design with practical plant care. Choose a project that fits your available space, use containers that manage moisture safely, and position the herbs where they receive enough light.
Start with two or three herbs you regularly use in the kitchen and build from there. Before long, your indoor garden can become both a useful source of fresh ingredients and one of the most attractive green features in your home.
